Hermansen Bike One 2021 User manual

1
Hermansen E-bikes
Owners Manual
Hermansen Bike One
Single speed e-bike
Hermansen Bike Ten
10-speed e-bike
August 2021
2
Bike One

3
Bike Ten

4
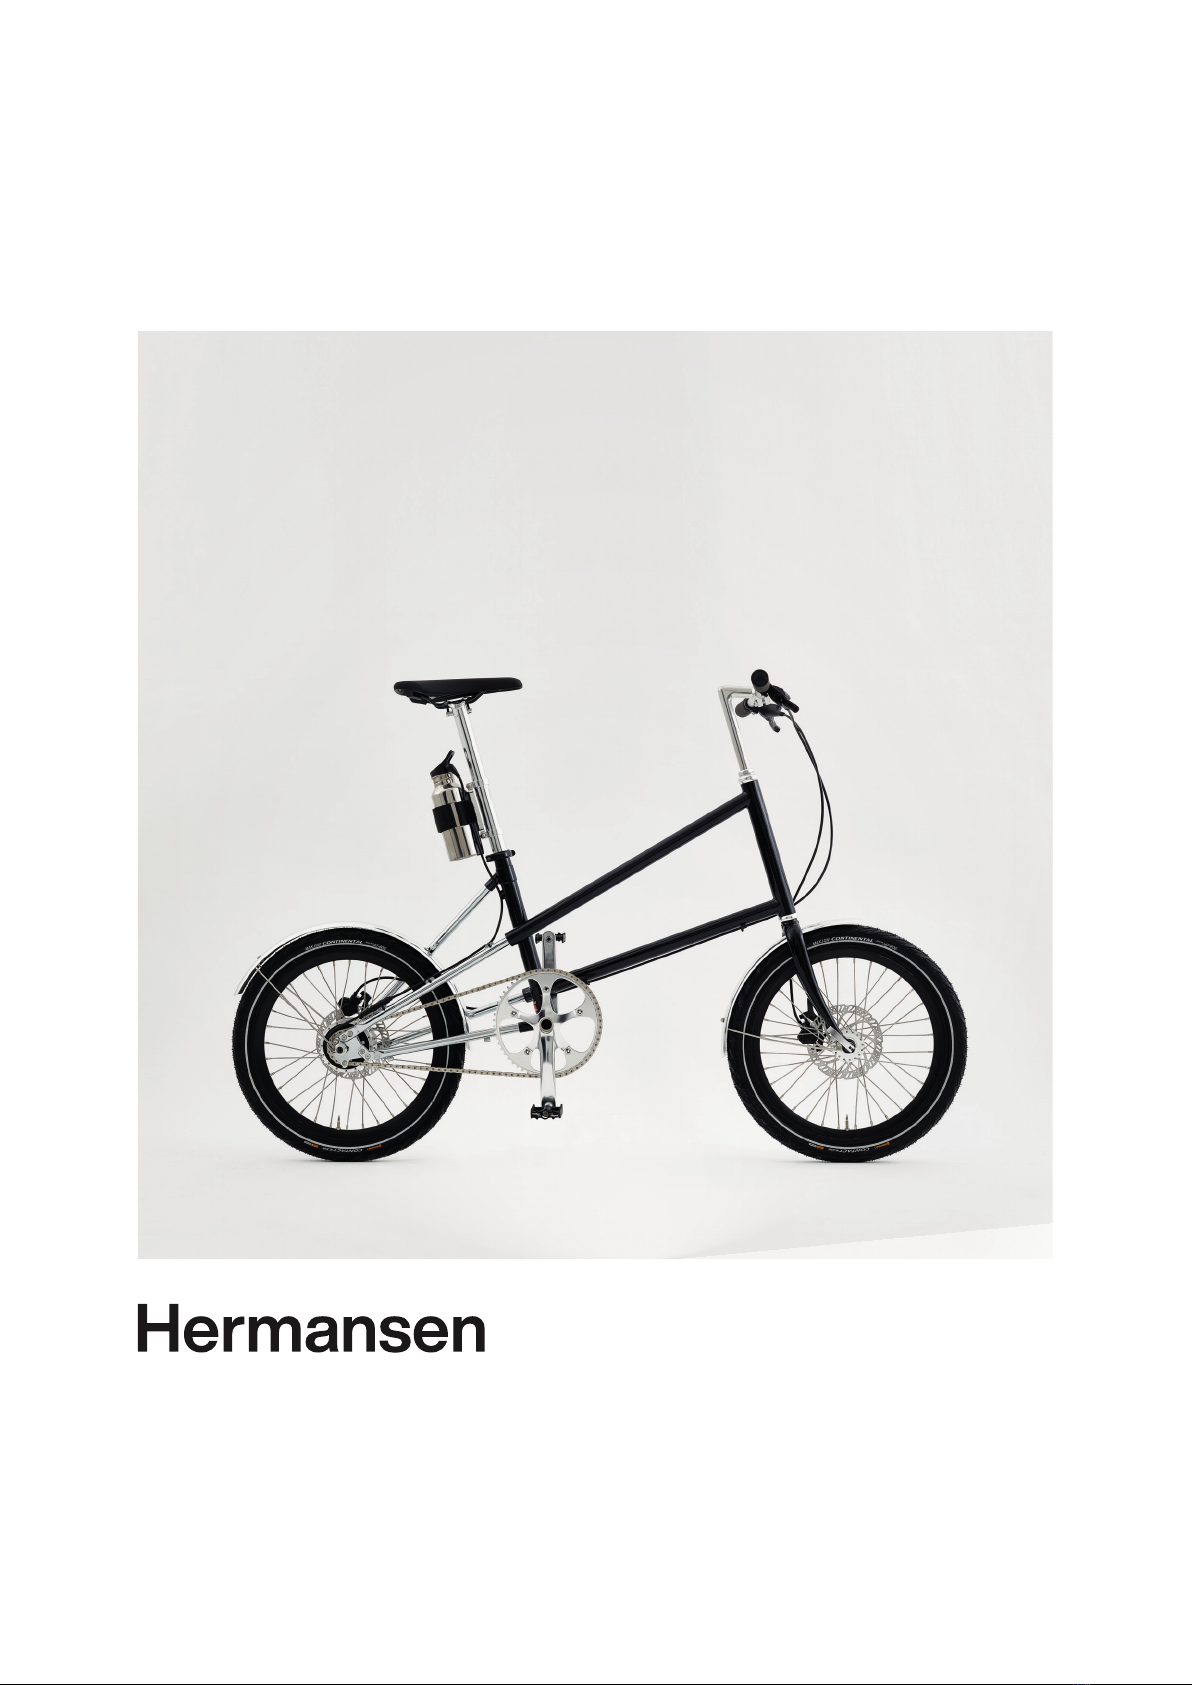
Thank you for choosing a Hermansen Copenhagen
e-bike. Before riding your new e-bike we recommend
you to carefully read through this manual to ensure
safe use and prevent accidents.
The manual contains information about your
e-bike and its components, how to operate it,
upkeep and safety. If you carry out any adjustments
or maintenance work yourself, please read the
relevant chapters of this manual rst to avoid making
any damage to the e-bike and possibly make it unsafe
to ride.
While the manual is intended as a guide, it is not a
comprehensive guide to cycling or
bicycle maintenance.
If you are ever unsure of how to maintain your e-bike,
please consult a qualied bike mechanic for expert
advice. We recommend having your e-bike inspected
and serviced by a qualied bike mechanic regularly.
Please keep the manual in a safe place for
future reference.
We continuously update and improve our e-bikes,
and we may provide supplementary pages in the
future to ensure you have the most up-to-date
information. Please regularly check for Owner Manual
updates at our website www.hermansencph.com in
the download section.
If you have any questions after reading this manual,
please get in touch.
Enjoy the ride!
Phone +45 26362637
Email [email protected]
Hermansen Copenhagen ApS
Filmtovet 68
DK-3500 Værløse
Denmark
VAT no. DK39964333
Hermansencph.com
Congratulations
with your
new e-bike

5
Table
of
Contents
2. General information 7
3. E-bike type 8
4. Legal details 8
5.Intended use 8
6. Legal national and local requirements 8
7. Safety 9
8. Before your rst ride 9
9. Before every ride ‘quick-check’ 10
10. Quick releases 13
11. Riding position 13
12. Braking system 16
13. Gear 17
14. Chain 17
15. Wheels and tyres 18
16. Carrying cargo 18
17. Transporting your e-bike 19
18. Electrical system 19
19. Battery range and precautions 20
20. Service and maintenance 21
21. Torque settings 22
22. Warranty 24
6
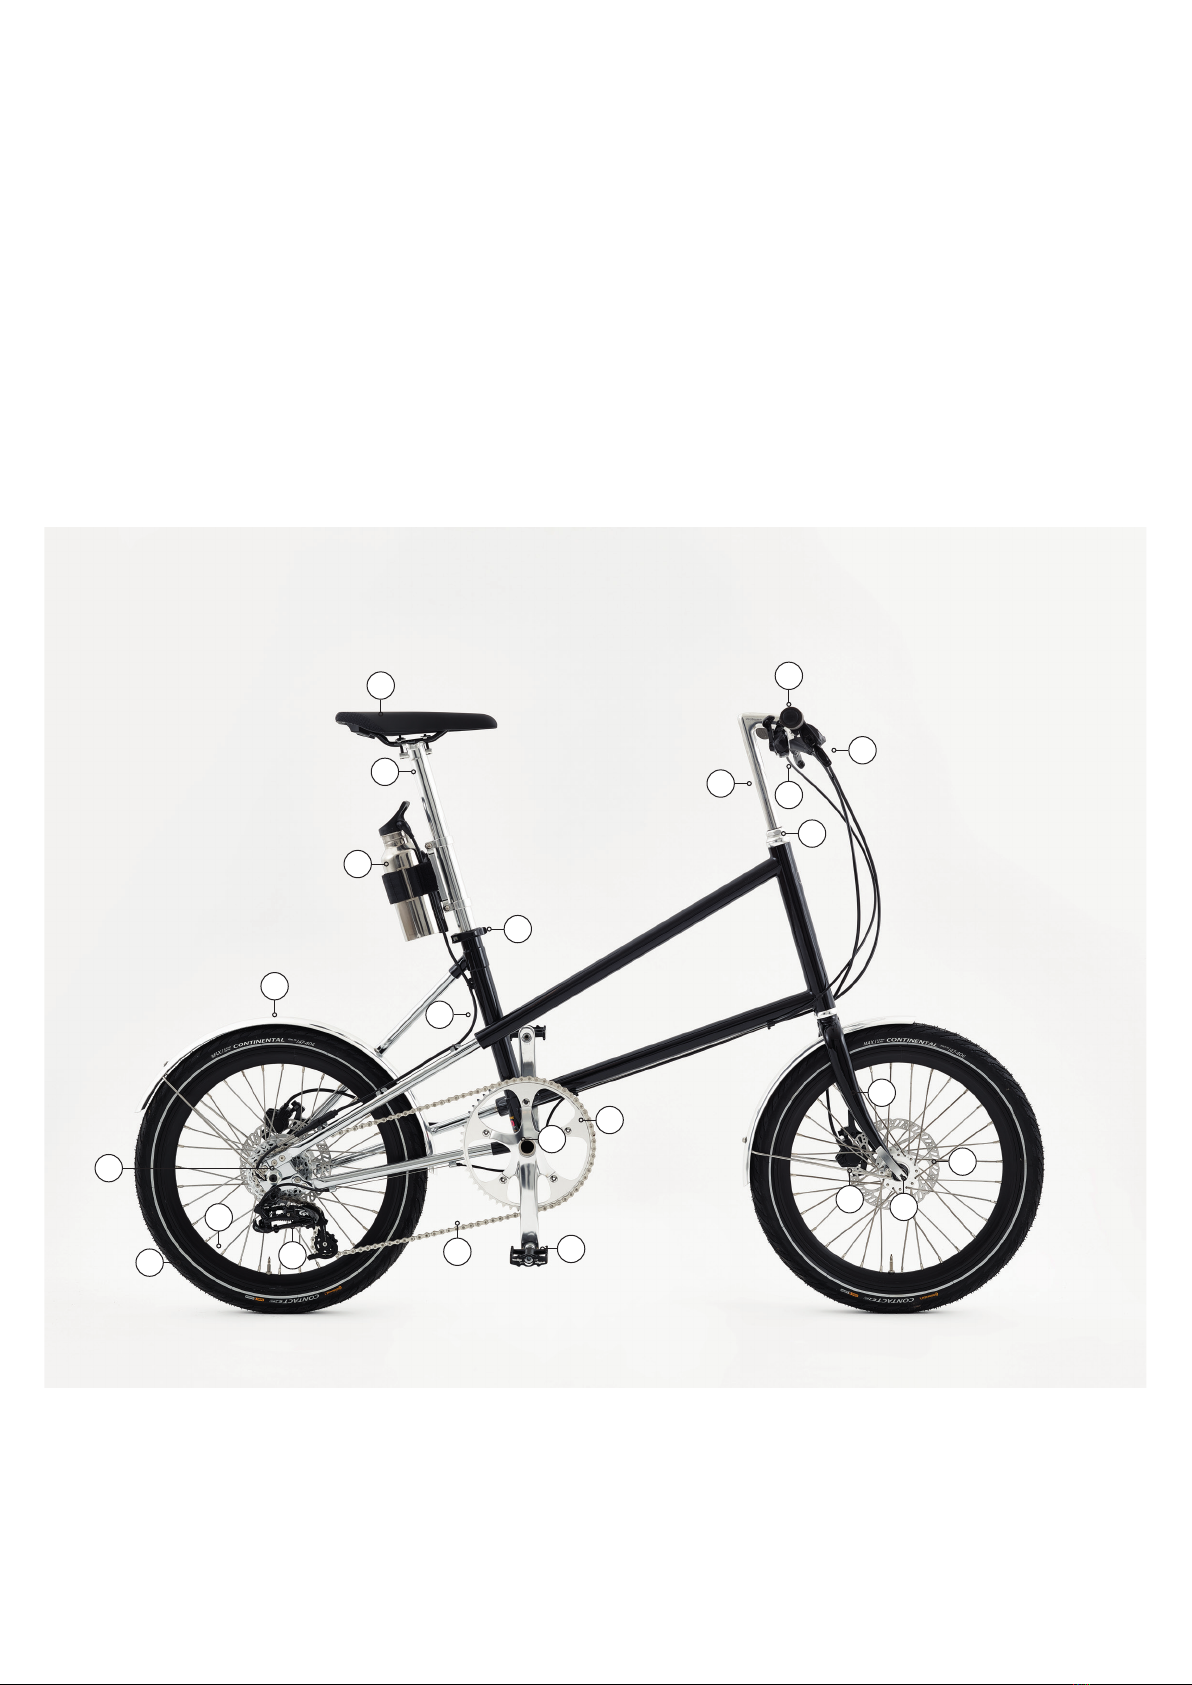
1.
Bike and
component
overview
1. Saddle
2. Seat Post
3. Quick Release Seat Clamp
4. Battery
5. Power Cable
6. Rear Hub Motor
7. Fender
8. Rim
9. Tyre
10. Rear Derailleur
11. Stem
12. Head Set
13. Handlebar
14. Gear Shifter
15. Brake Lever
16. Fork
1 7. Disc Brake Pads
18. Disc Brake Rotor
19. Quick Release Front Hub Axle
20. Bottom Bracket
21. Crank Set
22. Chain
23. Pedal
1
2
4
3
7
6
5
8
910
11
12
13
14
15
16
17
18
20
22
19
23
21
7
2. General information
Hermansen Copenhagen e-bikes are equipped with
innovative technology. Even if you are an experienced
rider, we strongly recommend you to attentively read
and observe the instructions in this manual before
riding your new e-bike.
Please familiarise yourself with all components of your
e-bike in the ‘Bike and components overview’ table
on the previous page where the bike components
referred to in this manual are identied.
In this manual, a number of maintenance and
repair tasks are described in detail. If you engage
in this activity, you must always consider that the
instructions are exclusively for Hermansen e-bikes
and not transferable to other bikes.
DANGER!
Torque settings in this manual are
specied in Nm. Do not rely on
your feeling “tight” because this is
simply not precise enough. ONLY
a torque wrench can ensure that a
bolt is properly tightened. You must
always use this tool to tighten the
components when a torque setting is
specied. A bolt that is too tight or too
loose can cause malfunctions which
could lead to an accident with serious
injuries as a result.
The content in this manual is subject to change or
withdrawal without notice. We make every effort
to ensure accuracy of its documentation and
assumes no responsibility or liability if any errors or
inaccuracies appear within. Please regularly visit
our website www.hermansencph.com and check the
download section to view and download the latest
version of the manual.
Note that the rst assembly and adjustment of your
bike and subsequent service and maintenance
requires special tools and technical expertise. If
you are uncomfortable performing any of the listed
tasks, please seek the assistance of a qualied bike
mechanic.
ATTENTION!
Bike owners are responsible for assessing
the way they use the e-bike at all times
and should ensure that they take due care
of their safety and welfare when riding,
moving or carrying their e-bike.
Before using your e-bike, carefully read the
instructions in the supplied Electrical System Manual.
It is vital you follow all the safety instructions.
For your own safety perform the quick check
explained in chapter 9 before every ride.
NOTE: Hermansen e-bikes are referred to in this manual as e-bike, bike,
pedelec or EPAC, unless otherwise noted.
DANGER! This symbol indicates that life-threatening risks are possible if the
corresponding instructions are not followed. Please read carefully.
ATTENTION! Here is a hint that will help you quickly become familiar with
your e-bike and its technology.
TIP! This symbol indicates useful additional information
This symbol indicates that you must use a torque wrench and comply with
the specied torque.
In the manual we use the following symbols to highlight certain information:

8
3. E-bike type
Hermansen e-bikes are of the pedelec e-bike type.
Pedelec stands for Pedal Electrical Cycle, also
referred to as EPAC, which stands for Electrically
Power Assisted Cycle.
The motor assist is activated by a pedal action sensor
designed to detect when the pedal is being turned.
This means that the bike provides motor assistance
only when you start to pedal, and when you stop
pedalling the motor stops supporting too. It makes
pedalling easy and feels like riding with constant tail
wind.
4. Legal details
Company name: Hermansen Copenhagen
Legal name: Hermansen Copenhagen ApS
Type of company: Limited liability company
(anpartsselskab)
VAT no.: DK39964333
Year founded: 2018
Legal address: Filmtorvet 68, 3500 Værløse, Denmark
(Ofce only)
Phone: +45 2636 2637
Website: hermansencph.com
Hermansen e-bikes are equipped with a unique code
according to the Danish bicycle registration system,
the VIN-system. The code is a combination of letters
and digits and consists of our manufacturer code
WHER, a serial number, and a construction year code.
The unique code is located under the bottom bracket.
Hermansen e-bikes compliy with EN 15194 for
Electrically power assisted cycles – EPAC Bicycles.
The motor assistance is limited to a maximum
continuous power rating of 0.250 kW (250 watt)
and a maximum speed of 25km/h (15.5 mph). The
noise testing of the motor in a normal environment
is <50dB. The maximum permissible total weight is
110 kg (including fully assembled EPAC plus rider,
equipment and luggage).
5.Intended use
The e-bike is intended for urban and commuter riding,
and for one person riding with both wheels in contact
with the ground and on roads and well-made paths
only. Your e-bike should be used for its intended
purpose only.
DANGER!
Your e-bike is intended for the
transportation of a single person only.
The e-bike is not intended for uses like off-road,
cross-country, extreme sports, jumps, stunts or similar
activities. Using the e-bike for other than the intended
purpose may cause damage to the bike, risk injury,
and void your warranty on the e-bike.
Pay attention to the maximum permissible total
weight (total weight of fully assembled EPAC, rider,
equipment and luggage) which is = 110 kg. If you carry
cargo or extra weight, make sure the bike is stable
and is within the maximum permissible total weight
DANGER!
If luggage is not properly handled and
secured, sudden shifts in load while
riding the bike can affect your balance
and lead to damaging the bike and
serious injury.
• Your e-bike is not approved for use in
competitions.
• Commercial use does not form part of the
intended use.
• The e-bike is not compatible with indoor trainers
or rollers. Do not attempt to use the bike in
conjunction with these.
• We do not recommend tting a child seat or trailer
to the bike.
Terms of use and maintenance described in
this manual are part of the intended use. The
manufacturer or dealer accepts no liability or
warranty if the e-bike is used out of the intended
use, when safety instructions are not observed, when
overloaded or improperly deciencies are eliminated.
The warranty does not cover damage caused by
installation errors, intent, crashes and poor care or
poor maintenance.
6. Legal national and local requirements
If you want to ride your e-bike on public roads, your
e-bike must be equipped in accordance with national
and local laws and regulations. It is important to note
that the specic laws, rules, and guidelines governing
e-bike use may vary from country to country.
Pedelecs are limited to 25 km/h (15.5 mph) in Europe.
In the United States, the limit is 32 km/h (20 mph).
Motor assistance is cut off above those designated
speeds. The A-weighted emission sound pressure
level at the driver’s ears must be less than 70 dB(A).
The braking system of an e-bike must have at least
two independently functioning brakes (front and
rear wheel). The mode of operation is not strictly
regulated.
Pay attention to legal requirements regarding lighting
and reectors on your e-bike.
In general, pedelecs are viewed by law as more similar
to a conventional bicycle than a motorised scooter or
motorcycle. In most cases, an e-bike can be ridden in
bike lanes, on bike paths, and can be locked to bike
racks like a regular bike.
9
ATTENTION!
It is important to familiarise yourself with
the laws in your specic location before
you begin riding your e-bike.
Riders are generally not required to have a driver’s
license to operate a pedelec and are not required to
obtain any special licensing or registration for their
pedelecs.
7. Safety
• Always take care in trafc as not to endanger
yourself or others.
• Respect the rules of the road so you don’t draw
the ire of other road users.
• Never ride without a helmet.
• Do not ride with hands off the handlebar.
• Do not ride with headphones and do not use your
phone on the e-bike.
• Do not drive if you are impaired in your driving
ability by medication, alcohol or other drugs
• Check if quick releases, thru axles or axle bolts
are properly secured. Do this before every ride
and even if you only shortly parked your e-bike.
• Adjust your speed to the terrain and your riding
ability.
• Always pay attention to road conditions and check
for potholes and other dangers, like car doors
opening and kids playing.
• Adapt your driving style to the weather conditions.
Riding in low light or poor visibility, such as
at night, dawn, dusk, in rain or in fog is more
dangerous than in daytime lighting conditions.
• Wet or slippery roads and heavy load increase the
braking distance so brake more gently and earlier
under those circumstances.
• To prevent skidding when slowing or stopping your
bike, pull Brakes gradually. Skidding does not slow
you down faster and means you cannot steer well
so it should be avoided.
• If you slam on your Front Brake, you may y over
the Handlebar, or your Rear Wheel may slide out
behind you. If the Rear Wheel rises, lean back and
ease off your Front Brake.
• Ride cautiously and defensively when visibility is
reduced. Your movement may be obscured so ride
predictably.
• Travel in a straight line unless you are avoiding
hazards or passing and always indicate your
intention to turn or pass.
• Think about your own visibility and avoid entering
vehicle blind spots.
• Make sure your lights are working properly.
• Reectors should be clean, unbroken and
mounted correctly.
• Use a bell, horn or your voice to indicate your
intention to pass and do so in advance so as not
to startle the rider you are passing.
• Make sure you always wear appropriate clothing
for example bright colours and reective gear.
• Make sure you always wear shoes with non-slip
and rigid sole.
• If you ride through forests and meadows, please
respect nature by cycling only on marked or paved
roadways. Observe the legal requirements for the
off-road use of bicycles. These are available from
your local authorities.
Note to all parents and guardians
As guardians you are responsible for the technical
condition of the e-bike and the safety of your child.
ATTENTION!
Minors may only ride e-bikes when
they have reached the required age
and possess the necessary license
respectively.
DANGER!
Always disconnect the power cable from
the e-bike battery before you start to
transport, maintain or work on your e-bike.
Unintended activation of the e-bike drive
can lead to injuries.
TIP!
All components must be replaced by
identical parts or parts with ofcial type
approval.
8. Before your rst ride
Make sure that you understand how to operate
and use your new e-bike before your rst ride. Pay
attention to how a pedelec works and make a test ride
in a safe area away from trafc to familiarise yourself
with the function of your e-bike before heading into
more busy and trafcked areas.
DANGER!
Note that a pedelec moves immediately
when you put your foot on the pedal
and it starts to move. Always rst pull
the brake and then get on the e-bike.
Otherwise an unexpected move can lead
to hazards an injury.
Electrical system
• Make sure you are familiar with the functions
of the motor and have download, installed and
correctly set up the app with which you control
the motor settings.
• Familiarise yourself with all app control functions.
• Make sure the battery is charged for your ride and
properly connected with the motor.

10
For more details about the electrical system please
see chapter 18 and consult the Electrical System
Manual provided with your e-bike.
DANGER!
Please familiarise yourself with the grip
of your pedals. Pedals may get slippery
when wet!
Braking system
• Familiarise yourself with the braking system and
test the braking power before heading into trafc.
• Your e-bike is equipped with hydraulic disc brakes
which can be much more powerful than what you
are used to. Squeezing the Lever too fast can lead
to unintended sudden stopping and cause you to
crash or get rear ended.
• Adjust the brake levers so you can reach them
every time.
• On Hermansen e-bikes the Right Lever operates
the rear brake, and the Left Lever operates the
front brake. Check if the front brake Lever is
on the side of the handlebar that you are used
to. If it is not you can either train with the new
arrangement or have a qualied bike mechanic
change the arrangement to t your needs.
ATTENTION!
Always bed-in new brakes for optimum
braking performance and low wear.
Bedding in disc brakes is the process
of preparing new disc rotors or pads for
heavy use by transferring material from
brake pads to the rotor through a careful
heating/cooling cycle.
For more details about the brakes please see chapter
12.
DANGER!
Modern brakes are much more powerful
than simple rim or drum brakes. Make
sure to test the braking power before
heading into trafc. Unintended braking
can lead to an accident. Slowly squeeze
the brake to generate more braking force.
When riding with a full load, the handling
is affected and it takes longer to stop.
Wheels and tyres
• Check the tight t of quick releases and all
important bolts and nuts.
• Check the tyre air pressure. You will nd the
required air pressure at the sidewall of the tyres.
Do not exceed the minimum and maximum air
pressure.
• Make sure that tyres and rims are free from
damages, cracks and deformations.
DANGER!
A worn or damaged Rim may fail without
warning and cause the rider to crash.
Gear Shifter
(applies to Hermansen multi-speed bikes only)
• Make a test ride in a safe area away from trafc to
familiarise yourself with the function of the Gear
Shifter and how to upshift and downshift.
For more details about gear shifting please see
chapter 13.
TIP!
Hermansen Bike Ten is a multi-speed
e-bike designed to be ridden normally like
a conventional bike if the power assist
is turned off. If you are going downhill
or want to extend your range, you can
turn off the assistance but keep the app
display on to watch your speed.
Riding position
• Ensure correct adjustment and attachment of
saddle, handlebar and stem for a secure and
comfortable riding position.
• The best riding position is the one that you are
most comfortable in, but a wrongly adjusted
seating position may lead to back or joint pain and
reduce your control.
• Check that your Saddle and Handlebar are at the
correct position and that you can reach Brake
Levers and Gear Shifter comfortably.
For more details about the riding position please see
chapter 11.
9. Before every ride ‘quick-check’
All of the following points must be checked before
every ride.
DANGER!
Only ride your bike if it passed all the
steps of the quick check. In case of
doubt, ‘consult a qualied bike mechanic.
A defective e-bike can cause accidents.
ATTENTION!
After a fall or accident only start using
your e-bike again once a qualied bike
mechanic has checked it for possible
damage.

11
Electrical system
• Check that the power cable from the motor is
correctly connected to the battery port.
• Check that the battery is securely xed to the
battery mount on the seat post with correct
magnet snap and the Velcro Strap tightly wrapped
and closed around the battery.
• Check the battery charge condition to make sure
you have enough battery for your planned trip.
• Check that you have Bluetooth connection
between the motor and your smartphone app that
you control the motor settings with.
DANGER!
Batteries that have not been properly
and securely xed to the battery mount
can come loose during a ride and fall out.
This can cause a crash and damage the
battery.
DANGER!
As with all mechanical components,
the e-bike is subjected to wear and
high stresses. Different materials and
components might react to wear or stress
fatigue in different ways. If the design
life of a component has been exceeded,
it may suddenly fail and possibly causing
injuries to the rider. Any form of crack,
scratches, or change of colouring in
highly stressed areas indicate that the life
of the component has been reached and
it should be replaced by an a qualied
bike mechanic.
Quick release/axle bolts/thru axles
• Check the tight t of quick releases and all
important bolts and nuts of components like the
front wheel, rear wheel, stem, handle bar, seat
post and saddle.
For more details about quick release, bolts and axles
please see chapter 10.
DANGER!
Quick releases and ttings that are not
properly closed can result in severe
accidents! Check the tight t of quick
releases, thru axles and bolts even if you
parked your e-bike only shortly at an
unattended place. Do not ride your e-bike
with untightened quick releases.
Brakes
• Check the brake system for tightness or bent
cable housings before every ride.
• Vigorously pull the brake lever. The levers should
stop just before reaching the handlebar.
• Test your brakes by standing next to your bike,
pull both brakes, and rock the e-bike back and
forth. The e-bike should not roll, and the Brake
Pads should remain rmly in place.
For more details about the Braking system please see
chapter 12.
DANGER!
Do not touch the rotors immediately after
riding the bike because the can be very
hot.
TIP!
Hydraulic disc brakes dissipate heat
thoroughly and distribute heat more
evenly than traditional mechanical
brakes, which means that hydraulic
brakes are more likely to last longer. This
cause is due to brake uid that resists
heat and compression in a hydraulic
brake system.
DANGER!
Riding with improperly adjusted or worn
Brakes is dangerous and can result in
injury or death. Keep Brake surfaces
clean and free from oil or lubricants.
Replace worn Brakes with authorized
replacements.
Saddle
• Check the tight t of the saddle by trying to twist
it.
Steering and headset
• Turn the Handlebar to the left and right. Do not
set off if you notice anything unusual about the
steering such as for example slackness of steering
or uneven resistance.
• Stand in front of your e-bike with the Front Wheel
pressed rmly between your legs and try to twist
the Handlebar. If movement occurs, realign your
Handlebar and tighten the Headset and stem base
or have the e-bike serviced by a qualied bike
mechanic.
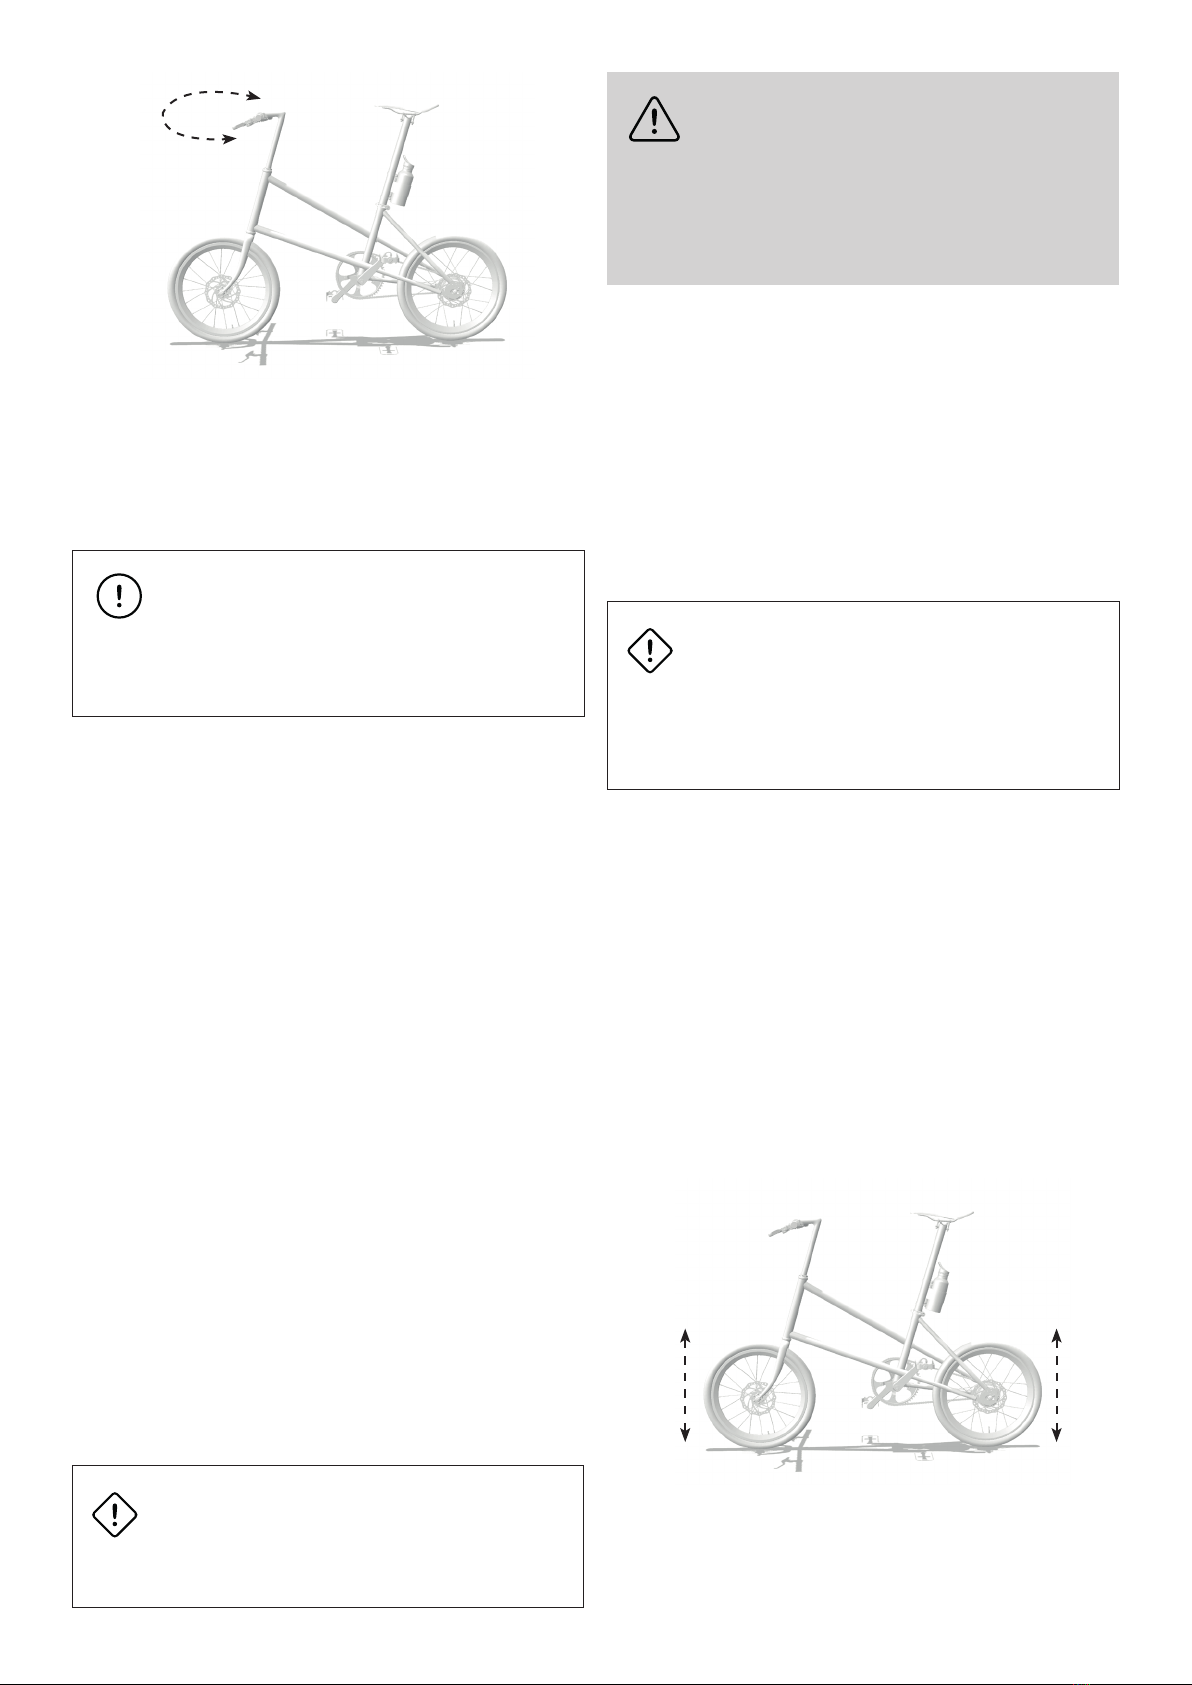
12
• Lift the Front Wheel off the ground and swing it
from side to side. Check if it feels smooth. If you
feel any binding or roughness in the steering, you
may have an overly tight Headset. Have a qualied
bike mechanic check it.
TIP!
The Headset is the set of components
on a bicycle that provides a rotatable
interface between the e-bike’s Fork and
the Head Tube of a bicycle frame.
Wheels and tyres
• Check the tight t of quick releases and all
important bolts and nuts.
• Check the tyre air pressure. You will nd the
required air pressure at the sidewall of the tyres.
Do not exceed the minimum and maximum air
pressure.
• Make sure that tyres and rims are free from
damages, cracks and deformations.
For more information about wheels and tyres please
see chapter 15.
Gears and chain
• Shift through all Gears and make sure the Chain
and Derailleurs are fully functional. If your Gears
are not shifting smoothly, we recommend you to
consult a qualied bike mechanic.
• Check that the Chain turns freely through the
Gears by rotating the Crank backwards, and make
sure that Cables are undamaged.
• For optimal shifting and efciency, the Chain must
connect with the teeth properly. To check that
your Chain is fully connected with the Chainring,
rotate the Cranks and ensure no gaps or kinks are
visible.
• Check all control Cables and Housings for rust,
kinks, and fraying. They should be replaced if
damaged.
ATTENTION!
The Chain endures huge tension forces
from pedalling making it important to
regularly check it.
DANGER!
If the Rear Derailleur is malfunctioning,
do not use the highest and lowest gears
of the Rear Cassette since the Chain or
Wheel may get jammed which can cause
damage to the e-bike or injury to the
rider.
Loading (if applicable)
• Check that the front rack is securely xed and
that all nuts and bolts are correctly xed and
tightened.
• Check that your luggage is xed securely on the
front rack and that nothing can get caught by the
wheels or block your sight.
• Check to ensure that you do not exceed the
e-bikes maximum permissible total weight
(fully assembled e-bike, rider, equipment and
luggage) = 110 kg.
ATTENTION!
Balance and handling of your e-bike may
change during and after loading your
luggage. Practice handling and riding your
e-bike with luggage in a quiet area before
heading into trafc.
For more information about carrying cargo please see
chapter 16.
Unusual noises
• Be aware of any unusual noises or changes to
handling characteristics which may indicate a
problem.
• You can test the bike by lifting it up about 10 cm
and drop it to the ground. If you hear any unusual
noise or notice issues with Frame stability
(especially Frame, Seat post and Handlebar
Joints), check all bearings and couplings or book
it for a service appointment at a qualied bike
mechanic.

13
DANGER!
Do not ride your e-bike if concerned
about any of these points! If in doubt
please consult a qualied bike mechanic.
A faulty e-bike can result in accidents!
DANGER!
After a crash or accident, a qualied bike
mechanic must inspect your e-bike for
damages before you use it again.
10. Quick releases
A quick release axle allows you to remove the wheel
of your bike without the use of a tool. Even though
quick releases are very convenient, many accidents
occur because of their misuse. So please pay
attention to the information in this chapter.
A Quick Release uses over-centre cam action to
clamp the component in place and allows for easy,
tool-less removal. A Quick Release has a Clamp, an
Acorn and a Lever.
The concave side closes inward. The Acorn allows
you to adjust the clamping force. Closing the Lever
as it passes the over-centre point requires increasing
force. This force should require you to use the palm of
your hand.
Quick release handling
• Open the lever. You should now be able to read
the word “Open“.
• To close it, move the lever so that on the outside
it reads ”Close“. At the beginning of the closing
movement, about halfway through its travel, the
lever must be slightly tight.
• During the second half of the lever’s travel, the
leverage increases signicantly. Finally, the lever
is very tight and is difcult to move. Use the palm
of the hand to close the lever. Once closed the
lever must be parallel to the wheel and not project
out laterally.
• Check the t by attempting to turn the closed
lever. When the lever rotates, it is not safe to use
the e-bike. You have to open it again to retighten
it. Do this by turning the Acorn one-half turn
(while holding quick release).
• Repeat the closing process and check the t
again. When the lever no longer rotates, it is
clamped properly.
• Check the tightness of the wheel: lift the wheel
several inches off of the ground and give the top
of the tyre a little whack. A securely xed wheel
should remain in the frame.
• When tightened on Wheels, the Quick Release
should emboss the Fork Dropouts.
DANGER!
Quick Releases are very convenient,
but many accidents occur because of
misuse. Improper adjustment may result
in damage to the bicycle or in an accident
which can cause serious injury or death.
Check that quick releases and important
nuts and bolts that keep your wheels,
handlebar and seat post in place
are properly closed and adequately
tightened. Correct tightening force is
vital. Too little force and the fastener may
not hold securely. Too much force and
the fastener can strip threads, stretch,
deform or break. Either way, incorrect
tightening can result in component failure
and cause loss of control and accidents.
See chapter 21 for correct torque values.
If you’re unsure, visit a qualied bike
mechanic and ask them to show you the
proper way.
DANGER!
Never ride a bike without rst checking
that the wheels are securely attached to
the frame with a quick release or bolt. If
not securely attached, the wheel could
fall out during the ride and lead to a
severe injury! Check the tight t of quick
releases, thru axles and bolts even if you
parked your e-bike only shortly at an
unattended place. Do not ride your e-bike
with untightened quick releases.
TIP!
Components secured with a quick release
are at risk of theft. If possible place an
additional lock on the wheels when you
park the e-bike.
11. Riding position
The correct riding position is essential for comfort
and power delivery. While seated, you should have a
slightly bend knee when the Pedal is pushed down all
the way. The leg should not be fully extended so make
sure the Saddle is not too high. If the seat is too low,
repetitive strain on the knee may lead to pain.

14
Saddle adjustment
Check the seat height using the following method
and be sure to wear shoes with a at sole. Sit on
the saddle and place the heel on the pedal in the
lowest position. In this position the leg should be fully
stretched. Make sure that your hips remain straight.
• To adjust the saddle height, you must loosen the
Quick Release clamp at the top of the Seat Tube.
• Now you can adjust the Seat Post to your desired
saddle height. Make sure that the Seat Post is
greased. If the Seat Post feels tight, clean and
regrease both surfaces. Never force the Seat Post
and if you have further issues, please contact a
qualied bike mechanic for further advice.
• Align the saddle in the direction of travel and
tighten and close the Quick Release Seat Clamp
securely again. For more details about how to
operate Quick Releases please see chapter 10.
• Check the tightness of the seat post. Try to twist
the saddle. If it doesn’t twist, the seat post is tight.
• Double check to make sure the leg extension is
correct. Verify that you can easily and safely reach
the ground. If this is not the case, position the
saddle lower.
DANGER!
Do not raise the Seat post above the
minimum insertion line etched on the
post. Doing so may result in post/frame
failure and serious injury. If proper saddle
height cannot be achieved without raising
the post above this line, you need a
longer Seat post.
Because the battery mount is xed to the seat post
and the battery cable has a certain length, it might be
necessary to adjust the position of the battery mount
to make the cable length t your desired saddle
height.
• To move the battery mount, loosen the two bolts
that holds the battery mount bracket with an Allen
key and give the bolts a few counter clockwise
turns until they are no longer tigh and can be
moved.
• Adjust the battery mount position up or down the
Seat Post to t the Power Cable length.
• Securely tighten the two bolts again with the Allen
key.
The Saddle can also be moved forward or backwards
and angled up or down. Try different positions to
nd the best t. A badly tted Saddle can injure
nerves, joints, and blood vessels. Moving the Saddle
backward works your glutes harder and forward works
your quads harder. Generally, the front of the knee
should not pass the Pedal Spindle. Once comfortable,
check your saddle height again and adjust as
necessary.
15
The Saddle should be roughly parallel to the ground,
but if it is not comfortable, angle the tip of the
saddle down to relieve pressure on the crotch or up
to distribute your weight over a greater area of the
Saddle. The seat should be tilted no more than 5° up
or down.
• To adjust the saddle position, use an Allen key.
• If you want to angle the Saddle tip downwards,
loosen the rear screw and tighten the front screw.
• If you want to angle the saddle tip upwards,
loosen the front screw and tighten the rear screw.
• When you have found the right position tighten
both screws securely.
If you want a riding position closer or further away
from the handlebar, you can move the saddle rail
forward or backwards to nd the right position.
• Loosen the saddle’s both rear and front screw.
• Move the saddle rail to the desired position.
• Tighten both screws securely again.
DANGER!
The successful execution of the above
operations requires proper tools and
expertise. If you have any doubts about
the adjustments, please consult a
qualied bike mechanic.
Please refer to chapter 21 for appropriate
saddle rail torque values
When riding, your hips should remain stationary, and
your knee should only bend about 20-25° when the
pedal is all the way down.
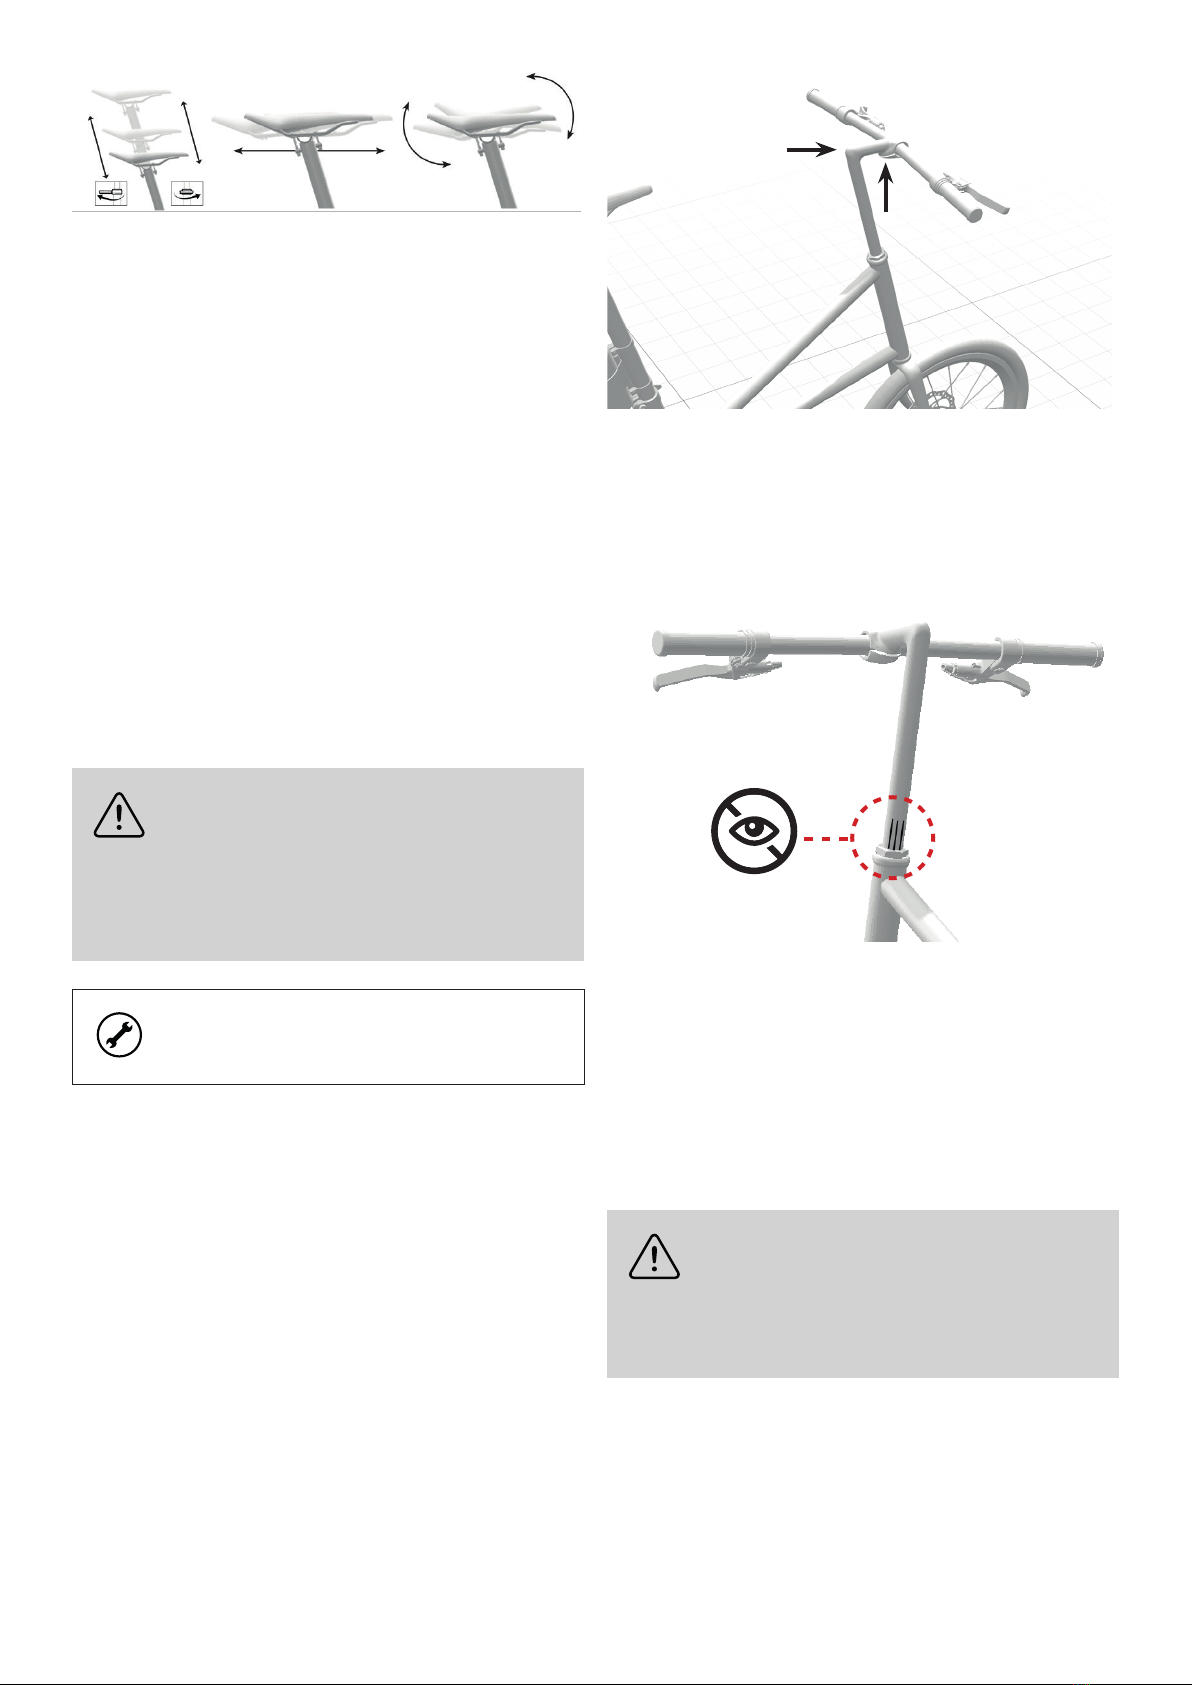
Stem and handlebar adjustment
The height of the handlebar affects the pressure
on your hands and your back posture and has
a substantial impact on your ride comfort. The
advantages of an upright seating position are less
strain on the wrist, arms and neck. The disadvantage
is a higher load on the saddle. Outstretched seating
position advantages are less load in the saddle, more
efcient power transfer, more streamlined and more
weight on the front wheel. Disadvantages are higher
load on wrists, arms and neck.
You e-bike has a xed headset Stem and a at
Handlebar. The height of the handlebar is adjusted by
raising or lowering the height of the stem.
A
B
• To adjust the stem height, unscrew bolt (A) by a
couple of turns using an Allen key.
• You are now able to adjust the stem height by
pulling the stem up- or downwards depending on you
desired height. Make sure never to position the Stem
above the minimum insertion line etched on the Stem.
• Re-tighten bolt (A) rmly once you have found the
desired height.
• To adjust the position of the handlebar, you
unscrew bolt (B) with an Allen key.
• The handlebar must always be horizontally centre
aligned, but you can twist the handlebar up or
down a bit to set the desired angle.
• Re-tighten the bolt (B) rmly once you have found
the desired angle of the handlebar.
DANGER!
Do not raise the Stem above the minimum
insertion line etched on the Stem. Doing
so may result in Stem/Frame failure and
serious injury.

16
ATTENTION!
After modications of stem and handlebar
position you must check if all cables
are still long enough. It is necessary to
have the full steering range without any
limitations by the cables.
DANGER!
The height adjustment of headset stems
requires properly setting the steering
bearings and improper installation
can result in accidents. Therefore it is
recommended that this is only performed
by or at least checked by a qualied bike
mechanic.
Brake lever rotation
• Loosen the bolts on the Brake Lever Handlebar
clamp.
• Sit on the Saddle and put your ngers on the
Brake Lever. Then twist the Brake Levers until
your hand and forearm form a straight line.
• Tighten the bolts on the Brake Lever handlebar
clamp to a torque setting of 5-6 Nm.
DANGER!
The bolts on the stem, handlebar,
grips and bar ends must be tightened
to the specied torque settings. The
corresponding values can be found in
chapter 21. If bolts are not tightened to
the correct specication it may cause the
parts to loosen or break which may lead
to serious injury.
12. Braking system
Your e-bike is equipped with hydraulic disc brakes.
Disc brakes that are well set up provide exceptionally
powerful and consistent braking. Regularly test the
brake system’s braking performance and check for
brake pad wear and tightness of the system. Brake
pads need to be replaced if they are dirty or less than
one millimetre thick.
DANGER!
Avoid permanently braking for a long
period of time as might be the case
during long, steep descends. Otherwise
vapour lock can occur, leading to total
failure of the brake system, which can
cause serious crashes and injuries.
New brake pads must be bedded in for optimum
braking performance and low wear. Bedding in your
brakes is the process of preparing new disc rotors or
pads for heavy use by transferring material from brake
pads to the rotor through a careful heating/cooling
cycle, which results in smoother brake operation and
improved braking power. The bed-in process also
sculpts the pad and rotor so that they mirror each
other, which maximises the contact area between the
two surfaces.
ATTENTION!
Failing to bed-in your disc brakes can
cause high-frequency vibration resulting
in noise, poor modulation, and lower brake
power.
A bed-in process is required in any metallic brake
system, and it is a simple procedure.
• Find a long road with plenty of space and a
smooth surface that allows you to ride 25 km/h
and has enough space and safety to perform
some hard stops.
• Pedal the e-bike up to moderate speed around 15
km/h.
• Sit down in the saddle and apply the brakes
evenly, without skidding, until the speed drops to
a walking pace. Release the brakes while you are
still moving. Repeat 10 times.
• You will feel brake power increasing with each
repetition. Be careful not to skid as brake power
increases with each repeat.
• Perform the same set of steps, but increase speed
to 25km/h. Repeat 10 times.
• The bedding-in process is completed once the
manual force required for the best possible
deceleration no longer decreases.
DANGER!
Brake disc and calliper can heat up
considerably during the braking process.
This applies in particular after frequent
braking or long descends. Do not touch
the brakes or rotors straight after braking
to prevent burns.
ATTENTION!
Do not pull the brake levers after removing
the wheels. This pushes the brake pads
together and makes it difcult to re-t the
wheel. Do not transport your e-bike with
the wheels up. This can cause the brakes
to become ineffective.

17
ATTENTION!
Have a qualied bike mechanic replace
worn brake pads.
• The braking performance of disc
brakes can signicantly be reduced
by oil, care or cleaning uids. When
cleaning your e-bike or greasing
the chain, make sure that the brake
pads and brake discs aren’t affected.
Greasy brake pads need to be
replaced immediately, brake discs can
be cleaned with a brake cleaner. Avoid
touching the friction surface of brake
discs or brake pads with your ngers.
• Check the brake system for tightness
or bent cable housings before every
ride. The loss of brake uid reduces
the braking performance or even
causes the brakes to fail. Immediately
see a specialist dealer to repair any
leaks.
13. Gear
Hermansen multi-speed bikes are equipped with
a derailleur gearing system. A Rear Derailleur is
the mechanism that shifts the chain at the Rear
Sprockets.
DANGER!
Practise gear shifting away from
trafc. On the roads this would be too
distracting.
The lower gears are used for climbing and the higher
ones are for descending.
1
2
To shift to a lower gear use your thumb to give the
upper shifter (1) a downwards push. To shift to a
higher gear give the lower shifter (2) a downwards
push.
When shifting on a bike with derailleur gear, it
is important to keep pedalling consistently and
effortlessly until the desired gear is engaged. Avoid
shifting while pedalling strongly.
DANGER!
Adjusting the gear is a job for
experienced bike mechanics only.
Mis-adjustments can cause serious
mechanical damage. Should you have
any problems with the gear, please
contact an experienced bike mechanic.
After a crash, accident or transport
damage you should get the gear checked
by a specialist.
14. Chain
Chains are wear parts but the rider can affect their
service life. Make sure you regularly grease the chain,
particularly before riding in the rain.
• Chains of derailleur gears can often reach
their wear limit after approx. 1,000 to 3,000
km. Replacing a Chain when it is worn will help
extend the life of the more expensive Cassette
and Chainring. You should therefore have an
authorised bike mechanic replace the chain at
regular intervals.
• For bicycles with hub gear and without additional
chain tensioner, the chain tension needs to be
checked at regular intervals and potentially
readjusted by the an authorised bike mechanic to
avoid excessive slack.
• To check for excessive slack, shift to the smallest
gear on the Cassette (if applicable) to create the
greatest amount of slack in the Chain. Clean your
chain with a dry cloth from time to time.
• The chain should only be replaced by a competent
person.
• Apply a suitable lubricant from a specialist shop to
the chain links.
TIP!
Chain slack should be within 10-20 mm
per span. Excessive slack can be caused
by a Chain that is worn and stretched.
A stretched Chain will not sit properly in
the teeth. Over time, gaps between the
teeth of the Sprockets becomes greater,
mirroring the shape of the Chain.
DANGER!
A chain that has not been tted or
tensioned correctly can come off or tear
and cause a fall. Ask a qualied bike
mechanic to replace the chain for you.
18
15. Wheels and tyres
• The wheels of an e-bike are under a lot of strain.
After the rst 200 to 400 km, a qualied bike
mechanic should check the wheels and true them
if necessary. Even after that you have to check
your wheels regularly.
DANGER!
Always inate the tyres to a pressure
between the minimum and the maximum
pressure allowed. Otherwise the tyres
could come off the rim or burst. Risk of
falling!
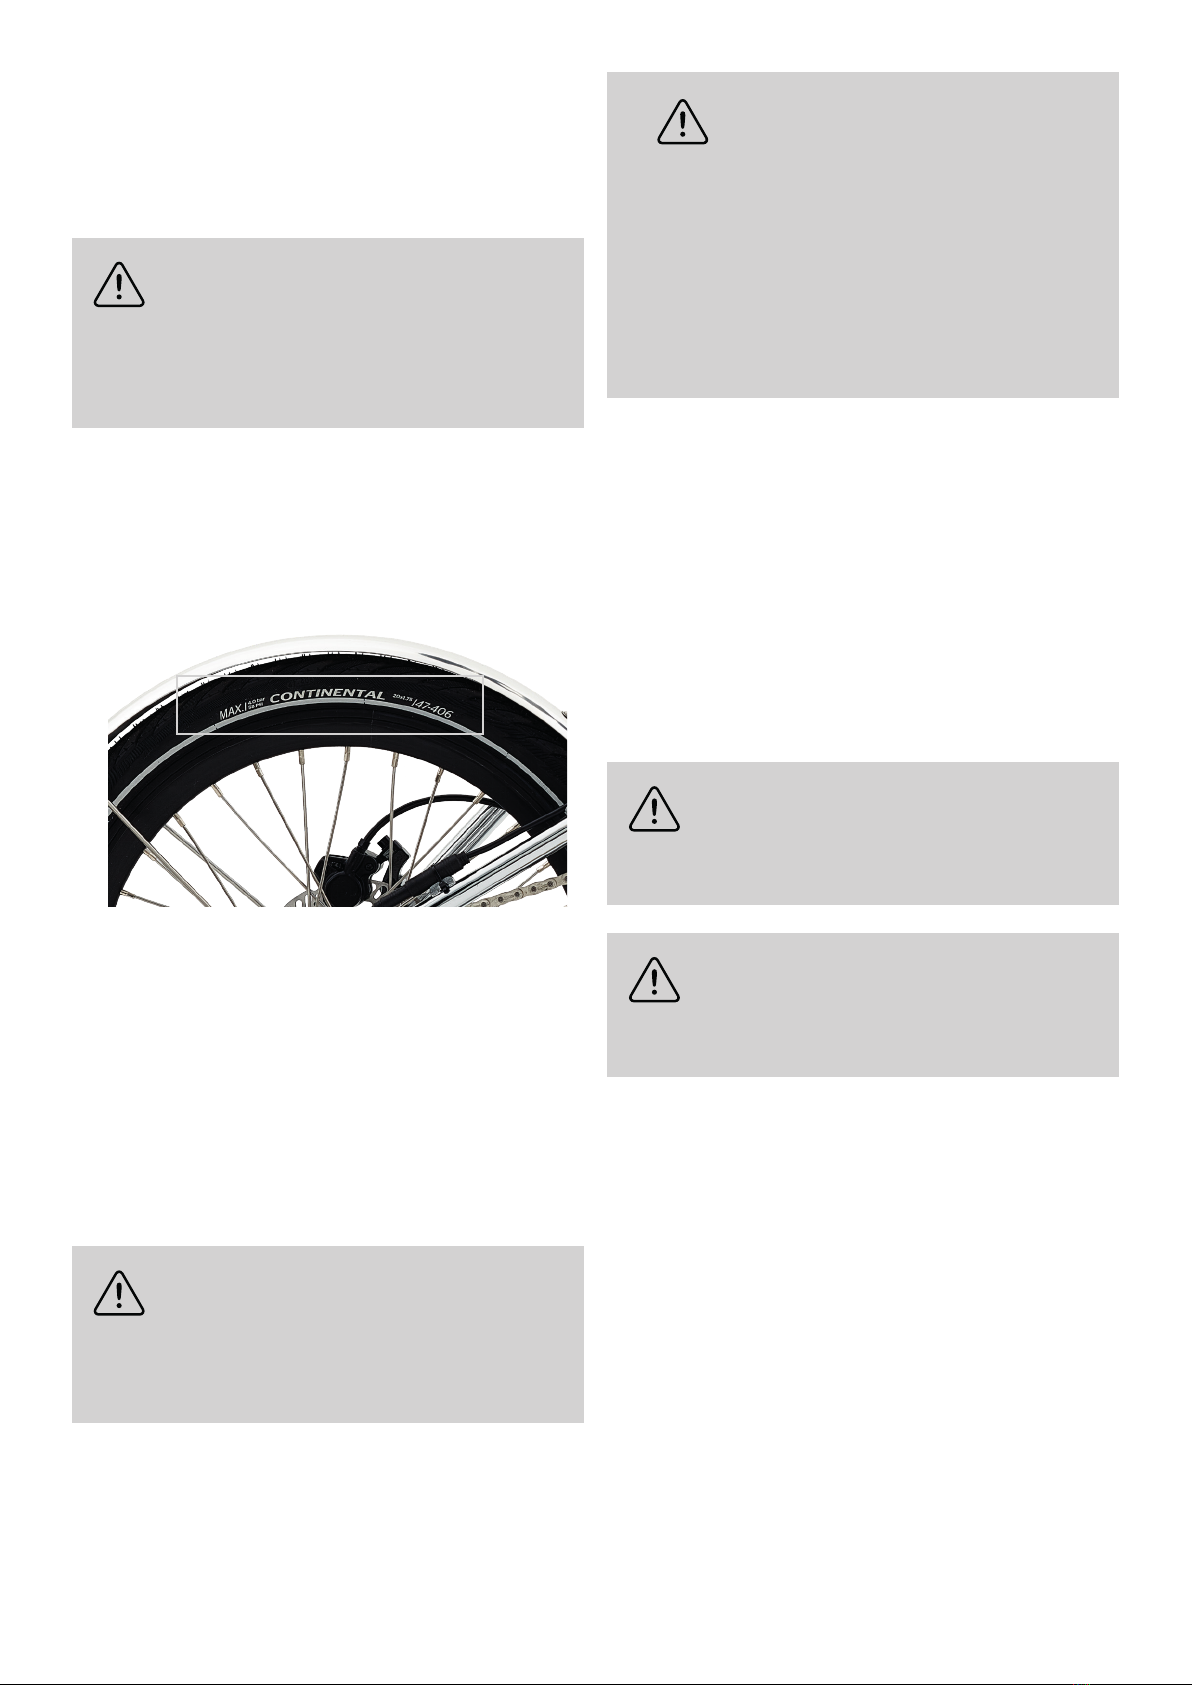
• Tyres have to be inated to the correct air
pressure in order to work properly. The correct
pressure also improves puncture resistance. The
recommended air pressure is specied in bar and
PSI on the tire or a label on the rim.
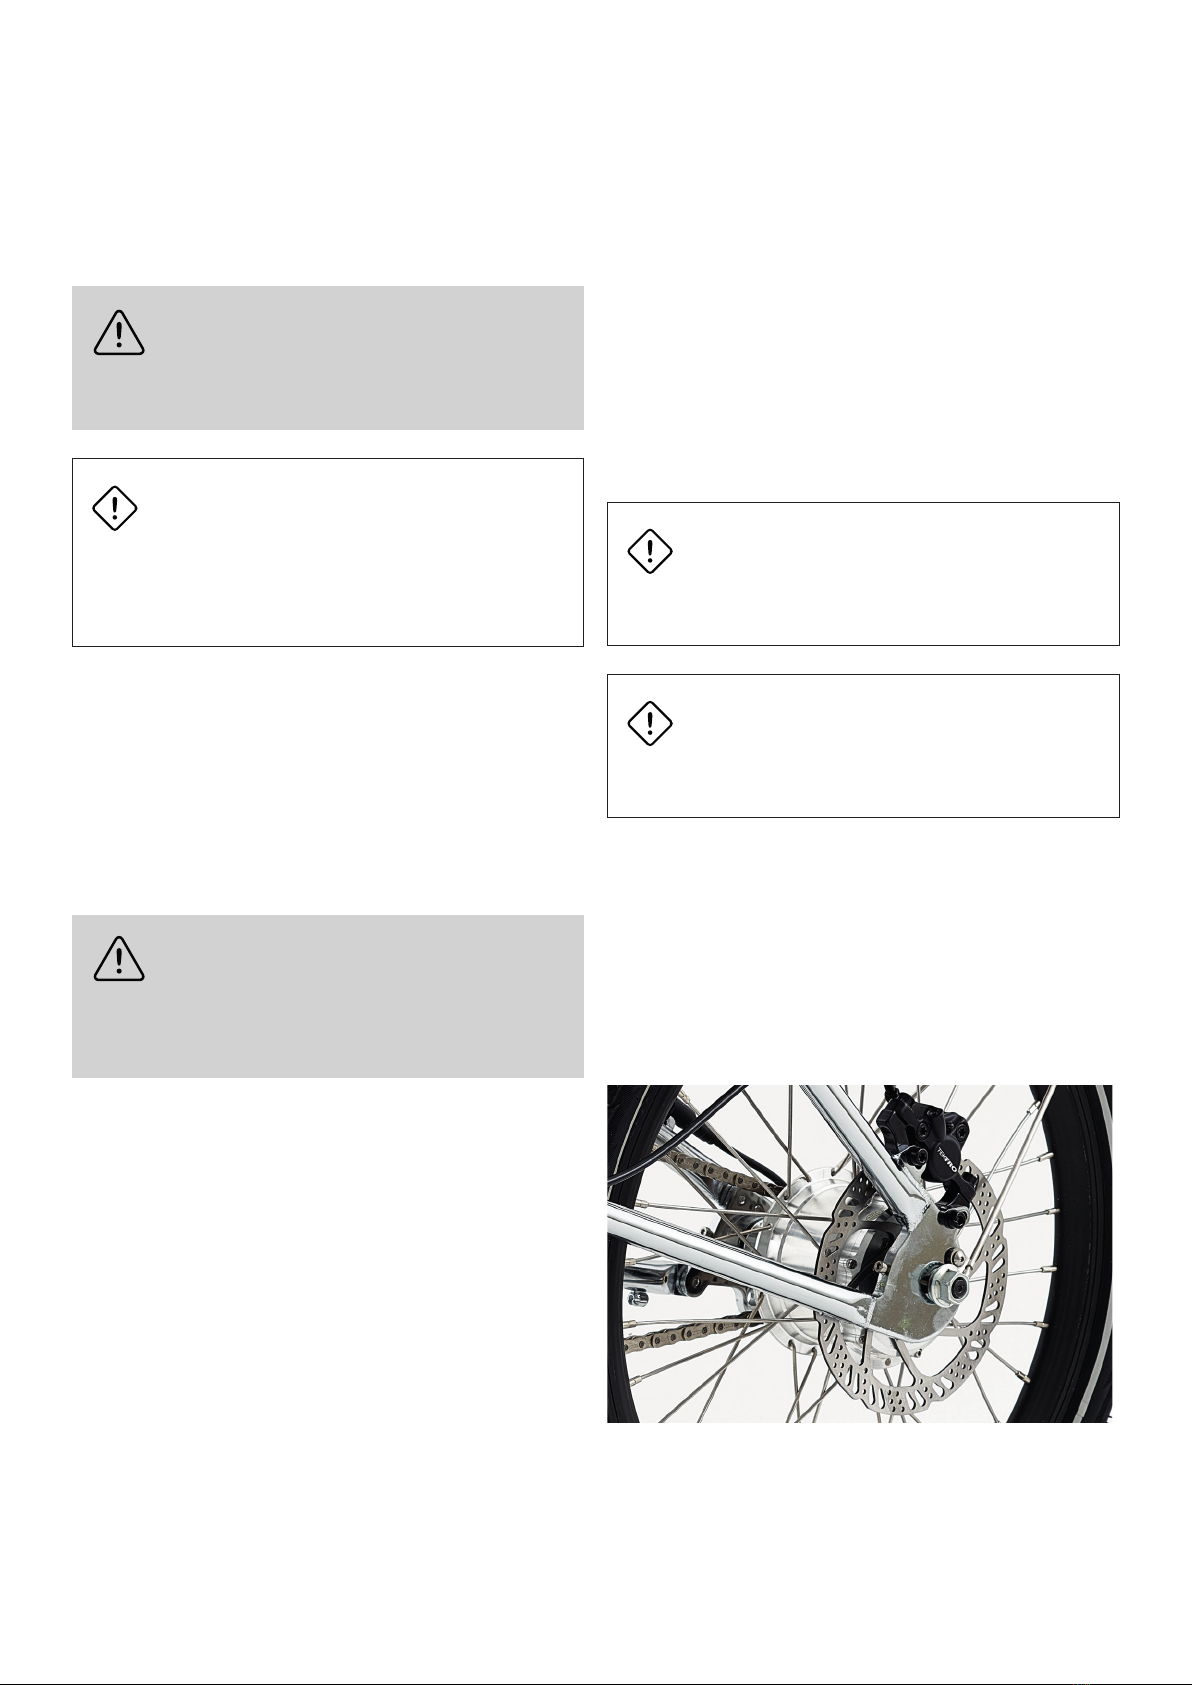
• Always check that the nut that fastens the
Rear Wheel with the rear hub motor is securely
tightened. It is recommended to tighten the rear
hub nut at both sides with a torque not exceeding
25N.
• Regularly check the true of the rim. Lifting the
wheel off the ground and spin it by hand. Monitor
the true running of the rim. The wheel should
rotate smoothly and not rub against the brakes.
If the Wheel wobbles side to side or rubs against
the Brake Pads, take the e-bike to a qualied bike
mechanic to have the Wheel trued or replaced.
DANGER!
Do not ride on untrue wheels. In case of
extreme deviations the brake pads of the
rim brake may miss the rims and get into
the spokes. Risk of falling!
‘
DANGER!
Tyres with worn tread or brittle edges
should be replaced by a qualied bike
mechanic. The structure of the inside
of the tyre can be damaged by moisture
or dirt. Faulty rim bands (rim bands are
located between the inner tube and rim)
must be replaced immediately. In extreme
cases, damage to the tyres can result in
the inner tube bursting suddenly, causing
a crash.
16. Carrying cargo
Hermansen Copenhagen offers a custom designed
front rack as a piece of add on equipment for the
e-bike. The maximum approved load capacity of the
Hermansen Copenhagen front rack is 10 kg.
Ensure that when carrying luggage you do not exceed
the maximum permissible total weight for the bicycle
(including e-bike, rider, equipment and luggage) of
110 kg.
Standard racks and baskets might not be compatible
with the e-bike.
DANGER!
Using incorrect luggage equipment may
interfere with steering and could be
dangerous.
DANGER!
Do not to exceed the maximum
permissible total weight (e-bike, rider
weight, equipment and luggage) = 110 kg.
Riding with cargo affects the bike’s weight, balance,
centre of gravity, and handling. For example, when
riding with a heavy load, the e-bike will require more
effort to balance and more time to brake. For your
safety, please attentively read the below information:
• There is a strong relationship between the weight
of the rider and the amount of cargo the rider can
comfortably balance and ride with.
• Get familiar with riding a loaded bike in a safe area
before riding on public roads.
• If you equip your bike with a front rack and load it
with cargo, test that it does not make the bike tip
over.
• Position cargo so that the centre of gravity is as
close to the centreline of the bike as possible.
• Balance the load when you secure the cargo.
Lopsided loads can pull the bike to one side.
• Make sure your cargo is secured with straps rated
for the weight of your cargo.
• Make sure that you have enough space to sit
19
properly, pedal, and steer the bike without any
interference from the cargo.
• Cargo should not interfere with normal operations
of the brakes and derailleur(s).
• Tall or large objects in the front of the bike should
not block your vision.
• Make sure that lighting or reectors are not
covered by your cargo.
DANGER!
If you cannot position your cargo to full
all of the above requirements, do not
attempt to ride with the cargo.
ATTENTION!
Riding behaviour is altered by a full
load and the braking distance is longer.
Carefully familiarise yourself with the
different riding behaviour of the fully-
loaded bike.
17. Transporting you e-bike
If transporting your e-bike, always take due
consideration of the weight of your bike, battery and
any luggage you plan to lift or carry. Balance this
against your particular physical capabilities. The
circumstances i.e. route, under-foot conditions etc.
must also be considered before each lift and/or carry
of the bike and luggage.
DANGER!
Remove the battery before transporting
your e-bike to avoid unintentional
activation of the electric system which
can cause injuries.
Do not attempt to lift or carry the combined weight
of the bike and luggage. Whenever you are no longer
able to ride your e-bike, inside a train station for
example, you should rst push it as far as possible
and then remove the luggage before carrying it for the
shortest distance.
Public transportation
Pedelecs can generally be transported on trains
and public transportation like conventional bicycles.
Please check with the rail or public transport operator
for specic requirements.
• Some operators require you to pre-book a space
and buy a separate ticket for the pedelec.
• Some allow travel with your pedelec only during
off-peak hours.
• Some require a cover to be placed on the pedelec.
Airplane
• Batteries used on pedelecs are considered
potentially hazardous and cannot be transported
on airplanes.
• Inquire with your local forwarder to see if you can
ship the battery separately.
Car
• Ask your dealer for a test tting if you are
interested in a bicycle carrier. Make sure the
carrier securely encloses the tubes and provides
stable support. Adapt your speed and way of
driving to the additional load and altered driving
behaviour.
• To reduce the weight, remove the battery from
your bike and place it inside the vehicle.
• Transport your bike inside your vehicle if you drive
a hatchback or have sufcient trunk space.
• Be careful not to damage the Derailleur
ATTENTION!
Keep in mind that your vehicle will be
larger due to the added dimensions of the
carrier and bike.
ATTENTION!
Some bike carrier clamps can damage
the frame tubes. Contact your specialist
dealer if you are in any doubt.
18. Electrical system
Hermansen e-bikes are equipped with an intelligent,
brushless and small 250W rear hub motor with a built-
in controller, sensor, and Bluetooth communication
module. It is a silent <50dB motor with a maximum
motor assisted speed level of 25 km/hr in compliance
with EU regulation. The motor only needs a single
cable connected to the external battery to work.
20
DANGER!
Get in touch with us if you have
questions, problems or notice a fault.
Lack of expertise can cause serious
accidents.
The motor is a pedal assist motor, also called a
pedelec or EPAC, which starts to assist through
pedal induction. This means that when you start to
pedal, the motor starts to assist, and when you stop
pedalling the motor stops to assist.
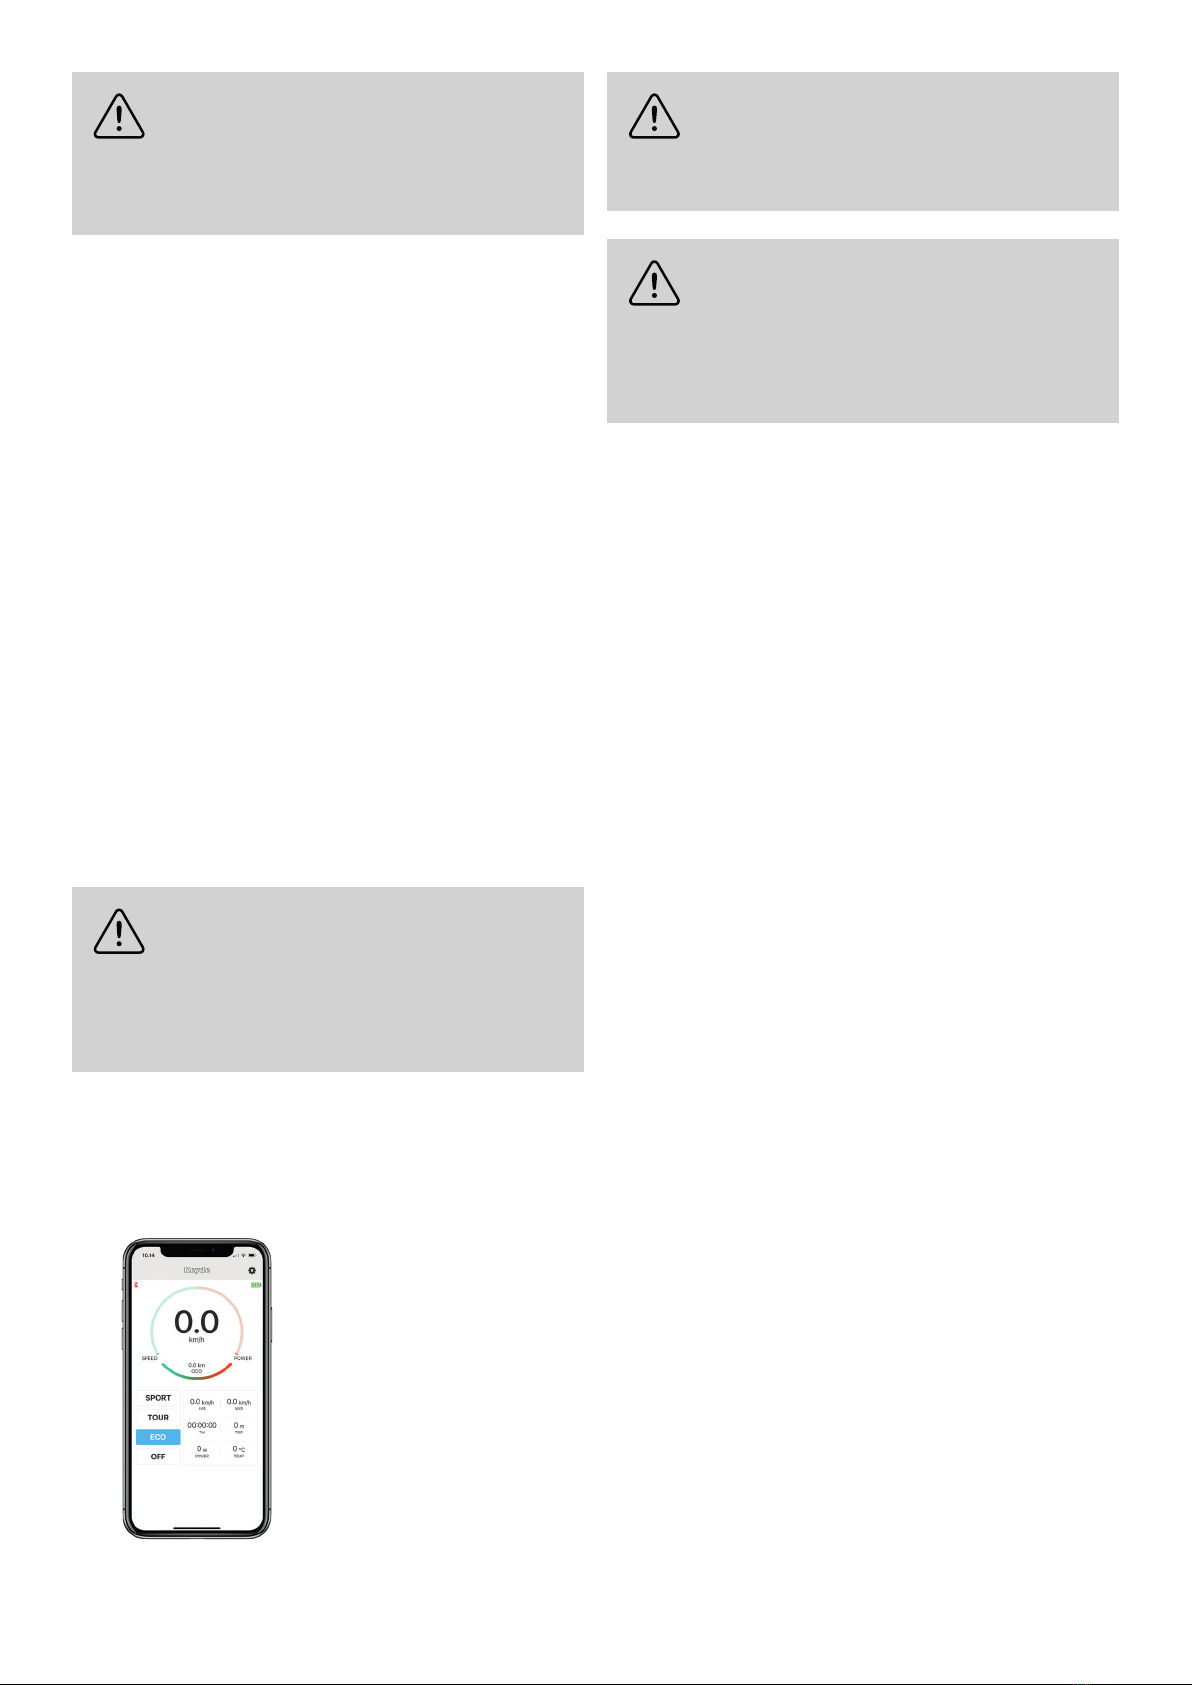
The motor has 4 power assist settings:
• Off: Zero assist
• Eco: 40% of maximum power assist
• Tour: 70% of maximum power assist
• Sport: 100% of maximum power assist
The battery that powers the motor is a bottle shaped
33V, 7Ah Li-ion battery with Panasonic NCR Series
18650 cells and BMS battery management system.
At present it’s the highest energy density battery on
the market. The battery range is 30-40 km but varies
depending on factors such as riding conditions, riding
style, cargo load an rider weight.
The battery is placed on the seat post xed to a
battery mount with a magnet and a Velcro Strap.
Make sure to always make the battery and battery
mount snap and tightly wrap the Velcro Strap around
the battery and close it before riding you e-bike.
DANGER!
Remove the battery before transporting
your e-bike or carrying out any assembly,
maintenance or other work on it. The
unintentional activation of the electric
system can cause injuries.
The motor is controlled from a Bluetooth connected
smartphone app, where you set the desired motor
assist level, motor parameters, view the running status
and the battery status.
DANGER!
If you notice damages to the electric
system, immediately remove the battery
from the e-bike
DANGER!
Never send off the battery yourself. A
battery is classed as hazardous material
and can overheat and catch re under
certain conditions. A faulty battery must
neither be charged nor used.
For more information about the electrical system
please consult the Electrical System Manual that was
provided with your e-bike. The manual can also be
found at our website www.hermansencph.com in the
download section.
For any enquiries about the electrical system please
by phone +45 26362637.
19. Battery range and precautions
General factors affecting battery range
• Average riding speed - the faster you go the more
energy is required and the quicker the battery will
be discharged. However, if you ride faster than the
maximum assist speed, the motor assist will shut
off and the motor will not drain the battery.
• Power assistance level used - the best way
to conserve battery power is pedalling effort.
Using less assistance and exerting more effort
into pedalling will decrease battery power
consumption and result in a longer range.
• General maintenance - keep your tyres correctly
inated at all times and maintain and lubricate
moving parts.
• Stop-and-go trafc - starting from a standstill will
always require more energy. To extend your range,
start in Eco mode.
• Rider’s weight and cadence - the motor will use up
more energy for heavier riders. Keeping a cadence
of at least 60 rpm will be more efcient.
• Some riding conditions such as uneven road
surfaces, headwinds and going uphill requires
more power to assist you up to a certain speed
and thus reduces the battery range.
Ranges in cold weather
• Electric e-bike components are designed to work
faultlessly down to -10° C. Cold temperatures
reduce the battery range. This is a normal physical
process and not a fault or defect.
• When using the battery in warmer temperatures,
you can make full use of its energy capacity again.
• On colder days we recommend that you store
the battery at room temperature overnight. It is
advisable to plan shorter trips or ride with a lower
motor assist level during winter.
This manual suits for next models
1
Table of contents
Other Hermansen Bicycle manuals


