Hernik Hero User manual
Herni
USER MANUAL
version: 02-2017
HER∞
Herni
TABLE OF CONTENTS
I. General information Page
1.1 Introduction 2
1.2 Purpose and indication 2
1.3 Relevant information 3
1.4 Declaration of conformity 3
1.5 Warranty 3
1.6 Service and repair 3
1.7 Practical instruction 3
II. Safety and installation in vehicles
2.1 Get to know your HERO 4
2.2 Safety information 4
2.3 Prior to first use 5
2.4 Installation in cars 6
III. Handling and function of the basic seat
3.1 Adjusting the belt and headrest 9
3.2 Forward and rearward configuration of the seat 11
3.3 Adjusting the resting position 12
3.4 Removing the child seat 13
IV. Using the optional accessories
4.1 Lateral supports 14
4.2 Abduction block 14
4.3 Security tray 15
4.4 Protection mat 15
4.5 Canopy 16
V. Guarantee 17
VI. Labeling 17
VII. Maintenance & product care 18
VIII. Technical characteristics 18
• Page 1 •
Herni
I. General Information
1.1 Introduction
You have choosen the child seat „HERO“ and recieve therefore a high quality
product from our company. We would like to thank you for your trust in us.
For maximum satisfaction with the product and to simplify your daily life, we
present you this user manual. It will help with the correct use of your car seat and
ensure you get the most from its features. These instruction's will also explain
maintenance and care of the product to avoid damage due to operating errors.
Should you have any further question, require any advice or help please contact
your specialist dealer or supplier.
We trust that our product meets your expectations and provides your child with
the comfort and support they require.
We reserve the right to make technical changes to the described product.
Prior to the first installation in your car, please pay special attention to the
instruction on page 4 to 6.
Please ensure that this manual remains attached to the product and consequently
is available for every user.
Yours
HERNIK GmbH
1.2 Purpose & Indikation
The HERO was developed for the safe transport of children with special needs in
vehicles. Children with bad Head and trunk control (z. B. infantile Cerebralparese,
muscular dystrophy, hypotonia) can be supported with individual positioned
lateral supports and security trails to ensure a safe transportation.
Important optional accessories such as abduction blocks or lateral supports enable
HERO to meet your childs‘ individual needs and postural support requirements.
For more see chapter IV.
• Page 2 •

Herni
I. General Information
1.3 Relevant information
The HERO special needs car seat consists of two moduless:
1. A commercial STARLIGHT-car seat made by Recaro (please refer to the
manufacturer´s instructions).
2. Adaption module with accessories to enable this seat to be used for special
needs purposes suiting the individual needs of the child. Please ensure you
follow these instructions from HERNIK GmbH.
1.4 Declaration of conformity
HERNIK GmbH accepts sole responsibility, that this 'Starlight-Young-Sport' car seat
fulfils the essential requirements of the Medical Devices Directive (Council Directive
93/42/EEC).
This product is CE marked in relation to the above-mentioned Directive.
1.5 Warranty
Do not modify or change this equipment in any way or change the use of any
components or optional equipment.
Do not add any non-approved accessories, without first having specific written
permission from the manufacturers. Failure to comply will render the warranty void
and the manufacturer will not accept any liability whatsoever for loss or damages
caused.
1.6 Service and repair
With reference to this product, ONLY the dealer and the manufacturer are
permitted to carry out repairs and or service to the car seat. If you have any
problems with or questions about the product please contact your dealer.
In the event of repair's or overhaul only original spare parts are to be used.
1.7 Practical instruction
The HERO seat is supplied fully assembled. The dealer is instructing the user upon
delivery, using the instruction manual. The dealer should istall the seat together
with the owner in the car and make sure that Iso-Fix and further components are
properly fitted and adjusted.
Grab the seat with on hand centrally in the front and one hand on the side when
you install HERO. Please adjust the car seat individually to the needs of the child to
• Page 3 •
Herni
II. Safety and installation in vehicles
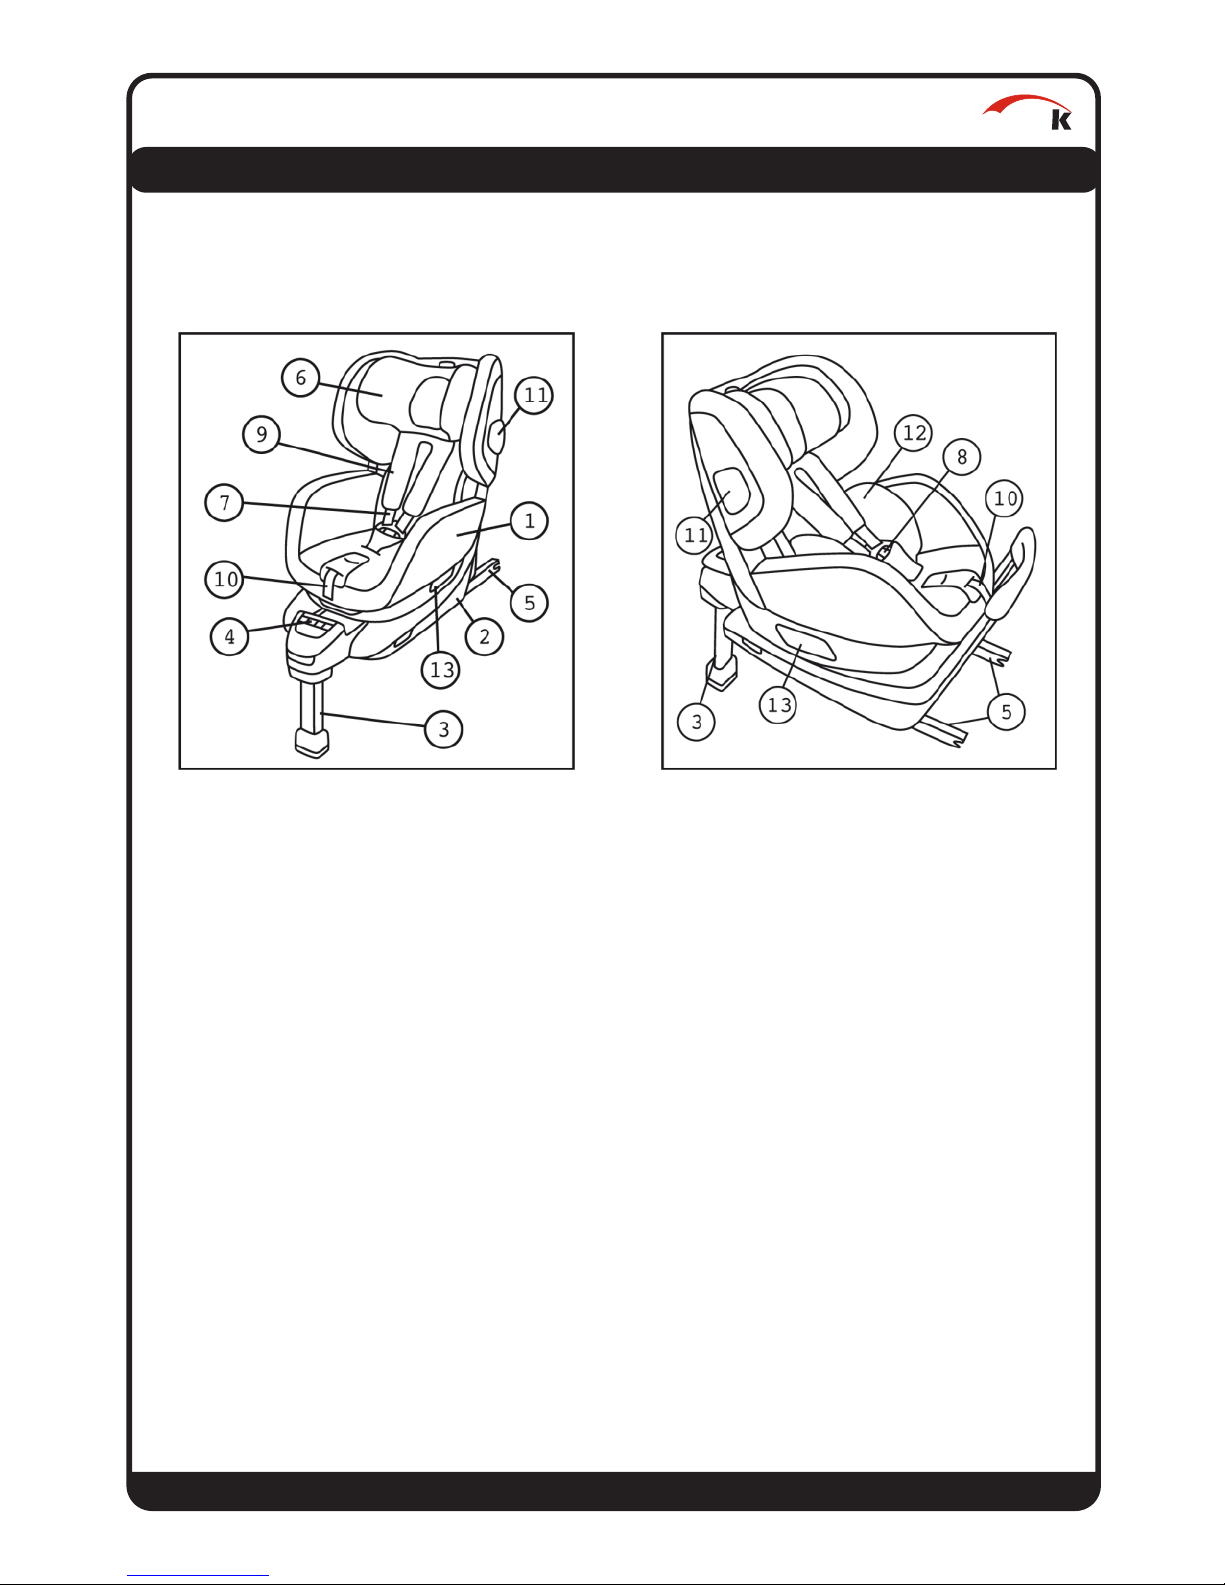
2.1 Get to know your HERO
1 Seat shell 8 Buckle
2 Seat base 9 HERO harness system
3 Support leg 10 Adjustment strap
4 Display 11 Side impact protection
5 ISOFIX connectors 12 Insert
6 Headrest 13 Rotating Handle
7 Harness
2.2 Safety information
• The HERO should always be secured according to the instructions, even when
not in use. In the event, that the driver has to brake hard in an case of
emergency, an unattached seat may cause injury to occupants in the vehicle.
• Install the child seat in the car in such a way that it is not trapped by the front
seat or the vehicle doors.
• The belts must not be twisted or trapped and must be completely tightened.
• The child seat must not be used after an accident.
• Always strap the child in.
• Before each journey, check that the indicators on the front of the seat base are
green.
• Page 4 •

Herni
II. Safety and installation in vehicles
• Page 5 •
2.3 Prior to first use
The Hero is equipped with a function which prevents the seat from being
accidentally turned to the forward position. It is delivered to you with the shell
facing forward. When used from birth up to the age of 15 months, the seat must
be used in the rearward facing configuration.
Turn the shell of the child seat to the initial position and continue to turn it to the
rearward-facing position. This prevents the shell from being moved to the forward-
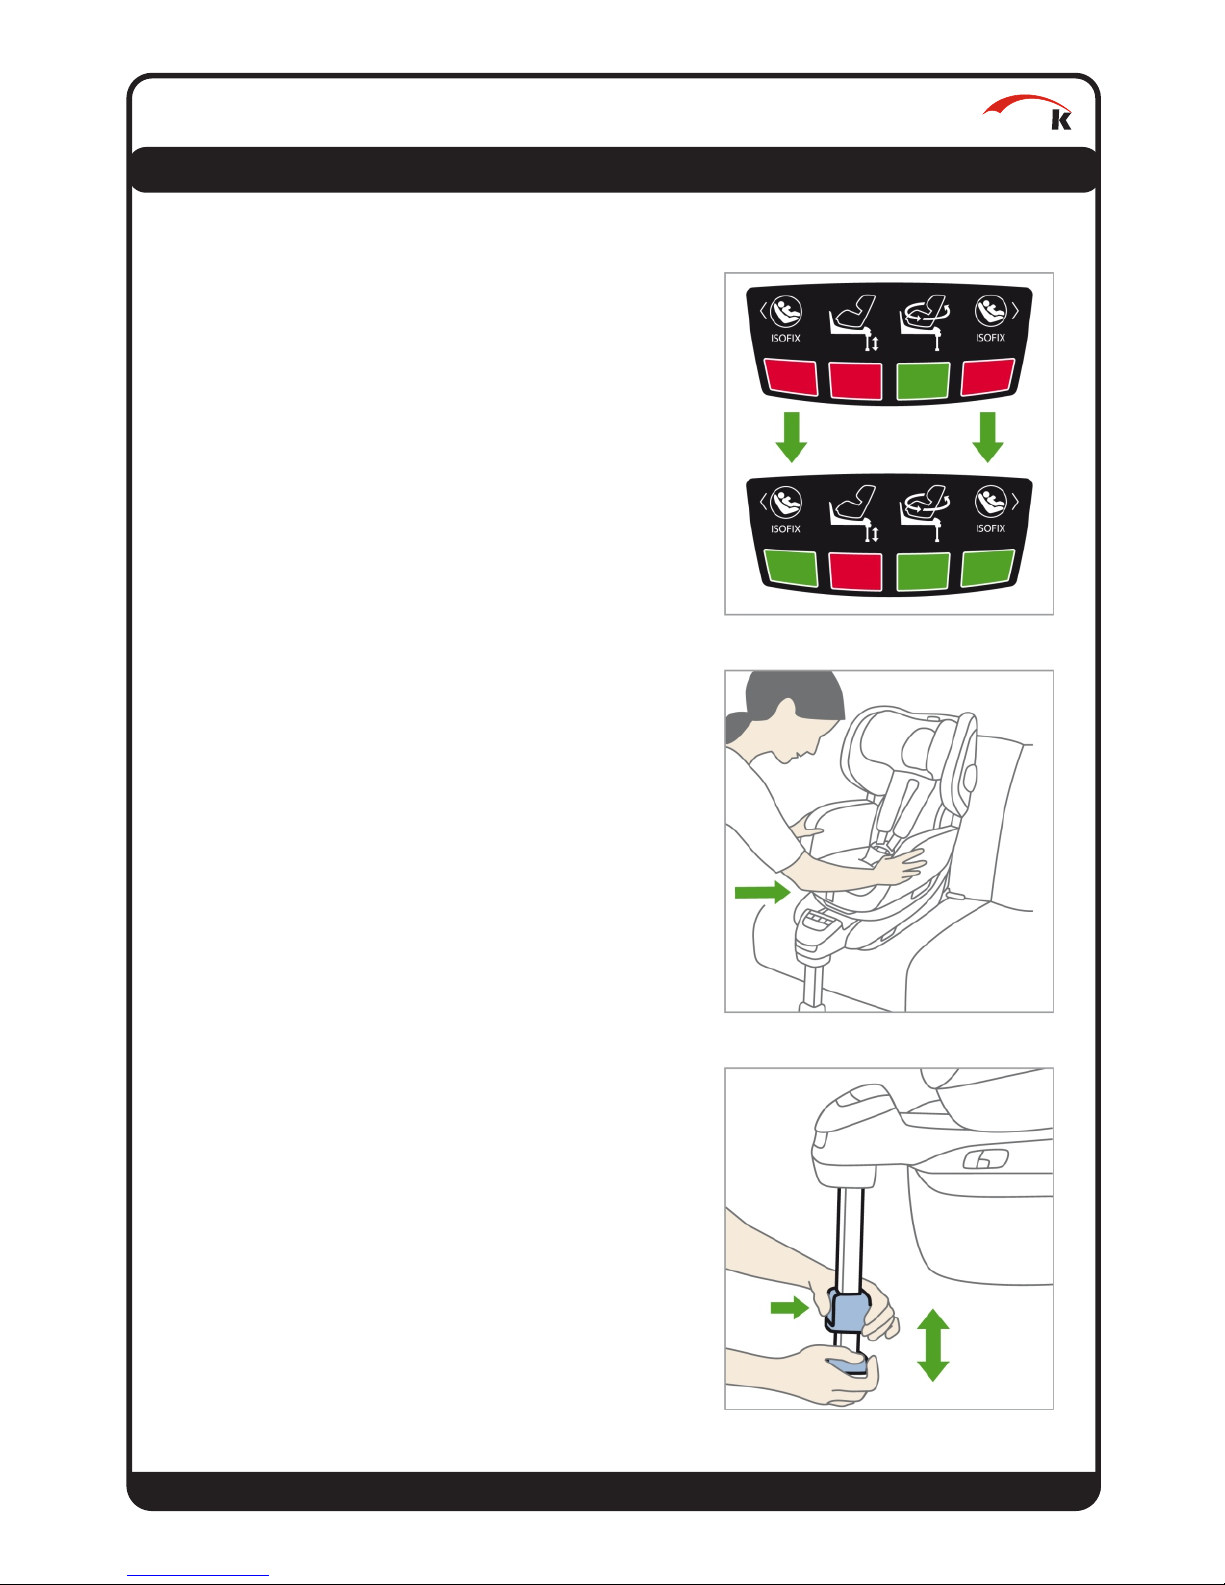
facing position by accident. Check hat the adjustment knob on the bottom side of
the seat is set rear-facing.
If you want to use the child seat in a forward-facing direction, first remove the seat.
Afterwards move the seat to the side to access the adjustment knob. To adjust the
selection lever, pull it as shown and then turn by 90° until the arrow points to the
forward-facing symbol. Let the button lock in place.

Herni
II. Safety and installation in vehicles
•Page 6 •
2.4 Installation in cars
First, fold out the support foot.
ATTENTION: The support foot must always be folded
out.
To extend the ISOFIX connectors, operate the lever
at the front above the support foot, and pull out the
connectors as far as possible.
Now position the HERO on the ISOFIX brackets and
push until you hear the connectors lock in place.
Herni
II. Safety and installation in vehicles
• Page 7 •
ATTENTION:
Both displays for ISOFIX must chance to green.
Check that the child seat is securely locked in
place by pulling it.
Lift the central handle and push the HERO towards
the backrest until it fits closely.
To adjust the height of the support leg, first slide
the support leg up till it reaches the stop and then
press the lockingmechanism on the front to the
support leg. Pull the support leg out until it securely
rests on the vehivle floor.
After releasing the lock button, make sure that the
support leg locks into position.

Herni
II. Safety and installation in vehicles
• Page 8 •
If the length is adjusted correctly, the display for
the support foot will change to green as soon as
you lower the support foot onto the vehicle floor.
If this is not the case, extend the support foot a
little further as described above.
ATTENTION: The display must change to green.
To increase safety in the event of an accident,
activate the child seat side impact protection.
To do so, lift the impact protector on the side of
the child seat facing the vehicle door. Check that
the impact protection is locked in place securely by
applying preasure to it.
Herni
III. Handling and function of the basic seat
3.1 Adjusting belt and headrest
The height of the shoulder belts, together with the
headrest, can be adjusted precisely to the height of
your child. The shoulder belts should ideally pass
over your child‘s shoulder height or slightly higher
in a backward direction.
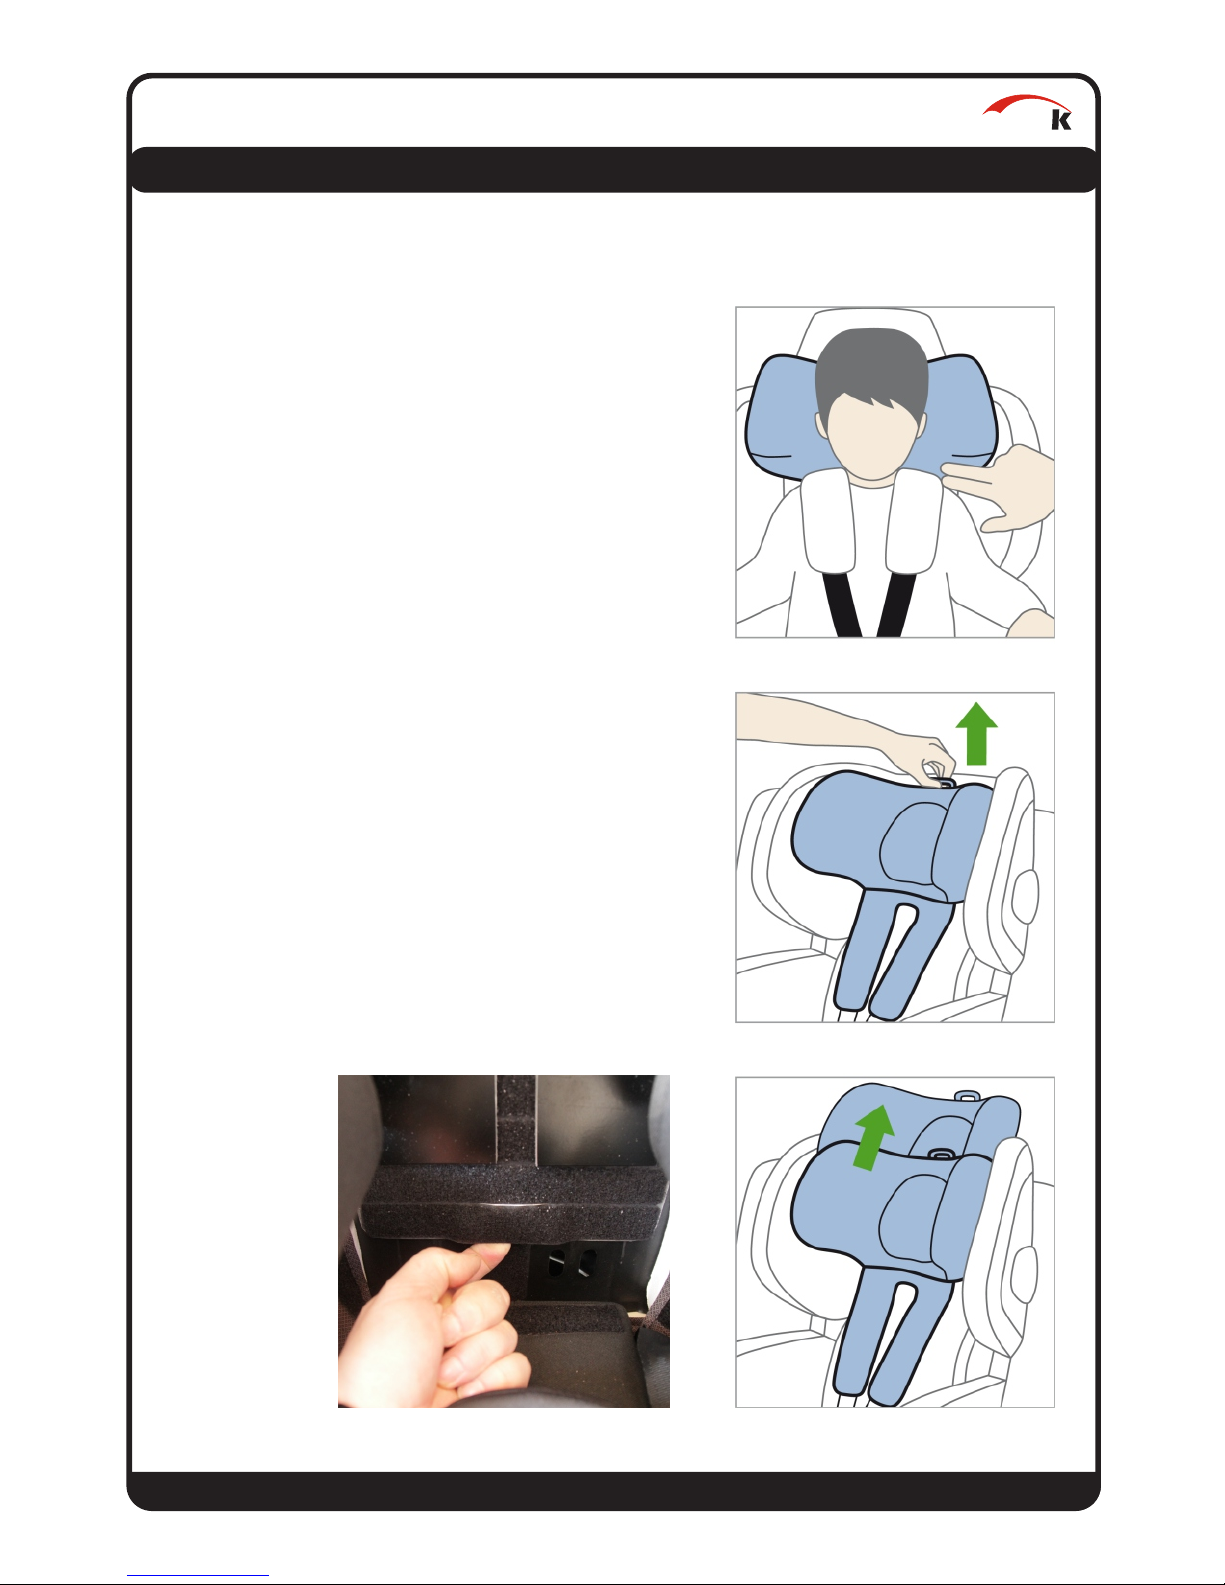
IMPORTANT: The lower edge of the headrest is
ideally positioned about 2 fingerbreadths above
the shoulders of the child.
Adjusting the headrest:
To release the locking mechanism, pull up the lever
on the back.
Now move the deadrest into the required position
and let the locking mechanism lock in place.
Ensure that the locking mechanism is locked in place
securely by pushing the headrest downwards.
It may be necessary to lengthen the belts prior to
this step.
If lateral supports are installed:
While releasing the locking mechanism, the
aluminium plate has to be detached from the
velcro fastener simultanously.
• Page 9 •

Herni
III. Handling and function of the basic seat
• Page 10•
To loosen the belts, press the belt adjustment
button and pull the shoulder belts forward as
shown.
Release the buckle by pressing the red button and
pull out the tips om am upward direction.
Place the belts on the outside.
Herni
III. Handling and function of the basic seat
• Page 11 •
3.2 Forward / rearward
To make buckling up easier, the seat shell of the
HERO can be turned to the side.
To unlock the turing function, first slide the button
in the middle of the adjustment lever downwards
and then pull the lever outwards.
You can now turn the seat shell to the side.
After strapping in the child, turn the seat shell back
to the starting position.
Herni
III. Handling and function of the basic seat
• Page 12 •
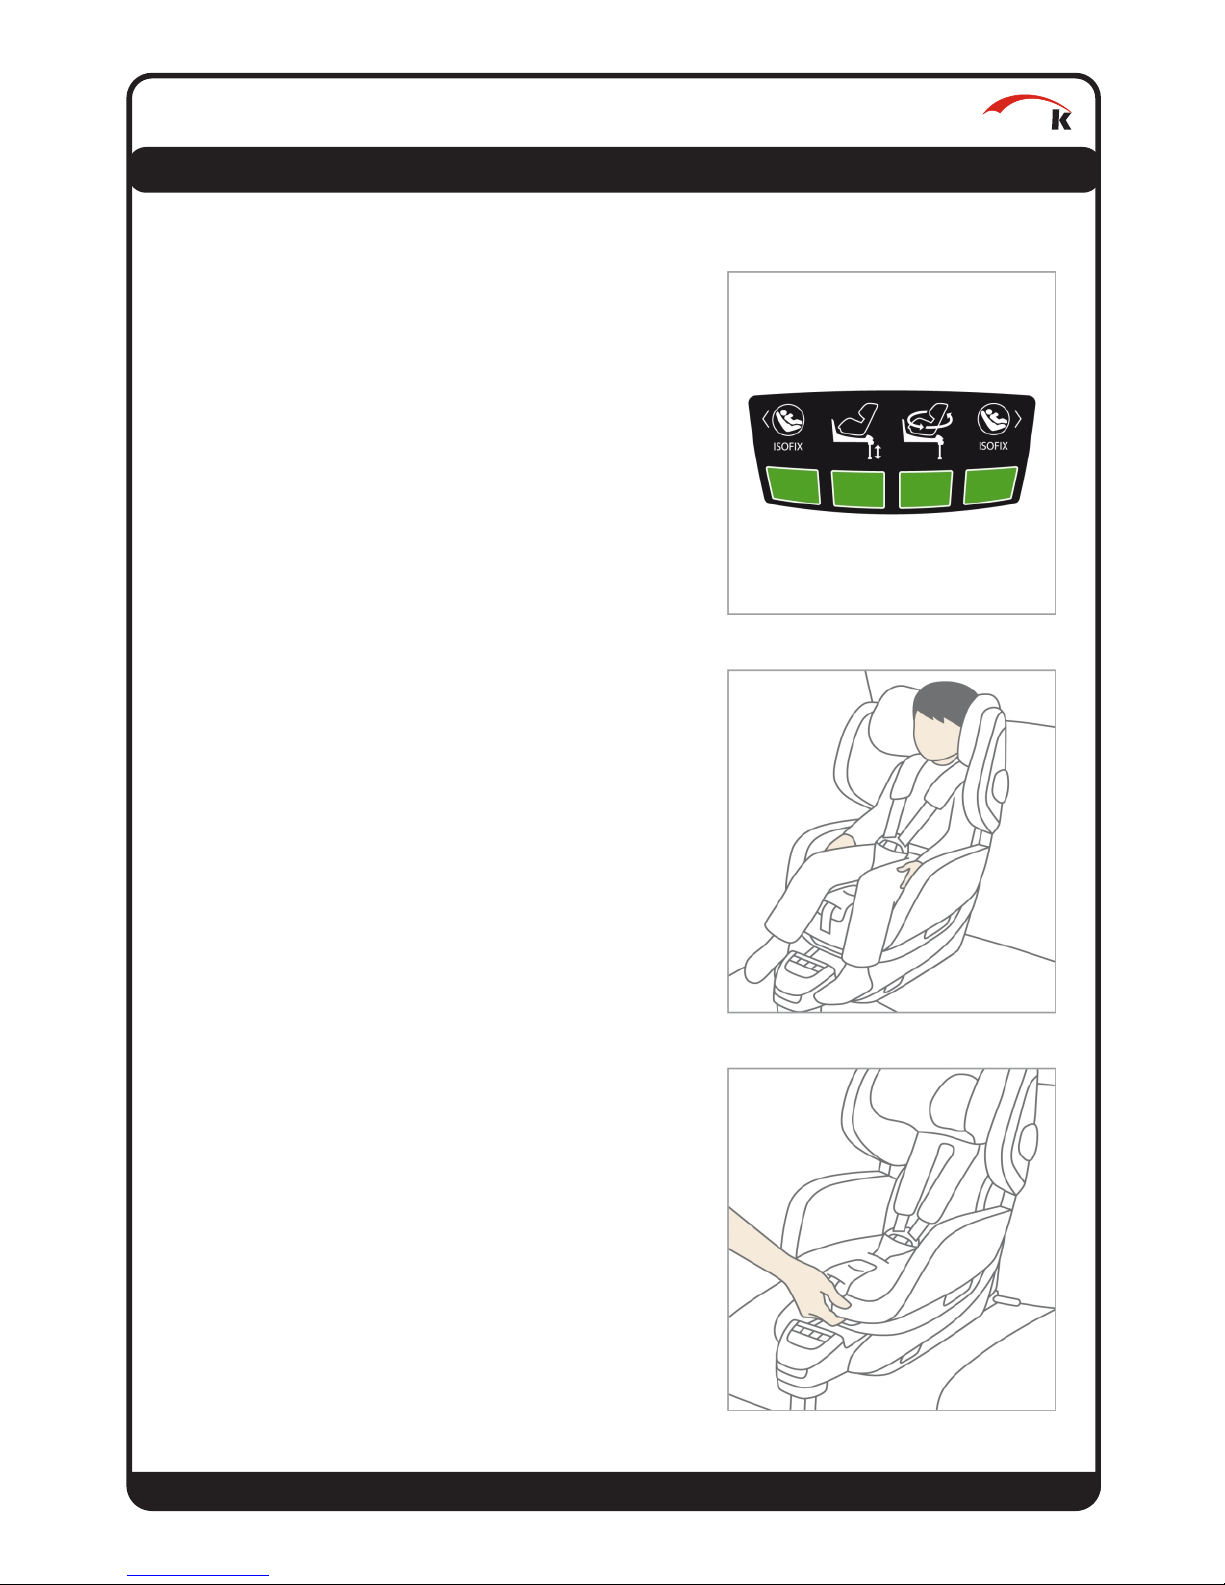
Ensure that the seat shell is locked securely in place.
Important: The display must change to green.
We recommend to transport your child in a
rear-facing direction as long as possible.
From the age of 15 months, it is also permissible
to transport your child in the direction of travel.
3.3 Adjusting resting position
To adjust the seat position, loosen the locking
mechanism by pulling the lever on the front of the
seat shell. You can now slide the seat shell into the
required position.

Herni
• Page 13 •
Once the seat is in the required position, release
the lever and allow it to lock in place.
Check hat the seat is securely locked in place by
pushing or pulling on the seat shell.
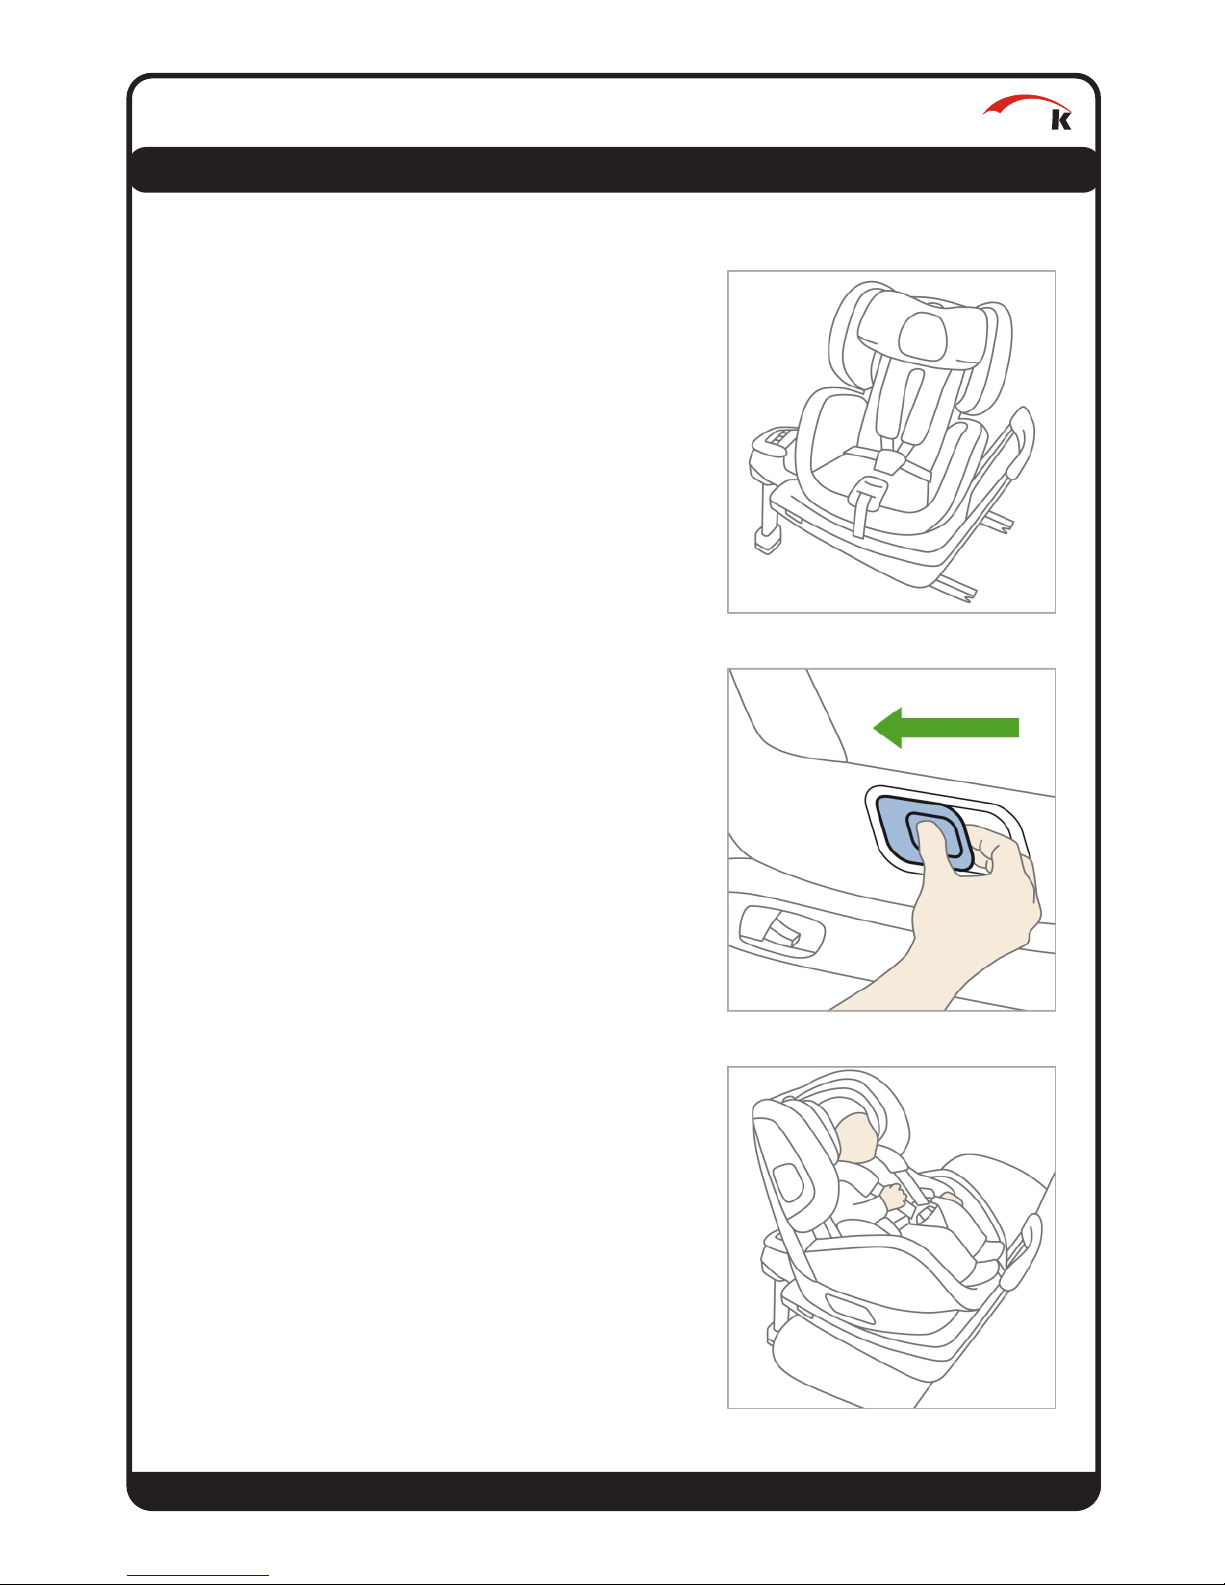
3.4 Removing the child seat
To remove the HERO, lift the gray handle on the
front of the child seat and pull it forward a little.
Now press down the light gray buttons and unlock
the connectors by pulling on the silver levers as
shown. You can remove the HERO from the
vehicle seat.
You can now fold in the support foot.
III. Handling and function of the basic seat

Herni
IV. Using the optional accessories
• Page 14 •
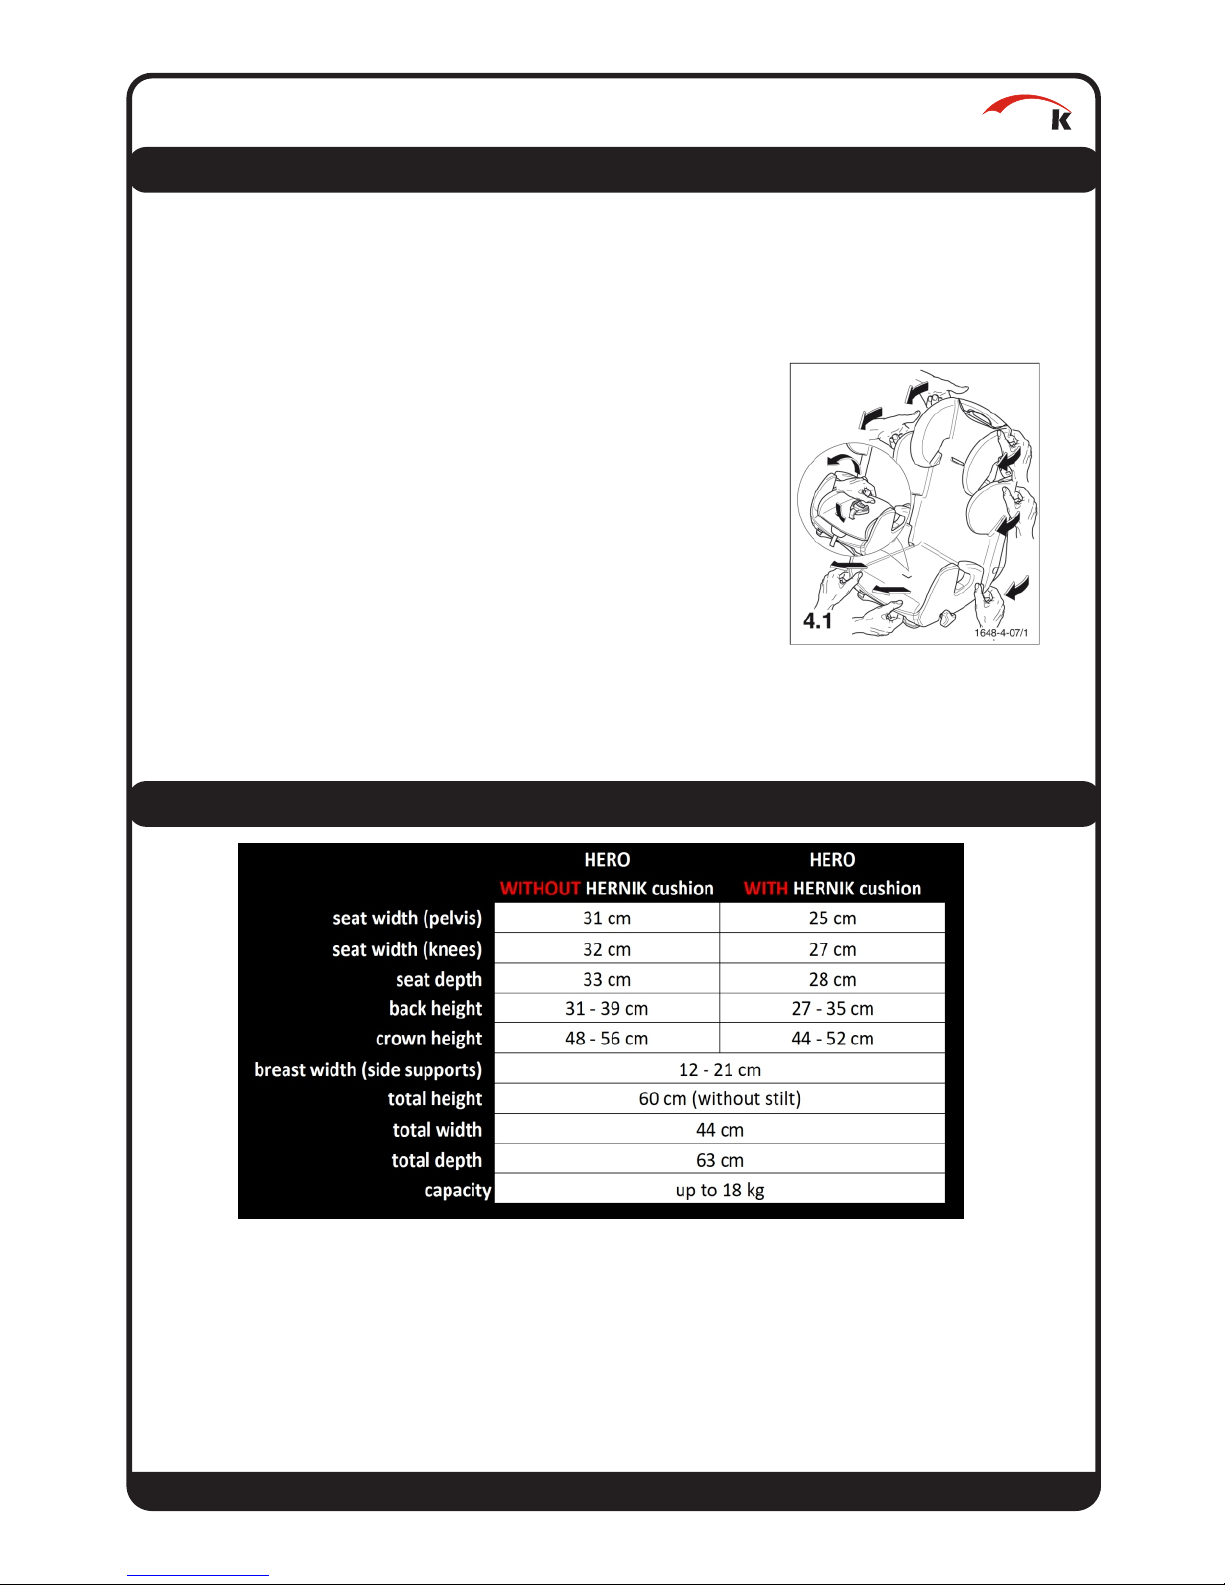
4.1 Lateral supports
The lateral supports assist your child with
stabilizing its upper body if the trunk control is
limited. They are adjustable in depth using a
screw fitting.
The supports are connected with a mounting
plate with the aid of a velcro fastener. They
can easely be removed. By pushing them to
the front direction, the supports can be fixed
at the choosen position.
The cover is removable and washable.
4.2 Abduction block
The abduction block support your child to
keep ist legs on a fixed position. The block is
attached to a stable plate wich is located
underneath the cover. Therefore it is not
moveable.
If placed correctly, the buckle to release the
belts is easy to reach.
IV. Using the optional accessories
4.3 Security tray
The security tray allow your child to rest ist
arms and thereby stabelize the upper body.
It is equipped with velcro strap at the bottom
to ensure a proper and stable position. The
tray must be stucked into the slots between
seating- and backparts to be assembled.
Afterwards, the velcro straps have to be fixed
at the back part.
The cover is removable and washable.
ATTENTION: The tray must only be used in the forward facing position!
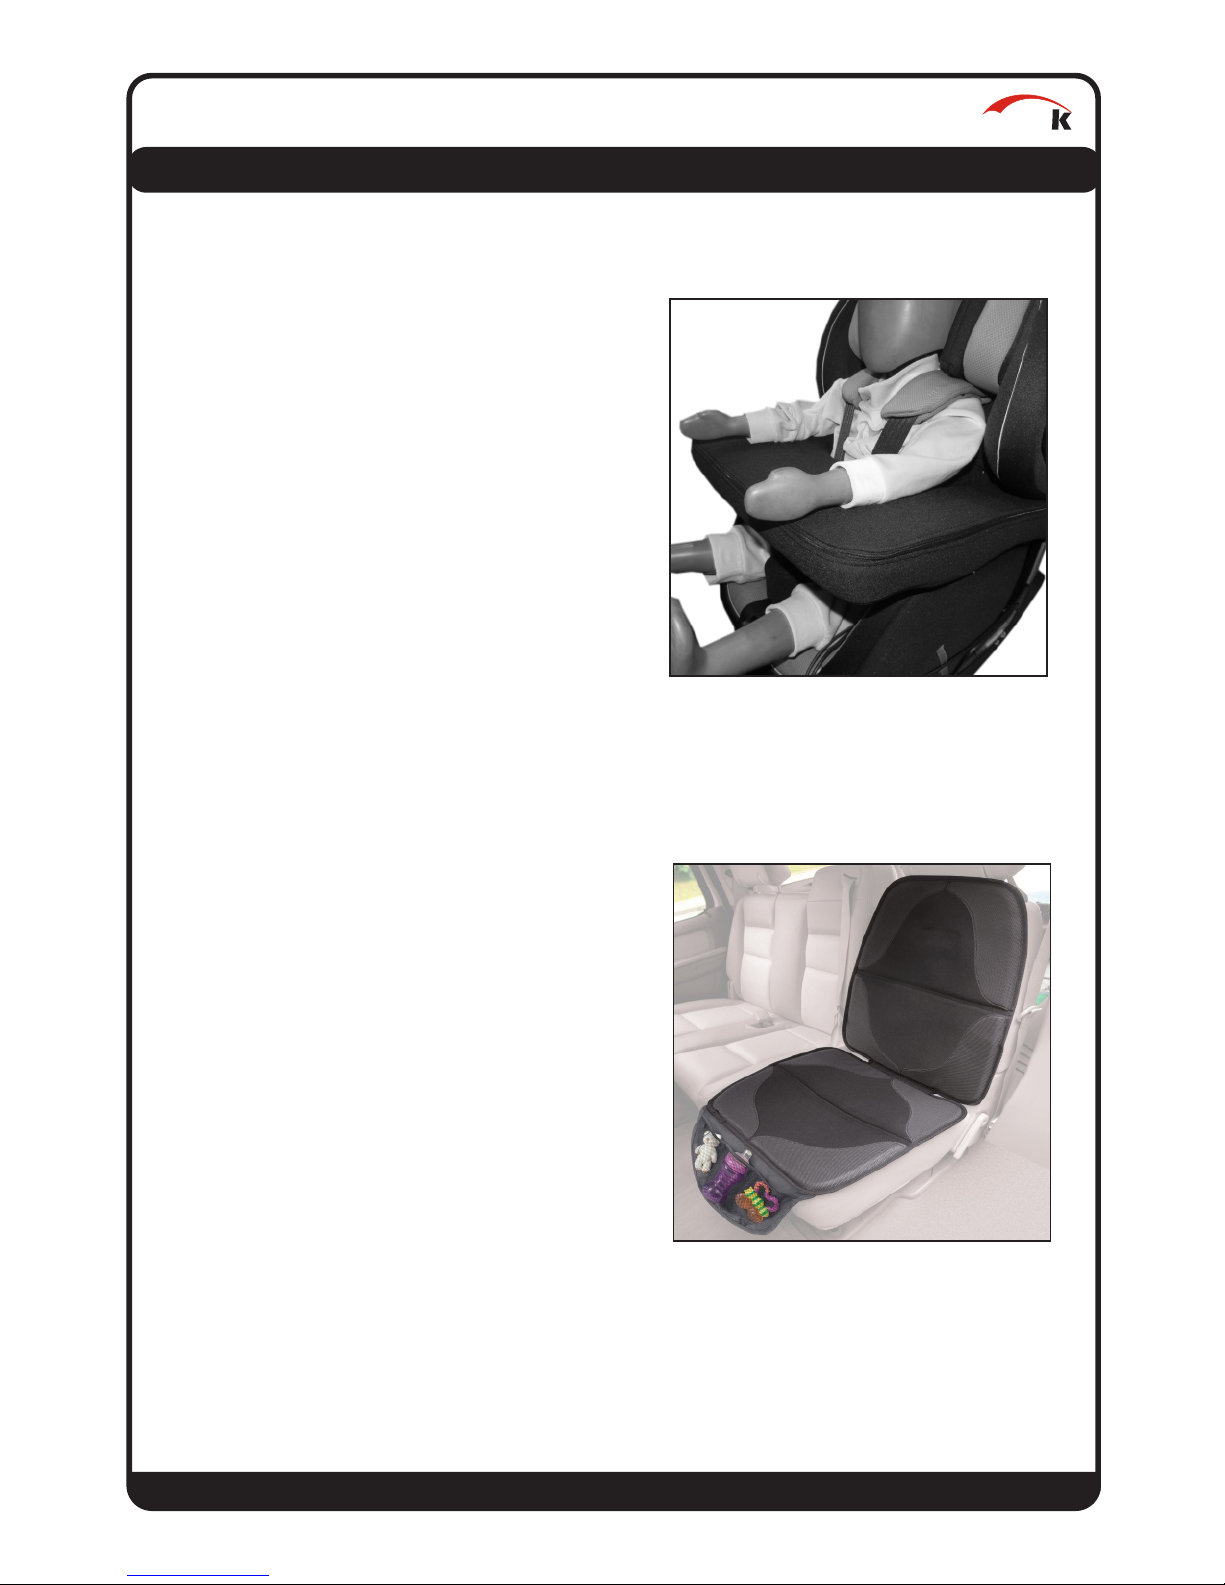
4.4 Protection mat
We would like to point out that the use of child
seats may cause damage to the seats in your
vehicle. Please use the protection mat to
protect your vehicles seat and reduce the
probability of usage marks.
Herni
• Page 15 •
IV. Using the optional accessories
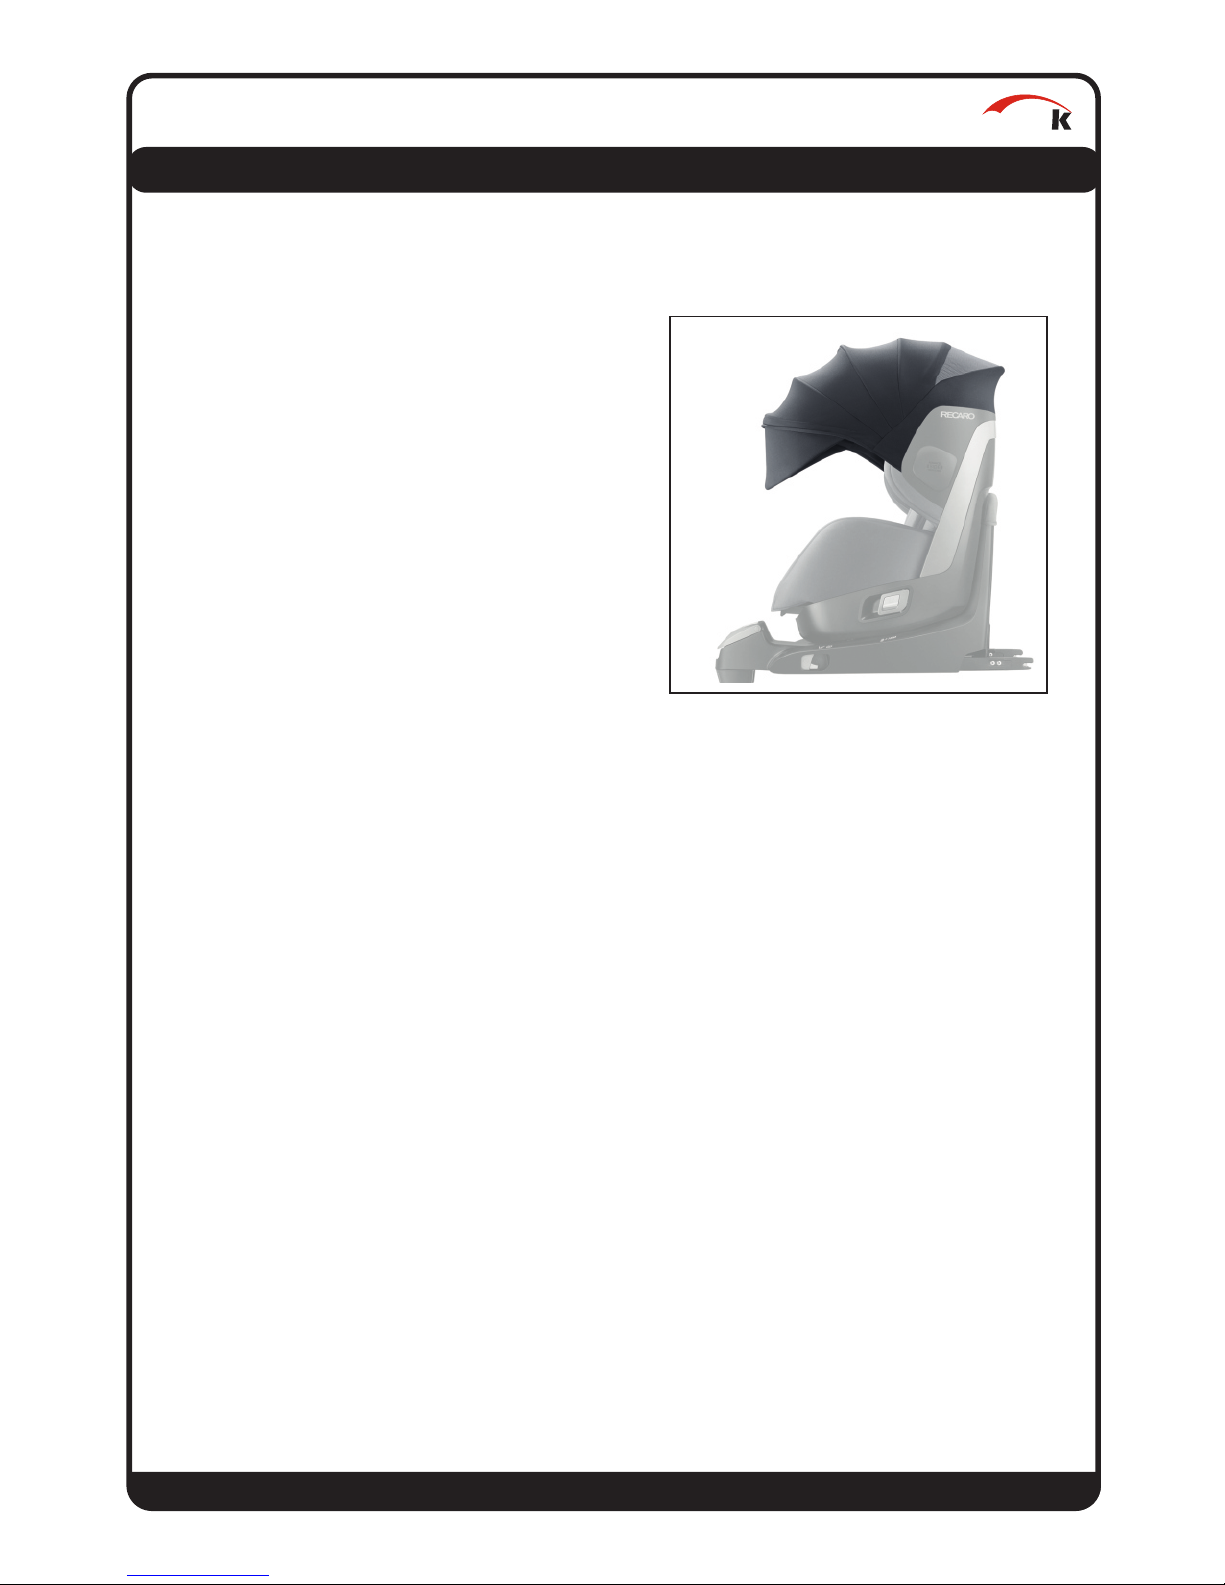
4.5 Canopy
This canopy is exclusive on a Reboarder.
It can be slid back and forth like with an
infant carrier. The mesh insert ensures a
proper air circulation.
Even with full extended headrest it is still
suitable and therefore designed for the
whole life circle of the chair.
The lateral guides on the sides of the canopy
have to be pluged into the sides of the back
part. The firm seam can be pocket along the
bottom side of the HEROs‘ back part.
Herni
• Page 16 •
IV. Using the optional accessories
Herni
V. Guarantee
Hernik products are designed and manufactured in accordance with strict quality
standards. In the exceptional case you have a complaint, HERNIK GmbH gurantee
in accordance to our business conditions from the date of delivery
• 24 months warrenty on fixed components
• 12 months warrenty on moving components
For components, not produced by HERNIK, we refer to the guarantee terms of the
manufacturer (RECARO).
There is no gurantee on special production except for defects in manufacture and
material. In those cases we offer replacement inbetween 12 months after
deliverance.
Claims under this guarantee are subject to the device being properly installed and
used in accordance with the instructions provided.
Warranty is void where modifications or improper repairs, without prior
consultation with the manufacturers are carried out or a device is improperly fitted.
Further claims, for whatever legal reason, in particular, claims for direct or indirect
damages are excluded.
At the back of the car seat you will find the following labeling:
• Page 17 •
VI. Labeling
Partenhauserweg 14 • 81369 München • Germany
Serien-Nr.: HO-2017-9999
Zero.1 HERO (18 kg)
Lesen Sie bitte vor Gebrauch die Bedienungsanleitung!
Herni GmbH
Rückhalteeinrichtung f. spez. Anforderungen „S“
Herni
VII. Maintenance and product care
• Page 18 •
1. Check the bolted connection on the seat in an 8 week interval. Retight
the screws if necessary.
2. Cleaning should be done with a dry cloth on a regular basis. Heavy
contamination can be cleaned with mild
household cleaner.
3. Cleaning the cover:
Seat and belt can be cleaned with lukewarm
water and soap. If required, the buckle can be
rinsed out with water.
RECARDO seat covers can be washed in the
washing maschine. We recommend washing
the covers at 30°C on a gentle wash setting in
order to protect the environment. If washed at
higher temperatures the colors may fade. Do not spin and never dry in a
tumble drier, as the material and padding could seperate from one
another.
Standard equiptment:
• 5-point-harness with upholstery
• extra cushions to reduce seat depth and seat width (removable)
• swivel 360°
• ISOFIX and support foot
VIII. Technical characteristics

Distributed in New Zealand by Medifab Ltd
32 Detroit Drive, Rolleston 7675
277 Mt Smart Road, Penrose, Auckland 1061
Call 0800 543 343
www.medifab.co.nz
Table of contents
Other Hernik Car Seat manuals


