Hernik KIDSFLEX User manual

Providers of Rehabilitation Technology
KIDSFLEX
Disabled Child Car Seat
Instructions

Kidsflex - Disabled Child Car Seat
Dear Customer,
We would like to thank you for purchasing our ‚Kidsflex special needs car seat.
Prior to installation and use of this seat in a vehicle, in the interest of correct and
safe use, we ask that you read carefully and understand this instruction manual.
Please be sure to observe all safety instructions
Please make sure that this instruction manual remains with the seat at
all times so that it is available for all users.
We reserve the right to make technical changes
Hernik GmbH.
Table of Contents................................................................................................. 2
General Information....................................................................................................3
How to Use .................................................................................................................3
Safety .........................................................................................................................4
Component Overview - Kidsflex .................................................................................5
Adjustments –Kidsflex 1 and 2 ..................................................................................6
Component Overview - Accessories...........................................................................7
How to Use - Accessories...........................................................................................8
Installation in a Vehicle .............................................................................................10
Care and Maintenance .............................................................................................10
Seat and Accessories ...............................................................................................11
Warranty ...................................................................................................................11
Serial Number / Identification....................................................................................12
-2-
Kidsflex - Disabled Child Car Seat
General Information
The Kidsflex Disabled Child Car Seat is designed to be used as a restraint system
for disabled children when travelling in a car, it is suitable for installation in most
cars.
The car seat is designed for use in the back seat of a car and requires a functioning
vehicle mounted 3-point seat belt.
The seat can be installed and used on the passenger side or on the driver side
(location to be specified at purchase).
In addition to the vehicles 3-point seat belt, the Kidsflex car seat is equipped with a
5-point support harness, with both shoulders, lap and crotch strap, to provide added
support for the child.
Options are available to offer added postural management and support for the child
where needed.
ATTENTION
The Kidsflex child seat is tested and approved for forward facing installation
in a rear seat position only.
The distance between the child’s head and the interior roof lining must be
a least 60mm.
How to Use
Your Kidsflex car seat is supplied assembled.
On delivery your dealer should unpack and check the seat, ensure adjustments are
made to suit the vehicle, and fit the seat in accordance with the Instructions.
If fitted with the Stabilizer Bracket, this must be adjusted to the relevant vehicle, the
seat will then be located by pushing the stabilizer bracket into the gap between the
backrest and cushion of the vehicles rear seat.
If fitted with our Isofix option, this must be adjusted to the relevant vehicle, the seat
will then be located by latching onto the vehicles Isofix locations (Note: this Isofix
option is for stability / location purposes, the vehicles 3-point seat belt must always
be used to secure the child).
In order to achieve the optimal seating position, it will be necessary to adjust
the seat to the child’s size and requirements. These adjustments should always
be carried out by your dealer.
After instruction, the appropriate person, in the presence of the dealer, should
perform all functions, as well as installation and removal of the car seat.
-3-

Kidsflex- -Disabled Child Car Seat
Safety
Before use –all components must be checked for proper function.
The operating instructions must always be carried on the car seat.
Your child’s safety is only guaranteed when the seat is properly installed and
your child is positioned correctly within the seat.
The support harness straps must be adjusted comfortable tight and must lay
flat on the child without twists and distortions.
The vehicles 3-point seat belt system must be used to secure the child,
and must be placed correctly within the seat belt guides provided.
Please check:
A. The vehicles seat belt is securely located within the seat belt guides.
B. That the belt buckles are securely engaged.
C. That there are no twists in the seat belt webbing.
Make sure that clothing, solid objects such as pins, belt buckles, etc. are
not placed between the child and the seat belt, which can result in
unnecessary injuries in accidents.
Explain to your child how important it is to be properly secured, that the belts
must be used correctly, not to pull on the straps or to open the buckles.
Do not modify the seat as this will endanger your child.
Damage must not be caused to the seat by moving parts or doorways.
You must not leave your child unsupervised in the child seat.
You should inform other passengers how to remove the child from the car
seat in the event of an accident or incident.
In the event of an accident the child seat must be replaced.
-4-
Kidsflex - Disabled Child Car Seat
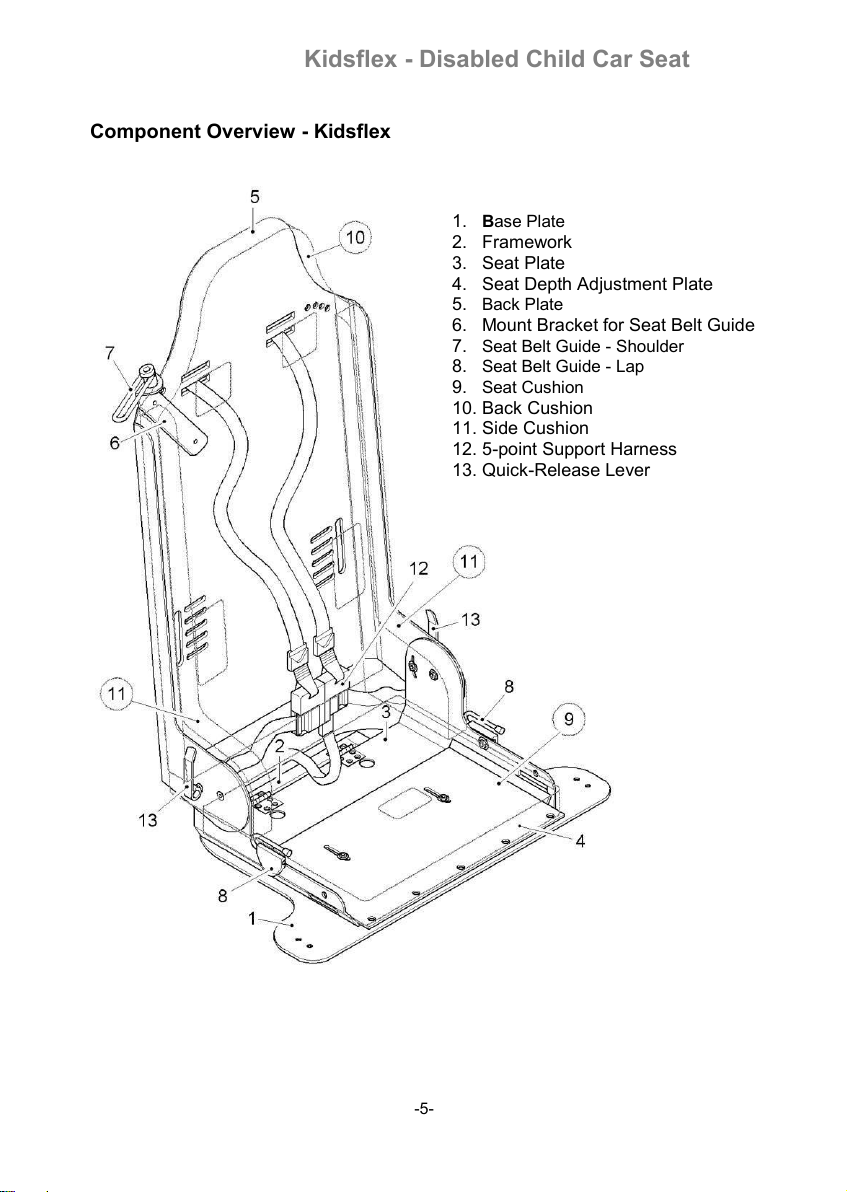
Component Overview - Kidsflex
1. Base Plate
2. Framework
3. Seat Plate
4. Seat Depth Adjustment Plate
5. Back Plate
6. Mount Bracket for Seat Belt Guide
7. Seat Belt Guide - Shoulder
8. Seat Belt Guide - Lap
9. Seat Cushion
10. Back Cushion
11. Side Cushion
12. 5-point Support Harness
13. Quick-Release Lever
-5-
Kidsflex - Disabled Child Car Seat
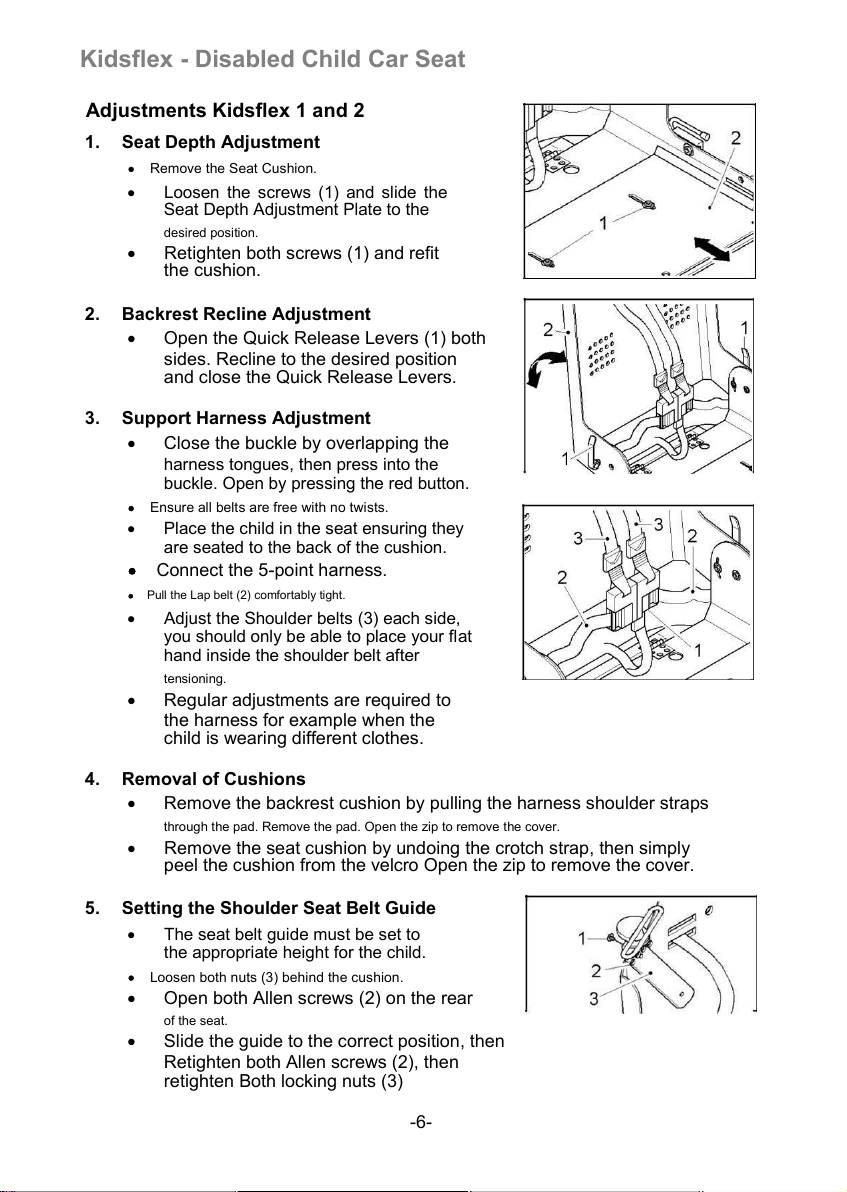
Adjustments Kidsflex 1 and 2
1. Seat Depth Adjustment
Remove the Seat Cushion.
Loosen the screws (1) and slide the
Seat Depth Adjustment Plate to the
desired position.
Retighten both screws (1) and refit
the cushion.
2. Backrest Recline Adjustment
Open the Quick Release Levers (1) both
sides. Recline to the desired position
and close the Quick Release Levers.
3. Support Harness Adjustment
Close the buckle by overlapping the
harness tongues, then press into the
buckle. Open by pressing the red button.
Ensure all belts are free with no twists.
Place the child in the seat ensuring they
are seated to the back of the cushion.
Connect the 5-point harness.
Pull the Lap belt (2) comfortably tight.
Adjust the Shoulder belts (3) each side,
you should only be able to place your flat
hand inside the shoulder belt after
tensioning.
Regular adjustments are required to
the harness for example when the
child is wearing different clothes.
4. Removal of Cushions
Remove the backrest cushion by pulling the harness shoulder straps
through the pad. Remove the pad. Open the zip to remove the cover.
Remove the seat cushion by undoing the crotch strap, then simply
peel the cushion from the velcro Open the zip to remove the cover.
5. Setting the Shoulder Seat Belt Guide
The seat belt guide must be set to
the appropriate height for the child.
Loosen both nuts (3) behind the cushion.
Open both Allen screws (2) on the rear
of the seat.
Slide the guide to the correct position, then
Retighten both Allen screws (2), then
retighten Both locking nuts (3)
-6-

Kidsflex - Disabled Child Car Seat
Component Overview –Kidsflex Accessories
1. Seat Recline Adjustment
2. Swivel Base Release
3. Abductor Pommel
4. Footrest
5. Trunk Supports (Left / Right)
6. Stabilizer Bracket / Isofix
7. Padded Play tray / Crash Pad
8. Outer Leg Supports (Left / Right)
-7-
Kidsflex - Disabled Child Car Seat
How to Use Kidsflex Accessories
1. Abductor Pommel
To remove the Abductor Pommel, loosen the
quick clamp lever (1), simply lift out the
Pommel (2) from the retaining bracket (3).
Position the child, tighten the harness
support, then refit the Abductor Pommel (2)
into the retaining bracket (3) and
retighten the quick clamp lever (1)
2. Trunk Supports
The Trunk Supports are fitted through
the backrest cushion, apertures are
provided both left and right side.
Trunk Supports are adjustable, up/down
and in/out, to suit the size of the child.
Adjustments are made using the Matrix in
the back of the seat. Remove the Allen
screws from the rear of the seat, reposition
and tighten.
For Swing-away Trunk Supports, pull down
Knob (2). When the child is seated, pull down
Knob (2), swing support forward to a
straight Positiion and lock knob in place.
3. Swivel Base
Lift release button (1) and swivel the
seat toward the open door.
Place the child and swivel the seat to face
forward, ensuring that the seat locks
securely.
Older versions –you must unscrew the
locking button before lifting the button
to release the seat for swivel.
When the seat is locked forward
facing, retighten the locking button.
4. Recline Angle
Remove screws (1) each side.
Adjust seat recline angle as required, refit
screws each side through location plate
(2) and retighten.
-8-
Kidsflex - Disabled Child Car Seat
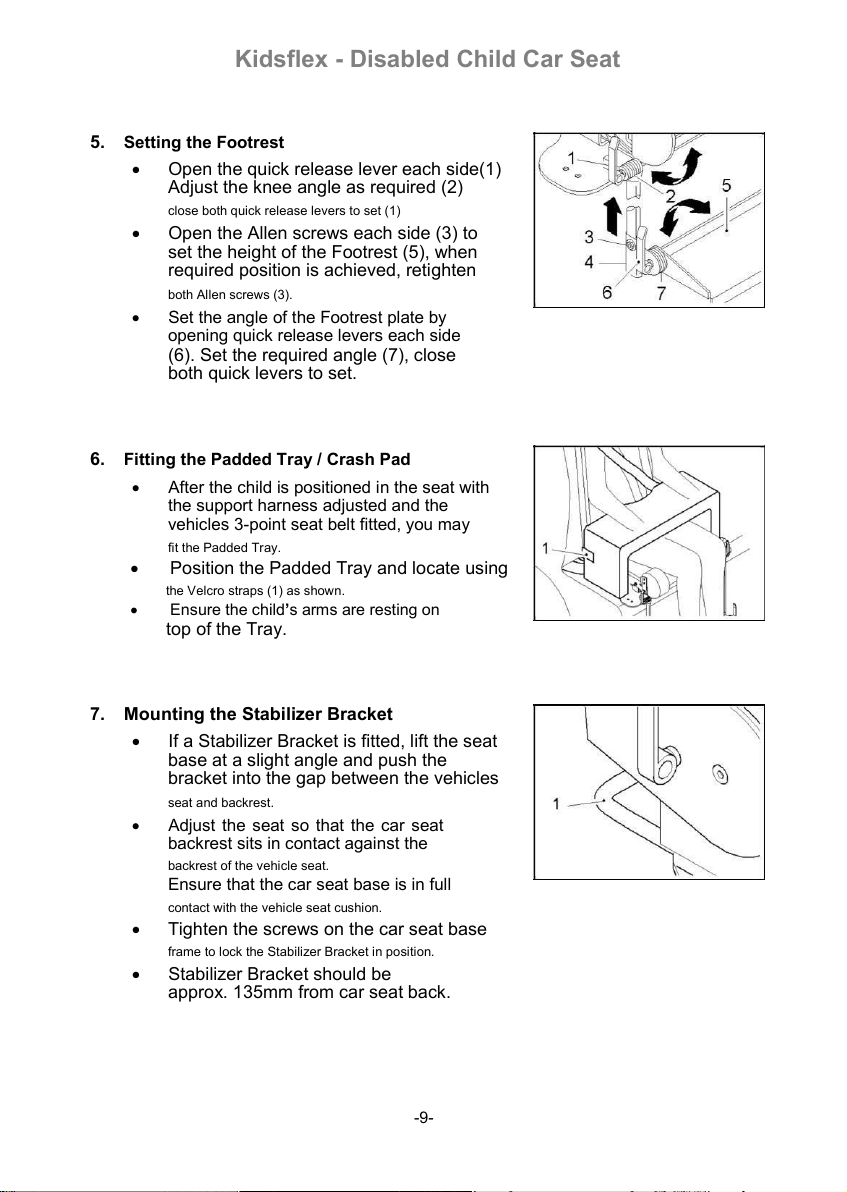
5. Setting the Footrest
Open the quick release lever each side(1)
Adjust the knee angle as required (2)
close both quick release levers to set (1)
Open the Allen screws each side (3) to
set the height of the Footrest (5), when
required position is achieved, retighten
both Allen screws (3).
Set the angle of the Footrest plate by
opening quick release levers each side
(6). Set the required angle (7), close
both quick levers to set.
6. Fitting the Padded Tray / Crash Pad
After the child is positioned in the seat with
the support harness adjusted and the
vehicles 3-point seat belt fitted, you may
fit the Padded Tray.
Position the Padded Tray and locate using
the Velcro straps (1) as shown.
Ensure the child’s arms are resting on
top of the Tray.
7. Mounting the Stabilizer Bracket
If a Stabilizer Bracket is fitted, lift the seat
base at a slight angle and push the
bracket into the gap between the vehicles
seat and backrest.
Adjust the seat so that the car seat
backrest sits in contact against the
backrest of the vehicle seat.
Ensure that the car seat base is in full
contact with the vehicle seat cushion.
Tighten the screws on the car seat base
frame to lock the Stabilizer Bracket in position.
Stabilizer Bracket should be
approx. 135mm from car seat back.
-9-
Kidsflex - Disabled Child Car Seat
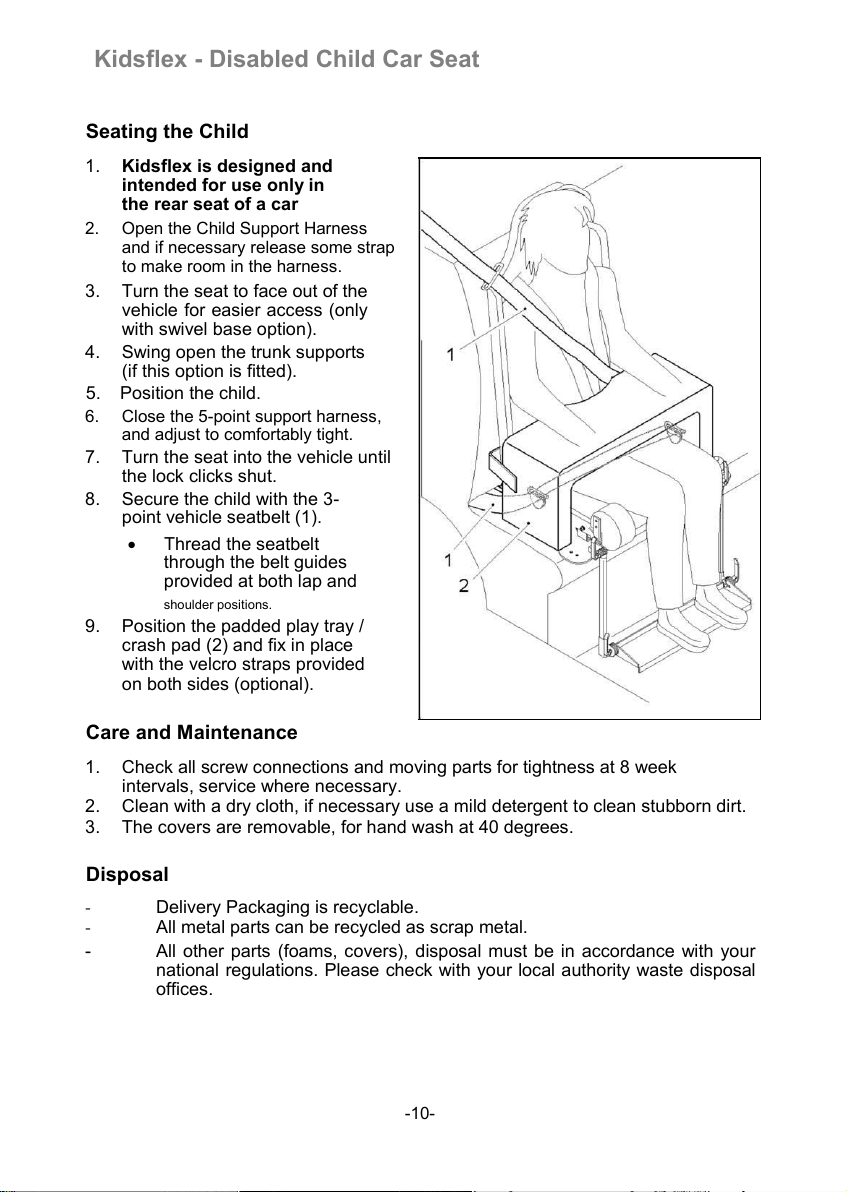
Seating the Child
1. Kidsflex is designed and
intended for use only in
the rear seat of a car
2. Open the Child Support Harness
and if necessary release some strap
to make room in the harness.
3. Turn the seat to face out of the
vehicle for easier access (only
with swivel base option).
4. Swing open the trunk supports
(if this option is fitted).
5. Position the child.
6. Close the 5-point support harness,
and adjust to comfortably tight.
7. Turn the seat into the vehicle until
the lock clicks shut.
8. Secure the child with the 3-
point vehicle seatbelt (1).
Thread the seatbelt
through the belt guides
provided at both lap and
shoulder positions.
9. Position the padded play tray /
crash pad (2) and fix in place
with the velcro straps provided
on both sides (optional).
Care and Maintenance
1. Check all screw connections and moving parts for tightness at 8 week
intervals, service where necessary.
2. Clean with a dry cloth, if necessary use a mild detergent to clean stubborn dirt.
3. The covers are removable, for hand wash at 40 degrees.
Disposal
-Delivery Packaging is recyclable.
-All metal parts can be recycled as scrap metal.
- All other parts (foams, covers), disposal must be in accordance with your
national regulations. Please check with your local authority waste disposal
offices.
-10-

Kidsflex - Disabled Child Car Seat
Seat and Accessories
Description
Size 1
Size 2
Size XL
Kidsflex
part no:
300000-S
310000-S310000-S-XL
Seat Angle Adjustment
part no:
300100-S
310100-S310100-S-XL
Swivel Base Plate
part no:
300200-S
300200-S300200-S
Head Support
part no:
300050-S
300050-S300050-S-XL
Leg Support - Left
part no:
300350-S
300350-S300350-S-XL
Leg Support - Right
part no:
300355-S
300355-S300355-S-XL
Abductor Pommel
part no:
300400-S
310400-S310400-S-XL
Footrest
part no:
300450-S
310450-S310450-S-XL
Trunk Support - Slim line
part no:
300500-S
300500-S300500-S-XL
Trunk Support - Deep
part no:
300510-S
300510-S300510-S-XL
Stabilizer Bracket
part no:
300550-S
310550-S310550-S-XL
Padded Play Tray
part no:
300600-S
310600-S
310600-S-XL
Warranty
HERNIK –products are manufactured in accordance with strict quality standards
using the latest technology.
In the unlikely event of a failure, or if our product does not meet expectation, our
General Terms and Condition of Warranty are as follows:
24 Months warranty on the base frame components.
12 Months warranty on all moving parts.
Warranty excludes: Normal wear and tear, damage due to excessive loading,
damage due to incorrect use, damage due to incorrect installation, damage due to
accidents.
Product warranty is contingent on correct use of this product, correct installation and
adjustment in your vehicle, in accordance with the Instruction Manual provided.
Warranty does not apply in the event of design changes, modifications or
improper repairs, without prior consultation and agreement of Hernik GmbH.
Claims, irrespective of their legal basis, in particular claims for direct or
indirect damages are excluded.
Hernik Kidsflex Handicap Child Car Seats meet the requirements of European
Standard EN 12182 and is labelled according to EU Directive 93/42/EEC.
-11-

Providers of Rehabilitation Technology
Standard Seat Specification (without options)
Kidsflex Child car Seat
We reserve the right to make technical changes.
Kidsflex
Size 1
Size 2
Size XL
Total Height
67 cm
80 cm
90 cm
Back Height Adjustment
43 to 51 cm
49 to 57 cm
58 to 69 cm
Seat Width
27 or 31 cm
31 or 35 cm
36 or 40 cm
Seat Depth Adjustment
28 to 33 cm
34 to 39 cm
40 to 46 cm
Height of Trunk Supports
21 to 25 cm
25 to 29 cm
30 to 36
Width of Trunk Supports
19 to 28 cm
23 to 32 cm
29 to 40 cm
Approved
25 kg
36 kg
75 Kg
Nameplate
The nameplate is readily visible on the Kidsflex
The Nameplate:
HERNIK GmbH –Agents for Rehabilitation
HERNIK GmbH - Agentur für Reha
–
Technik
Technology
Partenhauserweg 14 –81369 München
Partenhauserweg 14 –81369 München
Kidslover Gr. 1
Kidslover Gr. 2
Serial No:
Serien- Nr.:
max. Load: 25 Kg
max. Belastung: 36 Kg
Read Instruction Manual Before Use
Lesen Sie vor Gebrauch die Bedienungsanleitung
Agentur für Reha –Technik
Partenhauserweg 14
81369 München
Tel.:
089 / 714 41 76
Fax.:
089 / 780 69 309

Instructions for use: ISOFIX –Mounting Bracket
Our seats are available with an Isofix Adapter Bracket option, in place of the regular clamp style Stability
Bracket. The Isofix Adapter Bracket allows the seat to locate to existing Isofix attachment points in all cars
after 2006. As it is a mechanical connection the Isofix Adapter Bracket offers more support and greater stability
for the child seat in the car.
Caution: Our Isofix Adapter Bracket is for location and stability purposes only, the vehicles
3-point seat belt must always be used to secure the passenger. Please read carefully and
understand the User Instructions provided with your car seat.
Installation:
1. Position the Isofix Adapter Bracket into the
rectangular tubes provided to the rear of the base
plate on the seat. Turn both Allen screws (1) each
side but do not tighten.
2. Extend (slide) the isofix bracket out from the
seat and pinch tighten the Allen screws (1)
3. Line up the Isofix latches with the car’s Isofix brackets
then push the car seat back on both sides until a clearly
audible click is heard from both Isofix latches.
4. Set the required angle of the car seat
backrest (see User Instructions).
Now loosen both Allen screws (1) both sides,
slide the car seat against the backrest of the
vehicle seat, ensuring there is contact.
5. Tighten both Allen screws on both sides to
lock the Isofix Adapter Bracket in place.
6. Secure the Isofix latches from inadvertent
opening by tightening the thumbscrews (2)
provided both left and right side.
7. Check to verify that the Isofix latches are securely
locked in place.
12
Removal :
1. Loosen both thumbscrews (2), left and right.
2. Pull both thumbscrews simultaneously, forward
toward the child seat to unlock the Isofix latches.
3. You may now remove the car seat.
12
Table of contents
Other Hernik Car Seat manuals


Popular Car Seat manuals by other brands


Britax
Britax BOB B-SAFE E9LT34A instructions

Nordic Cap
Nordic Cap Explorer manual

FableKids
FableKids NOBLE Original user manual

Peg-Perego
Peg-Perego BASE TWIST Instructions for use

BEBE CONFORT
BEBE CONFORT Windoo Plus Instructions for use & warranty

BEBE CONFORT
BEBE CONFORT Pebble Instructions for use & warranty