HeyCafe H1 User manual
1
© HeyCafé Company, Ltd.
Version 3.0, November 2020
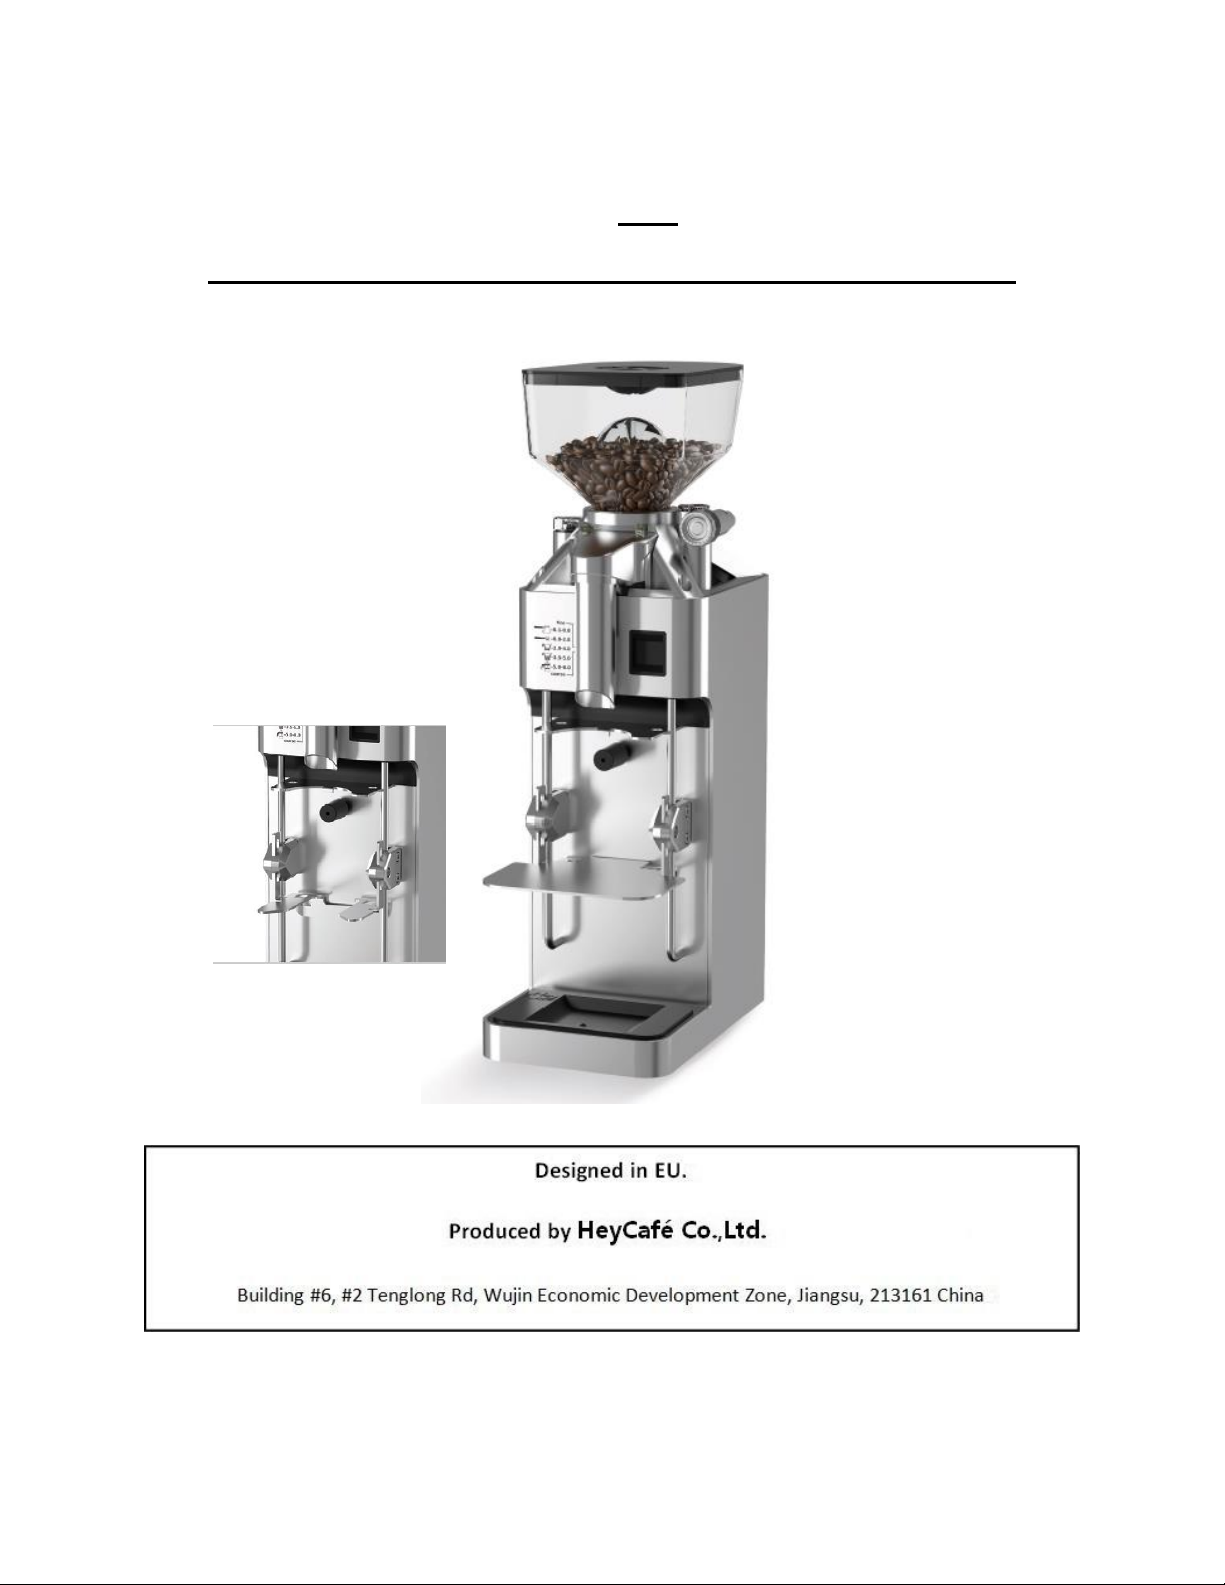
H1
All around professional Coffee Grinder
2
© HeyCafé Company, Ltd.
Version 3.0, November 2020
WARNINGS
This grinder is not intended for use by persons (including children) with reduced physical, sensory or mental
capabilities, or lack of experience and knowledge, unless they have been given supervision or instruction
concerning use of the grinder by a person responsible for their safety.
Children should be supervised to ensure that they do not play with the grinder.
Care is needed when handling cutting disks during cleaning.
If the supply cord is damaged, it must be replaced by the manufacturer or its service agent or a similarly
qualified person in order to avoid the risk of electric shock.
Correct Disposal of this product
This marking indicates that this product should not be disposed with other household wastes throughout the EU.
To prevent possible harm to the environment or human health from uncontrolled waste disposal, recycle it
responsibly to promote the sustainable reuse of material resources. To return your used device, please use the
return and collection systems or contact the retailer where the product was purchased. They can take this product
for environmental safe recycling.
Warranty Information
The manufacturer provides warranty in accordance with the legislation of the customer's own country of residence,
with a minimum of 2 years, starting from the date on which the grinder is sold to the end user.
The warranty only covers defects in material or workmanship.
The repairs under warranty may only be carried out by an authorized service center.
When making a claim under the warranty, the original bill of purchase (with purchase date) must be submitted.
The warranty will not apply in cases of:
Normal wear and tear Incorrect use, overloading of the grinder, use of non-approved accessories, use of force,
damage caused by external influences, damage caused by nonobservance of the user manual, connection to a nun
suitable mains supply or noncompliance with the installation instructions. Partially or completely dismantled
grinders

3
© HeyCafé Company, Ltd.
Version 3.0, November 2020
TABLE of CONTENTS
1) Preface……………………………………………………………………………………………….4.
2) Technical Specifications …….………………………………………………………………4.
3) General Description ……………………………………………………………………..……5.
4) Unpacking and installation ………………………………………………………………..5.
5) Operation……………………………………………………………………………………………6.
6) Safety devices…………………………………………………………………………………….7.
7) Safety instructions………………………………………………………………………….….8.
8) Maintenance and service…………………………………….……….…………………….8.
9) Cleaning…………………….……………………………………………………….………………10.
10) Remarks and important details………………….…………………….……………….11.
4
© HeyCafé Company, Ltd.
Version 3.0, November 2020
1) PREFACE
Congratulations for purchasing the H1 commercial coffee grinder. The H1 was designed as an all-around
professional grinder with wide range of grinding settings, from as fine as Turkish coffee to espresso and different
filter-coffee brewing (including cupping tests).
The H1 coffee grinder is suitable for different commercial operations such as coffee shops, grocery shops, coffee
labs and offices.
The H1 coffee grinder features:
1. Belt drive system that separates motor’s heat from the grinding chamber
2. All Aluminum body and grinding chamber with cooling fins
3. BottomSetting® grinding setting mechanism with encoder measurement
4. 64mm flat burrs
5. Unique body design that allows using the grinder for different coffee brewing systems
Read this manual from cover to cover before using the grinder as it contains important safety, operations and
maintenance instructions. Keep the manual in a safe place for future reference. The manufacturer reserves the
right to modify the grinder and the manual accordingly. This manual can also be downloaded at www.heycafe.com
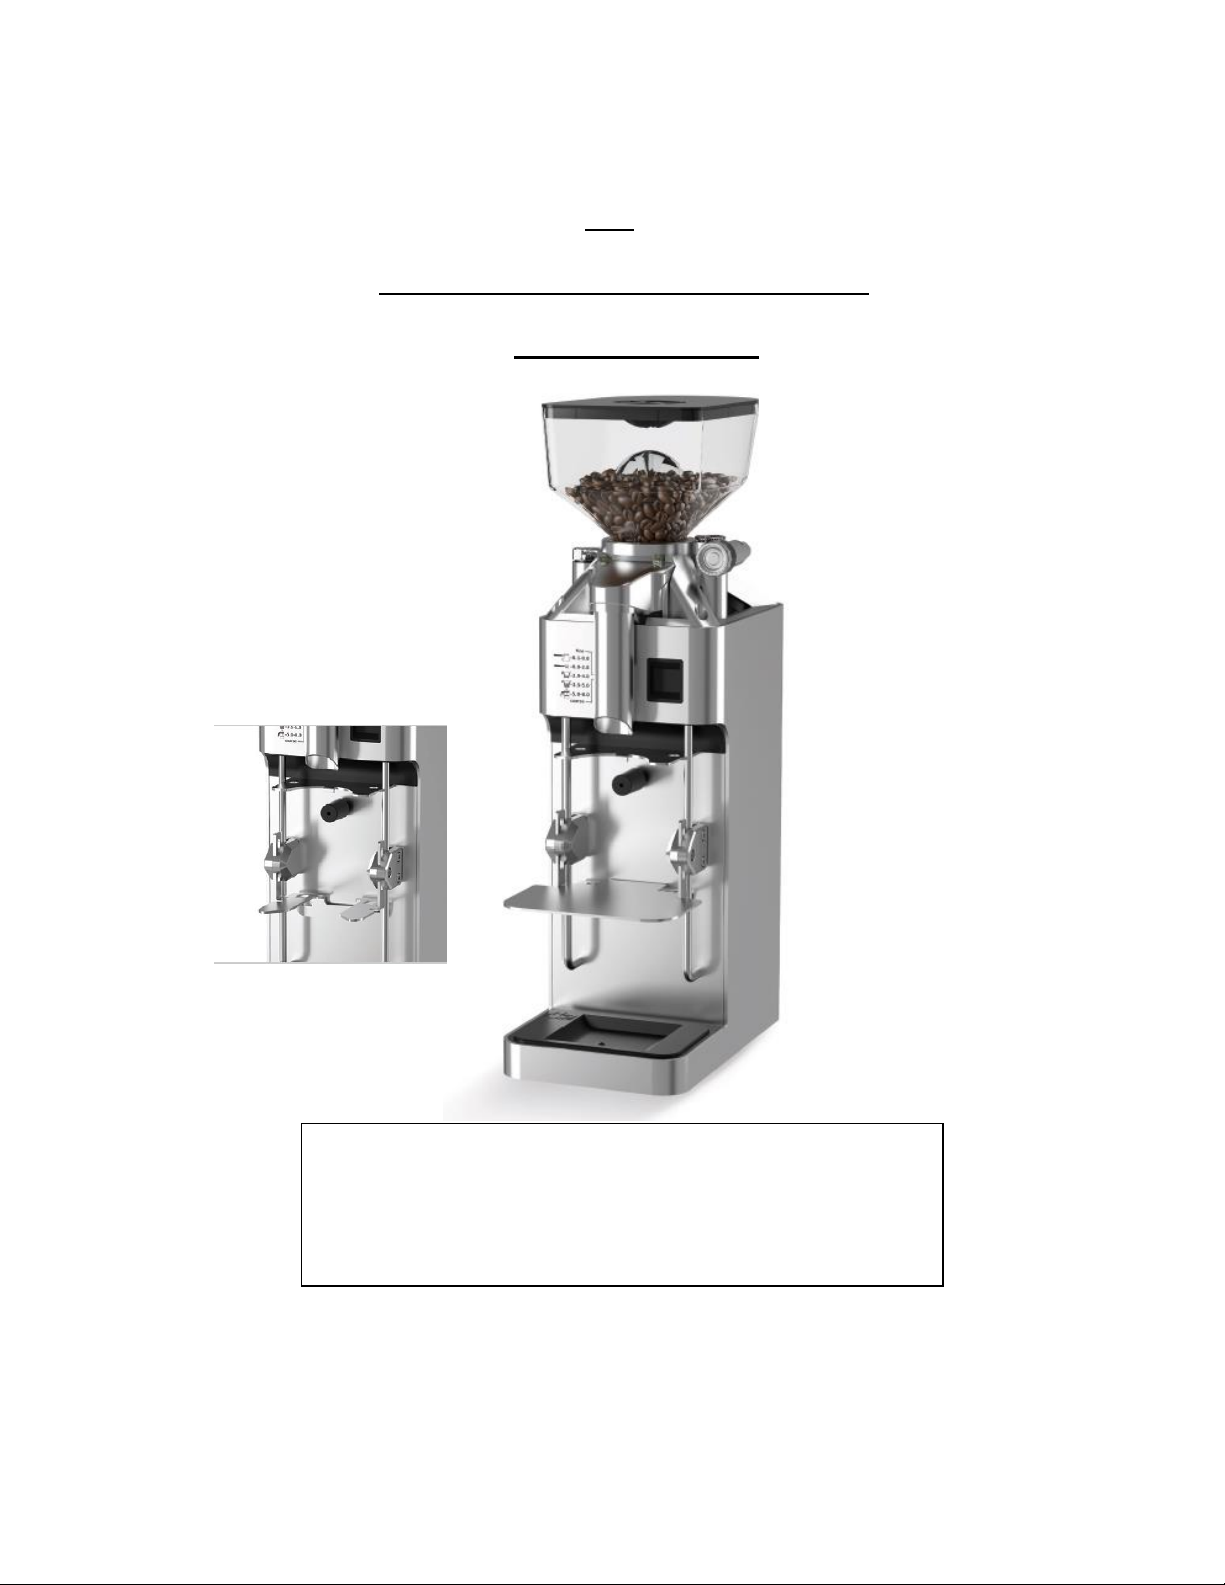
2) TECHNICAL SPECIFICATIONS H1
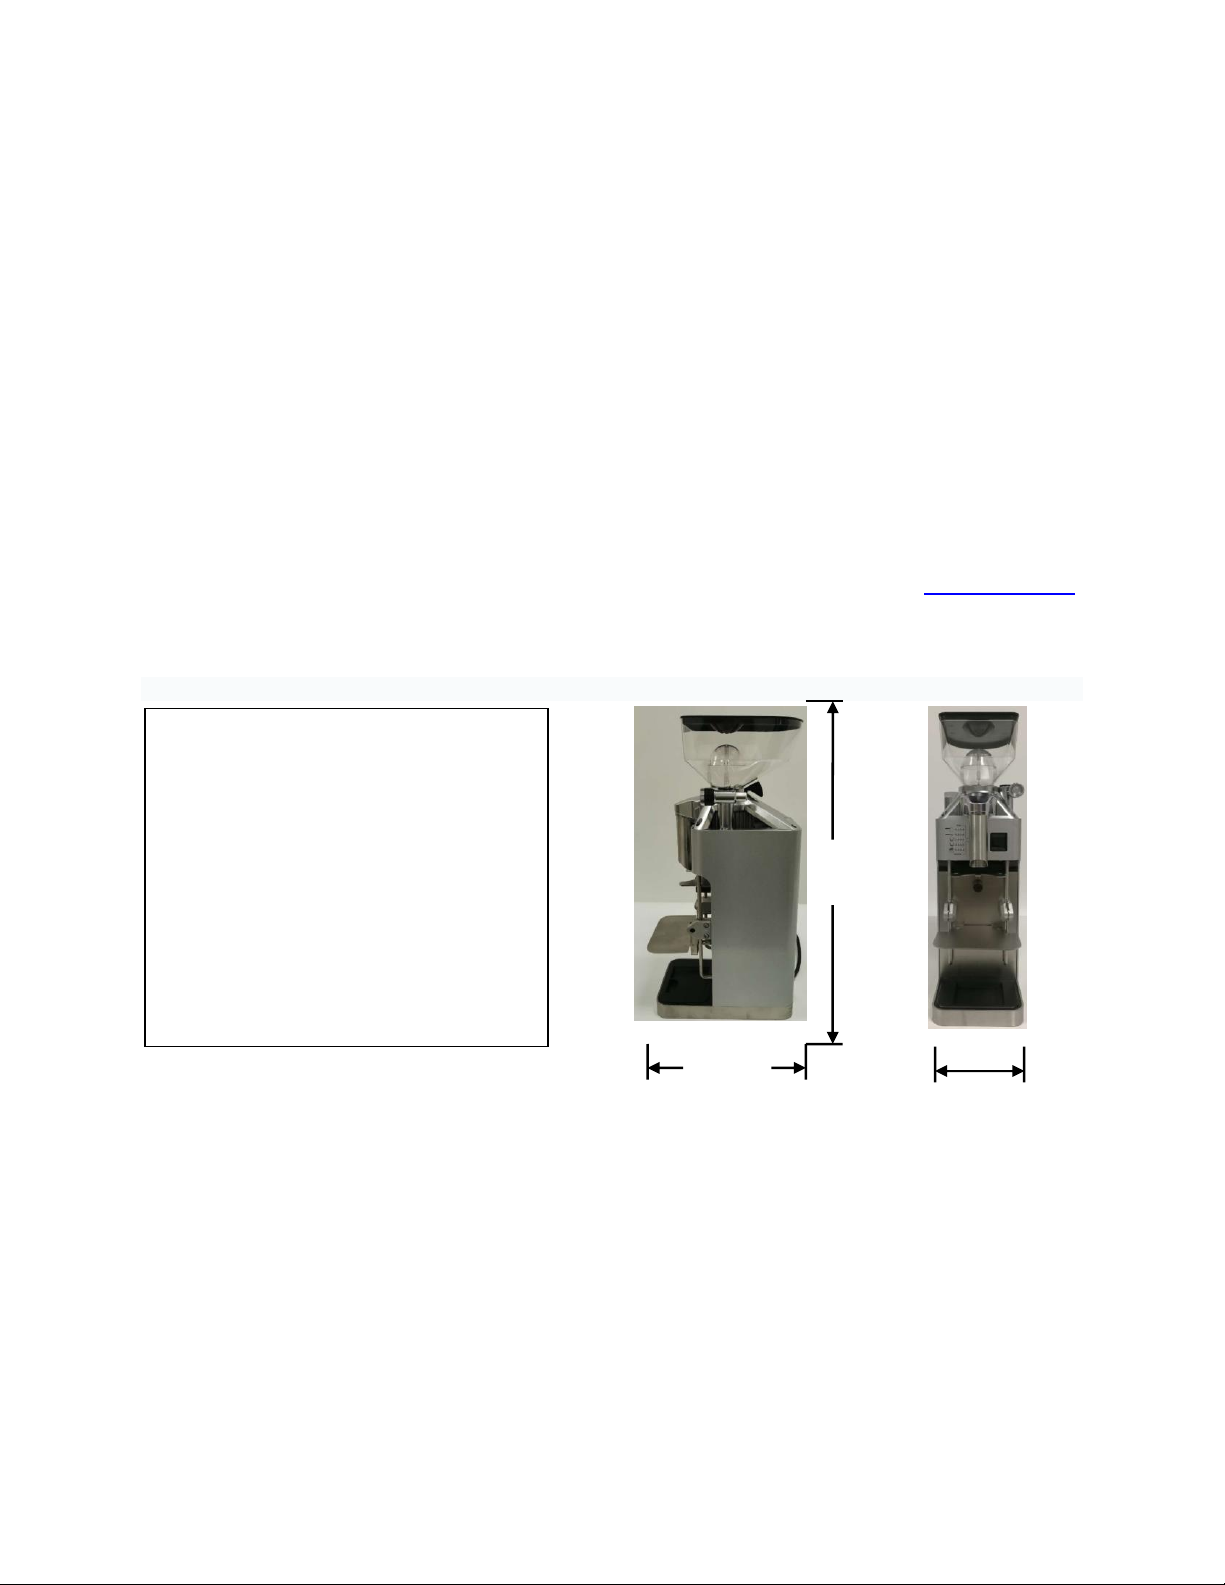
Dimensions: (view picture on right)
Height: 470mm
Width:138mm
Length:230mm
Weight: 6.5kg
Burrs diameter: 64mm (flat type)
Each hopper capacity: 380gr. Coffee beans
Electrical Specifications:
Voltage: 110V/ 230V 50Hz/60Hz
Power: 200W
Duty Cycle: 40%
Grinding capacities: 2.5-3g/second
230
470
138

5
© HeyCafé Company, Ltd.
Version 3.0, November 2020
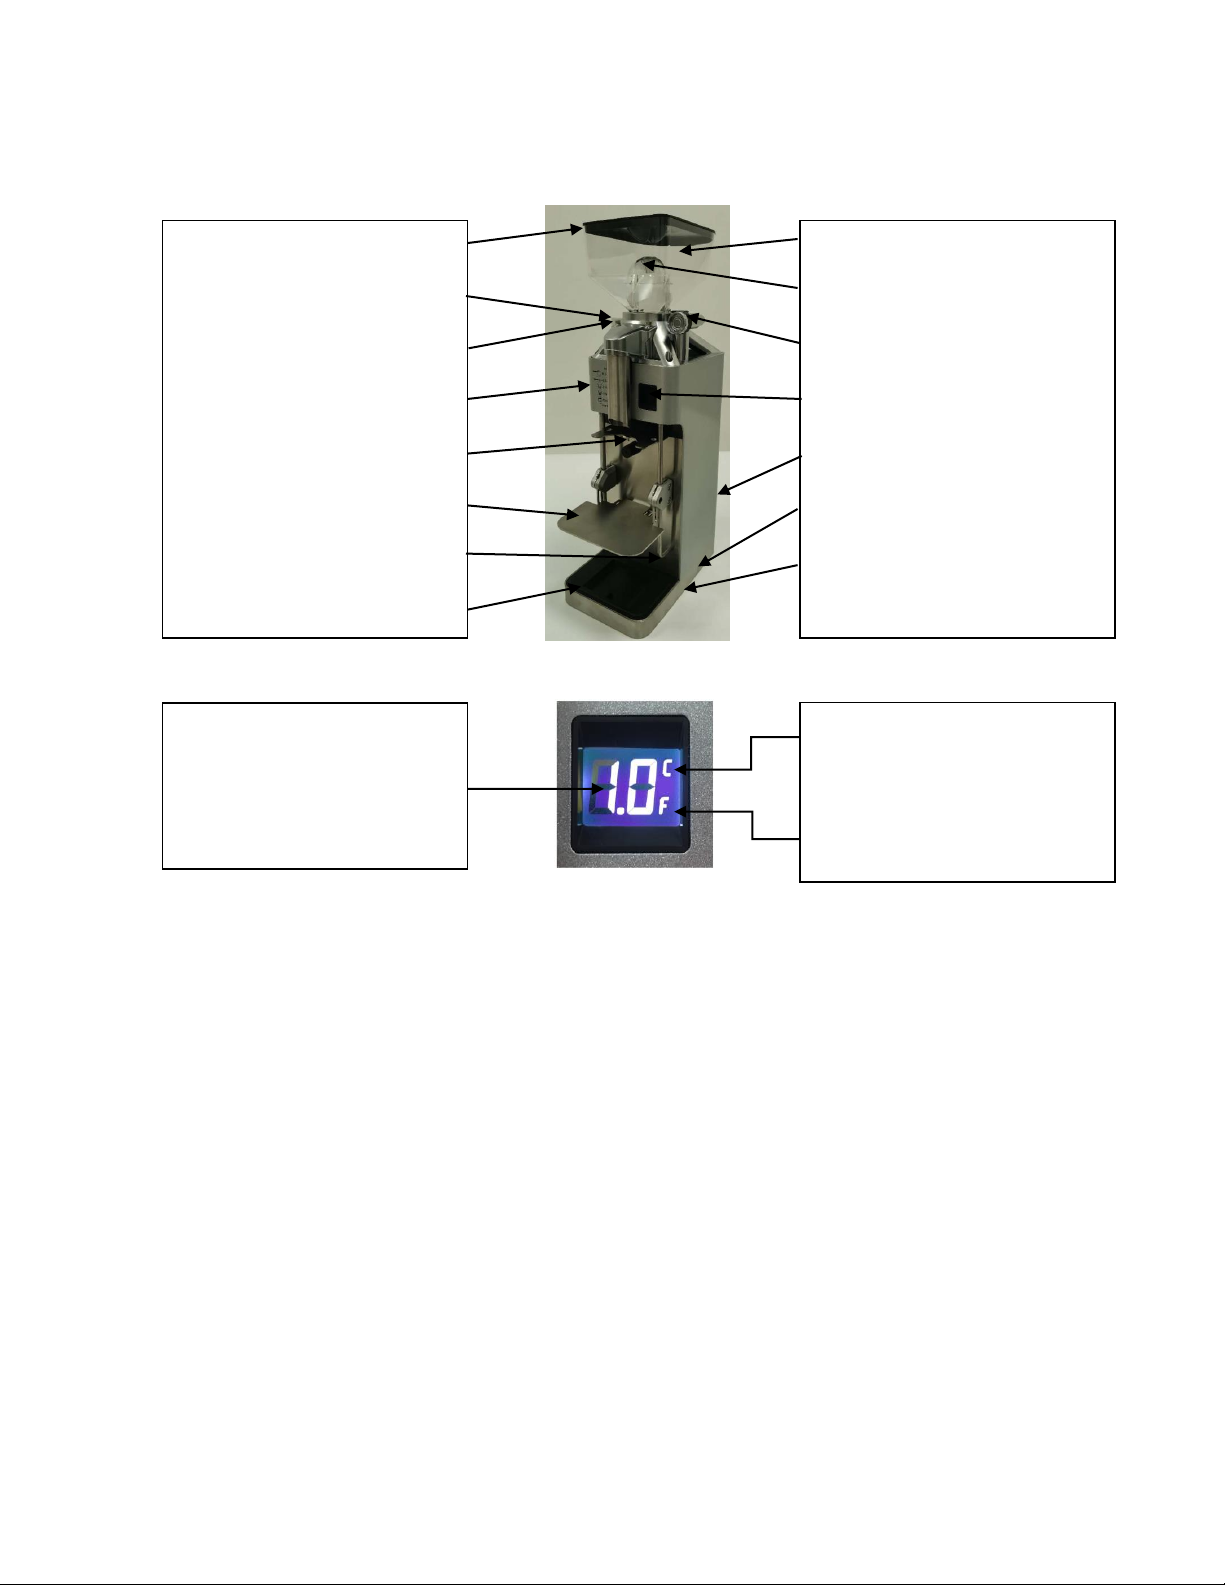
3) General Description
Grind setting display (LCD)
4) UNPACKING AND INSTALLATION:
Unpack the carton box carefully. For your convenience, it is suggestable to store all the packaging materials
where they can be used whenever the grinder’s transportation is needed.
After opening the box, make sure that the grinder is in one piece and there is no visible damage. If you have
any doubt about the grinder’s condition, DONOT use the grinder and call your local dealer for further
assistance.
Place the grinder on a stable flat counter in a dry area away from water or water splashes and away from
direct sun.
This product was not design for outdoor use.
Position the coffee residue tray inside the grinder’s base frame.
Before plugging in the electrical cord, make sure:
oThe grinder voltage rating (per grinder’s label on the bottom base) is matching the supply mains.
oThe wall socket is fitted with an efficient grounding (Earth) contact.
oPlug in the grinder into the supply mains ONLY after the ground system was inspected and verified to
follow your country’s electric safety rules.
oIT IS COMPULSORY USING A GROUNDED POWER CABLE. The manufacturer cannot be held
responsible if this regulation was not complied with.
oThe power consumption of the grinder (per grinder’s label) is consistent with the relevant wall socket
capacity.
oThe wall socket is protected against short cuts and power surges.
oDo not use extension cables, plug adapters for multiple sockets, or make shift connections.
Plug in the grinder
NEVER OPERATE THE GRINDER IF THE BEAN HOPPER IS NOT FULLY INSTALLED.
Beans’ hopper lid
Demand push button (2)
Running signal light
Grinder’s body
Demand push button (1)
Portafilter support/cup tray
Universal accessories holder
Coffee residue tray
Beans’ hopper
Beans’ hopper finger protector
Grinding setting knob
Grind setting display (LCD)
Main power switch (on back)
Grinder’s base
Fuse housing (on bottom)
Coffee grind coarseness
C= grind setting coarser, (CW)
F= grind setting finer, (CCW)
6
© HeyCafé Company, Ltd.
Version 3.0, November 2020
5) OPERATION
General description of the H1 grinding
The H1 grinder is a manual grinder and can be operated by two ways:
oPressing the demand button on the grinder’s front cover.
oPressing the Jog switch (combined with the operation lamp)
Note:H1 core grinder own power switch on the machine back(Fig.5.1).So make sure the powder switsh is ON
before you operating the machine.
Grinding coffee with the H1:
Open the beans lid and fill a suitable amount of coffee beans into the hopper. Maximum capacity is 380gr.
(0.83Lb) At first operation it is recommended to fill in minimal quantity of beans.
Safety Note: the original hopper must be fully installed before using the grinder.
Set the desired grinding coarseness by turning the setting knob according the LCD reading. The grinder is
factory set to meet Espresso coarseness.
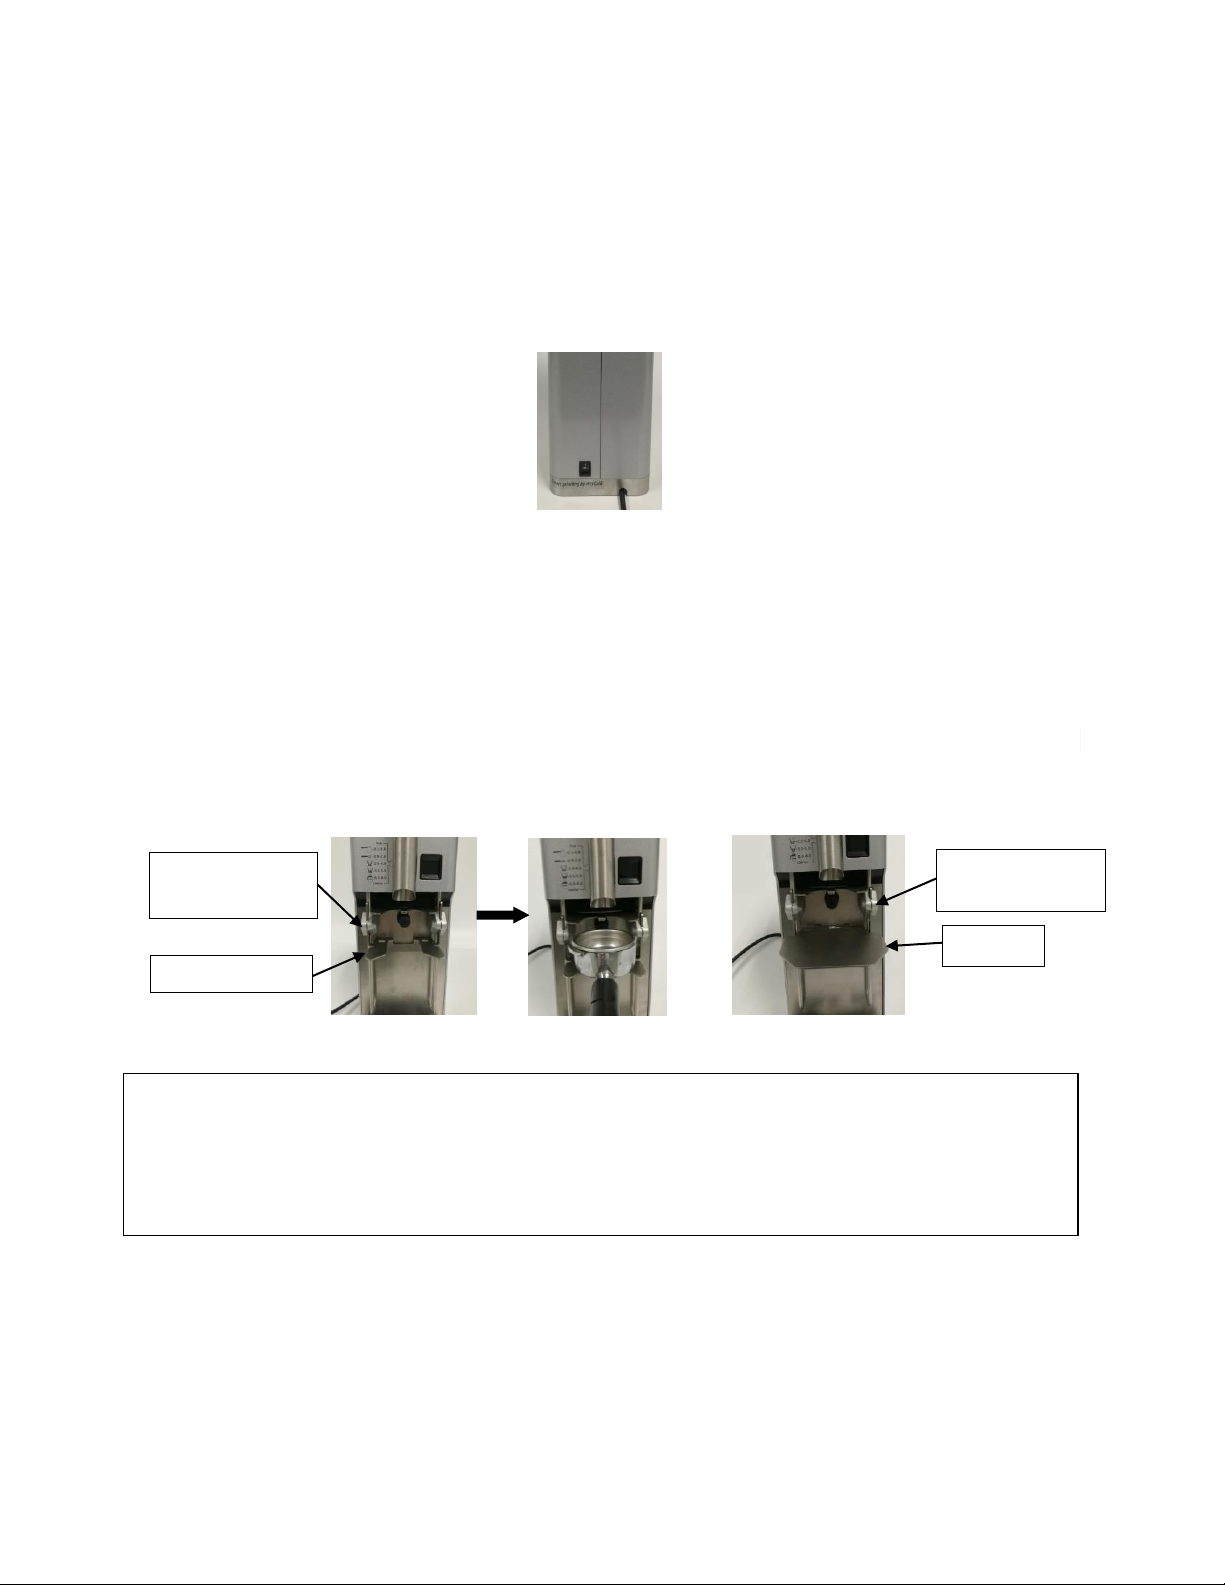
Adjusting the height of the portafilter support(Fig.5.2) according the portafilter needs. When there is a coffee
cup needs,you can use the cup tray which is package in tooling bag,then it can directly support by the
portafilter holder (Fig.5.3). If you need to adjust the height slightly, just loosen one screw on each side(Fig.5.2).
If you need to adjust the height significantly, just loosen three screws on each side(Fig.5.3).
Then place a porta filter handle or any collecting container under the outlet chute and use the demand switch
to operate the grinder.
Adjusting coffee grind coarseness
The grinding disks’ distance range was factory pre adjusted to satisfy different common coffee grinds (from
super fine to coarse).
The H1 is provided with a revolutionary accurate Grind Setting Measurement system (GSM) which is based on
an encoder measurement. Measurement reading is continuously displayed on the LCD. Measurement range is
0.1-8.0 (steps of 0.1), refer to the table below (Fig.5.4) for the correlation between the different measurement
Operating intervals:
The grinder was not designed to be used continuously for periods exceeding 90 seconds
The H1 grinder’s duty cycle is 40%(40% of the time grinding; 60% of the time resting)
It is a normal occurrence that during a long grinding periods the grinding chamber will heat up. To achieve
best grinding results, grind coffee in short intervals of a few seconds each.
Fig.5.3
Loose the front
screw on each side
cup tray
Fig.5.2
Fig.5.1
Portafilter support
Loose three
screws on each
side

7
© HeyCafé Company, Ltd.
Version 3.0, November 2020
to different type of brewing.
Turning the grinding dial incrementally counter clockwise direction will make the grind finer (letter F will
appear on the LCD) and turning it clockwise will make the grind coarser (letter C will appear on the LCD).
LCD reading
Coffee Brewing style
0.1-0.8
Turkish coffee
0.9-2.8
Espresso coffee
2.9-4.0
Super Automatics
3.5-5.0
Filter Coffee
5.0-8.0
French Press
Fig.5.4
When grinding the Turkish coffee powder, you need remove the outer flapper (Fig.5.5). Then when grinding
other types of coffee powder, you need keep the outer flapper. H1 coffee grinder default factory setting is 3.5.
Fig.5.5
H1 coffee grinder has the memory function, so you can adjust the dial knob whenever it’s plugged or not.The
display screen will always show the correct digits. Also no matter in any case you suspect the dial system’s
display digit’s setting,please refer to chapter 8 for GSM recalibration.
Grind a small amount of coffee and test its coarseness with your espresso machine.
As coffee beans’ qualities and characteristics are changing from time to time it is recommended repeating this
adjustment occasionally.
6) SAFETY DEVICES
A) Over current fuse protector
To eliminate the risk of fire the motor’s driver is equipped with an over-current fuse that is limiting the current
consumption of to the grinder.
If the over current fuse was tripped as a result of malfunction (e.g.: jammed disks, worn out bearings, foreign
object in grinding chamber, etc.) the main power plug must be disconnected.
oSet the grinder’s setting to most coarse
oClose the hopper door and remove the hopper
oEntirely empty the beans hopper into a container by turning the grinder upside down
oManually release any obstacle from the grinding chamber till you can freely turn the grinder’s shaft
oVisually inspect the driving belt and the grinding disks. In case any of them require replacement Refer
to section 8) for “Belt replacement instructions”, “Grinding disks replacement” and ”Fuse
replacement instructions”
oAlways replace the tripped fuse with the same size and capacity fuse (the grinder is originally
equipped with one spare fuse use the tripped fuse to get an identical replacement).
oIf after all the above steps were provided and the fuse is still tripping, then for further handling of the
grinder contact your local dealer.
If the fuse was tripped as a result of a long continuous grinding operation (read section 5, for operating
intervals) allow the grinder to cool down and replace the fuse protection with an identical new one.
B) Beans hopper
The grinding chamber can be a hazardous area if the proper precautions aren’t observed.
8
© HeyCafé Company, Ltd.
Version 3.0, November 2020
NEVER OPERATE THE GRINDER WITHOUT THE BEANS’ HOPPER
The grinder is equipped with safety switch that preventing grinding operation when beans hopper is absent.
In case the safety switch is malfunction don’t continue using the grinder and send the grinder for service with
your local dealer.
7) SAFETY INSTRUCTIONS
NEVER OPERATE THE GRINDER WITHOUT BEANS’ HOPPER. BEFORE REMOVING THE BEANS HOPPER (FOR ANY
REASON) MAKE SURE TO DISCONNECT THE POWER SUPPLY.
BEFORE CLEANING OR SERVICING THE GRINDING CHAMBER OR THE BEANS HOPPER, DISCONNECT THE
POWER PLUG FROM THE POWER SOCKET.
Never attempt to insert your fingers or any foreign objects into the grinding chamber or disks.
Be aware that grinding disks continue rotating for a short while after the grinding operation has ended.
Never bypass or tamper with the HOPPER safety switch or the grinder
Do not use the grinder barefoot or if your hands or feet are damp
Do not use the cable wire to pull and disconnect the power plug
Always keep the grinder dry (internally and externally)
Never put grinded coffee into the hopper or try to regrind coffee powder
The H1 is a COFFEE GRINDER, never attempt grinding anything else other than roasted coffee beans.
Keep all packing materials and the provided tool-bag away from children these items are not toys and can be
harmful if wrongly handled
Please make sure the socket is with correct wires connection,and ground connection is well funtional also.
8) MAINTENANCE AND SERVICE
Warning: grinder’s maintenance and repair should be performed by certified personnel or by your
local dealer. The procedures described below are the only user-level allowed maintenance
procedures.
Be aware of the grinder’s noise level. In case the noise level is higher than normal or irregular noises are coming
from within the grinder, get certified personnel to perform an overall check of the grinder.
A) GSM LCD calibration
1. In any case where you suspect the measurement display is not consistent with the real setting of the grinder
please follow the below steps to recalibrate the setting.
2. Close beans hopper door and turn on the grinder till running empty.
3. Turn the grind setting handle CCW (F on the LCD) till reaching minimum setting
4. Lean the grinder back and press shortly on the reset button (Fig. 8.A.1) the display will show again 0.1
5. Turn the grind setting handle back to your desired grinding setting and check that coarseness matches your
need.
*Remark: if after calibration the grind setting display and actual coarseness are still not matching please contact
your grinder’s dealer.
Fig.8.A.1

9
© HeyCafé Company, Ltd.
Version 3.0, November 2020
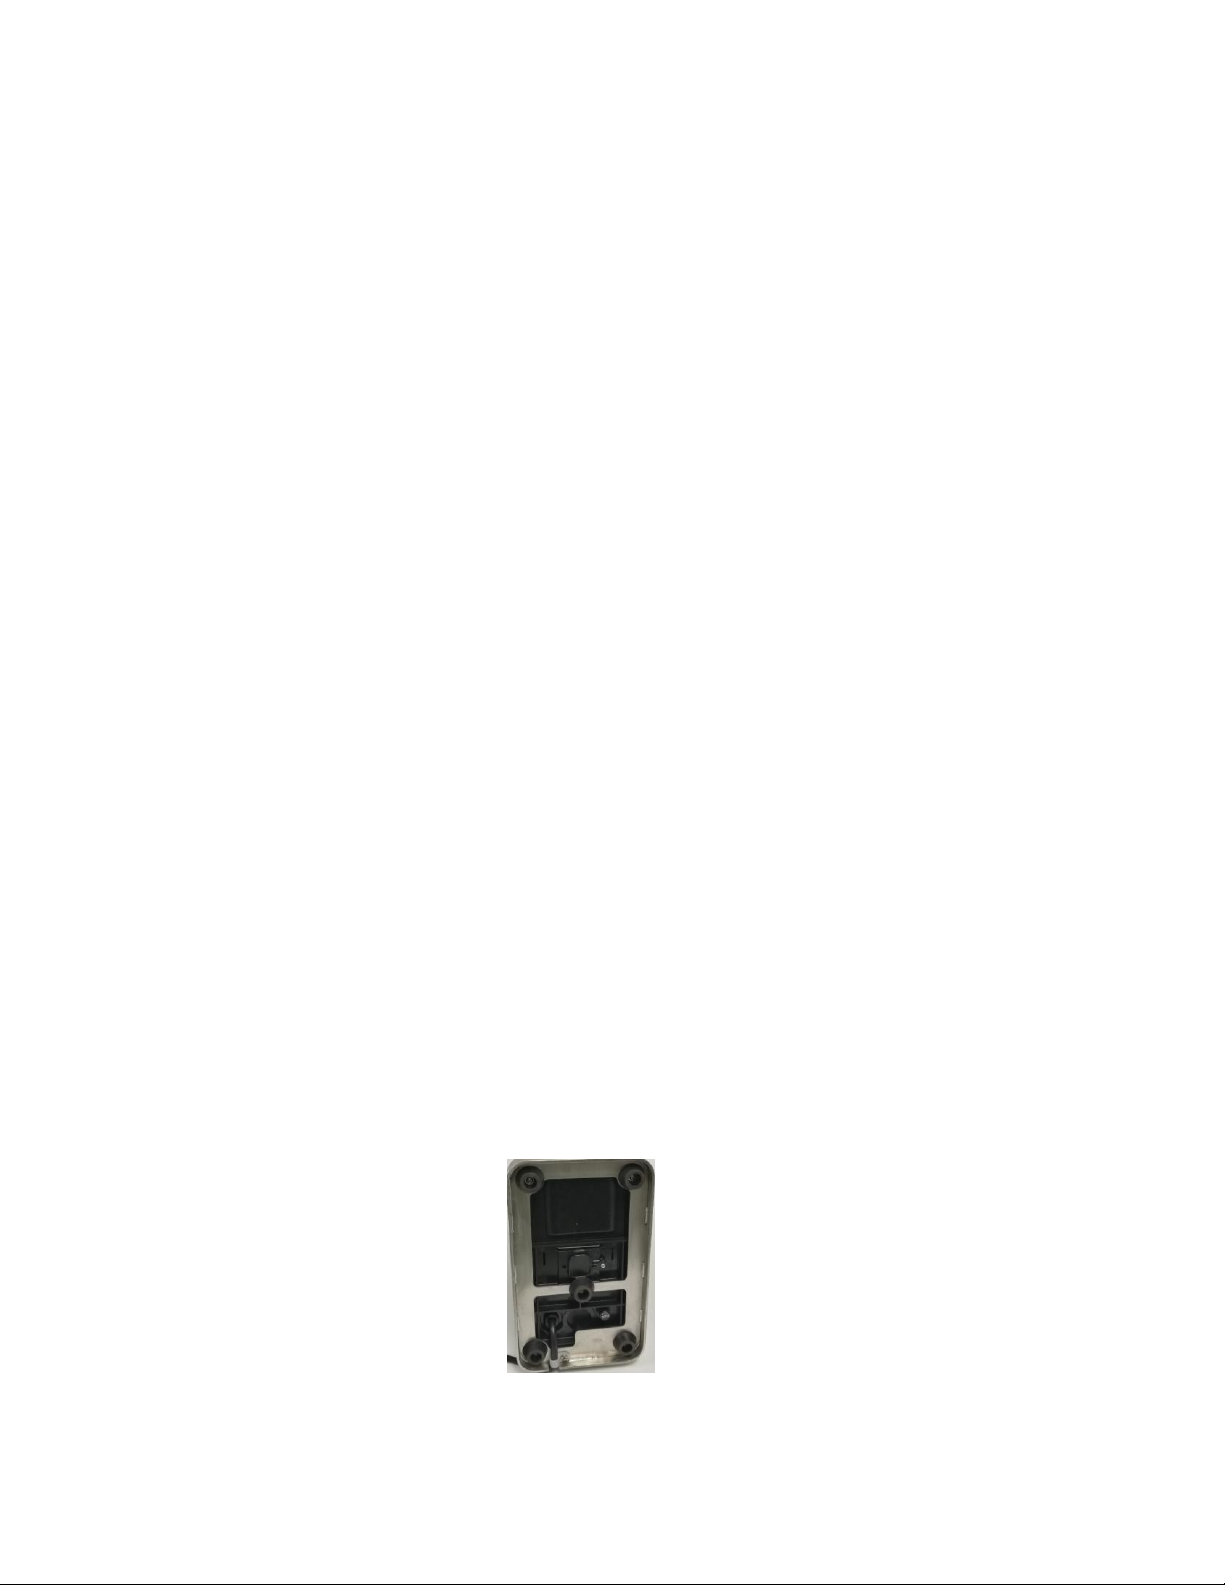
B) Over current fuse replacement
1. Turn OFF main switch and disconnect the main power cable.
2. Remove the beans hopper and turn H1 grinder upside down (Fig. 8.B.1). Turn the “FUSE” knob(Fig. 8.B.2).
3. Replace the tripped fuse with an identical size and rating fuse(Fig. 8.B.3)
4. Close the fuse housing; repeat the above steps in opposite order for closing and reconnecting the grinder.
C) Grinding disks replacement:
Check the state of the grinding disks periodically (approximately every 50kg of grinded coffee) good condition disks
will result in a high-quality grind and prevent the Grinder’s overheating.
Recommended grinding disks replacement:
Every 500-700Kg of grinded coffee (when using standard HeyCafé disks)
Every 1000-1500Kg of grinded coffee (when using Ditting original disks)
Warning: The replacement and assembly of a new set of disks is a delicate task. Perform blade removal and
assembly only if you are confident with your technical skills and after reading and understanding the entire
instructions below.
1. Grind thoroughly the entire left over beans
2. Disconnect main power plug
3. Remove hopper and hopper lid
4. Use the provided Allen key to remove the top spider construction (Fig.8.D.1)
5. Release the four top blade holder screws to expose the grinding chamber (Fig.8.D.2)
6. Use the flat screw driver to release the blade screws (3 of each blade) (Fig.8.D.3)
7. Before starting to assemble the new disks make sure the entire grinding chamber is clean (use brush,
vacuum cleaner and dry clean cloth) (Fig.8.D.4)
8. Use original replacements’ parts to assemble the new disks on the disks sitting and secure them with new
stainless-steel screws
9. Assemble the grinder following backward the above steps.
Note: return the dial knob to the same position (knob against the finest grinding setting stopper)
Fig.8.B.1
Fig.8.B.2
Fig.8.B.3
Fig.8.C.1
Fig.8.C.2
Fig.8.C.3
Fig.8.C.4

10
© HeyCafé Company, Ltd.
Version 3.0, November 2020
D) Driving belt replacement
The H1 grinder is equipped with a Lifetime warrantied drive belt (for normal usage of the grinder). Yet, it may
happen that jammed disks or improper grinded substance will result an abnormal wear of the belt and the need to
replace it. Always use an original HeyCafé belt as a replacement part. Follow the steps below to replace the belt:
1. Repeat steps Fig.8.C.1.
2. Open the screw connecting the grinder to the body
3. Pull out the grinder and grinder connecting plate
4. Release the motor tensioning screw to remove the drive belt
5. Replace the drive belt and tension back the motor .
6. Place the motor back to its original position make sure to assemble the outlet rubber ring
7. Repeat the steps above backwards to back assemble the grinder
9) CLEANING
PRIOR TO ANY CLEANING PROCEDURE GRIND COMPLETELY EMPTY (OR EMPTY THE BEANS’ HOPPER) AND
DISCONNECT THE GRINDER’S POWER SUPPLY.
NEVER USE RUNNING WATER TO CLEAN THE MAIN BODY.
USE ONLY PERFECTLY CLEAN CLOTHS OR SOFT BRUSHES TO CLEAN THE GRINDER.
WIPE THE EXTERANL BODY WITH WET CLOTH
DO NOT USE ABRASIVE CLEANING PRODUCTS AS THEY MAY SCRATCH THE GRINDER’S COATING.
Cleaning the beans’ hopper
Pull out the bean hopper (make sure to leave the silicone rubber ring on the grinder) and rinse it thoroughly with
water and soap. As the bean hopper is made of clear polymer, use only liquid detergent (free of abrasive
components) and soft sponge. Before reinstalling the beans hopper back to its position, make sure it is dried
thoroughly. To ensure great coffee taste, clean the bean hopper periodically.
Cleaning the powder chute pipe
Remove the nozzle body, use screwdriver to remove the chute pipe (Fig.9.1),
Clean the outlet chute slope (Fig.9.2) and chute pipe (use brush or vacuum cleaner), Install the cleaned chute pipe
and install the nozzle body.
Cleaning the grinding chamber and grinding disks
In order to clean the grinding chamber HeyCafé is recommending the usage of commercially provided cleaning pills.
Follow manufacturer instructions. In any case
Do not use sharp objects to scrape coffee deposits off of the disks.
After all cleaning and replacing tasks are through make sure to assemble all the parts the same way as they were
disconnected. If anything does not fit back together or there are some leftover parts, do not attempt to operate
the grinder, call for the assistance of your local dealer.
To ensure long lasting grinder and great fresh taste of coffee, the cleaning procedure
as described above should be repeated periodically and at least once per month or as necessary
according the grinder’s usage and quality of beans.
END
Fig.9.1
Fig.9.2
11
© HeyCafé Company, Ltd.
Version 3.0, November 2020
10) Remarks and important details
Add your remarks here
#
Date
Event
Remark
Important details and telephone numbers:
Local dealer
Address: ________________________________________________________________
Telephone number: ____________________Fax number:_______________________
Technician mobile number: ____________________name: __________________
Coffee beans supplier details:_________________________________________________________________
Telephone number: ____________________Fax number:_______________________
1
赫意凯(常州)电器设备有限公司
Version 3.0, November 2020
H1
全方位专业咖啡磨豆机
操作说明书
赫意凯(常州)电器设备有限公司
常州市武进经济开发区腾龙路 2号6号厂房
邮编:213161
2
赫意凯(常州)电器设备有限公司
Version 3.0, November 2020
警示
1.该款机器不建议有生理,视觉或精神缺陷的,或缺乏此方面经验和知识的人操作使用(包括儿童
在内),除非有相关负责人授权使用。
2.儿童禁止触碰该磨豆机。
3.在清洁磨豆机时需小心刀片部位,以免划伤。
4.如果发现电源线有损坏,请联系制造商,代理商或相关技术人员维修,以免造成伤害。
废旧产品处理
标志表明此产品不可与其他生活垃圾一同处理。为防止不当处理对环境的污染和人类健康的损害,
请注意材料的合理可再回收使用。请联系当地的经销商或通过回收利用系统回收该废弃磨豆机,以
保证产品安全回收。
质保说明
制造商提供 2年保修期,自该磨豆机销售到终端客户开始。质量保修仅限于零部件和技术支持。在
保修期内,仅限该磨豆机制造厂商授权的服务机构进行维修。在保质期内维修的,请出示原始标有
购买日期的发票.
以下情况不在保修范围之列:
正常损耗和非正常使用造成的损坏,如机器超负荷使用,使用不配套的配件,强行操作,由外部环
境造成的损坏,未阅读说明书而操作失误的,如:连接至不匹配电源或未按照说明安装操作,擅自
整体或部分拆卸机器都不在保修之列。

3
赫意凯(常州)电器设备有限公司
Version 3.0, November 2020
目录
1) 前言……………………………………………………………………………………4
2) 技术参数………………………………………………………………………………4
3) 样品展示………………………………………………………………………………5
4) 开箱与安装……………………………………………………………………………5
5) 操作指南………………………………………………………………………………6
6) 安全装置………………………………………………………………………………7
7) 安全说明………………………………………………………………………………8
8) 维修与服务……………………………………………………………………………8
9) 清洁……………………………………………………………………………………10
10)问题反馈及重要细节…………………………………………………………………11

4
赫意凯(常州)电器设备有限公司
Version 3.0, November 2020
1)前言
欢迎购买使用商用磨豆机H1。H1作为一款全方位的专业咖啡磨豆机,有着广泛的研磨设置,从精细
的土耳其咖啡到意式浓缩咖啡,并适用于不同种类的咖啡过滤器(包括杯测)。H1咖啡磨豆机适用
于不同的商业场所,比如咖啡店,杂货商场,咖啡实验室和办公室等。
H1咖啡磨豆机的特点:
1. 带传动系统,可将电机的热量从研磨室中分离出来。
2. 全铝机身,带散热片的研磨室。
3. 带编码器测量的研磨设置机构BottomSetting®。
4. 64mm平面研磨刀。
5. 独特的机身设计,适用于不同的咖啡过滤器。
请在使用前逐页阅读该说明书,以确保正确安全的使用和保养设备。并请妥善保管说明书,以备日
后使用和参考。厂商保留修改设计及规格的权利。
2)技术参数
尺寸:
高:470mm
宽:138mm
长:230mm
重量:6.5kg
刀片尺寸:64mm
漏斗容量:380g咖啡豆
电气参数:
电压:110V/ 230V 50Hz/60Hz
功率:200W
工作周期:40%
研磨速度:2.5-3g/second
230
470
138
5
赫意凯(常州)电器设备有限公司
Version 3.0, November 2020
3)样品展示
研磨设置显示屏(LCD)
4)开箱与安装
请小心拆箱。为了您的方便,我们建议请妥善保存包装以备日后运输机器使用。
打开包装箱后,确认机器完好无损。如有任何疑问,禁止使用并立即联系当地经销商。
请将机器放在平稳干燥处,避免滴水或溅水。
本产品不是为户外使用而设计的。
请将托盘放在机身底座上。
接通电源线前请确认:
o机器电压及额定频率(参照机身底部标贴)与供电电源一致。
o墙式插座须配有有效的接地线系统。如果接地系统未被检查是否与安全电流量相符,切
勿接通电源。电源插座的接地安全性必须保证。如未按此规则操作,所引起一切后果厂
商概不负责。
o机器消耗功率(参照机身底部标贴)需与所提供墙式插座的功率相一致。
o注意不要使墙式插座短路或过载供电。
o请勿使用电缆线,多电源插座等非生产厂商推荐的辅助配件。
接通电源
如果漏斗没有完全安装好,请不要使用机器。
漏斗盖
运行指示灯
连续研磨开关
机身
需求按钮
过滤器托架/杯托
过滤器支架
托盘
漏斗
漏斗芯
研磨设置旋钮
研磨设置显示屏(LCD)
电源控制开关(机身背面)
底座
保险丝座(机身底部)
咖啡研磨粗度测量值
C= 研磨粗度设置, (CW)
F=研磨细度设置, (CCW)

6
赫意凯(常州)电器设备有限公司
Version 3.0, November 2020
5)操作指南
H1磨粉操作:
H1咖啡磨豆机为手动研磨机,分别有以下两种操作模式:
o按压机身前盖上的需求按钮。
o按压连续研磨按钮 (运行指示灯亮起)。
注意:H1咖啡研磨机在机身的背面设有电源控制开关(图5.1)。故在操作研磨机之前,请先
确保此电源控制开关为打开状态。
H1研磨咖啡粉:
打开漏斗盖,将适量的咖啡豆倒进漏斗中。漏斗的最大容量为380克。第一次操作时,建议倒
入最少数量的咖啡豆(0.83磅)。
安全提示:在使用咖啡磨豆机之前,必须将漏斗完全安装完毕。
通过旋转LCD读数旋钮来设置咖啡粉的粗细,磨豆机在出厂时,会统一按照浓缩咖啡粉的粗细
度进行原始设置。
首先根据您所使用的接粉器,来调整过滤器托架的高度,使其适配您当前所使用的接粉器(图
5.2)。您也可以使用工具包中附带的杯托,将其安装在支架上,从而适配更多不同类型的接
粉容器(图5.3)。如果需要轻微调整过滤器托架的高度,只要松掉两边各一颗螺钉即可(图5.2)。
如果需要大幅度调整过滤器托架的高度,则需要松掉两边各三颗螺钉(图5.3)。
然后在出粉管下方放置一个咖啡过滤器手柄或者任何可以收集咖啡粉的容器,按下需求开关进
行咖啡粉的研磨。
咖啡粉粗细度的调节:
研磨刀的距离是工厂预先设定的,以满足不同的普通咖啡粉(从超细到粗)。
H1咖啡磨豆机提供了一个革命性的基于编码器测量的精准研磨设置测量系统(GSM)。测量读
数连续显示在液晶显示屏上。测量范围为0.1-8.0(初始值为0.1),不同的测量数值范围对应
操作时间间隔:
磨豆机每次连续使磨粉的时间不能超过90秒。
H1咖啡磨豆机的占空比为40%(在一个工作周期内40%的时间在研磨,60%的时间在休息)。
在长时间的研磨过程中,研磨室温度升高为正常现象。为了达到最好的研磨效果,建议每研
磨一次咖啡粉后,间隔几秒钟再进行再次的研磨工作。
图5.3
过滤器托架
杯托
图5.2
图5.1
松动两边各一颗
螺钉
松动两边各三颗
螺钉

7
赫意凯(常州)电器设备有限公司
Version 3.0, November 2020
不同类型咖啡酿造风格,具体参数见下表(图5.4)。
逆时针方向旋转调节旋钮,使研磨更精细(LCD上显示字母F)。顺时针方向旋转调节旋钮,使
研磨更粗糙(LCD上显示字母C)。
LCD数值
咖啡酿造风格
0.1-0.8
土耳其咖啡
0.9-2.8
意式浓缩咖啡
2.9-4.0
细虑
3.5-5.0
粗虑
5.0-8.0
冷饮/法式压榨
图5.4
当需要研磨土耳其咖啡粉时,需要取出出粉口处的外挡粉片(图5.5)后再使用机器。而研磨
其他档位的咖啡粉则需保留出粉口处的外挡粉片。磨豆机默认出厂设置为3.5档。
图5.5
H1咖啡磨豆机带有断电操作记忆功能,在不通电情况下操作了调节旋钮时,再次通电开机后会
按对应的刻度来显示。不管出于何种原因,若怀疑当前的系统的设置有偏差,请参阅第8节进
行GSM重新校准。
研磨少量的咖啡粉,用您的咖啡机测试它的粗度。
由于咖啡豆的品质和特性不断变化,建议定期重复测试调整。
6) 安全装置
A) 热过载保护
为了消除火灾的危险,电机配备有过热保护装置,如果电机温度过高,则该过热保护装置将切
断电机的电源。
o如果过热保护装置由于故障跳闸(例如:磨损的刀片,磨损的轴承,研磨室中的异物等),
应立即关闭设备主开关,并且主电源插头必须断开。
o将研磨设置调整到最粗位置。
o关闭漏斗门,拆卸漏斗。
o翻转磨豆机,将咖啡豆全部倒进一个容器里。
o拿掉研磨室中的任何障碍物,直到可以自由转动研磨机轴。
o目视检查传动带和研磨刀片。如需更换,请参阅第8节中的“更换皮带说明”,“更换
研磨刀片”和“更换保险丝说明”。
o要始终使用相同尺寸和容量的保险丝更换跳闸保险丝(磨豆机原本有一个相同尺寸与容
量的备用保险丝,以便用于更换跳闸的保险丝)。
o如果在完成以上所有的步骤后,保险丝仍在跳闸。那么需要进一步处理磨豆机时,请与
您当地的经销商联系。

8
赫意凯(常州)电器设备有限公司
Version 3.0, November 2020
如果保险丝是由于长时间的连续研磨操作而跳闸(操作间隔时间请参阅第5节),则需先让磨
豆机冷却下来,再更换同规格的新的保险丝。
B) 漏斗
如果没有适当的预防措施,研磨室是个危险区域。请不要在没有漏斗的情况下操作磨豆机。
磨豆机设有安全开关,以防止在没有漏斗的情况下进行研磨。如果安全开关出现故障,请不要继续
使用磨豆机,并将磨豆机送到当地经销商维修。
7) 安全说明
不要在没有漏斗的情况下操作磨豆机。在取下漏斗之前,请先断开电源。
进行清洗或者维修之前,请先断开电源。
请勿将手指或任何异物插入刀片或者研磨室。
当心!无论切断电源还是任何操作结束后刀片仍会保持一定时间的惯性旋转。
请勿更换或篡改本产品。
请勿赤脚或者湿手的时候使用设备。
在移动机器时请勿拉扯电源线。
始终保持设备干燥(内部和外部)。
请勿将研磨过的咖啡粉放入漏斗或尝试研磨咖啡粉两次。
不要研磨除咖啡豆以外的任何东西。
请将所有的包装材料和提供的工具包放在儿童触碰不到的地方。
安全起见,请务必确保电源插座接线正确且接地有效。
8) 维修及服务
警告:所有的设备的维护与操作,如安装、维修及保养都应该由专业人员或当地经销商处理。
下面描述的过程是唯一允许用户级维护的过程。
请注意机器的噪音情况,一旦噪音高于正常水平或者有内部不规则噪音,请联系专业人员进行全面
检查。
A) GSM系统校准
1. 如果您怀疑测量显示与磨豆机的实际设置不一致,可按照以下步骤重新校准设置。
2. 关闭漏斗门,打开磨豆机,直到磨豆完毕。
3. 逆时针转动研磨设置旋钮(液晶显示屏上显示F),直到达到最小设置。
4. 将磨豆机向后切斜,并短时间按下复位按钮(图8.A.1),显示将再次显示0.1。
5. 将研磨设置旋钮转回您想要的研磨设置,并检查粗度是否符合您的需求。
*提示:如果校正后磨粉设定显示与实际粗度仍不匹配,请与当地的经销商联系。
图8.A.1

9
赫意凯(常州)电器设备有限公司
Version 3.0, November 2020
B) 更换保险丝
1. 关闭主开关,切断电源线。
2. 取出漏斗,将磨豆机倒置(图8.B.1)。旋出“FUSE”旋钮(图8.B.2)。
3. 用相同规格的保险丝更换跳闸的保险丝(图8.B.3)。
4. 旋入保险丝底座,按相反顺序重复上述步骤重新打开磨床。
C) 更换研磨刀片
定期检查研磨刀片(约研磨50公斤咖啡豆),保持刀片状况的良好可以保证高品质的研磨和避免机
器过热。
建议更换研磨刀片
每研磨500-700公斤咖啡豆后需更换研磨刀片(当使用的是标准的Heycafe刀片时)。
每研磨1000-1500公斤咖啡豆后需更换研磨刀片(当使用的是Ditting刀片时)。
警告:更换和组装一组新的研磨刀片是一项非常危险的任务。只有在你对自己的技术技能有信心,
并且阅读和理解了下面的全部说明之后,才能进行拆卸和组装刀片。
1. 将机器中剩余的咖啡豆全部研磨完毕。
2. 断开电源线。
3. 拆下漏斗和漏斗盖。
4. 使用提供的扳手拆除顶部的螺钉(图8.C.1)。
5. 拆除顶部的四颗固定上刀架的螺钉,露出研磨室(图8.C.2)。
6. 用一字螺丝刀拆除刀片的固定螺钉(每片刀片3颗螺钉)(图8.C.3)。
7. 在安装新的刀片之前,确保整个研磨室清洁(使用刷子、吸尘器和干的清洁布)(图8.C.4)。
8. 替换新的研磨刀片,并用新的不锈钢螺钉固定。
9. 按照上述步骤的相反顺序,重新安装好磨豆机。
注意:将研磨设置旋钮复位(将旋钮设置在最细磨粉位置上)。
图8.B.1
图.8.B.2
图.8.B.3
图8.C.1
图8.C.2
图8.C.3
图8.C.4
Table of contents
Other HeyCafe Coffee Grinder manuals

HeyCafe
HeyCafe H5 User manual

HeyCafe
HeyCafe HC-880 LAB Instruction and safety manual

HeyCafe
HeyCafe Buddy User manual

HeyCafe
HeyCafe AROMA II S User manual

HeyCafe
HeyCafe HC-880 Instruction and safety manual

HeyCafe
HeyCafe HC-600 User manual

HeyCafe
HeyCafe HC-880 Operating instructions

HeyCafe
HeyCafe TITAN II S User manual


