High Great HG TAKE User manual

HG TAKE
User Manual V1.0
2017.2


Legend
Symbols
Warning Tips
Reading Suggestions
HIGHGREAT has provided the following manuals for HG TAKE users:
In the Box
《
Battery Safety Instructions Disclaimer
》
《
HG TAKE Quick Start Guide
》
《
HG TAKE User Manual
》
To learn how to use HG TAKE, we suggest you read the provided manuals in
this order: In the Box, Battery Safety Instructions, Disclaimer and then HG
TAKE Quick Start Guide. If you want to learn more, please read HG TAKE
User Manual.
Downloading the App
Before using this product, you need to download and install the HG TAKE
app. You can scan the following QR codes, or search for HG TAKE in App
Store or Google Play.
iOSAndroid
HG TAKE supports Android 4.3 and later versions, iOS 8.4 and later
versions.
无法显示图像。
计算机可能没有
足够的内存以打
开该图像,也可
能是该图像已损
坏。请重新启动
计算机,然后重
新打开该文件。
如果仍然显示…
无法显示
图像。计
算机可能
没有足够
的内存以
打开该图
像,也可
能是该图
像已损
坏。请

Product Profile
This section will introduce HG TAKE’s features and the names of HG TAKE’s
structural components.
Introduction
HG TAKE is a portable and easy-to-use drone for selfie. It consists of the
aircraft itself and an accompanying app.
Through using the app, you can control HG TAKE’s flight, take photos and
record videos. The app also allows you to control HG TAKE by voice
commands, earphones and other methods simply and easily.
Features Highlights
In order to give you a convenient and safe selfie experience, HG TAKE has
various great features:
App
The app is specifically developed for HG TAKE and is really simple to use. It
can be used as a remote controller for flight control and photo & video
shooting.
Indoor Flight
HG TAKE uses the optic flow and ultrasonic positioning system to support
indoor flight. You can also enjoy it indoors, free of the no-fly zone restrictions
High Definition Photo &Video Shooting
HG TAKE is equipped with a professional high definition camera that
supports 4208x3120 photo shooting and 1920x1080 video shooting.
EIS (Electronic Image Stabilisation)
After EIS, your 4K video footages become 1080p high definition videos. The
videos won’t be blurry even if you’re flying during recording.
Target Tracking
HG TAKE can automatically follow and record video on the moving target
you’ve chosen.
Orbit
Automatically fly and record video around a certain point with a certain radius
and at a certain altitude.
Return to Home
After outdoor flight, HG TAKE can return to you by just one tap on screen.
Sharing
Directly share your photos & Videos with your friends on SNS.
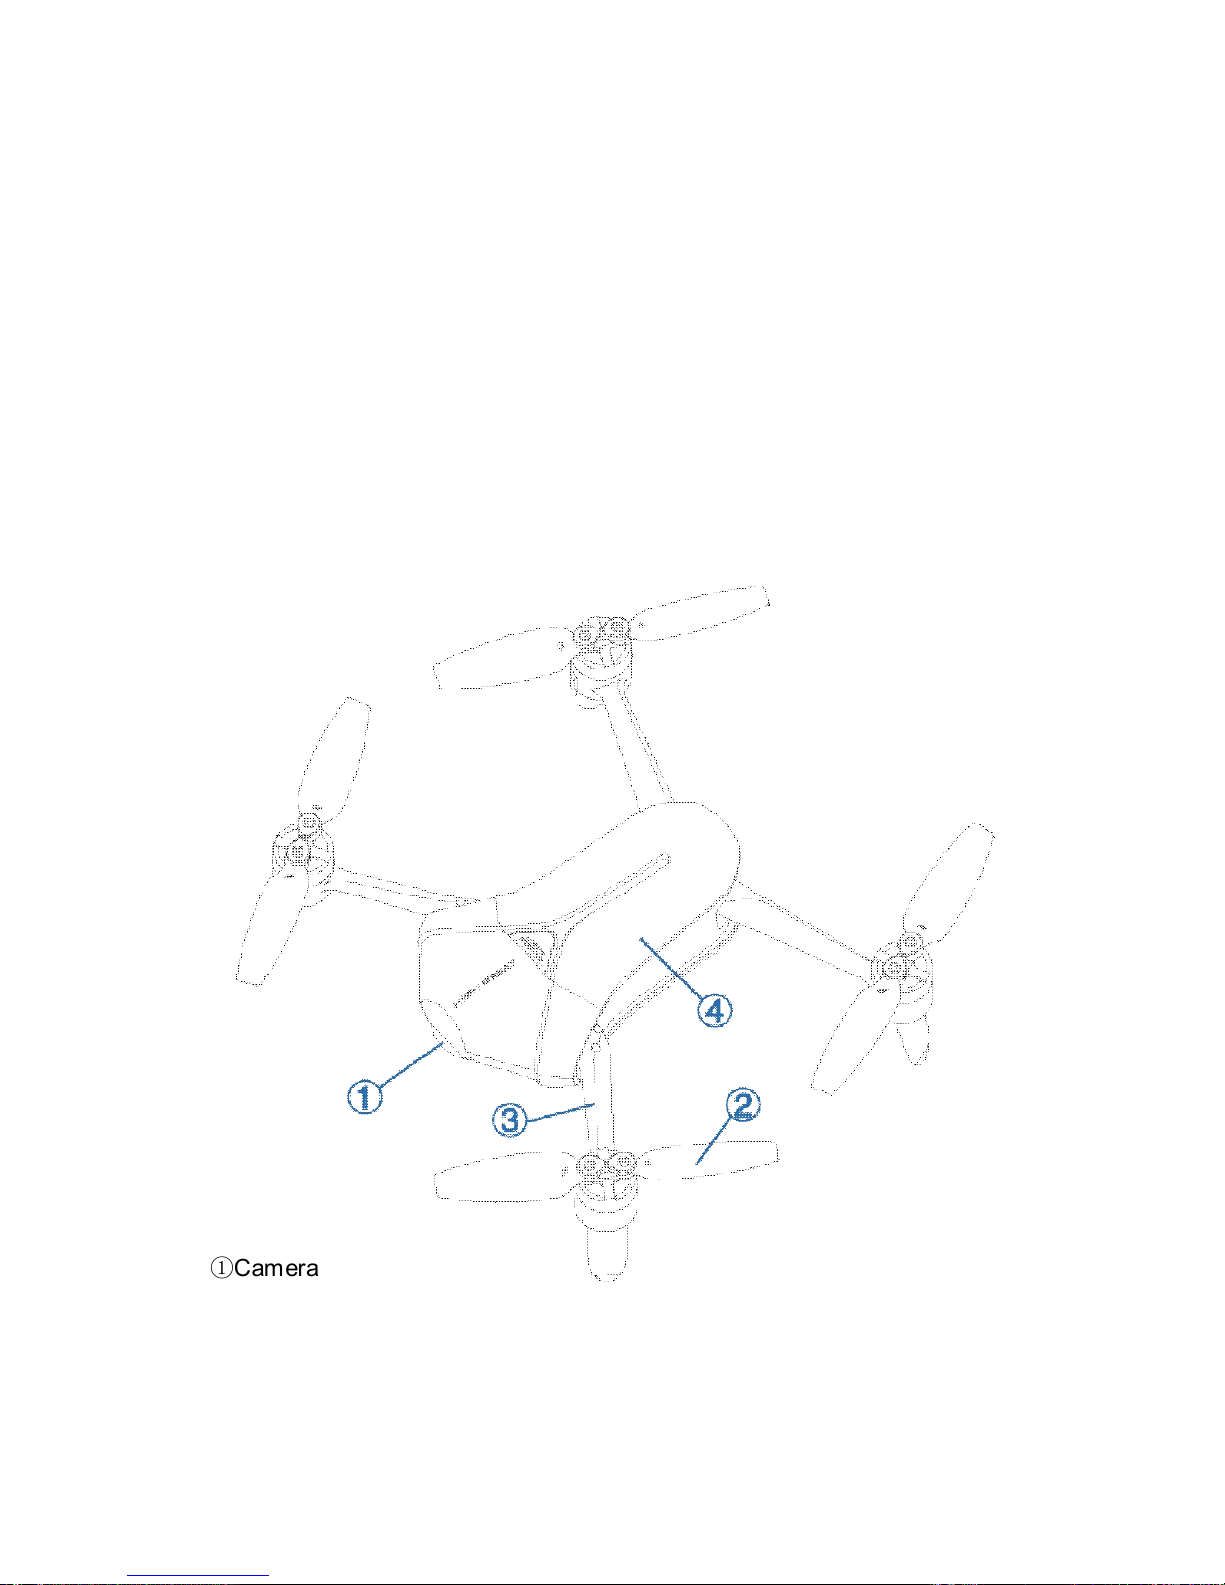
Aircraft Diagram
①Camera
②Propeller
③Arm
④ Battery ware house

⑤ Reset Key
⑥Power key, light indicator
⑦Micro USB port
⑧ Optic Flow and Ultrasonic Positioning Module
Aircraft Profile
HG TAKE mainly consists of the flight system, the positioning system, the
communication system, the power supply system and the camera system.
This section will explain the functions of each of the parts.
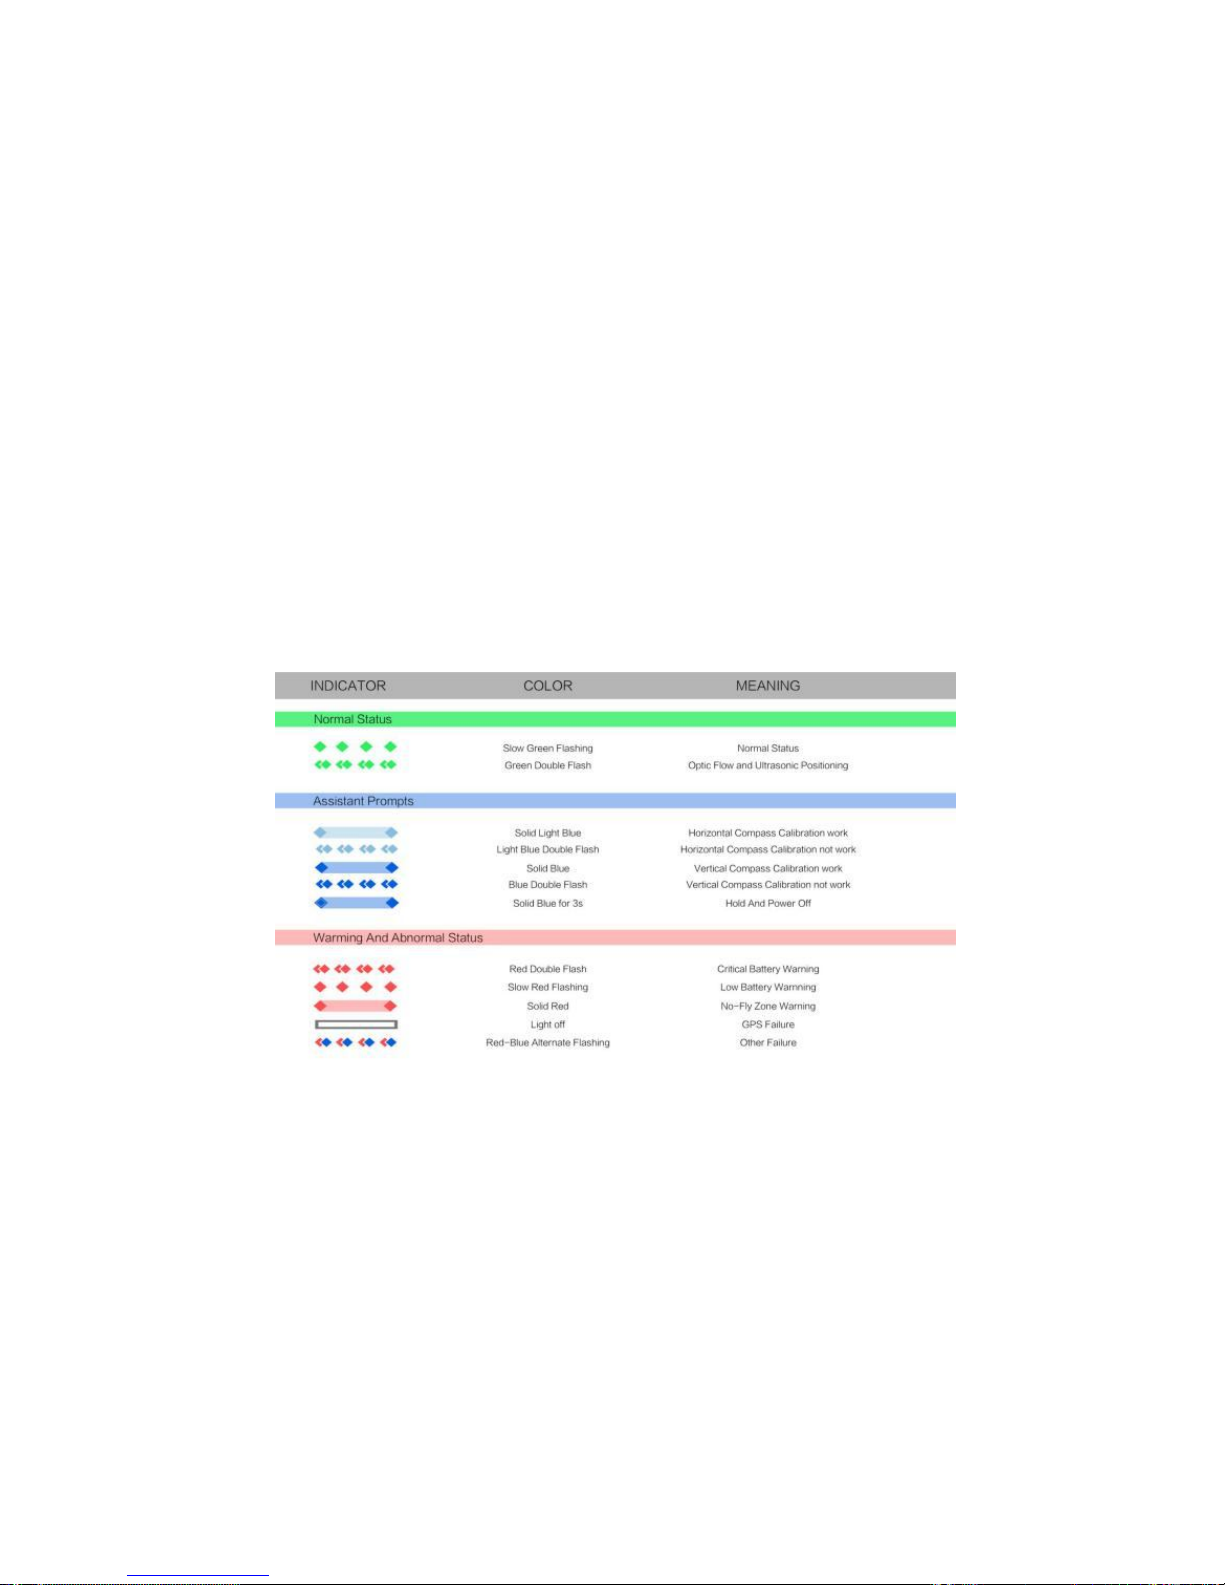
On/Off Switch and Power Indicator
The On/Off Switch has an inbuilt Power Indicator.
Hold the On/Off Switch for 3 seconds. Wait until the Power Indicator starts
flashing blue, then remove your finger and HG TAKE will switch on. After a
few seconds, HG TAKE will make a noise alerting you that the ESC has
turned on.
After connecting to the app, the Power Indicator will turn solid blue.
Hold the On/Off Switch for 3 seconds. Wait until the blue light of the Power
Indicator goes out, then remove your finger and HG TAKE will switch off.
GPS Positioning
HG TAKE uses a GPS&GLONASS dual-mode satellite positioning system.
The satellite positioning system is GPS based, with GLONASS acting as a
supplementary system.
During outdoor flight, HG TAKE uses GPS positioning when the number of
searched-out GPS satellites ≥8.
Optic Flow and Ultrasonic Positioning
HG TAKE will use the optic flow and ultrasonic positioning during indoor flight.
If the GPS signal is weak (the number of searched-out GPS satellites<8)

during outdoor flight, the aircraft will automatically use optic flow and
ultrasonic positioning for supplement.
The optic flow and ultrasonic positioning system combines dynamic image
analysis to horizontally position the aircraft during flight and ultrasonic
distance measurement to determine the distance from the ground. It
positions the aircraft during indoor flight and assists the GPS positioning
system during outdoor flight.
The optic flow and ultrasonic positioning module is located on the base of the
aircraft. It consists of an optic flow camera and an ultrasonic sensor.
Usage Conditions and Restrictions
The optic flow and ultrasonic positioning system is used for indoor flight. It is
also used for outdoor flight if the GPS signal is weak. The operating height
range for this positioning system is 0.5-3m.
When using this positioning system, after the aircraft has taken off and
ascended to 0.5m, it will determine if the requirements for using this system
have been met. If they have not, it will initiate landing. If the requirements are
not met for this system during flight, the aircraft will also initiate landing.
Requirements for the optic flow and ultrasonic positioning system: When
using this system, the area underneath the aircraft needs to have a clear
textured surface that is not too sparse or too dense. Users can put a textured
carpet or cloth on the ground, table or any large, horizontal surface to provide
the required textured surface.
---------------------------------------------------------------------------------------------------------------------------------------------------
The optic flow and ultrasonic positioning system may not work under
these circumstances, please use with caution:
◎Above highly reflective surfaces;
◎Above water or transparent objects;
◎Above people or moving objects;
◎In areas with rapidly changing/flashing lights;
◎Above very bright or very dark surfaces;
◎Above objects that easily absorb ultrasonic waves;
◎Above surfaces without clear textures or with too sparse or too
dense textures;
◎During fast flight at low levels (0.5m or less), the optic flow and
ultrasonic positioning system may not work.
---------------------------------------------------------------------------------------------------------------------------------------------------
-------------------------------------------------------------------------------------------------------------------------------------------------------
◎Ensure that the lens of the optic flow camera is clear.
◎Because the ultrasonic positioning system may be disturbed by
ultrasonic waves emitted by other ultrasonic equipment, please do not
use HG TAKE near other ultrasonic equipment, including other
drones.
◎The Ultrasonic Sensor will emit ultrasonic waves that are inaudible
to humans but may make some animals nervous. Please do not use
HG TAKE close to animals.
-------------------------------------------------------------------------------------------------------------------------------------------------------
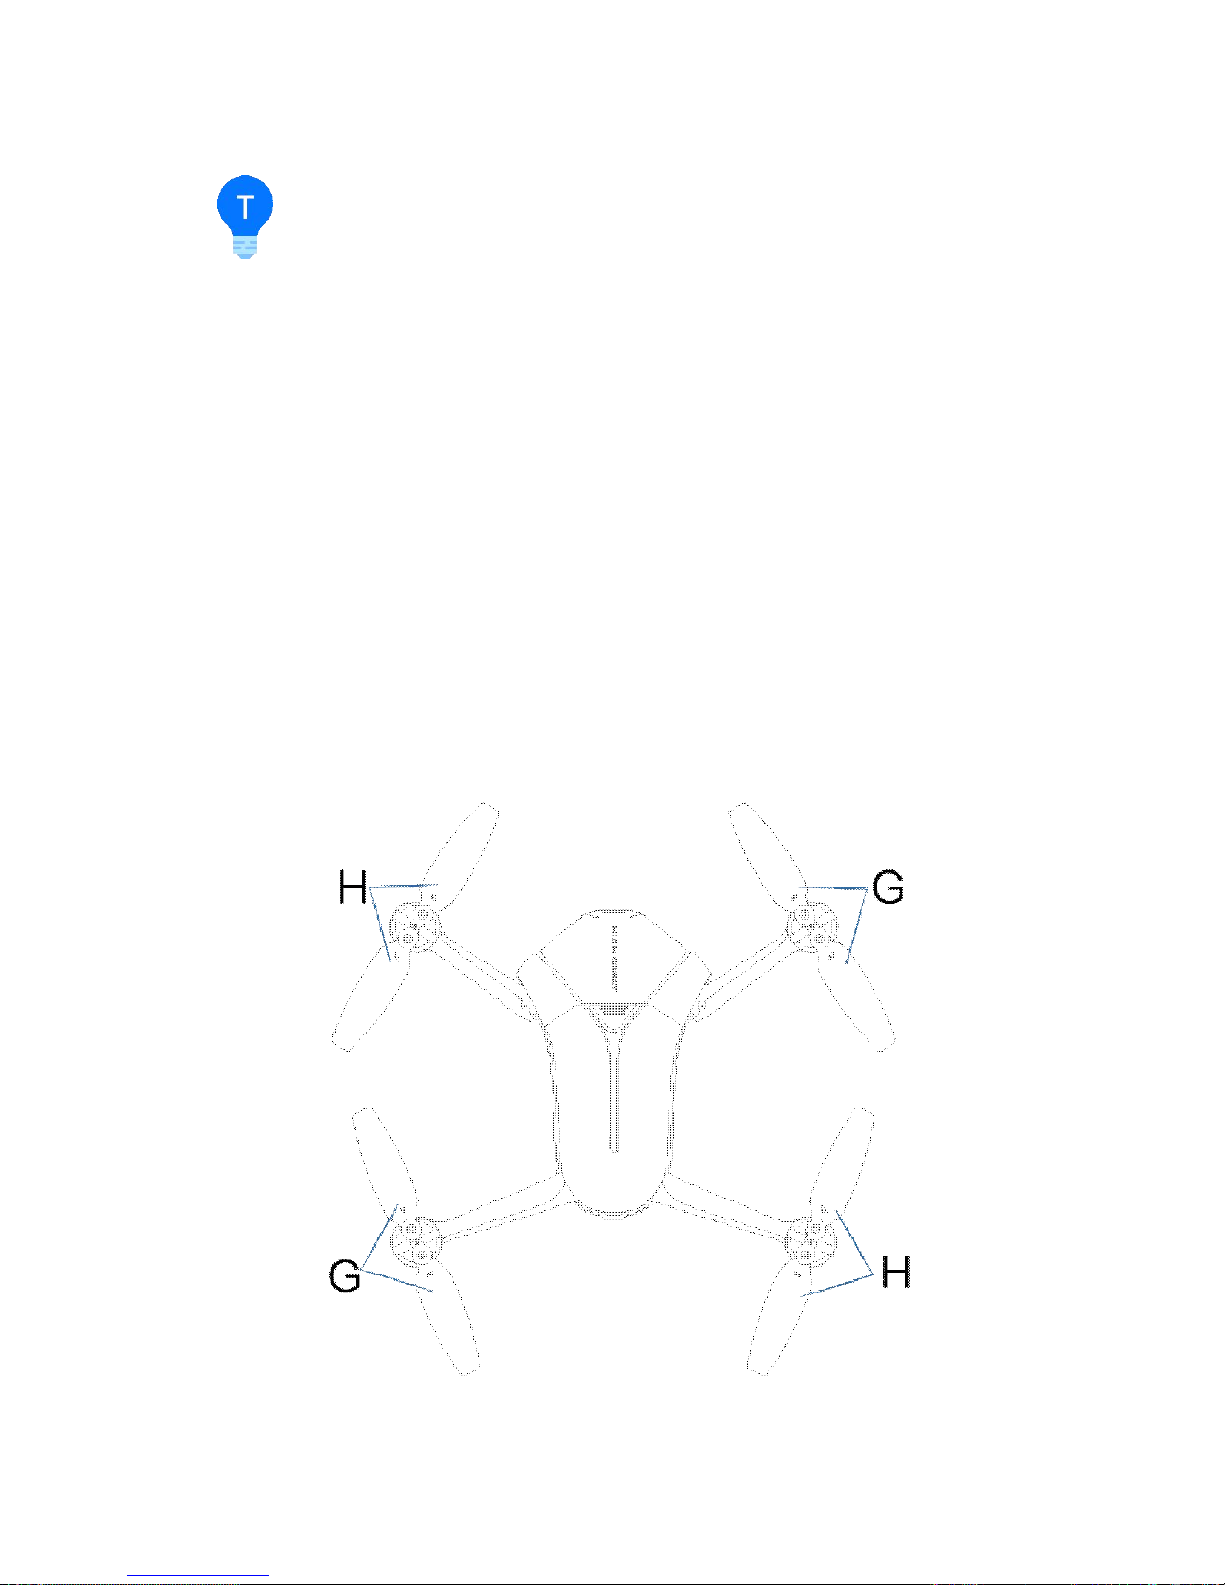
Propeller
HG TAKE has 4 sets of 3-inch foldable Propellers. The propeller blades are
already mounted; users only need to expand the Arms before flight. When
you're done flying, fold the Arms and the blades into the base of the aircraft to
prevent damaging them.
The blades have either “H” or “G” on the top to indicate in which direction they
spin, as shown in the following figure:
Replacing the Propeller Blades
Blades must be replaced with ones that spin in the same direction. Blades
with an “H” on top must be replaced with ones that also have an “H”; Blades
with a “G” on top must be replaced with ones that also have a “G”,as in the
above figure.
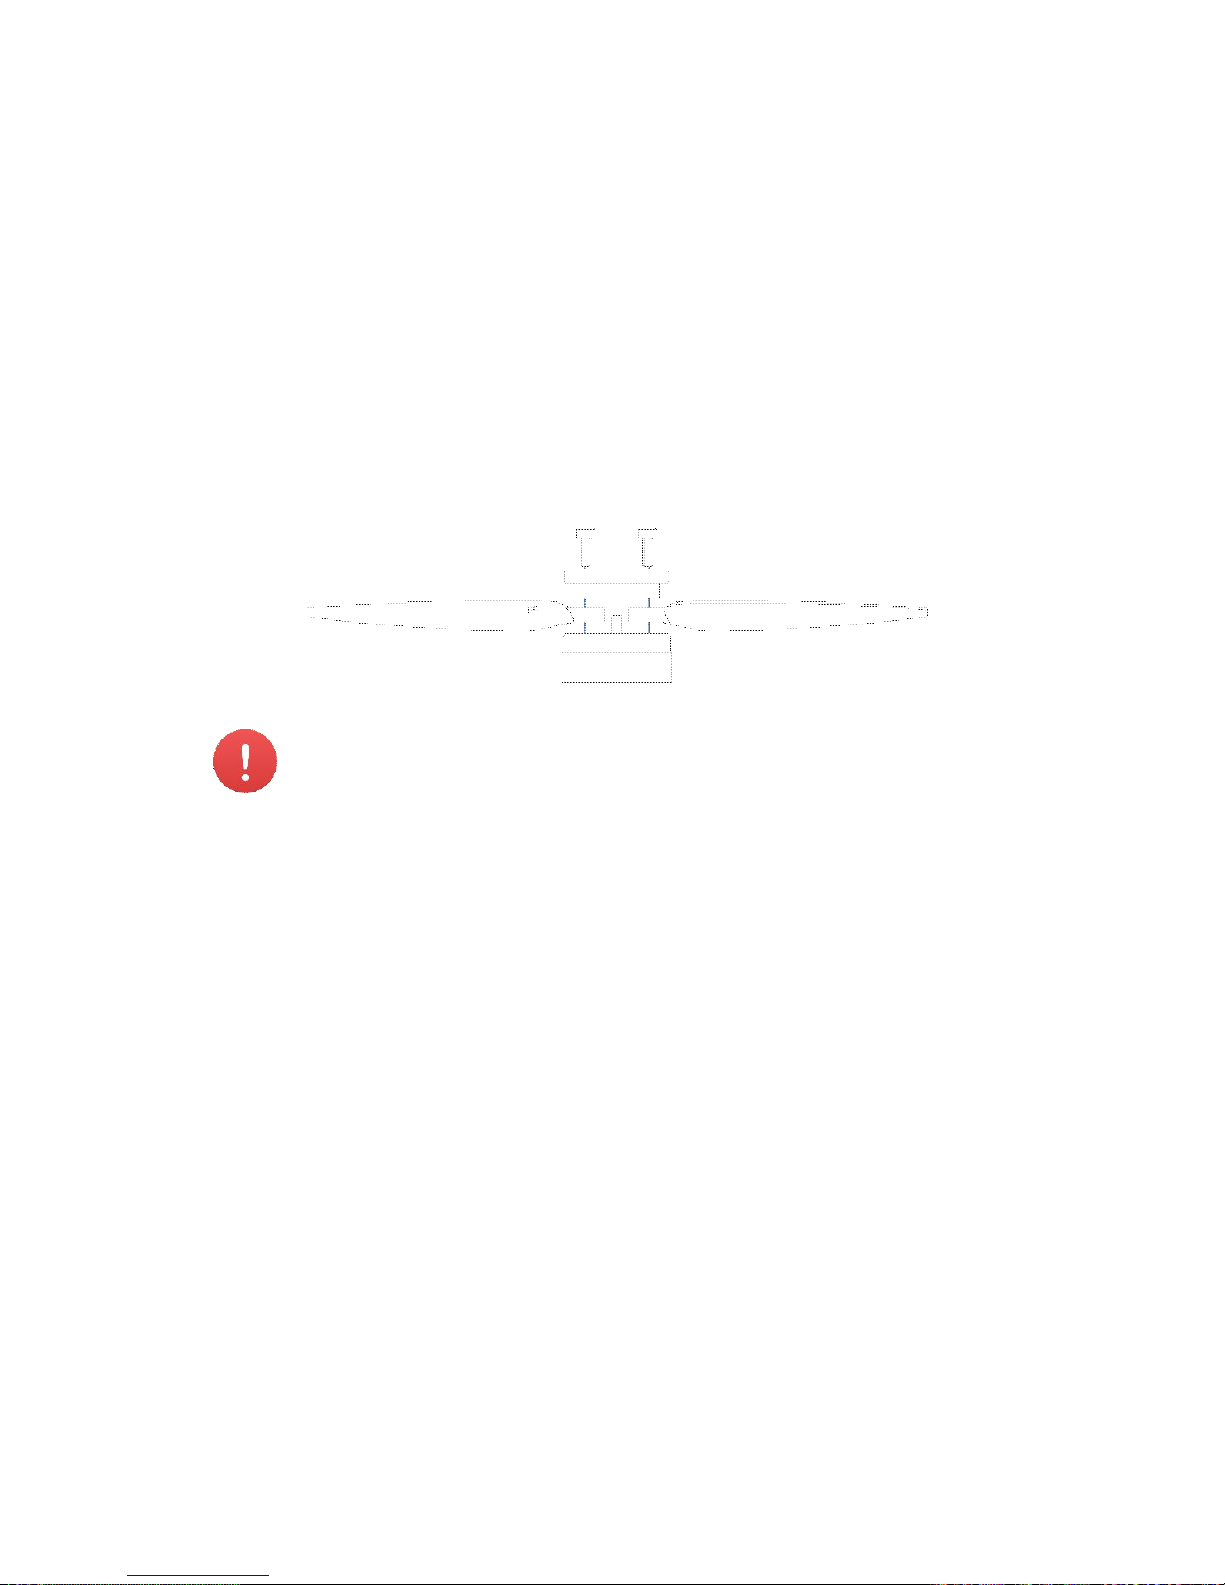
How to replace the propeller blades:
Use a wrench or a screwdriver to loosen the screws, remove the old ones
and mount the new ones onto the base, as shown in the following figure:
-------------------------------------------------------------------------------------------------------------------------------------------------------
Please ensure that the propeller is tightly screwed in, to prevent
against the screws coming loose and the propellers blades coming off
during flight. It will need to be retightened after every 10 hours of
flight.
-------------------------------------------------------------------------------------------------------------------------------------------------------
Battery
The battery is designed specifically for use with HG TAKE. It has a rated
capacity of 1450mAh and a nominalvoltage of 11.4V.
The battery’s major characteristics are as follows:
◎Balance Charging Protection: automatic balance of the battery’s
internal cell voltage to preserve the battery;
◎Overcharge Protection: Overcharging can seriously damage the
battery. The battery will stop charging once it’s charged to13.05V;
◎Over-discharge Protection: Over-discharging can seriously damage
the battery. The battery will cease output once it’s discharged to 4.6V;
◎Short-circuit Protection: The battery will cease output to protect itself
once short circuit occurs.
Before using HG TAKE, ensure that the battery is fully charged. For more
details about charging the battery,please refer to “Charging the Battery” on
page 10.

Using the Battery
Please plug the battery into the battery compartment before using HG TAKE.
-------------------------------------------------------------------------------------------------------------------------------------------------------
◎Please don’t remove the batteries while the aircraft is turned on.
◎Battery overheating may affect the performance of HG TAKE. Do
not use it in hot environments (over 40°C). If the app notifies you of
battery overheating, please immediately initiate landing, and suspend
use before it’s fully cooled down.
◎The battery may be very hot after use. Please do not touch it with
bare hands immediately after use, for fear of burns.
◎If the battery leaks, emits an odor, generates heat by itself, changes
shape (swells, etc.), changes color or shows any other abnormalities
during use, charging or storage, please remove the battery
immediately and cease use.
◎Do not use the battery in cold environments (under 50C), or it may
cause irreversible damage to it. When the temperature is low, the
battery’s usage time may drop. Please warm it up to 5°C or higher
before plugging it into the aircraft, 200C or higher is better.
-------------------------------------------------------------------------------------------------------------------------------------------------------
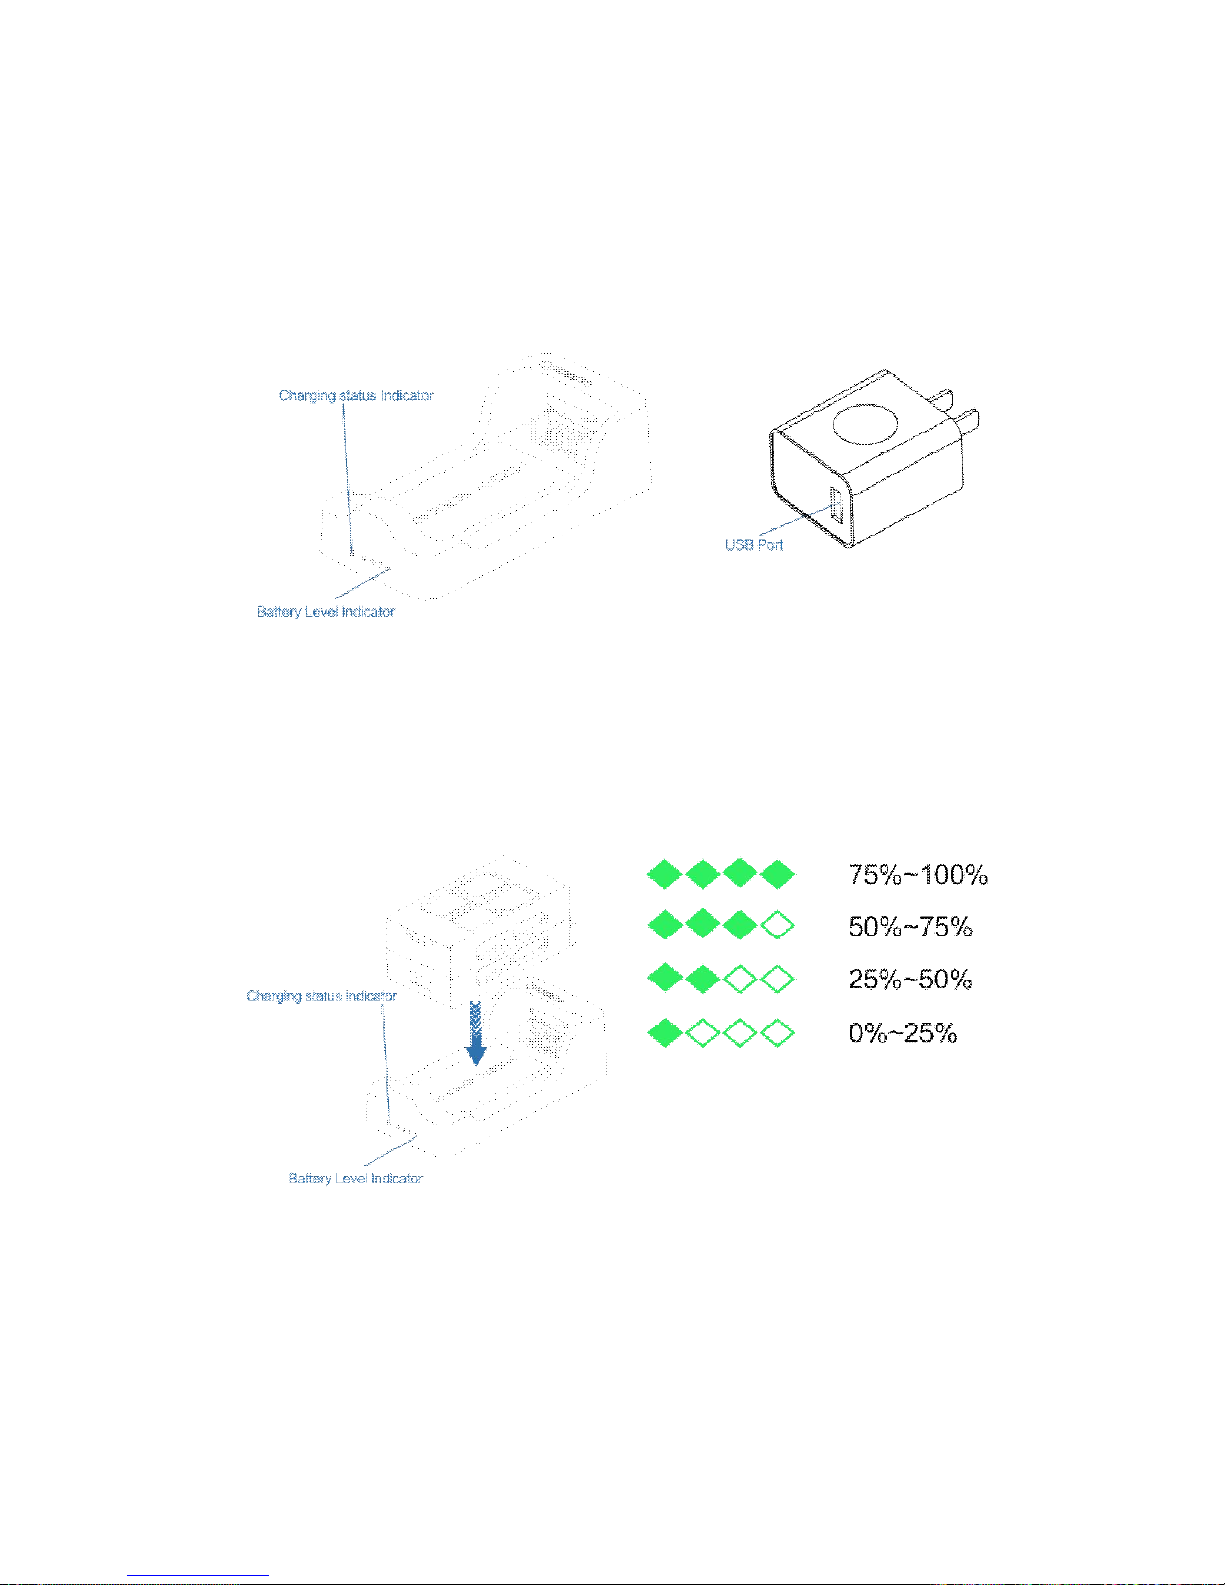
Charging the Battery
The battery comes with a charger, an adapter, and a USB cable.
Put the battery into the battery adapter, The indicator will show the current
battery level. The indicator will go out automatically after 5 seconds. The
indicator’s status and the corresponding battery level in percentage are as
follows:

Plug the battery down into the charger. Use the USB cable to connect the
charger to the adapter. Plug the adapter into a power socket to begin
charging.
The charger uses quick charge technology. Using it together with the
accompanying adapter allows for quick charge. The Charging Status
Indicator will be solid orange during quick charge. If you don't use the
provided adapter, it may only achieve slow charge instead of quick charge.
The Charging Status Indicator will be solid red during slow charge.
If the Charging Status Indicator turns solid green, this means the battery is
fully charged. Please turn off the power source and remove the battery from
the charger.
The Charging Status Indicator’s status and the corresponding meanings are
as follows:
-------------------------------------------------------------------------------------------------------------------------------------------------------
◎We suggest you use the provided HIGHGREAT’s HG TAKE battery
charging devices to charge the battery. Any issues that occur due to
use of other charging equipment shall be the responsibility of the
user.
◎Do not connect power sources or power banks to the Micro-USB
port on the base of the aircraft. This may not only be unable to charge
the battery effectively, but also damage the aircraft.
-------------------------------------------------------------------------------------------------------------------------------------------------------
-------------------------------------------------------------------------------------------------------------------------------------------------------
◎Users can use a power bank to charge the battery. Plug the battery
down into the charger, and use the USB cable to connect the charger
to the power bank to begin charging.
◎The adapter can only be used below 2000m above sea level.
-----------------------------------------------------------------------------------------------------------------------------------------------------
Camera
HG TAKE is equipped with a high definition camera that can take 4208x3120
photos and shoot 1920x1080 videos.
Micro-USB Port
While HG TAKE is turned on, use the provided USB cable and adapter to
connect HG TAKE to your computer. You can then copy your photos and
videos onto your computer.
-------------------------------------------------------------------------------------------------------------------------------------------------------
◎HG TAKE must be turned on to be able to connect to your
computer.
◎HG TAKE’s Micro-USB port can only be connected to data
communication ports, do not connect it to power sources or power
banks.
-------------------------------------------------------------------------------------------------------------------------------------------------------
Reset Button
Hold down the Reset Button on the base of the aircraft for 3 seconds until the
Aircraft Status indicator finishes blue, so as to reset the Wi-Fi, including:
The default SSID and password:
SSID: HG-XXXXXXX. Labelled beside the battery compartment on the base
of the aircraft, the XXXXXX are THE LAST 6 alaphanumeric digits of the
Wi-Fi’s MAC address
Password: Higreat02
App
This section will cover the main parts of the HG TAKE app and the settings.
App Profile
The HG TAKE app is specifically developed to be used with HG TAKE. Users
can use HG TAKE as a remote controller for flight control and photo & video
shooting. You can also directly share your photos and videos to social
networks.
Tap the little HG TAKE icon at the bottom to enter the main interface.
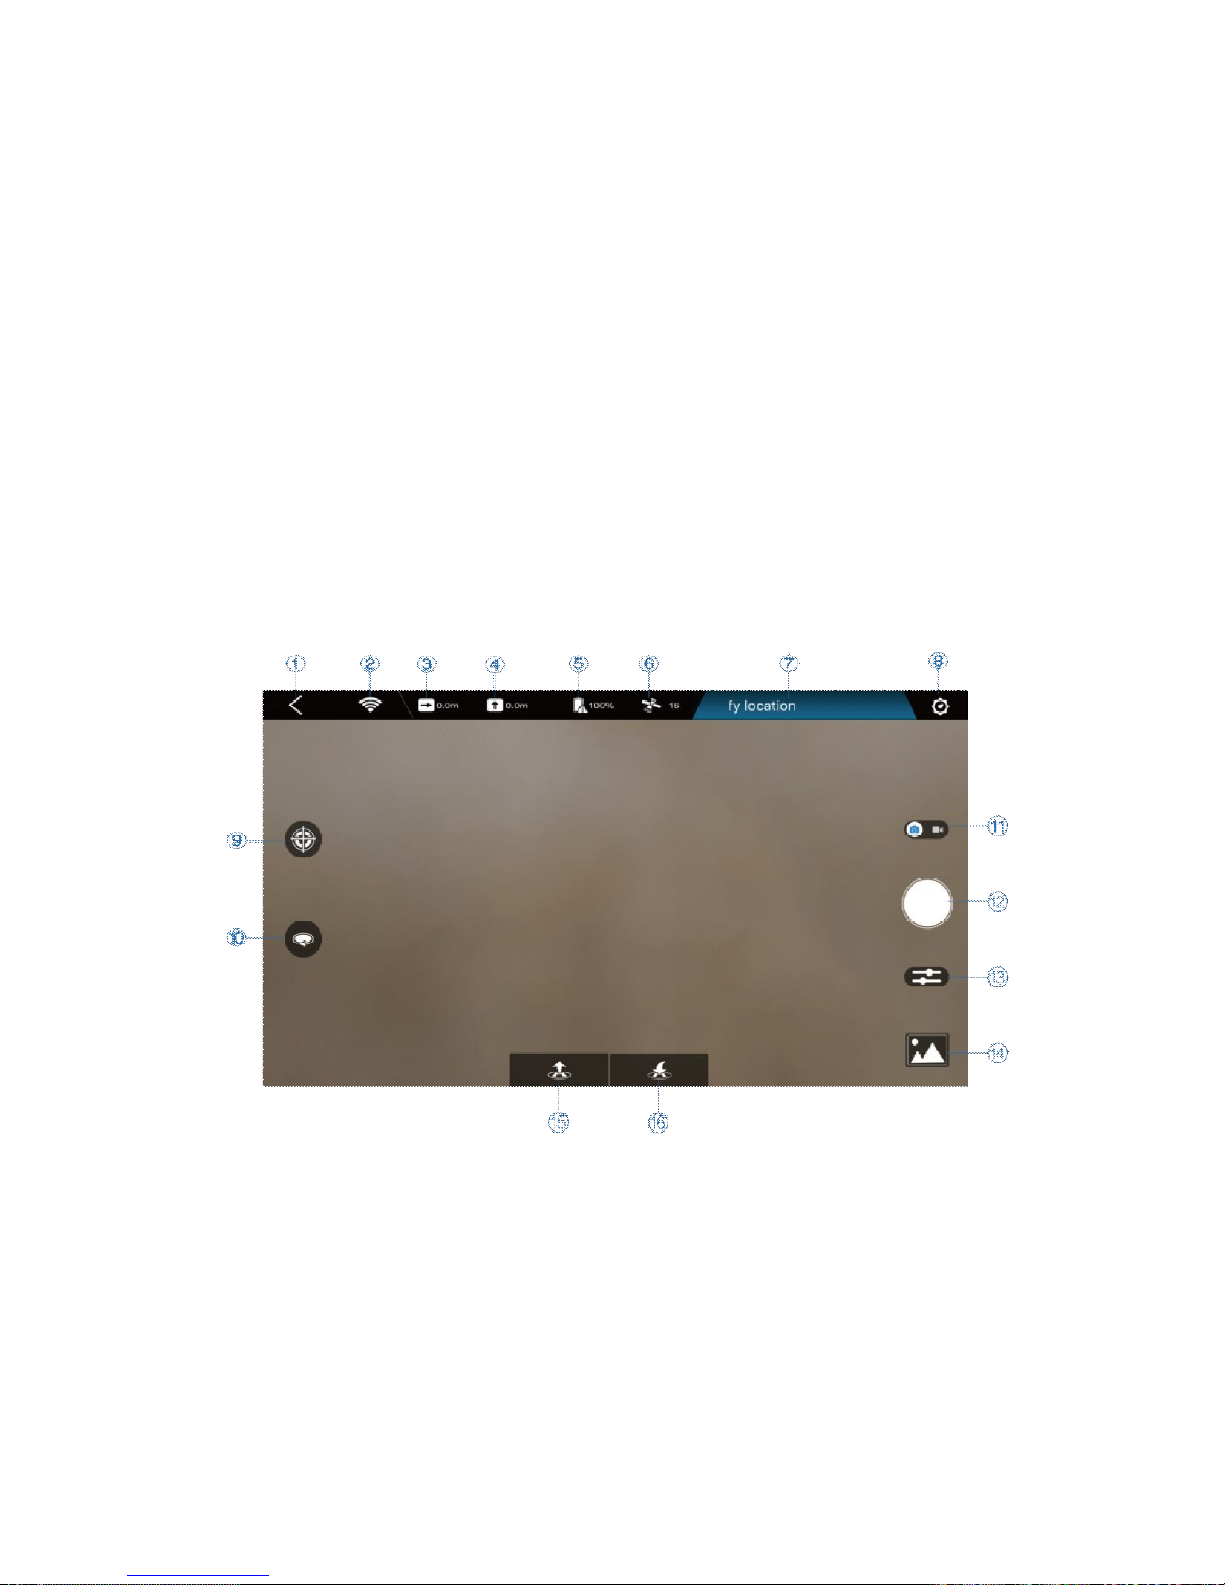
App Main Interface
All the necessary status indicators and main function buttons are on the main
interface. The layout is as follows:
1. Back to main interface 2.Wi-Fi Connection Status 3. Current Flight Distance
4.Current Flight Height 5.Aircraft Battery 6.Positioning Status
7.Status Bar 8.APP Settings 9.Target Tracking
10.Orbit 11.Photo/Video Switch 12.Shutter
13.Camera Setting 14.Media Library 15.Takeoff/Landing/Stop
16.Return to Home
Here’s a brief description of these status indicators and function buttons. For
more details on flight control and camera operation, please refer to
“Flight/Shooting” on page 23.

1.Back to main interface
Return back to main interface after clicking it, you can enter into
personal interface in main interfact.
2.Wi-Fi Connection Status
Wi-Fi connected
Wi-Fi disconnected
-------------------------------------------------------------------------------------------------------------------------------------------------------
◎If the Wi-Fi connection is lost during flight, HG TAKE will
return and land if the GPS positioning is being used, or initiate
landing
◎if the optic flow and ultrasonic positioning is being used.
-------------------------------------------------------------------------------------------------------------------------------------------------------
3.Current Flight Distance
The current flight distance will be displayed after the icon.
4.Current Flight Height
The current flight height will be displayed after the icon
5.Aircraft Battery
Full battery(The battery level will be displayed in percentage after the
icon)
Low battery(The battery level will be displayed in percentage after the
icon)
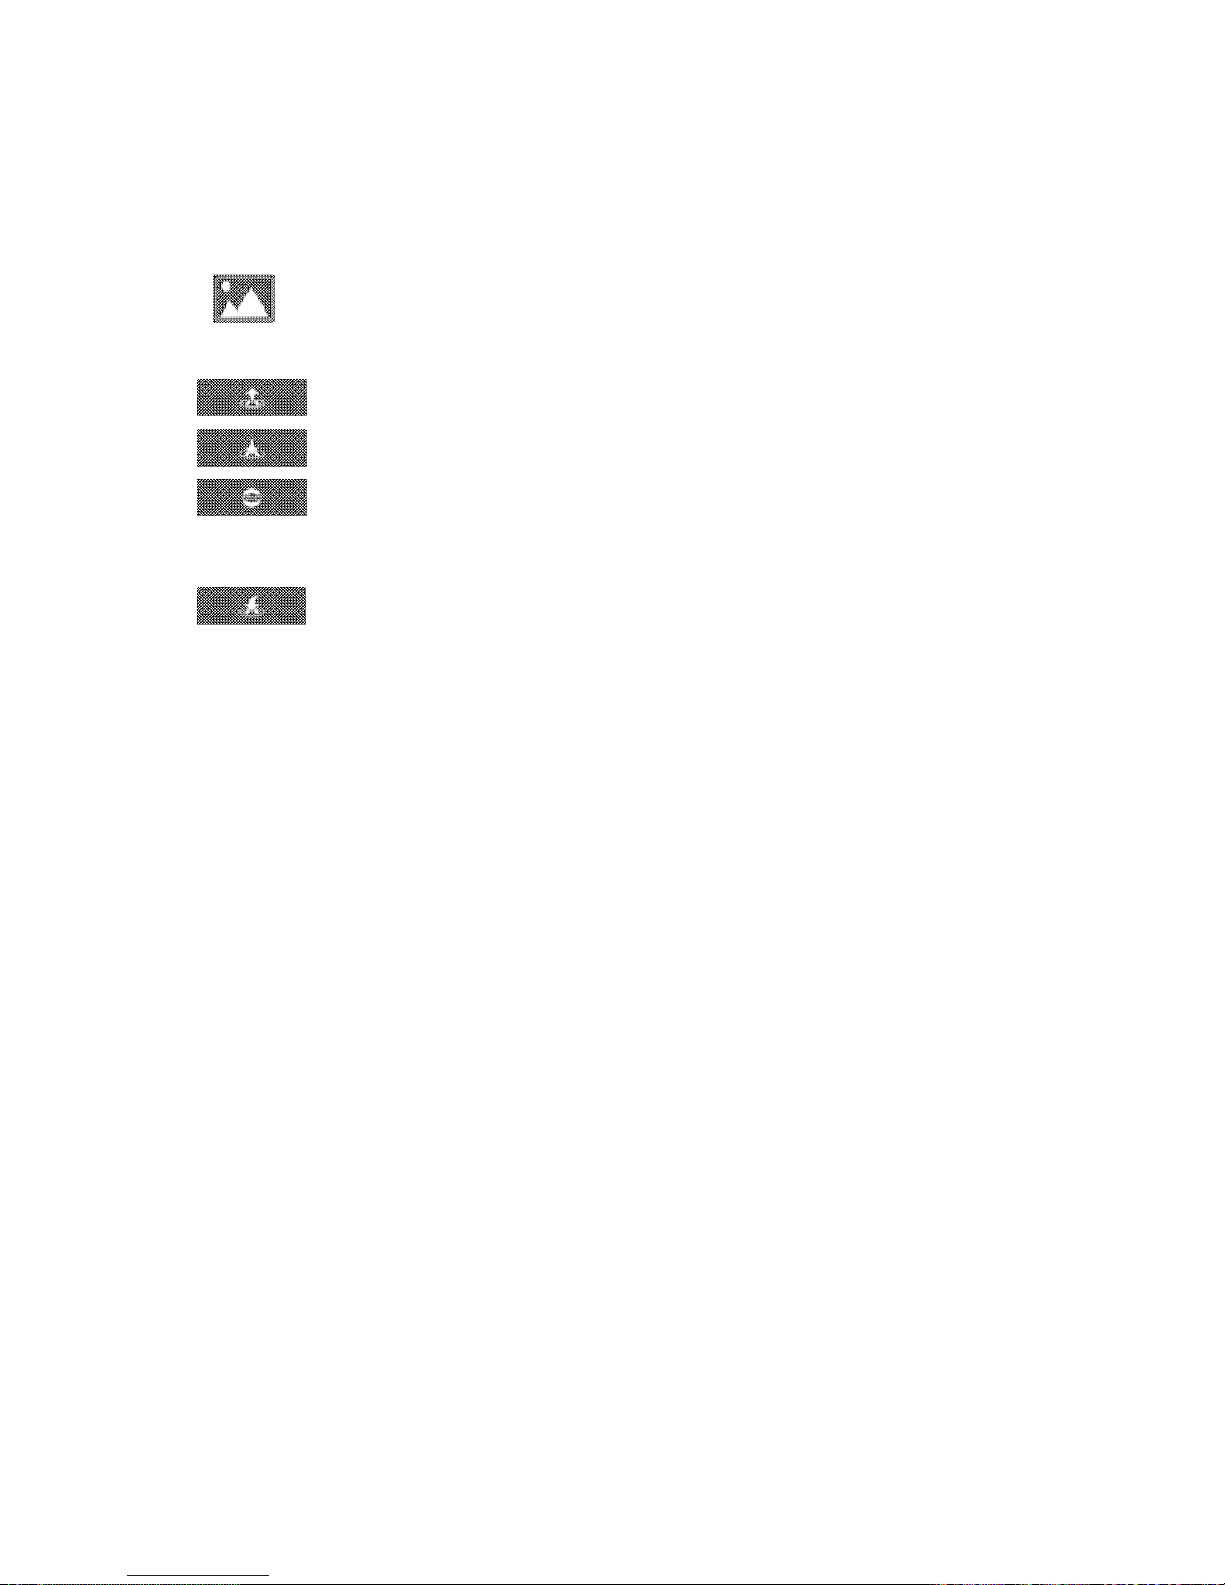
6.Positioning Status
GPS positioning status normal(The number of searched-out satellites
will be displayed after the icon. The number≥8 means normal)
GPS positioning status normal(The number of earched-out satellites
will be displayed after the icon. The number<8 means abnormal)
Optic flow and ultrasonic positioning status normal
Optic flow and ultrasonic positioning status abnormal
-------------------------------------------------------------------------------------------------------------------------------------------------------
If the positioning status gets abnormal during flight, HG TAKE will
start to hover until the positioning status returns to normal or user
lands it.
-------------------------------------------------------------------------------------------------------------------------------------------------------
7.Status Bar
The status bar will display the current status information. Different levels of
status will be displayed in different colors; red-abnormal status,yellow-status
warning, blue-normal status. Abnormal status will be displayed by priority if
there’re several pieces of status information. Tap to see all the status
information.
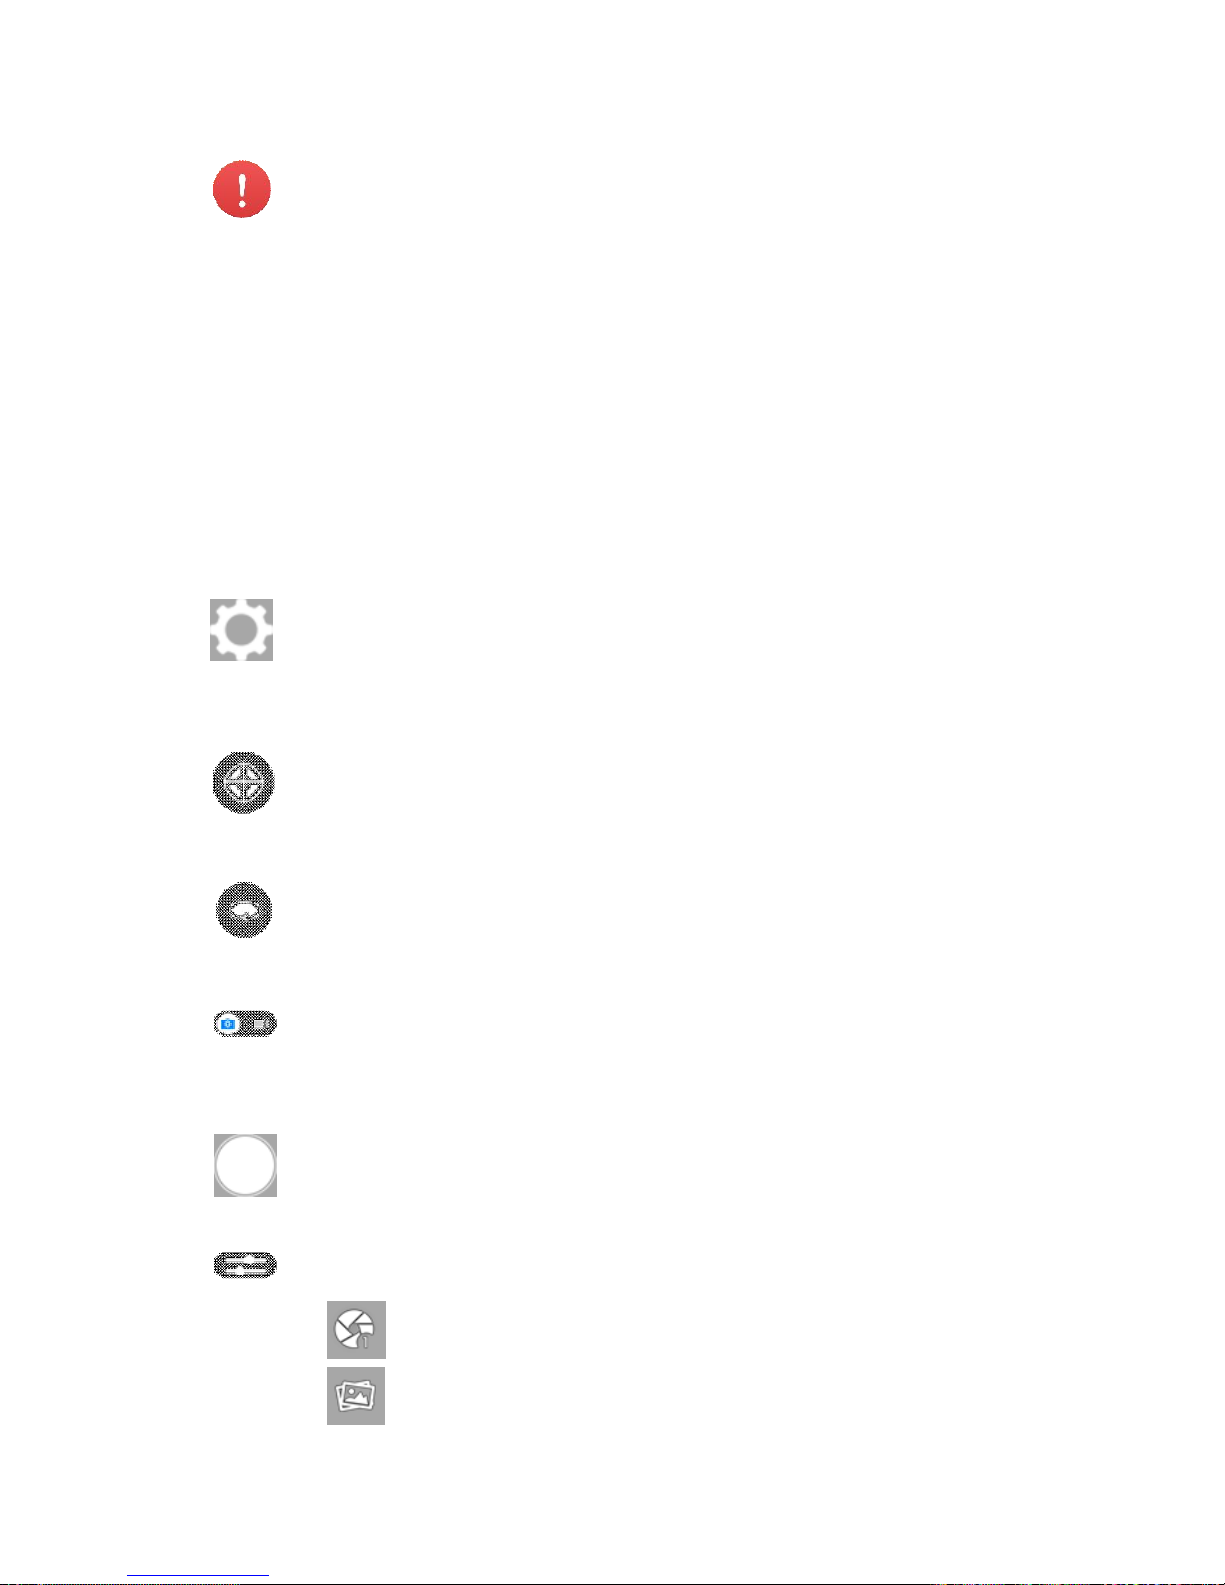
8.APP Settings
Tap to enter the app setting and see”About”.
Some of the settings will need to access the Internet by using mobile
data or switching to router Wi-Fi.
9.Target Tracking
Aircraft automatically follow the chosen target, and record video.
10. Orbit
Aircraft automatically fly around the chosen target, ad record video.
11.Photo/Video Switch
Toggle to switch between the main interface and the conventional
video recording interface.
12.Shutter
Tap to take photo(s)
13.Camera Setting
Tap to enter the camera settings:
Modes Single shot: Tap to enter the single shot mode
Burst shot: Tap to enter the burst shot mode and select
how many photos to take.
ParametersAWB: Tap to set the white balance
EV: Tap to select the exposure value
14.Media Library
Tap to enter your media library
15.Takeoff/Landing
Tap to initiate takeoff, or activate palm takeoff.
Tap to initiate landing, or enable palm landing.
Tap to stop during takeoff/landing.
16.Return to Home
Aircraft automatically return to the takeoff point and land.
App Settings
Photograph Vibration
It’s turned off by default.
When it is activated, your mobile device will vibrate after taking photos.
App Mute
It’s turned off by default.
When it is activated, your mobile device will be mute when the app is used.
Control Method
It’s set to “Motion Sensing” by default.
HG TAKE comes with 4 control methods that users can choose between:
“Motion Sensing”,“Swipe Screen”, “Free Sticks” and “Safe Sticks”.
The motion sensing method uses your mobile device’s gravity sensor. It
allows you to control HG TAKE’s flight by tilting your mobile device. For
specifics on operation, please refer to “Motion Sensing Method” on page 27.
Looking through the camera’s perspective, the swipe screen method allows
you to control HG TAKE’s flight by swiping the screen in the viewfinder frame.
For specifics on operation, please refer to “Swipe ScreenMethod” on page
29.
Just like the remote controller, the free sticks method allows you to control
HG TAKE’s flight by holding the virtual sticks and toggling up/down/left/right.

For specifics on operation, please refer to “Free SticksMethod” on page 30.
You can choose between “American Operator”(left-hand throttle) and
“Japanese Operator” (right-hand throttle).
Just like the remote controller too, the safe sticks method allows you to
control HG TAKE’s flight by tapping on the arrows on the four directions in the
virtual sticks. For specifics on operation, please refer to “SafeSticks Method”
on page 32. Also, you can choose between “American Operator”(left-hand
throttle) and “Japanese Operator” (right-hand throttle).
Language
Various languages for you to choose from.
Compass Calibration
HG TAKE can assist with compass calibration. Please refer to “Calibrating
the Compass” on page 24.
Aircraft FC Update
Upgrade the aircraft flight control.
Aircraft OS Update
Upgrade the aircraft operating system.
Quick Guide
Download HG TAKE Quick Start Guide, which may help you to learn to use.
Reset Guide Pages
Once again display the function guide pages, which may help you to learn the
function of each button.
Available
Check the available storage space on HG TAKE. Please schedule your
shooting progress according to the available storage space and timely clear
HG TAKE's memory.
About
App Upgrade, Fault Report, Feedback, etc.
Fault Report will help you deal with malfunction. Input your contact method,

the SN
Media Library
When opening the media library, it will go to the photo gallery by default. Tap
the “Video” button at the top of the screen to switch to the video gallery.
Photos
When you are connected to HG TAKE’s Wi-Fi, after you take photos the
thumbnails will automatically be sent to your mobile device. The photo gallery
displays thumbnails in date order. Swipe up to load more thumbnails and
swipe down to load new thumbnails.
If a photo is already downloaded to your mobile device, a mobile phone icon
will be added to the top
right hand corner of the thumbnail.
Selecting Photos
To select a photo, tap the tick in the bottom right hand corner of the photo. To
select all the photos taken in one day, tap the “Select All” next to the date.
Deleting Photos
After selecting photos, tap the “Delete” button in the upper right hand corner
of the screen to remove them from your media library. When you are
connected to HG TAKE's Wi-Fi, it will delete the files from both HG TAKE and
your mobile device. When the Wi-Fi is not connected, it will not delete the
files from HG TAKE.
The browsing page also has a “Delete” button, so you can delete photos
directly.
Table of contents
Other High Great Quadcopter manuals


