Hikobike ENDURO 2022 User manual
PLEASE READ THIS GUIDE BEFORE RIDING YOUR EBIKE
ENDURO
2022 model
USER GUIDE

2
CONTENTS
GENERAL PRECAUTIONS BEFORE RIDING
3
SPECIFICATIONS
3
BATTERY
4
BATTERY CHARGING
4
BATTERY STORAGE & SUSPENSION ADJUSTMENT
5
INSTALLING AND REMOVING THE BATTERY
6
BATTERY WARNINGS
6
LED DISPLAY C600
7
CONTROL PANEL
8
QUICK START
9
NORMAL OPERATION
10
ON / OFF
10
POWER ASSIST - PAS SELECTION
10
HEAD LIGHT / REAR LIGHT AND BACKLIGHT DISPLAY INDICATOR
10
CURRENT DISPLAY
11
SET OPERATION (RIDING MODE, TRIP RESET, MAX SPEED, KM/H OR MPH)
12
BATTERY CAPACITY INDICATOR
13
BATTERY VOLTAGE
13
ERROR CODES
14
MAINTENANCE AND STORAGE
14
TORQUE SETTINGS
15
WARRANTY
16
CONTACT
16

3
ASSEMBLY
The assembly of your HIKOBIKE must be performed and safety checked by a HIKOBIKE dealer or
bicycle mechanic. Assembly of the stem, handle bars, and tuning of the gears and brakes requires
expert bicycle mechanic knowledge.
GENERAL PRECAUTIONS BEFORE RIDING
Always wear a safety bicycle helmet when riding a HIKOBIKE electric bike.
Observe the local rules for bicycles and e-bikes.
Check Tyre Pressure (35-50psi), brakes, fasteners, and locking systems before commencing a ride.
HIKOBIKES are designed for comfort for use on smooth gravel, dirt or paved surfaces. They are ideal
for maintained walking and biking tracks, but not for downhill or single-track mountain bike type use.
HIKOBIKES are not designed for jumps or extreme riding conditions.
SPECIFICATIONS
Model ENDURO
Weight without battery
Maximum assist speed
Maximum load carrying
Motor
Display
Front Fork
Brakes
Derailleur
Tyres
Battery
Samsung 500Wh with BMS
25kg
37km/hr
130Kg
300Watt rear motor
C600
Suntour XCM
Tektro 180mm Hydro
Shimano Deore 10
Kenda 27.5” x 2.35
Weight
2.9Kg

4
BATTERY
HIKOBIKE ENDURO comes standard with a 48v Samsung Li-Ion battery with a built in Battery
Management System (BMS). The BMS is an important component as it allows the charger to charge
the Samsung cells evenly, which will maximise the life expectancy and storage power of the battery.
It is possible to fit a higher capacity battery –ask you distributor about upgrades possibilities.
BATTERY CHARGING
IMPORTANT: Use a surge protector with your battery charger to protect against spikes in
household voltage.
The battery can be charged either on or off the bike but there is no need to remove the battery for
charging.
Charging time is normally: 3 -6 hours for 100% charge.
Only charge the battery in temperatures between 10 –30 °C, in a dry and safe place. Do not
cover the battery during charging. If the battery is extremely cold, warm the battery in a warm
ambient room for a few hours before charging it.
To charge your battery follow these steps:
1. Plug the charger’s 3 pin plug into the wall socket / surge protector (which is OFF).
2. Plug the charger into the battery.
3. Then turn ON the wall socket/ surge protector to turn ON the charger.
4. The charger will show LED lights: RED –battery is being charged; GREEN - the battery
is charged.
5. Once charged, turn OFF or unplug the charger from the wall socket. The battery can remain
plugged into the charger if the charger is turned OFF or unplugged from the wall socket.
Your battery has a battery level indicator with 4 LED lights showing the charge state. Press the
button on top of the battery to check the battery charge level.
Do not leave the charger ON connected to the battery for more than 24hrs. Turn off the
charger at the wall socket when the battery has completed charging.
The duration of battery while riding can range from 25 to 60 miles, or more, depending on
assist level selected, rider input, and road conditions.
Never leave your battery fully discharged after a long ride. Charge the battery as soon as
possible within the next 12hrs.

5
BATTERY STORAGE
Your battery likes the same temperatures you do. Store your battery somewhere dry with
a temperature between 15-25 °C. Do not leave it on the bike somewhere that it is likely to
freeze.
When storing the battery for periods longer than 2 months, fully charge the battery and remove the
charger from the wall socket. The battery has a 4-bar charge indicator on the battery pack. Push the
button to see how many bars light up, or the colour of the charge light. Try to keep the battery with
at least 2 bars showing on the controller, or several lights on the battery itself.
The Li-Ion battery will slowly lose its charge over long storage intervals. It is important to check and
charge the battery at least every 3 months and keep the battery charged between 25% and 100%.
Never leave your battery fully discharged as it may cause permanent damage to the battery.
Allowing the battery to fully discharge during long storage can destroy your battery.
SUSPENSION ADJUSTMENT
Your Hikobike has been set up for an average rider and so for most people will not need altering.
However, you can adjust both the seat suspension and the front fork suspension for either a harder
or softer ride or for heavier or lighter riders.
To adjust the seat suspension: Undo the seat post lever clamp and pull the saddle and post
completely out. At the bottom of the seat post there are slots. Use a coin or a large flat screwdriver
in these slots to either tighten to increase the tension or loosen to reduce it. Reinsert the seat post
and set at your preferred height and do up the lever clamp.
To adjust the fork coil spring preload: The fork can be adjusted to the rider's weight and preferred
riding style via the spring preload. It is not the coil spring hardness that is set, but the spring preload.
This reduces the “SAG” of the fork when the rider sits down. A medium hardness spring is used as
standard setting. Turn the preload adjust knob clockwise to increase the spring preload and turn it
anticlockwise to reduce it. Other adjustments are best done with your dealer.

6
INSTALLING AND REMOVING THE BATTERY
The key is to secure the battery from theft and does not need to be in place to use the bike.
Hikobikes are supplied with 2 keys when new. Please keep one in a safe place where you can find
it again –there are a multitude of key numbers so if you lose both keys you will find it a serious
inconvenience!
To remove the battery from the frame
The battery can be easily removed from the bike. It is quite heavy and can easily be dropped so
take great care
turn the key anticlockwise
Place one hand underneath the battery and hold it. With your other hand turn the turnbuckle
that is on the underside to release the battery
Lower the top of the battery, still holding it firmly and then remove it gently without letting it
slip out of your hands
If you are turning the key to unlock the battery, ensure you are holding onto the battery at the
same time.
To install the battery
insert the lower end of the battery into the bottom of the battery frame, with the top end of
the battery lower than the frame
Lift the upper end of the battery and click it firmly into the frame
Check that the battery is secure before removing your other supporting hand
The battery is then secure
BATTERY WARNINGS
The Li-Ion battery is one of the major components on the HIKOBIKE e-bikes and great effort
should be taken to look after it.
•Always handle with great care. Do not drop or allow it to be struck.
•Do not take the battery casing apart or tamper with the battery.
•Keep it away from children.
•Keep it away from temperatures above 50 °C.
•Never allow a connection between the electrical contacts.
•Never spray it with a hose, immerse it or allow excess water on it.
If you suspect the battery is damaged or not working correctly, contact your dealer who can
have the battery checked and diagnosed using the built-in Battery Management System.

7
LED DISPLAY C600 AND CONTROL PANEL
8

9
QUICK START - RIDING THE BIKE
If the battery is off the bike - check the battery capacity:
The LEDs on the battery by the button show the battery charge level. Make sure it is well charged
before riding. The most common reason for running out of charge is leaving home with only part
charge.
When the battery is on the bike, turn on the C600 display by pressing down the ON button on the
handlebar keypad. Check that you have at least most of the charge bars lit and that the voltage is
48V or more.
When you first turn on the bike the default is 0 (no assist). Select the level of assist from 0 - 5. You
can change this as you go along using the + and –button.
You can hold down the SET button for 3 seconds to select/change POWER, STANDARD or ECO riding
mode. Hold down SET to return.
Start pedalling to start the motor.
Select the appropriate gear.
Pulling on either the front or rear brake level will stop the motor immediately.
For optimum battery life, try to avoid riding your HIKOBIKE until the battery is completely flat.
Turn off the power assist as soon as you notice the battery has lost power and pedal the bike
home, charging the battery as soon as possible.
The thumb lever next to the controller will give you a boost of power when you want it to.
10
NORMAL OPERATION
ON / OFF
Push ON / OFF to start the display. The display will provide power to the controller. Push ON /
OFF again to operate the backlight. With the display on, press ON / OFF for 3 seconds to turn the
power OFF.
The panel will go to sleep when the speed is zero for 5 minutes.
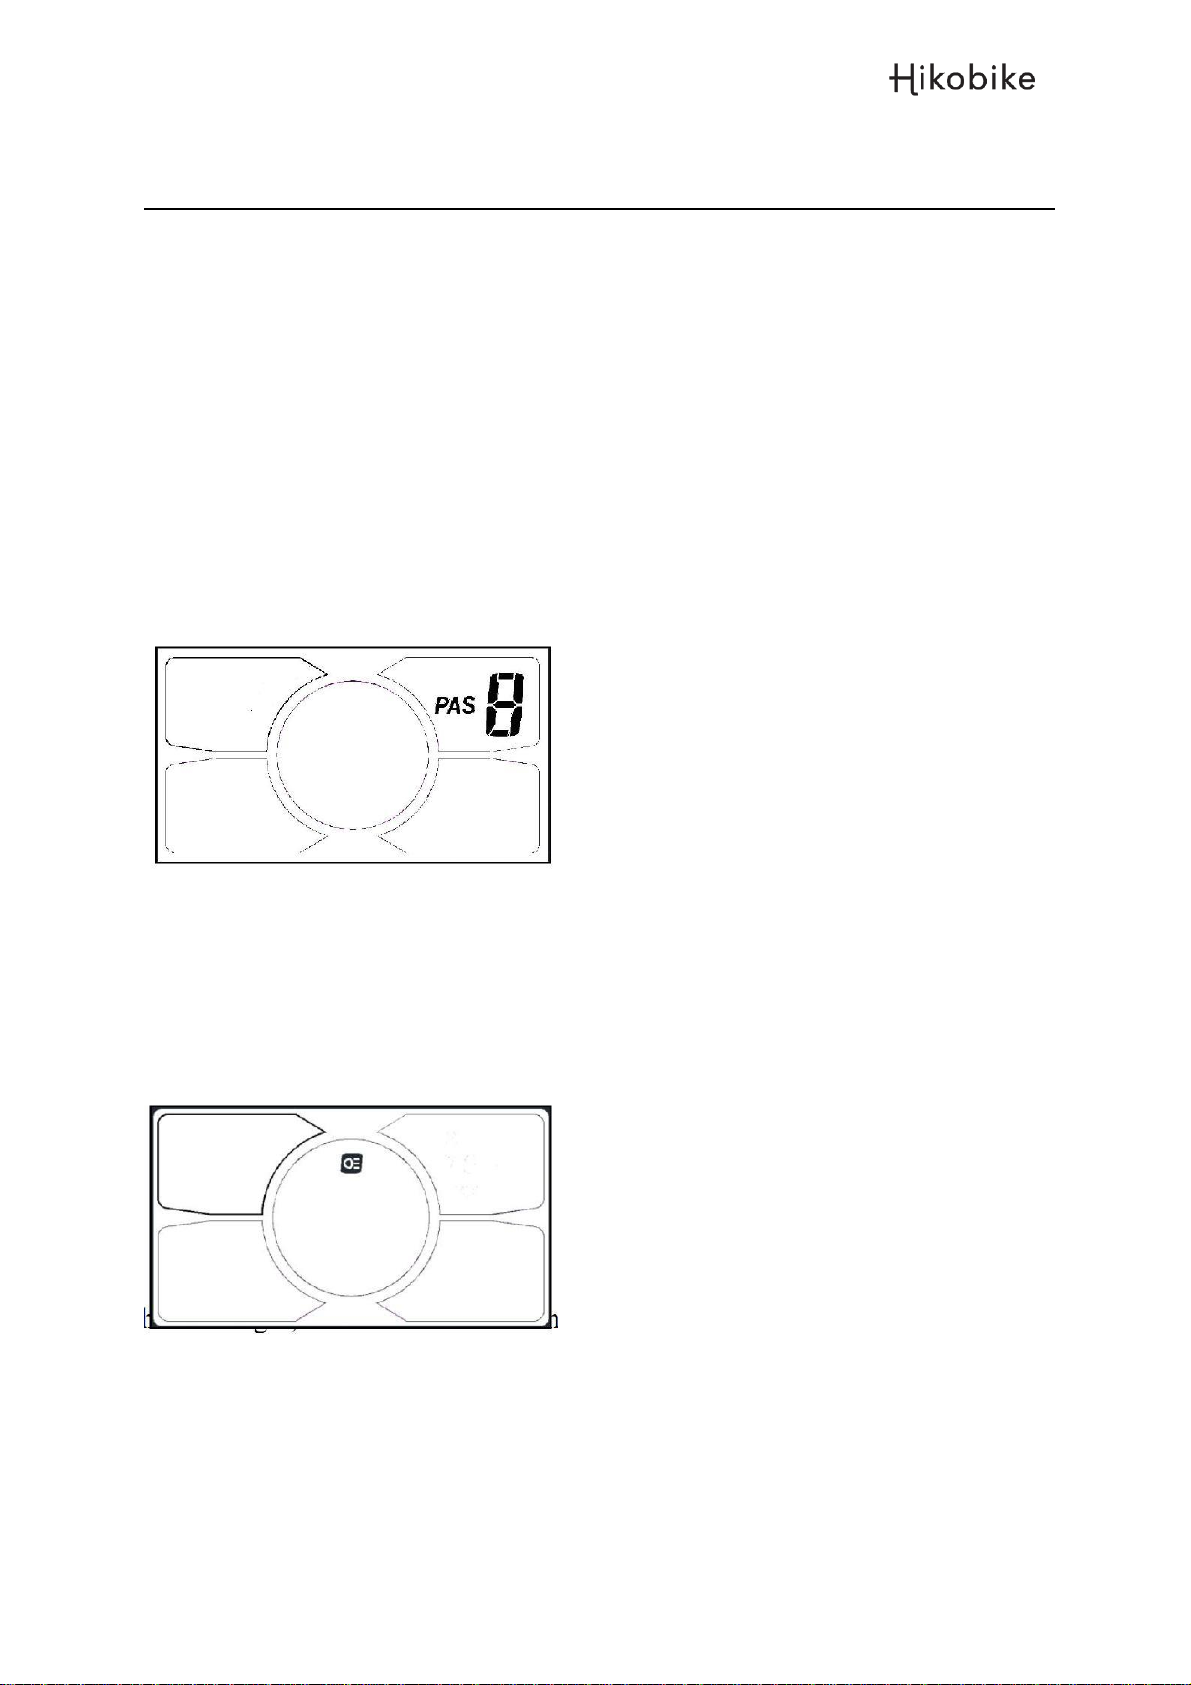
PAS LEVEL SELECTION
Click UP and DOWN to change the PAS level of assistance from 1 - 5. Default is level 0 (No Assist).
HEAD LIGHT / REAR LIGHT AND BACKLIGHT DISPLAY INDICATOR
With the display ON, click the ON / OFF button to turn on the headlight, rear lights and
backlight of the display. Click it again to turn OFF.

11
6 KM/HR WALK MODE
This mode is handy when pushing your HIKOBIKE up a steep incline or when you just want to walk
beside it.
Hold the DOWN ( - ) button for 2 seconds to get into 6 KM/HR Walk mode, and keep the button pressed.
Release the button to stop walk mode.
CURRENT DISPLAY
This represents the amount of current used by the motor. Each segment is about 2A.
The more bars showing the more battery energy you are using. You will notice the bars drop down when
you are going faster than the motor assist maximum.

12
SET MENU OPERATION
Hold the SET button for 2 seconds and enter the setting interface. Number 0 will be displayed,
and the display will flash. Click the SET to cycle from 0 to 4. Press UP or DOWN to select the
desired parameter and hold the SET for 1 second to exit.
SET 0 –RIDING MODE SELECTION
The Enduro is default set to Normal mode. You can use the –button to change to Eco mode which
will restrict the power available to the motor. This may be quite adequate if you are not tackling
steeper gradients. Power mode will use up the battery power more quickly.
SET 1 –RESET TRIP 1 DISTANCE
Click the DOWN ( - ) button to reset trip 1. The TRIP1 icon will flash and the trip will be cleared.
SET 2 –MAX SPEED SETTING
The maximum speed setting is set to 35KM/H.
SET 3 –WHEEL DIAMETER SETTING
Do not adjust this setting as it affects speed and distance (Default 27.5”).
SET 4 –KM/H or MPH
Use this setting to select from either KM/H and Kilometres or MP/H and Miles.
13
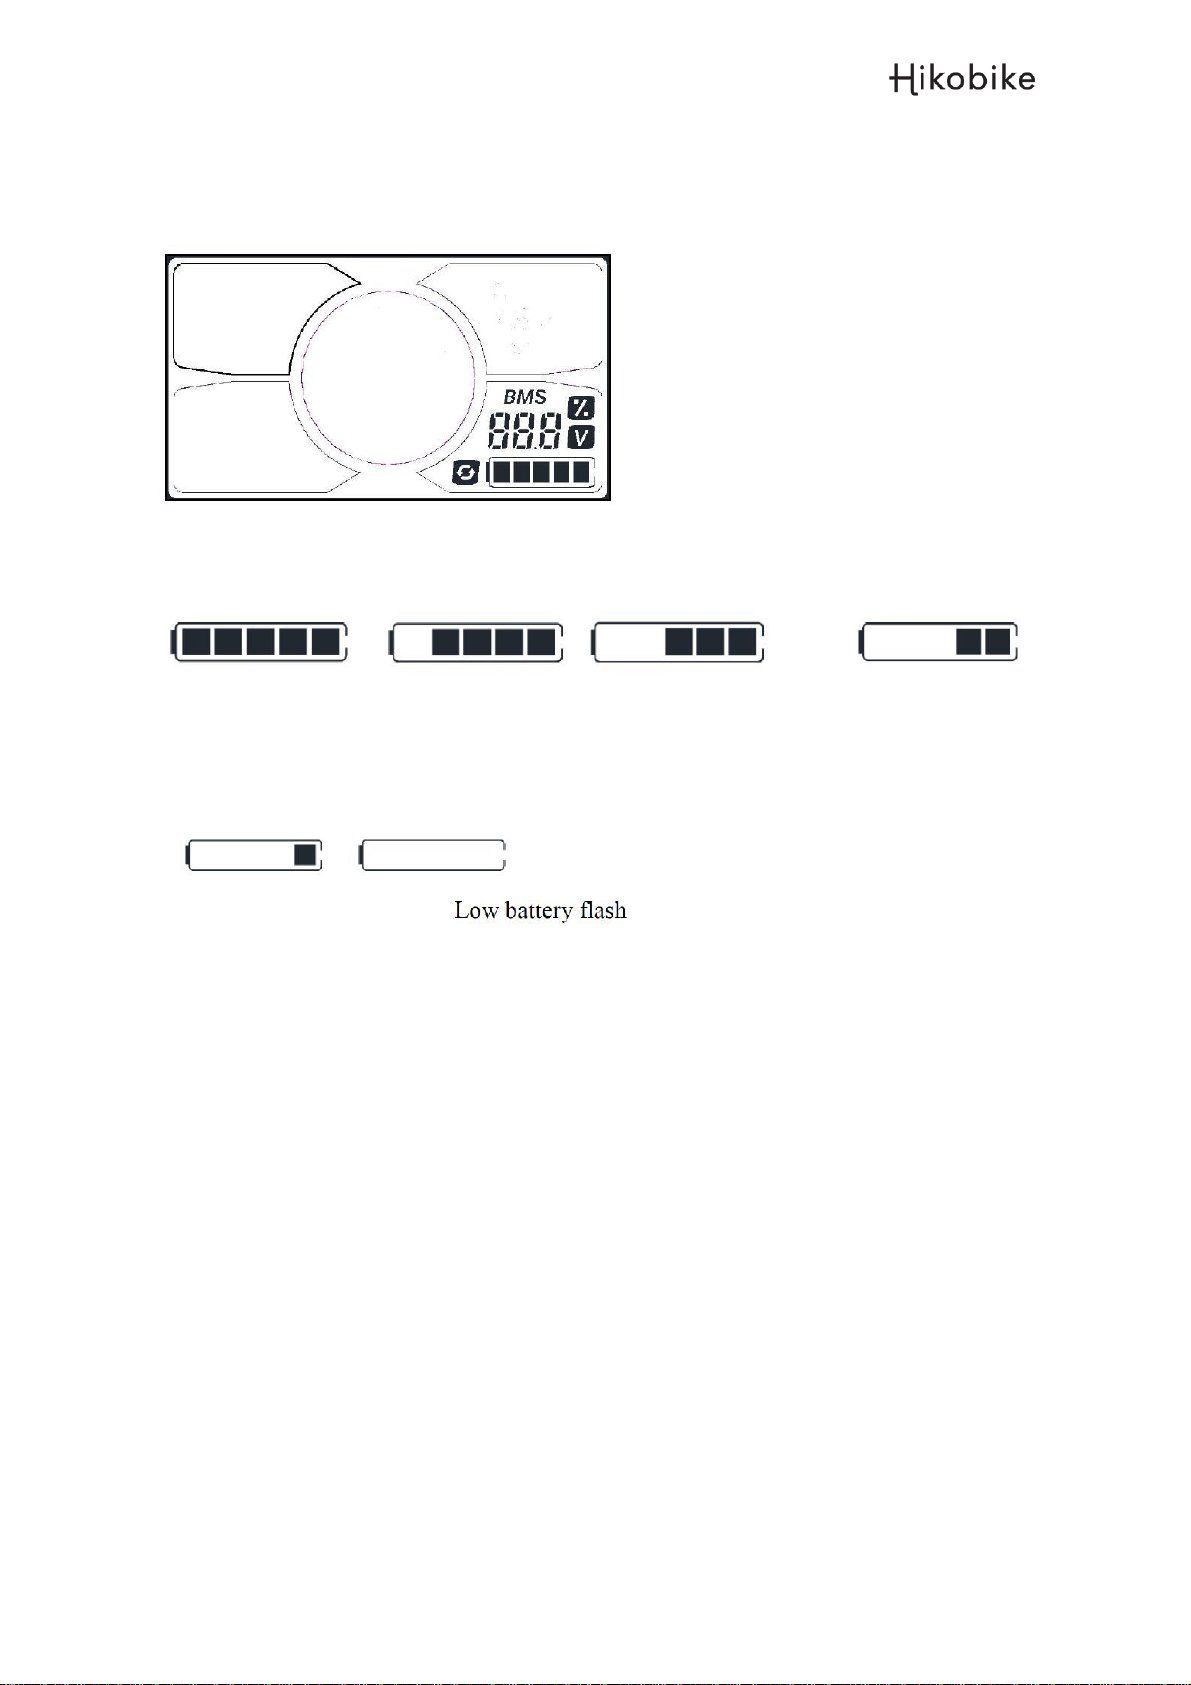
BATTERY CAPACITY INDICATOR
The battery indicator has 5 segments each representing 20% battery capacity. When the battery is
full the 5 segments all light up.
When the battery is severely low the last segment will flash. It is recommended to charge the
battery immediately. It is not recommended to allow the battery to discharge completely whilst
riding as this can decrease the overall life of the battery.
BMS - BATTERY VOLTAGE
Displays the current voltage of the battery.

14
ERROR CODES
Error Definition Trouble Shooting
code
0
1
2
3
4
5
6
7
8
9
Normal
Current Error or Controller Damage
Check Controller
Throttle Error
Check Throttle
Motor No Phase Position
Check Motor
Hall Sensor Error
Check Motor
Brake Error
Check Brakes
Under Voltage
Check Battery
Motor Stalling
Check Battery / Motor
Communication Error from Controller
Check Controller Connections
Communication Error from Display
Check Display Connections
MAINTENANCE AND STORAGE
Dealer and Bicycle mechanic routine maintenance:
Your bicycle should be taken to your servicing dealer or a bicycle mechanic after around 200 KMS of
riding for a general check and to check the spoke tension. Then every 1000 KMS for a general service
and inspection. Failure to do this can void your warranty due to unnecessary wear and tear.
User maintenance:
1. Oil the chain frequently, by using special bicycle lubricant (dry or wet). Apply the lube oil on
the chain by turning the pedals and dripping the lube oil on the chain as it moves past, and
spin for a few turns and change into all gears. It is easiest to do this on the bike stand or
bike carrier, with the wheels suspended off the ground. After applying the lube oil it is
important to clean off excess lube oil with a cloth. This removes old dirt that the new lube
has dislodged.
2. Keep tyre pressures within the tyre recommendations; see tyres for max PSI inflation.
Normally 35-55psi gives a hard tyre pressure for efficient pedalling and battery
consumption. A weekly check will save lots of pedalling energy later!
3. Check brake disc pads for even wear patterns. If the brakes become noisy when applied,
take to a service bike shop to check to see if they need replacement.
4. Store your e-bike in a dry place and away from corrosive environments.

15
5. Torque Settings
All bolt torques should have been checked during the pre delivery inspection (PDI). If
you have done the final assembly yourself please check before you set off for the first
time.
a. Handlebar clamp bolts 8 Nm
b. Headset bolts 8 –10 Nm
c. Stem angle bolt 15 Nm
d. Quick release front axle Common industry practice is resistance at lever
halfway through swing from open to fully closed.
e. Seat tube clamp nut Common industry practice is resistance at lever halfway
through swing from open to fully closed
f. Seat angle clamp bolt 22Nm
For reference specific bolts are tightened according to the recommended torques on PDI
With any other bolts, the torque depends on the diameter:
M4 2.5-4.0 Nm
M5 4.0-6.0 Nm
M6 6.0-7.5 Nm
Dos and Don’ts
Do treat your HIKOBIKE like any bicycle you would want to last well. Keep it stored somewhere
secure and away from the elements.
Don’t treat your HIKOBIKE as a dirt-bike. The motor and battery are weatherproof, but not water-
tight. It is ok in rain, but not to ford rivers and streams etc
Do take extra care on the road as you will be travelling faster than you normally do on a bike and
your bike is now power-assisted, so will behave differently.
Never take your HIKOBIKE on the beach as salt water and sand will drastically shorten the lifespan
of many of the e-bike’s components (motor, gears, wiring connections, etc).
Note: Your warranty is void if evidence of salt, sand, or water damage are present within the
components. Important: If you live very close to the sea you must keep your bike indoors when not
in use. This will save you lots of money as your components will last longer.
Important: Your bike may arrive with the battery partially charged. You need to give it a full
charge before ANY use. Top your battery up after each use (lithium batteries prefer shallow
discharge).
Note: The LCD battery display bars will dip under full load (on hills, etc). This is normal as running
voltage drops under high load. To get an accurate battery reading, wait about 10 seconds after the
motor stops being used.

16
WARRANTY
Before delivery to the customer, Hikobike e-bikes are checked to the BS EN 14764 standard for
defective materials and construction defects by a qualified bicycle mechanic.
The warranty is only applicable to the first owner of the e-bike. The rights are not transferable.
Warranty Periods
The warranty period is effective from the date of delivery to the customer.
Part
Warranty Period
Components
1 year
Third party component warranty conditions
for the relevant manufacturer also apply. The
warranty does not apply to parts that are
susceptible to wear and tear, such as tyres,
chains, brakes, cables, cassettes, derailleur
except if they are assembly or material
defects.
Motor, battery and other
electronic equipment
2 years
Frame
5 years
Invalidating the Warranty
This warranty will be invalidated in any of the following circumstances:
•The e-bike has been subject to damage due to use in competitions, jumping, downhill, or
trials.
•The e-bike has been ridden in places unsuited to electric bicycles, including rivers, streams,
sea or any water deeper than a few inches, on sand or beaches, or any other place clearly
unsuited to an e-bike.
•The e-bike has been involved in an accident.
•The e-bike has been operated in a careless or reckless fashion.
•The e-bike has been modified with non-original parts or altered from its original settings.
•The e-bike has been used for rental or any other commercial purposes.
Hikobike has the ultimate decision whether to acceptant a warranty claim and the option of repair,
replacement or reimbursement.
Warranty work should only be carried out by authorised Hikobike agents and does not cover the
any transport costs.
Hikobike accept no liability for damage to the e-bike or parts that have arisen from: incorrect tuning
of moving parts; the improper use of the e-bike; and the improper maintenance of the e-bike. This
includes damage as a result of untimely replacement of parts which suffer wear and tear.
Acceptance of any warranty claim does not imply an acceptance of any liability for any damages.
This warranty is in addition to the customer’s standard legal rights in New Zealand.

Table of contents
Popular Bicycle manuals by other brands


Hudora
Hudora 10273 INSTRUCTIONS ON ASSEMBLY AND USE

XtremepowerUS
XtremepowerUS 42CC Owner's manual and safety instructions

Brompton
Brompton B75 quick start guide

TP
TP Dino Discovery 4in1 TP710 Instructions for assembly, maintenance and safe use

Prodeco Technologies
Prodeco Technologies G Plus Mariner 7 user guide

Batribike
Batribike Granite Pro owner's manual


