Hilti TE 6-A Li User manual

TE 6-A Li
Operating instructions en
Mode d’emploi fr
Manual de instrucciones es
Manual de instruções pt
Printed: 07.07.2013 | Doc-Nr: PUB / 5071062 / 000 / 00

1
267
15
4
3
TE 6-A Li
Li-lon
CPC
36 Volt Li-Ion
2.4 Ah
8
This Product is Certified
Ce produit est certifié
Este producto esta certificado
Este produto está certificado
CUS
Printed: 07.07.2013 | Doc-Nr: PUB / 5071062 / 000 / 00

R L
5
4
6
3
2
+
R
+
R
36 Volt Li-Ion
2.4 Ah
3
3
2
4
5
4
2
3
6
7
2
Printed: 07.07.2013 | Doc-Nr: PUB / 5071062 / 000 / 00

1
3
2
R L
10 11
12
14
13
8 9
Printed: 07.07.2013 | Doc-Nr: PUB / 5071062 / 000 / 00

36 Volt Li-Ion
2.4 Ah
36 Volt Li-Ion
2.4 Ah
15
16
Li-lon
CPC
Printed: 07.07.2013 | Doc-Nr: PUB / 5071062 / 000 / 00

1
en
General information
1. Signal words and their meaning
-WARNING-: The word WARNING is used to draw atten-
tion to a potentially dangerous situation which could
lead to severe personal injury or death.
-CAUTION-: Used to draw attention to a potentially
dangerous situation which could lead to minor person-
al injury or damage to the equipment or other property.
-NOTE-: Used to draw attention to an instruction or other
useful information.
It is essential that the operating
instructions are read before the
tool is operated for the first time.
Always keep these operating
instructions together with the tool.
Ensure that the operating instruc-
tions are with the tool when it is
given to other persons.
Contents Page
General information 1
Description 1
Technical data 2
Safety rules 3
Before use 5
Operation 5
Insert tools and accessories 6
Care and maintenance 7
Manufacturer's warranty – tools 7
Disposal 8
Operating controls
Chuck
Side handle with depth gauge
Selector switch for hammering action / rotary only
Forwards / reverse switch and transport lock
Control switch
Battery (accessory, not supplied with the tool)
Release buttons with additional function – activation
of charge status indicator
Charge status and fault indicator
Description
The TE 6-A Li is a cordless, battery-powered, rotary ham-
mer drill with pneumatic hammering mechanism designed
for professional use.
The following conditions must always be observed
when the tool is in use:
– The tool is for hand-held use only.
– Do not use the tool in places where the surrounding
conditions may present a risk of explosion.
ORIGINAL OPERATING INSTRUCTIONS
TE 6-A Li cordless rotary hammer
The numbers refer to the illustrations. The illustra-
tions can be found on the fold-out cover pages. Keep
these pages open while you read the operating instruc-
tions.
In these operating instructions, the TE 6-A Li with battery
is referred to as “the tool”.
Location of identification data on the power tool
The type designation can be found on the type identifi-
cation plate and the serial number on the side of the
motor housing. Make a note of this data in your oper-
ating instructions and always refer to it when making an
enquiry to your Hilti representative or service depart-
ment.
Type:
Serial no.:
V = volts
–––
---= direct current
no=noloadspeed
min-1 = revolutions per minute
j= hammer drilling
= rotation only
Symbols
Read the
operating
instructions
before use
Return
waste material
for recycling
Warning signs
General
warning Warning:
electricity Warning:
caustic
substances
Wear ear
protection Wear
protective
gloves
Wear
breathing
protection
Wear eye
protection Wear a
hard hat
Obligation signs
Do not dispose
of batteries
with general
refuse
2. Pictograms
Printed: 07.07.2013 | Doc-Nr: PUB / 5071062 / 000 / 00

2
en
The tool is designed for the following uses:
Use
Drilling in concrete, masonry and
natural stone
Setting anchors
Drilling in wood and metal
Screwdriving
Using hole saws in wood, plastic,
tiles and masonry
Drilling in snow, ice and hard
ground
Required insert tool
Drill bit with TE-C connection end
Anchor setting tool with TE-C
connection end
Quick-release chuck or key-type
chuck
S-BHU 75 M SDS bit holder
Quick-release chuck or key-type
chuck
TE-C-EB ice drill bit
Diameter range
Drilling in concrete:
5/32″–5/8″(4–16 mm) dia.
All Hilti anchors with TE-C setting
tools
Wood drill bits up to 3/4″(20 mm)
dia.
Metal drill bits up to 3/8″(10 mm) dia.
TE-HS hole saws 1″–45/8″(25–105
mm) dia.
11/8″–13/8″(28–35 mm) dia.
Technical data
Voltage 36 V
Weight of machine
TE 6-A Li including B36/2.4 Li-Ion battery 8.2 lbs (3.7 kg)
TE 6-A Li including B36/2.6 Li-Ion battery 8.2 lbs (3.7 kg)
TE 6-A Li including B36/3.3 Li-Ion battery 9.3 lbs (4.2 kg)
TE 6-A Li including B36/2.4 NiCd battery 10.4 lbs (4.7 kg)
Dimensions (L×H×W) 13″×8.9″×3.9″(330×215×90 mm)
Speed 890 r.p.m.
Hammering speed 5,000 blows/min.
Single impact energy 1.5 joules
Chuck TE-C Click
Drill bit dia. range in concrete up to 5/8″(16 mm)
Drill bit dia. range in wood up to 3/4″(20 mm)
Drill bit dia. range in metal up to 3/8″(10 mm)
Dust-tight encapsulation and permanent lubrication (maintenance-free)
Technical data for the battery
(accessory TE 6-A Li) B36 / 2.4 Li-Ion B36 / 2.6 Li-Ion B36 / 3.3 Li-Ion B36 / 2.4 NiCd
Voltage 36 V 36 V 36 V 36 V
Battery capacity 36 V x 2.4 Ah 36 V x 2.6 Ah 36 V x 3.3 Ah 36 V x 2.4 Ah
= 86.4 Wh = 93,6 Wh = 118,4 Wh = 86.4 Wh
Weight 2.6 lbs (1.17 kg) 2.6 lbs (1.17 kg) 3.5 lbs (1.6 kg) 4.6 lbs (2.08 kg)
Type of cell Lithium-ion Lithium-ion Lithium-ion Nickel-cadmium
No. of cells 10 10 30 30
Temperature monitoring NTC NTC NTC NTC
Deep discharge prevention ✓✓✓
Right of technical changes reserved
Insert tools, accessories
Bit holder S-BH 50
Charger for NiCd and NiMH batteries TCU 7/36
C 7/36-ACS
for Li-ion batteries C 4/36-ACS
Battery for the TE 6-A Li B36 / 2.4 Li-Ion
B36 / 2.6 Li-Ion
B36 / 3.3 Li-Ion
B36 / 2.4 NiCd
Printed: 07.07.2013 | Doc-Nr: PUB / 5071062 / 000 / 00

3
en
Safety rules
1. General safety rules
-WARNING- Read all instructions! Failure to follow
all instructions listed below may result in electric shock,
fire and/or serious injury. The term "power tool" in all
of the warnings listed below refers to your mains oper-
ated (corded) power tool or battery operated (cord-
less) power tool.
SAVE THESE INSTRUCTIONS
1.1 Work area safety
a) Keep work area clean and well lit. Cluttered or
dark areas invite accidents.
b) Do not operate power tools in explosive atmos-
pheres, such as in the presence of flammable liq-
uids, gases or dust. Power tools create sparks
which may ignite the dust or fumes.
c) Keep children and bystanders away while operat-
ing a power tool. Distractions can cause you to lose
control.
1.2 Electrical safety
a) Power tool plugs must match the outlet. Never
modify the plug in any way. Do not use any adapter
plugs with earthed (grounded) power tools. Unmod-
ified plugs and matching outlets will reduce risk of
electric shock.
b) Avoid body contact with earthed or grounded sur-
faces such as pipes, radiators, ranges and refrig-
erators. There is an increased risk of electric shock
if your body is earthed or grounded.
c) Do not expose power tools to rain or wet condi-
tions. Water entering a power tool will increase the
risk of electric shock.
d) Do not abuse the cord. Never use the cord for car-
rying, pulling or unplugging the power tool. Keep
cord away from heat, oil, sharp edges or moving
parts. Damaged or entangled cords increase the
risk of electric shock.
e) When operating a power tool outdoors, use an
extension cord suitable for outdoor use. Use of a
cord suitable for outdoor use reduces the risk of
electric shock.
1.3 Personal safety
a) Stay alert, watch what you are doing and use com-
mon sense when operating a power tool. Do not
use a power tool while you are tired or under the
influence of drugs, alcohol or medication. A moment
of inattention while operating power tools may result
in serious personal injury.
b) Use safety equipment. Always wear eye protection.
Safety equipment such as dust mask, non-skid safe-
ty shoes, hard hat, or hearing protection used for
appropriate conditions will reduce personal injuries.
c) Avoid accidental starting. Ensure the switch is in
the off-position before plugging in. Carrying pow-
er tools with your finger on the switch or plugging in
power tools that have the switch on invites accidents.
d) Remove any adjusting key or wrench before turn-
ing the power tool on. A wrench or a key left attached
to a rotating part of the power tool may result in
personal injury.
e) Do not overreach. Keep proper footing and bal-
ance at all times. This enables better control of the
power tool in unexpected situations.
f) Dress properly. Do not wear loose clothing or jew-
ellery. Keep your hair, clothing and gloves away
from moving parts. Loose clothes, jewellery or long
hair can be caught in moving parts.
g) If devices are provided for the connection of dust
extraction and collection facilities, ensure these
are connected and properly used. Use of these
devices can reduce dust-related hazards.
1.4 Power tool use and care
a) Do not force the power tool. Use the correct pow-
er tool for your application. The correct power tool
will do the job better and safer at the rate for which
it was designed.
b) Do not use the power tool if the switch does not
turn it on and off. Any power tool that cannot be
controlled with the switch is dangerous and must
be repaired.
c) Disconnect the plug from the power source and/or
the battery pack from the power tool before making
any adjustments, changing accessories, or storing
power tools. Such preventive safety measures reduce
the risk of starting the power tool accidentally.
d) Store idle power tools out of the reach of children
and do not allow persons unfamiliar with the pow-
er tool or these instructions to operate the power
tool. Power tools are dangerous in the hands of
untrained users.
e) Maintain power tools. Check for misalignment or
binding of moving parts, breakage of parts and
any other condition that may affect the power tool's
operation. If damaged, have the power tool repaired
before use. Many accidents are caused by poorly
maintained power tools.
f) Keep cutting tools sharp and clean. Properly main-
tained cutting tools with sharp cutting edges are less
likely to bind and are easier to control.
g) Use the power tool, accessories and tool bits etc.,
in accordance with these instructions and in the
manner intended for the particular type of power
tool, taking into account the working conditions
and the work to be performed. Use of the power
tool for operations different from those intended
could result in a hazardous situation.
1.5 Battery tool use and care
a) Ensure the switch is in the off position before insert-
ing battery pack. Inserting the battery pack into pow-
er tools that have the switch on invites accidents.
b) Recharge only with the charger specified by the
manufacturer. A charger that is suitable for one
type of battery pack may create a risk of fire when
used with another battery pack.
Printed: 07.07.2013 | Doc-Nr: PUB / 5071062 / 000 / 00

4
en
c) Use power tools only with specifically designated
battery packs. Use of any other battery packs may
create a risk of injury and fire.
d) When battery pack is not in use, keep it away from
other metal objects like paper clips, coins, keys,
nails, screws, or other small metal objects that
can make a connection from one terminal to anoth-
er. Shorting the battery terminals together may
cause burns or a fire.
e) Under abusive conditions, liquid may be ejected
from the battery, avoid contact. If contact acci-
dentally occurs, flush with water. If liquid contacts
eyes, additionally seek medical help. Liquid eject-
ed from the battery may cause irritation or burns.
1.6 Service
a) Have your power tool serviced by a qualified repair
person using only identical replacement parts.
This will ensure that the safety of the power tool is
maintained.
2 Additional safety precautions
2.1 Personal safety
a) Wear ear protectors. Exposure to noise can cause
hearing loss.
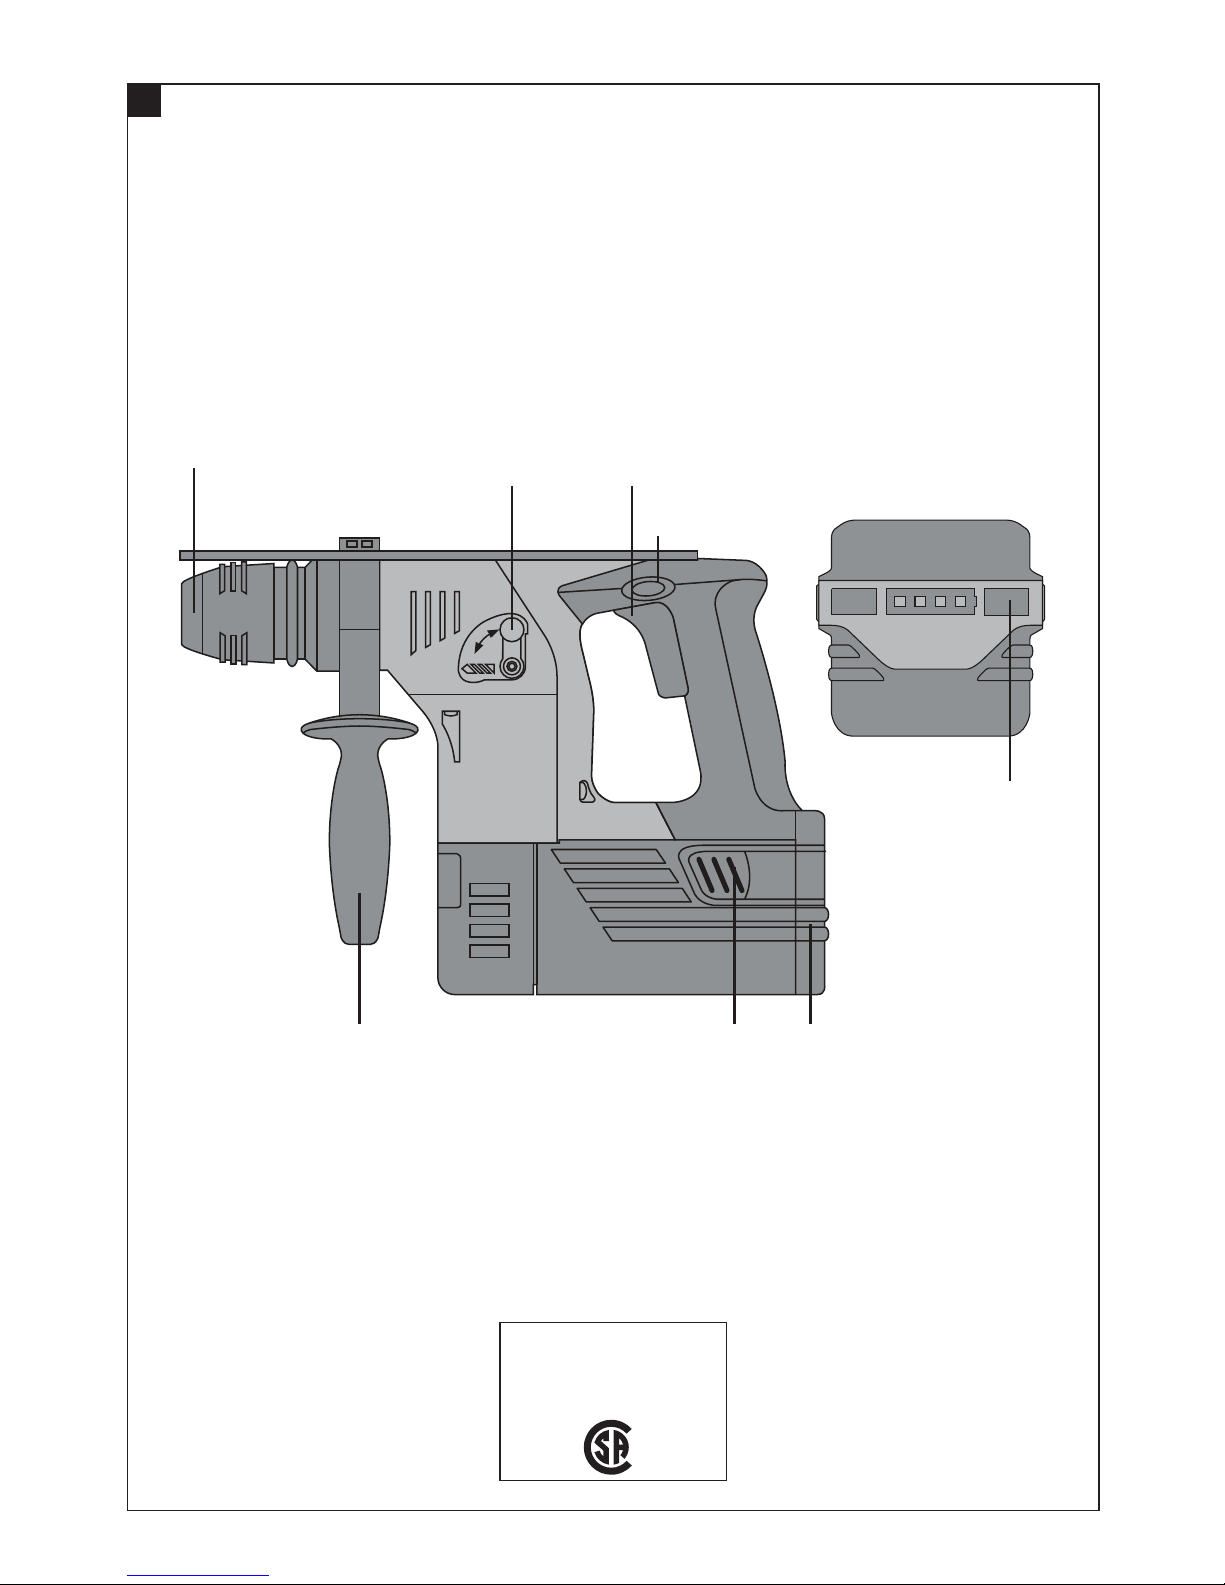
b) Use auxiliary handles supplied with the tool. Loss
of control can cause personal injury.
c) Prevent unintentional starting. Ensure the switch
is in the off-position before connecting to power
source and/or battery pack, picking up or carrying
the tool. Carrying power tools with your finger on
the switch or energising power tools that have the
switch on invites accidents.
d) Always hold the tool securely with both hands on
the grips provided. Keep the grips clean, dry and
free from oil and grease.
e) Adjust the side handle to the desired position and
check that it is fitted and secured correctly.
f) Avoid contact with rotating parts. Switch the tool
on only once it has been brought into the work-
ing position close to the workpiece.
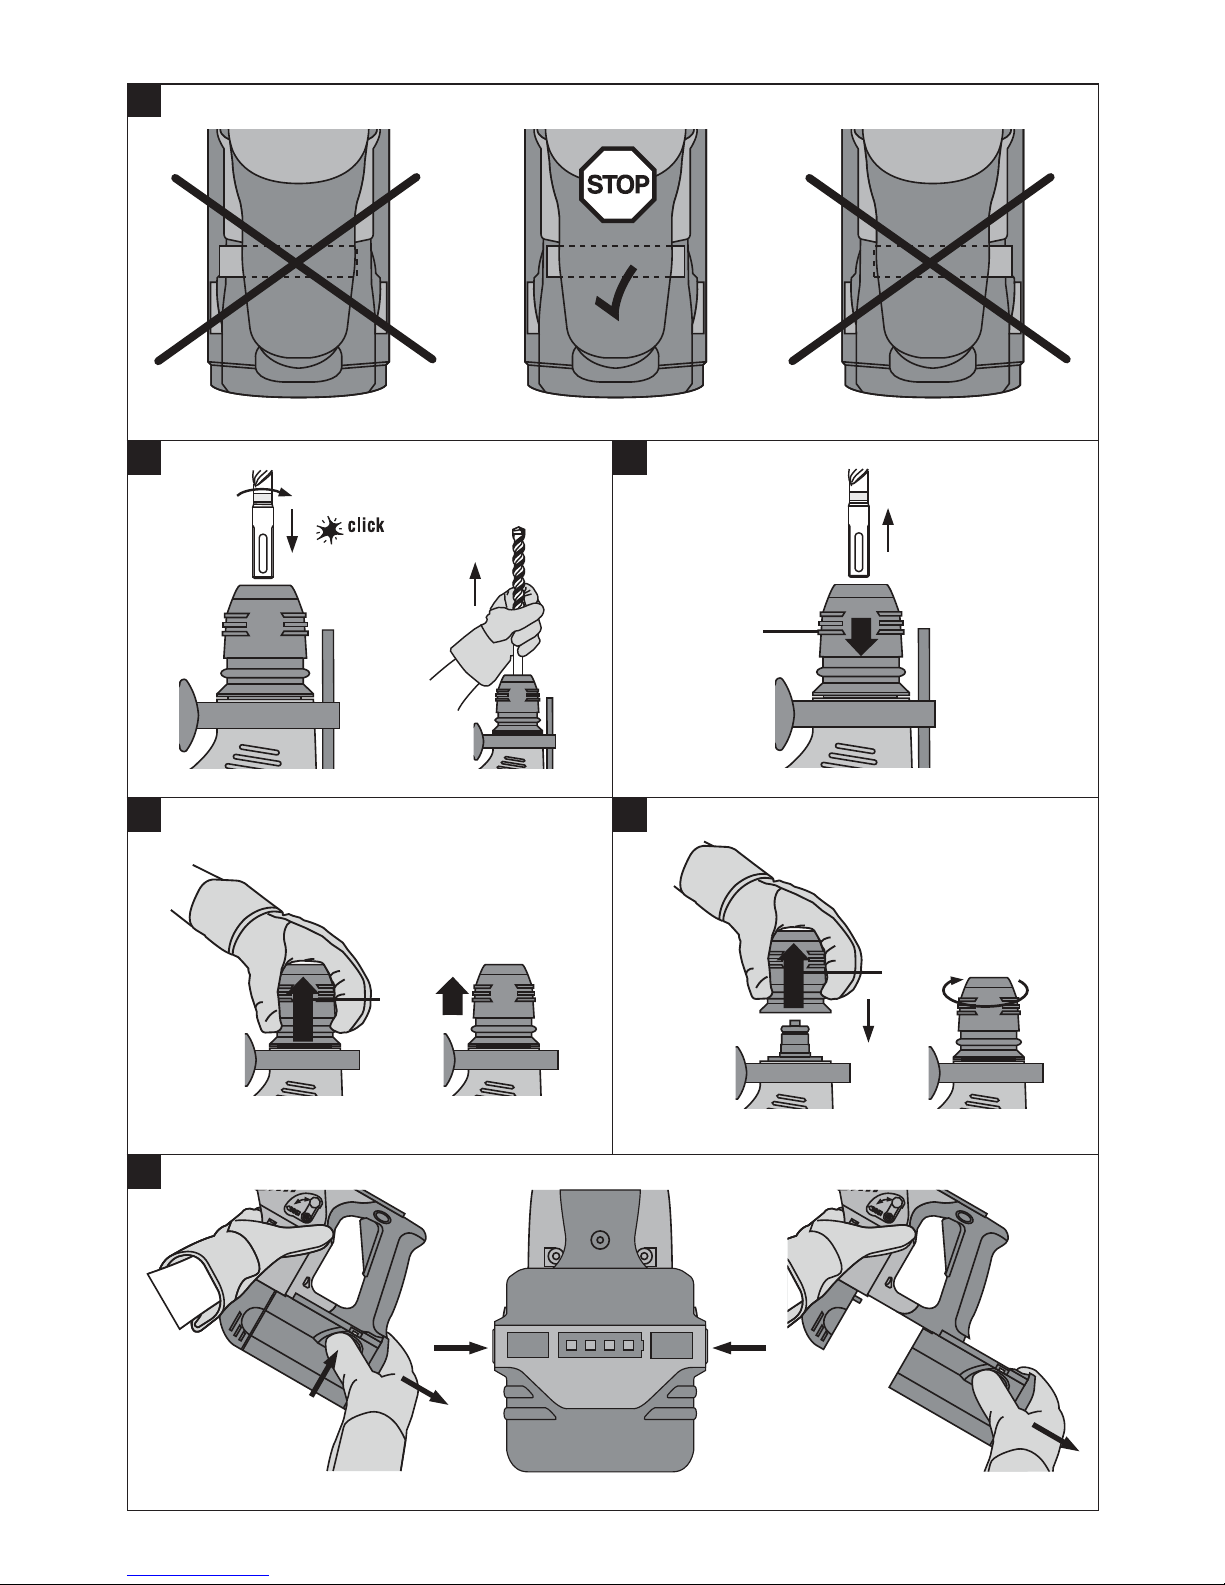
g) Avoid unintentional starting. Do not carry the tool
with your finger on the on/off switch. The forwards
/ reverse / transport lock switch should be brought
into the transport lock position (middle position)
when the tool is not in use, e.g. during pauses
between work, before maintenance, when chang-
ing insert tools and during transport.
h) Breathing protection must be worn when the tool
is used without a dust removal system for work
that creates dust.
i) Operate the tool only as directed and only when
it is in faultless condition.
j) Exercise your fingers during pauses between work
to improve the blood circulation in your fingers.
k) Children must be instructed not to play with the
tool.
l) The tool is not intended for use by children,by
debilitated persons or those who have received
no instruction or training.
m) WARNING: Some dust created by grinding, sand-
ing, cutting and drilling contains chemicals known
to cause cancer, birth defects, infertility or other
reproductive harm; or serious and permanent res-
piratory or other injury. Some examples of these
chemicals are: lead from leadbased paints, crys-
talline silica from bricks, concrete and other mason-
ry products and natural stone, arsenic and chromi-
um from chemicallytreated lumber. Your risk from
these exposures varies, depending on how often you
do this type of work. To reduce exposure to these
chemicals, the operator and bystanders should
work in a well-ventilated area, work with approved
safety equipment, such as respiratory protection
appropriate for the type of dust generated, and
designed to filter out microscopic particles and
direct dust away from the face and body. Avoid pro-
longed contact with dust. Wear protective cloth-
ing and wash exposed areas with soap and water.
Allowing dust to get into your mouth, eyes, or to
remain on your skin may promote absorption of
harmful chemicals.
2.2 Power tool use and care
a) Secure the workpiece. Use clamps or a vice to hold
the workpiece in place. The workpiece is thus held
more securely than by hand and both hands remain
free to operate the tool.
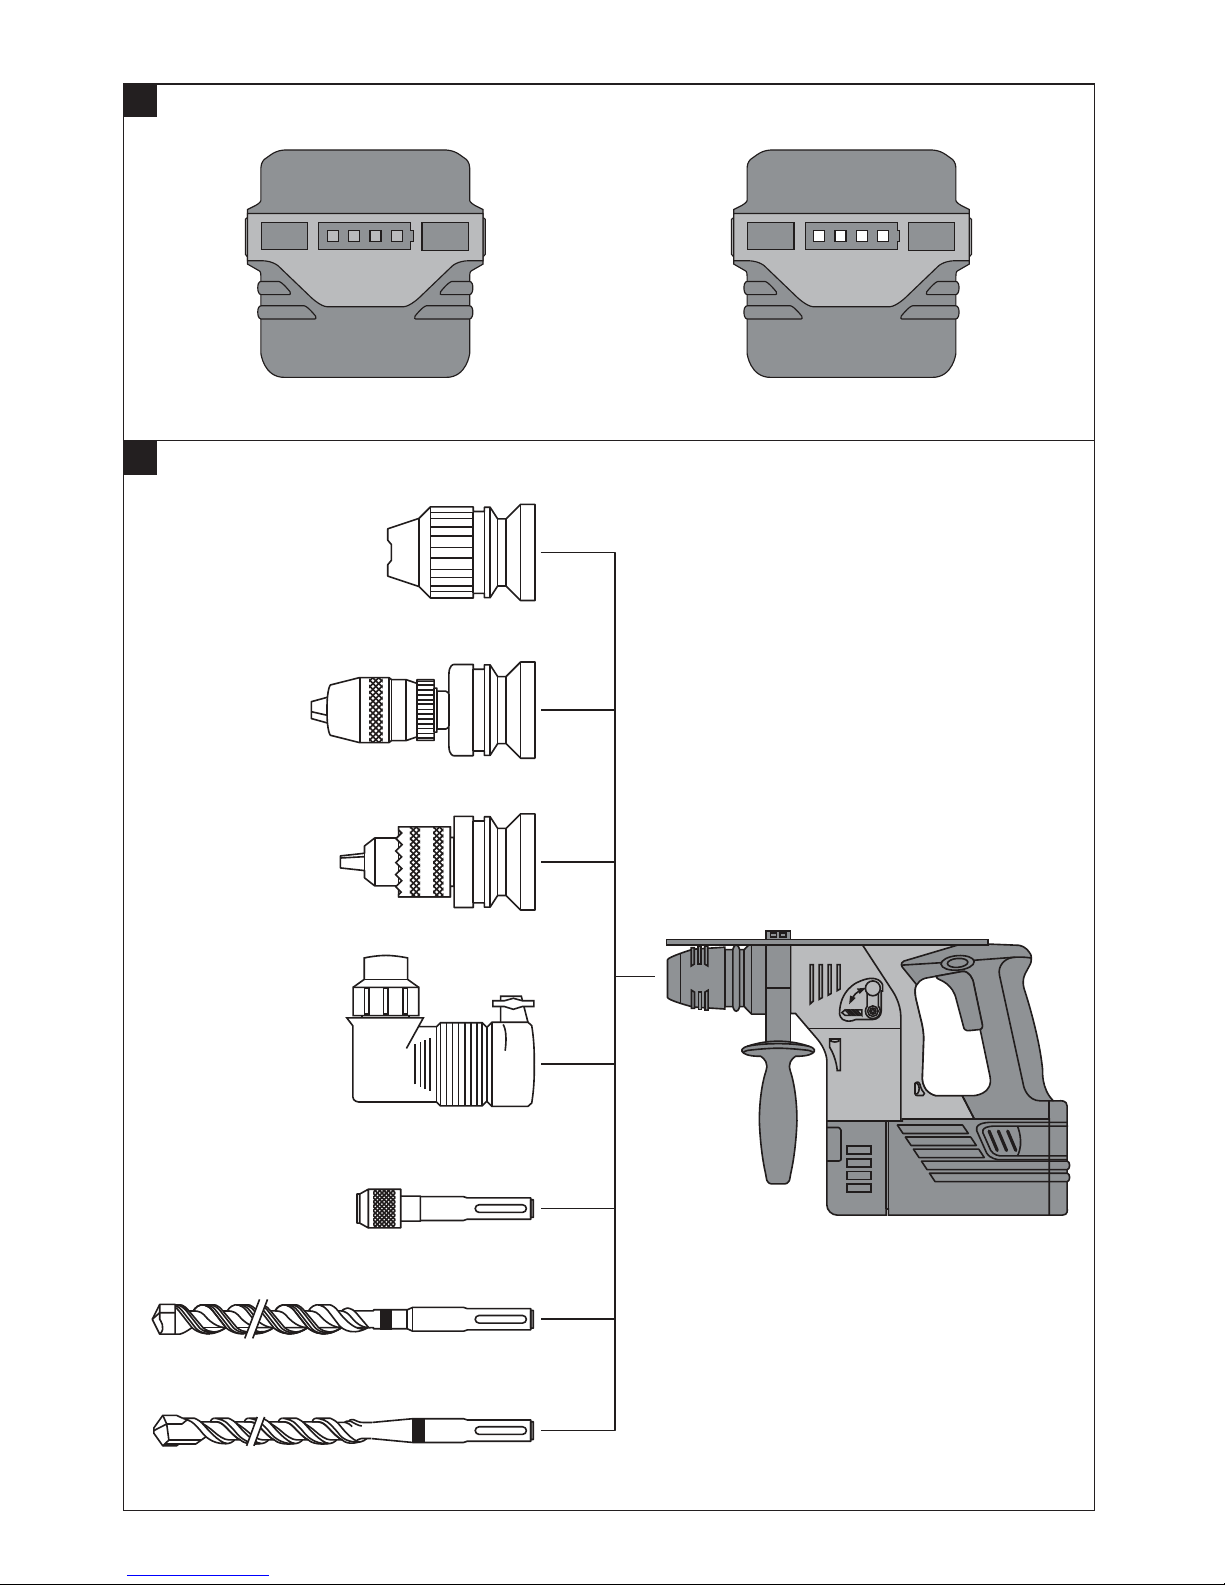
b) Ensure that the insert tools used are equipped with
the appropriate connection end system and that
they are properly fitted and secured in the chuck.
2.3 Electrical safety
a)Before beginning work, check the working area (e.g.
with a metal detector) to ensure that no concealed
electric cables or gas and water pipes are present.
External metal parts of the tool may become live if,
for example, an electric cable is damaged inadvertenly.
This presents a serious risk of electric shock.
2.4 Work area
a) Ensure that the workplace is well lit.
b) Ensure that the workplace is well ventilated.Poor-
ly ventilated workplaces may be injurious to the
health due to exposeure to dust.
2.5 Personal protective equipment
The user and any other persons in the vicinity must
wear suitable eye protection, a hard hat, ear protection
and protective gloves when the tool is in use. Breath-
ing protection must be worn if no dust removal sys-
tem is used.
Wear ear
protection Wear
protective
gloves
Wear
breathing
protection
Wear eye
protection Wear a
hard hat
Printed: 07.07.2013 | Doc-Nr: PUB / 5071062 / 000 / 00

5
Before use
Handling batteries with due care and attention
Note:
– Battery performance drops at low temperatures.
– Never keep on working with the battery until the tool
comes to a stand still. Change to the second battery
as soon as a drop in performance is noticed. Recharge
the battery immediately so that it is ready for reuse.
– Store the battery in a cool, dry place. Never store the
battery where it is exposed to the heat of the sun, on
a radiator, behind a motor vehicle windscreen or at a
window.
– Batteries that have reached the end of their life must
be disposed of safely and correctly to avoid environ-
mental pollution.
– Use the Hilti battery only with the approved Hilti charg-
ers listed in the “Tools and accessories” section.
– Ensure that the outer surfaces of the battery are clean
and dry before inserting it in the corresponding charg-
er.
– Read the operating instructions for the charger for
further information about the charging procedure.
Charging a new battery for the first time
A new battery must be charged correctly for the first
time before use. This will ensure that the cells form cor-
rectly. Incorrect initial charging may have a permanent,
negative effect on battery capacity. Please refer to the
applicable battery charger's operating instructions for
information about initial charging.
Recharging a NiCd or NiMH battery
NiCd and NiMH batteries must be allowed to reach full
charge each time they are charged.
Recharging Li-ion batteries
Li-ion batteries are ready for use at any time, even when
only partly charged. Charging progress is indicated by
the LEDs; please refer to the section “Battery charge sta-
tus”.
Fitting the battery to the tool
Caution: Before fitting the battery, check that the tool is
switched off and that the transport lock is engaged (for-
ward/reverse switch in the middle position). Use only
batteries approved for use with the tool.
1. Push the battery into the tool from behind until it is
heard to engage with a double click
2. Caution: A falling battery may present a risk of injury
to yourself or others. Check that the battery is seat-
ed securely in the tool.
Removing the battery from the tool
1. Press both release buttons.
2. Remove the battery from the tool.
Operation
Fitting the insert tool
1. Remove the battery from the tool.
2.Check that the connection end of the insert tool is
clean and lightly greased. Clean it and grease it if
necessary.
3. Check that the sealing lip of the dust shield is clean
and in good condition. Clean the dust shield if nec-
essary or replace it if the sealing lip is damaged.
4. Push the connection end of the insert tool into the
chuck and, while applying slight pressure, rotate the
insert tool until it engages in the guide grooves.
5. Push the insert tool further into the chuck until it is
heard to engage.
6. Check that the insert tool has engaged correctly (pull
by hand).
Removing the insert tool
CAUTION
Wear protective gloves when changing insert tools. The
insert tool may become hot during use.
1. Remove the battery from the tool.
2. Open the chuck by pulling back the locking sleeve.
3. Pull the insert tool out of the chuck.
2.6 Battery tool use and care
a)Ensure that the outer surface of the battery is clean
and dry before inserting the battery in the appro-
priate charger for charging.
b)Check that the battery is securely attached to the
tool. A falling battery could injure you or other per-
sons.
c)Batteries that have reached the end of their life
must be disposed of safely (see „Disposal“).
d)Observe the special instructions applicable to the
transport, storage and use of lithium-ion batteries.
e)Do not expose batteries to high temperatures or fire
(danger of explosion).
f) Batteries must not be opened or dismantled, squashed,
heated to temperatures over 100°C or incinerated.
Failure to observe this point may result in fire, explo-
sion or injury through contact with caustic sub-
stances.
g)Do not use batteries other than those recommend-
ed for the applicable tool or appliance. Use of oth-
er batteries or use of these batteries for purposes
for which they were not intended presents a risk of
fire or explosion.
h)Do not charge or continue to use damaged batter-
ies (e.g. batteries with cracks, broken parts, bent
or pushed-in and/or pulled-out contacts).
en
Printed: 07.07.2013 | Doc-Nr: PUB / 5071062 / 000 / 00

6
en
2. Move the selector lever to the hammer drilling posi-
tion (hammer symbol) .
3. Bring the tip of the drill bit into contact with the work-
piece at the position where the hole is to be drilled
and press the control switch slowly. Drill at low speed
until the drill bit centers itself in the hole.
4. Press the control switch fully and continue drilling at
full power. When drilling a through hole, reduce drilling
speed shortly before the drill bit breaks through. This
will reduce spalling around the hole.
5. Do not exert excessive pressure as this will not increase
hammering power. Lower contact pressure increas-
es the life of the drill bit.
Drilling using the depth gauge
Always use the TE 6-A Li with the side handle.
The side handle is adjustable and can be clamped in
any desired position. Release the side handle by unscrew-
ing the grip a few turns, bring the depth gauge to the
desired drilling depth and retighten the side handle .
Note: Use of the depth gauge increases the number of
holes drilled per battery charge by avoiding drilling holes
to excessive depth.
Drilling in wood and steel without hammering action
Bring the selector lever to the drilling position (drill bit
symbol) .
When the lever is in this position, only the rotary action
is transmitted to the insert tool.
Reverse rotation
The desired direction of rotation can be selected simply
by moving the switch .
Insert tools and accessories
TE-C chuck, quick-release chuck or key-type chuck
Changing the chuck
Pull the chuck sleeve forward and remove the chuck
completely. When fitting the chuck, pull the sleeve for-
ward, hold it in this position and then push the chuck
onto the tool as far as it will go before releasing the
sleeve. Rotate the chuck until the sleeve snaps back
into position.
Note: The hammering action is de-activated automat-
ically when the key-type chuck or quick-release chuck
are fitted (for drilling without hammering action).
When using insert tools with cylindrical shanks, open
the key-type chuck to the necessary diameter, push in
the insert tool as far as it will go and use the key to
tighten the chuck. Check your insert tools at regular
intervals and replace them in good time. A damaged
or badly worn connection end may result in damage
to the electric tool. Drill bits with chipped or broken
Removing the chuck
CAUTION
Remove the depth gauge from the side handle in order
to avoid injury.
1. Remove the battery from the tool.
2. Pull the retaining ring on the chuck toward the front
and hold it in this position.
3. Pull the chuck away from the tool toward the front.
Fitting the chuck
CAUTION
Remove the depth gauge from the side handle in order
to avoid injury.
1. Remove the battery from the tool.
2. Grip the sleeve around the base of the chuck and pull
it forward. Hold it in this position.
3. Push the chuck onto the guide tube on the tool and
release the sleeve.
4. Turn the chuck until it is heard to engage.
Fitting the battery
Do not use batteries other than those recommended for
the applicable tool or appliance. Use of other batteries
or use of the battery for purposes for which it is not
intended presents a risk of fire or explosion.
Fit the battery to the tool by inserting it in the dovetail
guide and pushing it in as far as it will go. Two clicks
must be heard as the battery engages (secured at two
points) .
Charging the battery
Use the Hilti battery only with the approved Hilti charg-
ers listed in the “Tools and accessories” section.
Please refer to the operating instructions for the corre-
sponding charger for details of the charging procedure.
Battery charge status
When a Li-ion battery is used, battery charge status can
be displayed by pressing one of the release buttons light-
ly (press until resistance is felt – do not release the
battery!).
The LEDs on the rear of the battery provide the follow-
ing information:
LED lights constantly LED blinks Charge status C
LED 1, 2, 3, 4 – C ⭌75%
LED 1, 2, 3 – 50% ⬉C⬍75%
LED 1, 2 – 25% ⬉C⬍50%
LED 1 – 10% ⬉C⬍25%
– LED 1 C ⬍10%
Note: The charge status cannot be indicated while the
tool is in operation. Indication is given (LED blinks) only
when the battery is fully discharged or when it has over-
heated (temperature >80°).
Hammer drilling
1. Use TE-C hammer drill bits (for concrete, masonry
and natural stone) .
Printed: 07.07.2013 | Doc-Nr: PUB / 5071062 / 000 / 00

7
en
carbide tips may no longer drill holes of the specified
diameter, thus influencing their suitability for anchor
fastenings.
Batteries
Do not use batteries other than those recommended for
the applicable tool or appliance. Use of other batteries
or use of the battery for purposes for which it is not
intended presents a risk of fire or explosion.
Note: Deep discharge prevention device.
– This prevents damage to the cells caused by exces-
sively deep discharge.
– It also protects the entire system when subjected to
extreme loads (stalling of the spindle).
For information on the charging procedure, please refer
to the operating instructions for the applicable charger.
For information on the charging procedure, please refer
to the operating instructions for the applicable charger.
Special insert tools programme
Should you require insert tools not included in the stan-
dard programme, please contact the Hilti customer
service department or your Hilti representative. Hilti
offers a comprehensive range of special insert tools in
professional quality.
Care and maintenance
CAUTION
Before beginning cleaning, remove the battery from
the power tool in order to prevent unintentional start-
ing.
Care of insert tools
Remove any dirt adhering to the surface of the insert
tools and protect them from corrosion by rubbing them
with an oily cloth from time to time.
Care of the tool
CAUTION
Keep the power tool, especially its grip surfaces,
clean and free from oil and grease. Do not use clean-
ing agents which contain silicone.
The outer casing of the tool is manufactured from
impact-resistant plastic. The grip section is manufac-
tured from synthetic rubber.
The ventilation slots must be unobstructed and kept
clean at all times. Use a dry brush to clean the ventila-
tion slots carefully. Do not permit foreign objects to
enter the interior of the tool. Use a slightly damp cloth
to clean the outside of the tool at regular intervals. Do
not use a spray, steam-cleaning system or running
water for cleaning. This may negatively affect the elec-
trical safety of the tool. Always keep the grip sections
of the tool free from oil and grease. Do not use clean-
ing agents or polishes, etc., containing silicone.
Maintenance
Check all external parts of the tool for damage at reg-
ular intervals and check that all controls operate fault-
lessly. Do not operate the tool when parts are damaged
or when the controls do not operate faultlessly. If nec-
essary, have the tool repaired at a Hilti service centre.
Electrical parts of the tool may be repaired only by
trained electrical specialists.
Checking the tool after care and maintenance
After all care and maintenance work, the tool must be
checked to ensure that all safety equipment is fitted
and that it operates faultlessly.
Clean the dust shield on the chuck at regular intervals
using a clean, dry cloth. Carefully wipe the sealing lip
and grease it with a little Hilti grease. It is essential that
the dust shield is replaced when the sealing lip is dam-
aged. Proceed as follows: Insert a screwdriver at the
edge of the dust shield and prise it out in a forwards
direction. Clean the contact surface and insert a new
dust shield. Press it in firmly until it engages.
Care of the Li-ion battery
– Avoid entrance of moisture.
– Charge the battery fully before using it for the first
time.
– In order to achieve maximum battery life, stop dis-
charging the battery as soon as a significant drop in
performance is noticed.
– Use only the approved Hilti C4/36-ACS charger to
charge the battery.
–Note: If use of the tool continues, further battery dis-
charge will be stopped automatically before the bat-
tery cells suffer damage (LED 1 blinks).
– A conditioning charge (as is required with NiCd or
NiMH batteries) is not necessary.
– Interruption of the charging procedure has no nega-
tive effect on the life of the battery.
– Charging can be started from any state of discharge
with no negative effect on the life of the battery.
Thereisnomemoryeffect(aswithNiCdorNiMH
batteries).
– For best results, batteries should be stored fully charged
in a cool dry place. Avoid charging the battery in places
subject to high ambient temperatures (e.g. at a win-
dow) as this has an adverse effect on battery life and
increases the rate of self discharge.
Manufacturers warranty – tools
Hilti warrants that the tool supplied is free of defects
in material and workmanship. This warranty is valid so
long as the tool is operated and handled correctly,
cleaned and serviced properly and in accordance with
the Hilti Operating Instructions, and the technical sys-
tem is maintained. This means that only original Hilti
Printed: 07.07.2013 | Doc-Nr: PUB / 5071062 / 000 / 00

8
en
consumables, components and spare parts may be
used in the tool.
This warranty provides the free-of-charge repair or
replacement of defective parts only over the entire lifes-
pan of the tool. Parts requiring repair or replacement
as a result of normal wear and tear are not covered by
this warranty.
Additional claims are excluded, unless stringent
national rules prohibit such exclusion. In particular,
Hilti is not obligated for direct, indirect, incidental
or consequential damages, losses or expenses in
connection with, or by reason of, the use of, or inabil-
ity to use the tool for any purpose. Implied warranties
of merchantability or fitness for a particular purpose
are specifically excluded.
For repair or replacement, send tool or related parts
immediately upon discovery of the defect to the address
of the local Hilti marketing organization provided.
This constitutes Hilti's entire obligation with regard to
warranty and supersedes all prior or contemporane-
ous comments and oral or written agreements con-
cerning warranties.
Disposal
Return waste material for recycling.
Most of the materials from which Hilti power tools are
manufactured can be recycled. The materials must be
correctly separated before they can be recycled. In
many countries, Hilti has already made arrangements
for taking back your old electric tools for recycling.
Please ask your Hilti customer service department or
Hilti sales representative for further information.
Do not dispose of batteries with general refuse.
Dispose of the battery in accordance with national reg-
ulations or return used batteries to Hilti for recycling.
Dispose of defective batteries without delay. Keep them
out of reach of children. Do not attempt to open or dis-
mantle batteries and do not dispose of them by
incineration.
CAUTION
Improper disposal of the equipment may have serious
consequences:
– The burning of plastic components generates toxic
fumes which may present a health hazard.
– Batteries may explode if damaged or exposed to very
high temperatures, causing poisoning, burns, acid
burns or environmental pollution.
– Careless disposal may permit unauthorized and improp-
er use of the equipment. This may result in serious
personal injury, injury to third parties and pollution
of the environment.
Batteries
Hilti batteries contain lithium or nickel
and cadmium. Dispose of batteries in
accordance with national regulations.
RBRC
R
E
C
Y
C
L
E
1
.
8
0
0
.
8
2
2
.
8
8
3
7
Printed: 07.07.2013 | Doc-Nr: PUB / 5071062 / 000 / 00

9
fr
Consignes générales
1. Termes signalant un danger
-AVERTISSEMENT-: Pour attirer l'attention sur une
situation pouvant présenter des dangers susceptibles
d'entraîner des blessures corporelles graves ou la mort.
-ATTENTION-: Pour attirer l'attention sur une situation
pouvant présenter des dangers susceptibles d'entraî-
ner des blessures corporelles légères ou des dégâts
matériels.
-REMARQUE-: Conseils d'utilisation et autres informa-
tions utiles.
2. Pictogrammes
Avant de mettre en marche
l’appareil, lire absolument le
mode d’emploi.
Le présent mode d’emploi doit
toujours accompagner l’appareil.
Ne prêter ou céder l’appareil à
quelqu’un d’autre qu’en lui four-
nissant aussi le mode d’emploi.
Sommaire Page
Consignes générales 9
Description 9
Caractéristiques techniques 10
Consignes de sécurité 11
Mise en marche 13
Utilisation 14
Outils et accessoires 15
Nettoyage et entretien 15
Garantie constructeur des appareils 16
Elimination 16
Principaux éléments
Mandrin
Poignée latérale avec jauge de profondeur
Sélecteur «Arrêt de la percussion»
Inverseur du sens de rotation gauche/droite, blocable
pour transporter l’appareil
Interrupteur de commande
Bloc-accus (accessoire qui ne fait pas partie de l’équi-
pement)
Boutons de déverrouillage avec fonction complé-
mentaire – activation de l’indicateur du niveau de
charge de la batterie
Indicateur du niveau de charge de la batterie et indi-
cateur d’erreur
Description
Le TE 6-A Li est un perforateur sans fil muni d’un méca-
nisme de percussion pneumatique, destiné aux profes-
sionnels.
Lors de l’utilisation de l’appareil, toujours bien
respecter les conditions suivantes:
– l’utiliser uniquement en le tenant des deux mains,
– ne pas l’utiliser dans une ambiance déflagrante.
NOTICE ORIGINALE
Perforateur sans fil TE 6-A Li
Les chiffres renvoient à des illustrations. Les illus-
trations correspondant au texte se trouvent sur les pages
rabattables précédentes. Pour lire le mode d’emploi,
rabattre ces pages de manière à voir les illustrations.
Dans le texte du présent mode d’emploi, le terme «appa-
reil» désigne toujours le TE 6-A Li avec son bloc-accus.
Symboles
Lire le mode
d'emploi avant
d'utiliser
l'appareil
Recycler les déchets
Symboles d'avertissement
Avertissement
danger général Avertissement tension
électrique dangereuse Avertissement
matières
corrosives
Porter un
casque
antibruit
Porter des
gants de
protection
Porter un
masque
respiratoire
léger
Porter des
lunettes de
protection
Porter un
casque de
protection
Symboles d'obligation
V = Volt
–––
--- = Courant continu
no= Vitesse nominale à vide
Les blocs-accus
ne doivent pas être
éliminés avec les
ordures ménagères
min-1 = Tours par minute
j= Perçage à percussion
= Perçage
Printed: 07.07.2013 | Doc-Nr: PUB / 5071062 / 000 / 00

10
fr
L’appareil est prévu pour les applications suivantes:
Mode de fonctionnement
Perçages dans le béton, la
maçonnerie et la pierre naturelle
Chevillages
Perçages dans le bois et le métal
Vissages
Sciages dans le bois, les plastiques,
le carrelage et la maçonnerie
Perçages dans la neige, la glace et
la pierraille
Outil nécessaire
Mèche à emmanchement TE-C
Outil de pose à emmanchement
TE-C
Mandrin autoserrant ou mandrin à
clé
Porte-embouts BHU 75 M SDS
Mandrin autoserrant ou mandrin à
clé
Mèche spéciale TE-C-EB
Plage de travail
Plage de perçage dans le béton:
∅5/32″–5/8″(4–16 mm)
Toutes chevilles Hilti avec outils de
pose TE-C
Mèches à bois ∅3/4″(20 mm) max
Forets métaux ∅3/8″(10 mm) max.
Scies-cloche TE-HS
∅1″–45/8″(25–105 mm)
∅11/8″–13/8″(28–35 mm)
Caractéristiques techniques
Tension: 36 volts
Poids de la machine
TE 6-A Li avec bloc-accus B36/2.4 Li-Ion 8,2 lbs (3,7 kg)
TE 6-A Li avec bloc-accus B36/2.6 Li-Ion 8,2 lbs (3,7 kg)
TE 6-A Li avec bloc-accus B36/2.4 NiCd 10.4 lbs (4.7 kg)
Encombrement (L×l×h): 13″×8.9″×3.9″(330×215×90 mm)
Vitesse de rotation: 890 t/mn
Cadence de percussion: 5000 coups/mn
Energie libérée par coup: 1,5 Joule
Mandrin: TE-C Click
Plage de perçage dans le béton: 5/8″(16 mm) max.
Plage de perçage dans le bois: 3/4″(20 mm) max.
Plage de perçage dans le métal: 3/8″(10 mm) max.
Parfaitement étanche à la poussière, lubrification centrale permanente (pas besoin d’entretien)
Caractéristiques techniques du bloc-accus
(accessoire TE 6-A Li) B36 / 2.4 Li-Ion B36 / 2.6 Li-Ion B36 / 2.4 NiCd
Tension: 36 volts 36 volts 36 volts
Capacité du bloc-accus: 36 volts x 2,4 Ah 36 volts x 2,6 Ah 36 volts x 2,4 Ah
= 86,4 Wh = 93,6 Wh = 86,4 Wh
Poids: 2,6 lbs 2,6 lbs 4,6 lbs
(1,17 kg) (1,17 kg) (2,08 kg)
Type de cellule Ions Ions Nickel-Cad.
lithium lithium Cadmium
Bloc de cellules 10 éléments 10 éléments 30 éléments
Résistance thermique: NTC NTC NTC
Sécurité de non-mise à plat: ✓✓
Sous réserve de toutes modifications techniques!
Outils et accessoires
Porte-embout S-BH 50
Chargeur pour blocs-accus NiCd et NiMH TCU 7/36
C 7/36-ACS
pour bloc-accu Li-Ion C 4/36-ACS
Bloc-accu pour TE 6-A Li B36 / 2.4 Li-Ion
B36 / 2.6 Li-Ion
B36 / 2.4 NiCd
Printed: 07.07.2013 | Doc-Nr: PUB / 5071062 / 000 / 00

11
fr
Consignes de sécurité
1. Indications générales de sécurité
ATTENTION ! Lire toutes les indications. Le non-res-
pect des instructions indiquées ci-après peut entraî-
ner un choc électrique, un incendie et / ou de graves
blessures sur les personnes. La notion d'«outil élec-
troportatif» mentionnée par la suite se rapporte à des
outils électriques raccordés au secteur (avec câble de
raccordement) et à des outils électriques à batterie
(sans câble de raccordement).
GARDER PRECIEUSEMENT CES INSTRUCTIONS DE
SECURITE.
1.1 Place de travail
a) Maintenez l'endroit de travail propre et bien éclai-
ré. Un lieu de travail en désordre ou mal éclairé aug-
mente le risque d'accidents.
b) N'utilisez pas l'appareil dans un environnement
présentant des risques d'explosion et où se trou-
vent des liquides, des gaz ou poussières inflam-
mables. Les outils électroportatifs génèrent des
étincelles risquant d'enflammer les poussières ou
les vapeurs.
c) Tenez les enfants et autres personnes éloignés
durant l'utilisation de l'outil électroportatif. En cas
d'inattention vous risquez de perdre le contrôle sur
l'appareil.
1.2 Sécurité relative au système électrique
a) La fiche de secteur de l'outil électroportatif doit être
appropriée à la prise de courant. Ne modifiez en
aucun cas la fiche. N'utilisez pas de fiches d'adap-
tateur avec des appareils avec mise à la terre. Les
fiches non modifiées et les prises de courant appro-
priées réduisent le risque de choc électrique.
b) Evitez le contact physique avec des surfaces mises
à la terre tels que tuyaux, radiateurs, fours et réfri-
gérateurs. Il y a un risque élevé de choc électrique
au cas où votre corps serait relié à la terre.
c) N'exposez pas l'outil électroportatif à la pluie ou
à l'humidité. La pénétration d'eau dans un outil
électroportatif augmente le risque d'un choc électrique.
d) N'utilisez pas le câble à d'autres fins que celles
prévues, n'utilisez pas le câble pour porter l'ap-
pareil ou pour l'accrocher ou encore pour le débran-
cher de la prise de courant. Maintenez le câble
éloigné des sources de chaleur, des parties grasses,
des bords tranchants ou des parties de l'appareil
en rotation. Un câble endommagé ou torsadé aug-
mente le risque d'un choc électrique.
e) Au cas où vous utiliseriez l'outil électroportatif à
l'extérieur, utilisez une rallonge homologuée pour
les applications extérieures. L'utilisation d'une ral-
longe électrique homologuée pour les applications
extérieures réduit le risque d'un choc électrique.
1.3 Sécurité des personnes
a) Restez vigilant, surveillez ce que vous faites. Faites
preuve de bon sens en utilisant l'outil électropor-
tatif. N'utilisez pas l'appareil lorsque vous êtes
fatigué ou après avoir consommé de l'alcool, des
drogues ou avoir pris des médicaments. Un moment
d'inattention lors de l'utilisation de l'appareil peut
entraîner de graves blessures sur les personnes.
b) Portez des équipements de protection. Portez toujours
des lunettes de protection. Le fait de porter des équi-
pements de protection personnels tels que masque
anti-poussières, chaussures de sécurité antidérapantes,
casque de protection ou protection acoustique sui-
vant le travail à effectuer, réduit le risque de blessures.
c) Evitez une mise en service par mégarde. Assurez-
vous que l'interrupteur est effectivement en posi-
tion d'arrêt avant de mettre la fiche de la prise de
courant. Le fait de porter l'appareil avec le doigt sur
l'interrupteur ou de brancher l'appareil sur la sour-
ce de courant lorsque l'interrupteur est en position
de fonctionnement, peut entraîner des accidents.
d) Enlevez tout outil de réglage ou toute clé avant de
mettre l'appareil en fonctionnement. Une clé ou un
outil se trouvant sur une partie en rotation peut cau-
ser des blessures.
e) Ne surestimez pas vos capacités. Veillez à garder
toujours une position stable et équilibrée. Ceci vous
permet de mieux contrôler l'appareil dans des situa-
tions inattendues.
f) Portez des vêtements appropriés. Ne portez pas de
vêtements amples ni de bijoux. Maintenez cheveux,
vêtements et gants éloignés des parties de l'appa-
reil en rotation. Des vêtements amples, des bijoux
ou des cheveux longs peuvent être happés par des
pièces en mouvement.
g) Si des dispositifs servant à aspirer ou à recueillir
les poussières doivent être utilisés, vérifiez que
ceux-ci sont effectivement raccordés et qu'ils sont
correctement utilisés. L'utilisation de tels disposi-
tifs réduit les dangers dus aux poussières.
1.4 Utilisation et emploi soigneux de l'outil électro-
portatif
a)Ne surchargez pas l'appareil. Utilisez l'outil électro-
portatif approprié au travail à effectuer. Avec l'outil
électroportatif approprié, vous travaillerez mieux et
avec plus de sécurité à la vitesse pour laquelle il est
prévu.
b) N'utilisez pas un outil électroportatif dont l'inter-
rupteur est défectueux. Un outil électroportatif qui
ne peut plus être mis en ou hors fonctionnement est
dangereux et doit être réparé.
c) Retirer la fiche de la prise de courant et / ou le bloc-
accu de l'appareil, avant d’effectuer des réglages
sur l’appareil, de changer les accessoires ou de
ranger l’appareil. Cette mesure de précaution empêche
une mise en fonctionnement par mégarde.
d) Gardez les outils électroportatifs non utilisés hors
de portée des enfants. Ne permettez pas l'utili-
sation de l'appareil à des personnes qui ne se sont
pas familiarisées avec celui-ci ou qui n'ont pas lu
ces instructions. Les outils électroportatifs sont
dangereux lorsqu'ils sont utilisés par des personnes
non initiées.
Printed: 07.07.2013 | Doc-Nr: PUB / 5071062 / 000 / 00

12
fr
e) Prenez soin des outils électroportatifs. Vérifiez
que les parties en mouvement fonctionnent cor-
rectement et qu'elles ne sont pas coincées, et
contrôlez si des parties sont cassées ou endom-
magées de telle sorte que le bon fonctionnement
de l'appareil s'en trouve entravé. Faites réparer
les parties endommagées avant d'utiliser l'appa-
reil. De nombreux accidents sont dus à des outils
électroportatifs mal entretenus.
f) Maintenez les outils de coupe aiguisés et propres.
Des outils soigneusement entretenus avec des bords
tranchants bien aiguisés se coincent moins souvent
et peuvent être guidés plus facilement.
g) Utilisez les outils électroportatifs, les accessoires,
les outils à monter etc. conformément à ces ins-
tructions et aux prescriptions en vigueur pour ce
type d'appareil. Tenez compte également des condi-
tions de travail et du travail à effectuer. L'utilisation
des outils électroportatifs à d'autres fins que celles
prévues peut entraîner des situations dangereuses.
1.5 Utilisation et emploi soigneux des appareils sans fil
a) Vérifiez que l’appareil est effectivement en posi-
tion d’arrêt avant de monter l’accumulateur. Le
fait de monter un accumulateur dans un outil élec-
troportatif en position de fonctionnement peut cau-
ser des accidents.
b) Ne chargez les accumulateurs que dans des char-
geurs recommandés par le fabricant. Un chargeur
appropriéàuntypespécifiqued’accumulateurpeut
engendrer un risque d’incendie lorsqu’il est utilisé
avec d’autres accumulateurs.
c) Dans les outils électroportatifs, n’utilisez que les
accumulateurs spécialement prévus pour ceux-ci.
L’utilisation de tout autre accumulateur peut entraî-
ner des blessures et des risques d’incendie.
d) Tenez l’accumulateur non-utilisé à l’écart de toutes
sortes d’objets métalliques tels qu’agrafes, pièces
de monnaie, clés, clous, vis ou autres, étant don-
né qu’un pontage peut provoquer un court-circuit.
Un court-circuit entre les contacts d’accu peut pro-
voquer des brûlures ou un incendie.
e) En cas d’utilisation abusive, du liquide peut sortir
de l’accumulateur. Evitez tout contact avec ce liqui-
de. En cas de contact par mégarde, rincez soi-
gneusement avec de l’eau. Au cas où le liquide
rentrerait dans les yeux, consultez en plus un méde-
cin. Le liquide qui sort de l’accumulateur peut entraî-
ner des irritations de la peau ou causer des brûlures.
1.6 Service
a) Ne faites réparer votre outil électroportatif que par
un personnel qualifié et seulement avec des pièces
de rechange d'origine. Ceci permet d'assurer la
sécurité de l'appareil.
2, Consignes de sécurité spécifiques au produit
2.1 Sécurité des personnes
a) Porter un casque antibruit. Le bruit peut entraî-
ner des pertes auditives.
b) Utiliser la poignée supplémentaire livrée avec
l'appareil. La perte de contrôle peut entraîner des
blessures.
c) Évitez une mise en service par mégarde. S'as-
surer que l'outil électroportatif est arrêté avant
de le brancher à la source de courant et/ou au
blocaccu, de le prendre ou de le porter. Le fait de
porter l'outil électroportatif avec le doigt sur l’in-
terrupteur ou de brancher l’appareil sur la source
de courant lorsque l’interrupteur est en position
de fonctionnement, peut entraîner des accidents.
d) Toujours tenir l'appareil des deux mains par les
poignées prévues à cet effet. Essuyer les poignées
afin d'éliminer toute trace d'humidité et enlever
toute trace de graisse ou d'huile.
e) Placer la poignée latérale dans la position sou-
haitée, et s'assurer qu'elle est montée et serrée
correctement.
f) Eviter de toucher des pièces en rotation. Brancher
l'appareil uniquement dans l'espace de travail.
g) Eviter que l'appareil ne se mette en marche inopi-
nément. Ne pas porter l'appareil avec le doigt sur
l'interrupteur Marche / Arrêt. Si vous n’utilisez
pas l’appareil (p. ex. pendant une pause), avant
tout entretien, pour changer d’outil et pendant le
transport, verrouiller l’inverseur (inverseur du
sens de rotation gauche/droite en position médiane).
h) Si l'appareil fonctionne sans dispositif d'aspira-
tion de la poussière et si le travail effectué déga-
ge de la poussière, porter un masque respiratoi-
re léger.
i) Utiliser l’appareil uniquement s’il est dans un
état impeccable et seulement conformément à
l’usage prévu.
j) Faire régulièrement des pauses et des exercices
de relaxation et de massage des doigts pour favo-
riser l'irrigation sanguine dans les doigts.
k) Children must be instructed not to play with the
tool.
l) The tool is not intended for use by children,by
debilitated persons or those who have received
no instruction or training.
m) WARNING: Some dust created by grinding, san-
ding, cutting and drilling contains chemicals known
to cause cancer, birth defects, infertility or other
reproductive harm; or serious and permanent res-
piratory or other injury. Some examples of these che-
micals are: lead from leadbased paints, crystalline
silica from bricks, concrete and other masonry pro-
ducts and natural stone, arsenic and chromium from
chemicallytreated lumber. Your risk from these expo-
sures varies, depending on how often you do this type
of work. To reduce exposure to these chemicals,
the operator and bystanders should work in a well-
ventilated area, work with approved safety equip-
ment, such as respiratory protection appropriate
for the type of dust generated, and designed to fil-
ter out microscopic particles and direct dust away
from the face and body. Avoid prolonged contact
with dust. Wear protective clothing and wash expo-
Printed: 07.07.2013 | Doc-Nr: PUB / 5071062 / 000 / 00

13
fr
sed areas with soap and water. Allowing dust to get
into your mouth, eyes, or to remain on your skin may
promote absorption of harmful chemicals.
2.2 Utilisation et emploi soigneux de l'outil
électroportatif
a)Bloquer la pièce travaillée. Pour ce faire, utiliser
un dispositif de serrage ou un étau, pour mainte-
nir la pièce travaillée en place. Elle sera ainsi mieux
tenue qu'à la main, et les deux mains restent alors
libres pour commander la machine.
b)Vérifier que les outils sont bien munis du système
d'emmanchement adapté à l'appareil et qu'ils sont
toujours correctement verrouillés dans le mandrin.
2.3 Sécurité relative au système électrique
a) Avant de commencer, vérifier que l’espace de tra-
vail ne comporte pas de câbles ou gaines électriques,
conduites de gaz ou d'eau cachés, par exemple à
l'aide d'un détecteur de métaux. Toute pièce métal-
lique extérieure à l'appareil peut devenir conductri-
ce, par exemple si un câble électrique est endom-
magé par inadvertance. Ceci représente un danger
sérieux d’électrocution.
2.4 Place de travail
a) Veiller à ce que l'espace de travail soit correcte-
ment éclairé.
b)Veiller à ce que l'espace de travail soit bien venti-
lé. Un espace de travail mal ventilé peut être nocif
pour la santé en raison des nuisances dues à la pous-
sière.
2.5 Equipement de protection individuel
L'utilisateur et les personnes se trouvant à proximité
pendant l'utilisation de l'appareil doivent porter des
lunettes de protection adaptées, un casque de protec-
tion, un casque antibruit, des gants de protection et,
lorsqu'ils n'utilisent pas de dispositif d'aspiration de la
poussière, un masque respiratoire léger.
2.6 Utilisation et emploi soigneux des appareils sans fil
a)Vérifier que les surfaces extérieures du bloc-accu
sont propres et sèches avant de l'insérer dans le
chargeur pour la recharge.
b)Vérifier que le bloc-accu est solidement fixé dans
l'appareil. Toute chute du bloc-accu peut mettre l'opé-
rateur ou des tierces personnes en danger.
c)Une fois arrivés au terme de leur durée de service,
les blocs-accus doivent être éliminés conformé-
ment à la réglementation en vigueur et en toute
sécurité (voir Recyclage).
Porter un
casque
antibruit
Porter des
gants de
protection
Porter un
masque
respiratoire
léger
Porter des
lunettes de
protection
Porter un
casque de
protection
Miseenmarche
Utilisation soigneuse des blocs-accus
REMARQUE
– À basses températures, la puissance du bloc-accu
diminue.
– Ne pas utiliser le bloc-accu jusqu'à ce que l'appareil
s'arrête complètement. Remplacer le blocaccu à temps
par le bloc-accu de rechange. Recharger le bloc-accu
immédiatement pour qu'il soit de nouveau disponible
pour le prochain remplacement.
– Stocker si possible le bloc-accu dans un endroit sec
et frais. Ne jamais conserver le bloc-accu dans un
endroit exposé au soleil, sur un appareil de chauffage
ou derrière des vitres.
– Une fois arrivés au terme de leur durée de service, les
blocs-accus doivent être éliminés conformément à la
réglementation en vigueur et en toute sécurité.
– Utiliser les blocs-accus Hilti uniquement avec les char-
geurs Hilti homologués spécifiés dans le chapitre
«Outils et accessoires».
– Vérifier que les surfaces extérieures du bloc-accu sont
propres et sèches avant de l'insérer dans le chargeur
approprié.
– Avant de recharger le bloc-accu, lire le mode d'emploi
du chargeur.
Recharge initiale d'un nouveau bloc-accu
Avant d'utiliser un bloc-accu neuf, procéder impérati-
vement à une recharge initiale correcte du bloc-accu afin
que les cellules puissent se former de manière optima-
le. La capacité d'un bloc-accu neuf qui n'aurait pas été
d)Respecter les directives spécifiques relatives au
transport, au stockage et à l'utilisation des blocs-
accus Li-Ion.
e)Ne pas exposer les blocs-accus à des tempéra-
tures élevées ni au feu. Il y a risque d'explosion.
f) Les blocs-accus ne doivent pas être démontés,
écrasés, chauffés à une température supérieure à
100°C ou jetés au feu. Sinon, il y a risque d'in-
cendie, d'explosion et de brûlure par l'acide.
g)N'utiliser aucun autre bloc-accu que ceux homo-
logués pour l'appareil concerné. En cas d'utilisa-
tion d'autres blocs-accus ou d'utilisation non confor-
me des blocs-accus, il y a risque de feu et d'ex-
plosion.
h)Les blocs-accus endommagés (par exemple des
blocs-accus fissurés, dont certaines pièces sont
cassées, dont les contacts sont déformés, rentrés
et / ou sortis) ne doivent plus être chargés ni uti-
lisés.
Printed: 07.07.2013 | Doc-Nr: PUB / 5071062 / 000 / 00

14
fr
chargé correctement la première fois peut se trouver
affectée durablement. Avant de recharger le bloc-accu
pour la première fois, lire le mode d'emploi du chargeur
correspondant.
Recharge de blocs-accus NiCd et NiMH
Les blocs-accus NiCd et NiMH devraient être complè-
tement chargés à chaque processus de charge.
Recharge d'un bloc-accu Li-Ion
Les blocs-accus Li-Ion sont toujours prêts à l'emploi,
même lorsqu'ils sont partiellement chargés. Des témoins
lumineux indiquent la progression du processus de char-
ge (chapitre "Lecture de l'indicateur de l'état de charge
sur un bloc-accu Li-Ion").
Insérer le bloc-accu dans l'appareil
Attention: Avant de réinsérer le bloc-accu, s'assurer que
l'appareil est bien sur arrêt et que le blocage pendant la
marche est activé (inverseur du sens de rotation
droite / gauche en position médiane). Utiliser unique-
ment les blocs-accus Hilti homologués pour l'appareil.
1. Insérer le bloc-accu dans l'appareil par le bas, jus-
qu'à ce qu'il s'encliquette avec un «clic» audible.
2. Attention: Toute chute du bloc-accu peut mettre l'opé-
rateur ou des tierces personnes en danger.
Sortir le bloc-accu de l'appareil
1. Enfoncer les deux boutons de déverrouillage.
2. Tirer le bloc-accu hors de l’appareil.
Utilisation
Mise en place de l’outil
1. Tirer le bloc-accu hors de l’appareil.
2. Vérifier si l’emmanchement de l’outil est bien propre
et légèrement graissé. Le nettoyer et le graisser si
nécessaire.
3.Vérifier que la lèvre d'étanchéité de la protection
anti-poussière est bien propre et en bon état. Si
nécessaire, nettoyer la protection anti-poussière ou
remplacer la lèvre d'étanchéité si celle-ci est endom-
magée.
4. Introduire l'outil dans le mandrin et le tourner en le
serrant légèrement, jusqu'à ce qu'il se clipse dans les
rainures de guidage.
5. Pousser l'outil dans le mandrin jusqu'à ce qu'on en-
tende un clic.
6. Vérifier que l'outil est bien serré dans le dispositif de
verrouillage en tirant dessus.
Retrait de l'outil
ATTENTION
Utilisez les gants de protection pour changer d'outil.
L'appareil peut être très chaud après utilisation.
1.Tirer le bloc-accu hors de l’appareil.
2. Ouvrir le mandrin en tirant vers l'arrière le dispositif
de verrouillage de l'outil.
3. Tirer l'outil hors du mandrin.
Dépose du mandrin
ATTENTION
Retirer la butée de profondeur de la poignée latérale pour
éviter tout risque de blessures.
1. Tirer le bloc-accu hors de l’appareil.
2. Tirer la douille du mandrin vers l'avant et la mainte-
nir fermement.
3. Enlever le mandrin vers l'avant.
Pose du mandrin
ATTENTION
Retirer la butée de profondeur de la poignée latérale pour
éviter tout risque de blessures.
1. Tirer le bloc-accu hors de l’appareil.
2. Saisir la douille du mandrin, la tirer vers l'avant et la
maintenir fermement.
3. Déplacer le mandrin vers l'avant sur le cône intérieur
et relâcher la douille.
4. Tourner le mandrin jusqu'à ce qu'un clic se fasse
entendre.
Insertion du bloc-accus
N'utiliser aucun autre bloc-accu que ceux homologués
pour l'appareil concerné. En cas d'utilisation d'autres
blocs-accus ou d'utilisation non conforme des blocs-
accus, il y a risque de feu et d'explosion.
Insérer le bloc-accus dans le guide en forme de queue
d’aronde à fond dans l'appareil. Le bloc-accus doit
s'encliqueter 2x de manière audible (2 points de sécu-
rité).
Recharge du bloc-accus
Utilisez les blocs-accus Hilti uniquement avec les char-
geurs de batteries approuvés par Hilti et mentionnés
dans le paragraphe „Outils et accessoires“.
Pour la recharge, voir le mode d'emploi du chargeur
correspondant.
Indicateur du niveau de charge de la batterie
Quand un bloc-accus Li-Ion est utilisé, son niveau de
charge peut être controlé en appuyant légèrement sur
l’un des boutons de déverrouillage (appuyez jusqu’à ce
que vous sentiez une résistance mais ne déverrouillez
pas le bloc-accus).
Les voyants lumineux DEL présents à l’arrière du bloc-
accus donnent les informations suivantes:
DEL allumée en continu DEL clignotante État de charge C
LED 1, 2, 3, 4 – C ⭌75%
LED 1, 2, 3 – 50% ⬉C⬍75%
LED 1, 2 – 25% ⬉C⬍50%
LED 1 – 10% ⬉C⬍25%
– LED 1 C ⬍10%
Remarque: Il n’est pas possible de contrôler l’état de
charge pendant le travail. Le clignotement de la DEL per-
met seulement d’indiquer qu’un bloc-accu est complè-
tement déchargé ou trop chaud (températures >80°).
Printed: 07.07.2013 | Doc-Nr: PUB / 5071062 / 000 / 00

15
fr
Perçage en percussion
1. Utiliser des mèches béton TE-C (pour le béton, la
maçonnerie et la pierre naturelle).
2. Placer le sélecteur de fonction dans la position «Per-
çage en percussion» (symbole marteau).
3. Placer l’appareil contre le support en positionnant
la mèche à l’endroit où vous voulez percer le trou,
puis actionner lentement l’interrupteur de commande.
Travailler à vitesse lente jusqu’à ce que la mèche se
centre toute seule dans le trou.
4. Appuyer à fond sur l’interrupteur pour continuer de
travailler à plein régime. Pour percer un trou tra-
versant, le mieux est de réduire la vitesse de l’ap-
pareil juste avant de transpercer le support de l’autre
coté, pour réduire au maximum les éclatements.
5. Ne pas appuyer exagérément l’appareil contre la sur-
face, cela n’augmente en rien son rendement en per-
cussion. En réduisant un peu la pression d’appui, la
mèche dure plus longtemps.
Perçage avec la jauge de profondeur
Toujours utiliser le TE6-ALi avec sa poignée latérale!
La poignée latérale est orientable sur 360° et peut être
bloquée dans n’importe quelle position. Desserrer la
poignée latérale, régler la jauge de profondeur de maniè-
re à obtenir la profondeur de perçage voulue, puis blo-
quer la poignée latérale.
Remarque: Si vous travaillez en utilisant la jauge de pro-
fondeur, vous pouvez percer plus de trous de chevilles
par charge de bloc-accus car vous évitez ainsi de per-
cer à trop grande profondeur quand cela n’est pas utile.
Perçage sans la percussion (perçage seul) dans le
bois et l’acier
Placer le sélecteur de fonction dans la position «Perçage
sans la percussion (perçage seul)» (symbole mèche).
Dans cette position, l’outil tourne seulement.
Rotation à gauche
Pour choisir le sens de rotation désiré, il suffit d’actionner
l’inverseur du sens de rotation gauche/droite.
Outils et accessoires
Mandrin TE-C, mandrin autoserrant ou mandrin à
clé:
Remplacement du mandrin
Tirer la douille vers l’avant et enlever complètement le
mandrin. Pour remettre l’autre mandrin, tirer la douille
vers l’avant et la tenir. Faire coulisser le mandrin sur l’ap-
pareil à fond, puis relâcher la douille. Tourner le man-
drin jusqu’à ce que la douille se clipse vers l’arrière.
Remarque: lorsqu’on enfiche le mandrin à clé ou le
mandrin autoserrant, la percussion s’arrête automati-
quement (perçage sans percussion = perçage seul).
Pour emmancher un outil à queue cylindrique, ouvrir
le mandrin à clé jusqu’au diamètre nécessaire, enfon-
cer l’outil à fond, puis serrer avec la clé de mandrin.
Vérifier régulièrement vos outils et les échanger quand
vous voyez qu’ils sont usés. Si l’emmanchement est
abîmé ou déjà bien usé, ceci peut abîmer votre appa-
reil. Si les segments en métal dur des mèches sont
cassés, le diamètre du trou percé peut varier sur tou-
te la profondeur, ce qui peut influer sur l’aptitude de la
fixation par chevillage !
Bloc-accus B 36/2.4 Li-Ion, B 36/2.6 Li-Ion et B 36/2.4
NiCd
N'utiliser aucun autre bloc-accu que ceux homologués
pour l'appareil concerné. En cas d'utilisation d'autres
blocs-accus ou d'utilisation non conforme des blocs-
accus, il y a risque de feu et d'explosion.
Pour le recharge, voir le mode d’emploi du chargeur cor-
respondant.
Gamme d’outils spéciaux
Si vous avez besoin d’outils autres que ceux standard,
n’hésitez pas à contacter votre Service-Clients Hilti ou
votre conseiller de vente Hilti. Hilti peut en effet propo-
ser toute une gamme d’outils spéciaux haut de gamme
aux professionnels.
Nettoyage et entretien
ATTENTION
Avant tout travail de nettoyage, retirer le bloc-accu
pour éviter toute mise en marche intempestive de l'ap-
pareil !
Nettoyage des outils
Enlever toutes traces de saletés ou tous résidus et bien
protéger la surface de vos outils de la corrosion en les
frottant à l’occasion avec un chiffon imbibé d’huile.
Nettoyage de l’appareil
ATTENTION
Tenir l'appareil, en particulier les surfaces de pré-
hension, sec, propre et exempt d'huile et de grais-
se. Ne pas utiliser de nettoyants à base de silicone.
La coque extérieure du boîtier de l’appareil est en plas-
tique résilient. La partie préhensile est en élastomère.
Ne jamais faire fonctionner l’appareil si ses ouies d’aé-
ration sont bouchées ! Nettoyer ses ouies d’aération
avec circonspection à l’aide d’une brosse sèche. Évi-
ter toute pénétration de résidus à l’intérieur de l’appa-
reil. Nettoyer régulièrement l’extérieur de l’appareil
avec un chiffon légèrement humidifié. N’utiliser ni dif-
fuseur, ni appareillage à vapeur, ni eau courante pour
nettoyer l’appareil, sous peine d’affecter sa sécurité
électrique ! Toujours essuyer les parties préhensiles
de l’appareil pour enlever toutes traces d’huile ou de
graisse. Ne pas utiliser de nettoyants à base de silicone.
Entretien
Vérifier régulièrement toutes les pièces extérieures de
l’appareil pour voir si elles ne sont pas abîmées et tous
Printed: 07.07.2013 | Doc-Nr: PUB / 5071062 / 000 / 00
Table of contents
Languages:
Other Hilti Rotary Hammer manuals

Hilti
Hilti TE 7-A User manual

Hilti
Hilti TE1 User manual

Hilti
Hilti TE 70-D/AVR User manual

Hilti
Hilti TE15-C User manual

Hilti
Hilti TE 2-A22 User manual

Hilti
Hilti TE 6-A36 User manual

Hilti
Hilti TE 6-CL User manual

Hilti
Hilti TEMD20 LS T User manual

Hilti
Hilti TE 30-ATC/AVR User manual

Hilti
Hilti TE 2-A User manual
Popular Rotary Hammer manuals by other brands

Chicago Electric
Chicago Electric 69274 owner's manual

Bosch
Bosch GBH Professional 2-28 DV Original instructions

Makita
Makita HR140D instruction manual

Meister
Meister MAH 1500 P Translation of the original instructions

Bosch
Bosch GBH 24 VFR Original instructions

HIKOKI
HIKOKI DH 40MEY Handling instructions