Hilti VCD50L User manual

VCD 50 L
Bedienungsanleitung 1– 7
Operating instructions 9–15
Mode d’emploi 17–24
Istruzioni d’uso 25–31
Gebruiksaanwijzing 33–40
Manual de instruções 41–47
Manual de instrucciones 49–55
Brugsanvisning 57–63
Käyttöohje 65–71
Bruksanvisning 73–79
Bruksanvisning 81–87
Ο
Ο
δ
δ
η
η
γ
γ
ι
ι
ε
ε
ς
ς
χ
χ
ρ
ρ
η
η
σ
σ
ε
ε
ω
ω
ς
ς
89–95
Kasutusjuhend 97–103
Lietoßanas pamåcîba 105–111
Instrukcija 113–119
*371752*
371752
D
GB
F
I
NL
P
E
DK
SF
N
S
GR
LV
LT
EST
Printed: 07.07.2013 | Doc-Nr: PUB / 5071296 / 000 / 00

Printed: 07.07.2013 | Doc-Nr: PUB / 5071296 / 000 / 00

1
2 3
0max auto
쐊
씏쐈
쐄
쐆
쐋
쐃
쐇
쐅
쐎
Printed: 07.07.2013 | Doc-Nr: PUB / 5071296 / 000 / 00

6
4
5
쐃
씋
씊씎
씌
씍
쐉
씈
씉
Printed: 07.07.2013 | Doc-Nr: PUB / 5071296 / 000 / 00

1
Lesen Sie die Bedienungsanlei-
tung vor Inbetriebnahme unbe-
dingt durch.
Bewahren Sie diese Bedienungs-
anleitung immer beim Gerät auf.
Geben Sie das Gerät nur mit
Bedienungsanleitung an andere
Personen weiter.
VCD 50 L Trockensauger
Gerätebauteile
쐃Geräteoberteil
쐇Behälter
쐋Schubbügel
쐏Werkzeug Box Einschub
쐄Verschluss
쐂Fitting
쐆Netzstecker mit Netzkabel
쐊Schalter
쐎Schlauch
쐅Schnappmuffe
쐈Drehmuffe
쐉Entsorgungssackhalter
씈Entsorgungssack
씉Entsorgungssackmuffe
씊Filterstützkorb
씋Filter
씌Filterspannscheibe
씍Flügelschraube
씎Kühlluftfilter
씏Gerätesteckdose
Inhalt Seite
1. Allgemeine Hinweise 1
2. Beschreibung 2
3. Werkzeuge und Zubehör 2
4. Technische Daten 2
5. Sicherheitshinweise 3
6. Inbetriebnahme 4
7. Bedienung 5
8. Pflege und Instandhaltung 5
9. Fehlersuche 6
10. Entsorgung 7
11. Garantie 7
12. Konformitätserklärung 7
1. Allgemeine Hinweise
Die Zahlen verweisen jeweils auf Abbildungen. Die
Abbildungen zum Text finden Sie auf den ausklappbaren
Umschlagseiten. Halten Sie diese beim Studium der Anlei-
tung geöffnet.
Im Text dieser Bedienungsanleitung bezeichnet “das
Gerät” immer den Trockensauger VCD50L.
Ort der Identifizierungsdetails auf dem Gerät
Die Typenbezeichnung und die Serienkennzeichnung
sind auf dem Typenschild Ihres Geräts angebracht. Über-
tragen Sie diese Angaben in Ihre Bedienungsanleitung
und beziehen Sie sich bei Anfragen an unsere Vertre-
tung oder Servicestelle immer auf diese Angaben.
Typ:
Serie Nr.:
Signalwort für die Gefahr «VORSICHT»
Für eine möglicherweise gefährliche Situation, die zu
leichten Körperverletzungen oder zu Sachschaden führen
könnte.
Piktogramme
Verbotszeichen
Warnung vor
allgemeiner
Gefahr
Warnung vor gefährlicher
elektrischer Spannung Vor Benutzung
Bedienungsan-
leitung lesen
Am Kran
transportieren
verboten
Flüssigkeit
aufsaugen
verboten
Warnzeichen
Printed: 07.07.2013 | Doc-Nr: PUB / 5071296 / 000 / 00

4. Technische Daten
Spannung 110 V 110–120 V 220 V 230 V 230 V 230 V 220–240 V
Leistungsaufnahme 1100 W 1200 W 1200 W 1200 W 1200 W 1200 W 1200 W
Anschlussleistung der
integrierten Steckdose
für Elektrowerkzeuge 씏1650 W –– 2100 W 2400 W 1100 W 2000 W ––
Netzfrequenz 50–60 Hz
Netzanschlusskabel 7,5 m
Max. Saugleistung 1200 W = 50 l/s 1000 W = 45 l/s
Max. Unterdruck 1200 W = 23000 Pa 1000 W = 21000 Pa
(230 mbar)
Filteroberfläche 0,7 m2
Behältervolumen 50 l
Staubnutzvolumen 20 l
Saugschlauch ∅36 mm, Länge 5 m, Drehmuffe saugseitig, Schnappmuffe geräteseitig
Lufttemperatur von –20 bis +40° C
Automatische Filterreinigung Alle 30 s
Staubklasse L nach EN 60335-2-69
Schutzklasse I
Schutzart IP X 4 Spritzwasser geschützt
Abmessungen (L×B×H) 515×610×745 mm (mit Schubbügel 1025 mm)
Gewicht (mit Schlauch) 22,6 kg
Schalleistungspegel 80 dB(A)
Schalldruckpegel 64,6 dB(A) in 1 m Entfernung
Elektromagnetische
Verträglichkeit nach EN 55014-1, EN 55014-2, EN 61000-3-2, EN 61000-3-3
Technische Änderungen vorbehalten
2
2. Beschreibung
Lieferumfang
1 Trockensauger VCD50L
1 Schlauch D36 Länge 5 m antistatisch mit Drehmuffe und Schnappmuffe
1 Filter
1 Entsorgungssack
1 Entsorgungssackhalter
1 Konusadapter
1 Bedienungsanleitung
3. Zubehör
1 Werkzeug Box
1 Zubehörset
1 Konusadapter
Printed: 07.07.2013 | Doc-Nr: PUB / 5071296 / 000 / 00

3
5. Sicherheitshinweise
5.1 Grundlegende Sicherheitsvermerke
Neben den sicherheitstechnischen Hinweisen in den ein-
zelnen Kapiteln dieser Bedienungsanleitung sind folgende
Bestimmungen jederzeit strikt zu beachten.
5.2 Bestimmungsgemässer Gebrauch
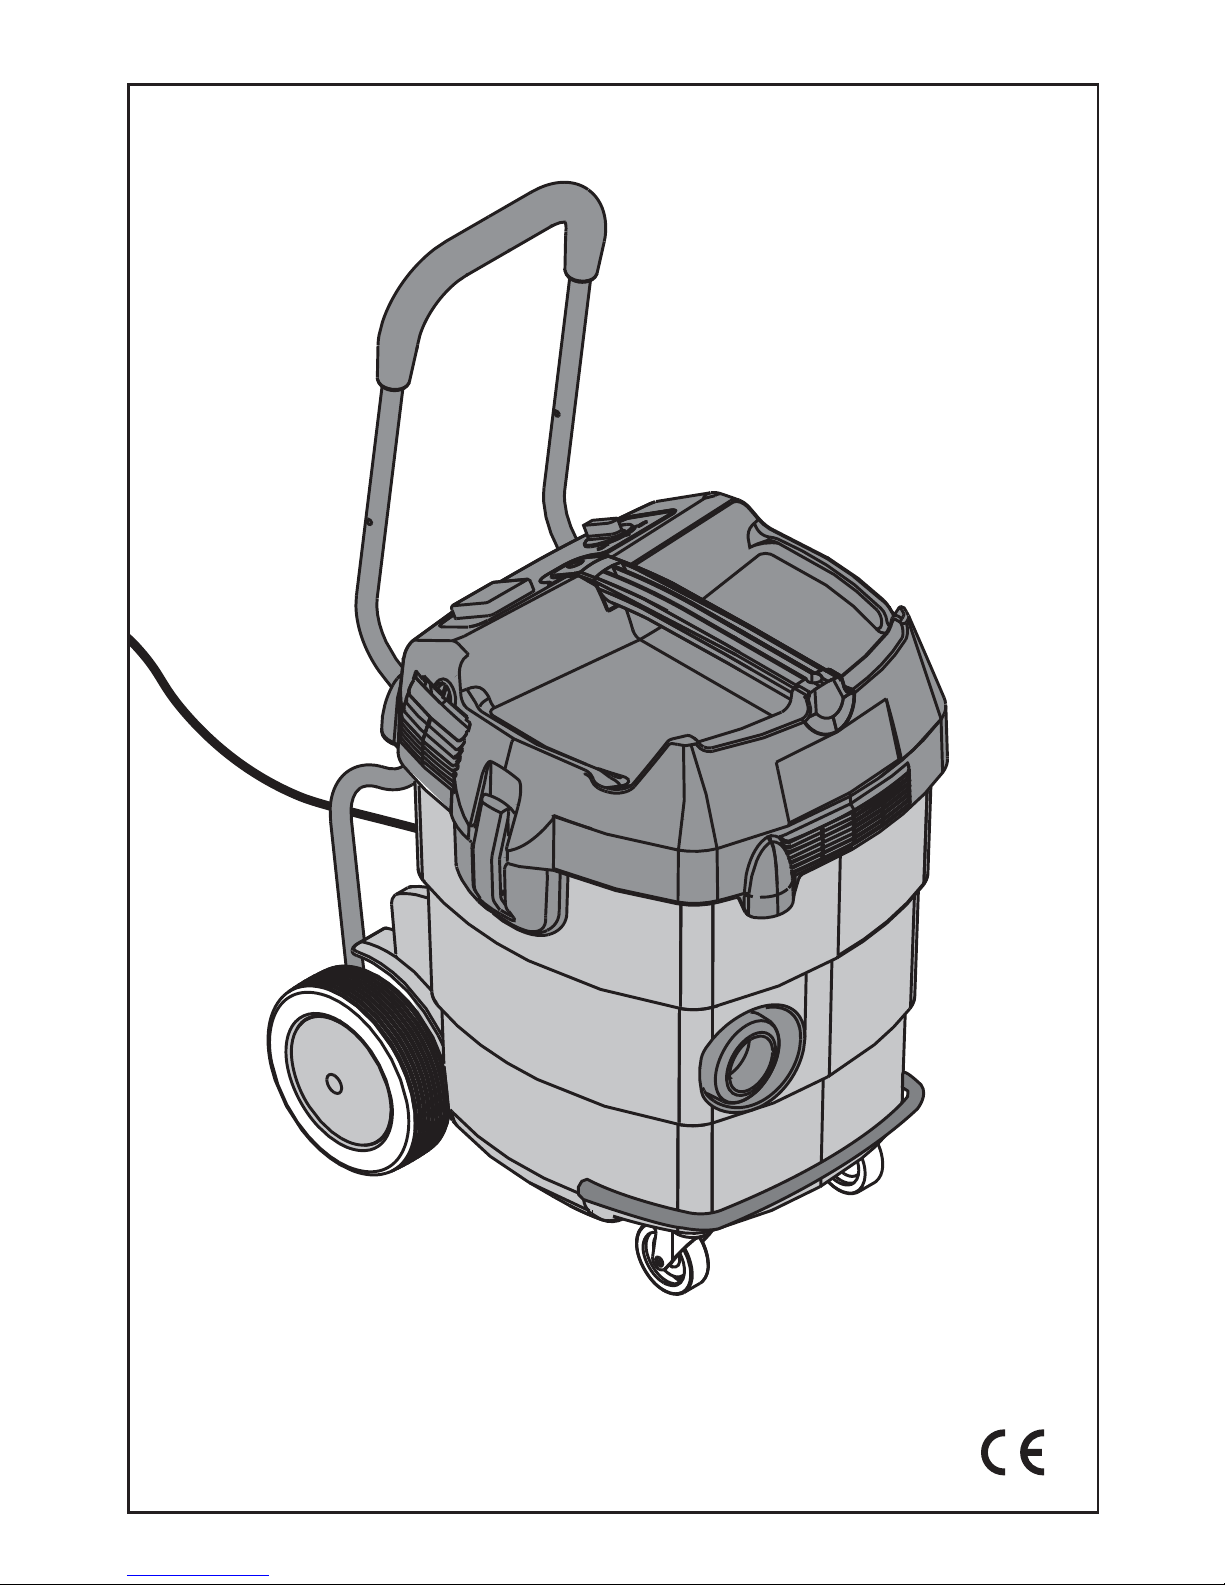
Das Gerät ist ein Trockensauger der Staubklasse L gemäss
EN 60335-2-69. Es ist besonders zum Absaugen von
grossen Mengen von Mineralstäuben mit MAK > 1 mg/m3
(MAK = Maximale Arbeitsplatz Konzentration), im Ein-
satz mit Hilti Diamantschleifer, Hilti Trennschleifer, Hilti
Bohrhämmer und Hilti Diamanttrockenkernbohrer, geeig-
net.
5.3 Missbräuchlicher Gebrauch
●Generell dürfen keine Flüssigkeiten (Wasser, Benzin,
Öl, Säuren, Laugen etc.), heisses oder explosives Gut
sowie gesundheitsgefährdende Stoffe aufgesaugt wer-
den
●Stäube mit einem MAK < 1 mg/m3sind gesundheits-
gefährdend und dürfen nicht gesaugt werden
●Das Gerät ist nicht für den Betrieb in automatischen
oder halbautomatischen Anlagen geeignet
●Manipulationen oder Veränderungen am Gerät sind
nicht erlaubt
●Benutzen Sie, um Verletzungsgefahren zu vermeiden,
nur original Hilti Zubehör und Zusatzgeräte
●Beachten Sie die Angaben zu Betrieb, Pflege und
Instandhaltung in der Bedienungsanleitung
5.4 Stand der Technik
●Das Gerät ist nach dem neusten Stand der Technik
gebaut
●Vom Gerät und seinen Hilfsmitteln können Gefahren
ausgehen, wenn sie von unausgebildetem Personal
unsachgemäss behandelt oder nicht bestimmungsgemäss
verwendet werden
5.5 Sachgemässe Einrichtung der Arbeitsplätze
●Tragen Sie rutschfestes Schuhwerk und sorgen Sie
jederzeit für sicheren Stand
●Vermeiden Sie eine ungünstige Körperhaltung
●Sorgen Sie für eine gute Beleuchtung
●Sorgen Sie für gute Belüftung des Arbeitsplatzes
●Halten Sie das Arbeitsumfeld frei von Gegenständen
an denen Sie sich verletzen könnten
●Halten Sie beim Arbeiten andere Personen, insbe-
sondere Kinder, vom Wirkungsbereich fern
●Führen Sie beim Arbeiten das Netz-, das Verlänge-
rungskabel und den Absaugschlauch immer nach hin-
ten vom Gerät weg
●Achten Sie darauf, dass Sie nicht über das Netz-, das
Verlängerungskabel oder den Absaugschlauch stolpern
●Transportieren Sie das Gerät nicht mit einem Kran
5.6 Stäube
●Stäube mit einem MAK < 1 mg/m3sind gesundheits-
gefährdend und dürfen nicht gesaugt werden
●Vermeiden Sie jegliche Entzündungsquellen, wie z. B.
Rauchen von Zigaretten während der Arbeit oder während
der Entleerung des Gerätes.
5.7 Generelle Gefährdung durch das Gerät
●Betreiben Sie das Gerät nur bestimmungsgemäss und
in einwandfreiem Zustand
●Lassen Sie das Gerät nie unbeaufsichtigt
●Vergewissern Sie sich vor dem Einstecken des Netz-
steckers in die Steckdose, dass das Gerät ausgeschaltet
ist
●Ziehen Sie bei Nichtgebrauch des Geräts (z.B. während
einer Arbeitspause), vor Pflege, Instandhaltung und Fil-
terwechsel, den Netzstecker immer aus der Steckdose
●Nicht in Gebrauch stehende Geräte müssen, an einem
trockenen, hochgelegenen oder abgeschlossenen Ort
ausserhalb der Reichweite von Kindern, aufbewahrt wer-
den
●Überprüfen Sie den korrekten Sitz des Filters
●Stellen Sie sicher, dass der Filter unbeschädigt ist.
5.8.1 Mechanisch
●Befolgen Sie die Hinweise für die Pflege und Instand-
haltung
●Überprüfen Sie, ob die beweglichen Teile einwandfrei
funktionieren und nicht klemmen, oder ob Teile beschä-
digt sind. Sämtliche Teile müssen richtig montiert sein
und alle Bedingungen erfüllen, um den einwandfreien
Betrieb des Geräts zu gewährleisten
●Verwenden Sie nur Originalwerkzeuge
5.8.2 Elektrisch
●Schützen Sie sich vor elektrischem Schlag. Vermei-
den Sie Körperberührung mit geerdeten Teilen, z.B. Roh-
ren und Heizkörpern
●Prüfen Sie das Gerät inkl. Netz- und Verlängerungs-
kabel sowie die Steckverbindungen auf ordnungsgemässen
Zustand. Betreiben Sie das Gerät nicht, wenn Beschädi-
gungen vorliegen, das Gerät nicht komplett ist oder Bedie-
nungselemente sich nicht einwandfrei betätigen lassen
●Ziehen Sie den Stecker nicht am Kabel aus der Steck-
dose
●Schützen Sie das Kabel vor Hitze, Öl und scharfen Kan-
ten
●Wird bei der Arbeit das Netz- oder Verlägerungskabel
beschädigt, dürfen Sie das Kabel nicht berühren. Ziehen
Sie den Netzstecker aus der Steckdose
Printed: 07.07.2013 | Doc-Nr: PUB / 5071296 / 000 / 00

4
●Verwenden Sie im Freien nur dafür zugelassene und
entsprechend gekennzeichnete Verlängerungskabel
●Überprüfen Sie das Gerät auf eventuelle Beschädi-
gungen. Vor weiterem Gebrauch des Geräts müssen alle
Geräteteile sorgfältig auf ihre einwandfreie und bestim-
mungsgemässe Funktion untersucht werden
●Beschädigte Schalter müssen beim Hilti Service ersetzt
werden. Benutzen Sie kein Gerät, bei dem sich der Schal-
ter nicht ein- und ausschalten lässt
●Lassen Sie Ihr Gerät durch eine Elektrofachkraft (Hilti
Service) reparieren
●Verwenden Sie, um eine Unfallgefahr zu vermeiden,
nur Originalersatzteile
●Stecken Sie den Stecker nur bei ausgeschalteter Maschi-
ne in die Steckdose
●Bei Stromunterbruch: Gerät ausschalten, Stecker her-
ausziehen
●Verlängerungskabel mit Mehrfachsteckdosen und
gleichzeitigem Betrieb von mehreren Geräten sind zu ver-
meiden
●Kupplungen von Netz-, Verlängerungs-, oder Gerä-
teanschlusskabel müssen spritzwassergeschützt sein
●Überprüfen Sie das Gerät auf Betriebssicherheit in
einer anerkannten Werkstatt
●Bei Nichtverwendung eines IPX4 Steckers an der Gerä-
testeckdose, darf der Sauger keinem Regen ausgesetzt
werden und muss im Trockenen aufbewahrt werden.
5.9 Anforderung an den Benutzer
●Das Gerät ist für den professionellen Benutzer bestimmt
●Das Gerät darf nur von autorisiertem, eingewiesenem
Personal bedient, gewartet und instand gehalten wer-
den. Dieses Personal muss speziell über die auftreten-
den Gefahren unterrichtet sein
5.10 Persönliche Schutzausrüstung
●Der Benutzer braucht keine persönliche Schutzaus-
rüstung.
6. Inbetriebnahme
Lesen und befolgen Sie unbedingt die Sicherheitshin-
weise in dieser Bedienungsanleitung.
6.1 Transport
●Klappen Sie zum Schieben den Schubbügel hoch und
arretieren Sie ihn mit den Hülsen
●Hängen Sie den Schlauch und das Anschlusskabel
über den Schubbügel
●Das zulässige Gesamtgewicht darf 60 kg nicht über-
steigen
6.2 Befestigen der Hilti Werkzeug Box oder des Hilti
DPC20amGerät
1. Schieben Sie die Werkzeug Box oder das DPC 20 in
die Führung in der Rückwand des Geräts
2. Drücken Sie die Werkzeug Box oder das DPC 20 gegen
das Gerät bis es einrastet
6.3 Lösen der Hilti Werkzeug Box oder des Hilti DPC20
vom Gerät
1. Drücken Sie den Schnappmechanismus nach oben
2. Entnehmen Sie die Tool Box oder das DPC20 aus der
Führung des Geräts
6.4 Erste Inbetriebnahme
Das Gerät darf bei allen Einstell- und Wartungsarbeiten
sowie beim Entsorgungssackwechsel, nicht an das elek-
trische Netz angeschlossen sein.
Im Sauger werden Etiketten mit dem Warntext für die
Staubklasse L in der jeweiligen Sprache mitgeliefert. Kle-
ben Sie den Warntext in Ihrer Landessprache über den
englischen Warntext auf dem Staubklasse L Etikett, das
bereits auf der Rückseite des Saugerkopfs befestigt ist.
Die Zubehörteile werden im Behälter 쐇liegend gelie-
fert und müssen vor der ersten Inbetriebnahme ent-
nommen werden.
1. Klappen Sie den Schubbügel hoch 쐋
2. Öffnen Sie den Verschluss 쐄
3. Heben Sie das Geräteoberteil 쐃ab
4. Entnehmen Sie den Entsorgungssackhalter 쐉
5. Entnehmen Sie den kleinen Konusadapter für Hilti
DC- und DD-Geräte.
6. Entnehmen Sie den Entsorgungssack 씈
7. Legen Sie den Entsorgungssack ein
8. Stecken Sie die Entsorgungssackmuffe 씉auf
den Fitting 쐂
9. Legen Sie den Entsorgungssackhalter 쐉ein
10. Schlagen Sie den Entsorgungssack III. um
11. Setzen Sie das Geräteoberteil 쐃auf den Behäl-
ter 쐇
12. Schliessen Sie den Verschluss 쐄
13. Schliessen Sie den Schlauch 쐎mit der Dreh-
muffe 쐈an den Fitting an
Hinweis: Der Entsorgungssack muss immer innerhalb
des Behälters um den Entsorgungssackhalter einge-
schlagen werden.
7. Bedienung
Lesen und befolgen Sie unbedingt die Sicherheitshin-
weise in dieser Bedienungsanleitung.
Printed: 07.07.2013 | Doc-Nr: PUB / 5071296 / 000 / 00

5
7.1 Elektrischer Anschluss
Die auf dem Typenschild angegebene Spannung muss
mit der Spannung des Netzes übereinstimmen.
Das Gerät muss ausgeschaltet sein (Schalterstellung 0).
1. Stecken Sie den Netzstecker in die Steckdose
7.2 Gerät ohne Gerätesteckdose
Drehen Sie den Schalter auf Stellung "MAN". Das Gerät
läuft sofort mit Softstart an
7.3 Gerät mit Gerätesteckdose
"MAN" Betrieb bei Gerät mit Gerätesteckdose
Drehen Sie den Schalter auf Stellung "MAN". Das Gerät
läuft sofort mit Softstart an
Elektrowerkzeug an die Gerätesteckdose anschlies-
sen
1. Drehen Sie den Schalter auf Stellung "0"
2. Ziehen Sie den Netzstecker aus der Steckdose
3. Schalten Sie das Elektrowerkzeug aus
4. Überprüfen Sie die maximale Leistungsaufnahme des
anzuschliessenden Elektrowerkzeugs (Tabelle "Tech-
nische Daten" und Aufdruck bei der Gerätesteckdose
beachten)
5. Schliessen Sie das Elektrowerkzeug an der Geräte-
steckdose an
6. Stecken Sie den Netzstecker in die Steckdose
"AUTO" Betrieb bei Gerät mit Gerätesteckdose
Hinweis: Achten Sie darauf, dass vor dem Drehen auf
die Stellung "AUTO" das an die Gerätesteckdose ange-
schlossene Elektrowerkzeug ausgeschaltet ist.
1. Drehen Sie den Schalter auf Stellung "AUTO".
Das Gerät startet beim Einschalten des angeschlosse-
nen Elektrowerkzeug nach ca. 5 Sekunden automatisch.
Wird das Elektrowerkzeug ausgeschaltet, schaltet das
Gerät nach einer Verzögerung aus.
7.4 Nach der Arbeit
1. Schalten Sie das Elektrowerkzeug aus
2. Drehen Sie den Schalter auf Stellung "0"
3. Ziehen Sie den Netzstecker aus der Steckdose
4. Rollen Sie den Schlauch und Anschlusskabel auf
8. Pflege und Instandhaltung
8.1 Filterreinigung
Der Filter wird während des Betriebs automatisch gerei-
nigt
Bei starker Verschmutzung ist eine Vollreinigung nötig
1. Gerät ausschalten
2. Schlauch mit der Hand zuhalten
3. Verschliessen Sie das Schlauchende mit einer Hand
4. Gerät einschalten "MAN" und 10 Sekunden bei ver-
schlossenem Schlauch laufen lassen
Der Filter kann zusätzlich mit Wasser (kein Hochdruckreiniger)
und Lappen gereinigt werden.
Bei nachlässiger Reinigung ist es möglich, dass sich der
Mineralstaub festsetzt und dadurch die Saugleistung
beeinträchtigt.
Den Filter zum Reinigen nicht gegen harte Gegenstände
klopfen oder mit harten beziehungsweise spitzen Gegen-
ständen bearbeiten. Dadurch sinkt die Lebensdauer des
Filters.
8.2 Entsorgungssack wechseln
Ausbauen
1. Öffnen Sie den Verschluss
2. Heben Sie das Geräteoberteil ab
3. Entfernen Sie den Entsorgungssackhalter
4. Verschliessen Sie den Entsorgungssack
5. Ziehen Sie die Entsorgungssackmuffe vom Fitting und
Verschliessen Sie den Entsorgungssack mit dem ange-
brachten Deckel
6. Verschliessen Sie den Entsorgungssack mit dem mit-
gelieferten Kabelbinder
7. Entnehmen Sie den Entsorgungssack und entsorgen
Sie ihn nach den nationalen und regionalen Vorschriften
Einbauen
1. Legen Sie den Entsorgungssack ein
2. Stecken Sie die Entsorgungssackmuffe auf den Fitting
3. Legen Sie den Entsorgungssackhalter ein
4. Schlagen Sie den Entsorgungssack um
5. Setzen Sie das Geräteoberteil auf den Behälter
6. Schliessen Sie den Verschluss
8.3 Filter wechseln
Ausbauen
1. Öffnen Sie den Verschluss
2. Heben Sie das Geräteoberteil ab und stellen Sie den
Geräteoberteil mit dem Filter nach oben ab
3. Lösen Sie die zwei Flügelschrauben
4. Ziehen Sie die Fliterspannscheibe ab
5. Ziehen Sie den Filter ab
Einbauen
1. Schieben Sie den neuen Filter bis zum Anschlag auf
2. Setzen Sie die Filterspannscheibe auf
3. Ziehen Sie die zwei Flügelschrauben fest
4. Setzen Sie das Geräteoberteil auf
5. Schliessen Sie den Verschluss
Printed: 07.07.2013 | Doc-Nr: PUB / 5071296 / 000 / 00

9. Fehlersuche
Fehler Mögliche Ursache Behebung
Nachlassen der Saugleistung Behälter voll Behälter muss entleert werden
Filter ist stark verschmutzt Vollreinigung nötig (siehe 8.1)
Filterwechsel
Schlauch oder Absaugglocke des Säubern von Schlauch und
Elektrogeräts verstopft Absaugglocke
Entsorgungssack ohne Halter Entsorgungssackhalter einlegen
eingelegt
Gerät ist an eine nicht geerdete Gerät an eine geerdete Steckdose
Steckdose angeschlossen anschliessen
Loch im Schlauch Neuer Schlauch nötig
Staub wird vom Gerät ausgeblasen Filter nicht richtig montiert Filter neu montieren
Filterspannscheibe nicht angezogen Filterspannscheibe nachziehen
Filter beschädigt Neuen Filter einbauen
Gerät schaltet ungewollt ein und aus Die elektrostatische Ableitung ist
oder nicht gewährleistet:
es erfolgen statische Entladungen – Gerät ist in eine nicht geerdete Gerät in eine geerdete Steckdose
über den Benutzer Steckdose eingesteckt stecken
– Es wird nicht mit dem Original Original Schlauch verwenden
Schlauch gearbeitet
– Die Ableitklammer, die Behälter Ableitklammer gerade biegen,
und Kopf verbindet, ist verbogen so dass sie den Behälter berührt
Motor läuft nicht mehr Sicherung der Netzsteckdose Sicherung einschalten. Nach
hat ausgelöst nochmaligem Auslösen Ursache für
Überstrom suchen
Motor-Thermosicherung hat Gerät ausschalten und ca. 5 min.
angesprochen abkühlen lassen. Läuft danach Motor
nicht an, muss der Kundendienst
aufgesucht werden
Motor-Thermosicherung schaltet Kühlluftfilter auswechseln
den Motor wiederholt ab, da der
Kühlluftfilter verschmutzt ist
Motor läuft nicht im Angeschlossenes Elektrowerkzeug Angeschlossenes Elektrowerkzeug auf
Automatikbetrieb ist defekt oder nicht richtig Funktion prüfen, bzw. Stecker fest
eingesteckt einstecken
6
8.4 Kühlluftfilter wechseln
1. Ziehen Sie den Kühlluftfilter an der Griffmulde aus dem
Gerät
2. Setzen Sie den neuen Kühlluftfilter mittels Griffmulde
in das Gerät
8.5 Pflege des Geräts
Die äussere Gehäuseschale des Geräts ist aus einem
schlagfesten Kunststoff gefertigt.
Betreiben Sie das Gerät nie mit verstopften Lüftungs-
schlitzen! Reinigen Sie die Lüftungsschlitze vorsichtig mit
einer trockenen Bürste. Reinigen Sie die Geräteaussen-
seite regelmässig mit einem leicht angefeuchteten Putz-
lappen. Verwenden Sie kein Sprühgerät, Dampfstrahl-
gerät oder fliessendes Wasser zur Reinigung! Die elek-
trische Sicherheit des Geräts kann dadurch gefährdet wer-
den. Verwenden Sie keine silikonhaltigen Pflegemittel.
8.6 Instandhaltung
Prüfen Sie regelmässig alle aussenliegenden Teile des
Geräts auf Beschädigungen und alle Bedienungselemente
auf einwandfreie Funktion. Betreiben Sie das Gerät nicht,
wenn Teile beschädigt sind, oder Bedienelemente nicht
einwandfrei funktionieren. Lassen Sie das Gerät vom
Hilti-Service reparieren.
Reparaturen am elektrischen Teil dürfen nur durch eine
Elektrofachkraft ausgeführt werden.
8.7 Kontrolle nach Pflege- und Instandhaltungsar-
beiten
Nach Pflege- und Instandhaltungsarbeiten ist zu prüfen,
ob alle Geräteteile angebracht sind und fehlerfrei funk-
tionieren.
Printed: 07.07.2013 | Doc-Nr: PUB / 5071296 / 000 / 00

7
11. Garantie
Hilti garantiert, dass das gelieferte Gerät frei von Mate-
rial- oder Fertigungsfehlern ist. Diese Garantie gilt unter
der Voraussetzung, dass das Gerät in Übereinstimmung
mit der Hilti Bedienungsanleitung richtig eingesetzt und
gehandhabt, gepflegt und gereinigt wird, dass alle Garan-
tieansprüche innerhalb von 12 Monaten (sofern nicht
zwingende nationale Vorschriften eine längere Mindest-
dauer vorschreiben) ab dem Verkaufsdatum (Rech-
nungsdatum) erfolgen und dass die technische Einheit
gewahrt wird, d.h. dass nur Original Hilti Verbrauchsmaterial,
Zubehör und Ersatzteile mit dem Gerät verwendet wer-
den.
Diese Garantie umfasst die kostenlose Reparatur oder
den kostenlosen Ersatz der defekten Teile. Teile, die dem
normalen Verschleiss unterliegen, fallen nicht unter die-
se Garantie.
Weitergehende Ansprüche sind ausgeschlossen, soweit
nicht zwingende nationale Vorschriften entgegenste-
hen. Insbesondere haftet Hilti nicht für unmittelbare
oder mittelbare, Mangel- oder Mangelfolgeschäden,
Verluste oder Kosten im Zusammenhang mit der Ver-
wendung oder wegen der Unmöglichkeit der Verwen-
dung des Geräts für irgendeinen Zweck. Stillschwei-
gende Zusicherungen für Verwendung oder Eignung
für einen bestimmten Zweck werden ausdrücklich aus-
geschlossen.
Für Reparatur oder Ersatz sind Gerät und/oder betroffe-
ne Teile unverzüglich nach Feststellung des Mangels an
die zuständige Hilti Marktorganisation zu senden.
Die vorliegende Garantie umfasst sämtliche Garantie-
verpflichtungen seitens Hilti und ersetzt alle früheren oder
gleichzeitigen Erklärungen, schriftlichen oder mündli-
chen Verabredungen betreffend Garantien.
10. Entsorgung
Abfälle der Wiederverwertung zuführen
Hilti-Geräte sind zu einem hohen Anteil aus wieder verwendbaren Materialien hergestellt. Voraussetzung für eine
Wiederverwendung ist eine sachgemässe Stofftrennung. In vielen Ländern ist Hilti bereits eingerichtet, Ihr Altgerät
zur Verwertung zurückzunehmen. Fragen Sie den Hilti Kundenservice oder Ihren Verkaufsberater.
Nur für EU-Länder
Werfen Sie Elektrowerkzeuge nicht in den Hausmüll!
Gemäss Europäischer Richtlinie 2002/96/EG über Elektro- und Elektronik-Altgeräte und Umsetzung in
nationales Recht müssen verbrauchte Elektrowerkzeuge getrennt gesammelt und einer umweltgerechten
Wiederverwertung zugeführt werden.
Hilti Corporation
Dr. Ivo Celi Dr. Heinz-Joachim Schneider
Senior Vice President Executive Vice President
Business Unit Diamond Business Area Electric Tools & Accessories
01/2005 01/2005
12. EG-Konformitätserklärung
Bezeichnung: Trockensauger
Seriennummer: 00000000–99999999
Typenbezeichnung: VCD50L
Konstruktionsjahr: 2001
Wir erklären in alleiniger Verantwortung, dass dieses
Produkt mit den folgenden Richtlinien und Normen
übereinstimmt: 98/37/EG, 89/336/EWG, EN 60335-1, EN
60335-2-69, EN 55014-1, EN 55014-2, EN 61000-3-2,
EN 61000-3-3
Printed: 07.07.2013 | Doc-Nr: PUB / 5071296 / 000 / 00

8Printed: 07.07.2013 | Doc-Nr: PUB / 5071296 / 000 / 00

9
It is essential that the operating
instructions are read before the
appliance is operated for the first
time.
Always keep these operating
instructions together with the
appliance.
Ensure that the operating instruc-
tions are with the appliance when
it is given to other persons.
VCD 50 L dry-type vacuum cleaner
Components parts
쐃Top section
쐇Container
쐋Transport handle
쐏Tool compartment
쐄Latch
쐂Hose socket
쐆Mains plug with supply cord
쐊Switch
쐎Hose
쐅Snap-lock connector
쐈Rotating connector
쐉Disposal bag holder
씈Disposal bag
씉Disposal bag connector
씊Filter support basket
씋Filter
씌Filter retaining disc
씍Wing screw
씎Cooling air filter
씏Electric socket
Contents Page
1. General information 9
2. Description 10
3. Tools and accessories 10
4. Technical data 10
5. Safety precautions 11
6. Before use 12
7. Operation 12
8. Care and maintenance 13
9. Troubleshooting 14
10. Disposal 15
11. Warranty 15
12. Declaration of conformity 15
1. General information
These numbers refer to the corresponding illustra-
tions. The illustrations can be found on the fold-out cov-
er pages. Keep these pages open while studying the oper-
ating instructions.
In these operating instructions, the VCD50L dry-type
vacuum cleaner is referred to as "the appliance".
Location of identification data on the appliance
The type designation and serial number can be found
on the type plate on the appliance. Make a note of this
data in your operating instructions and always refer to
it when making an enquiry to your Hilti representative
or service department.
Type:
Serial no.:
CAUTION
This word is used to draw attention to a potentially dan-
gerous situation which could lead to minor personal
injury or damage to the equipment or other property.
Pictograms
Prohibition signs
General
warning Warning: electricity Read the
operating
instructions
before use.
Do not
transport by
crane.
Do not suck up liquids.
Warning signs
Printed: 07.07.2013 | Doc-Nr: PUB / 5071296 / 000 / 00

4. Technical data
Voltage 110 V 110–120 V 220 V 230 V 230 V 230 V 220–240 V
Power input 1100 W 1200 W 1200 W 1200 W 1200 W 1200 W 1200 W
Power rating of built-in
socket for electric tools 씏1650 W –– 2100 W 2400 W 1100 W 2000 W ––
Mains frequency 50–60 Hz
Supply cord 7.5 m
Max. suction performance 1200 W = 50 l/s 1000 W = 45 l/s
Max. vacuum 1200 W = 23000 Pa 1000 W = 21000 Pa
(230 mbar)
Filter surface area 0.7 m2
Container volume 50 l
Effective dust capacity 20 l
Extraction hose 36 mm dia., length 5 m, rotating connector at vacuum cleaner end, snap-lock
connector at the other end
Air temperature From –20 to +40° C
Automatic filter cleaning Every 30 sec.
Dust class L in accordance with EN 60335-2-69
Protection class I
Protection type IP X 4 protected against sprayed water
Dimensions (l×w×h) 515×610×745 mm (1025 mm with transport handle)
Weight (with hose) 22.6 kg
Noise power level 80 dB(A)
Noise pressure level 64.6 dB(A) at 1 m distance
Electromagnetic compatibility in accordance with EN 55014-1, EN 55014-2, EN 61000-3-2, EN 61000-3-3
Right of technical changes reserved
10
2. Description
Items supplied
1 VCD50L dry-type vacuum cleaner
1 D36 hose, length 5 m, anti-static type with rotating connector and snap-lock connector
1 Filter
1 Disposal bag
1 Disposal bag holder
1 Tapered adaptor
1 Operating instructions
3. Accessories
1 Toolbox
1 Accessory set
1 Adaptor (tapered)
Printed: 07.07.2013 | Doc-Nr: PUB / 5071296 / 000 / 00

11
5. Safety precautions
5.1 Basic safety information
In addition to the safety precautions listed in the indi-
vidual sections of these operating instructions, the fol-
lowing points must be strictly observed at all times.
5.2 Correct use
The appliance is a dry-type vacuum cleaner of the dust
class L in accordance with EN 60335-2-69. It is particu-
larly suitable for removing large quantities of mineral
dusts with an MAK value of >1mg/m
3(MAK = maximum
workplace concentration), in conjunction with Hilti dia-
mond grinders, Hilti cutters, Hilti rotary hammer drills
and Hilti dry-cutting diamond coring machines.
5.3 Incorrect use (misuse)
●The appliance must not be used to suck up liquids
(water, gasoline, oil, acids, alkalis, etc.), hot or explosive
substances or substances hazardous to health.
●Dusts with an MAK value of < 1 mg/m3are hazardous
to health and must not be sucked up.
●The appliance is not suitable for use in automatic or
semi-automatic systems.
●Manipulation of, or modifications to the appliance are
not permissible.
●To avoid risk of injury, use only original Hilti acces-
sories and ancillary equipment.
●Observe the information in the operating instructions
concerning operation, care and maintenance.
5.4 State of the art
●The appliance is designed and manufactured accord-
ing to the state of the art.
●The appliance and its ancillary equipment may pre-
sent hazards when used incorrectly by untrained per-
sonnel or not as directed.
5.5 Proper arrangement and organisation of
the workplace
●Wear non-slip shoes and work from a safe stance at
all times.
●Avoid unfavourable body positions.
●Ensure that the workplace is well lit.
●Ensure that the workplace is well ventilated.
●Objects which could cause injury should be removed
from the working area.
●Keep other persons, children in particular, outside the
working area.
●Always lead the supply cord, extension cord and extrac-
tion hose away to the rear of the appliance when work-
ing.
●Take care to avoid tripping over the supply cord, exten-
sion cord or extraction hose.
●Do not transport the appliance by crane.
5.6 Types of dust
●DustswithanMAKvalueof<1mg/m
3are hazardous
to health and must not be sucked up.
●Avoid all sources of ignition such as the smoking of
cigarettes while working or while emptying the appliance.
5.7 General hazards presented by the appliance
●Operate the appliance only as directed and only when
it is in faultless condition.
●Never leave the appliance unsupervised.
●Ensure that the appliance is switched off before insert-
ing the supply cord plug in the mains socket.
●Disconnect the supply cord plug from the socket when
the appliance is not in use (e.g. during pauses between
work), before maintenance and before changing the filter.
●When the appliance is not in use, it must be stored in
a dry place, locked up or out of reach of children
●Check that the filter is mounted in the correct position.
●Make sure that the filter is not damaged in any way.
5.8.1 Mechanical hazards
●Follow the instructions concerning care and mainte-
nance.
●Check whether parts have suffered damage and that
all moving parts function faultlessly without sticking. All
parts must be fitted correctly and fulfil all of the condi-
tions necessary to ensure faultless operation of the appli-
ance.
●Use only Hilti original tools and accessories.
5.8.2 Electrical hazards
●Protect yourself from electric shocks. Avoid body con-
tact with earthed objects, e.g. pipes and radiators.
●Check the condition of the appliance including the sup-
ply cord and extension cord as well as the plug connec-
tions. Do not operate the appliance if damage is found,
if the appliance is not complete or if its controls cannot
be operated faultlessly.
●Grip the plug and not the cable when pulling it out of
the socket.
●Do not expose the supply cord to heat, oil or sharp
edges.
●Do not touch the supply cord in the event of it becom-
ing damaged while working. Disconnect the supply cord
plug from the socket.
●When working outdoors, use only extension cords
approved and correspondingly marked for this applica-
tion.
Printed: 07.07.2013 | Doc-Nr: PUB / 5071296 / 000 / 00

12
●Check the appliance for any damage. All parts of the
appliance must be checked carefully to ensure correct,
faultless functionality before further use.
●Damaged switches must be replaced at a Hilti service
centre. Do not use the appliance if it cannot be switched
off and on properly.
●If necessary, have the appliance repaired by an elec-
trical specialist (Hilti service department).
●To avoid risk of accident, use only original Hilti spare
parts.
●Insert the supply cord plug in the socket only when
the appliance is switched off.
●In the event of a power cut: switch the appliance off
and unplug the supply cord.
●Avoid using extension cords with multiple sockets and
operating several appliances simultaneously.
●The connections used for supply cords, extension
cords or electric tool connecting cables must offer pro-
tection from sprayed water.
●To ensure safety, the appliance may be serviced or
repaired only at an authorised Hilti repair centre.
●When an IPX4 plug is not used at the appliance pow-
er socket, the vacuum cleaner may not be exposed to
rain and must be stored in a dry place.
5.9 Requirements to be met by the user
●The appliance is intended for professional use.
●The appliance may be operated, serviced and repaired
only by authorised, trained personnel. This personnel
must be informed of any special hazards that may be
encountered.
5.10 Personal protective equipment
●The user requires no personal protective equipment.
6. Before use
It is essential that the safety precautions printed in these
operating instructions are read and observed.
6.1 Transport
●When moving the appliance, bring the transport han-
dle into the extended position and lock it in place with
the sleeves.
●Hang the hose and supply cord over the transport
handle.
●The total permitted weight must not exceed 60 kg.
6.2 Attaching the Hilti toolbox or the Hilti DPC 20 to
the appliance
1. Slide the toolbox or the DPC 20 into the guides on the
rear of the appliance.
2. Press the toolbox or the DPC 20 toward the appliance
until it engages.
6.3 Releasing the Hilti toolbox or the Hilti DPC 20 from
the appliance
1. Push the locking mechanism upwards.
2. Remove the toolbox or the DPC 20 from the guides
on the appliance.
6.4 Preparing the appliance for inital use
The appliance may not be plugged into an electric sup-
ply when any kind of adjustments or maintenance work
are being carried out.
Labels in the local language displaying the warning for
dust class L are supplied inside the appliance. You should
select the warning label in your local language and apply
it over the English warning text on the dust class L label
already attached to the rear of the top section of the vacuum
cleaner.
The accessory items are supplied in the container 쐇
and must be removed before the appliance is used for
the first time.
1. Extend the transport handle into the upright position
쐋
2. Open the latch 쐄
3. Lift off the top section of the appliance 쐃
4. Remove the disposal bag holder 쐉
5. Remove the small tapered adaptor for Hilti diamond
cutters and Hilti dry-cutting diamond coring machines
6. Remove the disposal bag 씈
7. Fit the disposal bag
8. Attach the disposal bag sleeve 씉to the hose
socket 쐂
9. Insert the disposal bag holder 쐉
10. Fold over the edge of the disposal bag III.
11. Fit the top section 쐃onto the container 쐇
12. Close the latch 쐄
13. Connect the end of the hose 쐎with the rotating
connector 쐈to the hose socket.
NOTE: The disposal bag must always be folded over
the disposal bag holder inside the container.
7. Operation
It is essential that the safety precautions printed in these
operating instructions are read and observed.
7.1 Connecting to the mains supply
The voltage provided by the mains supply must corre-
spond to the voltage rating printed on the type plate.
The appliance must be switched off (switch position 0).
1. Insert the mains plug in the socket.
Printed: 07.07.2013 | Doc-Nr: PUB / 5071296 / 000 / 00

13
7.2 Appliances without an electric tool socket
Turn the switch to the "MAN" position. The appliance then
starts immediately (soft start function).
7.3 Appliances with an electric tool socket
"MANUAL" operation of appliances equipped with an
electric tool socket
Turn the switch to the "MAN" position. The appliance then
starts immediately (soft start function).
Connecting electric tools to the electric tool socket
1. Turn the switch to the "0" position.
2. Disconnect the supply cord plug from the socket.
3. Switch the electric tool off.
4. Check the maximum power input rating of the electric
tool to be connected (observe the data given in the
"Technical data" and the information printed at the elec-
tric tool socket.
5. Connect the electric tool to the electric tool socket.
6. Insert the mains plug in the socket.
"AUTO" operation of appliances equipped with an elec-
tric tool socket
NOTE Before turning the switch to the "AUTO" position,
check that the electric tool connected to the electric tool
socket is switched off.
Turn the switch to the "AUTO" position.
The appliance then starts automatically approx. 5 sec-
onds after the electric tool connected to it is switched
on. When the electric tool is switched off, the appliance
switches off automatically after a short delay.
7.4 After finishing work
1. Switch the electric tool off.
2. Turn the switch to the "0" position.
3. Disconnect the mains plug from the socket.
4. Roll up the hose and the supply cord.
8. Care and maintenance
8.1 Cleaning the filter
The filter is cleaned automatically during operation.
Nevertheless, should it become heavily soiled, complete
cleaning is necessary.
1. Switch the appliance off.
2. Hold the hose in the hand.
3. Use one hand to close off the end of the hose.
4. Turn the switch to the "MAN" position and, using the
hand to close off the end of the hose, allow the appli-
ance to run for 10 seconds.
In addition to this, the filter may be cleaned with water
and a cloth (do not use a high-pressure cleaning sys-
tem). Mineral dust may clog the filter, reducing its suc-
tion performance, if it is not cleaned adequately.
Don't knock the filter against a hard object or use a hard
or pointed object to clean it. This reduces the life of the
filter.
8.2 Changing the disposal bag
Removing the bag
1. Open the latch.
2. Lift off the top section.
3. Remove the disposal bag holder.
4. Close the disposal bag.
5. Pull the disposal bag sleeve from the hose socket and
use the cover provided to close the opening in the dis-
posal bag.
6. Use the cable tie supplied to close the disposal bag.
7. Remove the disposal bag and dispose of it in accor-
dance with national and local regulations.
Inserting the bag
1. Fit the disposal bag.
2. Attach the disposal bag sleeve to the hose
socket.
3. Insert the disposal bag holder.
4. Fold the edge of the disposal bag over.
5. Fit the top section onto the container.
6. Close the latch.
8.3 Changing the filter
Removing the filter
1. Open the latch.
2. Lift off the top section of the appliance and lay it down
with the filter facing upwards.
3. Release the two wing screws.
4. Pull off the filter retaining disc.
5. Pull off the filter.
Fitting the filter
1. Push on the new filter as far as it will go.
2. Fit the filter retaining disc.
3. Insert and tighten the two wing screws.
4. Fit the top section onto the appliance.
5. Close the latch.
8.4 Changing the cooling air filter
1. Pull the cooling air filter out of the grip depression in
the appliance.
2. Fit the new cooling air filter into the grip depression in
the appliance
Printed: 07.07.2013 | Doc-Nr: PUB / 5071296 / 000 / 00

9. Troubleshooting
Fault Possible cause Remedy
Drop in suction performance. The container is full. Empty the container.
The filter is heavily soiled. Complete cleaning necessary (see 8.1).
Change the filter
Hose or vacuum enclosure of the Clean the hose and vacuum
appliance is blocked enclosure
Disposal bag fitted without the Fit the disposal bag holder.
holder.
The appliance is plugged into a Connect the appliance to an earthed/
non-grounded plug socket. grounded socket.
Hole in the hose. Fit a new hose.
Dust is blown out of the Filter not fitted correctly. Refit the filter.
appliance. Filter retaining disc not tightened Retighten the filter retaining disc.
adequately.
Filter damaged. Fit a new filter.
The appliance switches on Electrostatic build-up is not being
and off unexpectedly or dissipated:
static electricity discharges – The appliance is not connected Connect the appliance to an
via the user. to an earthed socket. earthed socket.
– The original hose is not being Use the original hose.
used.
– The earth clip connecting the Straighten the earth clip so that it
container and top section is bent. makes contact with the container.
The motor doesn’t run. The fuse for the mains socket Reset or replace the fuse. If it
has been tripped. trips again, find the cause of the
excess current.
The motor thermal protection Switch the appliance off and allow
device has been activated. to cool for approx. 5 min. If the
motor then doesn’t start, please
contact Hilti customer service.
The motor thermal protection Replace the cooling air filter.
device switches the motor off
repeatedly as the cooling air
filter is blocked.
The motor doesn’t run in The electric tool connected is Check the functionally of the
automatic mode. defective or not plugged in electric tool connected and
correctly. ensure it is plugged in correctly.
14
8.5 Caring for the appliance
The outer casing of the appliance is manufactured from
impact-resistant plastic.
Always keep the ventilation slots free from obstructions.
Clean the ventilation slots carefully with a dry brush. Clean
the outer surface of the appliance at regular intervals with
a slightly damp cloth. Do not use a spray cleaning sys-
tem, steam cleaning system or running water for clean-
ing. This may negatively affect the electrical safety of the
appliance. Do not use cleaning agents, polish, etc., con-
taining silicone.
8.6 Maintenance
Check all external parts of the appliance for damage at
regular intervals and ensure that all operating controls
function faultlessly. Do not operate the appliance when
parts are damaged or when the operating controls do
not function faultlessly. If necessary, have the appliance
repaired at a Hilti service centre.
The electrical parts of the appliance may be repaired only
by trained electrical specialists.
8.7 Checking after cleaning and maintenance
After cleaning and maintenance work, check that all parts
of the appliance have been fitted and that they function
correctly.
Printed: 07.07.2013 | Doc-Nr: PUB / 5071296 / 000 / 00

15
11. Warranty
Hilti warrants that the product supplied is free of defects
in material and workmanship. This warranty is valid as
long as the product is operated and handled correct-
ly, cleaned and serviced properly and in accordance
with the Hilti operating instructions, all warranty claims
are made within 12 months (unless other mandatory
national regulations prescribe a longer minimum peri-
od) from the date of sale (invoice date) and the tech-
nical system is maintained, i.e. only original Hilti con-
sumables, accessories and spare parts are used with
the product.
This warranty provides the free-of-charge repair or
replacement of defective parts only. Parts requiring
repair or replacement as a result of normal wear and
tear are not covered by this warranty.
Additional claims are excluded, unless mandatory
national regulations prohibit such exclusion. In par-
ticular, Hilti is not obligated for direct, indirect, inci-
dental or consequential damages, losses or expens-
es in connection with, or by reason of, the use of, or
inability to use the product for any purpose. Implied
warranties of merchantability or fitness for a partic-
ular purpose are specifically excluded.
Send the product and/or related parts immediately upon
discovery of a defect to the local Hilti marketing orga-
nization for repair or replacement.
This constitutes Hilti's entire obligation with regard to
warranty and supersedes all prior or contemporane-
ous comments and oral or written agreements con-
cerning warranties.
10. Disposal
Return waste material for recycling
Most of the materials from which Hilti electric tools are manufactured can be recycled. The materials must be
correctly separated before they can be recycled. In many countries, Hilti has already made arrangements for
taking back your old electric tools for recycling. Please ask your Hilti customer service department or Hilti rep-
resentative for further information.
Only for EU countries
Disposal of electric tools together with household waste is not permissible!
In observance of European Directive 2002/96/EC on waste electrical and electronic equipment and its
implementation in accordance with national law, electric tools that have reached the end of their life
must be collected separately and returned to an environmentally compatible recycling facility.
Hilti Corporation
Dr. Ivo Celi Dr. Heinz-Joachim Schneider
Senior Vice President Executive Vice President
Business Unit Diamond Business Area Electric Tools & Accessories
01/2005 01/2005
12. EC declaration of conformity
Designation: Dry-type vacuum cleaner
Serial no.: 00000000–99999999
Type designation: VCD50L
Year of design: 2001
We declare, on our sole responsibility, that this product
complies with the following standards or standardisa-
tion documents: 98/37/EG, 89/336/EWG. Applicable har-
monised standards: EN 60335-1, EN 60335-2-69, EN
55014-1, EN 55014-2, EN 61000-3-2, EN 61000-3-3
Printed: 07.07.2013 | Doc-Nr: PUB / 5071296 / 000 / 00

16 Printed: 07.07.2013 | Doc-Nr: PUB / 5071296 / 000 / 00
Other manuals for VCD50L
1
Table of contents
Languages:
Other Hilti Vacuum Cleaner manuals

Hilti
Hilti DD-WMS 100 User manual

Hilti
Hilti NURON VC 140-2-22 User manual

Hilti
Hilti VC 20-U-Y User manual

Hilti
Hilti VC 20M-X User manual

Hilti
Hilti VC 40 User manual

Hilti
Hilti VC 20?U User manual

Hilti
Hilti VCU 40-M User manual

Hilti
Hilti VC 20?UM User manual

Hilti
Hilti VC 40 User manual

Hilti
Hilti VC 5-A22-L User manual

Hilti
Hilti TE DRS-S User manual

Hilti
Hilti VC 20-U User manual

Hilti
Hilti VC 300-17 X User manual

Hilti
Hilti VC 20?UM User manual

Hilti
Hilti VC 150-6 XE User manual

Hilti
Hilti VC 150-6 X User manual

Hilti
Hilti VC 20 User manual

Hilti
Hilti Nuron VC 5-22 User manual

Hilti
Hilti VC 20-U User manual

Hilti
Hilti TE DRS-4-A User manual