HIS KVM2EXT-xx-xx-USB User manual

KVM Extender Quick Start Guide
For full detailed instructions, including physical assembly, see the user manual and installation instructions that shipped with
your KVM2EXT-xx-xx-USB KVM Extender, also available online: http://www.hopeindustrial.com/installations/99116.pdf
IMPORTANT! KVM Extender should be bench-tested before installing in
the production environment!
KVM2EXT-xx-xx-USB Quick Start Guide • January 7, 2015 • www.HopeIndustrial.com • International: +1 (678) 762-9790 • UK: +44 (0) 20 7193 2618 • Copyright © 2015 Hope Industrial Systems, Inc. • Page 1 of 2
Shielded CATx Cables
up to 300 m (1000’)
Local KVM Extender
VGA and USB
VGA
Additional local monitor /
keyboard (optional)
VGA, USB, Power,
and CATx connections
inside monitor cavity
Computer being
controlled
Remote Industrial
Workstation
Cable Selection and Preparation
NOTE: Avoid routing cable along power lines, or near
high power devices such as motors, motor controllers, or
associated wiring. RF interference from these devices can
cause image blanking and distortion.
• Shielded CATx cable with properly terminated shielded RJ45
connectors is required.
• The mains power feeding the local and remote workstations must share
the same earth ground. Extending between locations not sharing an
earth ground point is not supported.
• Cable type should be chosen based on total cable length:
○ CAT5 Trunk, shielded – up to 200 m (650 ft)
○ CAT5e Trunk, shielded – up to 250 m (820 ft)
○ CAT6 Trunk, shielded – up to 300 m (1000 ft)
○ CAT7 Trunk, shielded – up to 300 m (1000 ft)
○ CAT7a Patch, shielded – up to
200 m (650 ft)
• RJ45 connectors must be terminated
using the T-568B standard shown to
the right:
• Test cable termination and continuity
using a cable tester such as a Tripp
Lite Multi-Functional Network Cable
Tester. Most issues are caused by
CATx cable termination problems.
Remote Unit Internal Monitor Connections
Make the following connections inside monitor cavity:
• VGA, AC Power, and touch screen USB (optional)
from remote KVM unit to monitor
• USB from any integrated Hope keyboard to
remote KVM unit
• USB from any other peripherals in use to remote
KVM unit
3 5Optimize Image
Program KVM Extender for CATx cable type and length
NOTE: Perform these steps when using >60m of CATx
cable, or when image at remote station is not perfect.
a. Connect a keyboard to the remote KVM unit (at the
monitor). If no keyboard will be used, temporarily
connect any USB keyboard to the remote unit.
b. Set toggle switch on remote KVM unit to the
“CAL” position.
c. On the remote keyboard: Press “C” followed
by the number for your cable type:
1 = CAT5 2 = CAT5e 3 = CAT6
4 = CAT7 5 = CAT7a
d. Press Enter.
e. Press “L” followed by your cable length in meters.
f. Press Enter.
g. Set toggle switch on remote KVM unit back to
the “RUN” position.
NOTE: If the switch is not returned to the
“RUN” position, the KVM Extender will not
function!
Conguration “CAL” Setting
Operation “RUN” Setting
Power Input
Remote CATx
Connection
Connections made
inside monitor cavity
Two additional USB ports
(on reverse)
VGA
Touch USB Keyboard USB
Monitor Power C-13
1 2 3 4 5 6 7 8
o O g B b G br BR
T-568B
away from you.
Clip is pointed
Pin 1
RJ-45 Plug
System Diagram Local Unit Connections
Connect the local KVM unit to the PC using supplied USB
and VGA cables.
If a separate local monitor will be used, connect it to the
local KVM unit now.
NOTE: Local KVM unit is powered via the USB
connection; no external power supply is needed.
2
To additional local monitor
1Install Touch Screen Driver
If a touch screen monitor
will be used, rst install
touch screen drivers with
monitor connected directly
to the PC, bypassing the
KVM Extender, then test the touch
screen.
Driver installation instructions may be found in the
monitor user manuals:
www.hopeindustrial.com/product_documentation.htm
4Remote Unit Power/CATx Connections
Connect an AC power cable to the power
input port on the remote KVM unit.
Connect local and remote KVM units
with shielded CATx cable. When bench
testing, use the same length of cable
that will be used in the production
environment.
NOTE: Proper CATx cable selection
and preparation is crucial. Review
the “Cable Selection and Preparation”
section before proceeding.

KVM Extender Quick Start Guide: Troubleshooting
Problem Solutions
Image is blurry or distorted Most image problems can be corrected by conguring the KVM
Extender for your cable type and length, and adjusting the skew
compensation.
To set cable type and length, follow the steps in the “Optimize Image”
section on reverse side. If image is still blurred, perform skew
adjustment as noted in the “Video compensation” section of the included
Adder KVM Extender manual.
Image is horizontally smeared from left to right Perform a skew adjustment as noted in the “Video compensation”
section of the included Adder KVM Extender manual.
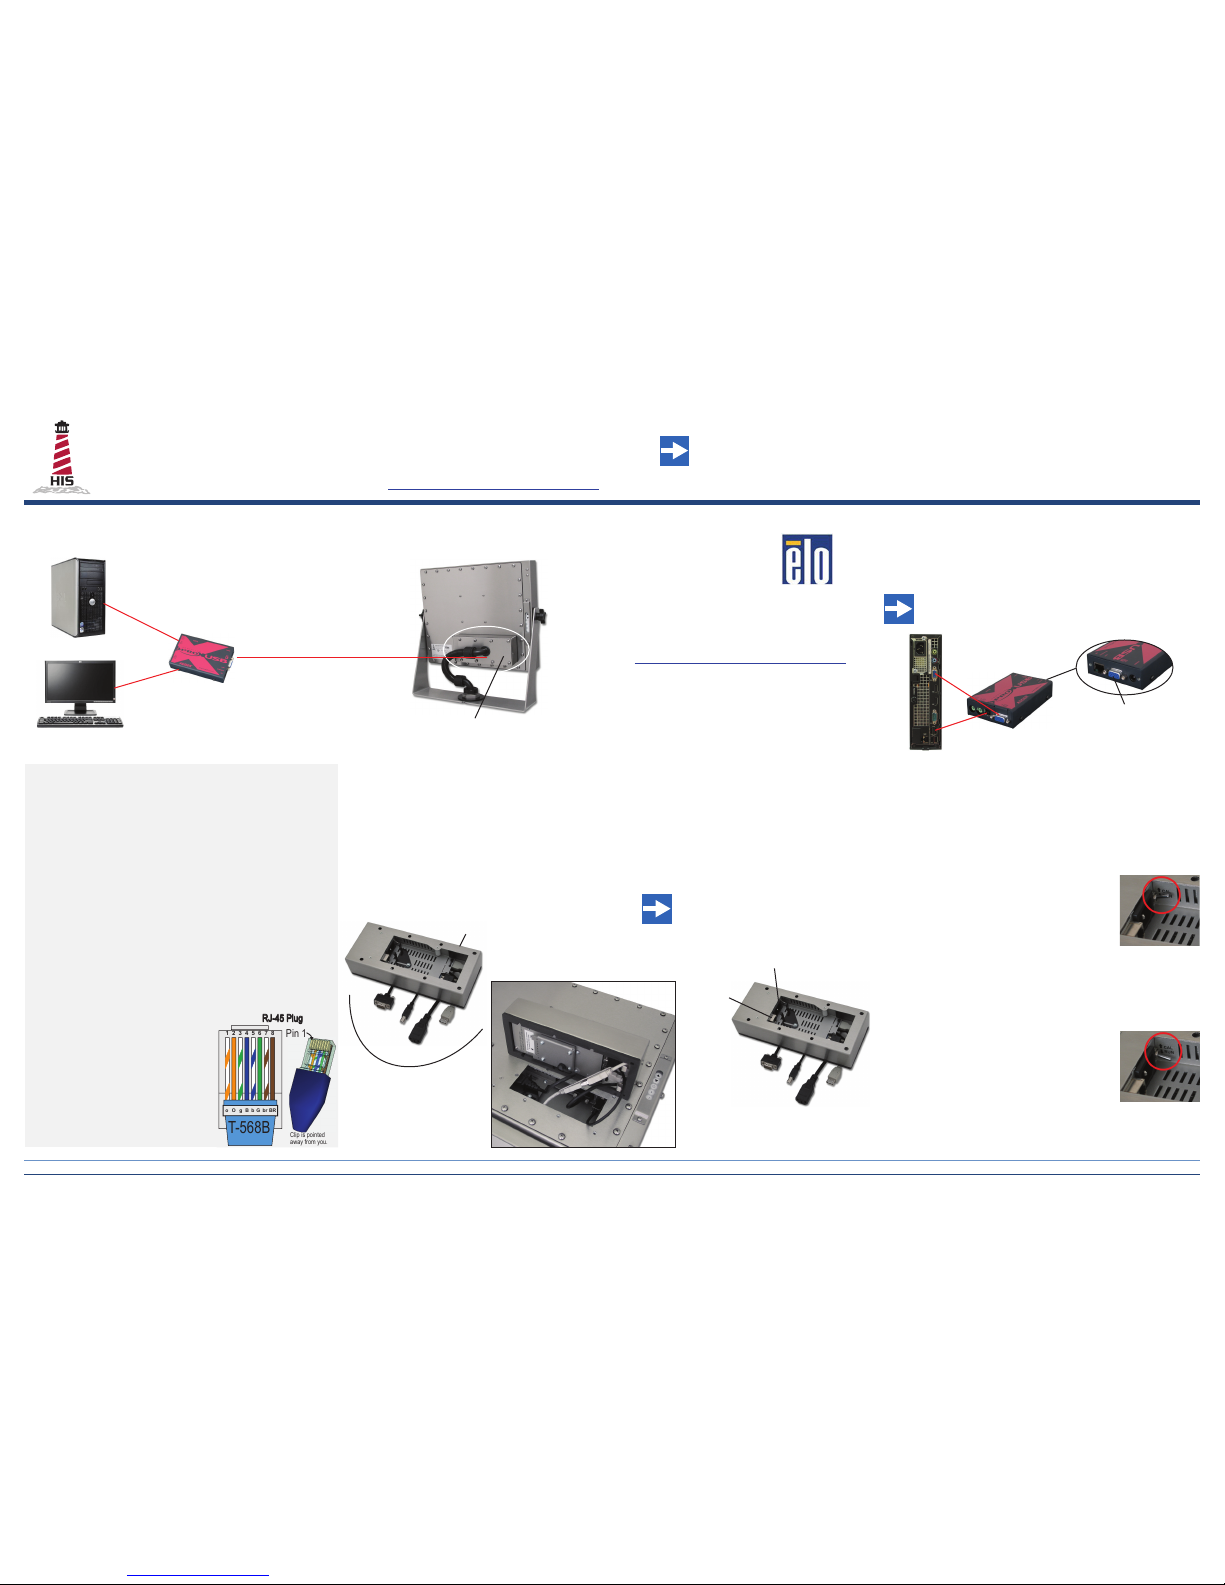
No image or no signal at remote monitor Multiple possible causes:
1. Conrm monitor is connected to AC power at the remote end.
2. Conrm all video connections have been made (see system
diagram on reverse side).
3. Conrm proper CATx cable type per the “Cable Selection and
Preparation” section on reverse side.
4. Conrm proper CATx cable termination per the “Cable Selection
and Preparation” section on reverse side. We highly recommend
use of a cable tester.
5. Conrm that proper cable length and type have been selected per
the “Optimize Image” section on reverse side.
Flashing or intermittent image at remote
monitor
First, conrm that image at local unit is not also having this issue
by connecting the monitor directly to either the video source or the
secondary local monitor output of the local KVM unit.
After conrming this, run through the steps in the “Optimize Image”
section on reverse side.
Finally, review the “Cable Selection and Preparation” section on reverse
side. Failure to meet any of these criteria could cause this issue.
Distorted colors at remote monitor (magenta,
yellow, or cyan-tinted image)
This is almost always caused by a missing color signal somewhere in
the video path, which is usually caused by a bad cable or connector for
one of the 3 video color components. Check:
• Remove, inspect, reconnect, and secure all 4 VGA connectors.
• Replace VGA cables with known-good cables.
• Remove and inspect RJ45 connectors at both ends; check CATx
cable (a common culprit) with a signal tester.
Problem Solutions
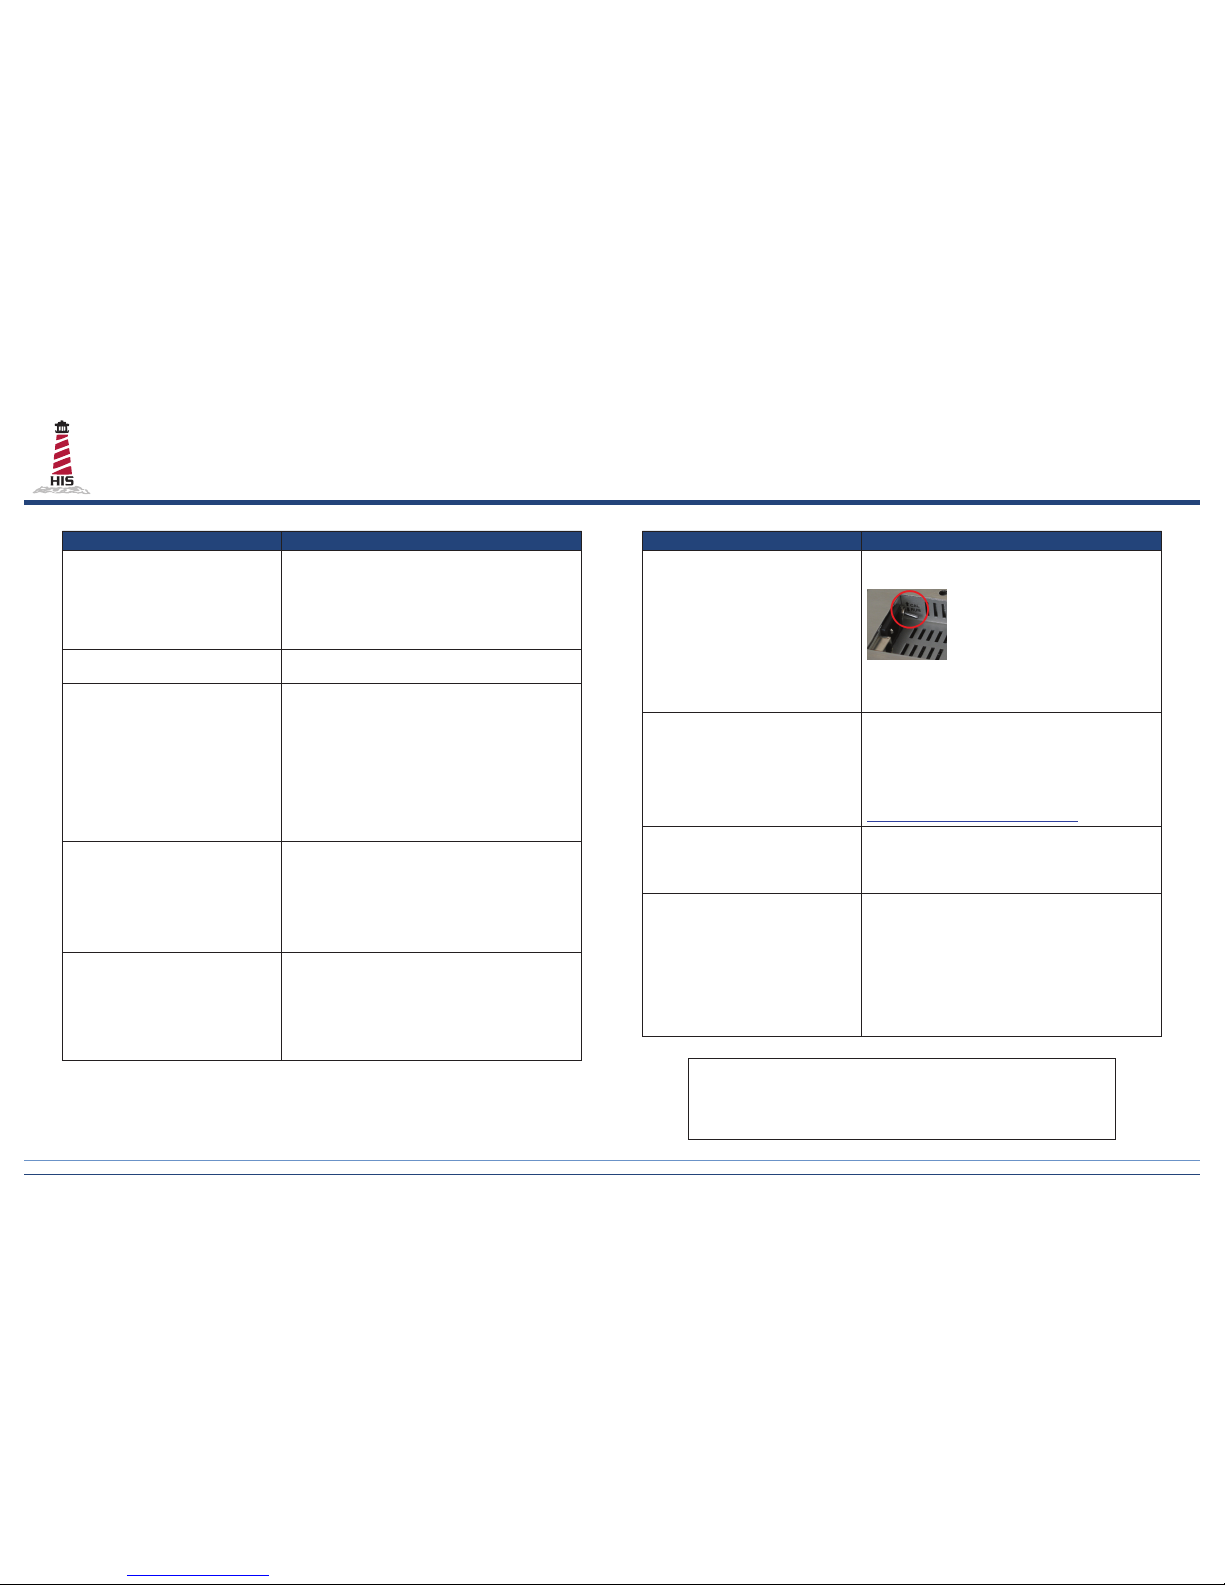
No response from remote touch screen,
keyboard, mouse or other USB device
Conrm remote unit is not in conguration mode: Toggle switch should
be in the “RUN” position as shown below:
This can also be caused by a bad or improperly terminated CATx cable.
Check CATx cable with cable tester and refer to the “Cable Selection
and Preparation” section on reverse side.
Remote keyboard or mouse works but not
remote touch screen
Check USB connection between remote KVM unit and the touch screen.
If a remote keyboard or mouse works, this conrms the USB data
connection is functioning. Bring the touch screen to the local station
and plug directly into the PC (bypassing KVM Extender), then reinstall
touch screen driver (see monitor manual) and conrm functionality
before moving monitor back to remote end. Detailed driver installation
instructions may be found in the monitor user manuals:
www.hopeindustrial.com/product_documentation.htm
Remote touch screen works but not remote
keyboard, mouse, or other USB device
If a remote touch screen works, this conrms the USB data connection
is functioning.
Check USB connection between remote KVM unit and the remote
keyboard, mouse, or other USB device.
Monitor shows “Out of Range” message First, conrm that the PC is outputting a compatible resolution for the
monitor, at 60 Hz refresh rate.
For users of 12” monitors: Disconnect power to local KVM unit
and connect the 12” monitor to the local KVM unit’s VGA Out port.
Reconnect power, wait for video, then move back to remote KVM VGA
Out. This refreshes the EDID display information stored in the local
KVM unit.
For users of 22” monitors: If using Intel Video Graphics, conrm that the
Intel Panel Fit option in the Intel Graphics Conguration utility is set to
“Maintain Display Scaling.”
Please contact our support team if you have any questions:
Phone: +1 (678) 762-9790
E-mail: [email protected]
KVM2EXT-xx-xx-USB Quick Start Guide • January 7, 2015 • www.HopeIndustrial.com • International: +1 (678) 762-9790 • UK: +44 (0) 20 7193 2618 • Copyright © 2015 Hope Industrial Systems, Inc. • Page 2 of 2
Table of contents
Other HIS Extender manuals
Popular Extender manuals by other brands

AvaLAN
AvaLAN AW900 user manual

PROLiNK
PROLiNK PME200 User's manual & installation instructions

LevelOne
LevelOne HVE-9005 user manual

Digital Antenna
Digital Antenna PowerMax 4KSBR-50M Installation and operation manual

Scion-Tech
Scion-Tech SC01.7060 user manual

StarTech.com
StarTech.com USBthere USB221EXT Specifications