Hisense 40K220PW User manual

物料号:

ES-
NO.1
LED Backlight TV
Read the manual carefully and ensure you have fully understood
its contents before operating this device for the first time.
English

1 English
Contents
1-Shortcuts
Instructions
1.1 Turning your TV on or off ........................................ 6
1.2 Selecting the Input Source ..................................... 6
1.3 Selecting the aspect ratio ....................................... 6
1.4 Audio function ......................................................... 7
1.5 EPG ........................................................................ 8
1.6 PVR/Timeshift ......................................................... 9
2-Menu 2.1 How to use the Menu .............................................. 11
2.2 Using the Picture Menu .......................................... 11
2.3 Using the Sound Menu ........................................... 12
2.4 Using the Screen Menu .......................................... 13
2.5 Using the Option Menu ........................................... 13
2.6 Using the Network Menu ........................................ 16
2.7 Using the Channel Menu ........................................ 18
3-Advanced
Features
3.1 How to use the Smart ............................................. 21
3.2 Digital Media Player (DMP) .................................... 21
3.2.1 Playable formats list .................................... 21
3.2.2 Playing Video Files ...................................... 21
3.2.3 Playing Music Files ..................................... 22
3.2.4 Browsing Pictures ....................................... 22
3.3 Picasa ..................................................................... 24
3.4 Browser ................................................................... 24
3.5 Social TV (Facebook/Twitter) ................................. 25
3.6 Anyview stream ...................................................... 25
4-Other
Information
4.1 Troubleshooting ...................................................... 27
4.2 Playable Format List ............................................... 28
Declaration and
Important Safety
Precautions
Declaration ............................................................. 2
Disposal of Used Electrical & Electronic Equipment 3
Warning .................................................................. 3
Safeguards .............................................................. 4

English 2
Declaration
Any content and service accessed through this device, while only intended for individual non-commercial
use, shall be the property of the applicable third party and subject to protection by regulations and laws on
copyright, patent, trademark and other intellectual property rights. No part of such content and service may be
modified, duplicated, published, uploaded, distributed, translated, marketed, or used to make and distribute
products derived from it without the prior permission of the content owner or service provider.
You acknowledge and agree explicitly that you will solely bear the risk associated with the use of this device,
and further you will solely bear any risk related to satisfactory quality, performance and accuracy for any
content and service accessed through this device. To the maximum extent permitted by applicable law, this
device and any third party’s content and service is provided as it is without any guarantee, express or implied.
Manufacturer hereby declare explicitly that Manufacturer shall not be held liable for any guarantee and
conditions, express or implied, related to this device and any content and service, including but not limited to
warranty on marketability, satisfactory quality, fitness for a particular purpose, accuracy, quiet use and non-
violation of any third party’s rights; to the maximum extent permitted by applicable law, Manufacturer gives
no guarantee on the accuracy, validity, timeliness, legitimacy and completeness of any content or service
provided through this device, or the fitness of such device, content or service for your particular requirement,
or the protection from interruption and error during operation of such device, content or service; to the
maximum extent permitted by applicable law, in any case, including fault or neglect, Manufacturer shall not be
held liable for legal actions or indemnity obligation arising from any consequence as a result of or related to
any information loaded in this device or use of such device, content or service by you or any third party .
Any content and service provided as it is together with this device shall be the property of the applicable third
party, therefore Manufacturer gives no declaration or warranty on modification, suspension, cancellation,
termination or abortion thereof, and shall not be held liable for legal actions or indemnity obligation arising
thereof.
Manufacturer reserves the rights to restrict the use or access of certain content or service. As the content and
service are transmitted through third party’s network and transmission facilities, Manufacturer undertakes no
customer service thereof or the obligation for such customer service.

3 English
Important Safety Precautions
Disposal of Used Electrical & Electronic Equipment
Warning
This symbol alerts user about the presence of a
dangerous voltage not isolated inside the product
which can be sufficiently powerful to constitute a
risk of electrocution.
Do not open the back cover.
In no case the user is allowed to operate inside the TV set.
Only a qualified technician is entitled to operate.
This symbol alerts user about the presence of
important operating instructions and maintenance
in the document enclosed in the package.
ATTENTION
RISK OF SHOCK
ELECTRIC
Packaging and electrical goods should be recycled appropriately, and not treated as household
waste. Please dispose of this equipment at your applicable collection point for the recycling of
electrical & electronic equipment waste. By ensuring the correct disposal of this product, you
will help prevent potentially hazardous to the environment and to human health, which could
otherwise be caused by unsuitable waste handling of this product. The recycling of materials
will help conserve natural resources. Please do not therefore dispose of your old electrical and
electronic equipment with your household waste. For more detailed information about recycling
of this product, please contact your local city office, your household waste disposal service or
the shop where you purchased the product.
Incorrect replacement of the battery may lead to the risk, including the replacement of another
similar or the same type. Do not expose batteries to heat such as sun or fire or something like that.
The device should not be exposed to dripping and spraying and it cannot be placed under objects
filled with liquids.
Main plug is used as the disconnect device, the disconnect device shall remain ready for
operating.
If a television is not positioned in a sufficiently stable location, it can be potentially hazardous due to falling.
Many injuries, particularly to children, can be avoided by taking simple precautions such as:
Using cabinets or stands recommended by the manufacturer of the television.
Only using furniture that can safely support the television.
Ensuring the television is not overhanging the edge of the supporting furniture.
Not placing the television on tall furniture (for example, cupboards or bookcases) without anchoring both
the furniture and the television to a suitable support.
Not standing the televisions on cloth or other materials placed between the television and supporting
furniture.
Educating children about the dangers of climbing on furniture to reach the television or its controls.

English 4
Important Safety Precautions
Please read the following safeguards for your TV and retain for future reference.
Always follow all warnings and instructions marked on the television.
1. A note about safety and operating instructions
Read and follow all safety and operating instructions, and retain them safely for future reference.
2. Heed Warnings
Adhere to all warnings on the appliance and in the operating instructions.
3. Cleaning
Unplug the TV from the wall outlet before cleaning. Do not use liquid, abrasive, or aerosol cleaners. Cleaners
can permanently damage the cabinet and screen. Use a lightly dampened cloth for cleaning.
4. Wall Bracket
Wall brackets are not supplied with this product. After market brackets may be available to purchase locally.
Please refer to the specification page for dimensions.
5. Water and Moisture
Avoid dripping or splashing of liquids onto the product. Objects filled with liquids, such as vases, should not be
placed on the product.
6. Setting
Do not place this TV on an unstable cart, stand or table. Placing the TV on an unstable base can cause the
TV to fall, resulting in serious personal injuries as well as damage to the TV. Use only a cart, stand, bracket or
table recommended by the manufacturer or salesperson.
7. Ventilation
Slots and openings in the cabinet are provided for ventilation, to ensure reliable operation of the TV and to
protect it from overheating. Do not cover the ventilation openings in the cabinet and never place the set in a
confined space such as built-in cabinet unless proper ventilation is provided. Leave a minimum 10cm gap all
around the unit.
8. Power Source
This TV should be operated only from the type of power source indicated on the marking label. If you are not
sure of the type of power supplied to your home, consult your appliance dealer or local power company.
9. Power-Cord Protection
Power- supply cords should be routed so that they are not likely to be walked on or pinched by items placed
upon or against them, paying particular attention to cords at plug, wall outlets, and the point where they exit
from the TV. MAIN plug is used as the disconnect device, the disconnect device shall remain readily operable.
10. Lightning
For added protection for this TV during a lightning storm, or when it is left unattended and unused for long
periods of time, unplug it from the wall outlet and disconnect the antenna or cable system. This will prevent
damage to the TV due to lightning or power-line surge.
11. Power Lines
An outside antenna system should not be located in the vicinity of overhead power lines or other electric light
or power circuits, or where it can fall into such power lines or circuits. Where installing an outside antenna
system, extreme care should be taken to keep from touching such power lines or circuits as contact with them
might be fatal.

5 English
Important Safety Precautions
12. Overloading
Do not overload wall outlets and extension cords as this can result in a risk of fire or electric shock.
13. Object and Liquid Entry
Never push objects of any kind into this TV through openings as they may touch dangerous voltage points or
short-out parts that could result in fire or electric shock. Never spill liquid of any kind on or into the TV.
14. Outdoor Antenna Grounding
If an outside antenna or cable system is connected to the TV, be sure the antenna or cable system is
grounded so as to provide some protection against voltage surges and built-up static charges.
15. Servicing
Do not attempt to service this TV yourself as opening or removing covers may expose you to dangerous
voltage or other hazards. Refer all servicing to qualified service personnel.
16. Damage Requiring Service
Unplug the TV from the wall outlet and refer servicing to qualified service personnel under the following
conditions:
(a) When the power - supply cord or plug is damaged.
(b) If liquid has been spilled, or objects have fallen into the TV.
(c) If the TV has been exposed to rain or water.
(d) If the TV does not operate normally by following the operating instructions. Adjust only those controls that
are covered by the operating instructions as an improper adjustment of other controls may result in damage
and will often require extensive work by a qualified technician to restore the TV to its normal operation.
(e) If the TV has been dropped or the cabinet has been damaged.
(f) When the TV exhibits a distinct change in performance - this indicates a need for service.
17. Replacement Parts
When replacement parts are required, be sure the service technician has used replacement parts specified by
the manufacturer or have the same characteristics as the original part. Unauthorized substitutions may result
in fire, electric shock or other hazards.
18. Safety Check
Upon completion of any service or repair to the TV, ask the service technician to perform safety checks to
determine that the TV is in safe operating condition.
19. Heat
The product should be situated away from heat sources such as radiators, heat registers, stoves, or other
products (including amplifiers) that produce heat.

English 6
To turn your TV on or off (standby mode):
1. Plug the AC power cord into a socket outlet of AC power supply.
2. Switch on the Power switch at the bottom of the TV to turn on/off your TV.
3. When the TV is powered on, press the [POWER] button on the remote control, it goes into standby mode.
Press the [POWER] button again to turn on your TV.
1.1 Turning your TV on or off
NOTES
When your TV is in standby mode, it is still consuming power. To completely disconnect power, please
remove the mains plug from the mains socket or switch off the Power switch.
If your TV does not receive an input signal for several minutes, it automatically goes into standby mode.
Select the Input Source depending on the video device you have connected to your TV.
To select the input source:
1. Turn on your TV, then press the [SOURCE] button on the remote, the list of Source appears.
2. Press the [▲/
▲
] buttons to select the input source.
3. Press the [OK] button to confirm your selection.
1.2 Selecting the Input Source
Shortcuts Instructions
You can use shortcuts on the remote control for fast operation. Refer to the “ Quick Setup Guide ” for more
information.
1.3 Selecting the aspect ratio
You can set various display modes which are shown as follows. Press the [ZOOM] button, you can achieve: 4:3
/16:9 / Zoom 1 / Zoom 2 / Smart Zoom / Auto / 1:1.
There are two kinds of input signal. One is 4:3, the other is 16:9. When you press the [ZOOM] button, he can
get different picture in different format. The recommended format for original 4:3 is 4:3 option or Auto and the
preferable format for original 16:9 signal is 16:9 option or Auto.
SIZE Input Signal 4:3 Input Signal 16:9
4:3
This selection will allow you to
view a picture with an original
4:3 aspect ratio. Black bars
will appear on both the left
and right of the screen.
This selection will allow you to
adjust the picture horizontally,
in linear proportion. Black
bars will appear on both the
left and right of the screen.
16:9
This selection will allow you to
adjust the picture horizontally,
in linear proportion, to fill the
entire screen.
This selection will allow you to
view a picture with an original
16:9 aspect ratio.

7 English
Shortcuts Instructions
1.4 Audio function (I/II)
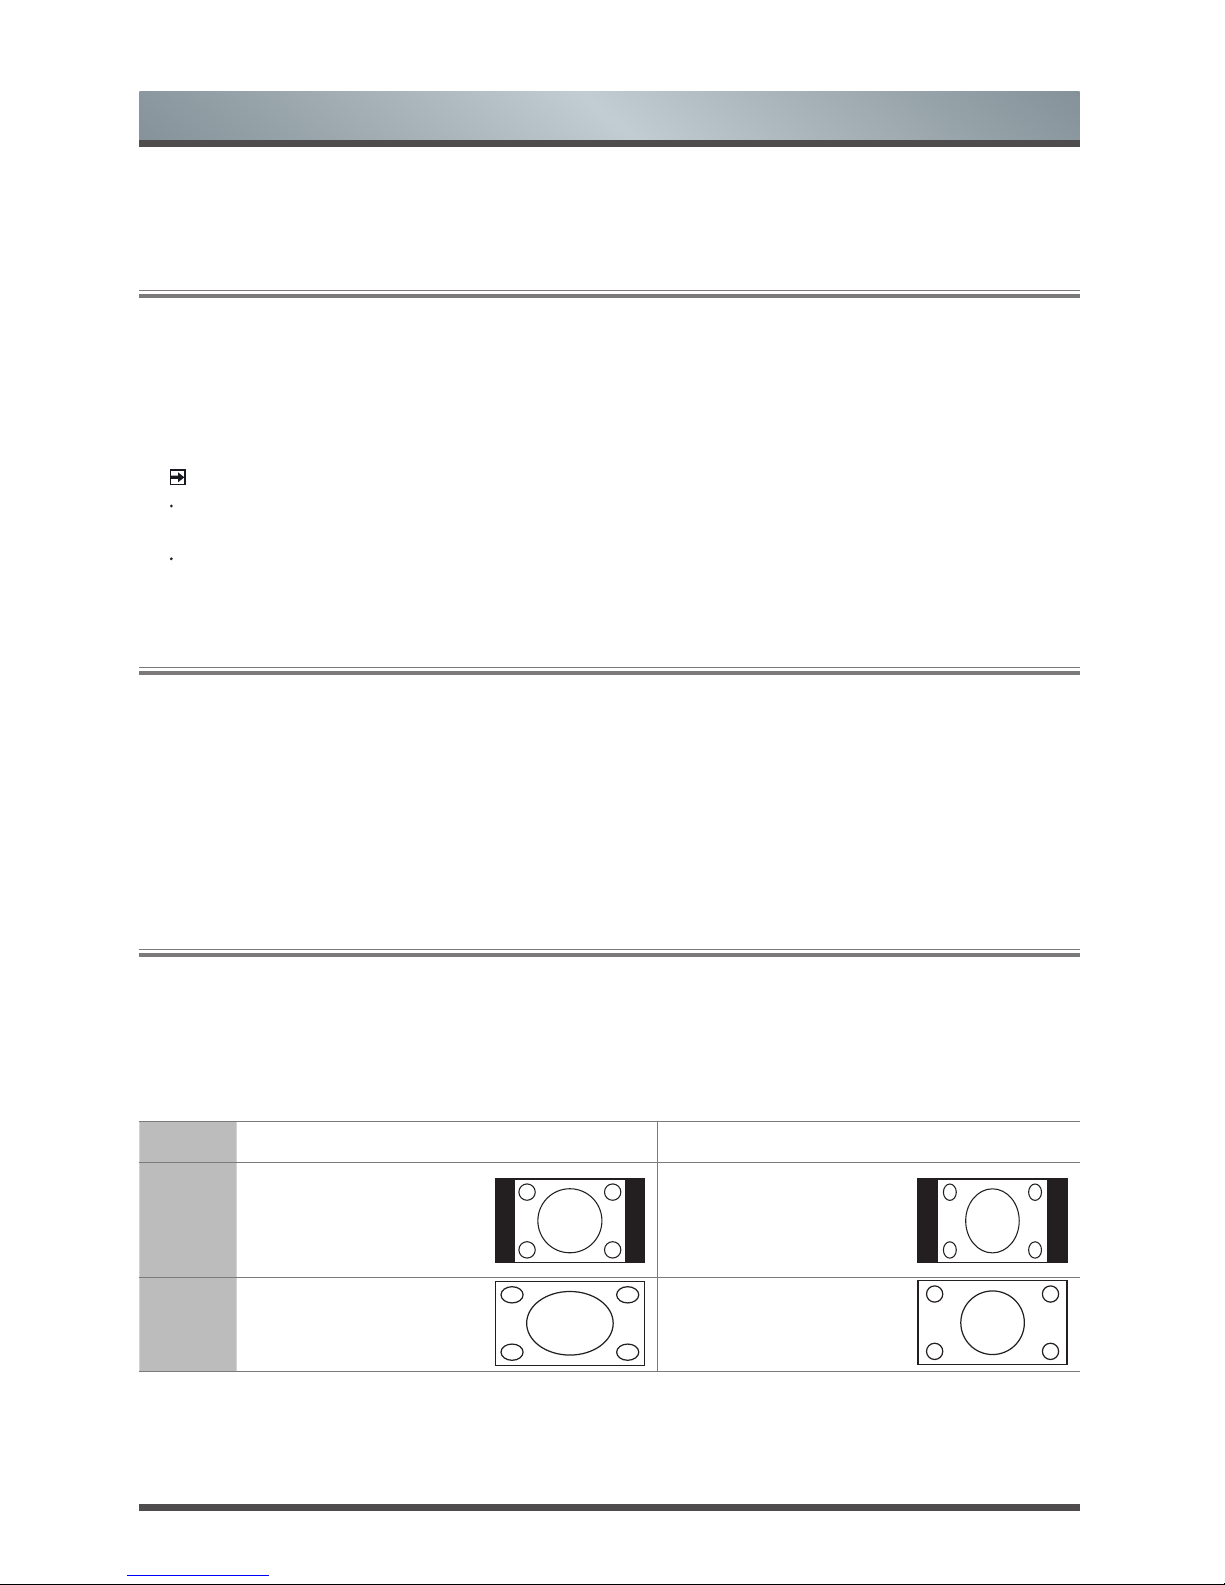
Zoom 1
This selection will allow you
to zoom in the picture without
any alteration. However,the
top and bottom of the
picture will be cropped. And
it allow you to adjust the
picture horizontally, in linear
proportion. Black bars will
appear on both the left and
right of the screen.
This selection will allow you
to zoom in the picture without
any alteration. However,the
top and bottom of the
picture will be cropped. And
it allow you to adjust the
picture horizontally, in linear
proportion. Black bars will
appear on both the left and
right of the screen.
Zoom 2
This selection will allow you to
zoom in the picture without any
alteration, while filling the entire
screen. However,the border of
the picture will be cropped.
This selection will allow you to
zoom in the picture without any
alteration, while filling the entire
screen. However,the border of
the picture will be cropped.
Smart
Zoom
This selection is similar to 16:9
mode, but the picture slightly
stretches horizontally side and
clips off a little from the top
and bottom.
This selection is similar to 16:9
mode, but the picture slightly
stretches horizontally side and
clips off a little from the top
and bottom.
Auto
This selection will display the
picture according to the aspect
ratio of the input source.
This selection will display
the picture according to the
aspect ratio of the input
source.
1:1 This selection will detect the resolution of the signal and display an image with the same number of pixels.
The signal is optional in some source. (eg the HDMI sourse)
Stereo/Dual Sound Reception (ATV Mode)
When a programme is selected, press the [LANG./I/II] button to display the sound information for the selected
station.
· Mono sound selection: If the stereo signal is weak in stereo reception, you can switch to mono by pressing
the [I/II] button. In mono reception, the clarity of sound is improved. To switch back to stereo, press the [I/II]
button again.
· Language selection for dual language broadcast: If a programme permits in two languages (dual
language), you can switch to NICAM DUAL I, NICAM DUAL II, NICAM DUAL I+II or MONO by pressing the [I/
II] button repeatedly.
Broadcast On Screen Display
Mono MONO
Stereo NICAM STEREO
Dual NICAM DUAL I, NICAM DUAL II, NICAM DUAL I+II
NICAM DUAL I Sends the primary broadcast language to the loudspeakers
NICAM DUAL II Sends the secondary broadcast language to the loudspeakers
NICAM DUAL I+II Sends the primary and secondary broadcast languages to the loudspeakers

English 8
Shortcuts Instructions
1.5 EPG
RED
(Recorder)
Press the [RED] button on the remote control while on the selected programme, the
RECORDER menu will be displayed. Press the [▲/▼/◄/►] buttons to select the
settings in the RECORDER menu for the Channel/Start time/End time/ Mode. After
finishing all the recorder adjustments, press the [OK] button to confirm your settings.
Channel Press the [◄/►] buttons to select the channel that you want to record.
Start time Press the [▲/▼] buttons to select the Minutes/Hour/Month/Date and
press the [◄/►] buttons to adjust the start time.
End time Press the [▲/▼] buttons to select the Minutes/Hour/Month/Date and
press the [◄/►] buttons to adjust the end time.
Mode Press the [◄/►] buttons to select the Once/Every Day/Weekly.
GREEN (Info) Displays detailed information of the selected programme.
YELLOW
(Schedule)
Press the [YELLOW] button to view the preset reminders or scheduled recordings in the
Schedule list.
BLUE
(Reminder)
Press the [BLUE] button while on the selected programme, the Reminder setting menu
will be displayed.
The EPG provides convenience to access to the television programmes that will be available in the next 7
days. The information displayed by the EPG is made available by the commercial television networks for
digital channels only. It also provides a simple way to programme the recording of your favourite programmes
and a reminder function which can automatically change channels at the correct time so that you do not
miss programmes of interest. (The availability and amount of programme information will vary, depending on the
particular broadcaster).
Press the [EPG] button on the remote control to display channel information on programme guide list. You
can press the [▲/▼] buttons to select the options.
NOTES
Reminder is only available for programmes that haven’t aired yet.
An USB storage device must be attached to the television for recording purposes.
Removing of the old file is not supported by the TV, you may need to connect the device to the computer
to delete the unwanted files.
The TV will record the programme even in standby mode.

9 English
1The progress bar when playing.
234Play/Stop/Pause.
56Rewind /Fast Forward.
7Slow Motion.
8Time Play.
While playing, press the [◄/►] buttons select the 8Time Play button, then press the [OK] button to
confirm. Set the time of the beginning to play, then press the [OK] button to confirm. The recorded
program starts playing at the input time, it will exit when play completes automatically.
9
10
Forward/Backward.
11
Recorder (Recorder button should not appear while playing recorded program) While recording, select
the 4 Pause button to pause recording. If you need to continue recording, press the [◄/►] buttons to
select the
11
Recorder button, then press the [OK] button on the remote control to confirm, this program
will continue recording.
Shortcuts Instructions
1.6 PVR
The control bar operation (PVR/Timeshift)
Press [RETURN] button to enter the control bar while playing. Press the [◄/►] buttons to select the icons
and press [OK] button to confirm. And you can press the corresponding buttons on the remote control directly.
00:00 00:10
Recorder
Play Pause FB FF Forward BackwardSlowMotionStop TimePlay
3
1
2 3 4 5 6 7 8 9
10
11 12
PVR
The PVR enables the user to easily record the digital television content for later viewing. The function is to be
used in DTV source only. The format of storage disk must be FAT32 or NTFS.
There are two options for recording, one option is to use Electronic Program Guide (EPG) and the other
option is to press the [PVR] button.
Press the [■] button to stop record and a *.pvr file will be saved. The files can be played back in DMP or
pressing [Index] button in remote.
Timeshift
Timeshift allows the user to watch a live broadcast (DTV only) with a delay. It can temporarily record the
current programme onto a USB or portable storage device. Please connect a USB disk with a storage
capacity of no less than 512M. Otherwise the recording will not be carried out.
Under live broadcast, press the [II] button on the remote control to pause the live broadcast. When you want
to continue watching, press the [►] button to resume watching from where you have stopped the programme.
The PVR/Timeshift progress bar will be displayed on the screen or press [ ■] button to stop the Timeshift play.

English 10
NOTES
Before you use the PVR and Timeshift function, you need to select the inserted device or disk where you
want to store your PVR or Timeshift contents and then continue to operate according to the presentation of
TV.
Please insert the FAT32 disk to the TV since TV is not able to format the disk.
Initiating Time shift for the first time, you can select between different allocated memory size (5min,10min
and 20min) during this process all data will be erased. For PVR recording, the size of disk determines the
maximum recording time.
The PVR function is not supported for analogue channels
The PVR functions are disabled for channels locked with Channel Lock or scrambled channels.
For individual non-standard high-capacity mobile hard disk, if it’s impulse current is greater than or equal
500mA, it may cause TV-rebooting or self-locking. So the TV does not support it.
The USB port supports a voltage of 5V.
The maximum supported storage space of the hard disk is 1T
Shortcuts Instructions
12
Occupancy of disk.
Timed looping
Enter the recorded program menu, press the [▲/▼] buttons to select recorded programs to play, press the [OK]
button on the remote control to confirm. The program will all start playing from 00:00.
To use this function, selecting the part from A to B of the recorded program to circularly play, please operate
as bellowing:
1. First, press the [◄/►] buttons to select the 2Play button in the playback control bar, when play progress
arrives at A point of the progress bar, pressing the [OK] button on the remote control to confirm, the
progress bar will turn green.
2. Continue to play until to arrive at the B point, press the [OK] button again to select the 2Play button in
the playback control bar, it will select the recorded part from point A to B of the progress bar ,and start
looping play.
3. Press the [■] button, it will stop the loop and turn into the normal playback.
Recorded Program List: Allows to view the recorded programs
1. In DTV mode, press the [INDEX] button to enter the Recorder List.
2. Press the [▲/▼] buttons to select the Recorded Program List.
3. Press the [►/OK] buttons to enter the submenu.
4. In the Recorded Program List, press the [◄/►] buttons to change the page, press the [▲/▼] buttons to
select the program and press the [OK] button to play.
5. You can press the [▲/▼] buttons to select the program and then press the [RED] button to delete it. The
default order is accordance with the time and you can select the order type by pressing the [GREEN]
button.

11 English
Menu
2.1 How to use the Menu
1. Press the [MENU] button to open the main menu.
2. Press the [▲/
▲
] buttons to select a menu option,
then press the [
▲
/OK] buttons to enter the menu.
3. In each menu, you can:
Press the [▲/
▲
] buttons to select an item,
Press the [◄/►] buttons to adjust the value, or
Press the [
▲
/OK] buttons to enter the submenu,
Press the [RETURN] buttons to return to the
previous menu.
4. Press the [MENU/EXIT] button to exit the menu.
NOTE
The menus in the user manual may vary slightly from the actual screen.
2.2 Using the Picture Menu
The picture setting allows the user to optimize the
output quality picture of the TV.
Picture Mode
For setting up the picture mode and improving the TV picture quality.
Press the [MENU] button and then select Picture Mode. Based on the environment and
the requirement select the correct picture mode from the following options: Standard,
Soft, Bright, User, Dynamic.
Brightness Adjust the overall luminance of the picture.
Contrast Adjust the luminance ratio between black and white.
Colour Adjust the colour saturation within the picture.
Sharpness Adjust to achieve the optimum sharpness of edges and details within the picture.
Tint Adjust flesh tones so that they appear natural. (Only available when receiving systems
is NTSC)
Backlight Change the backlight level.
Noise
Reduction
Reduce the noise level of the connected devices. You could select one of the following
options: Off, Low, Middle, High and Auto.
Picture Mode Standard
Brightness
Contrast
Colour
Sharpness
Tint
Backlight
Noise Reduction Middle
Colour Temperature Standard
Auto-Light Off
Adjust the picture
settings
Picture
Picture Mode Standard
Brightness
Contrast
Colour
Sharpness
Tint
Backlight
Noise Reduction Middle
Colour Temperature Standard
Auto-Light Off
Adjust the picture
settings
Picture

English 12
Menu
2.3 Using the Sound Menu
Sound Mode Select the Sound Mode options based on the personal requirement: Standard / Music /
Movie / Sport / User
Balance Adjust the relative volume of the speakers between the left and right speakers.
Equalizer
Allow the users preset with the 5 band Equalizer controller. Press the [►] button to
select the different audio frequency band between 120 Hz, 500 Hz, 1.5 KHz, 5 KHz, and
10 KHz. Press the [▲/▼] buttons to adjust each of frequency band level individually.
Auto Volume This mode allows the users to automatically adjust the volume to reach a consistent
level. This option is available by setting the Auto Volume Control to ON.
AD Switch
Audio Description is an auxiliary audio function that provides an additional audio track
for visually challenged persons. This function handles the Audio Stream for the AD (Audio
Description), when it is sent along with the main audio from the broadcaster.
· Set to “Off” for normal broadcasting sound coming out from speakers.
· Set to “On” to activate the description sound track if available. The availability of Audio
Description sound track is indicated by the visually impaired icon “V.I.” in the information
banner.
SPDIF Output
Send digital audio to an external audio system. You can select: PCM/Auto.
PCM PCM outputs two channel audio regardless of the input format.
Auto Select digital audio output format Auto.
Audio Delay Allow very subtle adjustments between the syncing of sound and vision, you can select:
1, 2, … , 10 or off.
The sound setting allows the user to optimize the
output audio sounds of the TV.
Adjust the sound
settings
Sound Mode
Balance
Equalizer
Auto Volume
AD Switch
SPDIF Output
Audio Delay
Standard
0
Off
Off
PCM
Off
Sound
Colour
Temperature
Adjust the colour components independently to achieve the desired warm or cool feeling
by selecting one of the following options: Standard, Warm and Cool.
Auto-Light Select Auto-light On or Off.

13 English
2.4 Using the Screen Menu
Menu
Horizontal Pos. Adjusts the horizontal position of image.
Vertical Pos. Adjusts the vertical position of image.
Horizontal size Adjusts the horizontal size of image.
Vertical size Adjusts the vertical size of image.
Picture positioning
and PC settings
Horizontal Pos.
Vertical Pos.
Horizontal size
Vertical size
50
50
50
50
Screen
NOTE
Depending on the input source or signal, the Screen Menu items will vary.
2.5 Using the Option Menu
Menu Language Select a preset Menu Language mode.
Audio Language
Allows you to select your desired audio language. Press the [◄/►] buttons to select
the Primary/ Secondary Audio Language. Press the [▼] button and then press the
[▲/▼/◄/►] buttons to select your desired audio language.
Subtitle
Language
Allows you to select your desired subtitle language. Press the [◄/►] buttons to
select the Primary/ Secondary subtitle language. Press the [▼] button and then
press the [▲/▼/◄/►] buttons to select your desired subtitle language.
OSD Timeout Allows you to select the display time of the on-screen menu: Off / 10S / 15S / … /
60S.
Installation
Guide
Press the [◄/►] buttons to turn on or turn off the Installation Guide by selecting On
or Off. If the Installation Guide is on, the menu as for the first installation will appear
when you turn the TV on.
System settings
English
English
English
Off
Off
Home Mode
Off
Off
Menu Language
Audio Language
Subtitle Language
OSD Timeout
Installation Guide
Use Mode
HDMI_CEC
Time
Security
Blue Screen
Option

English 14
Menu
Use Mode
Select your Mode Setting: Home Mode or Shop Mode.
Home Mode Recommended mode for the home use and low power
consumption.
Shop Mode Optimizes the picture for store environments.
HDMI_CEC
Users can control HDMI CEC compatible device connected to the HDMI Jacks on
TV according the remote control that came with TV. To use CEC function, you must
set the HDMI_CEC on.
NOTES
HDMI Cables must be used to connect HDMI CEC compatible devices to your TV.
The connected device’s HDMI CEC function must be tuned on.
If you connect One HDMI devcice that is not a HDMI CEC compatible,all the CEC
Control function may not work.
Depending on the connected HDMI device,the CEC control function may not work.
Device List Display list of HDMI CEC devices that are connected to TV and
select the source you want.
HDMI_CEC Turn CEC function on or off.
Auto
Standby HDMI CEC device auto standby when you turn off TV.
HDMI-ARC
When CEC is tuned on and you have connected an audio receiver
to your TV ,turning on Audio Receiver lets you use your TV’s
remode control to control the volume on the audio receiver.
TIME
Auto Sync Allows to adjust the date and time manual when it is set to Off.
Select On to output the time information from digital signal (DTV).
Clock The clock is set automatically when receiving a digital signal.
Off Time Allows you to set the off time that the TV will switch off
automatically.
On Time Allows you to set the on time that the TV will switch on
automatically.
Sleep Timer
The sleep timer automatically switches the TV to standby after the
preset time has elapsed. The clock will be set automatically when
receiving a digital signal. Time must be set before using Sleep
Timer function.
Press the [◄/►] buttons to select a period of time after which the
TV automatically switches to standby mode: Off / 10 / 20 / … / 180
/ 240 Mins. The timer begins to count down from the number of
minutes selected.
NOTE
If you turn the TV off after setting the sleep timer, the sleep timer
setting will be erased.
Auto Sleep Select the Auto Sleep options based on the personal requirement:
Off/3H /4H.

15 English
Menu
TIME Time Zone
When you select a Time Zone city, the TV time is set by the time
offset information based on Time Zone and GMT (Greenwich Mean
Time) which is received with the broadcast signal and the time is
set automatically by a digital signal.
Security
Prevent unauthorized users, such as children, from watching unsuitable programme.
When you first use this function, the default password is [0000]. Once you input this
password, you can continue to the next operation. You can change password in the
Change PIN submenu..
Lock System
The Lock System is designed to prevent accidental retuning of
the TV / losing channels and prevent children watching unsuitable
programmes.
The Lock System must be set to On for this function to operate. If
the Lock System is set to On, a valid password must be entered
when you access Reception Type/Automatic Scan/Digital TV
Manual Scan /Analogue TV Manual Scan/Edit Programmes/Export
to USB/Import from USB/Restore Factory Default.
NOTE
To access the Lock System menu, you must press the [◄/►]
buttons to select On and enter the password. Enter the default
password “0000” for first time use.
Change
PIN
If you want to change the default PIN, you should enter the old PIN
first and then enter the new one two times. The new PIN will be
activated.
Block
Programme
This function can let you block some programs according to
contents.
Parental
Guidance
This function allows you to set up blocking schemes to block
programmes and channels with age ratings. It operates according
to information from the broadcasting station, therefore if the signal
has incorrect or no information, this function will not operate.
NOTE
When a programme is blocked, a valid PIN has to be entered
when switching to these programmes.
Child Lock Press the [◄/►] buttons to select On or Off. To prevent
unauthorized users, such as children, from changing TV’s settings.
Blue Screen Allows the blue screen to turn On/Off during no signal conditions. (Only available in
ATV mode)
PVR File
System(DTV
Mode)
Select Disk Select the disk where you want to store your recorded content.
Timeshift Size After formatting, press the [◄/►] button to show the size of the
memory.
Format Start Press the [OK] button to conrm and then the [◄] button to start
formatting.
Speed Check This shows you the transfer rate of your USB storage device.

English 16
Menu
2.6 Using the Network Menu
Network
Conguration
You can set the TV network by selecting Configuration and press the [OK] button to enter
the submenu.
Wired
Network
1. On the Network Configuration screen, press the
[▲/▼] buttons to select Wired Network and press
the [OK] button to enter the submenu.
2. On the Wired Network screen, press the [▲/▼]
buttons to select Configuration and press the [OK]
button to enter the submenu. See Figure 1.
3. On the Network Configuration, you can press the
[◄/►] buttons to select DHCP (Auto) or Static
(Manual). See Figure 2.
· DHCP(Dynamic Host Configuration Protocol):
Acquire the necessary connection values and
connect your TV to a network automatically.
Wired Network
Configuration
MAC Address
Wired PPPOE
Proxy
OK MENU
Enter Return
Figure 1
OK MENU
Enter Return
Network Conguration Static
IP 0.0.0.0
Netmask 255.255.0.0
Gateway 0.0.0.0
DNS 0.0.0.0
OK
Figure 2
Software Update
Check your TV’s software version and upgrade it if necessary.
USB Update Update the software using a USB memory device.
Restore Factory
Settings Restore all settings to the factory defaults.
Version Display the software version information.
Disclaimer View the service statement. (May not be available, depending on your regions and
country.)
Network Configuration
Network Status
TV Name
Anyview stream
Anyview cast
Network
Network services
Static
Drawing room
On
On

17 English
Menu
Network
Conguration
Wired
Network
· Static: Manually Input the connection values such as IP, Netmask, Gateway
and DNS by using the [◄/►] buttons or Numeric buttons.
When done, press the [OK] button to connect the network.
NOTE
Some networks require a Static IP address. To get the IP address,
subnet mask, gateway and DNS values, check the settings of the
router/modem or your PC or contact the network provider.
Network
Conguration
Wi-Fi
Network
1. On the Network Configuration screen, press the
[▲/▼] buttons to select Wi-Fi Network and press
the [OK] button to enter the submenu.
2. On the Wi-Fi Network screen, press the [◄/►]
buttons to select On or Off. See Figure 1.
If you select On, you can set up your TV’s Wi-
Fi Network connection. Select Base Station to
enter the submenu.
OK MENU
Enter Return
Wi-Fi Network On
Base Station
MAC Address
Wi-Fi PPPOE
Proxy
Figure 1
3. If you have a wireless network around, all the existing wireless network will
appear on the screen. When connecting to certain network, press the [▲/▼]
buttons to select the wireless network you want to connect and press the [OK]
button to confirm. The screen of Please Enter Password will pop up. After
entering the password, press the [BLUE] button to connect. If there is no
password, you can press the [BLUE] button to connect directly.
4. If the wireless network connect successful, the screen will appear the prompt
“Success”.
Network
Status Display network connection status.
TV Name Press the [◄/►] buttons to select TV Name. The assigned name will appear on the
external devices connected to the TV via the network.
Anyview
stream
You can push media files of your mobile devices or computers to display on your TV.
· TV side:
Press the [◄/►] buttons to set Anyview stream to On.
· Mobile Device Setup:
Establish a link between the TV and a computer/other mobile device, and then push
media files to play on the TV.
NOTE
Anyview stream is only available with the device must support DLNA or Anyview
stream and be connected to the same network as the TV.

English 18
2.7 Using the Channel Menu
2.7.1 When the Reception Type is set to Air TV
Reception
Type Select a preset Reception Type: Air TV.
Country Select the Country you are in.
Automatic
Scan
Use this to automatically find and store all available channels.
In the Channel search menu, you can select DTV+ATV Scan, DTV Scan or ATV Scan,
and then press the [OK] button to search the channels.
Digital TV
Manual Scan
Allow you to make manual fine tuning adjustments of the channel under DTV mode.
When the Digital TV Manual Scan screen will pop up, press the [◄/►] buttons to
select the desired UHF channel or VHF channel and then press the [OK] button to
commence the search of that channel. When the signal has been tuned, signal strength
will be displayed on the screen.
Analogue TV
Manual Scan
Allows you to make manual fine tuning adjustments if the channel reception is poor under
ATV mode.
Store to Press the [◄/►] buttons to select the channel number which you
desired.
Tune in local television
services
Reception Type
Country
Automatic Scan
Digital TV Manual Scan
Analogue TV Manual Scan
Bandwidth Switch 7
Edit Programmes
Export to USB
Import from USB
CI Information
Signal Information
Air TV
Australian
Channel
Anyview cast
Display mobile device screens on your TV wirelessly.
· TV side:
Press the [◄/►] buttons to set Anyview cast to On.
· Mobile Device Setup:
Run Anyview cast or Miracast function on the mobile device (Refer to the user manual
of your device for more details). The TV will connect with the mobile device, and user
can view the connected mobile device’s screen on the TV.
NOTES
Anyview cast is only available with mobile devices that support Anyview cast or
Miracast.
Depending on the network condition, screen or voice dropouts may occur when the
Anyview cast function is running.
Due to compatibility issues, some Miracast models can not be supported on the TV.
Anyview cast will be unavailable when you watch video via any application.
Menu
Table of contents
Other Hisense LED TV manuals

Hisense
Hisense LHD32K21MH User manual

Hisense
Hisense AE6100 User manual

Hisense
Hisense 32A4EGTUK User manual

Hisense
Hisense 43M3000 User manual

Hisense
Hisense U7 Series User manual

Hisense
Hisense 32A5700FA User manual

Hisense
Hisense 50U7QF User manual

Hisense
Hisense ES-J141054 User manual

Hisense
Hisense H32B5100 User manual

Hisense
Hisense 32H4030F User manual

Hisense
Hisense 65K390PAD User manual

Hisense
Hisense 43H8E User manual

Hisense
Hisense HL55T36PZL User manual

Hisense
Hisense H40M2100T User manual

Hisense
Hisense 55U8K User manual

Hisense
Hisense 32A4KAU User manual

Hisense
Hisense 55A70GQ User manual

Hisense
Hisense 65N6 User manual

Hisense
Hisense H19K15E User manual

Hisense
Hisense H65U7A User manual