Hitachi HILU75203 User manual

Installation Manual
Model: HILS75204/HILU75203
Interactive Flat Panel Display
75˝
(74.52˝)

2
QUICK SETUP GUIDE
For further information, see the user manual.
Please contact directly if you have questions on the use of the touch monitor after
reading the Installation Manual and User Manual.
IMPORTANT:
Please read the precautions, safety instructions and this installation manual carefully
before installing the touch monitor.
CAUTION:
Changes or modifications not expressly approved by the party responsible for
compliance with the FCC Rules could void the user’s authority to operate this
equipment.
1. Precautions and safety instructions
Before using the touch monitor, please read this quick setup guide thoroughly to help
protect against damage to your own and other people‘s property and ensure your own
and other people‘s personal safety.
Be sure to observe the following instructions.
For your safety, be sure to observe the warnings contained in this guide.
For installation or adjustment, please follow this quick setup guide and refer all
servicing to qualified service personnel.
Safety Precautions
If smoke or a peculiar smell comes from the monitor, remove the power plug from the
socket immediately.
Failure to do above, it may result in an electric shock.
Contact your dealer for inspection.
If the monitor has been turned on but there isn’t a picture, remove the power plug
from the socket immediately. Failure to do above, it may result in an electric shock.
Contact your dealer for inspection.
If water is spilled or objects are dropped inside the monitor, remove the power plug
from the socket immediately.
Failure to do above, it may result in an electric shock.
Contact your dealer for inspection.
If the monitor is dropped or the cabinet is damaged, remove the power plug from the
socket immediately.
Failure to do above, it may result in an electric shock.
Contact your dealer for inspection.
To turn off the power of the monitor completely, remove the power plug from the
socket
If the power cord or plug is damaged or becomes hot, turn off the main power switch
of the monitor, make sure the plug has cooled down and remove the plug from the
socket. If the monitor is still used in this condition, it may cause an electric shock.
Contact your dealer for replacement.

3
Moving and Carrying Notice
Moving Notice:
Moving the monitor requires at least four people. If not, it may drop and a serious
injury may result.
Carrying Notice:
This monitor is heavy; please follow the instructions below when you are ready to
carry the monitor. Failure to do, it may cause injury.

4
Installation
Don‘t install in a high-temperature environment.
If the monitor is used in a high-temperature environment or in direct sunlight, it may
cause the case or other parts to become distorted or damaged resulting in
overheating or electric shock. Don‘t install in a high-humidity environment. This may
cause overheating or electric shock.
Don‘t install near any heat sources such as radiators, hot-air outlets, stoves, or other
apparatus that produce heat. This may cause an electric shock.
Don‘t overload sockets or cables beyond electrical capacity. Don‘t use extension
leads, otherwise this may cause an electric shock.
Don‘t insert the power plug into a socket other than 100~240V AC.
This may cause an electric shock.
• Don’t use a damaged power plug or worn socket.
• Don‘t insert the wrong plug as it may cause an electric shock.
Do not place monitors on unstable shelves or surfaces. They could collapse and
cause damage. Only install the unit on vertical, stable and level surfaces.
Don‘t place objects on the touch monitor.
•If the touch monitor is covered or the vents are blocked, the monitor could overheat
and cause a fire.
•If metal or liquid gets into the monitor, it may cause an electric shock.
•Do not place heavy objects on the monitor as they may fall causing injury.
•Please keep a minimum distance of 10 cm between the monitor and the other
objects for sufficient ventilation.
Don‘t move the touch monitor when it is connected to the power cord and AV cables.
•When moving the monitor, make sure you remove the plug and cables from the
socket or source.
•When unpacking or carrying the monitor, at least 4 people are needed. Make sure
the monitor is carried upright.
•Transport the monitor upright. Avoid placing the monitor face up or face down.
•Handle the monitor gently. Do not drop.

5
Wall mounting safety notes
Please make sure the bracket is fixed to a solid wall.
After assembling, please don‘t pull or shake violently.
Please don‘t install the bracket in direct sunlight or areas of humidity / high
temperature for fear that the quality is affected
Install the bracket at a minimum distance of 10 cm from other objects / walls on either
side. Only attach to vertical walls.

6
2. Package contents
Packing list
Item Q’ty
1. Interactive monitor
1
2. Carton
1
3. Bottom cushion
2
4.
Top cushion 3
5.
Packing bag 1
6. Accessories box
1
Unpacking
1. Set the LCD Monitor box in front and upright position.
2. Cut the banding and take off 10 clips
3. Open from the top of the box before removing the top cushions.
4. Remove the top cushion and take the accessories box out.
5. Take vinyl bag off and assembled bracket if it needs
Contents of the Accessories box
1. Power cord
2. Remote controller (2x AAA batteries included)
3. USB cable
4. HDMI cable
5. Pen x2
6. CD
7. Pentray
※Note
The following features are considered with the requirements:
- The equipment is intended to be installed on wall but any mounting means are not
provided with the equipment. For the installation, the following statement and
caution described in user manual;
- Ensure that an authorized installation company installs the wall mount(This
monitor shall be installed by qualified service personnel only).
- Otherwise, in may fall and cause personal injury.
- Wall mount have to be dimensioned according to size and weight of the monitor
and according to the instructions of wall mounting device.
7
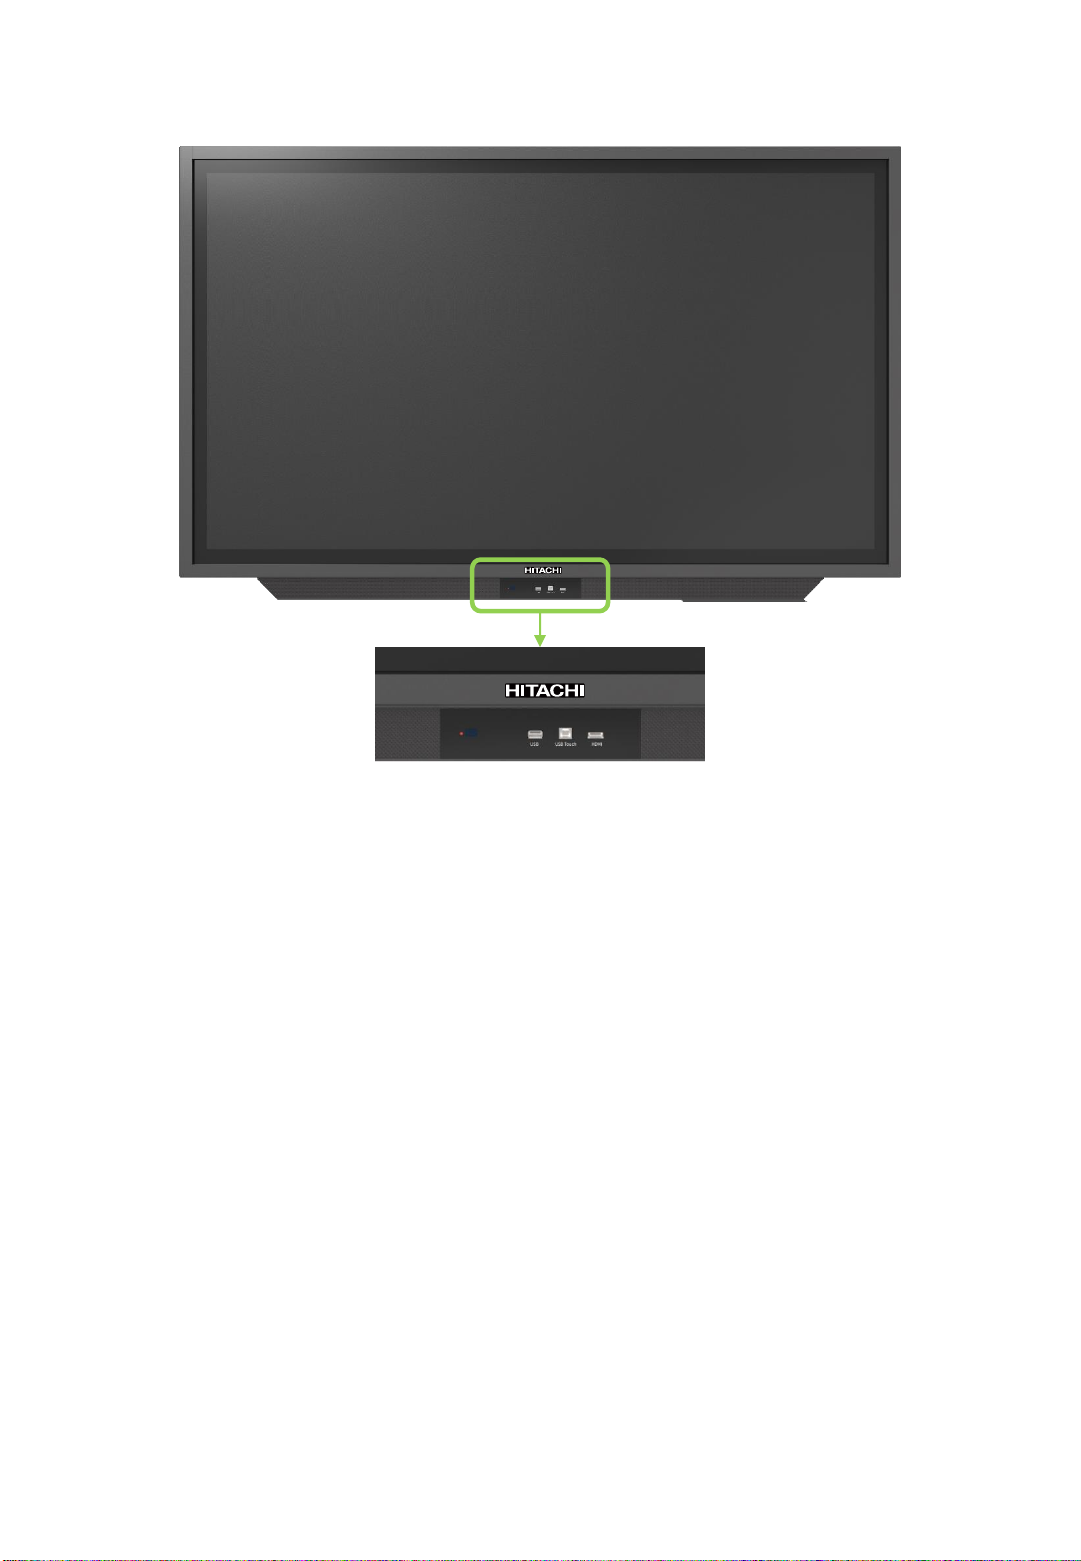
3. Description
① ② ③ ④
①LED Indicator
⁻Power ON mode: BLUE
⁻Power OFF(Standby) mode: RED
•Be sure to point the remote control at the remote control sensor on the LED/LCD
Display.
②USB for OPS and external devices.
③Touch USB : USB Port is available when External Source is selected.
④HDMI Input (When connected, it changes to External Source.)
Important Notice
◆The USB cable (3m) that Hitachi provides in this accessory box is for the Touch USB at
the back. Therefore, in case of connecting USB cable to Touch USB port in front,
separate USB cable is required and the length of cable is strongly recommended to be
less than 3m to make sure the signal intensity of touch sensor works properly.

①Button Control
①
③
②
1
2
3
4
5
6
7
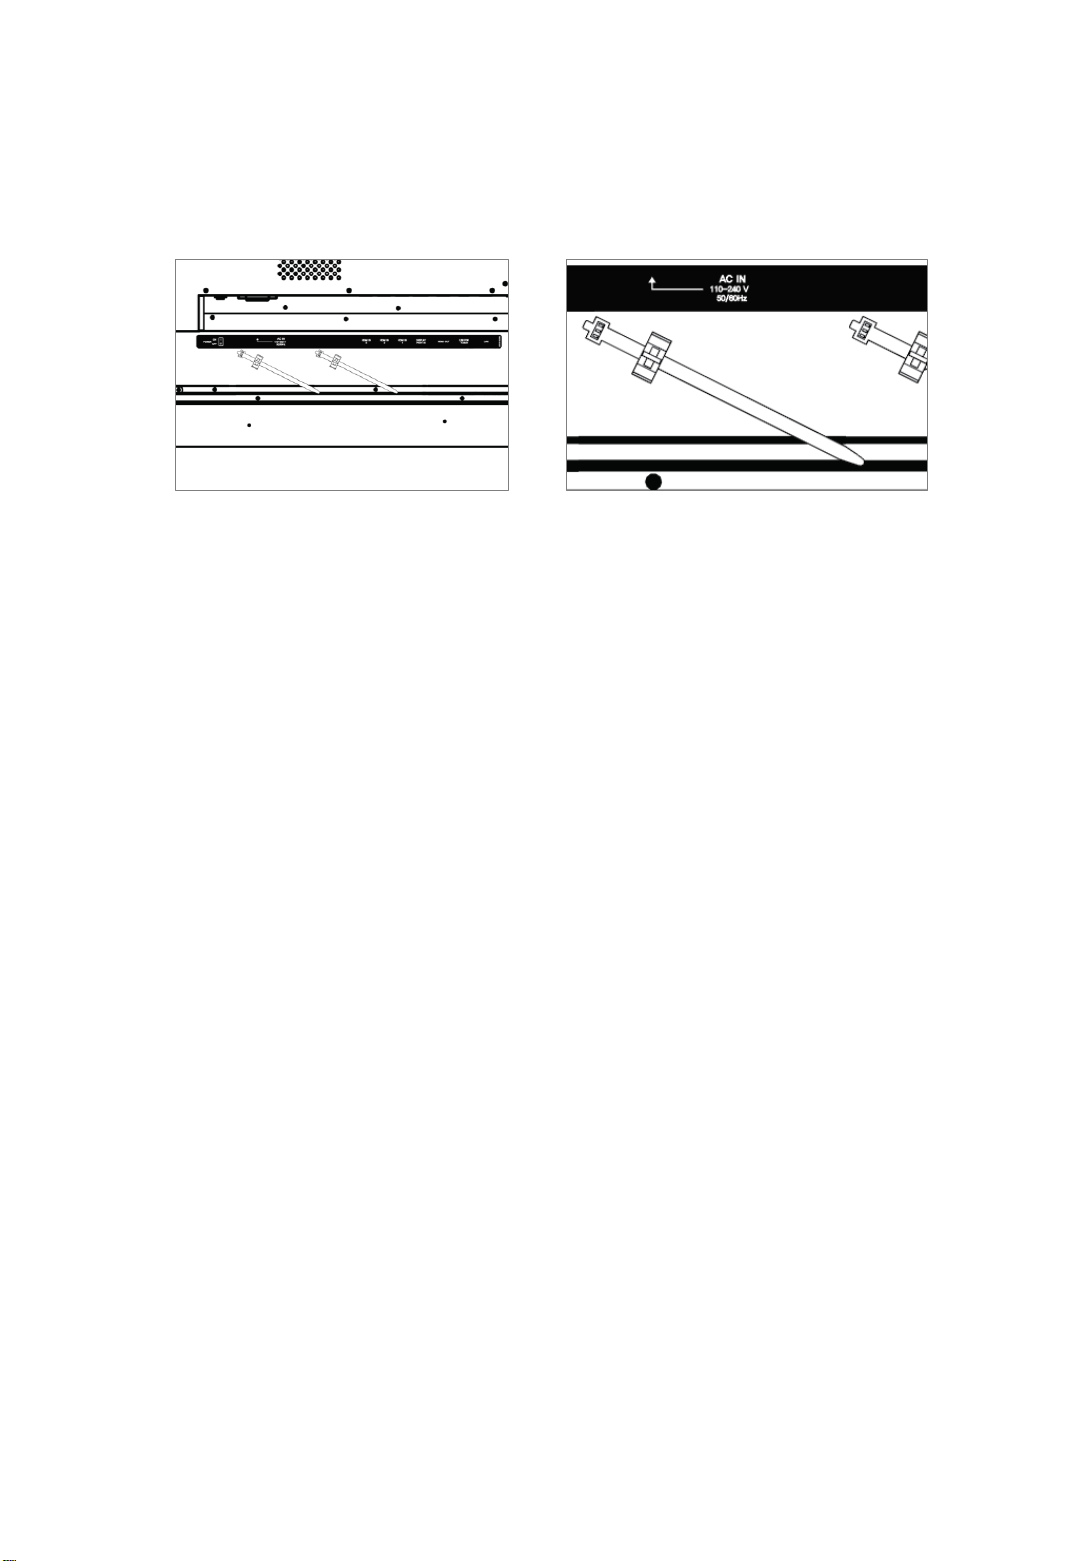
②Rear Panel Connections
1 2
3 4 5 6 7 8 9
1 ON / OFF
2 Display the main screen menu
3 VGA, OPS, EXTERNAL, HDMI 1, HDMI
2, HDMI 3, DP
4 Volume Up (Right)
5 Volume Down (Left)
6 Move Up
7 Move Down
1 Power Switch : ON / OFF
2 AC IN : 100V~ 240V, 50/60Hz
3 HDMI 3 Input
4 HDMI 2 Input
5 HDMI 1 Input
6 Display Port
7 HDMI Output
8 USB For Touch
9 RJ45(LAN)
8
④
Note: HDMI 1 has separate USB for
Touch located on ③

③Rear Panel Connections
1
2
3
4
5
6
7
8
1 RS232/RJ45 SWITCH
2 USB FOR TOUCH HDMI1 ONLY
3 RS232C
4SPEAKER OUT
5 USB 2.0
(Supports USB cam or camera function)
6 USB 3.0
(Supports USB cam or camera function)
7 LAN OUT
8 LAN IN
9 PC RGB IN
10 PC AUDIO IN
11 SPDIF
12 LINE OUT
9
9
VGA
IN
L(8Ω)
RS232C
RS232C/
RJ45
USB FOR
TOUCH
(HDMI 1 ONLY)
SPEAKER
OUT
R(8Ω)
USB 2.0
USB 3.0
PC AUDIO
IN
SPDIF
LINE OUT
LAN IN
LAN OUT
AETSTI005200
10
11
12
10
•To prevent the power cable from falling/shaking, you may use the cable holder if
necessary. SCREW (4x11)
④Installing an OPS PC
There is a slot on ④for OPS PC. When you need to install an OPS PC, remove screws
and existing cover first and screw up again after mounting OPS PC in the slot.
⑤AC cord holder
Other manuals for HILU75203
1
This manual suits for next models
1
Table of contents
Other Hitachi Interactive Whiteboard manuals

Hitachi
Hitachi HILU75202 User manual

Hitachi
Hitachi HILF75101 User manual

Hitachi
Hitachi StarBoard FX-DUO-63 User manual

Hitachi
Hitachi HILU65203 User manual

Hitachi
Hitachi HILS75204 User manual

Hitachi
Hitachi StarBoard FX-DUO-63 User manual

Hitachi
Hitachi StarBoard FX-TRIO-88W User manual

Hitachi
Hitachi StarBoard FX-79E1 User manual

Hitachi
Hitachi StarBoard FX-DUO-88W User manual

Hitachi
Hitachi HILU65203 User manual


