Hitachi WR18DSHL User manual

Cordless Impact Wrench
充電式衝擊扳手機
충전 임팩트 렌치
Máy bắt vít xung điện dùng pin
WR 18DSHL
Handling instructions Hướng dẫn sửdụng
使用說明書
취급 설명서
Read through carefully and understand these instructions before use.
使用前務請詳加閱讀
본 설명서를 자세히 읽고 내용을 숙지한 뒤 제품을 사용하십시오.
Đọc kỹvà hiểu rõ các hướng dẫn này trước khi sửdụng.
000BookWR18DSHLAra.indb1000BookWR18DSHLAra.indb1 2012/07/169:20:552012/07/169:20:55

9.5mm
3mm
12
3
4
5
6
7
8
1
2
9
!
0
^
*
&
(
%
@
$
#
)
q
w
1
8
2
123
456
789
10 11 12
000BookWR18DSHLAra.indb2000BookWR18DSHLAra.indb2 2012/07/169:20:572012/07/169:20:57

3
English 中國語 한국어
1Rechargeable battery 充電式電池 충전식 배터리
2Latch 卡榫 래치
3Battery cover 電池蓋 배터리 커버
4Terminals 端子 단자
5Ventilation holes 散熱孔 통풍구
6Push 推밀기
7Pull out 拉出 잡아당김
8Handle 握把 핸들
9Pilot lamp 信號燈 파일럿 램프
0Line 線라인
!After insert 安裝後 삽입 후
@Hexagonal socket 六角套筒 육각 소켓
#Groove 溝槽 홈
$Anvil 砧座 앤빌
%Switch 開關 스위치
^Remaining battery indicator switch 電池剩餘量指示開關 배터리 잔량 표시 스위치
&Remaining battery indicator lamp 電池剩餘量指示燈 배터리 잔량 표시등
*Light switch 照明開關 라이트 버튼
(Wear limit 磨損極限 마모 한계
)Nail of carbon brush 碳刷刷爪 카본브러쉬 돌출부
qProtrusion of carbon brush 碳刷突出部 카본브러쉬 고정쇠
wContact portion outside brush tube 刷管外聯繫部分 카본브러쉬 바깥접속부
Tiếng Việt
1Pin sạc
2Chốt
3Nắp pin
4Đầu cuối
5Lỗthông gió
6Đẩy
7Kéo ra
8Cầm
9Đèn báo
0Dây dẫn
!Sau khi lắp
@Chìa vặn lục giác
#Khe lắp
$Cữchặn
%Công tắc
^Công tắc đèn báo lượng pin còn lại
&Đèn báo lượng pin còn lại
*Công tắc đèn
(Giới hạn hao mòn
)Đinh chổi than
qPhần lồi chổi than
wPhần tiếp xúc bên ngoài vỏchổi
000BookWR18DSHLAra.indb3000BookWR18DSHLAra.indb3 2012/07/169:20:572012/07/169:20:57

English
4
GENERAL SAFETY RULES
WARNING!
Read all instructions
Failure to follow all instructions listed below may result in
electric shock, fire and/or serious injury.
The term “power tool” in all of the warnings listed below
refers to your mains operated (corded) power tool or battery
operated (cordless) power tool.
SAVE THESE INSTRUCTIONS
1) Work area
a) Keep work area clean and well lit.
Cluttered and dark areas invite accidents.
b) Do not operate power tools in explosive
atmospheres, such as in the presence of
flammable liquids, gases or dust.
Power tools create sparks which may ignite the dust
of fumes.
c) Keep children and bystanders away while
operating a power tool.
Distractions can cause you to lose control.
2) Electrical safety
a) Power tool plugs must match the outlet.
Never modify the plug in any way.
Do not use any adapter plugs with earthed
(grounded) power tools.
Unmodified plugs and matching outlets will reduce
risk of electric shock.
b) Avoid body contact with earthed or grounded
surfaces such as pipes, radiators, ranges and
refrigerators.
There is an increased risk of electric shock if your
body is earthed or grounded.
c) Do not expose power tools to rain or wet
conditions.
Water entering a power tool will increase the risk of
electric shock.
d) Do not abuse the cord. Never use the cord for
carrying, pulling or unplugging the power tool.
Keep cord away from heat, oil, sharp edges or
moving parts.
Damaged or entangled cords increase the risk of
electric shock.
e) When operating a power tool outdoors, use an
extension cord suitable for outdoor use.
Use of a cord suitable for outdoor use reduces the
risk of electric shock.
3) Personal safety
a) Stay alert, watch what you are doing and use
common sense when operating a power tool.
Do not use a power tool while you are tired
or under the influence of drugs, alcohol or
medication.
A moment of inattention while operating power tools
may result in serious personal injury.
b) Use safety equipment. Always wear eye
protection.
Safety equipment such as dust mask, non-skid
safety shoes, hard hat, or hearing protection used for
appropriate conditions will reduce personal injuries.
c) Avoid accidental starting. Ensure the switch is in
the offposition before plugging in.
Carrying power tools with your finger on the switch or
plugging in power tools that have the switch on invites
accidents.
d) Remove any adjusting key or wrench before
turning the power tool on.
A wrench or a key left attached to a rotating part of the
power tool may result in personal injury.
e) Do not overreach. Keep proper footing and
balance at all times.
This enables better control of the power tool in
unexpected situations.
f) Dress properly. Do not wear loose clothing or
jewellery. Keep your hair, clothing and gloves
away from moving parts.
Loose clothes, jewellery or long hair can be caught in
moving parts.
g) If devices are provided for the connection of
dust extraction and collection facilities, ensure
these are connected and properly used.
Use of these devices can reduce dust related
hazards.
4) Power tool use and care
a) Do not force the power tool. Use the correct
power tool for your application.
The correct power tool will do the job better and safer
at the rate for which it was designed.
b) Do not use the power tool if the switch does not
turn it on and off.
Any power tool that cannot be controlled with the
switch is dangerous and must be repaired.
c) Disconnect the plug from the power source
before making any adjustments, changing
accessories, or storing power tools.
Such preventive safety measures reduce the risk of
starting the power tool accidentally.
d) Store idle power tools out of the reach of children
and do not allow persons unfamiliar with the
power tool or these instructions to operate the
power tool.
Power tools are dangerous in the hands of untrained
users.
e) Maintain power tools. Check for misalignment or
binding of moving parts, breakage of parts and
any other condition that may affect the power
tools’ operation.
If damaged, have the power tool repaired before
use.
Many accidents are caused by poorly maintained
power tools.
f) Keep cutting tools sharp and clean.
Properly maintained cutting tools with sharp cutting
edges are less likely to bind and are easier to control.
g) Use the power tool, accessories and tool bits
etc., in accordance with these instructions and
in the manner intended for the particular type
of power tool, taking into account the working
conditions and the work to be performed.
Use of the power tool for operations different from
intended could result in a hazardous situation.
5) Battery tool use and care
a) Ensure the switch is in the offposition before
inserting battery pack.
Inserting the battery pack into power tools that have
the switch on invites accidents.
b) Recharge only with the charger specified by the
manufacturer.
A charger that is suitable for one type of battery pack
may create a risk of fire when used with another
battery pack.
c) Use power tools only with specifically designated
battery packs.
Use of any other battery packs may create a risk of
injury and fire.
000BookWR18DSHLAra.indb4000BookWR18DSHLAra.indb4 2012/07/169:20:582012/07/169:20:58

English
5
d) When battery pack is not in use, keep it away
from other metal objects like paper clips, coins,
keys, nails, screws, or other small metal objects
that can make a connection from one terminal to
another.
Shorting the battery terminals together may cause
burns or a fire.
e) Under abusive conditions, liquid may be ejected
from the battery; avoid contact. If contact
accidentally occurs, flush with water. If liquid
contacts eyes, additionally seek medical help.
Liquid ejected from the battery may cause irritation or
burns.
6) Service
a) Have your power tool serviced by a qualified
repair person using only identical replacement
parts.
This will ensure that the safety of the power tool is
maintained.
PRECAUTION
Keep children and infirm persons away.
When not in use, tools should be stored out of reach of
children and infirm persons.
PRECAUTIONS FOR CORDLESS IMPACT
WRENCH
1. Hold power tool by insulated gripping surfaces,
when performing an operation where the fastener
may contact hidden wiring. Fasteners contacting a
“live” wire may make exposed metal parts of the power
tool “live” and could give the operator an electric shock.
2. This is aportable tool for tightening and loosening bolts
and nuts. Use it only for these operations.
3. Use the earplugs if using for along time.
4. One-hand operation is extremely dangerous; hold the
unit fi rmly with both hands when operating.
5. Check that the socket is not cracked or broken. Broken or
cracked sockets are dangerous. Check the socket before
using it.
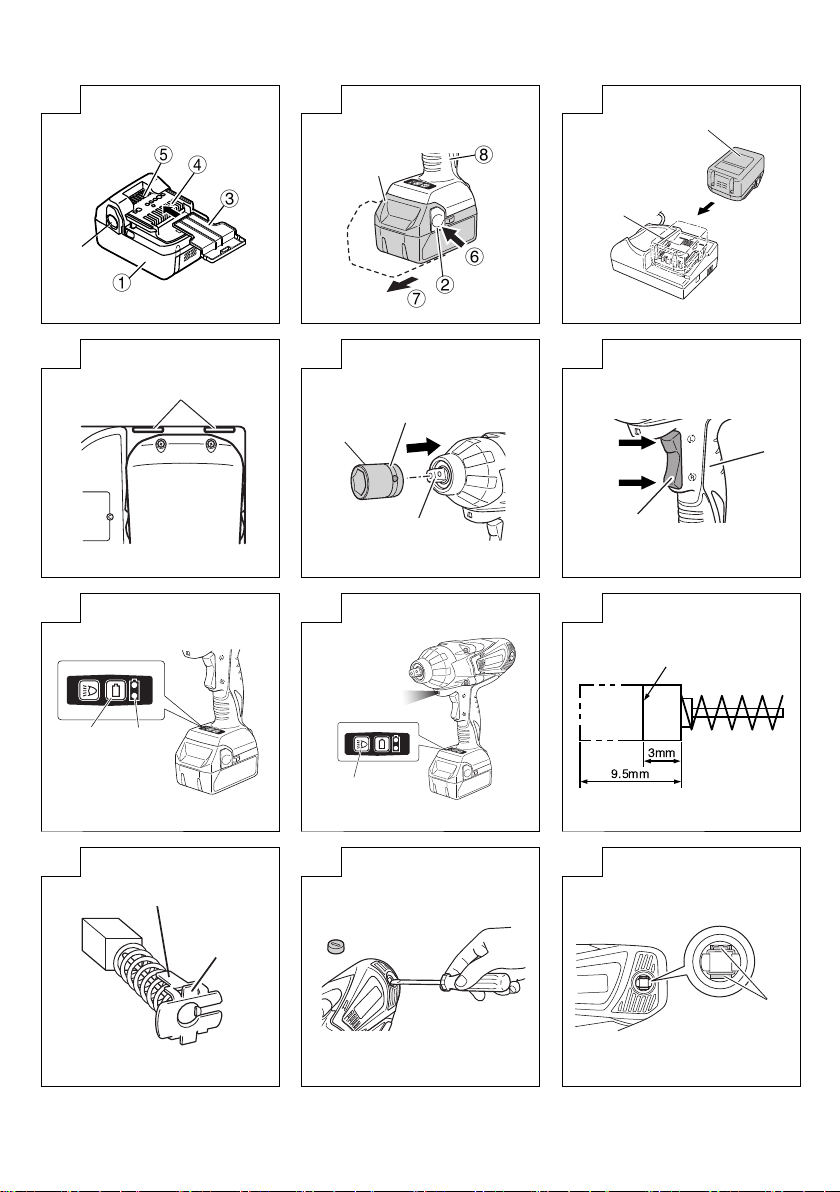
6. Secure the socket with the socket pin and the ring.
If the socket pin or ring securing the socket is damaged,
the socket may come offfrom the impact wrench, which
is quite dangerous. Do not use socket pins or rings that
are deformed, worn out, cracked, or in any other way
damaged. Always make sure to install the socket pin and
ring in the correct position.
7. Check the tightening torque.
The appropriate torque for tightening abolt depends on
the material the bolt is made of, its dimensions, grade,
etc.
Also, the tightening torque generated by this impact
wrench depends on the materials and dimensions of the
bolt, how long the impact wrench is applied for the way in
which the socket is installed, etc.
Also the torque when the battery has just been charged
and when it is about to run out are slightly different. Use a
torque wrench to check that the bolt has been tightened
with the appropriate torque.
8. Stop the impact wrench before switching the direction of
rotation. Always release the switch and wait for impact
wrench to stop before switching the direction of rotation.
9. Never touch the turning part.
Do not allow the turning socket section to get near your
hands or any other part of your body. You could be cut
or caught in the socket. Also, be careful not to touch the
socket after using continuously it for along time. It gets
quite hot and could burn you.
10. Never let the impact wrench turn without aload when
using the universal joint.
If the socket turns without being connected to aload, the
universal joint causes the socket to turn wildly. You could
get hurt or the movement of the socket could shake the
impact wrench so much as to make you drop it.
11. Always charge the battery at atemperature of 0–40°C.
Atemperature of less than 0°C will result in over charging
which is dangerous. The battery cannot be charged at a
temperature greater than 40°C.
The most suitable temperature for charging is that of 20 –
25°C.
12. Do not use the charger continuously.
When one charging is completed, leave the charger for
about 15 minutes before the next charging of battery.
13. Do not allow foreign matter to enter the hole for
connecting the rechargeable battery.
14. Never disassemble the rechargeable battery and
charger.
15. Never short-circuit the rechargeable battery.
Short-circuiting the battery will cause agreat electric
current and overheat. It results in burn or damage to the
battery.
16. Do not dispose of the battery in fi re.
If the battery burnt, it may explode.
17. Do not insert object into the air ventilation slots of the
charger.
Inserting metal objects or infl ammables into the charger
air ventilation slots will result in electrical shock hazard or
damaged charger.
18. Bring the battery to the shop from which it was purchased
as soon as the post-charging battery life becomes too
short for practical use. Do not dispose of the exhausted
battery.
19. Using an exhausted battery will damage the charger.
CAUTION ON LITHIUM-ION BATTERY
To extend the lifetime, the lithium-ion battery equips with the
protection function to stop the output.
In the cases of 1to 3described below, when using this
product, even if you are pulling the switch, the motor may
stop. This is not the trouble but the result of protection
function.
1. When the battery power remaining runs out, the motor
stops.
In such case, charge it up immediately.
2. If the tool is overloaded, the motor may stop. In this
case, release the switch of tool and eliminate causes of
overloading. After that, you can use it again.
3. If the battery is overheated under overload work, the
battery power may stop.
In this case, stop using the battery and let the battery
cool. After that, you can use it again.
Furthermore, please heed the following warning and caution.
WARNING
In order to prevent any battery leakage, heat generation,
smoke emission, explosion and ignition beforehand, please
be sure to heed the following precautions.
1. Make sure that swarf and dust do not collect on the
battery.
○During work make sure that swarf and dust do not fall on
the battery.
○Make sure that any swarf and dust falling on the power
tool during work do not collect on the battery.
○Do not store an unused battery in alocation exposed to
swarf and dust.
○Before storing abattery, remove any swarf and dust that
may adhere to it and do not store it together with metal
parts (screws, nails, etc.).
000BookWR18DSHLAra.indb5000BookWR18DSHLAra.indb5 2012/07/169:20:582012/07/169:20:58

English
6
CAUTION
1. If liquid leaking from the battery gets into your eyes, do not
rub your eyes and wash them well with fresh clean water
such as tap water and contact adoctor immediately.
If left untreated, the liquid may cause eye-problems.
2. If liquid leaks onto your skin or clothes, wash well with
clean water such as tap water immediately.
There is apossibility that this can cause skin irritation.
3. If you fi nd rust, foul odor, overheating, discolor,
deformation, and/or other irregularities when using the
battery for the fi rst time, do not use and return it to your
supplier or vendor.
WARNING
If an electrically conductive foreign object enters the terminals
of the lithium ion battery, ashort-circuit may occur resulting
in the risk of fi re. Please observe the following matters when
storing the battery.
○Do not place electrically conductive cuttings, nails,
steel wire, copper wire or other wire in the storage
case.
○Either install the battery in the power tool or store
by securely pressing into the battery cover until the
ventilation holes are concealed to prevent short-
circuits (See Fig. 1).
2. Do not pierce battery with asharp object such as a
nail, strike with ahammer, step on, throw or subject the
battery to severe physical shock.
3. Do not use an apparently damaged or deformed battery.
4. Do not use the battery in reverse polarity.
5. Do not connect directly to an electrical outlets or car
cigarette lighter sockets.
6. Do not use the battery for apurpose other than those
specifi ed.
7. If the battery charging fails to complete even when a
specifi ed recharging time has elapsed, immediately stop
further recharging.
8. Do not put or subject the battery to high temperatures or
high pressure such as into amicrowave oven, dryer, or
high pressure container.
9. Keep away from fi re immediately when leakage or foul
odor are detected.
10. Do not use in alocation where strong static electricity
generates.
11. If there is battery leakage, foul odor, heat generated,
discolored or deformed, or in any way appears abnormal
during use, recharging or storage, immediately remove it
from the equipment or battery charger, and stop use.
SPECIFICATIONS
POWER TOOL
Model WR18DSHL
Voltage 18 V
No-load speed 1500 /min
Capacity Ordinary bolt M12 –M22
High tension bolt M12 –M16
Tightening torque (Maximum) 480 N.m
Rechargeable battery
BSL1830: Li-ion 18 V(3.0 Ah 10 cells)
Weight
3.4 kg
CHARGER
Model UC18YRSL
Charging voltage 14.4 V–18 V
Weight 0.6 kg
STANDARD ACCESSORIES
In addition to the main unit (1), the package contains the
accessories listed in the table below.
WR18DSHL
(2LSRK)
1Charger ..............................................1
2Battery ................................................2
3Plastic case.........................................1
4Battery cover.......................................1
WR18DSHL
(NN)
Without charger, battery, plastic case and
battery cover.
Standard accessories are subject to change without notice.
OPTIONAL ACCESSORIES (sold separately)
1. Battery (BSL1830)
Optional accessories are subject to change without notice.
APPLICATIONS
Tightening and loosening of all types of bolts and nuts, used
for securing structural items.
BATTERY REMOVAL/INSTALLATION
1. Battery removal
Hold the handle tightly and push the battery latch to
remove the battery (see Fig. 2).
CAUTION
Never short-circuit the battery.
2. Battery installation
Insert the battery while observing its polarities (see
Fig. 2).
000BookWR18DSHLAra.indb6000BookWR18DSHLAra.indb6 2012/07/169:20:582012/07/169:20:58

English
7
CHARGING
Before using the power tool, charge the battery as follows.
1. Connect the charger’s power cord to a receptacle.
When the power cord is connected, the charger’s pilot
lamp will blink in red. (At 1-second intervals)
2. Insert the battery into the charger.
Firmly insert the battery into the charger until the line is
visible, as shown in Fig. 3,4.
3. Charging.
When inserting abattery in the charger, charging will
commence and the pilot lamp will light continuously in
red.
When the battery becomes fully recharged, the pilot lamp
will blink in red. (At 1-second intervals) (See Table 1)
(1) Pilot lamp indication
The indications of the pilot lamp will be as shown in
Table 1,according to the condition of the charger or the
rechargeable battery.
Table 1
Indications of the pilot lamp
The pilot lamp
lights or blinks
in red.
Before
charging Blinks
Lights for 0.5 seconds. Does not light for
0.5 seconds. (offfor 0.5 seconds)
While
charging Lights Lights continuously
Charging
complete Blinks
Lights for 0.5 seconds. Does not light for
0.5 seconds. (offfor 0.5 seconds)
Charging
impossible Flickers
Lights for 0.1 seconds. Does not light for
0.1 seconds. (offfor 0.1 seconds) Malfunction in the battery or
the charger
The pilot lamp
lights in green.
Overheat
standby Lights Lights continuously
Battery overheated.
Unable to charge.
(Charging will commence
when battery cools)
(2) Regarding the temperatures of the rechargeable battery
The temperatures for rechargeable batteries are as
shown in Table 2,and batteries that have become hot
should be cooled for awhile before being recharged.
Table 2 Recharging ranges of batteries
Rechargeable batteries Temperatures at which the
battery can be recharged
BSL1830 0°C –50°C
(3) Regarding recharging time
Depending on the combination of the charger and
batteries, the charging time will become as shown in
Table 3.
Table 3 Charging time (At 20°C)
Charger
Battery UC18YRSL
BSL1830 Approx. 45 min.
NOTE:
The charging time may vary according to temperature
and power source voltage.
4. Disconnect the charger’s power cord from the
receptacle
5. Hold the charger firmly and pull out the battery
NOTE:
After charging, pull out batteries from the charger fi rst,
and then keep the batteries properly.
Regarding electric discharge in case of new batteries,
etc.
As the internal chemical substance of new batteries and
batteries that have not been used for an extended period
is not activated, the electric discharge might be low when
using them the fi rst and second time. This is atemporary
phenomenon, and normal time required for recharging
will be restored by recharging the batteries 2–3times.
How to make the batteries perform longer.
(1) Recharge the batteries before they become completely
exhausted.
When you feel that the power of the tool becomes
weaker, stop using the tool and recharge its battery. If
you continue to use the tool and exhaust the electric
current, the battery may be damaged and its life will
become shorter.
(2) Avoid recharging at high temperatures.
Arechargeable battery will be hot immediately after use.
If such abattery is recharged immediately after use, its
internal chemical substance will deteriorate, and the
battery life will be shortened. Leave the battery and
recharge it after it has cooled for awhile.
CAUTION
○When the battery charger has been continuosly used,
the battery charger will be heated, thus constituting
the cause of the failures. Once the charging has been
completed, give 15 minutes rest until the next charging.
○If the battery is recharged when it is warm due to battery use
or exposure to sunlight, the pilot lamp map light in green.
The battery will not be recharged. In such acase, let the
battery cool before charging.
000BookWR18DSHLAra.indb7000BookWR18DSHLAra.indb7 2012/07/169:20:582012/07/169:20:58

English
8
○When the pilot lamp flickers in red (at 0.2-second intervals),
check for and take out any foreign objects in the charger’s
battery installation hole. If there are no foreign objects, it
is probable that the battery or charger is malfunctioning.
Take it to your authorized Service Center.
PRIOR TO OPERATION
1. Preparing and checking the work environment
Make sure that the work site meets all the conditions laid
forth in the precautions.
2. Checking the battery
Make sure that the battery is installed fi rmly. If it is at all
loose it could come offand cause an accident.
3. Selecting the socket matched to the bolt
Be sure to use asocket which is matched to the bolt to be
tightened. Using an improper socket will not only result in
insufficient tightening but also in damage to the socket or
nut.
Aworn or deformed hex. or square-holed socket will not
give an adequate tightness for fi tting to the nut or anvil,
consequently resulting in loss of tightening torque.
Pay attention to wear of socket hole, and replace before
further wear has developed.
4. Installing a socket
Select the socket to be used.
●Pin, O-ring type
(1) Align the hole in the socket with the hole in the anvil and
insert the anvil into the socket.
(2) Insert the pin into the socket.
(3) Attach the ring to the groove on the socket.
●Plunger type
Align the plunger located in the square part of the anvil
with the hole in the hex. socket. Then push the plunger,
and mount the hex. socket on the anvil.
Check that the plunger is fully engaged in the hole.
When removing the socket, reverse the sequence.
●Retaining ring type
(1) Align the square portions of the socket and the anvil with
each other.
(2) Make sure to fi rmly install the socket by pushing it all the
way into the anvil.
(3) When removing the socket, pull it out of the anvil.
CAUTION
○Please use the designated attachments which are listed
in the operations manual and Hitachi’s catalog.
Accidents or injuries could result from not doing so.
○Make sure to fi rmly install the socket in the anvil. If the
socket is not fi rmly installed it might come out and cause
injuries.
HOW TO USE
1. Operation of switch
The switch in this machine functions as amotor switch
and rotational direction selector switch. When the switch
is set to indicated on the handle, the motor rotates
clockwise to tighten the bolt. When the switch is set to ,
the motor rotates counterclockwise to loosen the bolt.
When the switch is released, the motor stops. (Fig. 6)
CAUTION
Be sure to turn the switch OFF and wait until the motor
completely stops before changing the direction of wrench
revolution. Switching while the motor is rotating will result
in burning the motor.
2. About Remaining Battery Indicator
When pressing the remaining battery indicator switch,
the remaining battery indicator lamp lights and the
battery remaining power can be checked. (Fig. 7)
When releasing your fi nger from the remaining battery
indicator switch, the remaining battery indicator lamp
goes off.The Table 4 shows the state of remaining
battery indicator lamp and the battery remaining power.
Table 4
State of lamp Battery Remaining Power
The battery remaining power is enough.
The battery remaining power is ahalf.
The battery remaining power is nearly
empty.
Re-charge the battery soonest possible.
As the remaining battery indicator shows somewhat
differently depending on ambient temperature and
battery characteristics, read it as areference.
NOTE:
○Do not give astrong shock to the switch panel or break it.
It may lead to atrouble.
○To save the battery power consumption, the remaining
battery indicator lamp lights while pressing the remaining
battery indicator switch.
3. How to use the LED light
Every time you press the light switch on the switch panel,
the LED light lights or goes off.(Fig. 8)
To prevent the battery power consumption, turn off
the
LED light frequently.
CAUTION
Do not expose directly your eye to the light by looking into
the light.
If your eye is continuously exposed to the light, your eye
will be hurt.
NOTE:
To prevent the battery power consumption caused
by forgetting to turn offthe LED light, the light goes off
automatically in about 15 minutes.
4. Tightening and loosening bolts
Ahex. socket matching the bolt or nut must fi rst be
selected. Then mount the socket on the anvil, and grip
the nut to be tightened with the hex. socket. Holding the
wrench in line with the bolt, press the power switch to
impact the nut for several seconds.
If the nut is only loosely fi tted to the bolt, the bolt may turn
with the nut, therefore mistaking proper tightening. In this
case, stop impact on the nut and hold the bolt head with a
wrench before restarting impact, or manually tighten the
bolt and nut to prevent them slipping.
OPERATIONAL CAUTIONS
1. Resting the unit after continuous work
After use for continuous bolt-tightening work, rest the
unit for 15 minutes or so when replacing the battery. The
temperature of the motor, switch, etc., will rise if the work
is started again immediately after battery replacement,
eventually resulting in burnout.
NOTE:
Do not touch the metal parts, as it gets very hot during
continuous work.
2. Work at a tightening torque suitable for the bolt
under impact
The optimum tightening torque for nuts or bolts differs with
material and size of the nuts or bolts. An excessively large
tightening torque for asmall bolt may stretch or break the
bolt. The tightening torque increases in proportion to the
operation time. Use the correct operating time for the bolt.
000BookWR18DSHLAra.indb8000BookWR18DSHLAra.indb8 2012/07/169:20:582012/07/169:20:58

English
9
3. Holding the tool
Hold the impact wrench fi rmly with both hands. In this
case hold the wrench in line with the bolt.
It is not necessary to push the wrench very hard. Hold
the wrench with aforce just sufficient to counteract the
impact force.
4. Confirm the tightening torque
The following factors contribute to areduction of the
tightening torque. So confi rm the actual tightening torque
needed by screwing up some bolts before the job with
ahand torque wrench. Factors affecting the tightening
torque are as follows.
(1) Voltage
When the discharge margin is reached, voltage
decreases and tightening torque is lowered.
(2) Operating time
The tightening torque increases when the operating time
increases. But the tightening torque does not increase
above acertain value even if the tool is driven for along
time.
(3) Diameter of bolt
The tightening torque differs with the diameter of the bolt.
Generally alarger diameter bolt requires larger tightening
torque.
(4) Tightening conditions
The tightening torque differs according to the torque ratio;
class, and length of bolts even when bolts with the same
size threads are used. The tightening torque also differs
according to the condition of the surface of workpiece
through which the bolts are to be tightened. When the
bolt and nut turn together, torque is greatly reduced.
(5) Using optional parts
The tightening torque is reduced alittle when an
extension bar, universal joint or along socket is used.
(6) Clearance of the socket
Aworn or deformed hex. or asquare-holed socket will
not give an adequate tightness to the fi tting between the
nut or anvil, consequently resulting in loss of tightening
torque.
Using an improper socket which does not match to the
bolt will result in an insufficient tightening torque.
(7) Tightening torque varies, depending on the battery’s
charge level.
MAINTENANCE AND INSPECTION
1. Inspecting the socket
Aworn or deformed hex. or asquare-holed socket will
not give an adequate tightness to the fi tting between
the nut or anvil, consequently resulting in loss of
tightening torque. Pay attention to wear of asocket holes
periodically, and replace with anew one if needed.
2. Inspecting the mounting screws
Regularly inspect all mounting screws and ensure that
they are properly tightened. Should any of the screws be
loose, retighten them immediately. Failure to do so may
result in serious hazard.
3. Maintenance of the motor
The motor unit winding is the very “heart” of the power
tool.
Exercise due care to ensure the winding does not
become damaged and/or wet with oil or water.
4. Inspecting the carbon brushes (Fig. 9)
The motor employs carbon brushes which are
consumable parts. Since and excessively worn carbon
brush can result in motor trouble, replace the carbon
brush with new ones when it becomes worn to or near
the “wear limit”. In addition, always keep carbon brushes
clean and ensure that they slide freely within the brush
holders.
NOTE:
When replacing the carbon brush with anew one, be sure
to use the Hitachi Carbon Brush Code No. 328481.
5. Replacing carbon brushes
Take out the carbon brush by fi rst removing the brush
cap and then hooking the protrusion of the carbon brush
with afl at head screw driver, etc., as shown in Fig. 11.
When installing the carbon brush, choose the direction
so that the nail of the carbon brush agrees with the
contact portion outside the brush tube. Then push it in
with afi nger as illustrated in Fig. 12.Lastly, install the
brush cap.
CAUTION:
Be absolutely sure to insert the nail of the carbon brush
into the contact portion outside the brush tube. (You can
insert whichever one of the two nails provided).
Caution must be exercised since any error in this
operation can result in the deformed nail of the carbon
brush and may cause motor trouble at an early stage.
6. Cleaning of the outside
When the impact wrench is stained, wipe with asoft dry
cloth or acloth moistened with soapy water. Do not use
chloric solvents, gasoline or paint thinner, as they melt
plastics.
7. Storage
Store the impact wrench in aplace in which the
temperature is less than 40°C, and out of reach of children.
NOTE:
Make sure that the battery is fully charged when stored
for along period (3 months or more). The battery with
smaller capacity may not be able to be charged when
used, if stored for along period.
8. Service parts list
A: Item No.
B: Code No.
C: No. Used
D: Remarks
CAUTION
Repair, modifi cation and inspection of Hitachi Power
Tools must be carried out by an Hitachi Authorized
Service Center.
This Parts List will be helpful if presented with the tool to
the Hitachi Authorized Service Center when requesting
repair or other maintenance.
In the operation and maintenance of power tools, the
safety regulations and standards prescribed in each
country must be observed.
MODIFICATIONS
Hitachi Power Tools are constantly being improved
and modifi ed to incorporate the latest technological
advancements.
Accordingly, some parts (i.e. code numbers and/or
design) may be changed without prior notice.
Important notice on the batteries for the Hitachi
cordless power tools
Please always use one of our designated genuine
batteries. We cannot guarantee the safety and
performance of our cordless power tool when used with
batteries other than these designated by us, or when
the battery is disassembled and modifi ed (such as
disassembly and replacement of cells or other internal
parts).
NOTE
Due to HITACHI’s continuing program of research and
development, the specifi cations herein are subject to
change without prior notice.
000BookWR18DSHLAra.indb9000BookWR18DSHLAra.indb9 2012/07/169:20:582012/07/169:20:58

10
中國語
一般安全規則
警告!
閱讀所有說明,未遵守下列之說明可能導致電擊、火
災及 / 或嚴重傷害。
「電動工具」一詞在下列警告中,關係到電源操作(有
線)之電動工具或電池操作(無線)之電動工具。
記住這些說明
1) 工作場所
a) 保持工作場所清潔及明亮。
雜亂及昏暗區域易發生意外。
b) 勿在易產生爆炸之環境中操作,譬如有易燃液
體、瓦斯或粉塵存在之處。
電動工具產生火花會引燃粉塵或煙氣。
c) 當操作電動工具時,保持兒童及過往人員遠離。
分神會讓你失去控制。
2) 電氣安全
a) 電動工具插頭必須與插座配合,絕不可以任何
方法修改插頭,且不得使用任何轉接插頭於有
接地之電動工具。
不修改插頭及所結合之插座可減少電擊。
b) 避免身體接觸到接地面諸如管子、散熱器、爐
灶及冰箱。
如果你的身體接地或搭地,會增加電擊的危險。
c) 勿讓電動工具淋雨或曝露在潮濕的環境下。
電動工具進水會增加電繫的危險。
d) 勿濫用電源線。絕勿使用電源線去纏繞、拖拉
電動工具或拔插頭,保持電源線遠離熱氣、油
氣、尖角或可動零件。
損壞或纏繞的電源線會增加電繫之危險。
e) 電動工具在室外操作時要使用一適合室外用的
延長線。
使用合適之室外用延長線會減少電擊的危險。
3) 人員安全
a) 保持機警,注意你正在做什麼,並運用普通常
識操作電動工具。
當你感到疲勞或受藥品、酒精或醫療影響時,
勿操作電動工具。
操作中瞬間的不注意可能造成人員嚴重的傷
害。
b) 使用安全裝備,常時佩戴安全眼鏡。
安全裝備有防塵口罩、防滑安全鞋、硬帽,或
在適當情況下使用聽覺防護,可減少人員傷害。
c) 避免意外地啟動。在插電前確認開關是在“off”
的位置。
以手指放在開關握持電動工具,或在電動工具
的開關於“on”的狀況下插上插頭,都會導致
意外發生。
d) 在將電動工具啟動前,先卸下任何調整用鑰匙
或扳手。
扳手或鑰匙遺留在電動工具的轉動部位時,可
能導致人員傷害。
e) 身體勿過度伸張,任何時間要保持站穩及平衡。
以便在不預期的狀態下,能對電動工具有較好
的控制。
f) 衣著要合宜,別穿太鬆的衣服或戴首飾。
保持你的頭髮、衣服及手套遠離轉動部位。
寬鬆的衣服、手飾及長髮會被捲入轉動部位。
g) 如果裝置要用於粉塵抽取及集塵設施,要確保
其連接及正當使用。
使用此類裝置能減少與粉塵有關之危害。
4) 電動工具之使用及注意事項
a) 勿強力使用電動工具,使用正確之電動工具為
你所需。
正確使用電動工具會依其設計條件使工作做得
更好更安全。
b) 如果開關不能轉至開及關的位置,勿使用電動
工具。
任何電動工具不能被開關所控制是危險的,必
須要修理。
c) 在做任何調整、更換配件或收存電動工具時,
要將插頭與電源分開,且 / 或將電池從電動工
具中取出。
此種預防安全措施可減少意外開啟電動機之危
險。
d) 收存停用之電動工具,遠離兒童,且不容許不
熟悉電動工具或未瞭解操作電動工具說明書的
人操作電動工具。
在未受過訓練的人手裡,電動工具極為危險。
e) 保養電動工具,檢核是否有可動零件錯誤的結
合或卡住、零件破裂及可能影響電動工具操作
的任何其他情形。
電動工具如果損壞,在使用前要修好。許多意
外皆肇因於不良的保養。
f) 保持切割工具銳利清潔。
適當的保養切割工具,保持銳利之切削鋒口,
可減少卡住並容易控制。
g) 按照說明書使用電動工具、配件及刀具等,使
用特殊型式之電動工具時要考量工作條件及所
執行之工作。
使用電動工具未如預期用途之操作時,會導致
危害。
5) 電池式工具的使用及注意事項
a) 在插入電池組之前,確保開關置於關閉“off”
的位置。
因插入電池組進入電動工具時,若開關置於打
開“on”的位置時,將導致意外事故發生。
000BookWR18DSHLAra.indb10000BookWR18DSHLAra.indb10 2012/07/169:20:582012/07/169:20:58

中國語
11
b) 需再充電時,僅能使用製造商指定的充電器。
因充電器僅適合同一型式的電池組,若使用任
何其它電池組時,將導致起火的危險。
c) 使用電動工具時,僅能使用按照其特性設計的
電池組。
因使用其它任何電池組時,將導致人員傷害及
起火的危險。
d) 當電池組不在使用時,需保存於遠離其它金屬
物件之處,例如 : 迴紋針、錢幣、鑰匙、圖釘、
螺釘,或類似能造成端子與端子間連接的其它
較小金屬物件。
因電池組端子間短路時,將導致燃燒或起火的
危險。
e) 在誤用情況下,電解液可能自電池中噴出;請
避免接觸。當發生意外接觸時,請用清水沖洗。
若電解液觸及眼睛時,請儘速尋求醫療協助。
因自電池中噴出的電解液,將導致灼傷或刺激
皮膚。
6) 維修
a) 工具需維修時,請找合格修理人員,並請使用
與原材料相同的零組件予以更換。
遵循此規定,方能維持及確保電動工具的安全
性。
注意事項
不可讓孩童和體弱人士靠近工作場所。
應將不使用的工具存放在孩童和體弱人士伸手不及的
地方。
使用充電式衝擊扳手機的注意
事項
1. 進行緊固件可能接觸到暗線的操作時,請握著電
動工具的絕緣手柄表面。接觸到“通電”電線的
緊固件可能使電動工具的金屬零件“通電”,而
造成操作人員觸電。
2. 本機組為旋緊、旋鬆螺栓和螺帽專用的可攜式工
具。請勿使用於其他用途。
3. 長期間使用時,請配戴耳塞。
4. 單手操作極其危險;操作時請用雙手緊握工具。
5. 檢查確認套筒沒有破裂或損壞。破裂或損壞的套
筒非常危險。使用套筒前請進行檢查。
6. 用套筒插銷和 O 型環固定套筒。
如果固定套筒的插銷和 O 型環受損,套筒可能從
衝擊扳手上脫落,這是相當危險的。如果套筒插
銷或 O 型環有變形、磨損、破裂或其他任何損壞,
請絕對不要使用。請務必將套筒的插銷和 O 型環
安裝在正確的位置。
7. 檢查旋緊力矩。
旋緊螺栓的適當扭矩取決於螺栓的製造材料、尺
寸、等級等。
此外,本衝擊扳手產生的旋緊扭矩亦取決於螺栓
的材料和尺寸,以及套筒安裝方式所需要的衝擊
扳手長度。
此外,當電池剛充完電和電池即將耗盡時,扭矩
也略有不同。可使用扭矩扳手檢查螺栓是否已按
適當的扭矩旋緊。
8. 在切換旋轉方向之前,先停止衝擊扳手。在切換
旋轉方向之前,請務必鬆開開關,等待衝擊扳手
停下來。
9. 絕勿觸摸旋轉部位。
不要讓旋轉的套筒靠近手或身體其他部位,否則
可能會被套筒割傷或夾住。此外,套筒長時間持
續使用之後,注意不要碰到套筒。因為套筒變得
很燙,可能將人灼傷。
10. 使用萬向接頭時,不要讓衝擊扳手空負荷旋轉。
如果在沒有連接負荷時讓套筒旋轉,萬向接頭會
造成套筒劇烈轉動。此種情況下您可能會受傷,
而套筒的劇烈運動可能會振動衝擊扳手以致扳手
掉落。
11. 務請在 0 ∼ 40℃ 的溫度下進行充電。溫度低於
0℃ 將會導致充電過度,極其危險。電池不能在
高於 40℃ 的溫度下充電。
最適合於充電的溫度是 20 ∼ 25℃。
12. 請勿連續使用充電器。
一次充電完成后,請將充電器擱置 15 分鐘以上,
然後再進行下一次充電。
13. 勿讓雜質進入充電池連結口內。
14. 切勿拆卸充電式電池與充電器。
15. 切勿使充電式電池短路。造成過大電流和過熱,
從而燒壞電池。
16. 請勿將電池丟入火中。
燃燒電池將引起爆炸。
17. 請勿將異物插入充電器的通風口。
若將金屬異物或易燃物插入通風口的話,將會引
起觸電事故或使充電器受損。
18. 充電後電池壽命太短不夠使用時,請盡快將電池
送往經銷店。不可將用過的電池亂丟。
19. 請勿使用耗竭了的電池,否則將會損壞充電器。
鋰離子電池使用注意事項
為延長使用壽命,鋰離子電池備配停止輸出的保護功
能。
若是在使用本產品時發生下列 1 至 3 的情況,即使
按下開關,馬達也可能停止。這並非故障,而是啟動
保護功能的結果。
000BookWR18DSHLAra.indb11000BookWR18DSHLAra.indb11 2012/07/169:20:592012/07/169:20:59

12
中國語
1. 在殘留的電池電力即將耗盡時,馬達會停止。
在這種情況下,請立即予以充電。
2. 若工具超過負荷,馬達亦可能停止。在這種情況
下,請鬆開工具的開關,試著消除超過負荷的原
因。之後您就可以再度使用。
3. 若電池在過載工作情況下過熱,電池電力可能會
中止。
在這種情況下,請停止使用電池,讓電池冷卻。
之後您就可以再度使用。
此外,請留心下列的警告及注意事項。
警告
為事先防止電池發生滲漏、發熱、冒煙、爆炸及起火
等事故,請確保留意下列事項。
1. 確保電池上沒有堆積削屑及灰塵。
○ 在工作時確定削屑及灰塵沒有掉落在電池上。
○ 確定所有工作時掉落在電動工具上的削屑和灰塵
沒有堆積在電池上。
○ 請勿將未使用的電池存放在曝露於削屑和灰塵的
位置。
○ 在存放電池之前,請清除任何可能附著在上面的
削屑和灰塵,並請切勿將它與金屬零件(螺絲、
釘子等)存放在一起。
2. 請勿以釘子等利器刺穿電池、以鐵錘敲打、踩踏、
丟擲電池,或將其劇烈撞擊。
3. 切勿使用明顯損壞或變形的電池。
4. 使用電池時請勿顛倒電極。
5. 請勿直接連接電源插座或汽車點煙器孔座。
6. 請依規定方式使用電池,切勿移作他用。
7. 如果已過了再充電時間,電池仍無法完成充電,
請立即停止繼續充電。
8. 請勿將電池放置於高溫或高壓處,例如微波爐、
烘乾機或高壓容器內。
9. 發現有滲漏或異味時,請立即將電池遠離火源處。
10. 請勿在會產生強烈靜電的地方使用。
11. 如電池出現滲漏、 異味、發熱、褪色或變形,或
在使用、充電或存放時出現任何異常,請立即將
它從裝備或電池充電器拆下,並停止使用。
注意
1. 若電池滲漏出的液體進入您的眼睛,請勿搓揉眼
睛,並以自來水等乾淨清水充分沖洗,立刻送醫。
若不加以處理,液體可能會導致眼睛不適。
2. 若液體滲漏至您的皮膚或衣物,請立即以自來水
等清水沖洗。
上述情況可能會使皮膚受到刺激。
3. 若初次使用電池時發現生銹、異味、過熱、褪色、
變形及或其他異常情況時,請勿使用並將該電
池退還給供應商或廠商。
警告
若具有導電性的異物進入鋰離子電池的端子,可能會
造成短路,進而引發火災。請在存放電池時遵循以下
事項。
○ 請勿將切削下來會導電的物品、鐵釘、鋼線、銅
線或其他電線放入儲存箱內。
○ 無論是將電池安裝在電動工具內,或是儲存電池,
請確實壓下電池蓋,直至遮住通風孔為止,以防
短路。 ( 請參閱圖 1)
規 格
電動工具
型式 WR18DSHL
電壓 18 V
無負荷速度 1500 轉 / 分
性能 普通螺栓 M12 – M22
高張力螺栓 M12 – M16
旋緊扭矩(最大值) 480 N.m
充電式電池 BSL1830: Li-ion 18 V (3.0 Ah 10 節電池 )
重量 3.4 kg
充電器
型式 UC18YRSL
充電電壓 14.4 V - 18 V
重量 0.6 kg
000BookWR18DSHLAra.indb12000BookWR18DSHLAra.indb12 2012/07/169:20:592012/07/169:20:59

中國語
13
標 準 附 件
除了電鑽機機身(1)以外,包裝盒內包含下表所列
之附件。
WR18DSHL
(2LSRK)
1 充電器 ....................................... 1
2 電池 .......................................... 2
3 塑料套 ....................................... 1
4 電池外蓋 ................................... 1
WR18DSHL
(NN)
不含充電器、電池、塑料套及電池外
蓋。
標準附件可能不預先通告而徑予更改。
選 購 附 件(分 開 銷 售)
1. 電池 (BSL1830)
選購附件可能不預先通告而徑予更改。
用 途
旋緊和旋鬆為固定結構性物品的各類螺栓和螺帽。
電池的拆卸 / 安裝法
1. 取下電池
緊握機身,推動電池卡榫並將電池取下(見圖 2)。
注意
請勿使電池短路。
2. 電池的安裝法
請先確認了電池的正負極後,再將電池插進去(見
圖 2)。
充 電
使用電動工具之前,按下述方法將電池進行充電。
1. 將充電器的電源線連接至插座。
當電源線連接插座時,充電器的指示燈會閃爍紅
燈。(每隔1秒)。
2. 將電池裝入充電器。
將電池裝入充電器,直到看見標線,如圖 3、4
所示。
3. 充電
將電池插入充電器後,就會開始充電,紅色信號
燈持續亮燈。充電完成後 , 信號燈閃爍紅燈(閃
爍間隔時間為 1 秒,見表 1)
(1) 信號燈指示
信號燈會依據充電器或充電池的狀態而有不同的
指示,請見表 1:
表 1
信號燈指示
紅色信號燈亮起
或閃爍
充電前 閃爍
亮起 0.5 秒,熄滅 0.5 秒。
(熄滅時間 0.5 秒)
充電時 亮起 持續亮起
充電完成 閃爍
亮起 0.5 秒,熄滅 0.5 秒。
(熄滅時間 0.5 秒)
無法充電 快速閃爍
亮起 0.1 秒,熄滅 0.1 秒。
(熄滅時間 0.1 秒) 電池或充電器故障
綠色信號燈亮
起。 過熱待機 亮起 持續亮起 電池過熱。
無法充電。
(待電池降溫後便會開始充電)
000BookWR18DSHLAra.indb13000BookWR18DSHLAra.indb13 2012/07/169:20:592012/07/169:20:59

14
中國語
(2) 關於充電電池的溫度
表 2 為充電電池的溫度,而過熱的電池必須先冷
卻,才能進行充電。
表 2 電池充電溫度範圍
充電電池 電池可充電的溫度
BSL1830 0℃ – 50℃
(3) 關於充電時間
依據充電器及電池的不同,充電時間的變化將如
表 3 所示。
表 3 充電時間(於 20℃ 時)
充電器
電池 UC18YRSL
BSL1830 約 45 分鐘
註:
根據環境溫度和電源電壓,充電時間可能會有
所不同。
4. 將充電器電線從插頭拔下
5. 抓穩充電器並取出電池
註:
充電結束後,先從充電器拔出電池,然後妥善
存放電池。
使用新電池或其他電池,產生電量較弱的問題時
由於新電池及長時間未使用之電池的內部化學物
質未活化,因此初次及第二次使用時的電量會較
弱。此為暫時現象;在充電 2 至 3 次後,電量就
會恢復正常。
怎樣讓電池使用時間更長
(1) 在電池電量完全耗盡之前給電池充電。
在感覺工具的動力變弱時,停止使用工具並為電
池充電。如果繼續使用工具消耗電流,可能會造
成對電池的損壞,電池使用壽命會縮短。
(2) 避免在高溫下充電
充電電池在剛使用後會發熱。如果在電池剛使用
後為電池充電,電池的內部化學物質的性能會下
降,電池使用壽命會縮短。請先將電池放置一會
兒,待電池冷卻後再進行充電。
注意
○ 連續使用電池充電器後,電池充電器,會因為
變熱的關係而無法正常充電。完成一次充電後,
請讓充電器休息 15 分鐘,再進行下一次充電。
○ 如果電池充電時,電池因剛使用過或曝曬在陽
光下以致電池溫度較高時,指示燈會亮起綠燈。
此時電池不會進行充電。請讓電池冷卻後再充
電。
○ 當指示燈閃爍紅燈時(每隔 0.2 秒),檢查充電
器的電池安裝孔中是否有異物並取出。如果沒
有異物,可能是電池或充電器發生故障。請聯
絡 HITACHI 授權服務中心。
操 作 前
1. 準備並檢查工作環境
請確保工作地點符合注意事項規定的所有條件。
2. 檢查電池
請確保電池安裝牢固。如果電池相當鬆動,可能
會脫落並造成事故。
3. 選擇與螺栓匹配的套筒
請務必使用與被旋緊的螺栓相匹配的套筒。使用
不合適的套筒,不僅無法充分旋緊螺栓,而且會
損壞套筒或螺帽。
磨損或變形的六角形或方形孔套筒沒有足夠的緊
密性與螺帽或砧座吻合,因此會造成旋緊扭矩的
降低。
請注意套筒孔的磨損,在磨損更嚴重前進行更換。
4. 安裝套筒
選擇要使用的套筒。
● 插銷、O 型環的類型
(1) 將套筒的孔與砧座的孔對準,並將砧座插入套筒。
(2) 將插銷插入套筒。
(3) 將 O 型環套到套筒上的凹槽。
● 柱塞式
將砧座方形部位上的柱塞與六角形套筒的孔對
準。然後推動柱塞,將六角形套筒安裝到砧座上。
檢查柱塞是否完全與套筒接合。
要卸下套筒時,按相反的順序操作。
● 固定環型
(1) 將套筒的方形部位與砧座互相對準。
(2) 將套筒完全推到砧座,確保套筒已牢固安裝。
(3) 要卸下套筒時,從砧座拉出來。
注意
○ 請使用操作手冊和日立產品目錄中所列出的指
定附件。
否則可能會導致意外或人身傷害。
○ 確保套筒牢固安裝在砧座內。如果套筒安裝不
牢固,可能會脫落並導致人身傷害。
000BookWR18DSHLAra.indb14000BookWR18DSHLAra.indb14 2012/07/169:20:592012/07/169:20:59

中國語
15
操作使用方式
1. 開關操作
此工具的開關具有開關馬達和旋轉選擇方向的功
能。將開關設在扳手機上的 標記位置時,馬
達會朝著順時針方向旋轉並擰緊螺栓。將開關設
於 位置時,馬達會朝著逆時針方向旋轉並鬆
開螺栓。放開開關時,馬達即停止。( 圖6)
注意
改變扳手機的旋轉方向之前,請務必關掉開關
並等待馬達完全停止。如在馬達旋轉時進行操
作開關的話,會導致馬達的燒毀。
2. 電池剩餘量指示燈
按下電池剩餘量指示燈開關,電池剩餘量指示燈
亮起,可以確認電池的剩餘電量(見圖 7)。
從電池剩餘量指示燈開關放開手指後,電池剩餘
量指示燈熄滅。參照表 4 可得知電池剩餘量指示
燈所表示的電池剩餘量狀態。
表 4
指示燈狀態 電池的剩餘電量
電池的剩餘電量足夠。
電池的剩餘電量為一半。
電池的剩餘電量幾近零。
請儘快進行充電。
由於電池剩餘量指示燈根據環境溫度和電池特性
有所不同,僅供參考。
註
○ 請勿折斷或給予開關面板強烈衝擊。可能會導
致故障。
○ 為了節省電池消耗量,電池剩餘量指示燈只在
按壓指示燈開關時才會亮起。
3. 使用 LED 燈
每次按下開關面板上的 LED 燈時,LED 燈會亮起
或熄滅(見圖 8)。
為了防止電池耗電,請頻繁地關閉 LED 燈。
注意
請勿讓眼睛直視光線。
若眼睛持續接觸到光線,會造成您雙眼的傷害。
註
為了防止由於忘記關閉 LED 燈而造成電池的電
量消耗,亮燈約 15 分鐘後會自動熄滅。
4. 旋緊和旋鬆螺栓
必須先選用與螺栓或螺帽相配的六角形套筒。然
後將套筒裝入砧座,緊握螺帽與六角形套筒擰緊。
握住扳手使其與螺栓成一直線,按下電源開關,
壓緊螺帽數秒鐘。
如果螺帽與螺栓安裝起來略鬆,螺栓可能會與螺
帽一起轉動,因此誤認為已適當旋緊。在這種情
況下,在重新啟動衝擊前 , 停止對螺帽施力並用
扳手抓住螺栓頭,或以手動擰緊螺栓和螺帽以防
止滑落。
操作注意事項
1. 持續操作後讓本機組休息
在使用本機組進行持續的旋緊螺栓工作後,更換
電池時讓機組休息約 15 分鐘左右。如果更換電
池後又立即繼續使用,馬達、開關等的溫度將會
上升並最終導致燒毀。
註:
切勿觸摸金屬部分,連續操作後金屬部分會變
得很燙。
2. 以適於受衝擊螺栓的旋緊扭矩進行操作
螺帽或螺栓最適宜的旋緊扭矩因螺帽或螺栓的材
料和尺寸而有所不同。對小螺栓使用過大的旋緊
扭矩,可能會使螺栓扭曲或損壞。旋緊扭矩的增
加與操作時間成正比。請以適合螺栓的正確時間
操作。
3. 握持工具
雙手抓穩衝擊扳手。在這種情況下,握住扳手對
準螺栓。
沒有必要非常用力地推動扳手。握持扳手,只要
讓力量足以抵消衝擊力即可。
4. 確認旋緊扭矩
下列因素會造成旋緊扭矩的減少。因此,請在工
作前用手工扭矩扳手確認擰緊螺栓所需的實際旋
緊扭矩。影響旋緊扭矩的因素如下 :
(1) 電壓
達到放電極限時,電壓降低,旋緊扭矩亦減少。
(2) 操作時間
操作時間增加時,旋緊扭矩也增大。但是,即使
工具驅動很長一段時間,旋緊扭矩也不會增大到
超過某個特定值。
(3) 螺栓直徑
旋緊扭矩根據螺栓的直徑而有所不同。一般來說
直徑較大的螺栓需要較大的旋緊力矩。
000BookWR18DSHLAra.indb15000BookWR18DSHLAra.indb15 2012/07/169:20:592012/07/169:20:59

16
中國語
(4) 旋緊條件
即使使用同樣尺寸螺紋的螺栓,旋緊扭矩會根據
螺栓的扭矩比率、等級和長度而有所不同。旋緊
扭矩亦因螺栓所要擰緊的工件表面條件而有所不
同。螺栓和螺母一起轉動時,扭矩會大幅減少。
(5) 使用選購配件
使用延長桿、萬向接頭或長套筒時,旋緊扭矩會
略有減少。
(6) 套筒的間隙
磨損或變形的六角形或方形孔套筒沒有足夠的緊
密性與螺帽或砧座吻合,因此會造成旋緊扭矩的
降低。
使用與螺栓不匹配的不適當套筒會導致旋緊扭矩
不足。
(7) 根據電池的電量,旋緊扭矩會有變化。
維 修 和 檢 查
1. 檢查套筒
磨損或變形的六角形或方形孔套筒沒有足夠的緊
密性與螺帽或砧座吻合,因此會造成旋緊扭矩的
降低。請定期注意套筒孔的磨損狀態,如有必要
請更換新套筒。
2. 檢查安裝螺釘
要經常檢查安裝螺釘是否緊固妥善。若發現螺釘
鬆了,應立即重新扭緊,否則會導致嚴重的事故。
3. 馬達的維修
馬達繞組是電動工具的“心臟部”。
應仔細檢查有無損傷,是否被油液或水沾濕。
4. 檢查碳刷(見圖 9)
馬達的碳刷為易損耗零件。由於過度磨損碳刷會
導致馬達故障,當碳刷變舊或接近“磨損極限”
時請更換新的碳刷。此外,請隨時保持碳刷清潔,
並確保刷柄內能順利滑動。
註
更換新的碳刷時,請勿必使用日立碳刷 Code
No. 328481。
5. 更換碳刷
先卸下碳刷蓋,然後取出碳刷,接著用平頭螺絲
刀鉤起碳刷的突出部等,如圖 11 所示。
安裝碳刷時,選擇方向使碳刷刷爪與刷管外聯繫
部分相符。然後如圖 12 所示用手指推入。最後,
蓋上碳刷蓋。
注意
確定碳刷刷爪確實插入刷管外部聯繫部分(您
可以插入兩個附屬的刷爪中任何之一)。
必須千萬注意安裝流程,安裝中的任何錯誤都
可能會導致碳刷刷爪變形,並可能致使馬達提
早損壞。
6. 清理外部
衝擊扳手機髒汙時,請使用乾淨軟布或沾肥皂水
的布擦拭。切勿使用氯溶液、汽油或稀釋劑,以
免塑膠部分溶化。
7. 收藏
衝擊扳手機應收藏於溫度低於 40℃ 且為小孩拿
不到的地方。
註:
請確定長時間儲藏時(3 個月以上),電池已充
滿電。若長時間儲藏,在未來使用時,容量較
小的電池可能無法進行充電。
8. 維修部件目錄
A: 項目號碼
B: 代碼號碼
C: 所使用號碼
D: 備注
注意
日立電動工具的修理、維護和檢查必須由日立
所認可的維修中心進行。
當尋求修理或其他維護時,將本部件目錄與工
具一起提交給日立所認可的維修中心會對您有
所幫助。
在操作和維護電動工具中,必須遵守各國的安
全規則和標准規定。
改進
日立電動工具隨時都在進行改進以適應最新的技
術進步。
因此,有些部件(如,代碼號碼和或設計)可
能未預先通知而進行改進。
日立充電式工具電池重要注意事項
請務必使用本公司所指定的原廠電池。若未使用本
公司所指定的電池,或使用經拆解及改裝的電池
(例如,拆解後更換電池芯或其他內部零件 ),則
本公司無法保證充電式工具的性能及操作安全。
註:
為求改進,本手冊所載規格可能不預先通告而徑予
更改。
000BookWR18DSHLAra.indb16000BookWR18DSHLAra.indb16 2012/07/169:20:592012/07/169:20:59

17
한국어
일반적인 안전 수칙
경고!
설명서를 자세히 읽으십시오.
설명서의 내용에 따르지 않을 시에는 감전 사고나 화재가
발생할 수 있으며 심각한 부상을 입을 수도 있습니다.
아래에 나오는 ‘전동 툴’이란 용어는 플러그를 콘센트에
연결해 유선 상태로 사용하는 제품 또는 배터리를 넣어 무선
상태로 사용하는 제품을 가리킵니다.
설명서의 내용을 숙지하십시오.
1) 작업 공간
a) 작업 공간을 깨끗하게 청소하고 조명을 밝게
유지하십시오.
작업 공간이 정리되어 있지 않거나 어두우면 사고가
날 수 있습니다.
b) 인화성 액체나 기체 또는 먼지 등으로 인해 폭발
위험이 있는 환경에서는 전동 툴을 사용하지
마십시오.
전동 툴을 사용하다 보면 불꽃이 튀어서 먼지나
기체에 불이 붙을 수 있습니다.
c) 어린이를 비롯하여 사용자 외에는 작업장소에
접근하지 못하도록 하십시오.
주의가 산만해지면 문제가 생길 수 있습니다.
2) 전기 사용시 주의사항
a) 전동 툴 플러그와 콘센트가 일치해야 합니다.
플러그를 절대로 변형하지 마십시오.
접지된 전동 툴에는 어댑터 플러그를 사용하지
마십시오.
플러그를 변형하지 않고 알맞은 콘센트에 꽂아
사용하면, 감전 위험을 줄일 수 있습니다.
b) 파이프, 라디에이터, 레인지, 냉장고 등 접지된
표면에 몸이 닿지 않도록 주의하십시오.
작업자의 몸이 접지되면, 감전될 위험이 있습니다.
c) 전동 툴에 비를 맞히거나 젖은 상태로 두지 마십시오.
물이 들어가면 감전될 위험이 있습니다.
d) 코드를 조심해서 다루십시오. 전동 툴을 들거나
당기거나 콘센트에서 뽑으려고 할 때 코드를
잡아당기면 안 됩니다.
열, 기름, 날카로운 물건, 움직이는 부품 등으로부터
코드를 보호하십시오.
코드가 파손되거나 엉키면 감전될 위험이
높아집니다.
e) 실외에서 전동 툴을 사용할 때는 실외 용도에 적합한
연장선을 사용하십시오.
실외 용도에 적합한 코드를 사용해야 감전 위험이
줄어듭니다.
3) 사용자 주의사항
a) 전동 툴을 사용할 때는 작업에 정신을 집중하고,
상식의 범위 내에서 사용하십시오.
약물을 복용하거나 알코올을 섭취한 상태 또는
피곤한 상태에서는 전동 툴을 사용하지 마십시오.
전동 툴을 사용할 때 주의가 흐트러지면 심각한
부상을 입을 수 있습니다.
b) 안전 장비를 사용하십시오. 항상 눈 보호 장구를
착용해야 합니다.
먼지 보호 마스크, 미끄럼 방지 신발, 안전모, 청각
보호 장비 등을 사용하면 부상을 줄일 수 있습니다.
c) 전동 툴이 갑자기 작동되지 않도록 합니다. 플러그를
꽂기 전에 스위치가 ‘OFF’ 위치에 있는지
확인하십시오.
손가락을 스위치에 접촉한 채 전동 툴을 들거나
스위치가 켜진 상태로 플러그를 꽂으면 사고가 날 수
있습니다.
d) 전원을 켜기 전에 조정 키 또는 렌치를 반드시
제거해야 합니다.
전동 툴의 회전 부위에 키 또는 렌치가 부착되어
있으면, 부상을 입을 수 있습니다.
e) 작업 대상과의 거리를 잘 조절하십시오. 알맞은
발판을 사용하고 항상 균형을 잡고 있어야 합니다.
그렇게 하면 예기치 못한 상황에서도 전동 툴을 잘
다룰 수 있습니다.
f) 알맞은 복장을 갖추십시오. 헐렁한 옷이나 장신구를
착용하면 안 됩니다. 머리카락, 옷, 장갑 등을
움직이는 부품으로부터 보호하십시오.
헐렁한 옷이나 장신구, 긴 머리카락이 부품에 딸려
들어갈 수도 있습니다.
g) 분진 추출 및 집진 장비에 연결할 수 있는 장치가
제공되는 경우, 그러한 장치가 잘 연결되어 있고
제대로 작동하는지 확인하십시오.
이러한 장치를 사용하면, 먼지와 관련된 사고를 줄일
수 있습니다.
4) 전동 툴 사용 및 관리
a) 전동 툴을 아무 곳에나 사용하지 마십시오. 용도에
알맞은 전동 툴을 사용하십시오.
적절한 전동 툴을 사용하면, 정상 속도로 안전하고
효과적으로 작업을 수행할 수 있습니다.
b) 스위치를 눌렀을 때 전동 툴이 켜지거나 꺼지지
않으면 사용하지 마십시오.
스위치로 작동시킬 수 없는 전동 툴은 위험하므로,
수리를 받아야 합니다.
c) 전동 툴을 조정하거나 부속품을 바꾸거나 보관할
때는 반드시 전원에서 플러그를 빼야 합니다.
이러한 안전 조치를 취해야 전동 툴이 갑자기 켜지는
위험을 피할 수 있습니다.
d) 사용하지 않는 전동 툴은 어린이의 손이 닿지 않는
곳에 보관하고, 사용법을 잘 모르는 사람이 사용하지
못하도록 하십시오.
전동 툴은 미숙련자가 다루기에는 매우 위험한
물건입니다.
e) 전동 툴을 잘 관리하십시오. 움직이는 부품이 잘못
결합되어 있거나 꽉 끼어 움직이지 못하게 되어 있지
않은지 점검하십시오. 또한 전동 툴의 작동에 영향을
미칠 수 있는 기타 파손이 없는지 확인하십시오.
파손된 부분이 있는 경우, 사용하기 전에
수리하십시오.
전동 툴을 제대로 관리하지 못해서 생기는 사고가
많습니다.
f) 절삭 툴은 날카롭고 청결한 상태로 관리하십시오.
절삭 날을 날카로운 상태로 잘 관리하면, 원활하게
잘 움직이며 다루기도 훨씬 편합니다.
g) 설명서를 참조하여 전동 툴과 부속품, 툴 비트 등을
사용하십시오. 또한 작업 환경과 수행할 작업의
성격을 고려해서 알맞은 종류의 전동 툴을 선택하고,
적절한 방식으로 사용하십시오.
원래 목적과 다른 용도로 전동 툴을 사용하면 위험한
사고가 날 수 있습니다.
5) 배터리 도구 사용 및 관리
a) 배터리 팩을 삽입하기 전에 스위치가 꺼졌는지
확인하십시오.
스위치가 켜진 상태에서 배터리 팩을 전동 툴에
삽입하면 사고가 발생합니다.
b) 제조업체가 지정한 충전기로만 충전하십시오.
한 종류의 배터리 팩에 적합한 충전기는 다른 배터리
팩에 사용될 때 화재 위험을 발생시킬 수 있습니다.
c) 구체적으로 지정된 배터리 팩만 전동 툴에
사용하십시오.
다른 배터리 팩을 사용하면 부상 및 화재의 위험이
발생할 수 있습니다.
000BookWR18DSHLAra.indb17000BookWR18DSHLAra.indb17 2012/07/169:20:592012/07/169:20:59

18
한국어
d) 배터리 팩을 사용하지 않을 때는 종이 클립, 동전,
열쇠, 못, 나사와 같은 기타 금속 물체 또는 단자간
연결을 만들어낼 수 있는 기타의 작은 금속 물체와
떨어진 곳에 놓아두십시오.
배터리 단자가 모두 단락되면 화상 또는 화재가
발생할 수 있습니다.
e) 가혹한 조건 하에서 액체가 배터리에서 누출될 수
있습니다. 배터리 누액과 접촉하지 마십시오. 배터리
누액과 우발적으로 접촉할 경우 물로 씻으십시오.
배터리 누액이 눈에 들어갈 경우 의사의 진찰을
받으십시오.
배터리에서 누출되는 액체는 염증 또는 화상을
일으킬 수 있습니다.
6) 서비스
a) 자격을 갖춘 전문가에게 서비스를 받고, 항상 원래
부품과 동일한 것으로 교체해야 합니다.
그렇게 하면 전동 툴을 보다 안전하게 사용할 수
있습니다.
주의사항
어린이나 노약자가 가까이 오지 못하도록 하십시오.
전동 툴을 사용하지 않을 때는 어린이나 노약자의 손이 닿지
않는 곳에 보관해야 합니다.
충전 임팩트 렌치의 주의사항
1. 작업 중 나사가 숨겨진 배선에 접촉할 경우를 대비하여
절연된 손잡이로 전동 공구를 잡으십시오. “전류가
흐르는” 전선과 공구의 “전류가 흐르는” 노출된
금속이 닿으면 작업자가 감전될 수 있습니다.
2. 볼트와 너트를 조이고 푸는 휴대용 공구입니다. 볼트와
너트를 조이고 푸는 데만 사용합니다.
3. 장시간 사용할 경우에는 귀마개를 착용하십시오.
4. 한 손으로 사용은 매우 위험하므로, 사용할 때는
양손으로 꽉 잡으십시오.
5. 소켓의 균열 또는 파손 여부를 점검하십시오.
파손 또는 균열이 생긴 소켓은 위험합니다. 사용하기
전에 소켓을 점검하십시오.
6. 소켓을 소켓 핀과 링으로 고정하십시오.
소켓을 고정하는 소켓 핀이나 링이 손상되면 소켓이
임팩트 렌치에서 빠져 아주 위험할 수 있습니다. 변형,
마모, 균열, 다른 손상이 발생한 소켓 핀이나 링은
사용하지 마십시오. 소켓 핀과 링은 항상 정확한 위치에
장착하십시오.
7. 조임 토크 점검
볼트에 적절한 조임 토크는 볼트의 재질, 치수, 등급에
따라 달라집니다.
또한 이 임팩트 렌치에서 생성되는 조임 토크는 볼트의
재질과 치수, 임팩트 렌치를 부착된 소켓으로 타격하는
시간 등에 따라 달라집니다.
또한 토크는 배터리의 완충 및 방전 상태에 따라 차이가
있습니다. 볼트가 적절한 토크로 조여졌는지를 점검할
때는 토크 렌치를 사용하십시오.
8. 회전 방향을 전환하기 전에 임팩트 렌치를 멈추십시오.
회전 방향을 전환하기 전에는 항상 트리거 스위치에서
손을 떼고 임팩트 렌치가 멈출 때까지 기다리십시오.
9. 절대로 회전하는 부분을 만지지 마십시오.
회전하는 소켓 부분은 손이나 신체의 다른 부분에서
멀리 두십시오. 회전하는 소켓에 감기거나 말려들 수
있습니다. 또한 장시간 연속 사용한 후에는 소켓을
만지지 않도록 주의하십시오. 소켓을 매우 뜨거우므로
화상을 입을 수 있습니다.
10. 유니버셜 조인트를 사용할 때는 절대로 무부하 상태에서
임팩트 렌치를 회전시키지 마십시오.
무부하 상태에서 소켓을 회전시키면 유니버셜 조인트가
소켓을 격렬하게 회전시킵니다. 따라서 다치거나 소켓
움직임으로 임팩트 렌치가 흔들려 임팩트 렌치를
떨어뜨릴 수 있습니다.
11. 배터리는 항상 0~40℃의 온도에서 충전하십시오.
0~40℃를 벗어난 온도에서 배터리를 충전하면 적절한
충전이 이루어지지 않고 배터리 수명이 단축될 수
있습니다.
가장 적절한 충전 온도는 20~25℃입니다.
12. 한 번 충전이 끝나면, 다음 충전 때까지 15분 정도
기다리십시오.
13. 재충전 배터리와 충전기의 연결 구멍에 이물질이
들어가지 않도록 하십시오.
14. 재충전 배터리 및 충전기는 절대로 분해하지 마십시오.
15. 절대 재충전 배터리를 쇼트시키지 마십시오.
배터리가 쇼트되면 과전류 및 과열이 발생합니다. 과전류
및 과열이 발생하면 배터리가 타거나 망가집니다.
16. 배터리를 불 속에 버리지 마십시오.
배터리가 타면 폭발할 수 있습니다.
17. 충전기의 통풍구에 이물질을 넣지 마십시오.
금속성 물질이나 가연성 물질을 충전기의 통풍구로
넣으면 감전되거나 충전기가 망가질 수 있습니다.
18. 사용 중 배터리의 수명이 짧아지면 배터리를 구매처로
가져가십시오. 소모된 배터리를 버리지 마십시오.
19. 소모된 배터리를 사용하면 충전기가 망가질 수
있습니다.
리튬-이온 배터리에 대한 주의사항
수명을 연장하기 위해서 리튬-이온 배터리에는 출력을
중지시키기 위한 보호 기능이 탑재되어 있습니다.
아래에서 설명한 1에서 3의 경우에, 이 제품을 사용할
때, 스위치를 잡아당기고 있을 때조차, 모터가 정지할 수
있습니다. 이것은 문제는 아니지만 보호 기능의 결과입니다.
1. 남은 배터리 전원이 모두 소모되면, 모터가 정지합니다.
그러한 경우 즉시 충전하십시오.
2. 공구에 과부하가 발생하면 모터가 정지할 수 있습니다.
이러한 경우 공구의 스위치를 놓은 후 과부하의 원인을
제거하십시오. 그런 다음 공구를 다시 사용할 수
있습니다.
3. 배터리가 과부하 작업으로 인해 과열된 경우 배터리
전원이 정지할 수 있습니다.
이러한 경우 배터리 사용을 중지하고 배터리를
냉각시키십시오. 그런 다음 공구를 다시 사용할 수
있습니다.
또한 다음 경과 및 주의사항에 주의하십시오.
경고
배터리 누액, 발열, 연기 배출, 폭발 및 점화를 사전에
방지하려면, 다음 주의사항에 주의하십시오.
1. 부스러기와 먼지가 배터리에 뭉쳐 있지 않은지
확인하십시오.
○ 작업 중에 부스러기와 먼지가 배터리에 떨어지지 않는지
확인하십시오.
○ 작업 중에 전동 툴에 떨어지는 부스러기와 먼지가
배터리에 뭉쳐 있지 않는지 확인하십시오.
○ 부스러기와 먼지에 노출된 위치에 미사용 배터리를
보관하지 마십시오.
○ 배터리를 보관하기 전에, 배터리에 붙을 수 있는
부스러기와 먼지를 모두 제거하고 배터리를 금속 부품
(나사, 못 등)과 함께 보관하지 마십시오.
2. 못과 같은 날카로운 물체로 배터리에 구멍을 내거나,
배터리를 망치로 두들기거나, 밟거나, 던지거나
배터리에 심한 물리적 충격을 가하지 마십시오.
000BookWR18DSHLAra.indb18000BookWR18DSHLAra.indb18 2012/07/169:21:002012/07/169:21:00

19
한국어
사양
전동 툴
모델 WR18DSHL
전압 18 V
무부하 속도 1500 /
분
용량 일반 볼트 M12 - M22
고강도 볼트 M12 - M16
조임 토크 (최대) 480 N·m
충전식 배터리 BSL1830: 리튬 이온 18 V (3.0 Ah 10 셀)
중량 3.4 kg
충전기
모델 UC18YRSL
충전 전압 14.4V - 18 V
중량 0.6 kg
기본 부속품
주 장치(1) 이외에 패키지에는 아래 표에 열거된 부속품이
들어 있습니다.
WR18DSHL
(2LSRK)
1 충전기 ......................................1
2 배터리 ......................................2
3 플라스틱 케이스 ...........................1
4 배터리 커버 ................................1
WR18DSHL
(NN)
충전기, 배터리, 플라스틱 케이스, 배터리
커버 별도
기본 부속품은 예고 없이 변경됩니다.
3. 손상되거나 변형된 듯한 배터리는 사용하지 마십시오.
4. 배터리의 음극과 양극을 반대로 맞춰 사용하지
마십시오.
5. 배터리를 전기 콘센트 또는 차량 시가 라이터 소켓에
직접 연결하지 마십시오.
6. 배터리를 지정된 목적 이외의 목적으로 사용하지
마십시오.
7. 지정된 충전 시간이 경과했는데도 배터리 충전이
완료되지 않을 경우 충전을 즉시 중지하십시오.
8. 배터리를 전자 레인지, 드라이어 또는 고압 용기 등과
같은 고온 또는 고압 기기에 넣거나 고온 또는 고압에
노출시키지 마십시오.
9. 누액 또는 악취가 감지되는 즉시 불에서 멀리
떨어지십시오.
10. 강력한 정전기가 발생하는 곳에서는 사용하지 마십시오.
11. 사용, 충전 또는 보관 중에 배터리 누액, 악취, 발열,
변색 또는 변형이 있을 경우, 또는 어떤 식으로든
비정상으로 보일 경우, 배터리를 즉시 장치 또는 배터리
충전기에서 제거한 후 사용을 중지하십시오.
주의
1. 배터리 누액이 눈에 들어갈 경우 눈을 비비지 말고
수돗물과 같은 깨끗한 물로 잘 닦은 후 즉시 의사의
진찰을 받으십시오.치료하지 않을 경우 액체가 시력
문제를 유발할 수 있습니다.
2. 액체가 피부나 옷에 묻을 경우, 즉시 수돗물과 같은
깨끗한 물로 잘 닦으십시오.
피부에 염증이 발생할 가능성이 있습니다.
3. 배터리를 처음 사용할 때 녹, 악취, 과열, 변색, 변형 및/
또는 기타의 문제가 발견될 경우, 사용하지 말고 공급자
또는 벤더에게 반품하십시오.
경고
전도성 물체가 리튬이온 배터리에 들어갈 경우 배터리는
쇼트가 되어 불이 날 수도 있습니다. 리튬이온 배터리를
보관할 때에는 아래의 원칙을 따라주세요.
○ 전도성 금속조각이나 못, 철선, 동선, 기타 와이어 등을
케이스에 같이 넣지 마십시오.
○ 쇼트를 방지하기 위해서는 배터리를 공구에 장착해
두시거나 통기구가 안 보이게 배터리 커버로 잘
덮어주세요. (그림 1 참조)
옵션 부속품 (별매품)
1. 배터리 (BSL1830)
옵션 액세서리는 예고 없이 변경될 수 있습니다.
용도
볼트 너트의 조이기 및 풀기
배터리 제거/설치
1. 배터리 제거
핸들을 세게 잡고 배터리 래치를 밀어 배터리를
제거하십시오 (그림 2 참조).
주의
배터리를 절대로 단락시키지 마십시오.
2. 배터리 설치
배터리를 음극과 양극을 확인하여 삽입하십시오 (그림 2
참조).
000BookWR18DSHLAra.indb19000BookWR18DSHLAra.indb19 2012/07/169:21:002012/07/169:21:00

20
한국어
충전
드라이버 드릴을 사용하기 전에 배터리를 다음과 같이
충전하십시오.
1. 충전기의 전원 코드를 콘센트에 연결하십시오.
전원 코드를 연결하면 충전기의 파일럿 램프가
빨간색으로 깜박입니다. (1초 간격으로)
2. 배터리를 충전기에 삽입하십시오.
배터리를 라인이 보일 때까지 충전기에 단단히
삽입하십시오(그림 3, 4 참조)
3. 충전
충전 배터리를 충전기에 삽입하면, 충전이 시작되고
파일럿 램프가 빨간색으로 계속 켜져 있습니다.
배터리가 만충전되면, 파일럿 램프가 빨간색으로
깜박입니다. (1초 간격으로) (표 1 참조)
(1) 파일럿 램프 점등 상태
파일럿 램프의 점등 상태는 충전기 또는 충전식 배터리의
상태에 따라 표 1에 나와 있는 것과 같이 표시됩니다.
표 1
파일럿 램프의 점등 상태
파일럿 램프는
빨간색으로
켜져 있거나
깜박입니다.
충전 전 깜박임
0.5초 동안 켜집니다. 0.5초 동안 켜지지
않습니다. (0.5초 동안 꺼짐)
충전 중 켜짐 계속 켜짐
충전 완료 깜박임
0.5초 동안 켜집니다. 0.5초 동안 켜지지
않습니다. (0.5초 동안 꺼짐)
충전 불가능 깜박임
0.1초 동안 켜집니다. 0.1초 동안 켜지지
않습니다. (0.1초 동안 꺼짐) 배터리 또는 충전기의 고장
파일럿 램프가
녹색으로
켜집니다.
과열 대기 켜짐 계속 켜짐
배터리 과열.
충전 불가능.
(배터리가 냉각되면 충전이
시작됨)
(2) 충전식 배터리의 온도에 대하여
충전식 배터리의 온도는 표 2에 나와 있는 것과 같으며,
과열된 배터리는 충전 전에 잠시 냉각시켜야 합니다.
표 2 배터리 충전 범위
충전식 배터리 배터리를 충전할 수 있는 온도
BSL1830 0°C - 50°C
(3) 충전 시간에 대하여
충전기와 배터리의 조합에 따라 충전 시간은 표 3에
나와 있는 것과 같이 됩니다.
표 3 충전 시간 (20°C일 때)
충전기
배터리 UC18YRSL
BSL1830
약
45
분
참고:
충전 시간은 온도와 전원 전압에 따라 다를 수 있습니다.
4. 충전기 전원 코드를 전원 콘센트에서 분리
5. 충전기를 단단히 쥐고 배터리를 제거
참고:
충전 후 먼저 배터리를 충전기에서 빼고 나서 배터리를
올바르게 보관하십시오.
새 배터리 등의 방전에 대하여
새 배터리와 오랫동안 사용하지 않은 배터리에 들어
있는 화학물질은 활성화되어 있지 않기 때문에, 이러한
배터리들을 첫 번째와 두 번째 사용할 때 방전이 낮을 수
있습니다. 이것은 일시적 현상이며 배터리를 2 - 3회
충전하면 충전에 필요한 정상적 시간이 복원됩니다.
배터리 수명 연장 방법
(1) 배터리를 완전히 방전되기 전에 충전하십시오.
툴의 출력이 점점 약해진다고 느낄 경우, 툴 사용을
멈추고 배터리를 충전하십시오. 툴을 계속 사용하고
전류가 모두 사용된 경우, 배터리가 손상될 수 있고
배터리 수명이 더 짧아집니다.
(2) 고온에서 충전하지 마십시오.
충전식 배터리는 사용 직후 뜨거워집니다.
그러한 배터리를 사용 직후 충전하면 내부에 들어
있는 화학물질이 열화되고 배터리 수명이 줄어듭니다.
배터리를 한 동안 냉각시킨 후 충전하십시오.
주의:
○ 배터리 충전기가 연속적으로 사용된 경우, 배터리
충전기가 가열되어 고장의 원인이 될 수 있습니다. 일단
충전이 완료되면 15분 쉬었다가 충전하십시오.
○ 배터리 사용 또는 햇빛 노출로 인해서 배터리가 따뜻할
때 배터리를 충전할 경우, 파일럿 램프가 녹색으로 켜질
수 있습니다.
배터리는 충전되지 않습니다. 그러한 경우, 배터리를
냉각시킨 후 충전하십시오.
○ 파일럿 램프가 빨간색으로 깜박일 경우(0.2초
간격으로), 충전기 배터리 설치 구멍에 이물질이 있는지
확인해 이물질을 모두 제거하십시오. 이물질이 없을
경우, 배터리 또는 충전기가 오작동 상태일 가능성이
있습니다. 공인 서비스 센터에 가져가십시오.
사용전 주의사항
1. 작업환경을 정리하고 점검하기
위의 주의사항에 작업환경이 적절한지 점검하십시오.
2 배터리의 확인
배터리가 단단하게 장착되었는지 확인하십시오.
배터리가 헐거우면 사용 중 빠져서 사고로 이어질 수
있습니다.
000BookWR18DSHLAra.indb20000BookWR18DSHLAra.indb20 2012/07/169:21:002012/07/169:21:00
Table of contents
Languages:
Other Hitachi Power Tools manuals

Hitachi
Hitachi M 12VC Manual

Hitachi
Hitachi C 6DC2 User manual

Hitachi
Hitachi CV 350V Operator's manual

Hitachi
Hitachi H 65SD2 Troubleshooting guide

Hitachi
Hitachi H 60MC User manual

Hitachi
Hitachi H 25PV User manual

Hitachi
Hitachi NV 65AF3 Manual

Hitachi
Hitachi TR-12 User manual

Hitachi
Hitachi RH 650V User manual

Hitachi
Hitachi C 6DC2 User manual

Hitachi
Hitachi SJ300-EL Series User manual

Hitachi
Hitachi SAY-150A User manual

Hitachi
Hitachi M 12SC User manual

Hitachi
Hitachi NV90AB User manual

Hitachi
Hitachi nv90ag User manual

Hitachi
Hitachi DH 40FR Manual

Hitachi
Hitachi CE 18DSL User manual

Hitachi
Hitachi G 18SR Manual

Hitachi
Hitachi CV 350V User manual

Hitachi
Hitachi H 60MC User manual