HiWeigh X2-BMI User manual


!
3!
Introduction
4
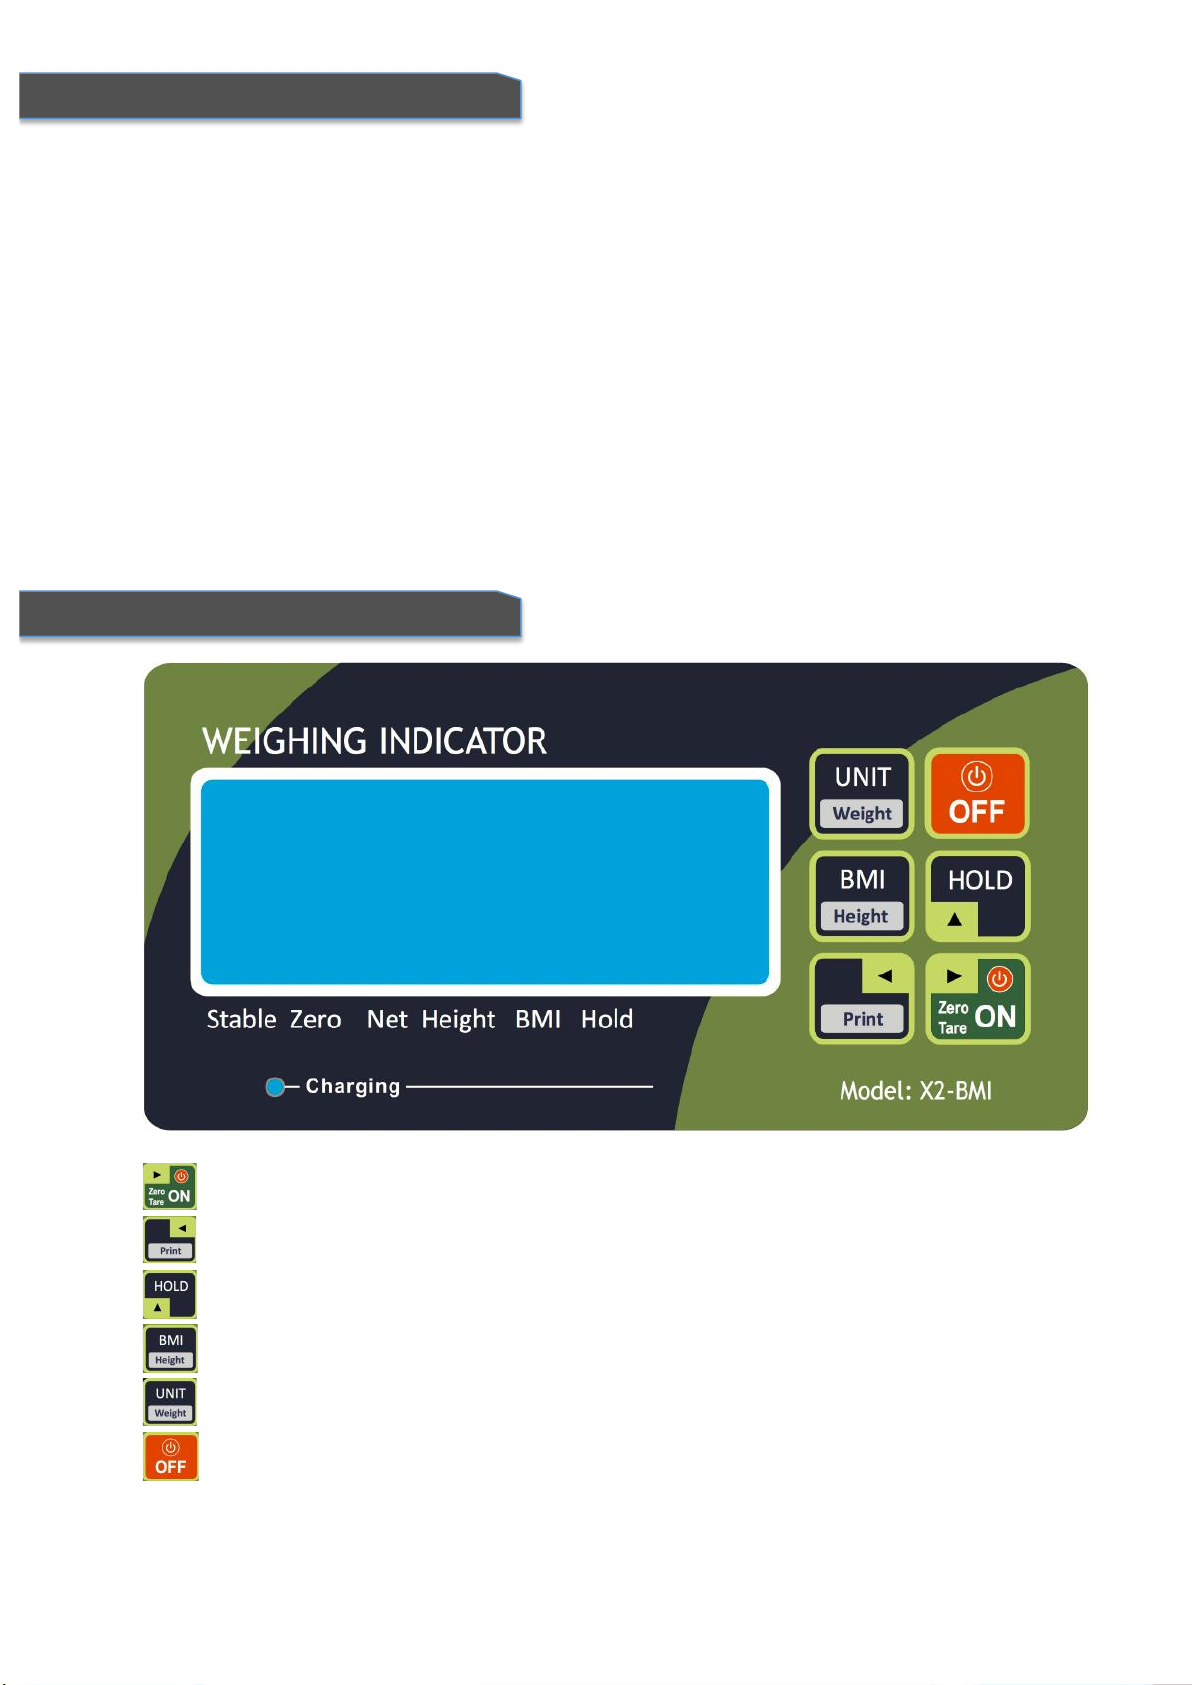
Keyboard Functions
4
Technical Description
5
Connecting to load cell
Connecting to RS232
Standard Operations
5
On/Off
Zero/Tare
Net/Gross weighing
Accumulating
Accumulating recall and clear
Connecting to RS232
Connecting to load cell
Unit exchange
Further Operations (User Setting)
6
Internal A/D value
Hi/Lo/Ok checkweigh function
Auto power off
Backlight
Hold function (animal weighing)
RS232 set (optional)
Weighing speed
Zero track
Gravity adjusting
Guarantee
10
INDEX
!
4!
1. INTRODUCTION
2. KEYBOARD FUNCTIONS
•Max. A/D sampling speed: 120 times / second.
•Display resolution: from 1/3000 up to 1/15000
•Maximum A/D converting: 24bit
•Sensitivity: 0.6mv/V – 3mV/V
•Excitation voltage: DC 5V; up to 4 load cells 350 Ω, 8 load cells 700 Ω.
•Weight unit: Kg/Lb/Oz/Gr/Ton
•Communication interface: Optional RS232
•Rate continuous ASCII data output: 1200 / 2400 / 4800 / 9600 Baud.
•External power supply: 100-240V AC – 9V500mA
•Operating temperature: -10ºC-40ºC
•Storage temperature: -25ºC-55ºC.Introduction
•Relative humidity: ≤80 % non-condensing.
•Display: 23mm digits with backlight
•Rechargeable battery and operating life
6V1.2Ah 40hrs
•Housing material: ABS
•Dimensions: 220mm(L) x 130mm(H) x 55 mm(W)
•Approximated weight: 1.8Kg
Switch on / Zero/Tare / Move right (parameter setting) ON/T in the manual
Print/ Move left PRINT in the manual
Hold / Increasing digits HOLD in the manual
Height input/BMI calculation BMI in the manual
Unit Exchange / Return to weighing mode UNIT in the manual
Switch off OFF in the manual
!
5!
3. TECHNICAL DESCRIPTION
4. STANDARD OPERATIONS
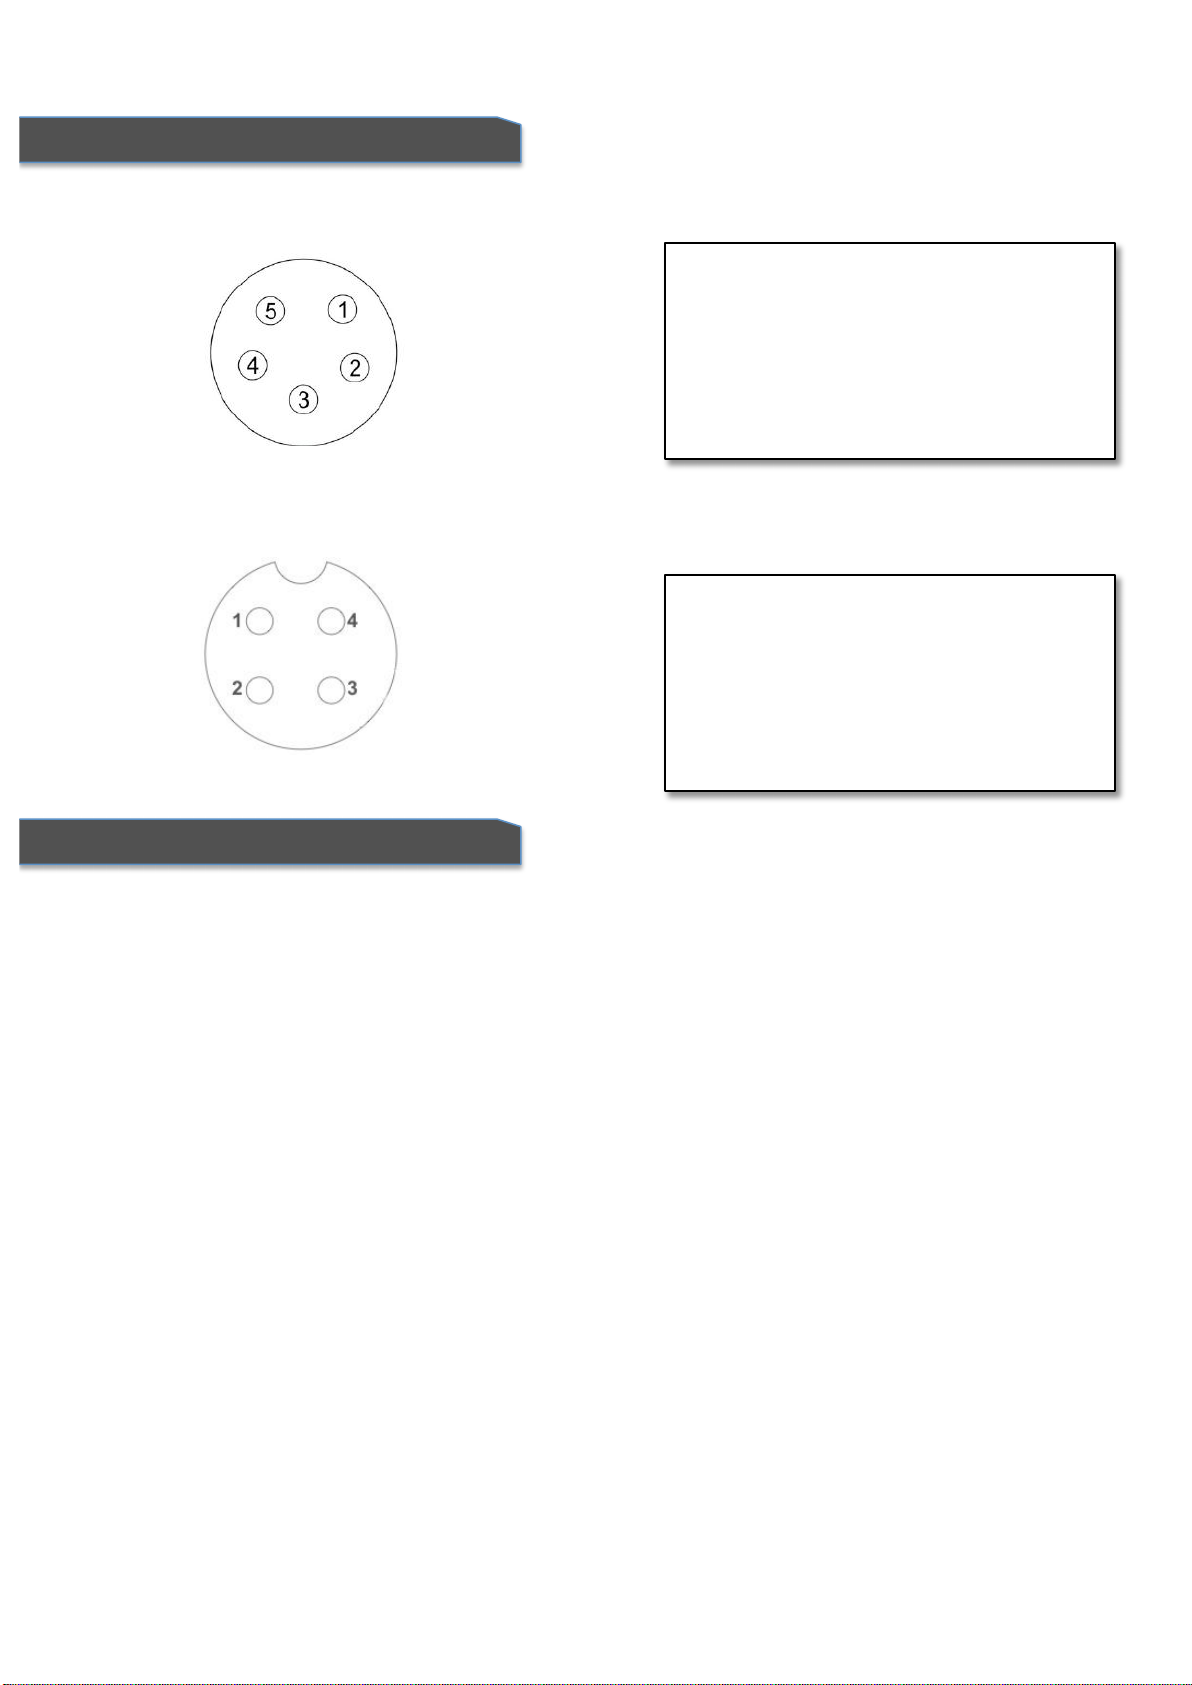
3.1 Connection of the load cell to indicator
3.2 Connection of RS232 to PC or Printer (optional)
Make sure the equipment connected correctly and parameters set well, and also the scale has already been
calibrated correctly.
Configuration and Calibration - Refer to TECHNICAL MANUAL
!Do not modify it by yourself; consult our distributor or your local authorized metrology worker, wrong
operation may cause the problem or wrong performance of the scale.
4.1 Switch on and switch off
Press ON/T to turn on the indicator
Press OFF for 2 seconds to turn off the indicator
4.2 Zero/Tare
4.2.1 If the display is not 0 after power on, pressON/T to zero the scale (<2%F.S.)
4.2.2 Weighing with the container, put the container on the scale (>2%F.S.) and pressON/T to make a
tare and get subtract of the weight of the container.
4.2.3 Remove the tare: remove the container and press ON/T to clear the tare value and zero the scale.
4.3 BMI Check
When the weight is stable, press BMI key to input the height value (on kg unit, it’s in the unit of cm, on lb
unit display, the height unit is feet and inch), after the height input, press BMI key again to get the BMI
index.
* When it display the BMI value, if you want to back to the weight display, please press
UNIT
key
INDICATOR LOAD CELL
+E (1) ------------- +Excitation
-E (2) ------------- -Excitation
+S (3) ------------- +Signal
-S (4) ------------- -Signal
GND (5) ------------- (GND) shield
INDICATOR PC/PRINTER
1---------------- TX
2 ---------------- SC
3---------------- GND
4 ---------------- SC

!
6!
5. FURTHER OPERATIONS
4.5 Manual Hold
When the weight is stable, press HOLD key to lock the weight and press it again to unlock.
4.6 Print
If the printer connected or PC connected, press PRINT to print the receipt or send data to computer,
and the format as below:
TICKET NO.: 00005
G.W: 78.5kg
T.W: 2.0kg
N.W: 76.5kg
H: 180cm
BMI: 23.6
4.7 Units Exchange
Press UNIT to exchange the weight units
Units set (kg/lb as default) - Refer to TECHNICAL MANUAL
Press BMI key andON/T at the same time, it will display UF - 1 , press ON/T or PRINT to
shift it from UF - 1 to UF - 9 , press BMI to enter and configure it.
5.1 Internal A/D Value and Battery Volume
UF - 1
Press BMI to view the internal A/D value of the scale
Press BMI again to display the voltage of the battery.
Press BMI again to change for next set or press UNIT to quit and back to normal weighing mode
5.2 Hi/Lo/Ok Checkweigh Function
* You can set a ideal weight as you want to achieve and the indicator will beeps if the weight above or low
than the weight you want.
UF – 2 Press ON/T PRINT HOLD to move and change the digits.
Press BMI to set the Lo value (the lower limitation) – 000.00L
Press BMI to set the Hi value (the top limitation) – 000.00h
Press BMI to change the working mode of buzzer of Hi/Lo/Ok – o 000
Remark
o 0 0 0
o A B C
A=0 Stable but no need to buzz
A=1 Stable to buzz
B no function, keep it as default and no change
C=0 Buzzer off
C=1 It beeps when the weight is ok (Lo<weight<Hi)
C=1 It beeps when the weight is out of limitation (Lo>weight or weight>Hi)

!
7!
5.3 Auto Power Off
UF – 3 Press ON/T PRINT HOLD to move and change the digits.
Press BMI to enter the set of automatic off function– AoFF 00
00 Auto off deactivated
01-99 Auto off activated in 01-99 minutes, you can change it from 01 minute to 99 minutes
5.4 Backlight
UF – 4 PressHOLD to change the digits.
Press BMI to enter the set of backlight function– Lit A
A Automatic
ON Backlight On
OFF Backlight Off
5.5 Auto Hold Function
UF – 5 PressHOLD to change the digits.
Press BMI to enter the set of backlight function– hoLd 0
0 Deactivated
1Animal weighing (refer to below remark)
2Peak hold (press any key to exit except forBMI key)
3Stable hold (press any key to exit except forBMI key)
4Stable hold (exit automatically when the weight is removed)
Remark
When choose hold = 1, it need to set the following two parameters
1. PCt xxx the number is from 001-100, the bigger number means the more accurate weight, but the
weighing time is longer, the smaller number means fast weighing (shorter stabilizing time) but not so
accurate result, it can be chosen depends on the weighing condition of the scale.
2. TinE xthe number it can repeat during the range of hold, it can choose 1/2/4/8/16/32/64
5.6 RS232 Interface (Optional)
UF – 6 PressHOLD to change the digits.
Press BMI to enter the set of RS232 format– 232 0
Format 1
Format 2
232 1
Stable Output
232 4
Stable Output
232 2
Stream Output
232 5
Stream Output
232 3
Keyboard (BMI Key) Output
232 6
Keyboard (BMI Key) Output
Format 3
Format 4
232 7
Accumulated Output
232 9
Accumulated Output
232 8
Auto-Accumulation Output
232 10
Auto-Accumulation Output

!
8!
Format 1 2 3 4
Communication Protocol
UART signal of EIA-RS232 C
Data Format
1. Baud Rate : 2400 / 4800 / 9600/19200/38400 BPS
2. Data Bit : 8 BITS
3. Parity Bit : None
4. Stop Bit : 1 BIT
Start Bit Data Bit Stop Bit
Format 1(232 1 ~ 3 ) :
HEAD1 ( 2 BYTES )
HEAD2 ( 2 BYTES )
OL -Overload
ST -Stable
NT -Net Weight
US -Unstable
GS -Gross Weight
Fixed 18 BYTES ASCII (kg g t lb)
1
2
1
1
2
1
1
2
3
4
5
6
7
8
1
2
1
2
HEAD1 HEAD2 DATA UNIT CR LF
Fixed 21 BYTES ASCII (tl.T lboz)
1
2
1
1
2
1
1
2
3
4
5
6
7
8
9
1
2
3
4
1
2
HEAD1 HEAD2 DATA UNIT CR LF
Fixed 19 BYTES ASCII (pcs)
1
2
1
1
2
1
1
2
3
4
5
6
7
8
1
2
3
1
2
HEAD1 HEAD2 DATA UNIT CR LF
Output examples :
1. Example +0.876 kg Stable net weight :
S
T
,
N
T
,
+
0
0
0
.
8
7
6
k
g
0D
0A
2. Example -1.568 lb unstable gross weight :
U
S
,
G
S
,
-
0
0
1
.
5
6
8
l
b
0D
0A
3. Example + 1.15.40 Taiwan Jin Stable net weight :
S
T
,
N
T
,
+
0
1
1
5
4
0
t
l
T
0D
0A
4. Example -20. 5.40 lb oz unstable gross weight :
S
T
,
G
S
,
-
1
0
0
5
4
0
l
b
o
z
0D
0A

!
9!
5. Example +1000 pcs stable net weight :
S
T
,
N
T
,
+
0
0
0
1
0
0
0
p
c
s
0D
0A
Format 2 (232 4 ~ 6) :
Fixed 12 BYTES ASCII (kg g t lb)
1
2
3
4
5
6
7
8
1
2
1
2
DATA UNIT CR LF
Fixed 15 BYTES ASCII (tl.T lboz)
1
2
3
4
5
6
7
8
9
1
2
3
4
1
2
DATA UNIT CR LF
Fixed 13 BYTES ASCII (pcs)
1
2
3
4
5
6
7
8
1
2
3
1
2
DATA UNIT CR LF
Output examples :
1. Example +0.876 kg stable net weight :
+
0
0
0
.
8
7
6
k
g
0D
0A
2. Example -1.568 lb unstable gross weight :
-
0
0
1
.
5
6
8
l
b
0D
0A
3. Example + 1.15.40 Taiwan Jin Stable net weight :
+
0
1
1
5
4
0
t
l
T
0D
0A
4. Example -20. 5.40 lb oz unstable gross weight :
-
1
0
0
5
4
0
l
b
o
z
0D
0A
5. Example +1000 pcs stable net weight :
+
0
0
0
1
0
0
0
p
c
s
0D
0A
※Factory default : 232 0 - RS232 OFF
Format 3(232 7-8) :
Printing Output
S/N WT/Kg
0001 85.5
0002 75.2
--------------
0002 160.7

!
10!
7. GUARANTEE
Format 4(232 9-10) :
Printing Output
TICKET NO.: 00005
G.W: 78.5kg
T.W: 2.0kg
N.W: 76.5kg
H: 180cm
BMI: 23.6
5.7 Weighing Speed
UF – 7 PressHOLD to change the digits.
Press BMI to enter the set of weighing speed -SPEEd 3
1Standard speed (normal speed)
2Fast response
3Slow response
* the faster response, the more time for stability, the more slow speed, the shorter time for stability
5.8 Zero Track
UF – 8 PressHOLD to change the digits.
Press BMI to enter the set of weighing speed -ZP 1
1= 1e
2= 2e
3= 3e
4= 4e
5= 5e
* Example: for 1e zero track (if e=20g), the scale will show 0 until it’s more than 20g (1e).
5.9 Gravity Adjusting
UF – 9 Press ON/T PRINT HOLD to move and change the digits
Press BMI to enter the set of local gravity and change it accordingly-9.79414
This scale has a warranty against all manufacture and material defects, for a period of a year starting with
the delivery date. During this period, we will be in charge of the repairing of the scale. This warranty does
not include the damages done by overload or wrong use. The warranty does not cover the delivery expenses
necessary for the repair of the scale.
* The rechargeable battery is not within the range of guarantee period

Table of contents
Other HiWeigh Measuring Instrument manuals

Popular Measuring Instrument manuals by other brands

Leutert
Leutert MSI-4 operating instructions

Innoquest
Innoquest SpotOn FM-15 product manual

LOVATO ELECTRIC
LOVATO ELECTRIC DMED301 instruction manual

EDS
EDS eSense EMS-100GSM installation manual

Medical Freezer
Medical Freezer GPRS operating manual

Geotech
Geotech ET Series Installation and operation manual

Downeaster
Downeaster Wind & Weather Medallion Series instruction manual

Alemite
Alemite 3644-C2 Use and installation manual

LI-COR
LI-COR TriSonica LI-560 manual

Proceq
Proceq hygropin Service Manual & Repair Guide

Quality Monitoring Instruments
Quality Monitoring Instruments QMI MULTIPLEX manual

Micromeritics
Micromeritics TriStar II 3020 Maintenance instructions


