HLF Italian Design 3600 User manual

3600 Cleaning Guide v27 Page
Failure to clean your machine properly will invalidate your warranty in the event of a breakdown.
1
3600 Bean to Cup Coffee Machine
Welcome
Thank you for your purchase of the 3600, please follow this guide to ensure that you
get the maximum usage and efciency from your machine for many years to come.
In addition to the training you received upon installation, please also read the
guidelines given in this document with regard to the cleaning procedures for your
machine.
We cannot stress enough the importance of cleaning the machine correctly and on a
daily basis in order to ensure it’s continuing performance and efciency. It is a fact that
95% of the breakdown calls we receive are due to improper or lack of regular cleaning.
If you have any queries/problems with anything in this guide, please call our helpdesk on 0845 4500 498
General guide lines
C A U T I O N - Drip Tray Full
Carefully remove the drip tray and empty, this is a good time to give it a quick rinse.
Replace and the caution will clear.
C A U T I O N - Grounds Drawer
Open the door and remove and empty the grounds draw. Replace the grounds draw, then press
the top red button inside the door labled cleaning, this will reset the grounds counter and clear the
caution.
Caution - Water Empty
The water tank is empty. Rell the tank and replace it. The machine will now say “Select a Drink”
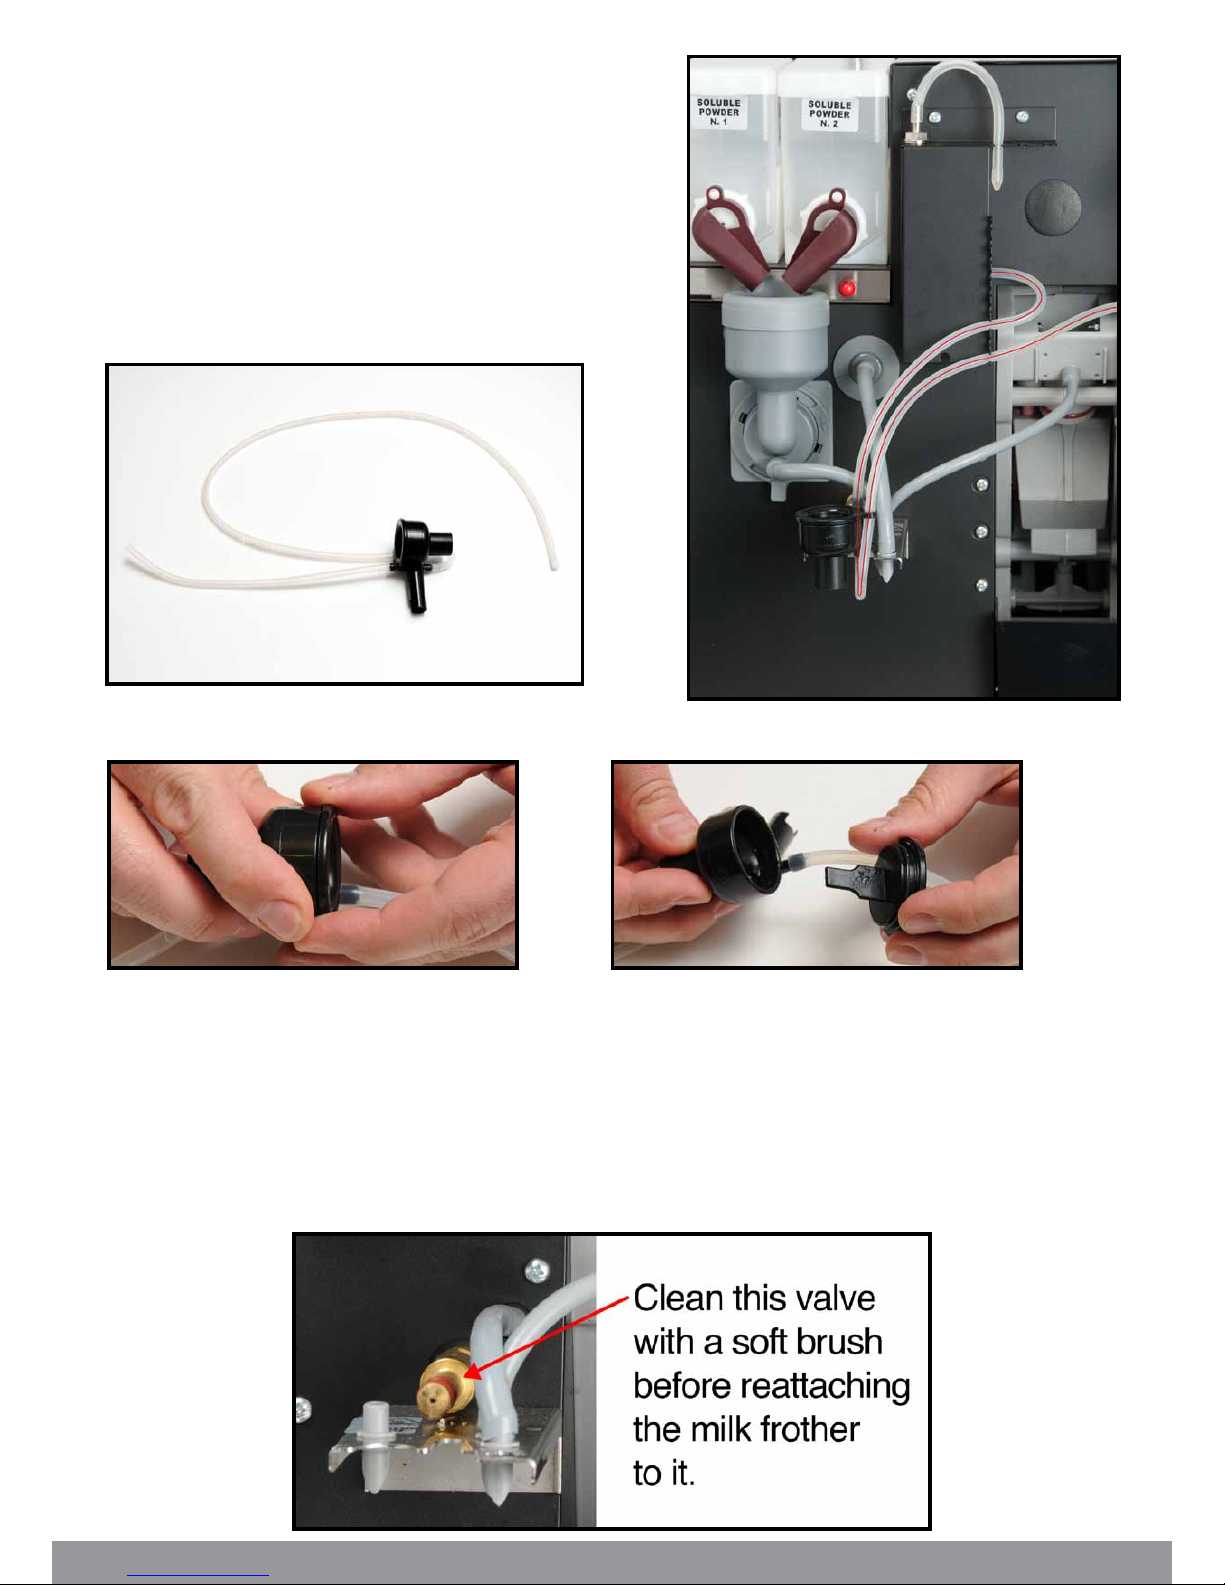
Caution - Fill Water Tank
The water tank is empty. Rell the tank, open door and press red cleaning button to reset the
machine. When the machine has been reset it will then it will ask “HOLD RED BUTTON” Open the
front door and press the red cleaning button for a 5 seconds. The machine will then say “POWDERS
CLEANING” then “Put empty jug under drink nozz” then PRESS RED BUTTON. Place a container
under the drink outlet and then press the red cleaning button. The machine will dispense a small
amount of water and then the machine will be ready to use.
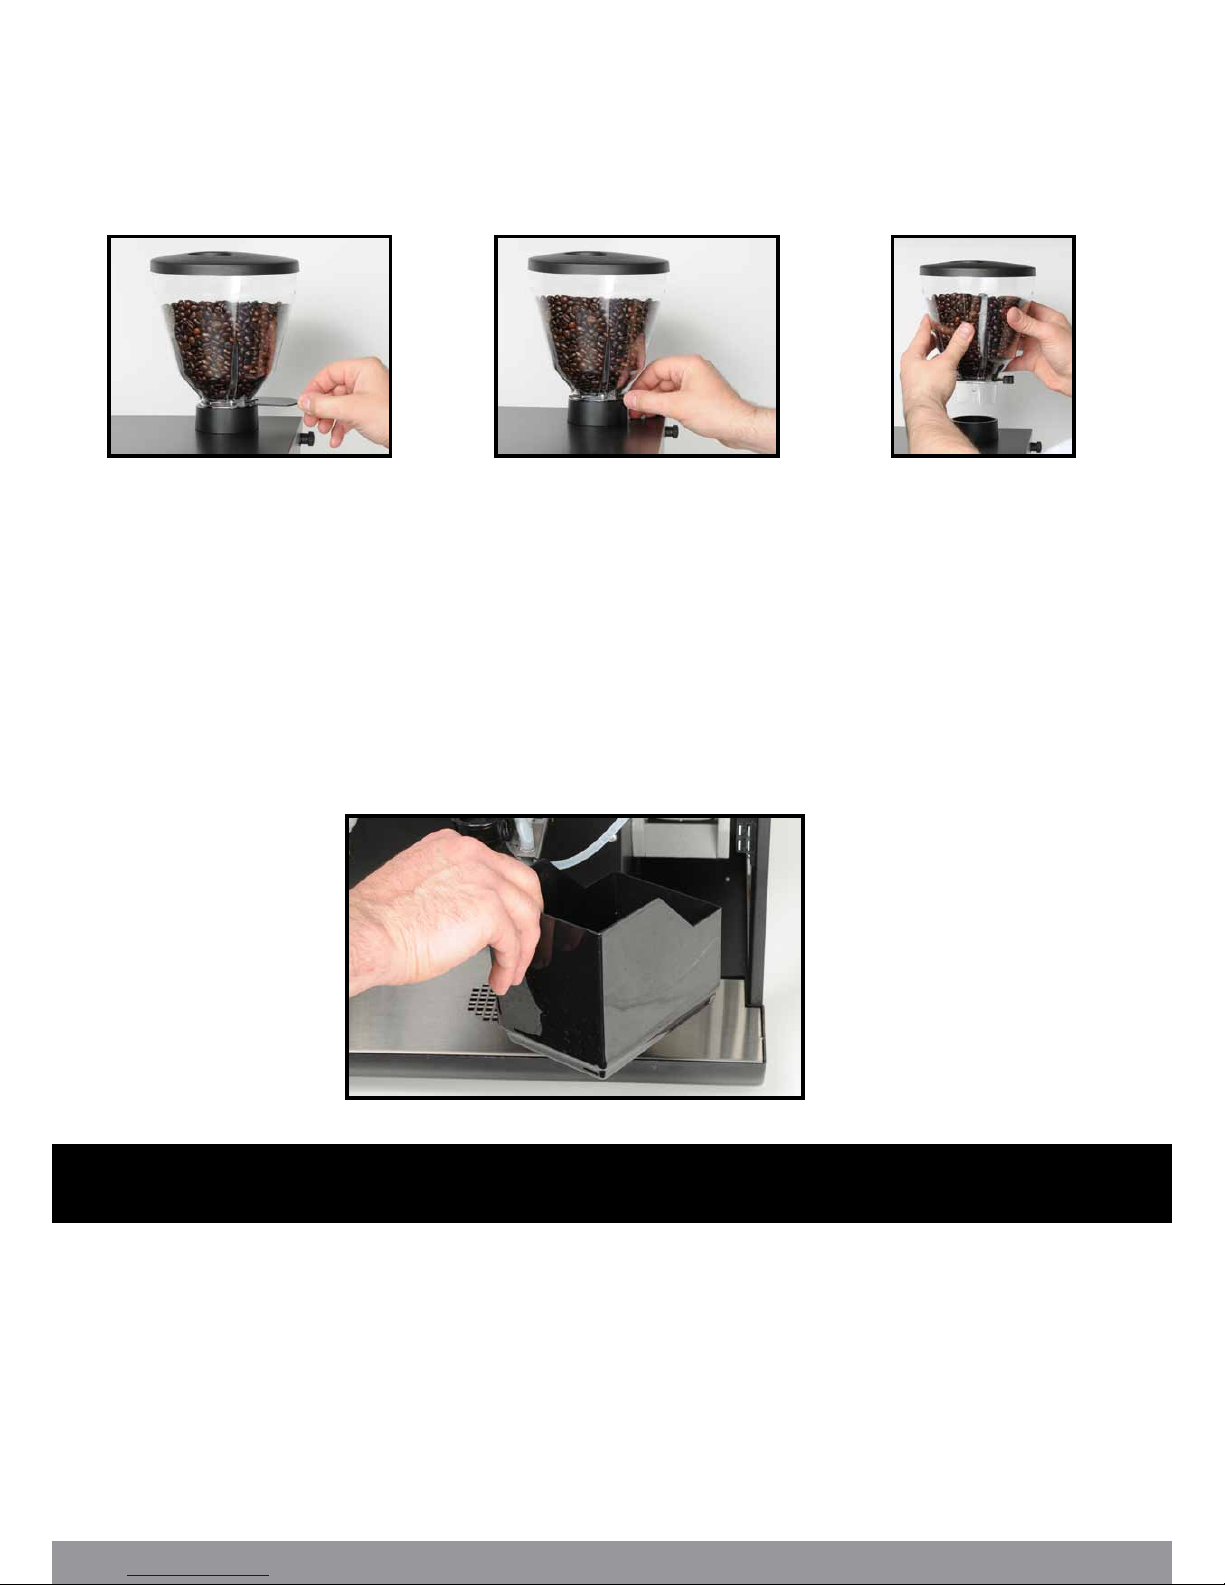
Caution – Out of Coffee
The machine is out of coffee beans, rell the coffee bean hopper, open the front door and press the
red cleaning button briey. The machine will reset and then will show “Select a Drink”

3600 Cleaning Guide v27 Page 2
3600 Cleaning Guide
CAUTION
Only use HLF approved cleaning products.
Only use non-corrosive, non-abrasive household cleaners.
Only use non-abrasive cloths.
Do not use any of the normal (rapid) decalcifying agents.
Do not use boiling water for the cleaning process.
Make sure that all tubes and components are properly back into their original position
before turning the unit back on.
Daily Cleaning (done at the end of the day - approx 5 mins)
Cappuccino clean
Open the front door and insert the door pin.
Press and hold the red cleaning button (inside the door at the top) for 5 seconds, the
display will show ‘
Cleaning cycle
’, then scroll through ‘Press key 1 for total cleaning’ -
‘Press 2 for powder cleaning’. Press key 1, then do the following steps:
1 - Place a empty container, minimum 2 litres, under the drink dispenser point. (The
drip tray can be removed to help t the container underneath if necessary.)
2 - Place the milk tube into a jug lled with 1 litre of Fresh cold water and a 50ml of
cappuccino cleaner.
3 - Press the red cleaning button.
Once nshed the machine will display cleaning cycle, rell the jug with fresh cold water
only and repeat steps 1-3 with out adding the cappuccino cleaner.
Finally remove the door pin and close the front door.
Cleaning Button

3600 Cleaning Guide v27 Page 3
Machine clean
Turn OFF the 3600 coffee machine.
Open the front door.
Shut off and remove the bean hopper. (If tted)
Open the machine lid.
Remove the water tank by lifting straight up.
Clean the water tank inside and out.
Thoroughly clean areas under the water tank using a cloth, hot water and detergent.
Dry thoroughly.
Remove the coffee grounds container and the drip tray and clean both with hot soapy
water.
DO NOT PUT ANY PART IN A DISHWASHER
Wipe the outside of the machine with a cloth and dry.
Replace the water tank, grounds draw and drip tray.
Close the lid rst then the door.
Replace and open the bean hopper - see above. (If tted)

3600 Cleaning Guide v27 Page 4
Remove and clean the milk frother
Turn OFF the 3600 coffee machine
Shut off and remove the bean hopper (If tted)
Open the front door and then the lid.
Remove the milk frother and it’s connected
tubes from the machine (Shown below and
highlighted in red on the right )
Open the milk frother as shown below.
Place the milk frother and tubes into a container lled with 1/2 litre of Fresh cold water
and a 50ml of cappuccino cleaner. Leave for 10 minutes.
Remove the frother and tubes from the cappuccino cleaner and rinse thoroughly with
warm water.
When nished, dry, re-assemble the milk frother and place back in its original position.
Close the lid rst then the front door.

3600 Cleaning Guide v27 Page 5
Remove and clean the mixing bowl
Start by disconnecting the pipe connected to the mixing bowl from where it meets the
drink dispenser.
Push the locking lever located at the bottom of the mixing bowl to the right. (Shown
right)
Carefully pull the mixing bowl away from the machine. (Shown bottom right)
Wash the mixing bowl in hot soapy water.
Dry thoroughly before replacing to ensure any instant drink powder doesn’t stick to it.
Replace the mixing bowl and lock in place by pushing the locking lever back the left.

3600 Cleaning Guide v27 Page 6
Machine Requested Cleaning (approx 30 mins)
N.B. The machine will request that the coffee group is cleaned after every 1000 cups.
Remove and clean the coffee group
The coffee group is located internally on the right side of the 3600 coffee machine. This
process needs to be carried out at the end of the day as it should be left over night.
Open front door.
Shut off and remove the bean hopper - see page 2 (If tted)
Remove both retaining bolts that secure the lid, these are located either side to the top
rear.
CAUTION
Turn OFF the 3600 coffee machine and disconnect from the mains electricity.
Lift the top lid off the machine, then remove the right hand side panel by sliding it up
then away.
N.B. The machine will request that the coffee group is cleaned after every 1000 cups*
*The coffee group may need cleaning earlier dependant on machine usage, coffee type used and humidity.
Coffee sticking and not dispensing correctly is a usual sign that the coffee group needs cleaning.

3600 Cleaning Guide v27 Page 7
Remove and clean the coffee group (Continued)
To remove the coffee group simply disconnect the hose attached to front of the coffee
group from the coffee dispenser, then turn each of the four levers from the 5 o’clock to
the 12 o’clock position and pull the group away from the machine.
The group needs to be submerged in hot water for 20 minutes, then thoroughly rinsed
to remove any coffee grounds.
The group then needs to be dried thoroughly before replacing, preferably left to dry
over night.
Once dry, work backwards through the steps to reassemble the machine.

3600 Cleaning Guide v27 Page 8
Descale Cleaning (When required - Approx 30 mins)
N.B. The message ‘descale/lter’ will appear when the machine requires a descale.
This is after 1000 drinks made.
This is only for machines with the internal water tank tted, not plumbed machines.
Descaling process
1 – Press and hold down button number 12 for 7 seconds; the machine will display
‘
descal. process
’.
2 – Shut off and remove the bean hopper; open the front door and insert the door pin;
then open the top lid.
3 – Remove the water tank; empty it; then ll with 700ml of cold water and add 3
descaling tablets; replace the tank back into the machine. The machine will also
display this message on screen.
4 – Place a minimum 1 litre jug under the drinks dispenser, again this will be displayed
on the screen.
5 – Press the red cleaning button to start the descale process, once again this will be
displayed on the screen.
6 - The screen will now display decalcifying time left and will start at 15 mins.
7 - Please wait 15 mins for the descaler to work, the machine will bleep once the 15
min period is complete and will also count down the minutes on the screen.
8 – The machine will now display ‘
descal. process
’ again.
9 – Remove the water tank, empty and rinse it thoroughly. Then rell with cold fresh
water and place back in the machine, this will also be displayed on the screen.
10 - Place a minimum 1 litre jug under the drinks dispenser, again this will be displayed
on the screen.
11 – Press the red cleaning button to start the rinse process.
12 – Once complete; empty the drip and grounds trays; rinse; dry and replace them.
13 – Remove the door pin, close the lid and front door, then replace and open the bean
CAUTION
The machine will request a descale when required.
This must be done within 48 hours of this being displayed.
After 48 hours the machine will not work until it has been descaled.

3600 Cleaning Guide v27 Page 9
Moving the machine (Mains water fed machines only)
Caution
Moving the machine without following these instructions will cause the machine to fail
and will require a chargeable engineer call out.
This must be followed even if moving the machine a small distance.
First make sure you have turned off the mains water and electricity supplies.
At the back of the machine below the water inlet there is a grey exhaust pipe with a
black plug in the end (right).
Place the end of the tube in a 300ml+ container and then remove the black plug
(below right).
Once fully drained replace the plug and clip the tube back in to its original position.
Do NOT turn the water and electricity back on until the machine has been moved to it’s
nal position.
Grey
exhaust
pipe
Black
plug
Table of contents
Other HLF Italian Design Coffee Maker manuals

HLF Italian Design
HLF Italian Design 1700 User manual

HLF Italian Design
HLF Italian Design 5500F User manual

HLF Italian Design
HLF Italian Design AROMA 4000 User manual

HLF Italian Design
HLF Italian Design 1700 User manual

HLF Italian Design
HLF Italian Design Aroma 4500 User manual

HLF Italian Design
HLF Italian Design 2700 Programming manual

HLF Italian Design
HLF Italian Design 2700 User manual

HLF Italian Design
HLF Italian Design 4600 G1 User manual

HLF Italian Design
HLF Italian Design 4500 MCG User manual

HLF Italian Design
HLF Italian Design HLF 4600 G1 User manual