HMC Trainer 5008 User manual

Note:
Before installaon and operaon, please read this operaon manual carefully and
save this manual for future reference.
te:
HARDCORE TRAINING

Safety Instrucons
Parts List
Hardware & Tool List
Overview Drawing
Assembly
How to Use
Warm Up
Trouble Shoot & Main Tenance
Contents
2
3
4
6
7
14
13
12

3
Read all the instrucons in this manual and do warm up exercises beforeusing this
equipment.
Before using this equipment, please consult your physician for a complete physical
examinaon. If you feel any discomfort while exercising, please stop immediately and
consult your doctor.
Before exercising and to avoid injuring your muscles, perform warm-up exercise for each
muscle group is highly recommended. Please refer to Warm Up secon of the Owner’s
Manual.
Keep the equipment indoors, away from moisture and dust. Place the equipment on a
level surface, with a mat beneath it to protect the floor or carpet. Make sure that there
is enough clearance around the equipment to mount, dismount, and use it.
Inspect and properly ghten all parts regularly. Replace any worn parts immediately.
Ensure that your fingers or clothing do not catch in the equipment moving parts.
Please keep children and pets away from the equipment at all mes. It is only suitable
for adults.
The equipment should not be used by persons weighng more than 150 kg. Serious
injury may occur if the user’s weight exceeds the limit shown here.
If you hear unusual noise when exercising, please stop your training immediately.
Do not use the equipment unl the problem has been resolved.
To prevent injuring you when stop exercising, do not touch the flywheel immediately.
Safety Instrucons

4
noitpircseD.oNnoitpircseD.oN
cp1L-revoccitsalptengaML62cp1emarFniaM1
2 Front stabilizer bar 40x80x2T 1 pc 27 Support bar 20x20x1.4T 1 pc
cp1tekcarbtengaM82cp1T2x08x04rabrezilibatsraeR3
4 Upright post 40x80x2T 1 pc 29 Tension control bar 1 pc
cp1revocdexiF03cp1T2x08x04tsoptaeS5
6 Handlebar Φ25.4x2T 1 pc 31 Пcp2renetsafepahs
cp1rehsawgnirpS23cp1tekcarbgnivomraeS7
CP26MtunnolyN33cp2lmm001x001x05renetsafictsalP8
CP28MtunnolyN43cp10016-LVtaeS9
10 Flywheel Φcp401MtunpaC53cp1864
11 Belt wheel Φ260 with Axis 1 pc 36 Carriage bolt M10x55 4 pc
CP6T5.1x91x01rehsaW73c
p15KP0951tleB21
cp4T6x01MtuN.xeH83cp1R-revocniahcniaM31
14 Main chain cover-L 1 pc 39 Hex socket head bolt M8x38 2 pc
15 Inner chain cover-R 1 pc 40 Spring Φcp181x6.2
16 Inner chain cover-L 1 pc 41 Adjustment bar Φ6x60 1 pc
gnirpsdesserpmoC24cp1revocmirtediS71 Φ1.5x9 1 pc
cp2gulpknarC34cp1R-knarCSCP3R81
cp4T4.01x5.1x21MtuNegnalF44cp1L-knarCSCP3L81
19 Plastic cap for Crank 2 pc 45 Hex socket head bolt M8x15 3 pc
cp2T2x92x01rehsaW64cp1R-V403-DJladePR02
cp521x5Mwercsgnippat-fleS74cp1L-V403-DJladePL02
cp1redlohelttoB84cp262x61MbonkgnirpS12
cp201x5MwercS94cp102
x01Mbonk-L22
cp201x3MwercsspilihP05cp182x01MbonK32
eveelsleetS15cp101MtuNkcoL42 Φ12*17*9 1 pc
25 Washer 19.5x38x2T 1 pc 52 Self-tapping screw M4.5x15 2 pc
26R Magnet plastic cover-R 1 pc 53 Self-tapping screw M4.2x10 13 pc
YT'QYT'Q
Parts List

5
noitpircseD.oNnoitpircseD.oN
cp2T0.1x71x21rehsaW07cp153x6MtloB.xeH45
gniraebcitsalP17cp1erutxifleehweldI55 Φ12.8x21.4x6.7T 4 pc
56 Nylon nut M10x9T 2 pc 72 Plastic sleeve Φ7.9x12.7x23.5mm 2 pc
57 Steel sleeve Φcp2etalpdexiF37cp1T01x23x1.52
58 Steel bearing 6005-2RS 2 pc 74 Cushion knob M10x25 4 pc
59 C-ring ΦpaC57cp202 Φcp467
60 C-ring ΦleehwtropsnarT67cp152 Φ70 2 pc
cp101MbonklortnocnoisneT77cp1leehweldI16
cp251x5MtloB87cp1T3.0x43x72rehsawevaW26
cp201x5MtloB97cp2T2x02x01rehsawcitsalP36
64 Wire plug Φcp552x5.4Mwercsgnippat-fleS08cp1
71
65 Steel sleeve Φcp1paccitsalP18cp1T6x51x2.01
66 Axis Φ20x155mm 1 pc 82 Washer 12x24x1.5T 2 pc
67 Wave washer 21x27x0.3T 1 pc 83 Washer Φcp25
cp1revoccitsalP48cp1T5.0x52x5.02rehsaW86
69 Hex. Bolt M10x32 1 pc 85 Washer 10x16x1.5T 1 pc
YT'QYT'Q

6
Hardware and Tools List
15
13
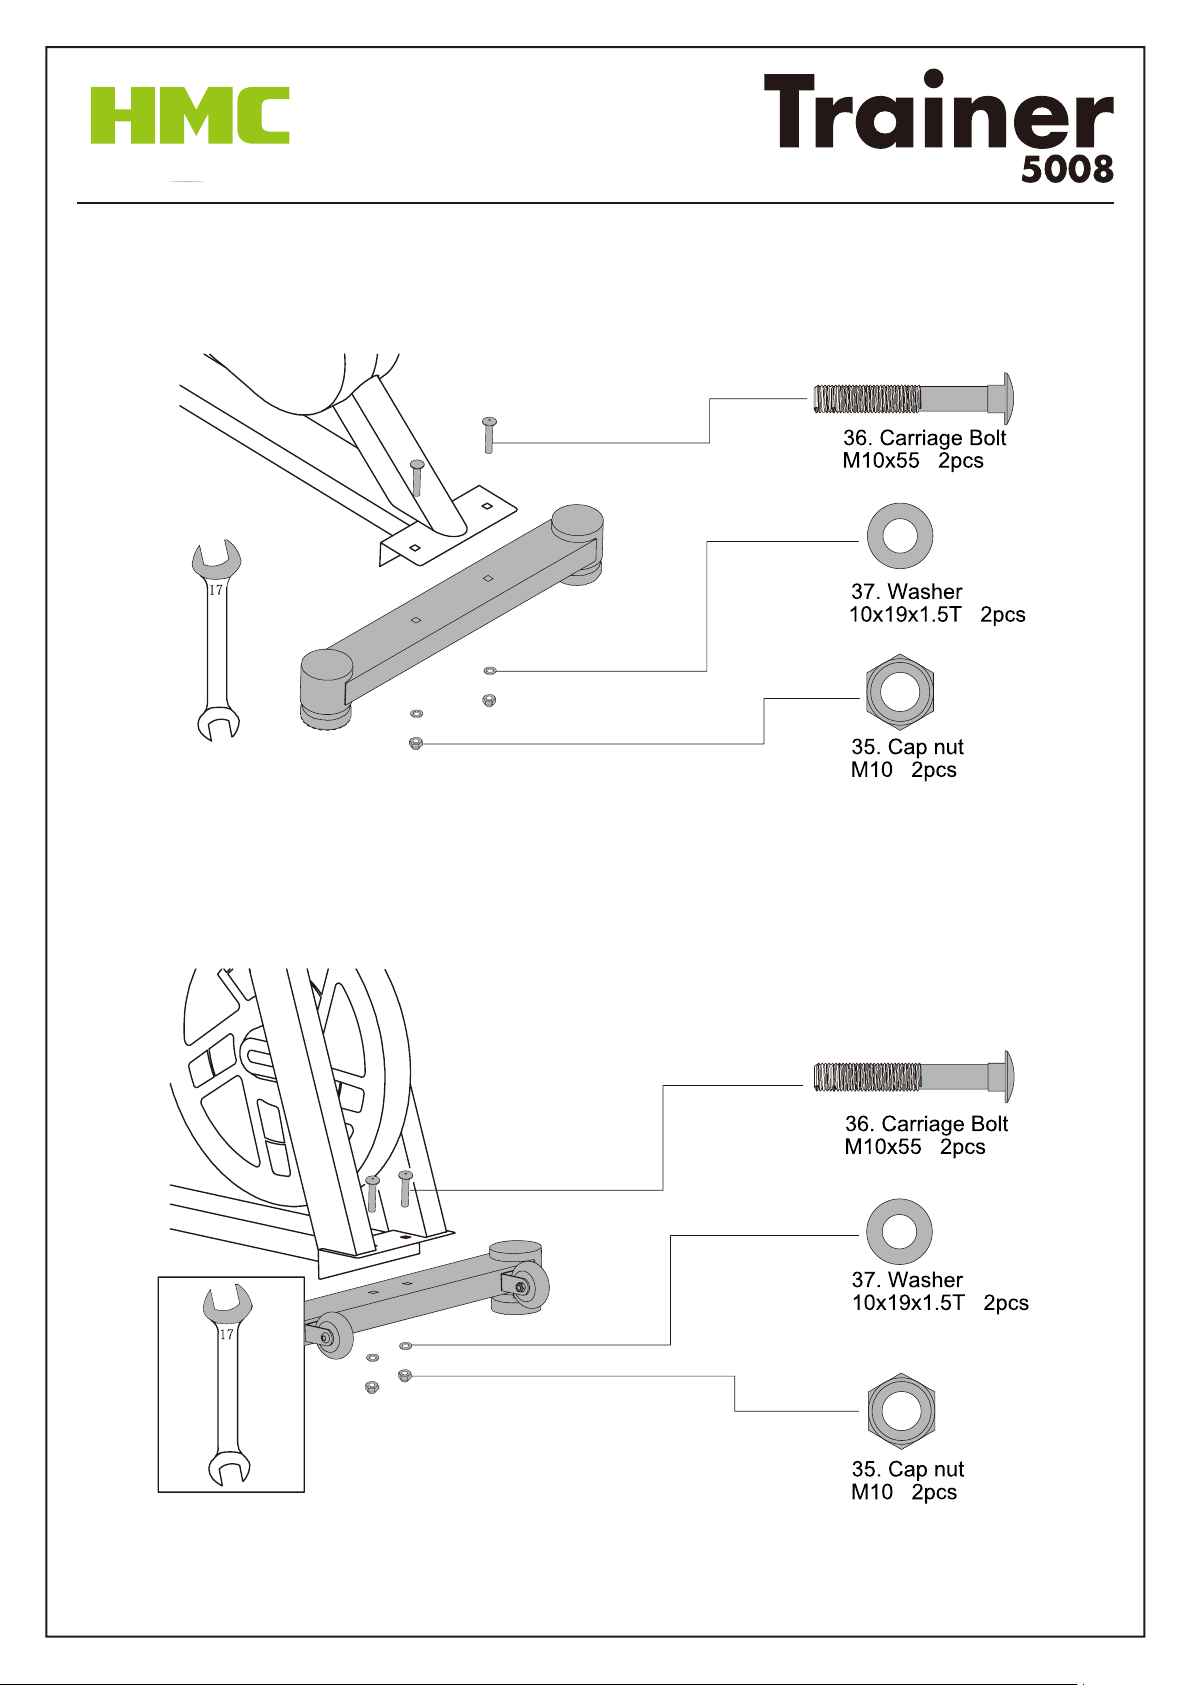
NO.35 Cap nut
M10 4PCS
NO.37 Washer
10x19x1.5T 4PCS
17
14
NO.46 Washer
10x29x2T 2PCS
NO.25 Washer
19.5x38x2T 1PC
NO.24 Lock Nut
M10 1PC
NO.22 L-knob
M10 1PC
NO.23 Knob
M10x28 1PC
NO.36 Carriage bolt
M10x55 4PCS
Open end wrench
14,17mm 1PC
Open end wrench
13,15mm 1PC
Screwdriver 1PC

7
Overview Drawing
8
Assembly

9

10

11
12
How to use
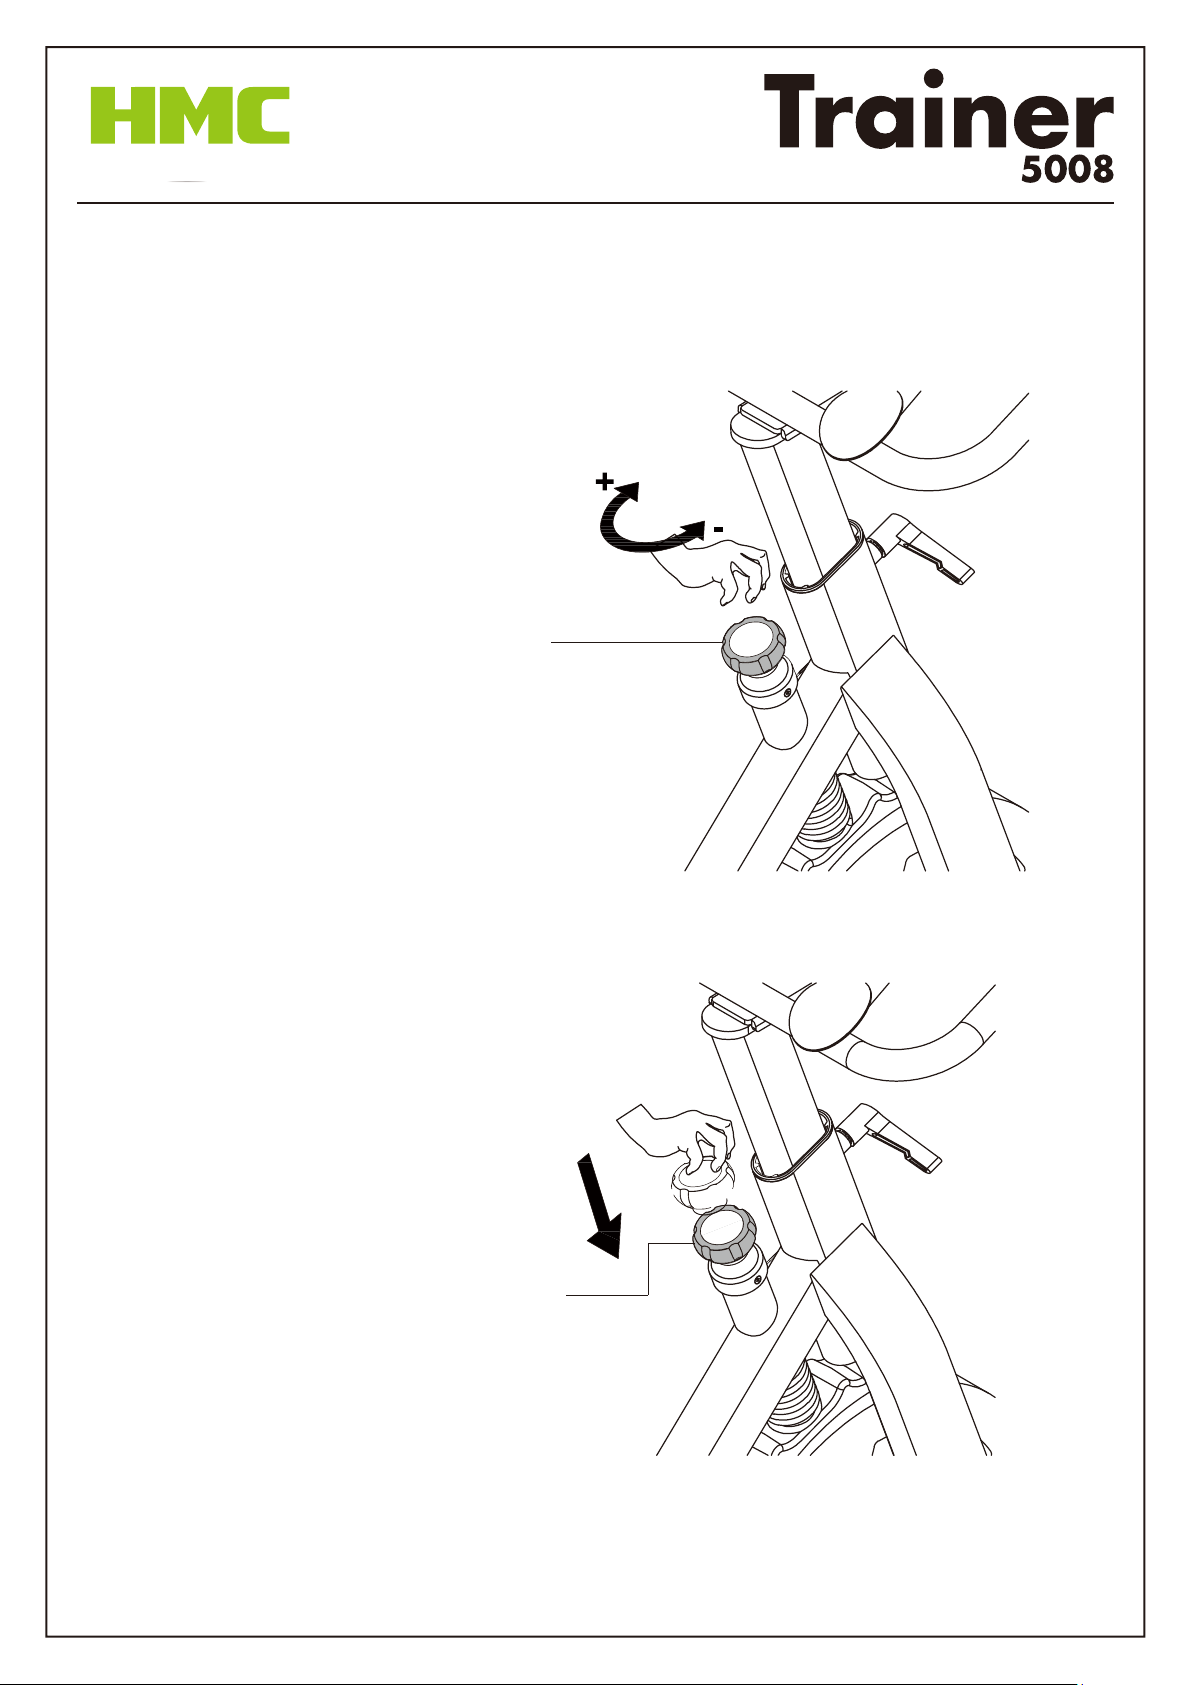
Tension Adjustment
Turn knob clockwise to increase tension
Turn knob counter-clockwise to decrease tension
Emergency Stop
Press down the knob to stop the flywheel

13
Quadriceps Stretch
With one hand against a wall for balance, reach behind you and
pull your right foot up. Bring your heel as close to your buocks
as possible. Hold for 15 counts and repeat with le foot up.
Inner Thigh Stretch
Sit with the soles of your feet together with your knees poinng
outward. Pull your feet as close to your groin as possible.
Gently push your knees towards the floor and hold for 15 counts
Toe Touching
Slowly bend forward from your waist, leng you back and
shoulders relax as you stretch toward your toes. Reach down
as far as you can and hold for 15 counts.
Hamstring Stretch
Sit with your right leg extended. Rest the sole of your le
foot against your right inner thigh. Stretch toward your toe
as far as possible. Relax and hold for 15 counts. Repeat with
le leg extended
Warm Up

14
The bike trainer wobbles or shakes when in use
Turn the adjustable leveler on the front stabilizer or rear stabilizer as needed to level the
bike trainer.
TROUBLESHOOTING
Squeaking noise when in use
The bolts may be loose on the bike trainer. Inspect all bolts and ghten as needed.
MAINTENANCE
Cleaning
The bike trainer can be cleaned with a so cloth and mild detergent. Do not use abrasives
or solvents on plasc parts. Please wipe your perspiraon off the bike trainer aer each
use. Please inspect all assembly bolts and pedals on the machine for proper ghtness
every week.
Storage
Store the bike trainer in a clean and dry environment away from children.
Thread sealant instrucon
If any parts need to be applied thread sealant, the parts must be cleaned before applying.
It needs at least 12 hours to a day to wait the sealant dry, do not use the bike unl the
thread sealant is fully dry.

www.hmcspin.com
Table of contents
Popular Exercise Bike manuals by other brands


Body Sculpture
Body Sculpture BC-6800G-HB Assembly and operating guide

VQ ActionCare
VQ ActionCare CFC-170 owner's manual

Stages cycling
Stages cycling StagesBike Assembly and Start Up Guide

SportsArt Fitness
SportsArt Fitness C530 owner's manual

AB-Bike
AB-Bike E0001-00 User Manual and Workout

Weslo
Weslo Pursuit 690s user manual

Vision Fitness
Vision Fitness R2000 Assembly instruction

Reebok
Reebok RT 300 RBEX2976.0 user manual

Tunturi
Tunturi S30 user manual

MINOURA
MINOURA B60-D instruction manual

HIT FITNESS
HIT FITNESS G8 PRO user manual

Christopeit Sport
Christopeit Sport KINOMAP RACER BIKE 4.0 Assembly and operating instructions