HME ION IQ User manual

Wireless Drive-Thru Audio System
Operating Instructions
HME# 400G660 Rev B 1/6/12
HM Electronics, Inc.
14110 Stowe Drive
Poway, CA 92064 USA
Phone: 1-800-848-4468
Fax: 858-552-0172


Table of Contents
ion|IQTM EQUIPMENT..............................................................................................................................1
Base Station..............................................................................................................................................................2
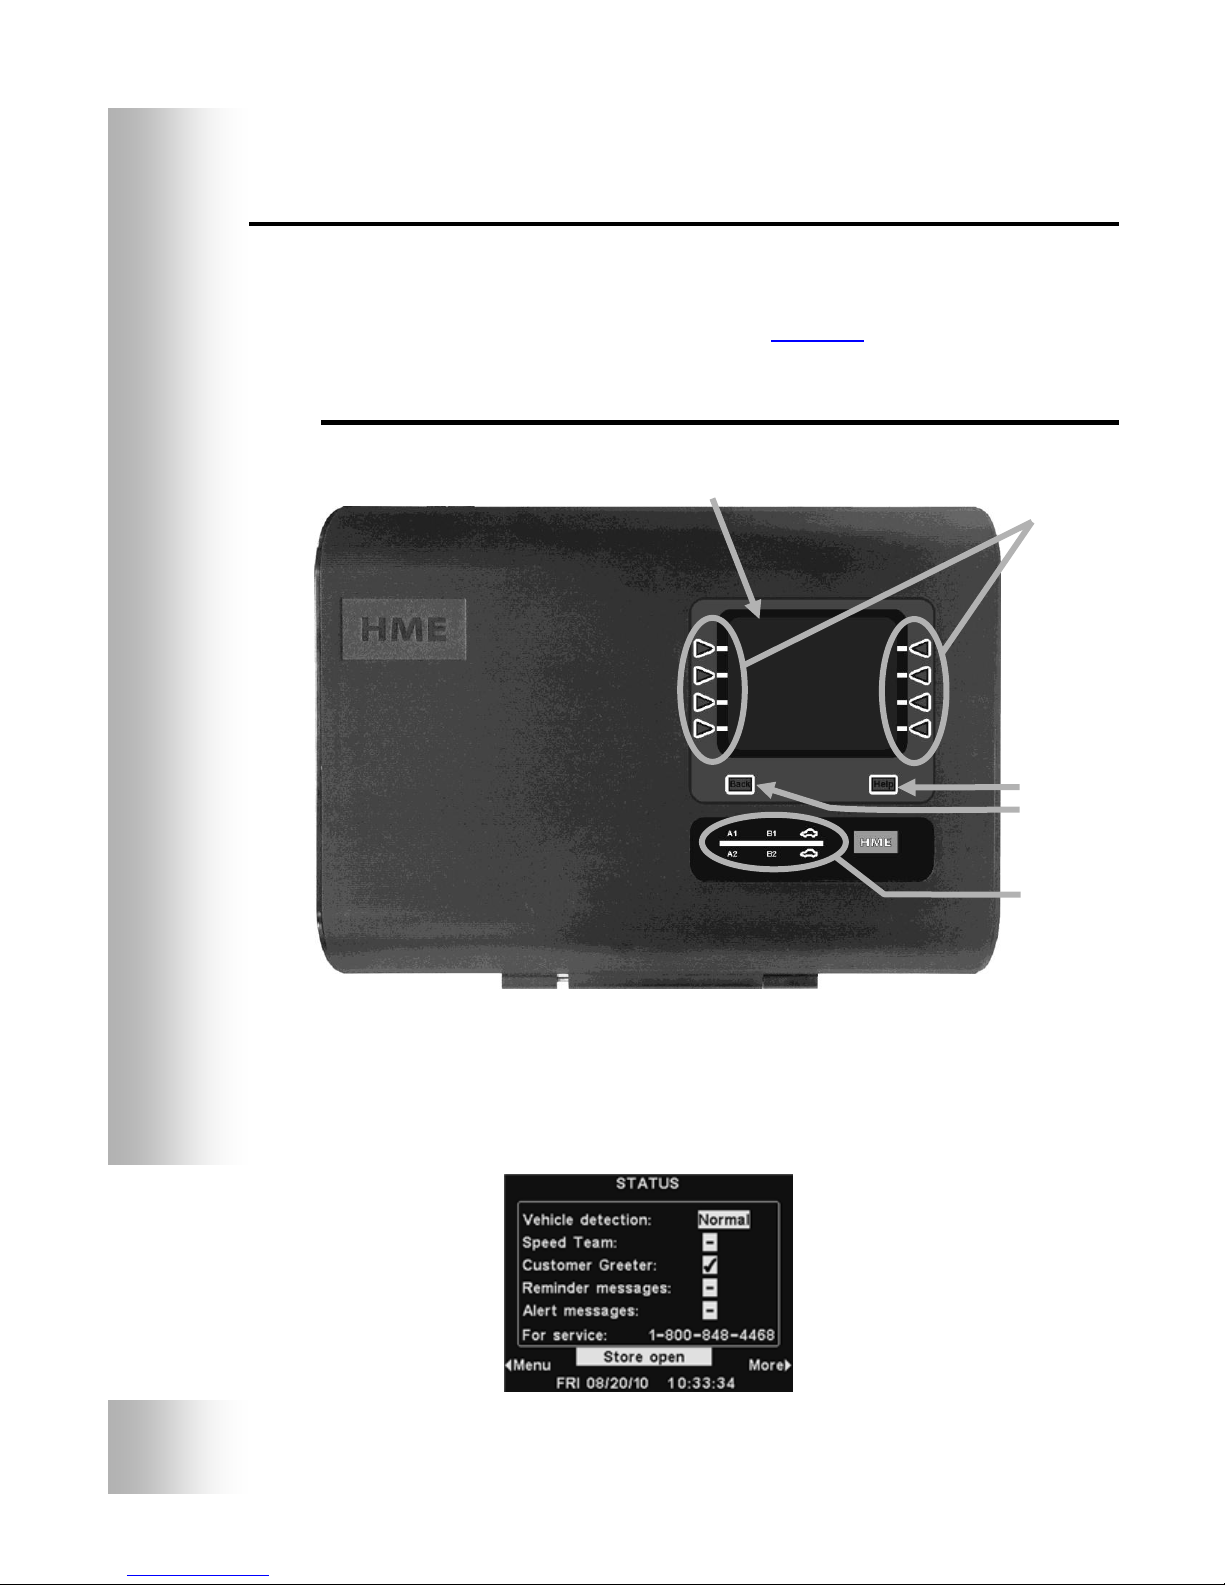
Front Panel...........................................................................................................................................................2
Rear and Side Panels............................................................................................................................................3
HEADSET................................................................................................................................................................4
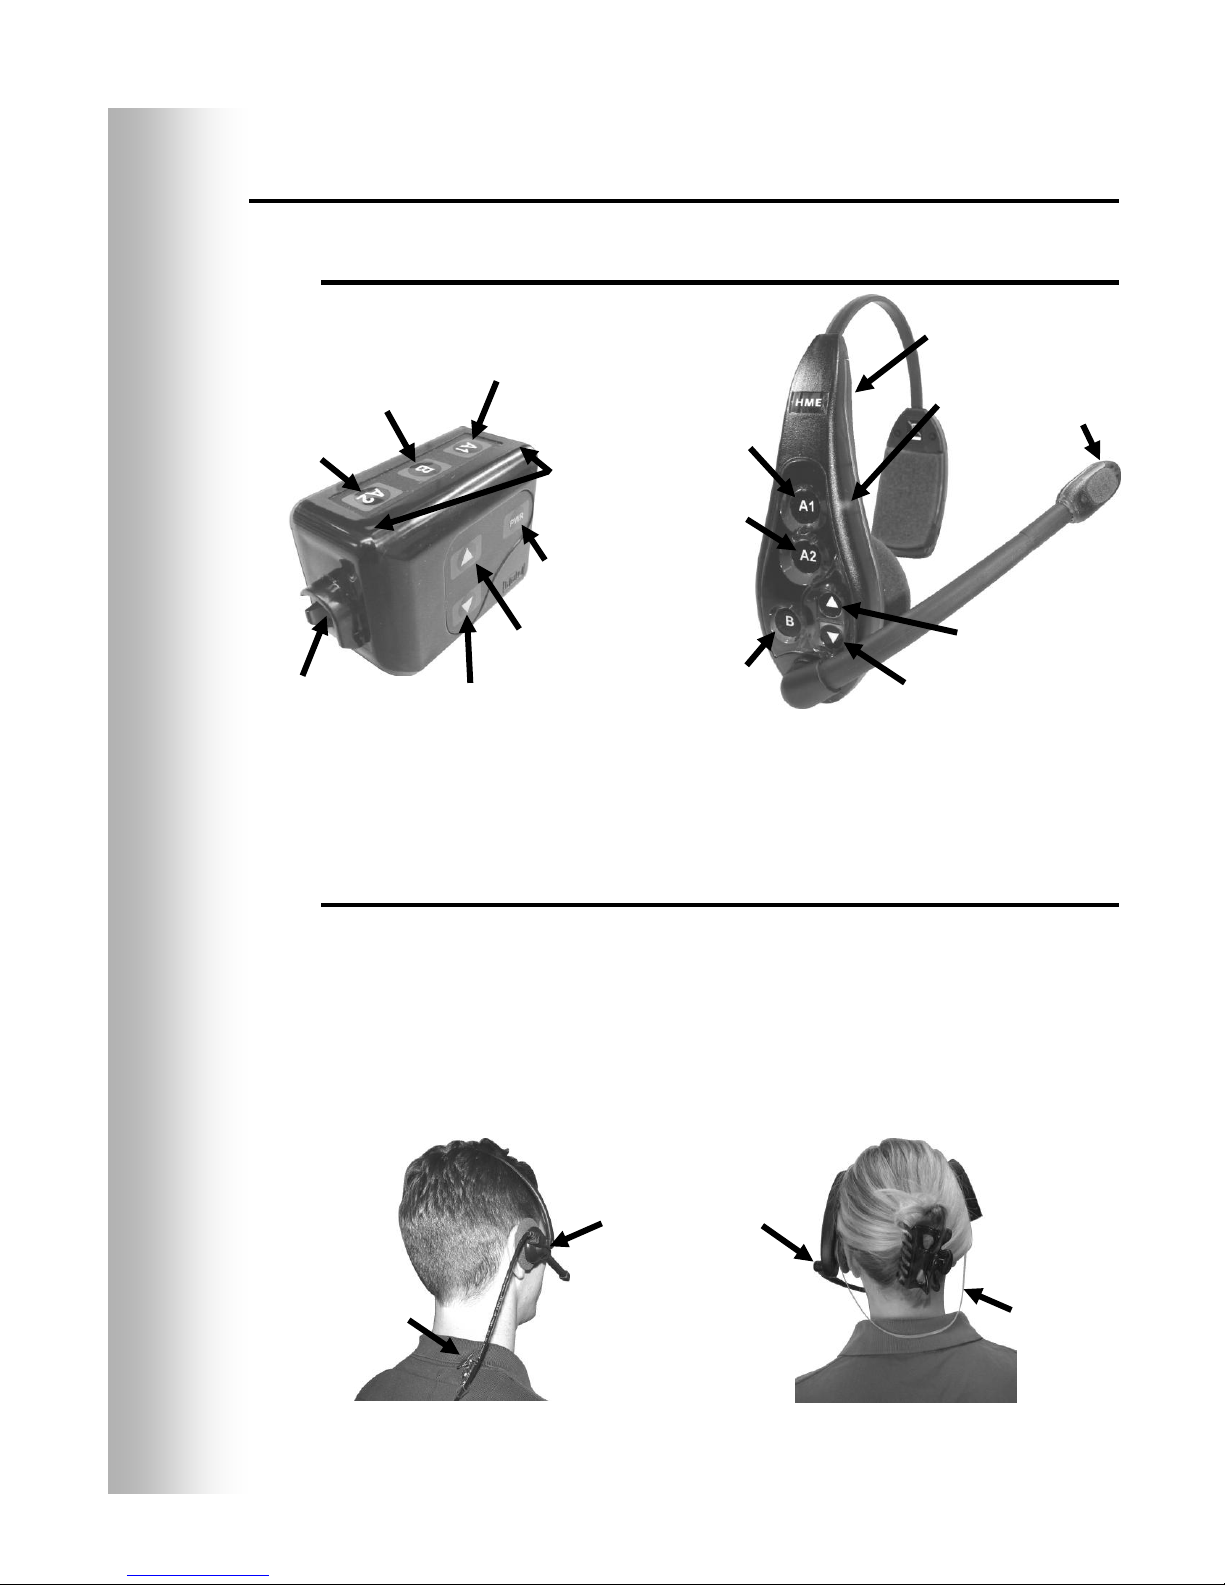
Features and Controls ..........................................................................................................................................4
How to Wear the Headset ....................................................................................................................................4
How to Use the Headset Controls........................................................................................................................5
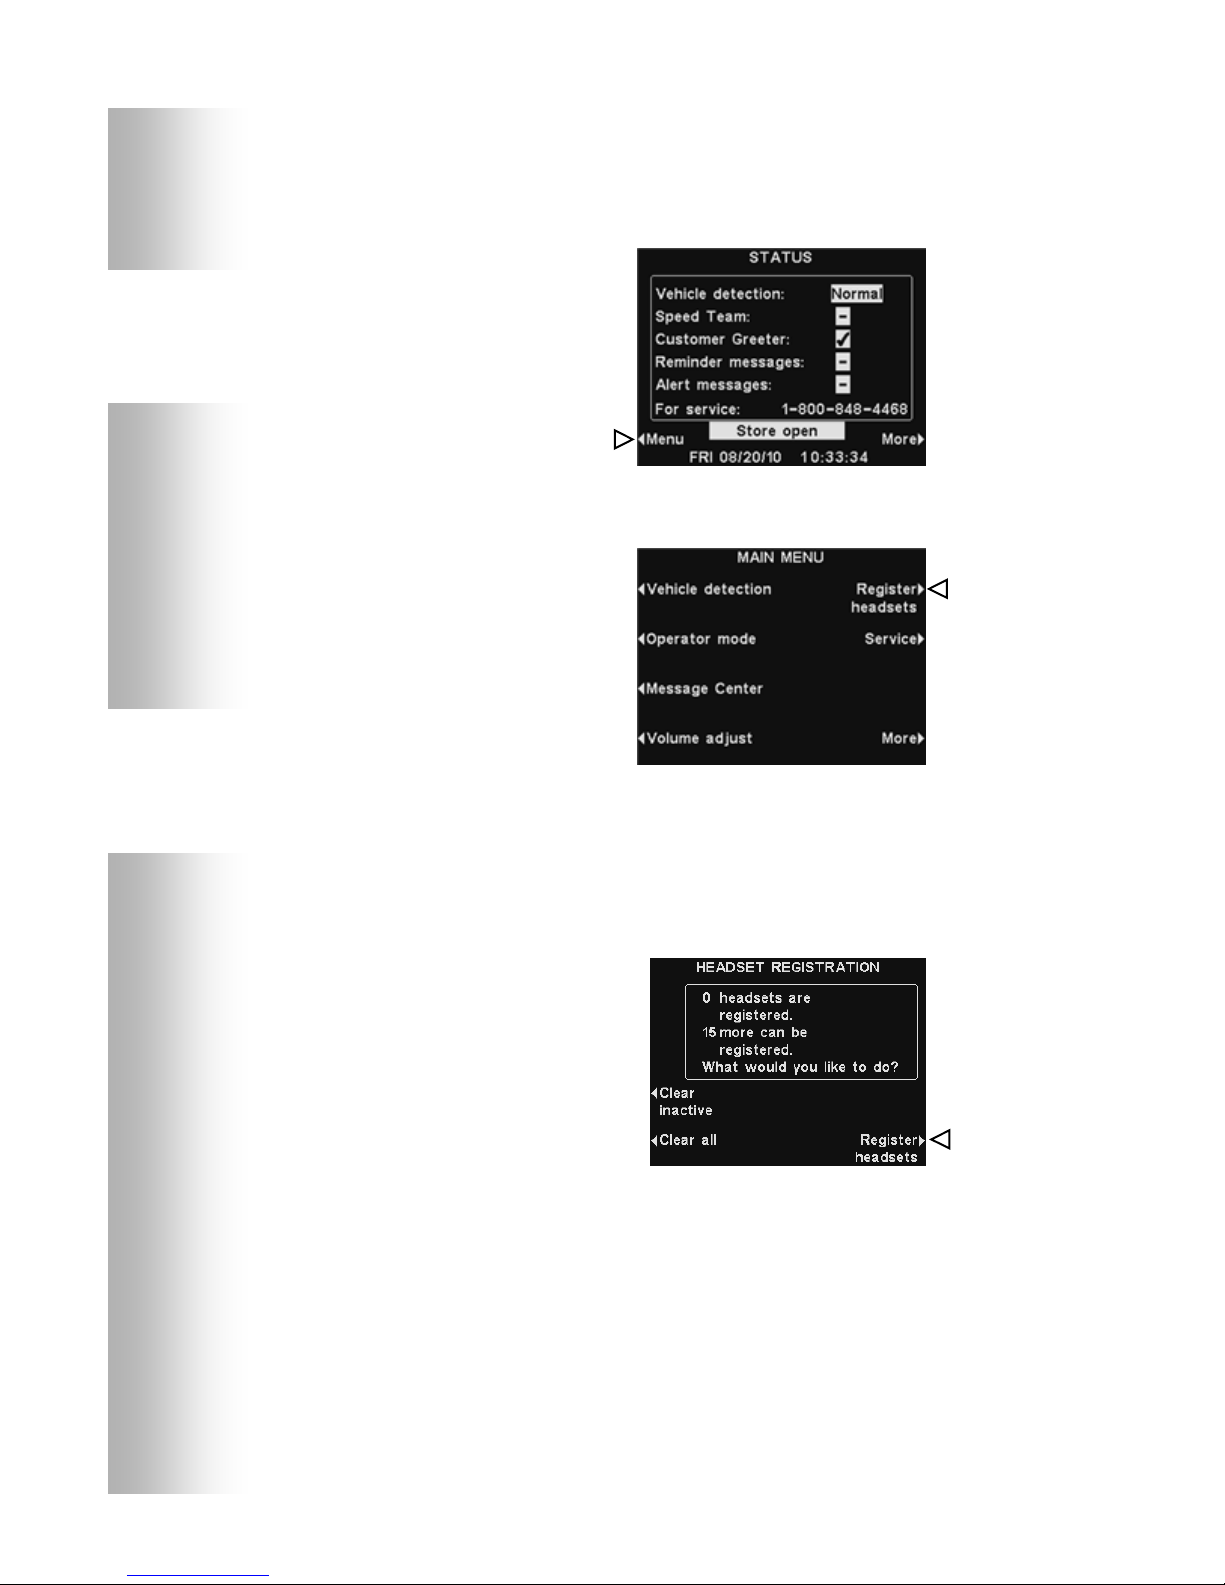
Headset Registration............................................................................................................................................5
Battery Removal and Replacement......................................................................................................................8
Battery Charger.........................................................................................................................................................9
ion|IQTM OPERATION.............................................................................................................................10
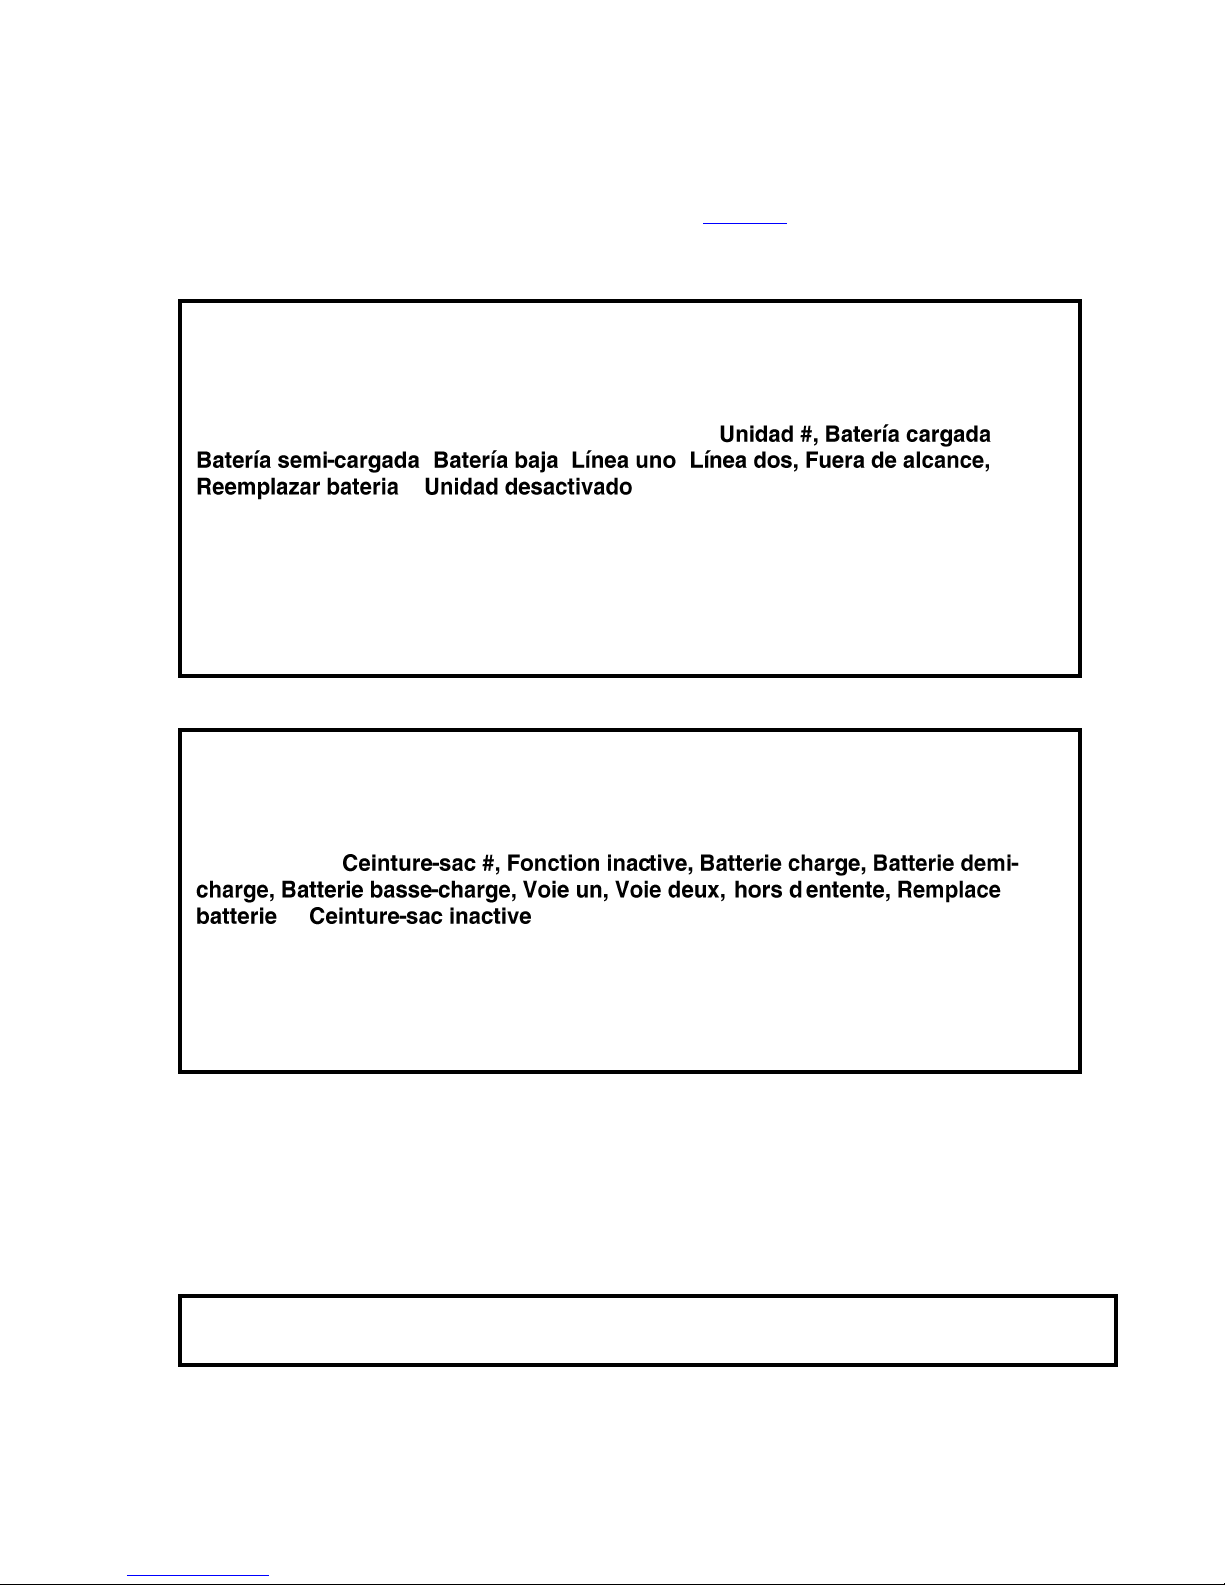
Changing Language of Headset Cues.....................................................................................................................10
Obtaining Headset Status........................................................................................................................................10
Single-Lane Operation............................................................................................................................................11
Dual-Lane Operation ..............................................................................................................................................12
Tandem Operation ..................................................................................................................................................13
Internal Communication.........................................................................................................................................13
Operator Mode........................................................................................................................................................14
Message Center Operation......................................................................................................................................15
Customer Greeter Settings .................................................................................................................................17
Reminder Message Settings...............................................................................................................................21
Alert Message Settings ......................................................................................................................................25
Schedule Times.......................................................................................................................................................30
Volume Adjustments ..............................................................................................................................................31
Wired Backup System Operation ...........................................................................................................................32
Vehicle Detection ...................................................................................................................................................33
Store Settings..........................................................................................................................................................34
PC Navigation.........................................................................................................................................................42
PC Reports..............................................................................................................................................................43
EQUIPMENT CARE AND CLEANING................................................................................................44
Handling the Equipment Properly ..........................................................................................................................44
Cleaning the Equipment .........................................................................................................................................44
IN CASE OF PROBLEMS.......................................................................................................................45
Troubleshooting......................................................................................................................................................45
Service Call.............................................................................................................................................................46
Base Station Internal Controls and Indicators.........................................................................................................47
Diagnostics .............................................................................................................................................................48
To Set Base Station for Spanish or French Language Operation............................................................................49
EQUIPMENT SPECIFICATIONS .........................................................................................................50
IMPORTANT NOTICES.........................................................................................................................51
Figures and Diagrams
Figure 1. ion|IQTM standard equipment ......................................................................................................................1
Figure 2. Base station front panel features .................................................................................................................2
Figure 3. Base station rear panel features...................................................................................................................3
Figure 4. Headset controls..........................................................................................................................................4
Figure 5. Correct wearing of the headset....................................................................................................................4
Figure 6. Belt-pac battery-release latch......................................................................................................................8
Figure 7. Headset battery-release latch.......................................................................................................................8
Figure 8. Batteries in charger .....................................................................................................................................9
Figure 9. Typical tandem drive-thru.........................................................................................................................13
Figure 10. Wired backup switches on bottom of base station ...................................................................................32
Figure 11. Base station internal features....................................................................................................................47

The Headset provides basic operating cues in Spanish and French, as follows. Refer
also to the Changing Languages instructions on page 10.
© 2012 HM Electronics, Inc.
The HME logo and product names are registered trademarks of HM Electronics, Inc. All rights reserved.
HM Electronics, Inc. is not responsible for equipment malfunctions due to erroneous translation of
its installation and / or operating publications from their original English versions.
Español
El COM6000BP proporciona información que indica el estado del
funcionamiento del mismo en español como es: ,
, , ,
y .
Para cambiar el idioma de la información que se escucha en la diadema, de ingles
a español, sigua los siguientes pasos: Oprima y mantenga presionado el botón
“A1”, así como el botón para reducir el volumen “▼”y el botón para encender el
comunicador “PWR” al mismo tiempo, hasta que el comunicador se encienda.
Français
COM6000BP fournit les sélections de fonctionnement fondamentales suivantes
en français:
et .
Pour changer les indications de l'anglais au français, appuyer et tenir le “A1” et
le volume en bas “▼” en même temps, tout en appuyant sur le boutton
d’allumage “PWR”.
Illustrations in this publication are approximate representations of
the actual equipment, and may not be exactly as the equipment appears.

1
ion|IQTM EQUIPMENT
The ion|IQTM is an audio system primarily for use at quick-service
restaurants. The equipment shown below is standard with the
ion|IQTM. Optional equipment can be ordered from your local
dealer.
Figure 1. ion|IQTM standard equipment
NOTE:
Equipment
quantities vary,
depending on
individual store
needs at time of
purchase.
Additional
equipment can be
ordered from the
list below.
OPTIONAL EQUIPMENT
Equipment Model Number
Belt-Pac COM6000BP
Belt None
Odyssey IQ All-In-One Headset HS6000
Wireless Headset (listen only) HS6000L
Battery for Odyssey IQ BAT41
Headset HS12
Headset, Over-the-Ear M220
Headset Earmuff None
Headset Earpiece Cover (disposable) None
Headset Interface HSI6000
Telephone Interface TI6000
Vehicle Detector Board VDB102
Vehicle Detector Board (with relay) VDB102R
Vehicle Detector Loop (underground) VDL100
Low-Profile Speaker SP2500LP
Ceiling Speaker MM100
Microphone DM4
Mode Switch (dual lane) MS10
Remote Speed Team Switch SW2
Switcher Circuit Board None
Antenna Coverage Extension Kit EC10
Extended Coverage Antenna Kit EC20
Remote Antenna Kit
(with 6 ft / 1.83 meter cable) ANT20-6
Remote Antenna Kit
(with 30 ft / 9.14 meter cable) ANT20-30

2
Display screen
Menu-select
buttons
Help button
Back button
Activity
indicators
Base Station
All functions of the drive-thru audio system are channeled through
the base station. It is the electronic heart of the ion|IQTM.
External base station features are shown in Figures 2 and 3.
Internal features are shown in Figure 11.
Front Panel
The display screen is where all menu selections will be seen for installer
setups and routine operation options. The STATUS display will be shown on
the base station until you press any of the buttons to select another display.
Figure 2. Base station front panel features
NOTE:
The STATUS
display will turn
off (sleep) if there
is no button
activity. Pressing
any button will
turn it back on
(wake it up).

3
The menu-select buttons are used to make selections from the menu on the
display screen.
The Help button can be pushed to obtain information needed in case of problems
with the ion|IQTM.
The Back button can be pushed to go back to the previous menu display.
The activity indicators light up as follows:
Above the line - Lane 1 activity (single or dual-lane operations)
A1 lights up when the A button is pushed on any headset in single-lane
operations, or on any Lane 1 headset in dual-lane operations.
B1 lights up when the B button is pushed on any headset in single-lane
operations, or on any Lane 1 headset in dual-lane operations.
The car above the line lights up when a car is present at the menu board in
single-lane operations, or at the Lane 1 menu board in dual-lane operations.
Below the line - Lane 2 activity (dual lane operations only)
A2 lights up when the A button is pushed on any Lane 2 headset.
B2 lights up when the B button is pushed on any Lane 2 headset.
The car below the line lights up when a car is present at the Lane 2 menu board.
Rear and Side Panels
When both of the cabinet latches, on top of the cabinet are pressed down at
the same time, the cabinet can be opened by pulling forward and down.
The antenna connectors are for screw-mounting the enclosed antennas.
The four screwholes are used to mount the base station on the wall.
The reset switch is used to perform a soft restart of the base station. It is
located in a small hole on the right side of the base station. To press the
reset switch, push a small pointed object, such as an unfolded paper clip,
into the hole.
Figure 3. Base station rear panel features
Cabinet
latches
Antenna
connectors
Screw
holes for
mounting
on wall
Reset switch
(recessed)

4
HEADSET
Features and Controls
How to Wear the Headset
Wear the headset with the microphone on your right or left side
next to your mouth.
Adjust the headband and microphone boom as needed.
If you are using a belt-pac with headset, clip the belt-pac to your
belt or waistband on either your right or left side. Clip the clothing
clips on the headset cable to the back of your shirt and collar.
If you are using an Odyssey IQ All-In-One Headset, put the
headset on your head with the headset band behind your neck.
Figure 4. Headset controls
Figure 5. Correct wearing of the headset
Headset band
Hold microphone
boom here to adjust
microphone
position
Clothing clip
Channel “A1”
button
Channel “B”
button
Channel “A2”
button
Power
button
Volume-up
button
Volume-down
button
Power
light
Transmit
light
Channel “A1”
button
Channel “B”
button
Channel “A2”
button
Power
button
Volume-up
button
Volume-down
button
Headset cable
connector socket
Power
lights

5
How to Use the Headset Controls
The headset control buttons will activate when pressed firmly. Use
your fingertips, not your fingernails, to press the buttons.
Power On/Off
Power On Press and release the power button.
If using a Belt-pac ─A voice message in the earpiece will say “belt-
pac #, battery full/half/low” and the red power lights next to the A1
and A2 buttons on the belt-pac will go on. After a short time, one
light will go off and the other will change to green. A voice message
will then say “Lane 1 (or 2) ready.” The green light indicates the unit
is ready to use. In dual-lane operations, a green light next to A1
indicates ready on Lane 1 and a green light next to A2 indicates
ready on Lane 2.
If using an Odyssey IQ ─A voice message in the earpiece will say
“headset #, battery full/half/low” and both the power light and the
transmit light will be flashing red. After a short time, the power light
will change to steady green for Lane 1 or steady red for Lane 2, and
the transmit light will go off. A voice message in the earpiece will
then say “Lane 1 (or 2).”
Power Off —Press and hold the PWR button for about two seconds.
A voice message in the earpiece will say “belt-pac off” or “headset off,”
and the power light will go off.
Volume Up/Down
Volume Up Adjustment —Press and release the volume-up ▲
button. Each time you press the button you will hear a higher pitch
beep in the earpiece as the volume increases. When you reach
maximum volume, you will hear a high-pitched double beep. If you
press and hold the volume-up ▲button, you will hear repeating
beeps, increasing in pitch until the volume reaches maximum.
Then you will hear high-pitched double beeps repeating until you
release the volume-up ▲button.
Volume Down Adjustment —Press and release the volume-
down ▼button. Each time you press the button you will hear a
lower pitch beep in the earpiece as the volume decreases. When
you reach minimum volume, you will hear a low-pitched double
beep. If you press and hold the volume-down ▼button, you will
hear repeating beeps, decreasing in pitch until the volume
reaches minimum. Then you will hear low-pitched double beeps
repeating until you release the volume-down ▼button.
Headset Registration
During installation of the ion|IQTM, each headset was registered for
use with the base station. The base station thereby recognizes all
headsets registered to it when their power is on, and will be able
to tell the difference between them and other electronic
equipment operating on similar frequencies.
A maximum of 15 headsets can be registered. If one is replaced,
you must register the new one before you use it. When a headset
is replaced, the old one remains in memory. If the maximum
number of 15 (in memory) is exceeded, the base station HEADSET
REGISTRATION display will tell you that 0 more headsets can be
registered. If this happens, you may either clear all inactive
headsets or clear all current registrations. If you clear all inactive
headsets, you can initiate the new registration. If you clear all
current registrations, you must re-register all active headsets.
Each active headset is registered the same way, one at a time.
NOTE:
All currently registered
headsets must be turned
on, or they will be
unregistered when you
clear inactive headsets.

6
Register each headset as follows:
Be certain all headsets to be registered are turned off and the
base station power is on. Other headsets can be on or off.
On the base station STATUS display, press the Menu button.
On the MAIN MENU, press the Register headsets button.
On the HEADSET REGISTRATION display, if you press the Clear
inactive button, you will unregister any headsets that are not
turned on.
If you press the Clear all button, you will unregister all headsets
that are registered to the base station, and the base station will
automatically restart.
To register headsets, press the Register headsets button on the
HEADSET REGISTRATION display.
NOTE:
Headsets must be within
6 feet (1.83 meters)
of the base station while
being registered.
NOTE:
You will be given a
warning and allowed to
quit or continue before
registrations are cleared.

7
On the TO REGISTER HEADSETS display, follow the
instructions in the box.
If you are registering only one headset, press the Register single
button on the TO REGISTER HEADSETS display.
If you are registering more than one headset, press the Register
multi button on the TO REGISTER HEADSETS display, and
continue registering the remaining ones.
When each registration is successfully completed:
The ID number assigned to this headset will be shown.
ID numbers are assigned sequentially as 0 thru 9, A, B, C, D and E.
When you have finished registering headsets, press the Back
button to exit the registration mode. You can press the Back
button repeatedly until you return to the MAIN MENU or STATUS
display.
The power light on the headset will remain on steady green.
If you have any problems registering the headsets:
In the USA, call HME Customer Support at 1-800-848-4468.
Outside the USA, call your local HME representative for assistance.

8
Battery Removal and Replacement
COM6000BP Belt-pac Batteries —
To change batteries:
If a battery is weak when Belt-pac
power is turned on, a voice in the
earpiece will say “Battery low.” If a
battery becomes weak during
operation, a voice in the earpiece will
say “Change battery.” When this
happens, take the Belt-pac out of its
pouch and slide the battery-release
latch in the direction of the arrow.
Pull up on the end of the battery near
the latch and lift it out of the Belt-pac,
or turn the Belt-pac over and catch the
battery in your hand.
To replace batteries:
When replacing a battery in the Belt-pac, place the end of the
battery with the metal contacts into the battery holder on the
Belt-pac, in the same position as the battery you removed. Press
the top of the battery carefully into the battery holder until it snaps
into the latch.
Odyssey IQ Headset Batteries —
To change batteries:
When a battery becomes weak, a voice in the Headset will say
“Change battery.” When this happens, remove the battery from
the Headset by carefully sliding the battery-release latch and
lifting the battery out.
To replace batteries:
When replacing a battery in the Headset, place the end of the
battery with the metal contacts into the battery holder on the
Headset, in the same position as the battery you removed.
Press the top of the battery carefully into the battery holder
until it snaps in place under the battery-release latch.
Recharge batteries according to the instructions on page 9.
Figure 6.
Belt-pac battery-release latch
Figure 7. Headset battery-release latch
Battery-release
latch
Battery
Battery-release
latch
Battery

9
Battery Charger
Up to four batteries can be charged in the charger at the same time.
Charging time is approximately 2.5 hours. The battery status lights
next to each charging port are explained below. Up to six fully
charged batteries can be stored in the battery storage ports.
A yellow light stays on steady next to each charging port while the
port is empty.
Insert a battery in one of the four charging ports until it clicks
in place.
If a yellow light is on steady next to a battery in a charging port, it
means CHARGE FAILED. Follow the diagnostic instructions on the
side of the battery charger.
If a yellow light is flashing next to a battery in a charging port, it
indicates CHARGE PENDING, which means the battery is too hot.
Lower the room temperature or move the charger to a cooler area.
A red CHARGING light will stay on next to a battery in a charging
port while the battery is charging.
A green READY light will go on next to a battery in a charging
port when the battery is fully charged.
Store fully charged batteries in the storage ports.
Figure 8. Batteries in charger
CAUTION:
Do not remove
batteries from
the charger
until the green
READY light is
lit, or the
charger will
reset and the
charge cycle
will begin
again.
Battery in
storage port
Battery in
charging port

10
ion|IQTM OPERATION
The ion|IQTM can be operated in Hands-Free (HF), Auto-Hands-Free
(AHF) or Push-To-Talk (PTT) modes.
A full-duplex system supports HF, AHF and PTT operation. In HF
and AHF operation, communication can be transmitted and
received at the same time, as in a normal telephone conversation.
In the AHF mode, transmission and reception are activated
automatically when a customer drives into the drive-thru lane. In
the HF mode, transmission and reception are activated by touching
and releasing the A1 or A2 button on the Communicator. In the
PTT mode, the A1 or A2 button must be pressed and held while the
operator is talking to the customer. A half-duplex system only
supports the PTT mode, and the customer’s voice will not be heard
while the operator is pressing the A1 or A2 button.
In single lane operations, when a customer arrives in the drive-
thru lane, you will hear a single beep in the headset.
In dual-lane operations, when a customer arrives in a drive-thru
lane, you will hear one beep in the headset for Lane 1 and two
beeps for Lane 2.
In dual-lane operation, if you are communicating with a customer
in one lane when another customer arrives in the other lane, you
will hear a beep in the headset. When the customer leaves the
speaker post in the lane you are connected to, the same beep will
repeat in the headset every four seconds until you touch the A1 or
A2 button to communicate with the customer in the other lane.
Refer to the instructions on the following pages for single-lane or
dual-lane stores.
Changing Language of Headset Cues
To change the language of the cues heard in the headset from
English to Spanish/French and back to English, with the headset
power off, press and hold the volume-down ▼button and the A1
button while you press the power PWR button. The language of
the cues heard in the headset earpiece will change when the
power goes on.
Obtaining Headset Status
To obtain headset status, with the headset power off, press and
hold the volume-down ▼button and the A2 button while you
press the power PWR button. You will hear the status message in
the headset earpiece when the power goes on.
NOTE:
In dual-lane operations, if
you have a Mode Switch
and it is set to
“DEDICATED,” you will
only hear beeps in the
headset when a customer
arrives in the lane you
are operating.

11
Single-Lane Operation
Hands-Free (HF) Mode
With the power off, press and hold the volume-up ▲and B buttons
while you press and release the PWR button to turn the power on in
the HF mode. The headset will remember this setting.
As a customer enters the drive-thru lane, you will hear an alert
tone (single beep) in your headset, and you will be able to hear
the customer at the speaker post or menu board.
Touch and release the A1 or A2 button to speak and listen to the
customer.
Touch and release the A1, A2 or B button to end communication
with the customer.
Touch and release the A1 or A2 button if you want to speak to the
customer again.
Use the volume-up ▲and down ▼buttons to adjust the
customer’s voice level in your headset if necessary.
If a customer drives away from the speaker post or menu board,
the headset will stop transmitting.
Auto Hands-Free (AHF) Mode
With the power off, press and hold the volume-up ▲and A1
buttons while you press and release the PWR button to turn the
power on in the AHF mode.
As a customer enters the drive-thru lane, you will hear an alert
tone (single beep) in your headset, and you will be able to hear
the customer at the speaker post or menu board.
Speak and listen to the customer without pressing any buttons.
Touch and release the A1, A2 or B button to end communication
with the customer.
Touch and release the A1 or A2 button if you want to speak to the
customer again.
Use the volume-up ▲and down ▼buttons to adjust the
customer’s voice level in your headset if necessary.
If a customer drives away from the speaker post or menu board,
the headset will stop transmitting.
Push-To-Talk (PTT) Mode
With the power off, press and hold the volume-down ▼and B
buttons while you press and release the PWR button to turn the
power on in the PTT mode. The headset will remember this
setting.
As a customer enters the drive-thru lane, you will hear an alert
tone (single beep) in your headset, and you will be able to hear
the customer at the speaker post or menu board.
Touch and hold the A1 or A2 button to speak to the customer.
Release to stop speaking to the customer (full duplex) or to listen
to the customer (half duplex).
Use the volume-up ▲and down ▼buttons to adjust the
customer’s voice level in your headset if necessary.
NOTE:
Only one headset
operator at a time
can use the auto
hands-free feature,
and this feature must
also be enabled on
the base station.
If a headset is turned
off while in the AHF
mode, it will
automatically be
reset for its previous
operating mode.

12
Dual-Lane Operation
In a dual-lane operation, there are two lanes, with one order point
in each lane.
Hands-Free (HF) Mode
With the headset power off, press and hold the volume-up ▲and
B buttons while you press and release the PWR button to turn the
power on in the HF mode. The headset will remember this setting.
As a customer enters a drive-thru lane, you will hear an alert tone
in your headset (single beep for lane 1, double beep for lane 2),
and you will be able to hear the customer at the speaker post or
menu board if that lane is selected.
Touch and release the A1 button for Lane 1 or A2 for Lane 2, to
speak and listen to the customer.
Touch and release the A1, A2 (depending on lane) or B button to
end communication with the customer.
Touch and release the A1 button for Lane 1 or A2 for Lane 2, to
speak to the customer again.
Use the volume-up ▲and down ▼buttons to adjust the
customer’s voice level in your headset if necessary.
To change lanes, touch and release the opposite A button.
If a customer drives away from the speaker post or menu board,
the headset will stop transmitting.
Auto Hands-Free (AHF) Mode
For Lane 1 operation, with the power off, press and hold the
volume-up ▲and A1 buttons while you press and release the
PWR button to turn the power on in the AHF mode.
For Lane 2 operation, with the power off, press and hold the
volume-up ▲and A2 buttons while you press and release the
PWR button to turn the power on in the AHF mode.
As a customer enters a drive-thru lane, you will hear an alert tone
in your headset (single beep for lane 1, double beep for lane 2),
and you will be able to hear the customer at the speaker post or
menu board if that lane is selected.
Speak and listen to the customer without pressing any buttons.
Touch and release the A1, A2 (depending on lane) or B button to
end communication with the customer.
Touch and release the A1 button for Lane 1 or A2 for Lane 2, to
speak to the customer again.
Use the volume-up ▲and down ▼buttons to adjust the
customer’s voice level in your headset if necessary.
If a customer drives away from the speaker post or menu board,
the headset will stop transmitting.
Push-To-Talk (PTT) Mode
With the headset power off, press and hold the volume-down ▼and
B buttons while you press and release the PWR button to turn the
power on in the PTT mode. The headset will remember this setting.
As a customer enters a drive-thru lane, you will hear an alert tone
in your headset (single beep for lane 1, double beep for lane 2),
and you will be able to hear the customer at the speaker post or
menu board if that lane is selected.
Touch and hold the A1 button to speak to a customer in Lane 1, or
A2 to speak to a customer in Lane 2. Release to stop speaking to
the customer (full duplex) or to listen to the customer (half duplex).
Use the volume-up ▲and down ▼buttons to adjust the
customer’s voice level in your headset if necessary.
NOTE:
In each lane, only one
headset operator at a
time can use the auto
hands-free feature. If
an operator attempts to
configure a second
headset, “System busy”
will be heard in his/her
headset.
When operating in the
AHF mode, changing
lanes is not possible.
If a headset is turned off
while in the AHF mode,
it will automatically be
reset for its previous
operating mode.
NOTE:
If you have an optional
MS10 Mode Switch,
placing the switch in the
Non-Dedicated position
allows headset operators
to hear alert tones when
a customer arrives in
either lane. Placing the
switch in the Dedicated
position allows an
operator for either lane
to hear only alert tones
for customers arriving in
his/her own lane.
If you do not have an
MS10 Mode Switch, use
the base station menus
to change modes. The
OPERATOR MODE
display on the base
station, must have the
dedicated mode set to
Ext to use an MS10.

13
Tandem Operation
Tandem is a special case of dual-lane operation in which a customer
arriving at Order Point #2 can be given a “Please pull forward”
message if no customer is present at Order Point #1. Headset
operation is the same as described for dual-lane operation.
Internal Communication
To communicate internally with other headset operators, press and
hold the B button while talking. Release when finished. In single-
lane operations, up to four headset operators can have conference-
call type communication by all pressing the B button. Everyone
pressing the B button will hear each other without interference.
In dual-lane operation, if your system was set up for “Split-B,”
internal communication will be heard only by headset operators in
your lane. If your system was set up for “Combined-B”operation,
internal communication will be heard by all headset operators in
both lanes. In dual-lane operation, up to three headset operators
can have conference-call type communication by all pressing the
B button. Everyone pressing the B button will hear each other
without interference. If a car arrives in a lane while internal
communication is taking place, priority will be given to the
respective A channel for customer communication, which will
reduce the number of internal communication channels available.
Figure 9. Typical tandem drive-thru
NOTE:
In Tandem operation,
if Order Taker #2’s
headset is set in the
Auto Hands-Free
mode, the “Please pull
forward” message
will not be played at
Order Point #2. If
necessary, Order
Taker #2 will have to
ask the customer at
Order Point #2 to pull
forward. If a headset
is turned off while in
the AHF mode, it will
automatically be reset
to its previous
operating mode.

14
Operator Mode
Speed team operation is used during high-volume times. An order
taker wearing a headset relays orders from outside into the store,
using button A1, A2 or B.
The dedicated mode is a dual-lane setting. In the dedicated mode,
headset users only hear vehicle arrival tones and customers talking
from their own lane.
Speed Team Operation
To start speed-team operation, press the Menu button on the base
station STATUS display, and then press the Operator mode button
on the MAIN MENU.
On the OPERATOR MODE display, press the Turn Speed Team
button, and highlight ✔(on). To change back to normal operation,
return to the OPERATOR MODE display and press the Turn Speed
Team button, and highlight −(off).
If you have an external speed-team switch, you can select Ext on
the SPEED TEAM display, and then use the optional remote speed-
team switch to go in and out of speed-team operation.
To save the setting, press the Back button.
Dedicated Mode Operation
To set up dedicated mode operation, select Menu on the STATUS
display and then select Operator mode on the MAIN MENU. On the
OPERATOR MODE display, press the Turn dedicated mode button to
highlight ✔(on). If you select Turn dedicated mode ✔(on), you must
later select −(off) when you want to return to normal operation.
To save the setting, press the Back button.
CAUTION:
If Speed Team is
✔
(on),
many base station
functions will be
disabled. Vehicle
arrival tones and the
customer’s voice will
not be heard during
Speed Team operation.
For normal order
taking, the Speed
Team setting should
be −(off).
NOTE:
In dual lane
operations only, the
Turn dedicated
mode selection and
Dedicated HELP will
appear on the
OPERATOR MODE
display. If you have a
single lane drive-thru,
only the Turn Speed
Team selection and
Speed Team HELP
will appear on the
OPERATOR MODE
display.

15
Message Center Operation
The Message Center is a central point at which messages can be
set up to be triggered by various events during designated time
periods, to be sent to customers at the speaker post or to crew
members via headsets or ceiling speakers.
Some messages are pre-named and pre-recorded. All messages
can be customized to meet your specific requirements. The three
types of messages are described below. The table on the next
page shows the names and contents of factory pre-set messages.
Following the table are detailed instructions of how to set up your
Message Center.
At the back of this manual you will find a Message Center Quick
Start Guide for planning your message settings.
Customer Greeter messages
Customer Greeter messages are heard by the customer at the
speaker post. They are typically used to greet customers and
inform them of promotional items. Customer Greeter messages
are pre-named but not pre-recorded, with the following
exceptions; the Store Closed message and Pull Forward message
(only for tandem drive-thrus) are pre-recorded. All Customer
Greeter messages can be renamed and recorded or re-recorded to
meet your store needs.
Reminder messages
Reminder messages are heard by crew members in their headsets
to remind them when routine tasks need to be done. Reminder
messages can also be set to play in the ceiling speaker. There are
12 pre-named and pre-recorded Reminder messages that can be
named and recorded to meet your store needs. There are also 3
“Empty” messages that can be named and recorded as needed.
Reminder messages can be sent to all headsets or targeted only to
designated headsets.
Alert messages
Alert messages are heard by crew members in their headsets to let
them know something that requires attention, such as a door being
left open or a customer arriving in the store. Alert messages can
be sent to all headsets or targeted only to designated headsets,
and/or to ceiling speakers. There are 4 pre-named and pre-
recorded Alert messages that can be renamed and re-recorded to
meet your store needs. There are also 16 “Empty” messages, of
which 1 additional message in single-lane operations, or 2
additional messages in dual-lane operations can be recorded and
used for Alert messages.
HINT!
Before continuing, it is
important to consider
all the possible time
periods during which
any of the Message
Center messages need
to be played in your
store. Up to 12 time
periods can be set up.
You can use the
Message Center Settings
Worksheet at the back
of this manual. When
you have determined all
the time periods needed,
go to the Schedule Times
section of these
instructions to set up the
time periods for your
store before continuing
with the Message Center
setups.
The current time and
date, and store open
and close times should
also be set before other
Message Center setups.

16
MESSAGE CENTER MESSAGES
NAME
CONTENT
CUSTOMER GREETER
All Day 1
Not pre-recorded.
All Day 2
Not pre-recorded.
Breakfast 1
Not pre-recorded.
Breakfast 2
Not pre-recorded.
Lunch 1
Not pre-recorded.
Lunch 2
Not pre-recorded.
Snack 1
Not pre-recorded.
Snack 2
Not pre-recorded.
Dinner 1
Not pre-recorded.
Dinner 2
Not pre-recorded.
Store Closed
Thank you for your visit, but we are currently closed.
Please visit us again during our normal business hours.
Pull Forward *
Hello, please pull forward to the next speaker. Thanks.
* (Tandem drive-thru only)
REMINDER
Hand Washing
Please wash your hands.
Sanitizer
Please change sanitizer solution.
DR Trash
Please check the dining room trash.
HACCP
Please complete the HACCP shift checklist.
Quality Check
Please complete the shift quality check.
Lot Check
Please complete a parking lot check.
Restroom Check
Please check the restrooms.
Pre-Rush
Please complete the pre-rush tasks for your workstation.
Post-Rush
Please complete the post-rush tasks for your workstation.
Headset Status
To check headset status, press and hold A2 and volume
down while turning on the power.
Change Language
To change headset prompt language, press and hold A1 and
volume down while turning on the power.
Hands Free ON
To turn headset hands free mode on, press and hold B and
volume up while turning on the power.
Empty 1-3
Not pre-recorded.
ALERT
Freezer Door
The freezer door has been left open.
Cooler Door
The cooler door has been left open.
Back Door
The back door has been left open.
Lobby Door
A guest has entered the lobby.
Empty 1
Not pre-recorded.
Empty 2-16
Not pre-recorded.
Customer Greeter
messages are
triggered by detection
of vehicles in the
drive-thru lane, plus
time and day.
Reminder messages
are triggered by time
and day only.
Alert messages are
triggered by input
signals, plus time and
day or Network events.
Other manuals for ION IQ
2
Table of contents
Other HME Stereo System manuals