©/TM 2023 UnityLab Corp. All rights reserved. | 65
GEM-III TECHNICAL MANUAL
2.0 INSTALLATION & STARTUP INSTRUCTIONS
2.1 GENERAL INSTALLATION INSTRUCTIONS
This section contains instructions for installing and preparing the machine for
operation. All machines are tested and adjusted before leaving the factory.
2.2 LOCATING THE STEAM GENERATOR
1. Remove the machine from the shipping carton and remove all wrapping
from the Steam Generator. Check for any shipping damage caused by or
due to shipping.
NOTE: DO NOT LIFT THE UNIT BY THE STEAM NOZZLE AS THIS CAN DAMAGE
THE UNIT.
2. Set the unit in a clear area where nothing can touch or surround the unit.
Proper air ventilation must be allowed to ow around and through the Steam
Generator. Also, do not set anything on nor lean objects against it.
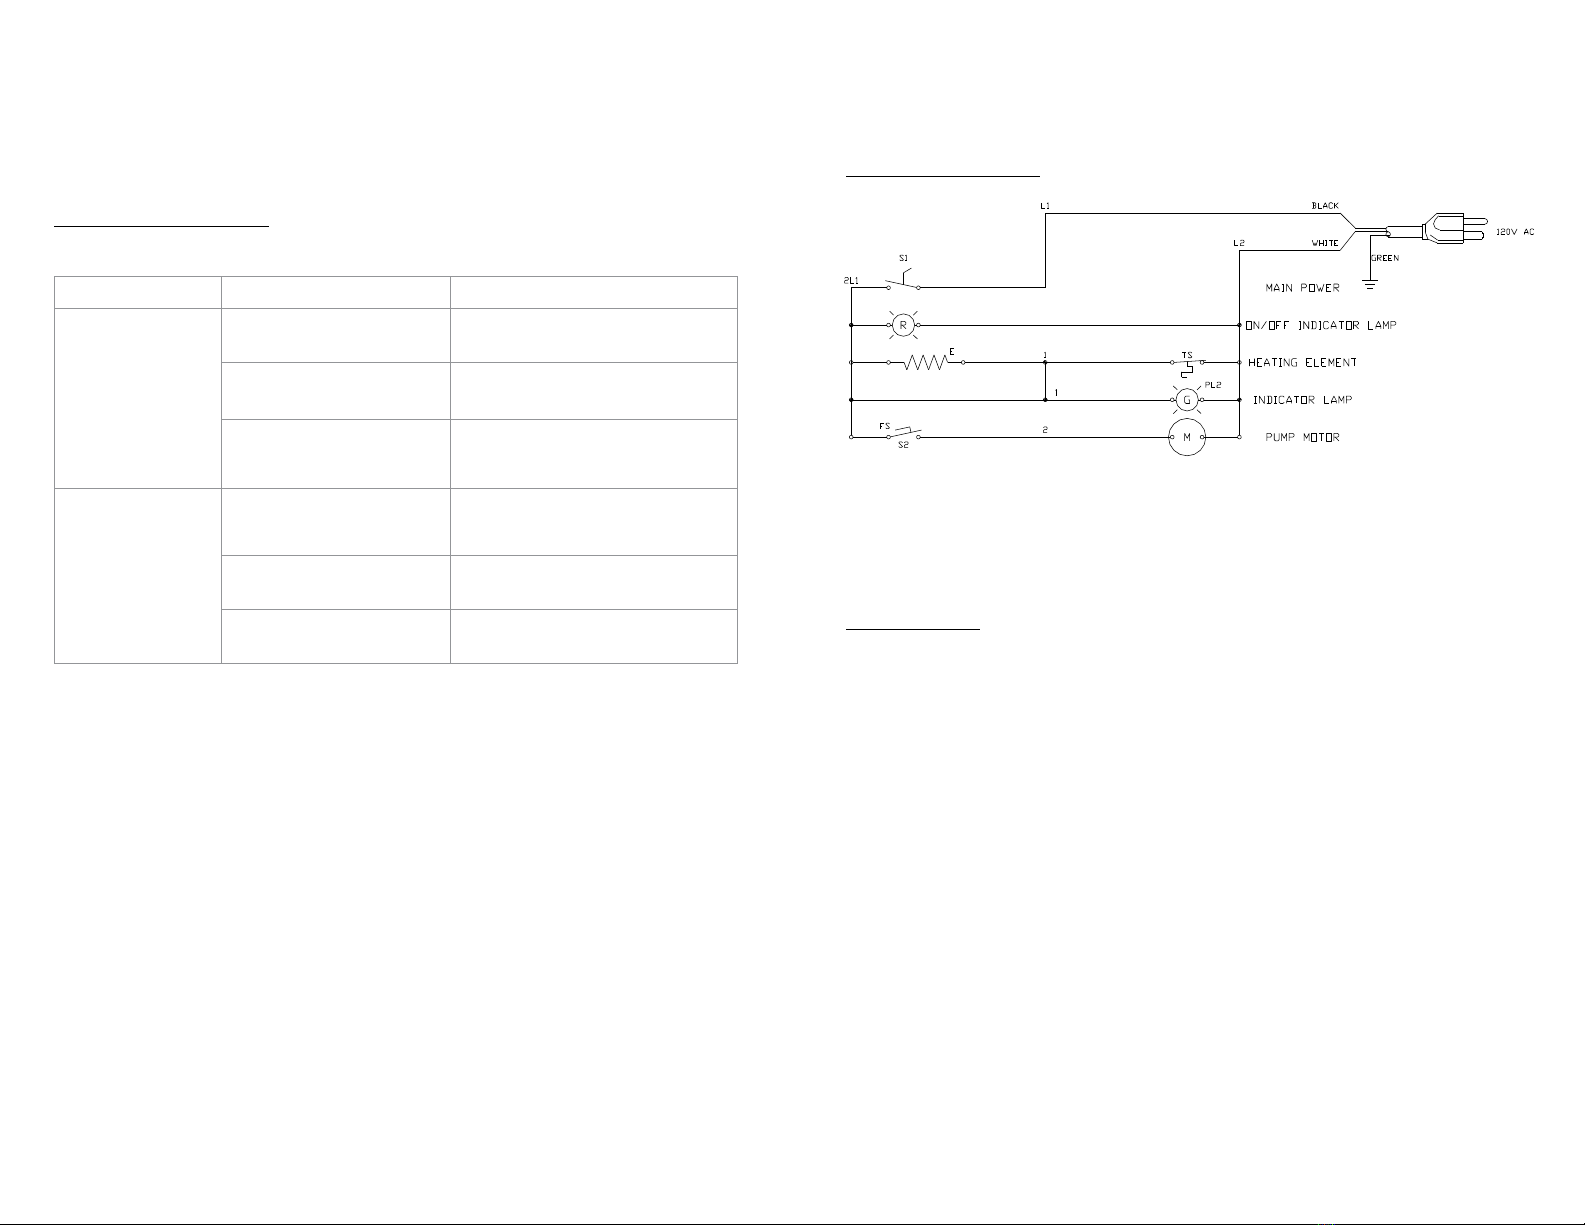
3. Plug the power cord into a 120 volt 15 amp (minimum) receptacle.
4. Place the foot pedal on the oor so that it rests conveniently at the left side of
the unit.
5. Place the end of the clear vinyl water intake hose into a container of distilled
water. Make sure that the copper tubing extending from the vinyl is at the
bottom of the container.
NOTE: USE DISTILLED WATER ONLY. TAP, SPRING AND FILTERED WATER ARE NOT
THE SAME AS DISTILLED WATER AND CAN DAMAGE THE STEAM GENERATOR. THE
USE OF NON-DISTILLED WATER WILL CAUSE MINERAL DEPOSITS WHICH WILL CLOG
THE STEAM CHAMBER AND OUTPUT NOZZLE. THE DAMAGE WILL BE SEVERE.
3.0 OPERATING INSTRUCTIONS
This section contains instructions and information required to operate the GEMIII.
Before operating the GEMIII, it is important that the operating personnel become
thoroughly familiar with the operating instructions.
3.1 OPERATING INSTRUCTIONS
The following steps outline the procedures for operating the GEMIII.
1. Turn the power switch to the on position and the red light will come on to
indicate that the machine is on.
2. The warm up time will be approximately ten minutes but it may vary. As soon as
the machine is turned on, the pump should be primed. Step on the foot pedal
and you should see distilled water owing through the vinyl tubing. Continue
depressing the foot pedal until the water reaches the inside of the machine.
3. The green “ready” light will come on indicating that the chamber is fully
heated and that the unit is ready for use. During use and throughout the day
the green light will cycle (on and off) in order to maintain maximum chamber
temperature. To make steam, wait until the green “ready” light comes on for
the rst time. Then push the foot pedal for approximately three to ve seconds.
NOTE: DO NOT HOLD FOOT PEDAL LONGER THAN FIVE SECONDS OR THIS WILL
CAUSE STEAM CHAMBER TO FILL WITH WATER. WHEN THIS HAPPENS THE ELEMENT
WILL HAVE TO REHEAT THE CHAMBER. WHEN THE CHAMBER IS HEATING THE
WATER INSIDE WILL SLOWLY TURN TO STEAM AND ESCAPE THROUGH THE NOZZLE.
THE LIGHT WILL CYCLE BACK TO GREEN WHEN HOT AND CAN BE OPERATED
NORMALLY AGAIN.
4. In normal use the steam will always be available. However, for long or
extended steam outputs the pressure and volume will decrease and, in some
cases the unit may require a few moments for the chamber to be brought
back to “ready” temperature.
NOTE: DURING NORMAL OPERATION SOME STEAM MAY ESCAPE FROM THE NOZZLE
WHEN NOT BEING USED. THIS IS JUST SMALL AMOUNTS OF WATER LEFT IN THE
CHAMBER TURNING TO STEAM.
CAUTION
AFTER RELEASING FOOT PEDAL, THIS UNIT WILL CONTINUE TO STEAM FOR
APPROXIMATELY 15 SECONDS. THIS IS NORMAL OPERATION.
WARNING
THE STEAMER STAYS HOT FOR A LONG TIME. TO AVOID BURNS, ALLOW THE
STEAMER TO COOL COMPLETELY BEFORE CLEANING.
3.2 CLEANING INSTRUCTIONS
The GEMIII Flash Steamer has a stainless steel, corrosion resistant and easy to
clean housing. To keep the housing clean and sanitized, have the steamer fully
cooled and wipe all exterior surfaces with antibacterial wipes such as Clorox®
Disinfecting Wipes.
This procedure should be performed at the end of each day or shift.