7
XL-FW20130RM-en-US Rev C · 2022-01-03 · Amendments and Errors Reserved · © SAF-HOLLAND, Inc., SAF-HOLLAND, HOLLAND, SAF,
and logos are trademarks of SAF-HOLLAND S.A., SAF-HOLLAND GmbH, and SAF-HOLLAND, Inc.
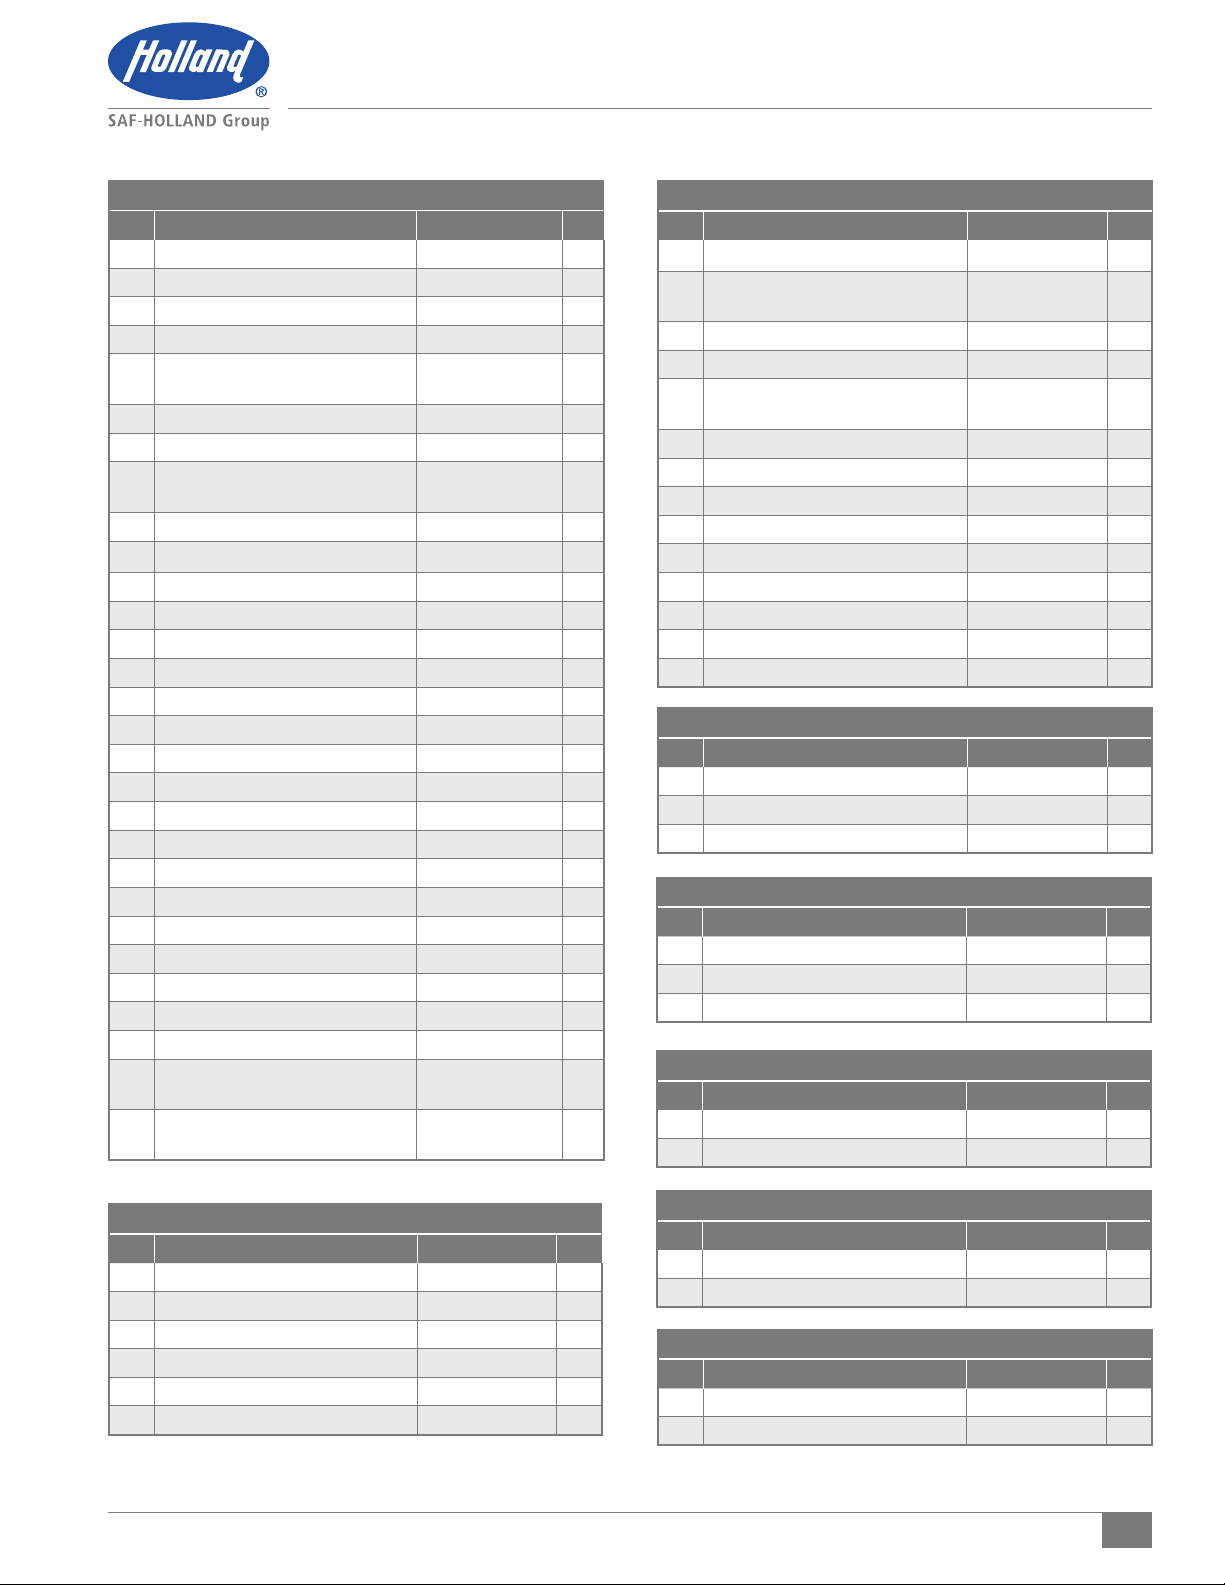
Parts List
RK-351-TT AND RK-351-UBT PARTS LIST
ITEM DESCRIPTION PART NUMBER QTY
1Yoke XA-12044-P 1
2 Yoke Shaft XA-12038-ST 1
3 Yoke Spring XB-1505-P 1
4 Spring Block XD-12028-P 1
5Hex Head Cap Screw,
M12 x 1.75 x 40 mm XB-HCS-M12-40-Z 5
6 Roller, 5/8" I.D. XA-1507-1-P 1
7 Washer, 5/8" I.D. x 1-3⁄4" O.D. XB-460 1
8Hex Head Cap Screw, M16 x 2 x
50 mm (Yoke/Cam Connection) XB-12049 1
9 Roll Pin, Ø1/2" x 2-3/4" XB-21-S-500-2750P 1
10 Torsion Spring XB-2149-P 1
11 Secondary Lock XA-3542-T-P 1
12 Lock Nut, M12 x 1.75 XB-HLN-M12-Z 3
13 Washer, 14 mm I.D. x 45 mm O.D. XB-76004 2
14 Cam Plate Assembly XA-12036-A 1
15 Roller, 1/2" I.D. XA-1029-P 1
16 Cam Spring, Inner XB-10087-P 1
17 Cam Spring, Outer XB-10088-P 1
18 Clevis Pin XA-12039-P 1
19 Washer, 5/8" I.D. x 1-1/4" O.D. XB-06180 1
20 Bushing XA-10810-P 2
21 Air Cylinder XA-12057 1
22 Lock Pin XA-12046-P 2
23 Lock Set XA-08332-1-P 1
24 Lock Pin Washer, 1-1/8" I.D. x 2" O.D. XB-10249 2
25 Lock Nut, M27 x 3 XB-12027 2
26 Lock Spring XB-07628-P 1
27 Never-Seez®(Not Shown) XB-02967 1
28a Pocket Insert (included with
RK-351-TT kit) XD-12026-P 2
28b Pocket Insert (included with
RK-351-UBT kit) XD-08908-P0 2
RK-12196 PARTS LIST
ITEM DESCRIPTION PART NUMBER QTY
2 Yoke Shaft XA-12038-ST 1
5Hex Head Cap Screw,
M12 x 1.75 x 40 mm XB-HCS-M12-40-Z 3
6 Roller, 5/8" I.D. XA-1507-1-P 1
7 Washer, 5/8" I.D. x 1-3⁄4" O.D. XB-460 1
8Hex Head Cap Screw, M16 x 2 x
50 mm (Yoke/Cam Connection) XB-12049 1
12 Lock Nut, M12 x 1.75 XB-HLN-M12-Z 3
13 Washer, 14 mm I.D. x 45 mm O.D. XB-76004 2
14 Cam Plate Assembly XA-12036-A 1
15 Roller, 1/2" I.D. XA-1029-P 1
16 Cam Spring, Inner XB-10087-P 1
17 Cam Spring, Outer XB-10088-P 1
18 Clevis Pin XA-12039-P 1
19 Washer, 5/8" I.D. x 1-1/4" O.D. XB-06180 1
20 Bushing XA-10810-P 1
RK-12058 PARTS LIST (XA-351-TT SERIES ONLY)
ITEM DESCRIPTION PART NUMBER QTY
29 Clinch Pin XB-12043 2
30 Bracket Pin XA-12037-P 2
31 Rubber Bushing XB-0011 2
BRACKET COMPONENTS (XA-351-UBT SERIES ONLY)
ITEM DESCRIPTION PART NUMBER QTY
32 Hex Head Cap Screw, 1-1⁄8"-7 x 7" XB-BR-118-C-7 2
33 Lock Washer, 1-1⁄8" XB-E-536 2
34 Rubber Bushing XB-1604-5 2
SERVICE TOOLS
ITEM DESCRIPTION PART NUMBER QTY
36 Kingpin Gauge TF-0110 1
37 Kingpin Lock Tester TF-TLN-5001 1
RK-PKT-5 PARTS LIST (XA-351-TT SERIES ONLY)
ITEM DESCRIPTION PART NUMBER QTY
28a Pocket Insert XD-12026-P 2
35 Double Face Tape XB-09422 4
RK-PKT-2 PARTS LIST (XA-351-UBT SERIES ONLY)
ITEM DESCRIPTION PART NUMBER QTY
28b Pocket Insert XD-08908-P0 2
35 Double Face Tape XB-09422 4
RK-12197 PARTS LIST
ITEM DESCRIPTION PART NUMBER QTY
22 Lock Pin XA-12046-P 2
23 Lock Set XA-08332-1-P 1
24 Lock Pin Washer, 1-1/8" I.D. x 2" O.D. XB-10249 2
25 Lock Nut, M27 x 3 XB-12027 2
26 Lock Spring XB-07628-P 1
27 Never-Seez®(Not Shown) XB-02967 1
Note: Kits available from a local SAF-HOLLAND Distributor.