Hollywood Baja Bicycle Carriers B2 User manual

When using the Hollywood Baja rack, please follow these important recommendations:
Install the Baja rack on structurally sound trunks and rear decks only. If you own a Mini Van or Sport
Utility Vehicle (SUV), be sure to read the
special notes below.
Never attach hooks to aluminum, plastic,
glass, fiberglass or carbon fiber. If in
doubt, check the surface with a magnet. If
the magnet sticks, it’s okay to use the
rack. If not, do not use the rack on the
subject vehicle. The rack strap hooks can
damage non-steel surfaces. Hooks may be
attached to roof rack cross bars. Check the
contour of the bar first.
Clean the surface of the trunk, rear door
or deck lid before installation of the rack.
Clean the surfaces of the sponge pads on
your Baja rack. Dirt trapped between the
pads of the rack and the trunk can scratch
the vehicle’s paint due to the abrasive composition of dirt.
Tighten all six straps both before and after mounting bikes on the rack.
Never place more than 100 lbs. (45 KG) on either the Baja 2 or Baja 3 racks.
Use at least the two upper rubber tie down straps per bike when securing your bike(s) to the rack. The
lower (Anti-Sway) rubber strap should also be placed around the bike’s seat tube or front tire to prevent the
bike(s) from moving on the rack as you drive.
Always use the attached safety tie down strap/buckle after loading all of the bicycles onto the rack. This
final Safely Strap should be threaded through all of the bikes, and the frame of the Baja rack itself.
Keep the bicycle tires at least one foot (1’=30 cm approx.) away
from the exhaust pipe(s). Automotive exhaust is hot enough to melt
bicycle tires.
Check the rack, bikes and straps regularly during use.
Drive slowly when used on bumpy or rock/dirt surface roads.
Mounting the Hollywood Baja Rack on Your Vehicle:
Your new Baja (2 or 3) rack comes to you fully assembled in the box,
so there is no assembly to do on the rack itself. There will be some
adjustment and set-up required so that the Baja will fit on your vehicle
correctly. Please read and adhere to all instructions as follows:
1. After removing your Baja rack from the box, loosen the black hubs by flipping the hub lever outward
(away from the rack). This will allow the two sections of the rack frame to move relative to one another for
correct rack placement on your vehicle. Note how the teeth on the hubs interlock into place. See Fig. 2a.
showing the hub and lever in the open position. The Baja is adjustable to clear spoilers and small rear wings.
2. Adjusting the rack frame: Position the Baja rack on the vehicle such that the bicycle support arms are
parallel to the ground, or angled slightly upward at the back of the rack. The rear brace should rest on a steel
trunk lid, or rear door. See Fig. 1. If necessary (particularly on vans, station wagons and SUV’s) the upper
Hub Leve
r
Installation Instructions for Hollywood
Model B2 and B3 Baja bicycle carriers
1
Fig. 1a Fig. 1b
Fig. 2A

pads may rest on glass. This is because the weight of the rack and bicycles is support by the upper straps, and
the lower pads. Be careful not to interfere with rear mounted wiper blade if the vehicle is so equipped.
3. Once the proper rack position has been determined by
moving the Baja’s bicycle support arms and rear brace, tighten the hubs
by flipping black levers in and locking them in place against the rack;
then rotate the lever and/or cup until the hubs are snug and secure.
See Fig. 2b.
Be sure that the teeth of the black hubs are interlocked evenly,
so that the support arms are parallel. See Fig. 1.
4. Attaching the straps: Begin attaching straps with the upper (farthest
forward) pair, placing the hooks in the most forward trunk lid opening, and then pulling on the end of the
strap until the proper length is reached. Once the upper straps have been attached, the side and bottom straps
can be attached in any order. If your vehicle has a “soft” plastic bumper, the lower straps may be attached to
the lower edge of the trunk lid, or rear door opening instead of the bumper.
5. When all six straps are attached, pull on each strap to make sure that the hooks are properly seated, and that
all straps are tight. After mounting the bikes, recheck and retighten all straps since the weight of the bike(s)
often adds tension to the upper straps, and removes and equal amount of tension from the lower straps.
Mounting bike(s) to your Hollywood Baja rack:
6. Attach the rubber straps (total 6 for Baja 2, or 9 for Baja 3) to the rubber cradles and anti-sway
blocks (beneath every other cradle). Start with the round (end) hole of the strap stretched over the diamond
shaped “nub” on the cradle. Which hole you choose for the other “nub” will depend on the diameter of the
bicycle’s specific tube placed in the cradle, or next to the Anti-Sway block. Each strap should snuggle firmly
and completely over the “nub.” Check to make certain all straps are attached correctly before proceeding. Be
sure not to route straps over any cables (see Fig. 3.), but rather under them (see Fig. 4). This will protect the
finish on the bicycle frame and provide a more solid mounting on the rack.
7. Place the heaviest bike onto the rack first (closest to the vehicle), putting the bike’s top tube (usually)
into the rubber cradles on the support arms. It generally works out best to put the first bike’s handlebars on the
driver’s side of the car. Be sure to note the location of the pedal, as you may have to rotate the crank in order
to keep the pedal from hitting the vehicle. Pull the rubber strap across the bike’s frame tube and attach it to
the “nub” on the opposite side of the cradle for both right and left cradles. Straps should be snug, but do not
over-tighten the straps since this may shorten the useful life of the strap.
Fig. 3
Not like this!
Fig. 4Like this!
cup
2
Fig. 2b

Fig. 7: On a bike with a slanted top tube, place top
tube on rear cradle, and down tube on front cradle
to keep bike as “level” as possible.
8. Next, rotate the Anti-Sway block so that it rests against the bike’s seat tube (this is the frame tube into
which the seat post fits). See Fig. 6. Pull the strap across the bike’s seat tube in a similar snug, but not over-
tight motion as with the previous straps, and snap on to appropriate “nub.” On some bikes, it may be
necessary to unbolt the Anti-Sway block and turn it around, and mount it to a tire (see Fig. 5.), or other
appropriate part of the bike. For very small bikes (children’s and some ladies bikes) it may be necessary to
remove the Anti-Sway block. One of the advantages of the Hollywood Anti-Sway block, is that it’s so
versatile, easy to use and easily removable.
Euro Note: Special instructions for use in Europe: It is the
driver’s responsibility to insure that the vehicle number plate
and lights are visible.
Special Notes for SUV’s and Mini-Vans: The rear cargo
door on many SUV’s and Mini-vans may not be structurally
strong enough to support the weight of the Baja rack and
bicycles. For these vehicles we recommend the Model F4
Heavy Duty, or F6 Expedition bumper mount racks. If your
vehicle has a 1-1/4” or 2” receiver hitch, we recommend
fitting a Hollywood hitch rack.
Fig. 5.
Anti
–Sway
block on
front tire.
Fig. 6
Anti-Sway
block on seat tube.
Hollywood Baja 2 y 3 Portabicicletas
Esta hoja de instrucción es aplicable para, 2 y 3 bicicletas capacidades en esta porta bicicletas por
favor
seguir las siguientes importantes recomendaciones:
•SE instala el portabicis Baja en cubiertas metalicas solamente.Si posees una mini furgoneta o un vehículo para uso (SUV), estar
seguro leer las notas especiales abajo.
.Nunca poner los ganchos al aluminio, plástico, cristal, fibra de vidrio, carbón. Si duda, comprobar la superficie con un imán. Si
pega, es aceptable utilizar el portabici. Si no, no utilizar el portabici en el vehículo. Los ganchos de la correa del portabici pueden
dañar la sup
erficies . Los ganchos se pueden unir a las barras cruzadas de la azotea. Comprobar el contorno de la barra primero. Para
estar seguro que aceptara y conservara el gancho con seguridad .
• Limpia la superficie de la puerta posterior o de la tapa de la c
ubierta antes de la instalación del portabici. Limpiar las superficies de
las esponja en tu portabici Baja. La suciedad atrapada entre los cojines del portabici y el maletero puede rasguñar la pintura del
vehículo debido a la composición abrasiva de la su
ciedad.
• Aprieta las seis correas todas antes y después que montan las bicis en el portabici.
• Nunca pone más de 100 libras. (45 kilogramos) en el Baja 2 o Baja 3 .
3
9. Once all bikes have been mounted and all rubber straps pulled snug,
wrap the loose end of the attached nylon strap (fig 8) around all the bikes
(may be necessary to go through wheels), then insert the strap end into
buckle, then tighten strap in buckle. Remember to re-check
All straps after bikes
have been mounted.
Fig. 8

.
Uso de las correas de goma. Minimo 2 por cada bici .para asegurar las bicis a tu porta bicis
.USA las dos correas de goma en la parte de arriba.y al lado se debe ta
mbién colocar alrededor del tubo del asiento de la bici o del
neumático delantero para evitar que las bicis se muevan en el portabicicletas mientras que conduces.
• usa siempre la correa de 86’’ alrededor de todas las bicis, y del marco del portabicicletas .
• bici por lo menos un pie lejos del tubo de escape. es bastante caliente y puede derretir los neumáticos de la bici.
• Revisar el portabici. las bicis y las correas regularmente durante el uso.
• Impulsión del vehiculo lentamente cuando está utilizado en los caminos superficiales desiguales o de roca.
Montar el Hollywood Baja en tu vehículo:
Tu nueva baja (2 o 3) viene completamente emsanblada en la caja,no hay nada que emsanblar .solamente Habra que hacer ciertos
agustes ,para que tu portabici baja pueda quedar en tu vehiculo correctamente.por favor Leer y seguir todas las istrucciones a
continuacion:
1 Sacar tu portabici Baja de la caja, aflojar cubos negros jalando la palanca del cubo hacia fuera Esto permitirá que las dos
secciones del marco del portabicis tengan movimiento relativo una a otra para colocacion correcta del portabici en tu vehiculo.
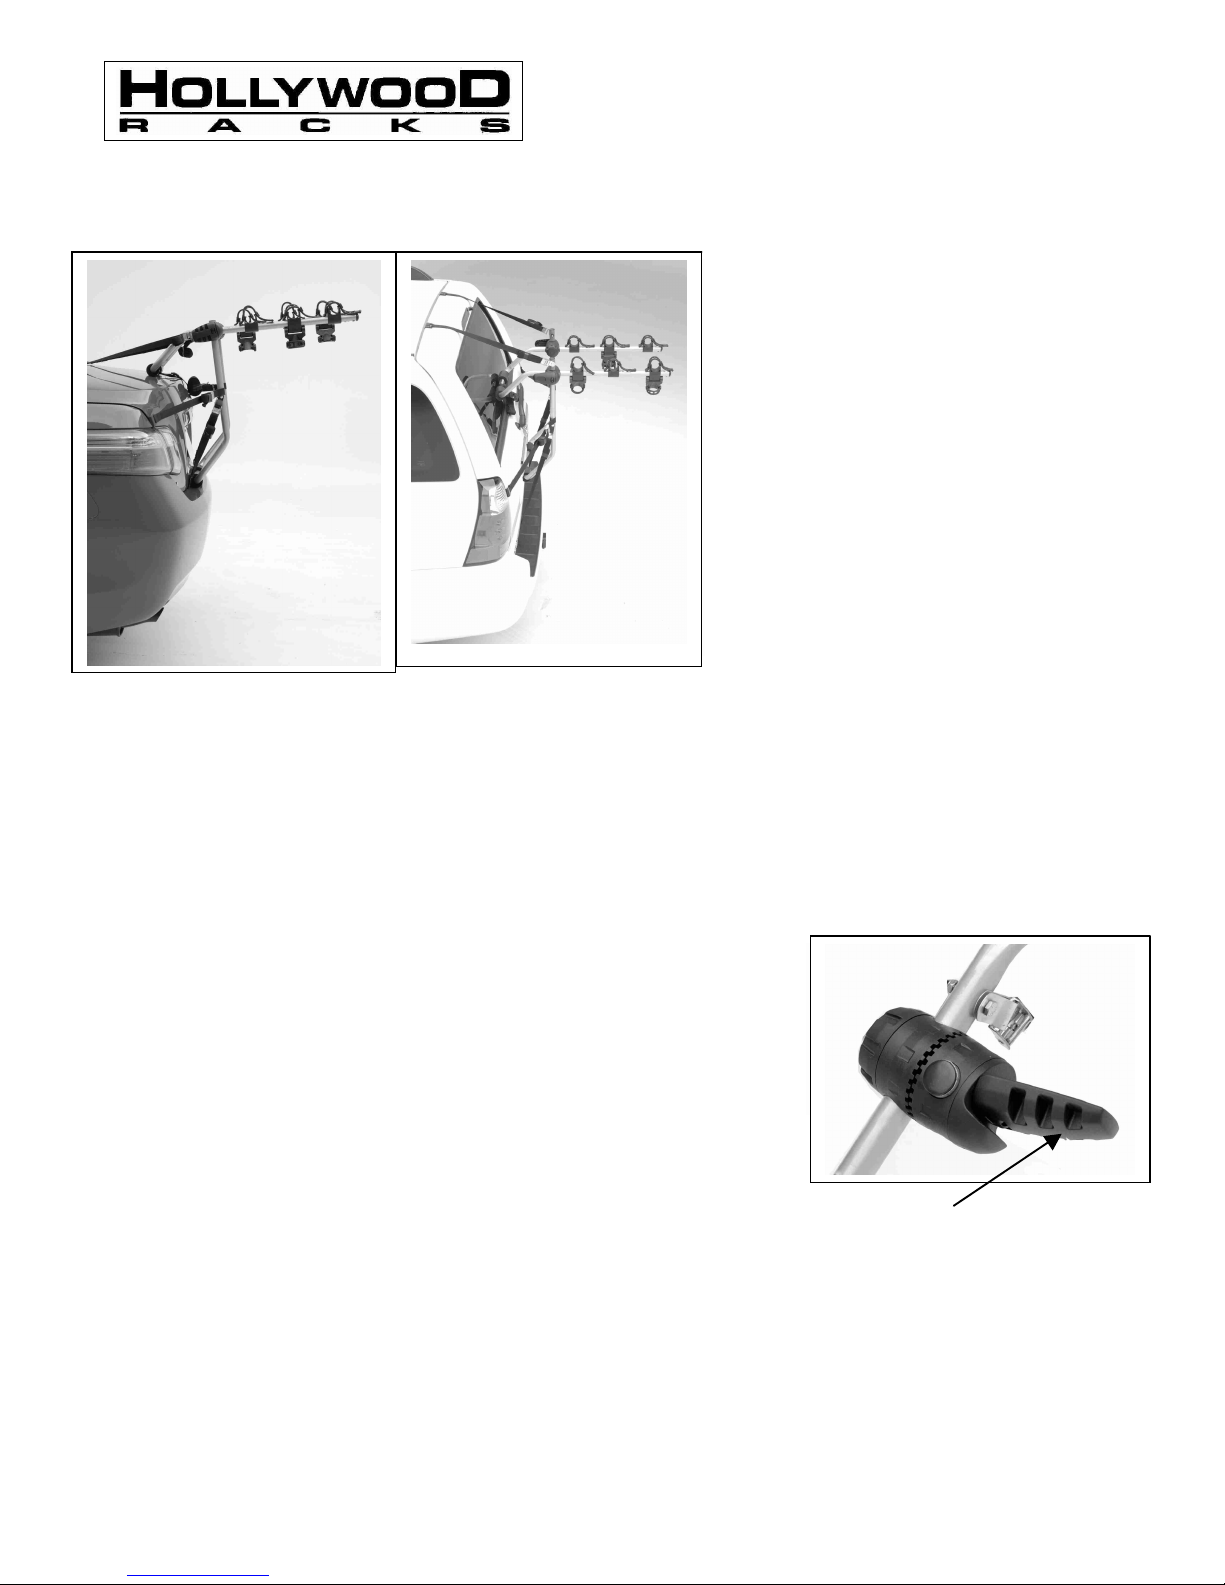
Nota ver cómo los dientes en los cubos se enclavijan en su lugar. Vease figura 2a.
2. Ajuste del marco del portabici: Colocar el portabici Baja en el vehículo tales que los brazos del portabici sean paralelos a la
tierra, o en angulo levemente hacia arriba en la parte posterior del portabici. El apoyo posterior debe reclinarse sobre la parte
superior, o puerta trasera. Vease figura 1. En
caso de necesidad (particularmente en las furgonetas, y SUV) los cojines superiores
pueden reclinarse sobre el cristal. Esto es porque el peso del portabici y
de las bicicleta esta apoyado por las correas superiores, y en los cojines de abajos. Tener cui
dado de no interferir con el limpiador
del crystal si el vehiculo asi esta equipado.
3. Una vez que la posición apropiada del portabicicletas haya sido determina ajustar los brazos del portabici Baja apretar los
cubos moviendo de un jalon la palancas negras hacia adentro y trabándolas en su lugar contra el portabici; entonces rotar la
palanca hasta que los cubos son apretados un poco y seguros. Vease figura 2b. Ser seguro que los dientes de los cubos negros
están enclavijados correctamente, de modo que los brazos de soporte sean paralelos. Vease figura 1.
4. Atadura de las correas: son 6 correas por todo 2 para la parte de arriba,2 hacia los lados,y 2 para la parte de abajo,meter los
ganchos entre la averturas,los ganchos de abajo estar seguros de que agarran en partes solidas y no suaves.
5. Cuando se colocan las seis correas, tirar de cada correa para cerciorarse de que los ganchos están asentados correctamente, y que
todas las correas son apretadas. Después de montar las bicis, volver a inspeccionar y volver a apretar todas las correas puesto que
el peso de las bicis agrega a menudo la tensión a las correas superiores,
. Montaje de las bicicletas a tu Hollywood portabicicletas baja:
6. Unir las correas de goma (total 6 en Baja 2, total 9 en Baja 3) a las horquillas, y bloques Anti-movimiento Comenzar con el
agujero redondo de la correa estirada sobre el “pedazo de forma diamantada” en la horquilla. Qué agujero eliges para el otro el
“pedazo” dependerá del diámetro del tubo específico de la bicicleta colocada en la horquilla, o al lado del bloque Anti-
movimiento. Cada correa se estira firmemente y totalmente Comprobar para asegurarse que todas las correas esten colocadas
correctamente. Ser seguro no colocar correas sobre cualquier cable (véase figura 3.), pero debajo de él si (véase figura 4). Esto
protegerá el afinado en el marco de la bicicleta y proporcionará un montaje más sólido en el portabicicleta.
7. Colocar la bici más pesada sobre el portabici primero (lo más cerca al vehículo), poniendo el tubo superior de la bici en las
horquillas de goma.de los brazos del portabici colocar lo mejor posible los manirales de la primera bici al lado del conductor del
coche. Ser seguro observar la localización del pedal, como puedas tener que rotar para guardar el pedal de golpear el vehículo.
Tirar de la correa de goma a través del tubo del marco de la bici
y unirla al “pedazo” en el lado opuesto de la horquilla para las horquillas derechas e izquierdas. Las correas deben ser apretadas un
poco, pero no aprietan las correas demasiado puesto que ésta puede acortar la vida útil de la correa.
8. Después, rotar el bloque Anti-movimiento de modo que se recline contra el tubo del asiento de la bici .Vease figura 6. Tirar de
la correa a través del tubo del asiento de la bici en un movimiento similar como con las correas anteriores, y un poco de presión
apretados un poco, pero no apretados fuertes para apropiarse del “pedazo.” En algunas bicis, puede ser necesario desarmar el
bloque Anti
-movimiento y darle vuelta alreves, y le monta en el neumático (véase figura 5.), o la otra pieza apropiada de la bici.
Para las bicis muy pequeñas puede ser necesario quitar el bloque Anti-movimiento. Una de las ventajas del bloque Anti-
movimiento de Hollywood, es que es tan fácil de utilizar y fácilmente desprendible.
9. Una vez que todas las bicis se monten en el portabicicletas Baja, y todas las correas de goma se tiran cómodamente sobre sus
“tubos respectivos, colocar la correa de 86’ alrededor de todas las bicis y el marco posterior del mismo. Recordar volver a
inspeccionar todas las correas después de que se hayan montado las bicis. Volver a apretar las correas cuanto sea necesario.
10. ¡Cuando tu portabici Baja no esta en uso, las palancas del cubo se pueden abrir de nue
vo de modo que el portabici doble como
era cuando lo sacaste de la caja!
Nota para Europa: Instrucciones para el uso especiales en Europa: Es la responsabilidad del conductor asegurar que las luces
traseras y el numero de placa del vehiculo sean visibles. Utilizar el portabicicletas modelo “elevador F10” de Hollywood en vez
del baja.es requerido por la ley
Notas especiales para SUV y Mini-Furgonetas: La puerta de carga posterior en muchos SUV y Mini-furgonetas puede no ser
fuerte para soportar el peso del portabicis y de las bicicletas Para estos vehículos recomendamos los portabicis modelo F4oF6.Si
tu vehículo tiene recividor 1-1/4” o” 2’recomendamos un porta bicicletas para recividor Hollywood.
6

Instructions d’installation pour les porte-vélos Hollywood Baja 2 et Baja 3
Quand vous installez le Baja Rack sur votre véhicule, rappeler vous des points suivants.
1. Installer uniquement le Baja Rack sur un coffre arrière solide.
2. Ne jamais installer les crochets superieurs sur du plastique, du verre ou de la fibre de verre.
3. Nettoyer la surface du coffre ou le Baja va être installé.
4. Serrer toutes les sangles avant et après avoir monter les vélos sur le Baja.
5. Ne Jamais depasser 45 kg sur le Baja.
6. Garder les pneus des vélos a plus de 30 cm du pôt d’échappement.
7. Vérifier le Baja, les vélos, la tension des sangles et les mollettes régulièrement pendant l’utilisation.
8. Conduiser avec prudence sur les routes dont le revêtement est mauvais.
Attention: Plaque Mineralogique et feux arrières doivent être toujours bien visible.
Installation du Baja Rack:
1.Ouvrir les attaches rapides du Baja (fig 2a.) jusqu’à que les 2 sections du rack peuvent bouger
independemment l’une (cadre principal) de l’autre (bras de support).
2.Placer le cadre principal de façon a ce qu’il soit perpendiculaire au sol. Faire pivoter les bras de suppport
de façon à ce qu’ils se reposent sur la coffre/hayon et qu’ils soient parallèles au sol ou légèrement inclinés vers le
haut. Refermer les attaches rapides (fig 2b).
3.Attacher les crochets superieurs au dessus du coffre/ hayon arrière. Serrer les sangles fermement
Placer les sangles inferieures/crochets sous le pare-choc ou au bas du coffre/ hayon arrière. Serrer fermement.
Installer les sangles latérales horizontallement sur le côté du coffre/hayon et serrer fermement.
Monter les vélos sur le Baja:
Attacher les sangles de caoutchouc aux berceaux porteurs sur les bras de support à travers un trou round a
l’extrémité de la sangle avant de monter les vélos. Attachés les sangles des berceaux du côte du véhicule seulement..
Placer le vélo le plus lourd en premier sur le Baja ( le plus proche du véhicule), en mettant le tube superieur
du cadre sur les berceaux en caoutchouc. Le guidon doit être du côté du conducteur. S’assurer que les pédales
du vélo ne touchent pas ou ne toucheront pas le véhicule. Attacher fermement les 3 sangles en caoutchouc comme
sur la Fig. 4, Fig. 5 et Fig. 6. Repeter les mêmes instructions pour le prochain vélo en le mettant dans l’autre sens
(guidon vers le passager). Pour le Baja 3, la direction du troisième vélo est la même que le premier.
Apres avoir mis tous les vélos sur le Baja Rack, attacher la sangle d’attache de vélos a travers les roues
des vélos ET du Baja Rack et serrer fermement (longue sangle de 2 mètre avec boucle a une extremité).
Attention:
Toujours vérifier les sangles après installation et après avoir installer les vélos sur le Baja.
Important:
Le fabriquant de ce produit n’est pas responsible des dommages causés par le mauvais usage de ce produit.
C’est la responsabilité de l’utilisateur de s’assurer que le porte vélo est monté proprement sur le véhicule
et que les vélos soient proprement chargés sur le porte vélo comme decrit dans ces instructions d’installation.
¡Precaución!
Este porta bicicleta se ha diseñado para la mayoría de los vehículos. Es la responsabilidad del usuario asegurar la instalación segura y
apropiada de este producto. la instalación incorrecta de este producto puede dar lugar a daños a
tus bicis, vehículo, o vehículos que siguen detrás de ti. Si los cojines
de este portabici(o de cualquier otro) se están reclinando contra el cristal o un panel e suave, estar enterado que esto puede causar daño a tu vehículo. El
fabricante de este produc
to no extenderá la garantía a ninguna por daños no atribuidos a un defecto en materiales y la ejecución. La guía impresa en este manual se
usa para referencia general solamente.Si se cambia el diseño del vehículo, materiales y los afinados usados en los vehículos automotores de marca la
responsabilidad es del usuario de determinar el uso de este producto. No unir los ganchos al aluminio, cristal,fibra de vidrio, fibra de carbón. ¡Comprobar por favor
la guía apta en la página trasera antes de la instalaci
ón! Si la marca y el modelo de tu coche se enumera como “ningún ajuste,” comprobar con tu distribuidor sobre
ayuda de la instalación, el intercambio para saber si hay otro modelo que quepa, o el reembolso. Esta guía no es completo debido a los cambios cont
inuos en diseño
automotor. preguntas, llamar nuestro departamento de servicio de cliente al: 310-516-8600 lunes. viernes. de 7:00 AM-3: 00PM tiempo del pacífico.
7

CAUTION!
This bicycle carrier has been designed to attach securely to most vehicles. It is the user’s responsibility to insure the safe
and proper installation of this product. Improper attachment or installation of this product may result in damages to your
bicycles, vehicle, or vehicles following behind you. If the pads of this rack (or any rack) are resting against glass or a
structurally soft panel, be aware that this may cause damage to your vehicle. The
manufacturer of this product will not extend
the warranty to any damages not attributable to a defect in materials and workmanship. The fit guide printed in this manual is
intended as a general reference only. On going changes in vehicle design, materials and finishes used on motor vehicles
make it the user’s responsibility to determine the use of this product. Do not attach hooks to aluminum, glass, fiberglass,
moldings, spoilers or carbon fiber parts. Please check the Fit Guide on the back page prior to installation!
If the make and model of your cars is listed as a “No Fit,” check with your dealer about installation assistance, exchange for
another model that will fit, or refund. This guide is not complete due to continuous changes in automotive design. For
answers to questions, call our customer service department at: 800-747-4085 Mon.-Fri. from 7:00AM–3:00PM Pacific time
OR Email us anytime at [email protected]
Limited Lifetime Warranty (effective January 1, 2008):
Hollywood Racks will warranty its car racks and accessories
during the time that an original retail purchaser owns the product subject to
the exclusions and limitations of this warranty. Hollywood Racks will remedy defects in materials and workmanship by repairing or
replacing (at i
ts option) the complete rack or a defective part without charge for labor or parts. Hollywood Racks may elect (at its option) to
issue a refund equal to the purchase price paid for the product.
This warranty does not cover problems caused by normal wear and tear including (but not limited to) weather, scratches, dents, rust,
accidents, unlawful vehicle operation, misuse, abuse, neglect, theft, unauthorized modifications, or unauthorized repair. No warranty is
given for defects resulting in incorrect ass
embly, incorrect installation onto the vehicle, installation on a “no fit” vehicle, incorrect attachment
of bicycles onto the rack, or overloading of the rack’s weight restrictions. This warranty terminates if the original retail purchaser transfers
the product to any other person.
If a product is believed to be defective, the original retail purchaser should contact either the original retailer or Hollywood Racks directly at
Disclaimer of Liability: Repair or replacement of a defective product or the issuance of a refund or credit (as determined by Hollywood
Racks) is a purchaser’s exclusive remedy under this warranty. Damage to a purchaser’s vehicle, cargo, bicycles and or to any other
person is excluded. This warranty is expressly made in lieu of any and all other express warranties, whether oral or written.
Hollywood Racks shall not be liable for any direct, indirect, consequential, incidental, special, punitive or
any other damages in connection with the purchase, use or handling of this product.
Some states do not allow the exclusion or limitation of consequential or incidental damages and the above limitation may not apply to you.
This warranty gives you specific legal rights and you have other rights, which vary from state to state.
Wichtige Hinweise des Bundestamtes für Polizeiewesen Zur Benützung von Fahrrad-Hechträgern
Die Vorrichtung wird am Fahrzeug angebracht und stützt sich auf der stossslange, der Heckklappe und dem Heckfenster ab.
Dabiestehl das Fahrad quer zur Fahrtrichtung. Nach Art. 73 Abs. 2 der Verkehrszulassungsverordnung (VRV) darf bei Motorwagen und
Anhăngern die Ladung seitlich nict Uberagen. Dies dürfte beim Mitführen von einem oder mehreren Fahrrädern mit genannter Vorricht
ung
je nach Fahrzeugbreite problematisch werden. Imweiteren ist auch Art. 89 des VTS, verdecken der Beleuchtungsvorrichtungen und
Kontrollschilder zu beachten.
Demzufolge kann nicht der Träger selbst für unzulässig einstuft werden, sondern nur die Ve
rwendung desselben in Verbindüng mit der
Kombination Transportfahrzeugen und Fahrrad, lässet eine endgültige Beurteilung zu.
Fahreten mit montiertem Träger ohne Fahrräder sind zu unterlassen!
Directives importantes du Conseil Federal pour les offices de police concernant l’utilisation de porte-vélos arriére
L’appareil doit ėtré appuyé sur le véhicule de sorte à ce qu’il vienne se caler sur le pare-choc arriére, le coffer et la vitre arriére.
Cepdantle cycle se positionne perpendiculaire au véhicule. En conséquence, d’aprés l’article 73, paragraphe 2 du décret sur le
autorisalions du code de la route, la charge surles véhicules motorisés et remorques ne doit pas dépasser la larguer totale. Ce qui pourrait
devenair problématique à la charge d’un ou de plusieurs cycles. Plus loin, il faut Aussi prendre compte de l’article 89 VTS l’entrave aux
éclairages arriéres et aux Plaques numériques.
Ainsila combinaison entre les véhicules motorisés et ce genre de porte-vélos ne doit etre utilizes uniquement por le transport de
bicyclettes. Les trajects avec les portes-vélos montes á vide sont interdits.
Hollywood Racks
12812 South Spring Street Los Angeles, CA 90061
(800) 747-4085 (310) 516-8600 Fax (310) 516-8955
Customer Service Hours: 8:00 AM- 3:00 PM Pacific Time
www.hollywoodracks.com [email protected]
Made in Taiwan 110308 c3
8
This manual suits for next models
1
Table of contents
Other Hollywood Automobile Accessories manuals
Popular Automobile Accessories manuals by other brands

AL-KO
AL-KO AK300 Original instructions for use

TruXedo
TruXedo Truxport Owners & installation manual

Ridewell Suspensions
Ridewell Suspensions RAR-260 Installation and service manual

EVSE
EVSE 3704 Series User manual and installation guide

Cruz
Cruz Airo Fix 925-70 Series Assembly instructions

Carrier
Carrier NEOS 200e Operator's manual

Directed
Directed Directechs DB3 installation guide

Kolpin Outdoors
Kolpin Outdoors 2786 Product instructions

Mercedes-Benz
Mercedes-Benz CRADLE ADAPTOR installation instructions

Prorack
Prorack K619 Fitting instructions

ARB
ARB INTENSITY SOLIS user guide

Dakota Digital
Dakota Digital VHX-1200 Instrument Installation