Holman Solid Metal Travelling Sprinkler User manual

2 of 8
Introduction
The Solid Metal Travelling Sprinkler is ideal
for extra large lawns. It is built extra durable with
a heavy duty cast iron body. Self propelled by a
2-speed gearbox, the front wheel travels the path
of the garden hose which can be placed to follow
any path you need. In total, the tractor can travel
up to 60m, watering an area up to 1,100m².
This instruction manual contains useful information
on the proper use and care of this product.
Please read through all instructions before
attempting to install the sprinkler to ensure it
is properly assembled before operation. Please
keep this user guide handy for future use.
Contents
Introduction 2
Overview 3
Connecting the Spray Arms 4
Spray Arm Direction 4
Spray Arm Adjustments 5
Setting up the Hose Track 5
Speed Control 5
Sprinkler Operation 6
Sprinkler Gears 6
Sprinkler Maintenance 6
Sprinkler Flow Rate 7

3 of 8
Overview
Travelling Sprinkler
1. Arm Centre Assembly Post
2. Spray Arms
3. Connector Nuts
4. Travelling Sprinkler Body
5. Back Wheels Assembly
6. Front Wheel Assembly
7. Stop Pin
8. Shut Off Ramp
9. Sprinkler Accessory Pack
10. 12mm Snap-on
Hose Connector
11. 18mm Snap-on
Hose Connector
1
2
8
5
3
9
7
6
4
10
11

4 of 8
Spray Arms
Connecting the Spray Arms:
1. Using the wrench provided, securely
hold the Connector Nut located in the
seat of the Travelling Sprinkler
2. While holding the Connector Nut, thread
the Arm Assembly Centre Post onto the
Travelling Sprinkler and hand tighten
3. Insert both of the Spray Arms into either side of the
Arm Assembly Centre Post as far as they will go
4. Tighten the Connector Nuts until
they feel secure when twisted
To prevent damage, do not lift or carry the
Travelling Sprinkler by the Spray Arms
Model of sprinkler may vary from illustration
Spray Arm Direction:
It is important that the Spray Arms are positioned
correctly, otherwise the Travelling Sprinkler will
not move properly, or it many not move at all
The Spray Arms must rotate clockwise to go forward
Correct
No Movement
Backwards
No Movement
Installation and Setup

5 of 8
Spray Arms
Adjusting the Angle of the Spray Arms:
Adjusting the angle of the Spray Arms
allow you to control the spray distance
For maximum coverage, turn the tips upwards
and out to approximately a 30º angle
For minimum coverage, turn the tips slightly downward
and clear of the Travelling Sprinkler body
Setting up the Hose Track
The Front Wheel of the Travelling Sprinkler
is designed to be placed over top of the hose and
then track the same path as the hose. On some
surfaces the wheel may be prone to veering off the
hose. Users should keep an eye on this when first
operating the Travelling Sprinkler. If the surface is
unsuitable, causing the Front Wheel to veer from the
hose, it may be necessary to use an 18mm hose
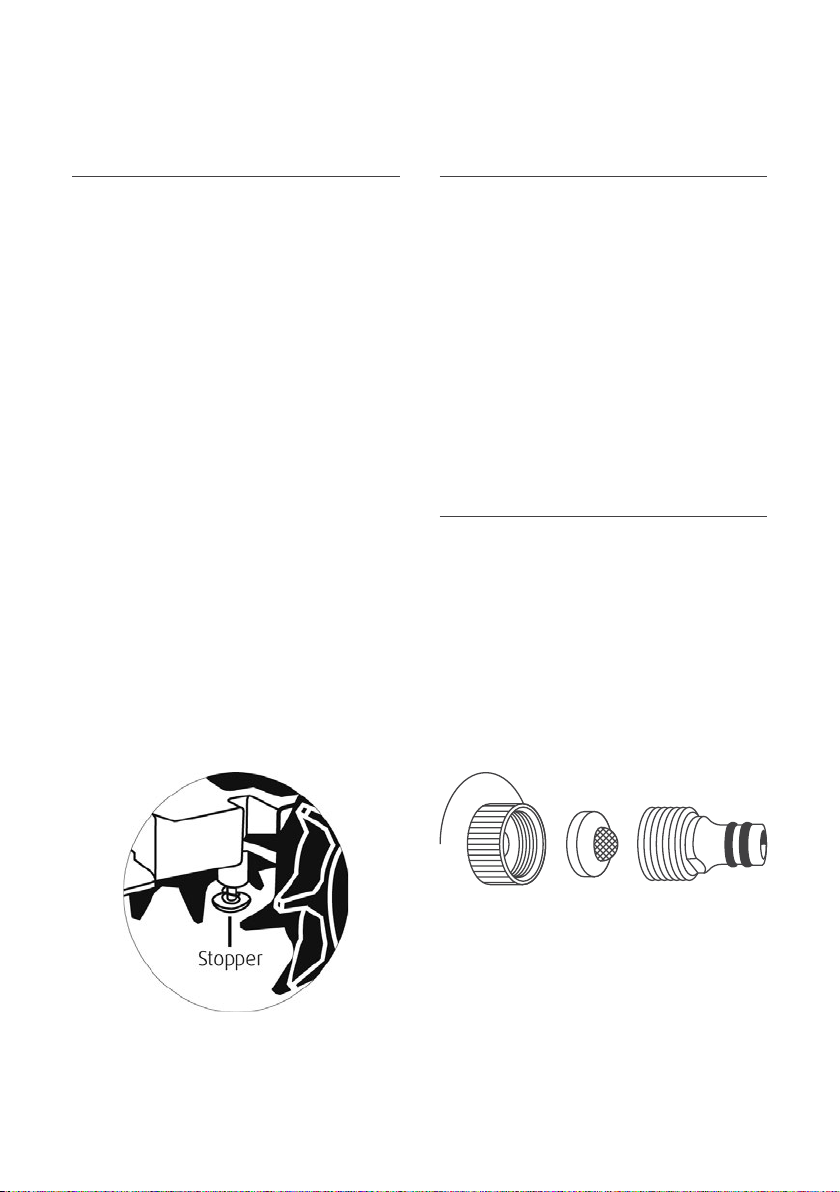
The Travelling Sprinkler comes with both
12mm and 18mm Snap-on Hose Connectors
Up to 60 metres of hose can be used to lay
out a path throughout the yard. To create 180º
turns, a minimum radius of 4.5m is required
Place the Shut Off Ramp on the hose to stop the
Travelling Sprinkler. There should be 1.5m of
straight hose on either side of the ShutOffRamp.
Be sure to anchor the ShutOffRamp into
the ground with the attached spike
Please ensure the Stop Pin is pulled all of the way
out on the underside of the Travelling Sprinkler.
This pin will stop the Travelling Sprinkler from
moving, but will not stop the watering
* For more information, refer page 6
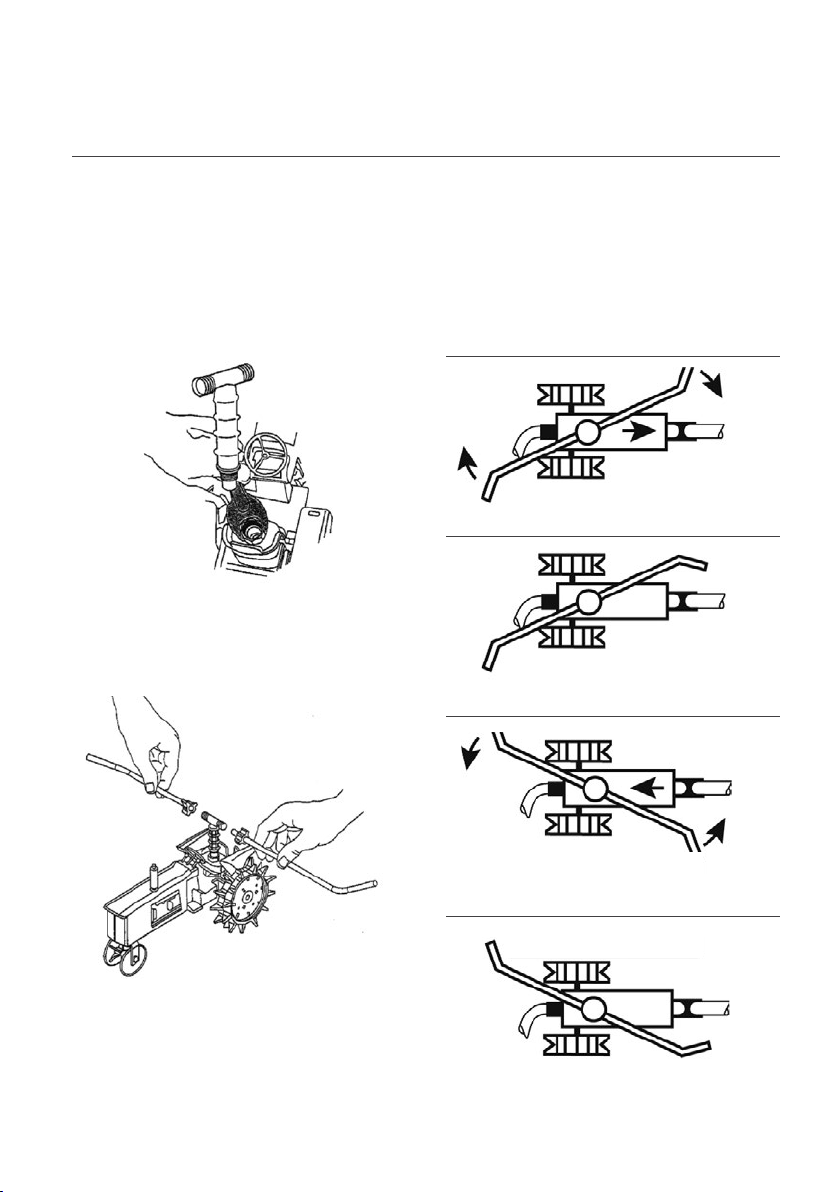
Speed Control
Depending on the speed selected, the
Travelling Sprinkler can travel from 6 to 11
metres per hour. LOW will apply more water,
with HIGH preferred for lighter watering
To water a specific area and to keep
the TravellingSprinkler stationary,
set the control to NEUTRAL
Installation and Setup (continued)

6 of 8
Sprinkler Operation
Sprinkler Operation
The small Front Wheel should straddle the hose
track. The Stop Pin (on the underside of the
Travelling Sprinkler near the BackWheels)
should be pulled out for watering
1. Turn on the water and the Travelling Sprinkler
should start spinning in a clockwise motion
2. If it should stop, turn the water off and be sure
the Stop Pin is pulled all of the way out
3. Then slowly turn the water on again
The Stop Pin will stop at the Shut Off Ramp as
travelling up the ramp will push the Stop Pin closed
If you want to move the TravellingSprinkler
to new location
1. Turn off the water to stop the pressure
2. Pick up the Travelling Sprinkler via the
base and move to the new location
3. Layout a new path with the hose and place the
Travelling Sprinkler on top of the hose
4. Place the Shut Off Ramp in the new position
5. Pull the Stop Pin back out before
turning on the water again
Sprinkler Gears
Protect the water motor gears from damage
by never operating the TravellingSprinkler
on driveways or footpaths
Do not push or pull the TravellingSprinkler
when it is operation
Do not let the Travelling Sprinkler get
stuck in wet areas or low ground that would
keep the wheels from moving forwards,
as this can damage the internal gears
Do not manually stop the rotation of the
Spray Arms. If you need to stop the
SprayArms, turn off the water supply first
Sprinkler Maintenance
These points will help the Travelling
Sprinkler work in the most effective way
1. Clean the Inlet Filter Washer regularly
by removing and rinsing it. A spanner may
be required to tighten back together
2. Drain the Travelling Sprinkler after use,
especially in cold weather. Freezing will
damage the sprinkler if water is left inside.
This includes opening the Stop Pin

7 of 8
Sprinkler Flow Rate
Sprinkler flow rate for 12mm and 18mm Hoses
Chart calculated using 12mm hose of up to 30m length, with an average pressure of 275kPa.
Dependent on sprinkler set up, flow rate ranges from 14Lpm to 20Lpm (average is 17Lpm).
Chart calculated using 18mm hose of up to 60m length, with an average pressure of 275kPa.
Dependent on sprinkler set up, flow rate ranges from 15Lpm to 23Lpm (average is 18.5Lpm).
Values quoted may vary depending on hose length, spray coverage and water pressure
Coverage can be affected by several things including water pressure, hose diameter, hose length and hose weight.
The Travelling Sprinkler is made for established lawns. For delicate, newly
seeded yards, another type of sprinkler should be used
12mm Diameter Hose
Spray Coverage 4.5 Metres 9 Metres 14 Metres
Millimetres of Water 16 23 817 5.5 12
Speed High Low High Low High Low
12mm Diameter Hose
Maximum Hose Length (m) Average Travel Speed (m/hr) Approximate Water Application
High Gear Low Gear High Gear Low Gear
30 10 55.5 12
18mm Diameter Hose
Maximum Hose Length (m) Average Travel Speed (m/hr) Approximate Water Application
High Gear Low Gear High Gear Low Gear
60 11 6 6 13
12mm Diameter Hose
Maximum Hose Length (m) Coverage (calculated with hose length at 60m)
Maximum Width (m) Maximum Area (m2) Effective Width (m) Effective area (m2)
30 16 480 14 420
18mm Diameter Hose
Maximum Hose Length (m) Coverage (calculated with hose length at 60m)
Maximum Width (m) Maximum Area (m2) Effective Width (m) Effective area (m2)
60 17 1020 14 840
18mm Diameter Hose
Spray Coverage 4.5 Metres 9 Metres 14 Metres
Millimetres of Water 17 25 919 613
Speed High Low High Low High Low

Thanks for being a
#SMARTGARDENER
We really appreciate having you as a customer, and would like to say thank you for choosing us.
We recommend registering your new product on our website. This will ensure we have
a copy of your purchase and activate an extended warranty. Keep up to date to with
relevant product information and special offers available through our newsletter.
www.holmanindustries.com.au/product-registration/
Thanks again for choosing Holman
This manual suits for next models
1
Table of contents
Other Holman Irrigation System manuals
Popular Irrigation System manuals by other brands

Autopot
Autopot SmartPot 48 XL Set-up guidelines

Hunter
Hunter Institutional Series I-35 manual

Havahart
Havahart Spray Away Elite II owner's manual

Johnson Controls
Johnson Controls Tyco AQUAMIST AM31 quick start guide

MAZE
MAZE Moisture Sensing Irrigation Kit instructions

Tyco Fire Product
Tyco Fire Product CENTRAL H instruction manual