Christmas Tree
Model: 23PG90087
Sku # 1009 537 790
TM
Step 1. Choose a location near a wall outlet.
Step 2. Unfold the legs of the tree stand and lay the stand on
the floor.
Step 3. Slide the locking disk of the tree stand down until it
snaps into place.
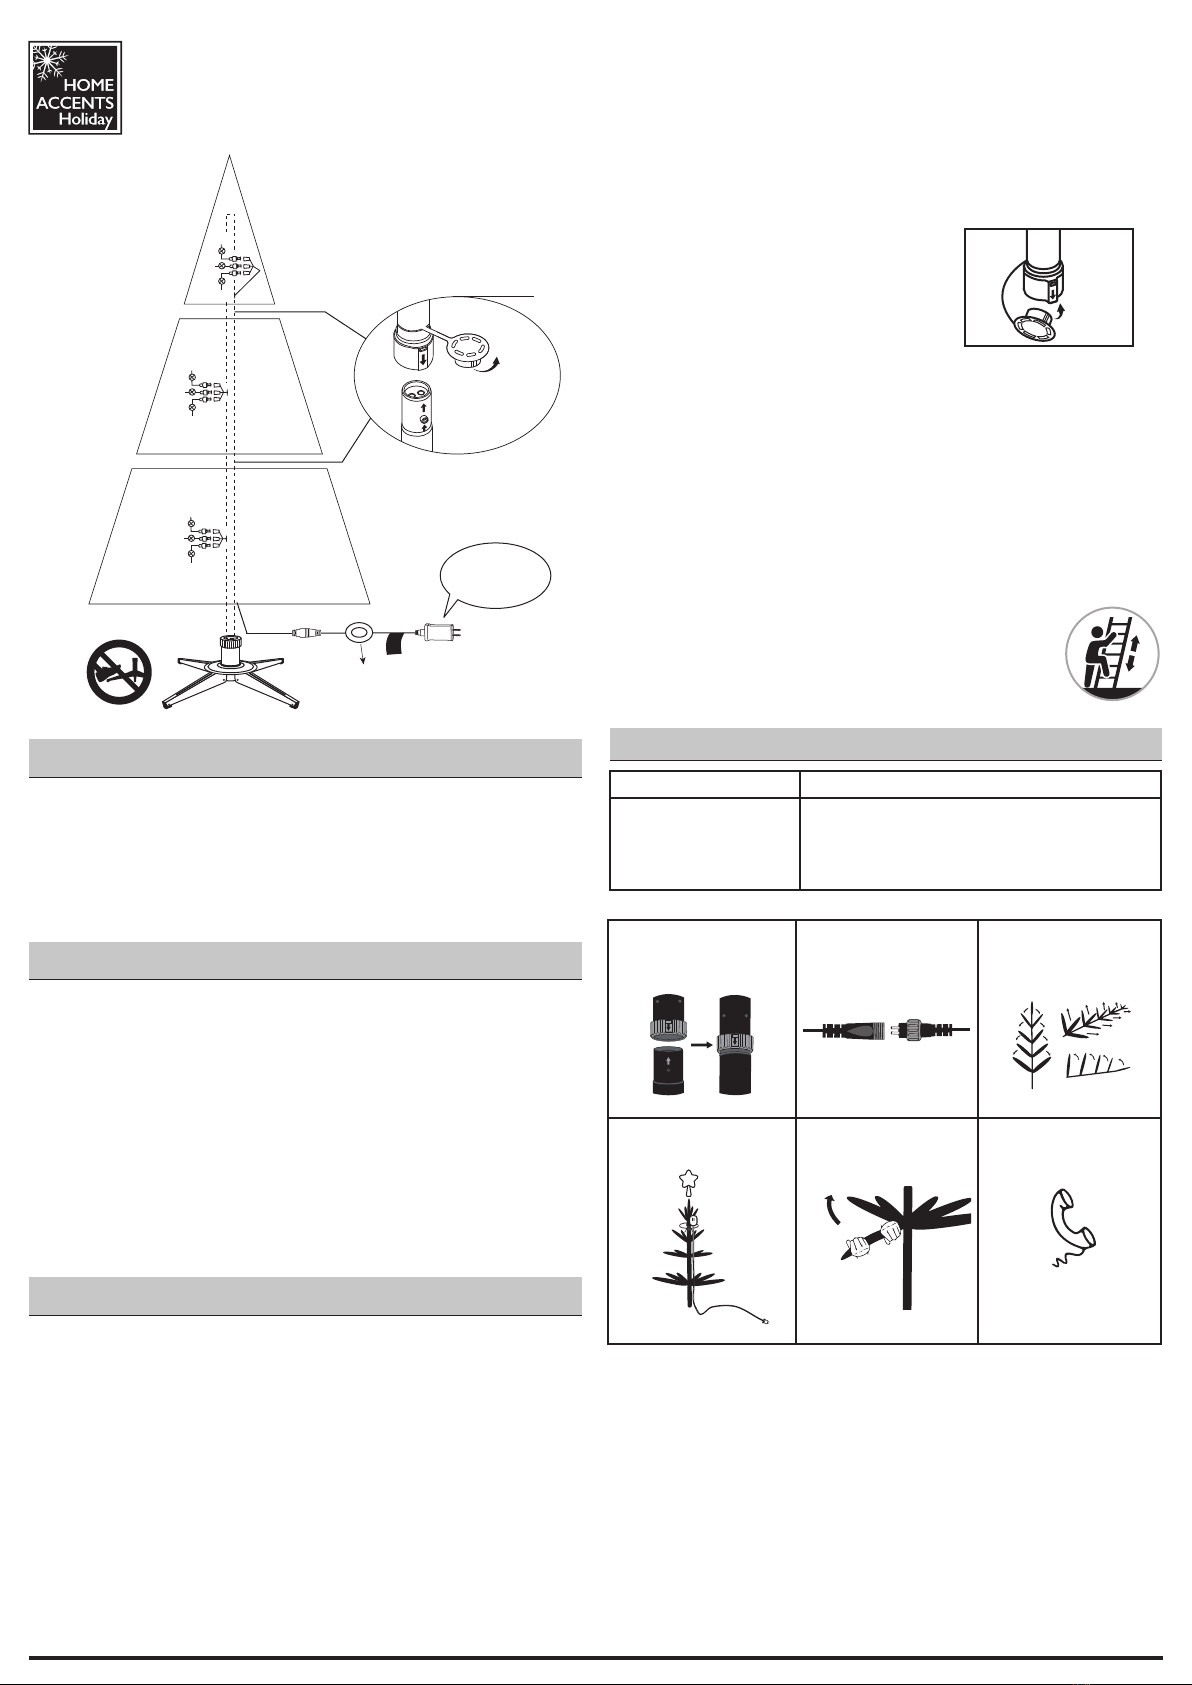
Assembling the tree
This tree assmbles with Quick Set® feature
---Set up and light up your tree in less than 10 minutes!
Step 1. Remove the protective caps from the tree bottom and
insert the pole into the tree stand.
Note: Do not step on the tree stand legs during the setup.
This may deform the tree stand and may result in an
unbalanced tree.
Step 2. Continue by inserting the upper tree section(s) to the
lower section(s) until inserting the tree top.
Step 3. Shape the branches to your preference by working from
the bottom to the top. When adjusting branches, ensure
that all wires are free of branch hinges.
Step 4. Insert the adapter into the wall outlet. All your lights
should now be lit.
Step 5.
Shape the tree from the bottom to the top. Start with the
branches farthest from the pole – fan out in a star shape,
and continue until the entire tree is shaped.
Step 6. When finished shaping the branches, slightly upsweep
all branch tips for a uniform look.
Step 1. Connect the light strings of the tree together and plug
the adapter into a wall outlet.
Step 2. If the tree comes with a foot pedal, step on the On/Off
button.
Operation
Turning on the tree
This tree package includes hinge pins & washers for any
replacement or repair that you need to perform on your tree.
If extra parts are needed, contact the Customer Service Team
at 1-855-HDHoliday (1-855-434-6543) from 8am to 7pm EST,
Monday through Friday, and 9am to 6pm EST, Saturday.
Repairing Loose Hinges
Step 1. Place the branch into the slot of the bracket
Step 2. Insert a new hinge pin through the holes of the bracket
and secure with a washer.
Maintenance
Spare parts
1. Before using or reusing, inspect product carefully. Discard any
products that have cut, damaged or frayed wire insulation or
cords, cracks in the lampholders or enclosures, loose connections,
or exposed copper wire.
2. Before disassembling the tree, unplug the tree and remove all
ornaments and decorations.
3. Gently lift the tree top straight up to remove from the center
section and fold all branches towards the pole.
4. Repeat this step for the center and bottom tree sections.
Use and Care Instructions
Troubleshooting
Problem Solution
The tree does not
light
Ensure that all tree sections are plugged into
each other and that the tree is plugged into
the wall. If your tree came with a foot pedal,
step on the On/Off button.
Adapter
To Be Plugged
Into Wall
Outlet
Foot Pedal
on/off Switch
Tree top
Section 2
Section 1
100S
100S
100S
50S
100S
100S
100S
100S
50S
Align both arrows
in a straight line
before sliding
down to insert
Open the
cap cover
Do Not Tamper
Internal Parts
5. When storing the product, carefully remove the product from
wherever it is placed, including tree, branches, or bushes,
to avoid anyundue strain or stress on the product conductors,
connections, and wires. Cover the
protective cap on the poles to avoid
damaging the internal parts.
6. When not in use, store neatly in a cool,
dry location protected from sunlight.
CAUTION:
1. To reduce the risk of fire and electric shock:
a) Use only the power supply that was provided with this
product. Using a different adapter will damage the lights
and may cause fire, or electrical shock hazards.
b) Do not install on trees having needles, leaves or branch
coverings of metal or materials which look like metal.
c) Do not mount or support strings in a manner that can cut
or damage wire insulation.
2. Use of ladder to set up tall trees:
Ensure the ladder is securely fixed and is not slippery.
Be cautious when climbing up and down the ladder.
Not Full?
Spread Branches
Run Extension
Cord
Tree Topper? Other Issue?
1-855-HDHoliday
(1-855-434-6543)
Branch Hanging Low?
Bend up
No Lights Working?
Check For Loose ConnectionEnsure pole is fully connected
Section Out?


