HomeSecure HS-PRO-01 User manual


HomeSecure HS-PRO-01 Manual: 22-08-2014
Copyright © 2015 HomeSecure
2
Table of Contents
1
Introduction
4
1.2
Functions
4
INSTALLATION
5
2
Quickguide
6
3
Prepare the Alarm Panel
7
3.1
Open the Alarm Panel and Insert SIM Card
7
3.2
Connect Wired Devices
8
3.3
Connect Backup Battery
9
3.4
Connect Power
9
4
Start Up and Registration of Sensors
10
4.1
Start Up
10
4.2
Register Sensors to the Alarm Panel
11
4.3
Zone Types
13
4.4
Register Remote Controls
14
5
Test and Installation
15
5.1
GSM Test
15
5.2
Install the Alarm Panel
15
5.3
Signal Test
16
5.4
Install Door/Window Sensor
17
5.5
Install Motion Sensor
18
5.6
Walk Test
19
6
Phone Numbers and Access Codes
20
6.1
Set Access Codes
20
6.2
Set Phone Numbers
21
OPERATION
24
7
Operating the Alarm System
25
7.1
The Alarm Panels Front Layout
25
7.2
Enabling/Disabling with the Keypad or Remote Control
26
7.3
Reminder by Open Doors and Windows
27
7.4
Keypad Lock
28
7.5
System Trouble (System Error)
29
7.6
Event Log
30
7.7
Operation using Call
30
7.8
Operation using SMS
31
8
Operation using the App
32
8.1
Setting up the HomeSecure 2014 App
32
8.2
App User Manual
33
9
Alerting
34
9.1
Alerting
34
9.2
Call in case of Alarm
35
9.3
SMS in case of Alarm
35
9.4
Stop Communication
36
SETTINGS
37
10
Zone Settings
38
11
Siren and Sound Settings
40
12
Delay Settings
43

HomeSecure HS-PRO-01 Manual: 22-08-2014
Copyright © 2015 HomeSecure
3
13
Communication Preferences
45
14
Other Options
47
15
CMS-Settings
50
16
Resetting
54
17
Appendix
56

HomeSecure HS-PRO-01 Manual: 22-08-2014
Copyright © 2015 HomeSecure
4
HomeSecure PRO 868MHz is the latest development in HomeSecure’s alarm selection.
Communication between the alarm panel and sensors runs on 868MHz frequency, which ensures
optimal reach and stability.
Setup is done on the alarm panel LCD display and the whole system is ready for use quickly and easily.
The sensors can be divided into inner and outer zones for home arming. When the alarm is triggered,
the alarm panel will send SMS and call and the built-in siren will sound with 85dB.
The HomeSecure PRO alarm introduces a series of new and advanced functions to the HomeSecure
selection. It is possible to create four user access codes, as well as temporary code, duress code, etc.
There are built-in tamper switches on the alarm panel that will trigger alarm when the panel is taken
down and/or opened. You can receive SMS notice for low battery on sensors and sensor loss. The alarm
will tell you if a door or window is open when you arm the system. Please see below for a
comprehensive list of functions.
1.2 Functions
Up to 10 contact numbers. 2 admin numbers, 4 SMS numbers and 4 call numbers
8 access codes: 1 installation code, 1 master code, 1 temporary code, 1 duress code and 4 user
codes –they can all be named, so you can see who operates the system
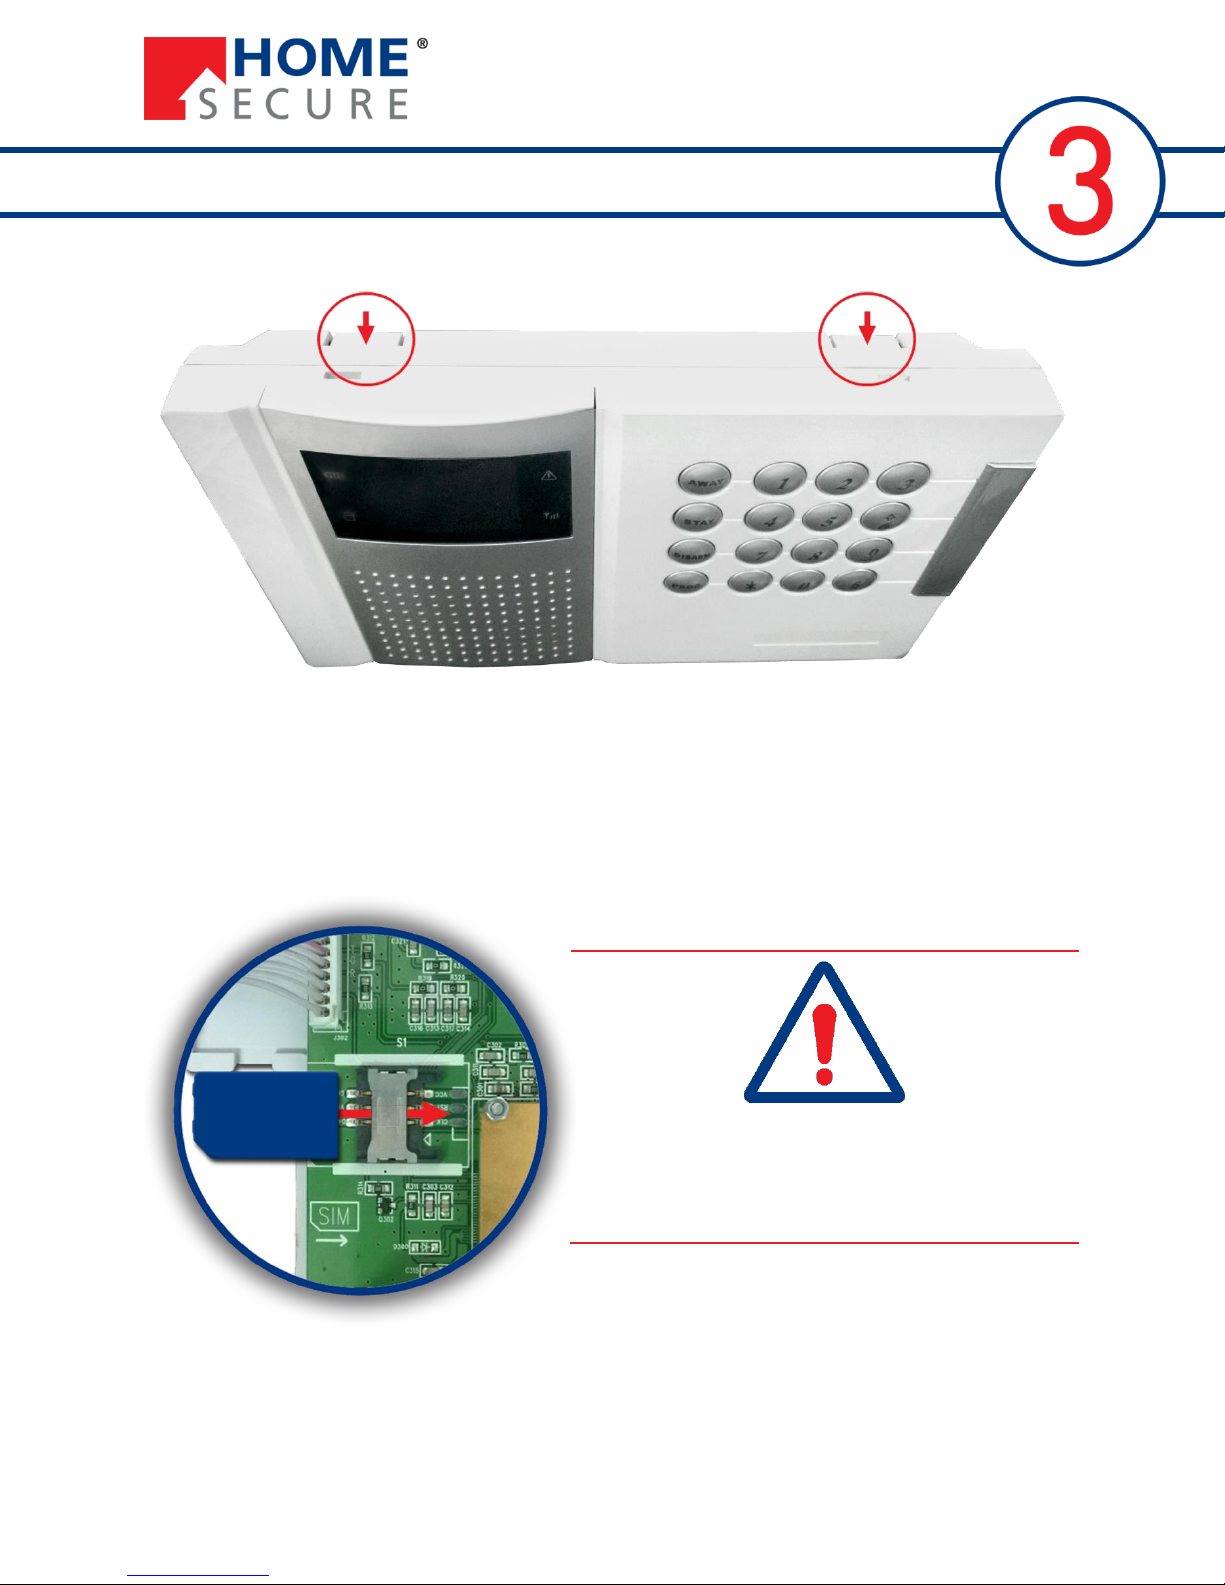
Wireless frequency: 868MHz
Connect up to 32 wireless sensors –they can all be named, so you can see which sensor that has
triggered alarm
2 inputs for wired sensors
Connect up to 6 remote controls
TFT LCD menu screen with intelligent voice guide
Periodic sensor supervision
Door/window open reminder when arming
Use PSTN or GSM (if landline is disconnected, GSM will take over automatically) for alarm calls
and SMS for alarm messaging
Event log with the 255 latest events
Built-in tamper switch inside and outside
Built-in siren (85db), it is possible to connect one wired siren and up to three wireless sirens
Controllable PGM output –turn on/off with App/SMS or use preprogrammed parameters
Introduction

HomeSecure HS-PRO-01 Manual: 22-08-2014
Copyright © 2015 HomeSecure
5

HomeSecure HS-PRO-01 Manual: 22-08-2014
Copyright © 2015 HomeSecure
6
Follow this procedure to get started quickly with your HomeSecure PRO alarm system.
Prepare the Alarm Panel
Insert SIM card
Attach wired devices
Connect backup
battery
Connect power
supply
Start up and Registering Sensors and Remote Controls
Start the alarm panel
Register sensors
Register remote controls
Test and Installation
Test GSM
Signal
Install the
alarm panel
Test wireless
signal
Install Sensors
Walk test
Settings and Operation
Set phone numbers
Set access codes
Quick Guide

HomeSecure HS-PRO-01 Manual: 22-08-2014
Copyright © 2015 HomeSecure
7
3.1 Open the Alarm Panel and Insert SIM card
Press down on the two lock on the top side of the panel and pull the front and back parts apart.
You must insert a SIM card in order for the GSM and SMS functions to work. AC power and battery must
both be disconnected for secure operation. Push the SIM card all the way in with the metal part facing
down.
Prepare the Alarm Panel
It is important that PIN code request and voice mail
are both disabled on the SIM card.
If these are not disabled, the alarm panel cannot use
the SIM card to access the GSM network.

HomeSecure HS-PRO-01 Manual: 22-08-2014
Copyright © 2015 HomeSecure
8
3.2 Connect Wired Devices
If you have any wired devices you wish to connect to the alarm panel, they must be connected to the
green cable joints inside the alarm panel. See below for an overview of the two cable joints.
Input for wired sensors. Connect one wire to Z1/Z2 and the other wire to GND. If the
sensors is connected as NC (normally closed), one of the included 2.2KOhm resistors
must be serially connected. If the sensor is connected as NO (normally open), the resistor
must be connected in parallel.
Output for wired siren. Connect the power wire to Bell and GND. The siren will beep
once when power is connected to the panel. Max. load: 400mA/DC12V.
AUX power output. Supplies power to wired sensors that need it. Max. Load:
100mA/AC10-12V (AC6-8V if the alarm panel is running on backup power).
PGM connection. Controllable output. You can turn it on/off depending on predefined
parameters or by using App/SMS (see morein 14.1 PGM Output Settings). Max. load:
500mA/DC50V.
Land line output. Connect the telephone cable from your telephone to this output.
Land line input. Connect the telephone cable from the wall to this input.

HomeSecure HS-PRO-01 Manual: 22-08-2014
Copyright © 2015 HomeSecure
9
3.3 Connect Backup Battery
Connect the wire coming out from the battery to the
white plug on the circuit board. Make sure to press it
all the way down, but avoid using too much pressure.
3.4 Connect Power Supply
Close the alarm panel and connect the AC
power supply to the plug right above the
green cable joints.
NOTE: There is a plug for the power supply,
do not cut the wire.

HomeSecure HS-PRO-01 Manual: 22-08-2014
Copyright © 2015 HomeSecure
10
4.1 Start Up
After connecting power supply and backup battery, the alarm panel will automatically turn on. The siren
will beep and the voice guide says: ”Welcome to intelligent alarm system”. First you must set date and
time:
The alarm system will keep track of time as long as it is connected to a power supply. If power is
disconnected, the clock will reset and has to be set again. See below:
The icon will move to next input automatically after each input. When you
are finished, press [#] to confirm. If you press [*] during setting, ”invalid
set” will appear on the screen. Press [*] to try again.
You now arrive at the alarm system’s main screen:
From this screen you can access the programming menu:
Menu Operation
Use the installation code to access the programming menu. It is 1234 as standard. We highly
recommend that you change all codes after setup.
1. While the alarm is disarmed, press the menu button on the panel .
2. The voice guide will say ”Enter password before setting the parameters”. Input the installation code
and finish with [#]. If the alarm says "wrong password", press the open pad lock and input code 0808
and start again from 1.
3. Now you are in the installation menu where all settings are made.
Arrows [6] and [9] navigates up and down, [#] means confirm/enter and [*] mean cancel/go back.
Start up and Register Devices

HomeSecure HS-PRO-01 Manual: 22-08-2014
Copyright © 2015 HomeSecure
11
Before the alarm panel can react to sensors, the sensors must be registered on the alarm panel. The
sensors send a wireless signal when they are triggered. This wireless signal must be registered on the
alarm panel for it to recognize it.
4.2 Register Sensors to the Alarm Panel
Register the sensors before installing them. This will make the whole process
easier.
Make sure to only register one sensor at a time!
Follow the procedure below to register each wireless sensor:
Use the navigation buttons and [#] to get to . You now have 60 seconds to trigger the sensor you
want to register. Simply trigger the sensor and the alarm panel will register it. When you get to , save
the sensor by pressing [#]. Now you can name the sensor. Press [#] at and type the name you want
using the number keys (like an old fashioned SMS message).
Choose [2. Clear WL.] at to clear sensors.
Door/window sensor:
Open the back side of the sensor and remove the plastic strip by the battery. Move the magnet close to
the right side of the base and move it away to trigger and register.

HomeSecure HS-PRO-01 Manual: 22-08-2014
Copyright © 2015 HomeSecure
12
Motion Detector:
Insert all batteries and put the sensor back in the box. Wait 10-15 minutes and take the sensor out of
the box to trigger and register.
Note, the motion detector has a so-called detection interval of 5 minutes, read more about it in [5.5
Install Motion Detector].
If you try to register a sensor that is already registered, the voice guide will
indicate it is already registered. If the signal is in a wrong format, the voice
guide will say ”Wireless Transmission Received”.
If no signal is received within the 60 seconds, the voice guide will
say ”Enrolling Failed”.
You must register each sensor in order for the alarm panel to recognize the wireless signal. Each sensor
has a unique encrypted ID code, which the alarm panel can only recognize once the sensor is registered.
Remember to set Zone Type for each sensor right after registering them. See
[4.3 Zone Types] on the next page.

HomeSecure HS-PRO-01 Manual: 22-08-2014
Copyright © 2015 HomeSecure
13
4.3 Zone Types
You must set a zone type for each registered sensor. The zone type will define different parameters
for the sensor. See the table below for an overview.
There are eight zone types: Activity zone, perimeter zone, panic zone, fire zone, gas zone, tamper zone
and duress zone (only for the duress code, see more in [6 Phone Numbers and Access Codes]
Overview of zone types
Zone Type
Disarmed
Arm
Away
Arm
Stay
Exit Delay?
Entry
Delay?
Siren and
Flash?
Sensor
Placement
Type
Number
Entry/exit
zone
Off
On
On
Yes
Yes
Yes
Entry
door(s)
01
Activity Zone
Off
On
Off
Yes
Yes
Yes
Indoor
02
Perimeter
Zone
Off
On
On
No
No
Yes
Window
03
Panic Zone
On
On
On
No
No
Yes
Panic button
04
Fire Zone
On
On
On
No
No
Yes
Smoke
sensor
05
Gas Zone
On
On
On
No
No
Yes
Gas sensor
06
Tamper Zone
On
On
On
No
No
Yes
Tamper
switch
07
Duress Zone
On
On
On
No
No
No
Duress code
08
Normally you should set all motion detectors to the activity zone, so they will be deactivated the alarm
system is set to arm stay. Doors you want to have delay on should be set to entry/exit zone, while doors
and windows you wish no delay on should be set to perimeter zone.

HomeSecure HS-PRO-01 Manual: 22-08-2014
Copyright © 2015 HomeSecure
14
4.3.1 Set Zone Type
Follow the procedure below to set zone type for each sensor.
Remember to set zone type for ALL sensors! If you do not set zone type for all
sensors, the alarm system will not function optimally.
4.4 Register Remote Controls
Remote controls are registered in the same way as sensors.
Press the panic button ( ) on the remote after within the 60 seconds to register the remote. Save
by pressing [#] at the end. You can also delete remote controls. Choose [2. Clear Keyfob] in .

HomeSecure HS-PRO-01 Manual: 22-08-2014
Copyright © 2015 HomeSecure
15
It is important to carry out the tests described in this section before installing the alarm panel and
sensors permanently. Follow these procedures to test the placement of the alarm panel and the sensors
and then install all units.
5.1 GSM Test
Test the strength of the GSM signal where you are planning to install the alarm panel. The alarm panel
communicates via the GSM network, so it is important that it is stable. Follow this procedure to test:
Signal strength is measured on a scale from 0-31. 31 strongest. The signal strength
should be over 12 to ensure stable GSM communication.
5.2 Install the Alarm Panel
Use the drilling template and drill four holes in the wall. Hang the alarm panel directly on the screws.
There is a tamper switch on the back of the alarm panel. Make sure it is completely compressed, when
hanging on the screws. If the alarm panel is removed from the wall, the tamper switch will trigger alarm.
The tamper switch on the backside must be COMPLETELY compressed to avoid false
alarms. The tamper switch is inactive for 3 hours after starting the alarm system to
avoid accidentily triggering the alarm.
Test and Installation

HomeSecure HS-PRO-01 Manual: 22-08-2014
Copyright © 2015 HomeSecure
16
5.3 Signal Test
Before installing the sensors permanently, it is important to make sure that they can communicate with
the alarm panel. Distance and walls will weaken the wireless signal reach. In normal houses, the reach is
about 30 meters, but make sure using the signal test before installing.
Follow this procedure to test all sensors one by one at the place where you plan to install the sensor.
After you have 300 seconds to trigger the sensor. When the signal is received, the alarm panel display
will show information about the sensor. If the alarm panel receives signal from a sensor, that is not yet
registered, it will show unknown signal. Press [*] to finish the test.
and are examples of what information will be shown for sensors and remote controls.

HomeSecure HS-PRO-01 Manual: 22-08-2014
Copyright © 2015 HomeSecure
17
5.4 Install Door/window sensor
Base and magnet should be installed maximum 5 mm apart. The magnet can be placed at a 90-degree
angle in front of the base but never more than 5 mm away.
Place the double sided tape
here
Magnet
Self-supervision –hold this
button down while the
battery is inserted to turn
status signal on/off.
Battery lid
LED indicator
Reed relay (inside, registers
the magnetic field)

HomeSecure HS-PRO-01 Manual: 22-08-2014
Copyright © 2015 HomeSecure
18
5.5 Install Motion Sensor:
Tamper switch. If the back panel is
removed, the switch triggers alarm.
Self-supervision –hold this button
down while the battery is inserted to
turn status signal on/off.
Detection interval:
TEST: Sensor triggers with no interval
5MIN: The sensor ”rests” for 5
minutes after triggering once to save
battery
LED on or off (saves battery).
Internal antenna
Battery lid
LED indicator. Blinks when there is
activity and lights constantly when
low battery.
Sensor surface (note: Is divided for pet
immune sensors).

HomeSecure HS-PRO-01 Manual: 22-08-2014
Copyright © 2015 HomeSecure
19
The motion detector should be installed at 1.8 to 2.2 meters height and point slightly downwards. Pet
immune sensors should be installed at 1.8 meters height.
Use the 5MIN detection interval described on the last page to save battery. If
the sensor detects movement, it takes 5 minutes before it can detect
movement again. Use TEST instead to have it detect continuously but note the
extra battery use.
5.6 Walk Test
The last test we recommend that you carary out is the walk test. This test will ensure that all sensors are
working properly. Make this test right after installing all devices and also with regular intervals after
installation. At all registered sensors are shown. Trigger them one by one (remember the 5 minutes
interval on the motion detectors). When the alarm panel receives the signal from a sensor, the sensor
will be removed from the list.
When the list is cleared and it says ”No Device!”, the test has been completed and the alarm system is
functioning properly.
The walk test will run for 10 minutes max. Press [*] to finish the test.

HomeSecure HS-PRO-01 Manual: 22-08-2014
Copyright © 2015 HomeSecure
20
6.1 Set Access Codes
We highly recommend that you change all access codes from the standard
ones once the installation is complete.
There are five types of access codes: Master code, installation code, duress code, temporary code and
user code (x4). Each code type has different functions. As standard, only the master code, installation
code and duress code are set. You must create the remaining codes to be able to use them. See the
table below for an overview of the code types, and what you can do with each of them:
Kodetype
Arm/disarm
Enter
PROG
Code set
”PROG” in
main menu
Editable
Deletable
Standard code
Master
Yes
Yes
Yes(1)
Nej
Yes
No
0808
Installation
Nej
Yes
Yes(2)
Yes
Yes
No
1234
Duress
Yes
No
No
No
Yes
No
0809
Temp.
Yes
No
No
No
Yes
Yes
User 1
Yes
No
No
No
Yes
Yes
User 2
Yes
No
No
No
Yes
Yes
User 3
Yes
No
No
No
Yes
Yes
User 4
Yes
No
No
No
Yes
Yes
(1) All codes except the installation code can be changed with the
master code.
(2) Only the installation code itself can be changed with the
installation code.
Phone Numbers and Access Codes
Table of contents