Hommax Sistemas TBK-4603E24IRV User manual

TBK-4603E24IRV
D/N BULLET CAMERA
MANUAL129
Features
1/3"high-resolution CCD.
600 TV lines.
4.3mm Day&Night fixed lens built-in with IR Cut filter built-in.
21 IR LED's.
AGC, auto exposure, aperture correction and anti color rolling functions.
Vandal proof housing made of stiff zinc alloy, tested to resist attacks up to 500lbs efficiently.
Waterproof and IP66 certification.
3 axis adjustable mount with built-in keys mechanism for secure and firm lock.
Measurements in mm
•
•
•
•
•
•
•
•
More than
NOVIEMBRE 2012

Model No. TBK-4603E24IRV
Image Sensor 1/3" Hi Resolution CCD
Effective Pixels 752 (H) X 582 (V)
Video System PAL TV System
Scanning System 2:1 Interlace
Electronic shutter Auto and up to 1/100.000
Sync System Internal Sync
H - Resolution More than 600
TV Lines
S/N Ratio > 48 dB
Min. illumination 0.2 Lux F1.2 - 0 lux with LED's on
Gamma 0.45 Approx
Gain Control AGC full auto
BLC Full auto
White Balance MCT-ATW (multi color temperature ATW)
C.Video Output VBS 1.0 Vp-p / 75ohm
Input Voltage DC 12[V] +/- 10%
Current
Camera only : max 250[mA] (at 12VDC)
LED's on : max500[mA] (at 12VDC)
Operating Temp' -10
~ +45
Storage Temp' -30
~ +60
LENS Fixed 4.3mm
IR LED 850 nm - 21pcs
Dimensions 85 (W) X 67 (H) X 218 (D) mm
Weight Net : 0.850 kg
IP level IP66
Caution.
Please, follow the above instructions for safe use.
Read this user guide carefully before any installation for safe operation of product.
WARNING Indicates the possibility of serious injury or death.
CAUTION Indicates the possibility of injury or material loss.
WARNING:
Do not disassemble the unit by yourself. When there is problem with the unit please contact after-sale service center or the
vendor.
Use only regulated power source.
Do not disassemble or re-model the camera, it could cause fire, electric shock or other hazards.
If the product is to be put out of operation definitively, take it to a local recycling
plant for a disposal which is not harmful to the environment
TBK-403E24IRV
D/N BULLET CAMERA MANUAL
NOVIEMBRE 2012

TBK-4603E24IRV
D/N BULLET CAMERA
Installation.
Fix the camera to the mounting surface (wall or cell mounting).
Use the three direction axis to aim the camera.
Angle adjustment: step 1. Loose the screw on the base and adjust the camera rotationally. Fix it and tighten the
screws.
NOVIEMBRE 2012

TBK-4603E24IRV
D/N BULLET CAMERA
Step 2. Loose the screw on the bracket and adjust the camera body vertically. Each cog gears 18 degrees. Fix it and
tighten the screws.
During the steps 1 and 2 do not let the screw loose fully; loose it only to be able to do the adjustment. It is a little
difficult to tight the screw again.
Step 3. Loose the screw from the bottom and adjust the camera horizontally. Each cog gears 18 degrees. Fix it and
tighten the screws.
Check the power is DC 12V 50mA and the monitor input impedance is set on 75.
Connect now the power and video signal line and turn on the power.
Things to keep in mind during installation and use.
Do not screw loosen the camera; it may cause malfunction of water proof.
Strong impacts may deform the unit and may cause malfunction of water proof.
Use regulated power supply of DC12V/50mA to avoid the heat damage or insufficient power.
If water enters the unit or lens, or smoke, unusual heat or smell is found, please, contact with your distributor.
NOVIEMBRE 2012

SETUP MENU
LENS
EXPOSURE
WHITE BALANCE
(WHITE BAL.)
BACKLIGHT
DAY / NIGHT
DPC
SPECIAL
RESET
EXIT
● DC ● MANUAL
● SHUTTER ● BRIGHTNESS ● AGC
● D-WDR ● RETURN
● ATW1 ● ATW2 ● AWC→SET
● MANUAL
● OFF ● BLC ● HLC
● AUTO ● COLOR ● B / W
● EXT
( Dead pixel compensation )
● CAM TITLE ● MOTION ● PRIVACY
● PARK. LINE ● IMAGE ADJ ● COMM ADJ
● LANGUAGE ● VERSION ● RETURN
● FACTORY ● RETURN
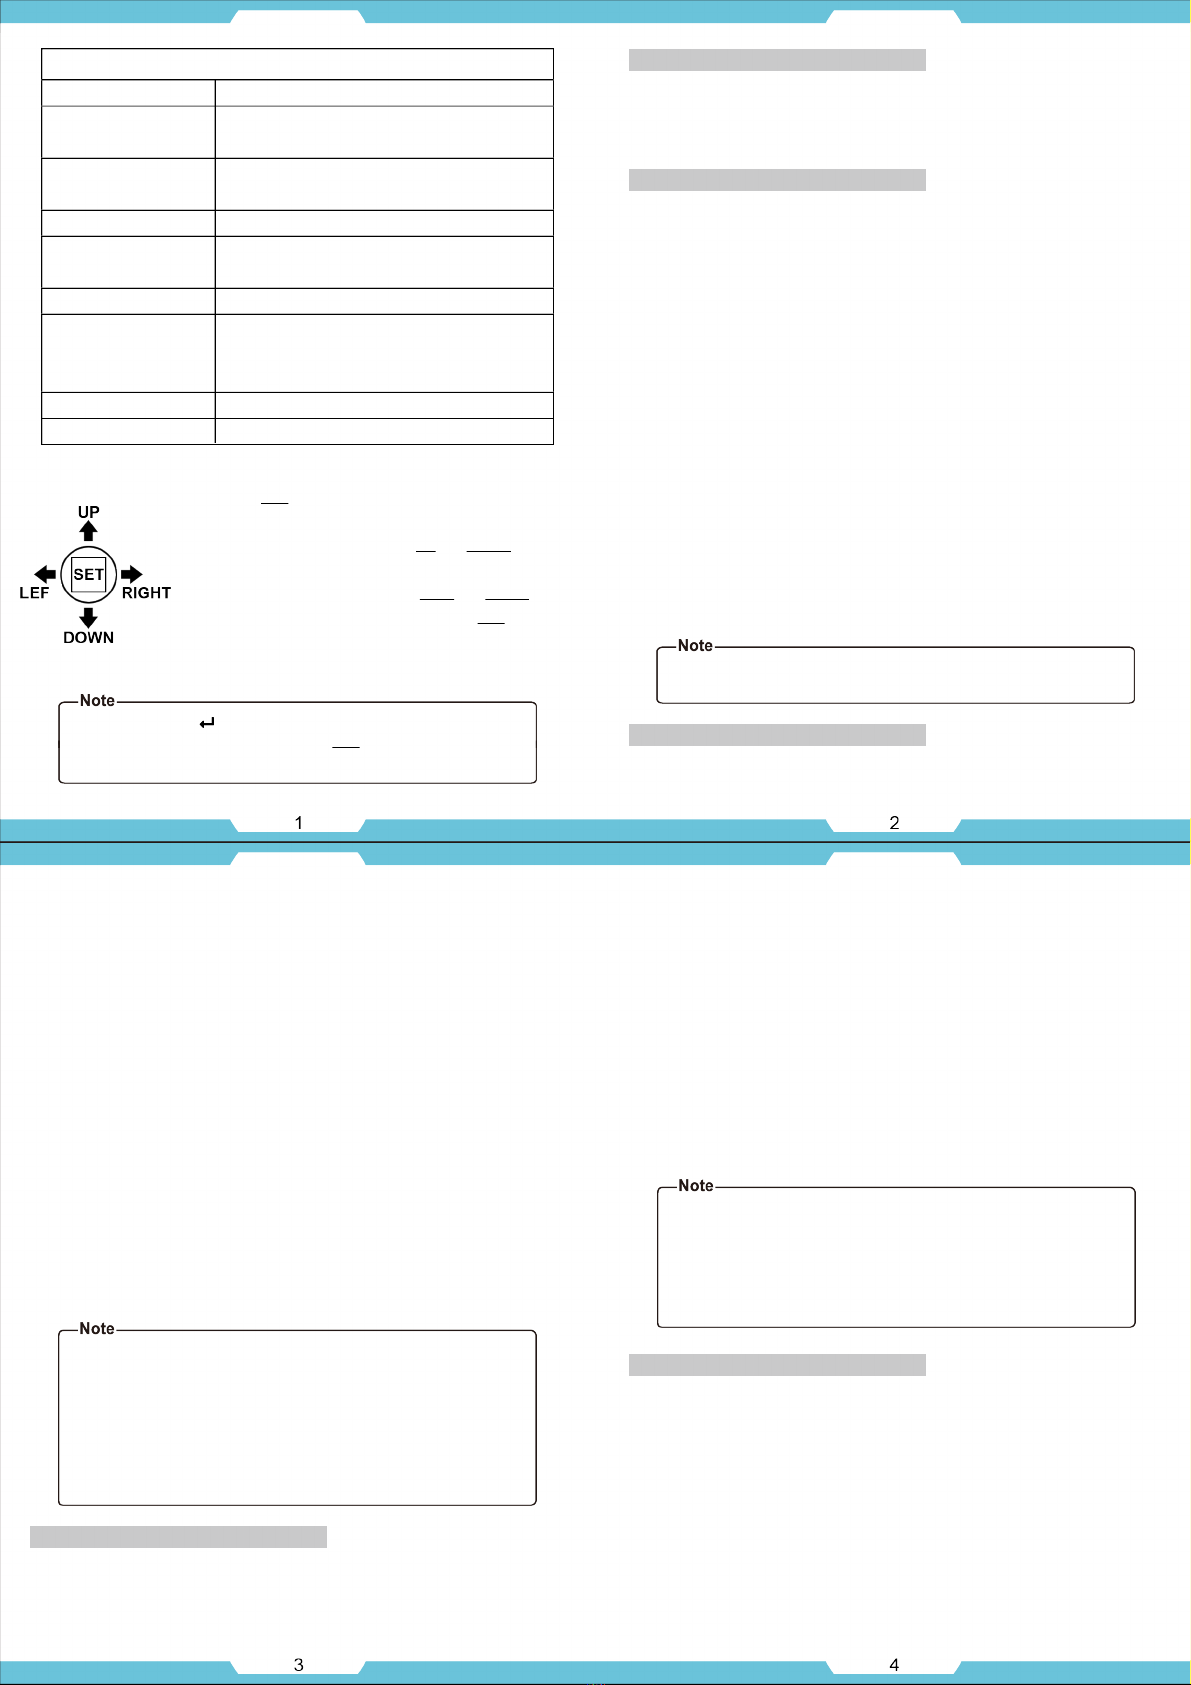
You can set up functions by using the 5 joysticks.
1. Press the SET joystick.
● Main setup menu is displayed on the monitor screen.
2. Select a desired function using the UP and DOWN joystick.
● Place the cursor over the desired item.
3. Set up a selected item by using the LEFT and RIGHT joystick.
4. To finish the setting, select “EXIT” and press SET joystick.
5. UP / DOWN / LEFT / RIGHT.
● Press any desired key over 3 seconds for quick completion.
►An item with the icon also has sub menus. To select a sub menu,
select an item with the icon and press SET joystick.
►An item with the - - - icon is unavailable due to function settings.
LENS
● DC : Select Auto Iris Lens
Choose the lens type DC and Manual lens by using the selector joystick.
● MANUAL : Select Manual Lens
EXPOSURE
● SHUTTER : You can select either auto or manual shutter.
- AUTO : Select this auto shutter.
- 1 / 60 : Select this 1 / 60 sec. shutter (Default).
- FLK : Select Flicker shutter.
- 1 / 250 ~ 1 / 100000 : Select shutter time.
● BRIGHTNESS : The range of bright control is between 0 and 255.
● AGC (AUTO GAIN CONTROL) :
The higher the gain level , the brighter the screen but the higher the noise.
- OFF : Deactivate the AGC function.
- LOW : Allow AGC from 0 to 24dB.
- MIDDLE : Allow AGC from 0 to 33dB.
- HIGH : Allow AGC from 0 to 40dB.
● D-WDR (Digital Wide Dynamic Range) :
- OFF : Deactivate the D-WDR Function.
- ON : Activate the D-WDR Function. (LEVEL 0 ~ 63)
The main Function of the D-WDR is to accumulate the scope of contrast
between the brightest and darkest points in the picture.
> LEVEL : Adjust the value between 0 ~ 63
►IR models, AGC is fixed.
►IR models, only one option “OFF” in D-WDR menu.
WHITE BALANCE (WHITE BAL.)
● ATW 1 / ATW 2 : Select this when the color temperature is between
1800°K and 10500°K.
● AWC → SET : To find the optimal setting for the current luminance
environment in this mode, set the point the camera towards
a sheet of white paper and press the SET joystick. If the
environment changes, readjust it.
● MANUAL : Select this to fine-tune White Balance manually. Set White Balance
first by using the INDOOR or OUTDOOR mode. After that switch to
MANUAL mode, fine-tune the White Balance and then press the
SET joystick.
- COLOR TEMP :
> INDOOR : Select this when the color temperature is between 4500°K and 8500°K.
> OUTDOOR : Select this when the color temperature is between 1800°K and
10500°K. (sodium light inclusion)
> MANUAL : Set the appropriate color temperature than increase / decrease the red
and blue color values and monitor the color changes of the object.
+ BLUE : User can remove / add more blue color on image by using left and
right joystick. (0 ~ 255)
+ RED : User can remove / add more red color on image by using left and
right joystick. (0 ~ 255)
►White Balance may not work properly under the following conditions.
In this case select the AWC mode.
1.When the color temperature of environment surrounding the subject is
out of control range (e.g. clear sky, or sunset)
2.When the ambient illumination of the subject is dim.
3.If the camera is directed towards a fluorescent light or is installed in a
place where illumination changes dramatically, the White Balance
operation may become unstable.
BACKLIGHT
● OFF : Deactivate the BACKLIGHT Function.
● BLC : Enable a user to directly select a desired area from a picture, and to
view the area more clearly.
- AREA SEL : AREA 1 / AREA 2
- AREA STATE : ON /OFF
- GAIN : Adjust the value between. (0 ~ 255)
- HEIGHT : Adjust the area height- WIDTH : Adjust the area width
- LEFT / RIGHT : Detect area left and right location
- TOP / BOTTOM : Detect area up and down location
● HLC : If there is a high light installed in a limited environment such as an
apartment parking garage or gas station entrance, removing the
high light makes it possible to view car license plates efficiently.
- LEVEL : Adjust the value between 0 and 255.
- MODE : NIGHT ONLY / ALL DAY.
Select HLC to activate in the NIGHT ONLY or in the ALL DAY.
►Because there can be a difference in the effectiveness of HLC
according to the amount of light area in the screen, optimize the
installation angle for best HLC performance.
►In a dark environment, the HLC is only activated when a high light
that is large than a certain area is present.
►The HLC is not activated in light or overly dark condition.
DAY / NIGHT
● AUTO : This mode is set for color in a normal environment,
but switches to B / W mode when ambient illumination is low.
To set up the switching time or speed for AUTO mode.
- D → N LEVEL : Adjust the Start Night level is between 0 to 255.
- D → N DELAY : Adjust the Start Night Delay time is between
1 / 3 / 5 / 10 / 15 / 20 / 25 / 30 seconds.
- N → D LEVEL : Adjust the End Night level is between 0 to 255.
- N → D DELAY : Adjust the End Night Delay time is between
1 / 3 / 5 / 10 / 15 / 20 / 25 / 30 seconds.
● COLOR : The picture is always displayed in color.
T
NOVIEMBRE 2012

● B / W : ON / OFF
This picture is always displayed in black and white.
- BURST : ON / OFF
Burst signal is off when it’s under B/W mode.
- IR SMART : ON / OFF
> IR GAIN : 0 ~ 255 > HEIGHT : 0 ~ 8 > WIDTH : 0 ~ 13
> LEFT / RIGHT : 0 ~ 7 > TOP / BOTTOM : 0 ~ 10
- IR LEVEL : LOW / HIGH
● EXT : This mode allows you to apply a desired filter to external signals.
►When using a Video Auto Iris Lens, if you set the lens level to low,
automatic switching between Color and B/W may not occur.
►The AGC in the EXPOSURE menu is “OFF” when DAY / NIGHT menu
is “AUTO”.
►The camera may focus less well under infrared illumination than under
normal illumination.
►Since the camera may not focus as well under infrared illumination at
night as it does under normal illumination, install an Extra-low
Dispersion Lens to obtain sharp picture.
►IR models, only one option “AUTO” in Day and Night menu.
DPC (Dead pixel compensation)
COVER THE LENS THEN PRESS THE ENTER KEY
SPECIAL
● CAM TITLE : If you enter a title, the title will appear on the monitor.
- OFF : No title will be displayed on the monitor even if you enter one.
- ON : Press the SET joystick to the menu.
Use the 4 direction joystick to move to a desired letter and select the
letter by pressing the SET joystick. Repeat this to enter multiple letters.
You can enter up to 15 letters.
Enter a title, move the cursor to “POS” and press
SET joystick. The entered title appears on the screen.
Select the position to displayed the title on the screen
by using the 4 direction joystick and press the SET
joystick. When the position is determined, select
“END” and press the SET joystick to return to the
SPECIAL menu.
►If you move the cursor to CLR and press the SET joystick, all the
letters are deleted. To edit a letter, change the cursor to the joystick
left arrow and press the SET button. Move the cursor over the letter
to be edited, move the cursor to the letter to be inserted and then
press the SET joystick.
● MOTION : If you connect an alarm device to this camera, you can monitor
activities more efficiently, because a signal is generated by the camera
whenever a motion is detected. The motion detection signal is output
through the MD OUT port.
- OFF : Deactivate the MOTION function.
- ON : Activate the MOTION function.
> AREA SELECT : You can select up to 4 areas.
> AREA STATE : Determine whether to use the area selected.
> HEIGHT : Adjust the height of the area.
> WIDTH : Adjust the width of the area.
> LEFT / RIGHT : Adjust position of the area.
> TOP/BOTTOM : Adjust position of the area.
> DEGREE : 0 ~ 255
> VIEW : ON / OFF
● PRIVACY : ON / OFF
Hide an area you want to hide on the screen.
- AREA SELECT : You can select up to 8 areas.
- AREA STATE : Determines whether to use the area selected.
- HEIGHT : Adjust the height of the area.
- WIDTH : Adjust the width of the area.
- LEFT / RIGHT : Adjust position of the area.
- TOP / BOTTOM : Adjust position of the area.
- COLOR : Determine area color.You can select 15 kinds of color.
● PARK. LINE :
- LT : 0 ~ 194 - RT : 0 ~ 194
- LB : 0 ~ 194 - RB : 0 ~ 194
- F : 0 ~ 80 - N : 0 ~ 80
- T : 2 ~ 15
● IMAGE ADJ :
- LENS SHAD : ON / OFF
> LEVEL : O ~ 255
- 2DNR : This function reduces the background noise in a low luminance
eniveronment.
> ON : Activate DNR, so that noise is reduced.
> OFF : Doactivate DNR. Noise is not reduced.
- MIRROR : ON / OFF
You can flip the picture / rotate the picture.
- FONT COLOR :
> FONT : 0 ~ 15
> ID / TITLE : 0 ~ 15
- CONTRAST : 0 ~ 255
- SHARPNESS : 0 ~ 31
- DISPLAY :
> LCD ADTUST : > USER ADTUST : > CRT ADTUST :
+ GAMMA + GAMMA + PED LEVEL
+ PED LEVEL + PED LEVEL + COLOR GAIN
+ COLOR GAIN + COLOR GAIN
- NEG. IMAGE : ON / OFF
You can make the negative image effect.
► IR models, only one option “OFF” in LENS SHAD menu.
● COMM ADJ (Communication Adjustment) :
This function sets up the camera communication status when controlling the
camera through an external control device.
- CAM ID : Determine the camera’s identification number (between 0 and 255)
- BAUD RATE : You can select 2400 / 4800 / 9600 / 19200 / 38400 / 57600 bps.
- PROTOCOL : You can select PELCO - D / PELCO - F / NEX TCHIP.
- DISPLAY ID : Display camera title on the screen.
- ID POS : Select the position where the IP is to be displayed by using the up,
pown, LEFT and RIGHT joystick.
► Only PELCO-D and Baud Rate 2400 are available for CWELL’S
RS-485 controller.
● LANGUAGE : You can select the menu language according to your
requirement.
● VERSION : 21 01 10
RESET
● FACTORY : Reset the camera setting to the factory defaults.
● RETURN : Select this return to the SETUP menu.
EXIT
Press the SET joystick in the EXIT menu to save the current setting and exit the
SET menu.
NOVIEMBRE 2012
Table of contents
Other Hommax Sistemas Security Camera manuals