Honeywell Genesis Touch User manual

User Manual
Genesis Touch
Remote Patient Monitor

Intended Use / Indications for Use
The Life Care Solutions Genesis Touch System is designed to retrospectively monitor vital signs. Vital signs include nonin-
vasive blood pressure, pulse oximetry, pulse rate, weight, temperature, blood sugar, prothrombin time/international nor-
malized ratio (PT/ INR), peak expiratory flow (PEF) and forced expiratory volume (FEV1). The Genesis Touch system
collects, displays and transmits vital signs measurements captured from commercially available wireless medical devices
designed for home use. Collected measurement data from the Genesis Touch System may be transmitted via a communi-
cation module to a central viewing station where the data can be viewed and analyzed by a healthcare professional.
The Genesis Touch System is intended for home use by caregivers, adult and pediatric patients over twelve years of age or
in a healthcare related environment by healthcare providers.
Contra-Indications and Use Limitations
The Genesis Touch monitor is not an emergency medical response device. The monitor does not have auditory or visual
alarms for out-of-limit parameters. The Genesis Touch monitor does not provide real-time, critical-care monitoring of
patient vital signs. All data is transmitted to your monitoring platform (LifeStream™) and examined retrospectively by qual-
ified health professionals.
Safety Information
Read and observe all the safety information in this document before you install or use the Genesis Touch to
prevent injury to yourself or damage to any equipment. Consult the Genesis Touch User Manual for more
detailed cautionary information and see the manufacturer’s user manual for information on approved Life
Care Solutions peripherals.
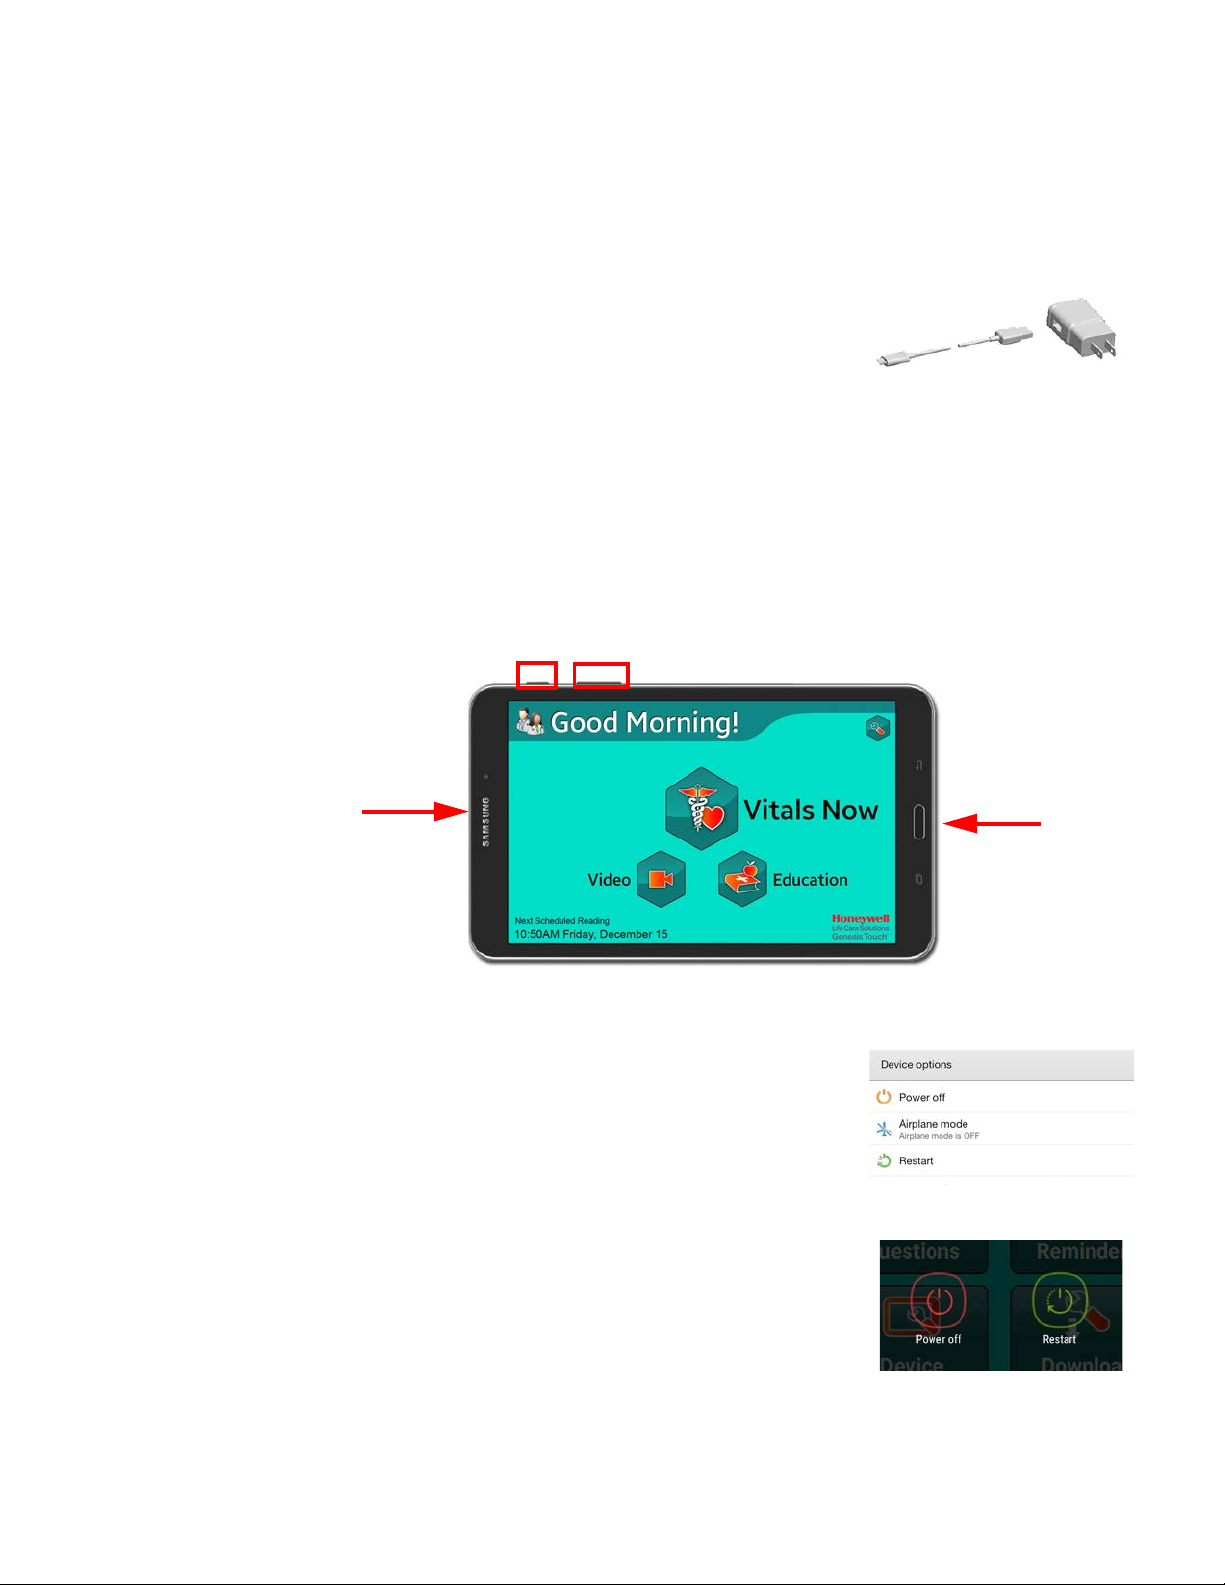
The Genesis Touch is a pre-configured medical device. DO NOT MAKE UNAUTHORIZED CHANGES TO THE DEVICE SET-
TINGS as it may result in damage to the functionality of the medical device. DO NOT REMOVE THE SIM CARD.
Video Visits should NOT be used for diagnosis or treatment. An additional license is required. Additional user terms and
conditions may apply.
Warning
Risk of ELECTRICAL SHOCK
DO NOT spray cleaners on or into the unit.
DO NOT immerse in water or other liquid.
DO NOT use with wet hands.
DO NOT turn on if wet, if on, turn off and dry the device with a towel.
DO NOT disassemble.
EXPLOSION HAZARD
Unit is powered with electricity and could ignite highly flammable gases. The Genesis Touch monitor contains a battery
and should not be placed in or near a heat source. Excessive heating can damage the monitor or the battery and could
cause the monitor or the battery to explode.
NOT A BABY UNIT
The Genesis Touch is not a toy. Caregiver supervision should practiced when the device is being used by children.
IMPLANTABLE MEDICAL DEVICES
When the unit is turned on, a minimum separation of six (6) inches should be maintained between the monitor and an
implantable medical device, such as a pacemaker or implantable cardioverter-defibrillator, to avoid potential interference
with the unit. TURN OFF the unit if there is any reason to suspect interference.
PHYSICAL HAZARD
Exercise care in the routing of external cables, wires and hoses to avoid creating a tripping hazard.
USE ONLY HOMMED AUTHORIZED MEDICAL EQUIPMENT
Attaching unauthorized equipment to the Genesis Touch may cause damage or equipment failure.
DO NOT use any AC adapter other than the one that came with the Genesis Touch monitor.
DO NOT expose to dust, dirt, or sand.
DO NOT use around or store with flammable
liquids, gases, or explosive materials.
DO NOT put in an oven, microwave or dryer.
DO NOT drop, knock, or shake the unit.

Genesis Touch - User Manual Preface
Customer Support
Technical Assistance
To search our knowledge base for a solution, report a problem, or log in to the Life
Care Solutions customer resources website:
Dial 1-888-353-5404. Press 1 for technical support.
Visit Customer Service Online at www.honeywelllifecare.com/customer-service/
User Manuals and Help
Access the Help menu of LifeStream for assistance with LifeStream.
To access manuals for Genesis Touch, visit: https://www.honeywelllifecare.com/
customer-service/genesis-touch-manuals/.
To access training presentations and video, visit https://
www.honeywelllifecare.com/lifestream-services/clinical-support/
You will need a login and password to access the customers section of our website.
You may click the Forgot your Password? link, or the Register link from the login
screen for authorization.
Purpose of this Document
This document is intended for the person installing and setting up the Genesis
Touch monitor and peripheral medical devices. It is not intended for patients.
Inspecting Equipment
Always inspect the monitor and accessories for damage or improper setup when in
use. Check for the following examples:
• Power cord is not frayed or connected to unauthorized equipment.
• Cables are properly attached and in good condition.
• Monitor is not standing in or near water.
• Monitor has not been moved to an unsuitable location.
If there is a frayed power cord, unplug the unit and replace the cord. The USB power
extension cable (optional) may be removed, and the monitor power cord may be
directly plugged into its original power adapter while a replacement is ordered.
If a monitor has been dropped or damaged, call Customer Service. Qualified ser-
vice personnel must inspect any dropped or damaged units before they are
assigned for use.

Preface Genesis Touch - User Manual
Facilitating Equipment Repairs
All repairs to the monitor and accessories must be made by an authorized repair
center. Any unauthorized repairs will invalidate your warranty. For product warranty
information please contact Customer Service.
If your equipment is not functioning correctly, contact a Customer Service Repre-
sentative to determine the appropriate action. Be prepared to identify the equip-
ment (monitor, scale, or accessory) and describe the problem in detail. You may be
asked to provide the model and serial number.
Shipping Equipment to Life Care Solutions
If Customer Service authorizes you to ship equipment, please follow the directions
below.
• Obtain a Return Material Authorization (RMA) number from Customer Service.
• Clean the monitor and all accessories prior to shipping equipment to prevent
contamination.
• Carefully pack the equipment in a sturdy box (the original box if possible) with at
least one-inch clearance around the equipment for protective packing
materials.
• Do NOT ship material with evidence of an infestation and consult a local
exterminator. Fees will be charged for non-disclosure of equipment infestation.
• Ship to the RMA address noted below.
Note: If your equipment is still under warranty, Customer Service will send you a UPS label.
Life Care Solutions RMA Shipping Address
Return merchandise authorizations (RMAs) should be sent to:
HONEYWELL
ATTN: Life Care Solutions Receiving
10640 Freeport Drive
Louisville, KY 40258
You are encouraged to share this information with anybody at your location who
would be responsible for coordinating product returns to avoid any delays.

Table of Contents
Getting Started
What’s In this Release? Genesis Touch v3.7 ............................................................................. 1
Unpacking Your Products ..................................................................................... 2
Getting Started .......................................................................................................... 3
Operating the Monitor ......................................................................................................................... 3
Using Monitor Keys ............................................................................................................................... 5
Communications .................................................................................................................................... 8
Settings Menu ............................................................................................................ 8
Setting Brightness and Volume ...................................................................................................... 9
Status Menu and Remote Configuration Retrieval ............................................................... 10
Verifying Monitor Version / About Menu .................................................................................... 11
Peripheral Devices
Pairing Peripheral Devices .................................................................................... 13
General Settings Menu ........................................................................................................................ 14
Peripherals Menu ................................................................................................................................... 15
Pairing a Scale ........................................................................................................... 16
Pairing a HomMed or NCI Technology Scale ........................................................................... 16
Pairing a Welch Allyn Scale ............................................................................................................... 18
Pairing an A&D UC-355PBT-Ci Scale .......................................................................................... 19
Pairing an A&D UC-321PBT Scale ................................................................................................ 22
Pairing a Blood Pressure Monitor ...................................................................... 24
Pairing an A&D Blood Pressure Monitor .................................................................................... 24
Pairing with a Legacy UA-767PBT Blood Pressure Monitor ............................................ 28
Pairing with a Welch Allyn Blood Pressure Monitor .............................................................. 28
Pairing an Oximeter ................................................................................................. 30
Pairing a Glucometer .............................................................................................. 33
Pairing an Entra Health Systems myglucohealth Glucometer........................................ 33
Pairing an H3 System Glucometer Adapter .............................................................................. 36
Unpairing a Wireless Peripheral Device .......................................................... 39
Patient-Entered Vital Sign Measurements .................................................... 41
Peripheral Device Information & Compatibility............................................. 43
Basic Scheduling
Remote Configuration Retrieval ......................................................................... 51
Weekly Scheduling ................................................................................................... 52
Setting the Reading Schedule ......................................................................................................... 52
Set the Peripherals Schedule ........................................................................................................... 54
Set the Questions and Reminders Schedules ......................................................................... 56

Taking Vital Sign Measurements
Taking Vital Sign Measurements ....................................................................... 62
Taking Blood Oxygen Measurements .......................................................................................... 62
Taking Blood Pressure Measurements ....................................................................................... 63
Taking Weight Measurements ........................................................................................................ 66
Taking Temperature Measurements ............................................................................................ 69
Taking Blood Glucose Readings ..................................................................................................... 69
Manually Entering Vital Signs Measurements ........................................................................ 72
Watching Assigned Video Education ................................................................ 75
Clinical Procedures and Telehealth Tools ...................................................... 76
General and Advanced Settings
Setting General Settings ........................................................................................ 77
Setting Up Language and Units ..................................................................................................... 77
Enabling Device Capabilities ........................................................................................................... 78
Download Genesis Touch Updates ............................................................................................... 80
Communicating With LifeStream ..................................................................................................83
Advanced Settings ................................................................................................... 85
Enabling / Disabling All Education ............................................................................................... 86
Enabling / Disabling All Video Education ................................................................................. 86
Downloading the Video Education Content Library ............................................................. 87
Connecting to a Wi-Fi Network ....................................................................................................... 88
Disabling a Network Connection .................................................................................................... 89
Verifying Communication Settings ...............................................................................................90
Setting Date and Time ......................................................................................................................... 91
Enabling Video Visits ............................................................................................................................ 92
Maintenance and Troubleshooting
Turning the Monitor Off ......................................................................................... 95
Resolving Monitor Power / Black Screen Questions ............................................................ 96
Maintenance .............................................................................................................. 97
Troubleshooting ........................................................................................................ 99
Questions List
Monitor Compatibility .......................................................................................................................... 111
Standard Questions List ..................................................................................................................... 112
Reminders List ......................................................................................................................................... 116
Multi-Level Questions List ................................................................................................................ 117

CHAPTER
1
Genesis Touch - User Manual 1
GETTING STARTED
Preface
This manual is a reference guide for care providers to help in the understanding
and proficient use of Life Care Solutions’ Genesis Touch monitors, running v3.7 of
Genesis Touch software. The latest version of Genesis Touch monitoring software
(v3.7) is available as an optional over-the-air upgrade for monitors already in use.
Although Genesis Touch v3.7 monitoring software is available for free to all current
customers with a compatible monitor via an over-the-air upgrade, this version of
software introduces new features which are only available to customers using the
LifeStream Web interface.
If you have downloaded this document, you may also download the Setup Guide to
assist users with pairing peripherals and checking for a remote configuration from
LifeStream. Patient Health Monitor Instructions are also available Online, to help
patients report and log their vital sign measurements.
Need a manual translation, or an older document revision for specific Genesis
Touch software? Check the Life Care Solutions website for an archive of manual
revisions and translations .
With the release of Genesis Touch v3.7, this manual contains the following content
updates:
What’s In this Release? Genesis Touch v3.7
Video Education from The Wellness Network - Assign patients video education
from a library of videos developed by the The Wellness Network, a national leader in
actionable patient education and engagement. With over 40 years of experience in
producing evidence-based patient resources, The Wellness Network content is
developed using national clinical guidelines and best practice standards, focused
on a single learning objective, developed at the 5th grade literacy level.

2 Genesis Touch - User Manual
A library of video education from The Wellness Network is pre-loaded on new Gen-
esis Touch monitors, but care providers must enable this feature on each monitor
while preparing equipment. If you have upgraded your Genesis Touch monitoring
software from an earlier version, care providers must connect to a Wi-Fi network, to
download the educational video library to the monitor.
Patient Health Questionnaire - Care providers may assign a PHQ 2/9 from the
LifeStream Web interface, which is displayed as a set of multiple choice questions
to patients during monitoring sessions.
Wong-Baker FACES® Pain Rating Scale - The industry-standard Wong-Baker
FACES® Pain Rating Scale may be assigned to telemonitored patients dealing with
chronic pain, enabling patients to tap the face on the screen that best represents
their level of pain.
Updated Patient Guide - A patient guide offers patient guidance on accessing and
using assigned Video Education, the Wong-Baker FACES® Pain Rating Scale, and
PHQ 2/9 surveys. While our patient guides include help on all features, we encour-
age customers to print and copy portions of the guide you need.
Samsung Tablet Monitor - The Genesis Touch is now available on the Samsung
Galaxy Tab A running Android™ 8.1. New monitors will begin with a serial number
starting with A5. A Samsung Tablet manual has been added to our online archive
for reference. Electronic versions of manufacturer user manuals for each device in
your patient monitoring kit are provided online for customers.
Unpacking Your Products
When you receive your Genesis Touch kit, carefully remove each piece of equip-
ment from the box and save any packaging materials in the event you need to
return items. Your package may include different products depending on the
model and/or patient need. Assemble peripheral medical devices as necessary.
Refer to the manufacturer’s instructions and safety documentation for more infor-
mation.
Check each piece of equipment for damage. If anything is damaged or missing,
contact Customer Service. Your package may include the following:
• Genesis Touch monitor
An optional USB extender cable connects between the end of the monitor power cord
and the power adapter unit to power the Genesis Touch. You may remove this cable if not
required, or if there is evidence of damage or malfunction.

Genesis Touch - User Manual 3
• Monitor AC power supply cable
• Monitor USB power supply extension cable (shown above)
•Powerstrip
• Monitor stand
The following items are often included with Genesis Touch kits. These parts may
also be ordered separately:
•Scale
• Scale AC power supply cable
• Blood pressure monitor
• Blood pressure cuff
•Oximeter
• Oximeter power supply cable
• Manufacturer user manuals and documentation
Getting Started
To get started using the Genesis Touch monitor, it is recommended to familiarize
yourself with the essential buttons and basic menus of the monitor, as well as the
Android™-powered Samsung tablet the monitoring software runs on.
Many features and functions of the tablet have been disabled to allow for
use as a Genesis Touch Monitor. Refer to the tablet manufacturer’s
instructions for additional information.
Operating the Monitor
Place the monitor on the stand or on a flat, stable, and uncluttered surface where
seating is available. A location near a window on an outside wall usually works best
for transmission purposes. The monitor can be run on batteries, just as a cellular
phone does; however, the preferred method is to keep it plugged in. Plug the moni-
tor into an electrical outlet via the supplied AC power adapter.
Plugging the Monitor In
Note: We recommend that you keep the monitor plugged in during use. Patients should
keep the monitor powered on and accessible at all times.
The monitor can run on batteries, although it is recommended to keep the monitor
plugged in. Prior to plugging the monitor into an electrical outlet via the supplied
AC power adapter, inspect the USB cable for any kinks or any other signs of dam-
age. Carefully inspect the charging port of the Genesis Touch for any debris, dust,
or signs of contamination.

4 Genesis Touch - User Manual
Monitors purchased after 2015, with serial numbers starting with A2, A3 and
higher, use a power adapter with a narrow USB plug that inserts into the monitor.
The USB plug, shown here, may insert into the monitor differently, depending on
the tablet you are using. Use the image diagram in the next section for reference -
in all cases, position the monitor so that the power button is on the top left
(referred to as the top of the monitor):
• On the right side under the home key (A2 models).
• On the left side, near the SAMSUNG logo (A3, A4
models). Some power cords may also be white.
• On the right side (A5 models). For these models,
ensure the volume and power buttons are on the top left, as shown below.
Turning the Monitor On
With the monitor plugged in, turn it on by pressing and holding the Power button
on the top left side of the monitor until the monitor displays startup images and
sounds. When powered on, a Vitals Now/Home screen similar to the following
appears. As highlighted below, the power button is on the top left of a monitor posi-
tioned horizontally, so that the SAMSUNG logo is vertical:
Turning the Monitor Off
The monitor should always remain on while in use. You
must be within a password protected menu to turn the
monitor off. Once a password has been entered (4237):
1. Press and hold the Power button on the top of the
monitor. A Device Options window may appear. Use
caution, to make sure Airplane Mode is not accidentally pressed.
2. Select Power off. On some monitors, the button will
appear as a red button, as indicated on the right.
Before configuring the Genesis Touch for a new patient,
it is recommended that a Genesis Touch is turned off.
Power Button
The monitor
should be placed
so the screen is
wide, with buttons
on the right side
(if applicable).
The SAMSUNG
logo, shown
here, is vertical.
Volume

Genesis Touch - User Manual 5
If the monitor has been left on without being plugged in, connect the power cord
and power off the Genesis Touch. Ensure the battery icon shows at least a 25%
battery charge before turning the Genesis Touch back on.
Using Monitor Keys
The power button and the volume buttons may be used from the monitor frame:
Button Function
Power Allows you to turn the monitor’s power on or off or wake up the monitor. If
you have entered a password protected area, this button also allows you
to turn off the monitor.
Volume Allows you to adjust the monitor’s volume.
Button Icon Description / Function
Vitals Now Begins manual vitals acquisition process.
Forward Allows you to move forward to the next screen in the workflow.
Back Allows you to back out of screens.
Home Brings you back to the Vitals Now/Home screen.

6 Genesis Touch - User Manual
Returning to the Home Screen
Because of the nature of the tablet, if you inadvertently touch certain parts of the
screen, you may have access to advanced controls locked during normal operation.
As a general rule, always look for and tap the Return / Back key to go
back to the Genesis Touch screen.
The return key is built into the frame of newer monitors. It may also appear as part
of a black menu bar on your screen on either the bottom or side. Monitors with a
serial number of A5, will show a white menu bar after swiping up on the screen.
Example: In the example below, tap the return
key or tap the green background of the
Genesis Touch. When you see an X, like
below, you may also tap the X to close
the window that has popped up:
Settings Allows you to change the brightness of the screen and volume of the
monitor. Access the Status screen and configure other monitor settings
with a password.
Video Allows this monitor to have the ability to join a video visit. If this doesn’t
appear on the home screen, the monitor has not been set up for video.
Education Allows this monitor to provide education to patients as scheduled, or as a
list of self-guided general health questions to review on demand. With
the introduction of video education, patients may also press to view video
education. If a number appears on this button, video education has been
assigned, and patients should select this button to watch all assigned
videos.
Back /
Return
Allows you to return to the previous screen. Appears periodically (e.g., if
you touch the bar at the bottom of the screen or if you are on a setup
screen). Monitors beginning with a serial number of A5, use a white
button design, shown on the left, which performs the same function.
Home/Recent Apps DO NOT use. If you accidentally touch these buttons while setting up the
monitor, press a green area of the Genesis Touch screen, or the Return
key shown above.
Button Icon Description / Function
The return key may also be
located on the frame of the
monitor.
The return key may appear on
the monitor screen sometimes

Genesis Touch - User Manual 7
In the examples below, the Recent Apps key has been pressed, or the Home key
has accidentally been held down for longer than a few seconds.
Select the Return / Back key to return to the Genesis Touch monitor screen.
Unpin the Navigation Menu (A5 Monitors)
Genesis Touch monitors, with a serial number beginning with A5, utilize the
Android™ Operating System 8.1, and display a white menu bar on the bottom of the
screen when swiping up from the bottom of the monitor screen. During normal
patient use, this menu is overridden by Genesis Touch software settings by design,
and cannot be used by patients.
However, a care provider accessing settings on the Genesis Touch may see this
navigation menu and accidentally pin the bar to the bottom of the screen. If the
menu shown below is persistently displayed over a patient-facing menu, tap the
dot in the lower left corner of the screen to unpin it.

8 Genesis Touch - User Manual
Communications
The Genesis Touch System provides two options for communicating with
LifeStream:
Cellular Network
The Genesis Touch comes activated on the Verizon Wireless cellular network, ready
to be used for basic transmission of patient monitoring data. The cellular network
works in the same way as it does for a cellular phone utilizing basic cellular network
speeds. This cellular connectivity is always on in the background, to help ensure
the transmission of vital sign measurements.
A monthly video-over-cellular data plan may also be purchased, to enable the
monitor to be used for Video Visits over a 4G LTE Verizon Wireless cellular network.
Wireless Internet (Wi-Fi)
The Genesis Touch is also designed to connect to any available Wi-Fi network
within range and may use a Wi-Fi access point to transmit vital sign data to
LifeStream, or conduct Video Visits without using a cellular network.
A stable Wi-Fi connection is also required for over-the-air download of the video
education library from The Wellness Network, or to conduct Video Visits without a
video-over-cellular data plan.
A Wi-Fi password is required to connect to a wireless network. It is the Wi-Fi net-
work administrator’s responsibility to verify Internet connectivity and provide a
network password to enable access. Refer to the Other Settings chapter for more
configuration information.
Settings Menu
Before patients use the monitor, it must be customized for their needs. Monitor
configuration may be done remotely from LifeStream, and from the monitor. Prior
to performing any configuration on the Genesis Touch, it is recommended to check
for a remote configuration first, from the Settings menu.
The Settings menu makes adjusting monitor volume and brightness levels menus
easy after deployment. The Status screen, also accessible from the Settings menu,
enables one-button retrieval of a remote configuration. The Status screen also fea-
tures a communications indicator, for verifying wireless connectivity.
The Settings menu may be accessed without a password from the Genesis
Touch Vitals Now/Home menu. From the Settings menu, a user may select
one of the following menu options:
•About
•Brightness&Volume

Genesis Touch - User Manual 9
• Status
The About, Brightness & Volume and Status menus are described below. General
and Advanced menus are described later in this guide.
Setting Brightness and Volume
To set the brightness and volume of the monitor from the Settings menu:
1. Select Brightness & Volume. A screen similar to the following appears:
2. Place your finger on the light bulb button ( ) and slide it to the left or right
to select the brightness.
3. To set the volume of the monitor, place your finger on the speaker button ( )
and slide it to the left or right to get the volume you want.
4. Press Back to return to the Settings menu.

10 Genesis Touch - User Manual
Status Menu and Remote Configuration Retrieval
The Genesis Touch can be configured for patient use from LifeStream, and a basic
configuration may also be setup from the monitor. When placing a monitor in the
home, it is recommended to retrieve a configuration first, before changing any set-
tings on the monitor. To do this quickly, utilize the Status menu:
1. From the Settings menu, select the Status button:
2. From the Status menu, select the Retrieve Configuration button. .
3. The Genesis Touch will now check for any configuration updates from
LifeStream and apply them. A message indicates retrieval status.
Note: If the Retrieval button is gray or does not work, check that the Internet status menu
item does not indicate the monitor is disconnected. You may need to use the down
arrow to display the Internet menu item, shown here. Confirm cellular or Wi-Fi
connectivity. See additional information in Troubleshooting the Status Screen in the
Troubleshooting section.
Checking Cellular and Wi-Fi Communication
The status bars on the Cellular and Wi-Fi sections indicate connection status.
The Status screen may assist users when troubleshooting connection issues with
the Genesis Touch monitor. For more information see Troubleshooting the Status
Screen in the Troubleshooting section.

Genesis Touch - User Manual 11
Verifying Monitor Version / About Menu
Select About from the Settings screen, to confirm the version of software your
monitor is running.
The following instructions pertain to Genesis Touch
monitors, with a serial number beginning with A2, A3 or
higher. The serial number is printed on the back of the
monitor. From the About menu, confirm at least the fol-
lowing Android™ versions are installed, depending on
your monitor serial number:
• Android™ version for A2 Monitors: v5.1
• Android™ version for an A3, A4 Monitor: v7.1.1
• Android™ version for an A5 Monitor: v8.1
If a lower version number is indicated, a major Android™ update is required. Soft-
ware versions are subject to change. For more information, check the Upgrade
Instructions, available from: https://www.honeywelllifecare.com/customer-
service/genesis-touch-manuals/
The following may be verified in the About menu:
• The Genesis Touch software version number
• The detailed Genesis Touch software version number: Minor software releases
are listed after the letters GTT, after the second decimal point.
• The Android™ Operating System software version number
• License information
• Unique Device Identification (UDI)
A depiction of an About menu is shown below. The following may be noted:
• We recommend accepting all Genesis Touch software updates as they become
available, while the monitor is not actively deployed.
• Genesis Touch software must be upgraded to at least v3.6.3, to utilize Video
Visits and Custom Questions or Reminders, and all peripheral devices. The latest
compatible version will always be installed when upgrading over the air.

12 Genesis Touch - User Manual

CHAPTER
2
Genesis Touch - User Manual 13
PERIPHERAL DEVICES
Pairing Peripheral Devices
After wireless Bluetooth® peripherals are selected and assigned to a patient, these
peripherals must be paired with the Genesis Touch. The peripheral pairing process
is different for each device. Reference the manufacturer user manual of each
peripheral device you use with the Genesis Touch. These instructions refer to the
pairing procedures needed to set up a wireless device with the monitor.

14 Genesis Touch - User Manual
General Settings Menu
1. From the Vitals Now/Home screen, select the Settings button ( ). The Set-
tings menu appears:
2. Select General. The Enter Password screen appears:
3. Type 4237and select the Forward button. The General Settings menu appears:
Other manuals for Genesis Touch
2
Table of contents
Other Honeywell Medical Equipment manuals