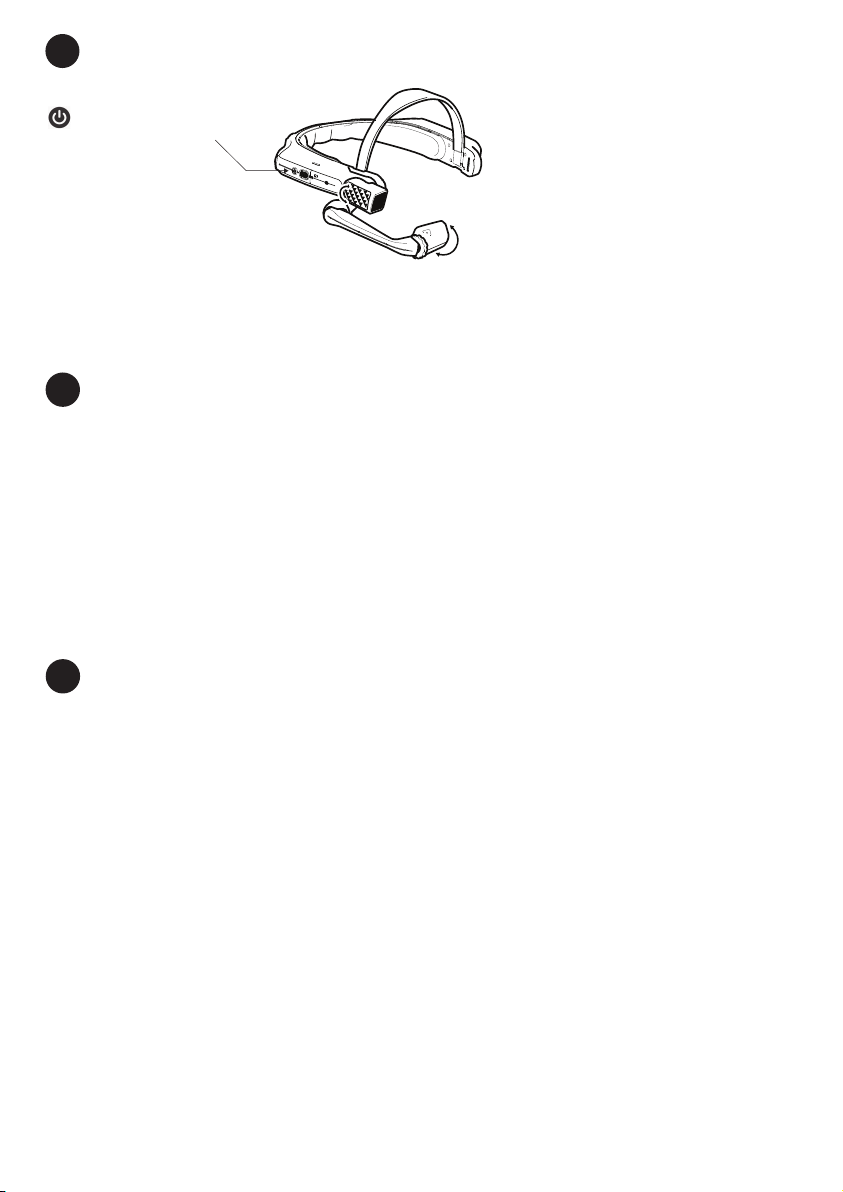
Honeywell RealWear HMT-1 User manual

© 2018 RealWear Inc. All rights reserved.
Version 15 20180507
http://www.hwll.co/SkillsInsight
Quickstart Guide


Power
ButtonAction
Button
Camera
Boom Arm
Flashlight
Elbow Joint
Display Pod
Mic A1
(A2 on opposite side)
Mic B1
Shoulder Joint
Removable Head Stra
p
Removable Head Pad
Speaker
Lock Ring
Device Overview
Display Window
Mic B2
Micro USB
Audio Jack

Using the HMT-1 with a Hard Hat
To get hard hat clips, visit shop.realwear.com.
1. Hook the hard hat Clips into the HMT-1 band and snap them into place.
2. Slide the clips into the hard hat accessory slots; the HMT-1 band should sit
outside of the hard hat’s harness.
3. Put on the hard hat and if applicable, tighten until secure and comfortable.
4. To remove the HMT-1 from the hard hat, pinch the clip ngers and push the clip out of
the hard hat slots.
A
B C D E F G H I J
A
B
C D E F G H I J
A B
C
D E F G H I J
Using the HMT-1 without a Hard Hat
Attaching the Head StrapAttaching the Rear Pad
The Rear Pad snaps
onto the HMT-1’s rear
band; align the open-
ings on the Rear Pad
to the pegs on the
HMT-1’s rear band,
and snap into place.
Insert the end of the
strap into the inside
slot on both sides of
the HMT-1 as shown.
Fold the end back on
itself and
secure using the
velcro patch.
During operation, remove the Rear Pad to view
intrinsically safe regulatory information.

Charging the HMT-1
1. Connect the Micro USB
charging cable as shown.
2. Connect the cable to the wall
charger as shown and plug in.
The power button will blink RED when
charging and turn GREEN when fully
charged.
The USB cable included with the HMT-1 is a special micro-USB cable for data transfer and charging. It in-
cludes a safety box that protects the HMT-1’s safety circuits from power surges. These surges can
damage the HMT-1 and may occur when connecting the HMT-1 to computers, wall chargers, car chargers,
and other power sources that are not certied or approved as intrinsically safe. It is the only cable approved
for charging the HMT-1 and for moving les to and from the HMT-1.
Safety Warning Only use the Provided Charger
Generate a QR Code for Conguration
1
2 3 4 5 6 7 8 9 10
1. Go to honeywell.setupmyhmt.com from your
computer or mobile device.
2. Select Conguration.
3. Follow the prompts to enter information and
generate a QR Code.
1. Download the RealWear Companion app from
the Google Play or Apple App Store.
2. Launch RealWear Companion from
your smartphone.
3. Select Conguration.
4. Select First Time Setup.
5. Follow the steps in the application in enter
information and generate a QR Code.
Scan this code from your smartphone to
download RealWear Companion.
Use the RealWear Companion App Use honeywell.setupmyhmt.com
OR

Put on the HMT-1
1 2
3
4 5 6 7 8 9 10
Do not extend the display too far from your eye. Keep the display as close to the eye as possible for the
best viewing experience. Adjust the overhead strap such that the HMT-1 rests horizontally, slightly above
the tops of your ears. Position the shoulder and elbow joints into a “Z” shape, below the line of sight, left or
right eye.
Eye dominance is the tendency to prefer visual input from one eye to the other. Most people are
right-eye dominant; however in a small portion of the population neither eye is dominant. It is best to
use your dominant eye when viewing the display.
To determine which eye is dominant
1. Form a triangle with your hands placed together at arms length.
2. With both eyes open, focus on any distant object centered in the triangle.
3. Maintaining focus on the object centered in the triangle, close your right eye.
If the object is still in the triangle, you are left eye dominant.
4. Maintaining focus on the object centered in the triangle, close your left eye.
If the object is still in the triangle, you are right eye dominant.
5. If the object is in the triangle with either eye then you are dominant eye neutral.
6. Repeat test to conrm.
Check your eye dominance
1
2
3 4 5 6 7 8 9 10

Press and hold the
power button for 3
seconds to turn on
the device.
Adjust display pod so you
can clearly see all 4 corners
of the display and then lock
into position using ring.
Turn on the HMT-1
123
4
5 6 7 8 9 10
1. The HMT-1 will automatically launch into conguration mode.
2. Point the camera at the QR code you generated in Step 1.
3. The HMT-1 will detect the QR code and congure the device.
The HMT-1 is controlled by voice and head motion.
Say what you see on the screen and move your head
to navigate. If you get stuck say Show Help.
Say What You See
1 2 3 4 5
6
7 8 9 10
Scan the Conguration QR Code from the HMT-1
1234
5
6 7 8 9 10
Note: Once the device connects to WiFi an update of RealWear Device Agent may occur.
Note: To change your language, press and hold the
action button on the side of the HMT-1. The language
selection will switch automatically, let go of the button
when the language you want is selected.


设备概况
歏彂䭾꛵
⸓⡲䭾꛵
䶑⫹㣢
⠽綫勍
䩛歏瘳
聴Ⱒ蒜
儑爚㾓㢫㡲
"띌⯘굥"⡙✵㼆
#띌⯘굥
聴Ⱒ蒜
〳䬓⽹㣢䌄
〳䬓⽹た㙈
䪋㡮㐼
ꝉ梠
儑爚璭
#띌⯘굥
.JDSP64#
侨䰘ㄤ⯏歏畮〡
⡙✵渷♴
갉곸䳄㶰

与安全帽配合使用HMT-1
要购买安全帽夹子,请访问shop.realwear.com。
1. 将安全帽夹子与HMT-1的带子系好,扣入相应位置。
2. 将夹子推入安全帽的配件槽;HMT-1的带子应在安全帽带子外围。
3. 戴上安全帽,如适用,绑紧直至安全舒适。
4. 捏住夹子的指状物,把夹子推出安全帽槽,即可将其和HMT-1分离。
A
B C D E F G H I J
A
B
C D E F G H I J
A B
C
D E F G H I J
不与安全帽配合使用HMT-1
装上头带装上后垫
后垫对齐HMT-1的后
带,将后垫上的开口对
准HMT-1后带上的销
钉,压 入 即 可。
如图所示,将带子尾部
插入HMT-1两边的内
槽。尾部折起并用尼龙
搭扣固定好。
在操作过程中,拆下后挡板以
查看固有安全的监管信息。

使用RealWearCompanion应用
从智能手机扫描此代码以下载RealWear
Companion
使用honeywell.setupmyhmt.com
1. 从您的计算机或移动设备前往honeywell.
setupmyhmt.com。
2. 选择“配置”
3. 按照提示输入信息并生成二维码。
或
1. 从GooglePlay或AppleAppStore下载
RealWearCompanionApp。
2. 从您的智能手机中启动RealWear
Companion。
3. 选择配置。
4. 选择首次设置。
5. 按照应用程序中的步骤输入信息并生成QR
代 码。
生成配置用二维码
1
2 3 4 5 6 7 8 9 10
给HMT-1充电
1. 如图所示,连接MicroUSB充电电缆
2. 如图所示,将电缆连接至壁装充电并
插 入。
充电时电源按钮闪烁红色,充满后变为
绿 色。
HMT-1配备的USB电缆是一种特殊的微型USB电缆,可用于数据传输和充电。它有一个安全盒,在功率骤增时保
护HMT-1的电路安全。将HMT-1设备连接电脑、壁装充电器、汽车充电器和固有安全性未认证或获批的其他电源
时,可能会使功率骤增并损坏HMT-1设备。该电缆是给HMT-1设备充电、与HMT-1设备之间传输文件的唯一指定
电 缆。
安全警告仅可使用原装充电器
从苹果应用商店
下载
在Google Play上
获取

戴上HMT-1设备
1 2
3
4 5 6 7 8 9 10
请勿将显示屏设置得离眼睛太远。尽可能使显示屏靠近眼睛,以获得最佳观看体验。调整头顶带,使HMT-1水
平放置,略高于耳朵上部。使肩部和肘关节呈“Z”形,位于左眼或右眼的视线下方。
单眼优势是指选择某一只眼而非另一只来进行视觉输入的倾向。大部分人是右眼具有此优势,但也有
少部分人没有这种现象。最好使用优势眼来看显示屏。
要确定优势眼
1. 把双手伸直围成一个三角形。
2. 两眼睁开,盯着在三角形中心的任何远方物体。
3. 继续盯着三角形中心的物体,闭上右眼。如果物体还在三角形中,您的左眼就是优势眼。
4. 继续盯着三角形中心的物体,闭上左眼。如果物体还在三角形中,您的右眼就是优势眼。
5. 如果任何一只眼闭上物体都在三角形中,那么您就无优势眼。
6. 重复测试以确任。
测试您的单眼优势
1
2
3 4 5 6 7 8 9 10

开启HMT-1
1 2 3
4
5 6 7 8 9 10
1. HMT-1会自动开启并进入配置模式。
2. 将摄像头指向您在第1步中生成的二维码。
3. HMT-1会检测二维码并配置设备。
4. 说“导航首页”以确认无线连接。在主屏幕的左下角显示无线网络。
注 意:一旦设备连接到WiFi,可能会更新RealWearDeviceAgent。
HMT-1设备受声音和头部运动的控制。说出您在屏幕
上看到的,然后摇晃头部操作。如果卡住,就说出Show
Help
注 意:选择语言时,要长按HMT-1旁的操作按钮。语言
选择自动切换,当您选定了想使用的语言时,松开按
钮。
从HMT-1扫描配置二维码
1 2 3 4
5
6 7 8 9 10
说出您所看到的
1 2 3 4 5
6
7 8 9 10
按住电源按钮3秒钟,
打开设备。
上下旋转摄像头,
获得最佳视野。
调整显示屏外壳,直到
清晰看到显示屏的四个
角,然后用环锁入位。


Vue d’ensemble de l'appareil
Coussinet arrière amovible Bandeau amovible
Mic B1
Articulation d’épaule
Lampe flash
Module d’affichage
Mic A1
(A2 de l’autre côté)
Bras articulé
Caméra
Ar
ticulation coudée
Bouton d’action
Bouton
d’alimentation
Haut–parleur
Mic B2
Écran
Prise audio
Port de
données & de charge
Micro USB situé
sous le couvercle

Utilisation du HMT-1 avec un casque de sécurité
Pour obtenir des clips de casque de sécurité, visitez shop.realwear.com.
1. Accrochez les clips du casque de sécurité dans la bande HMT-1 et enclenchez-les.
2. Glissez les clips dans les fentes d’accessoires du casque de sécurité ; la bande HMT-1 doit se trouver à
l’extérieur du harnais du casque de sécurité.
3. Mettez le casque et, si nécessaire, ajustez-le jusqu’à ce qu’il repose de manière sûre et confortable sur
votre tête.
4. Pour retirer le HMT-1 du casque de sécurité, pincez le clip et poussez-le hors des fentes du casque de
sécurité.
A
B C D E F G H I J
A
B
C D E F G H I J
A B
C
D E F G H I J
Utilisation du HMT-1 sans casque de sécurité
Fixation de la sangle de têteFixation du coussinet arrière
Le coussinet arrière
s'enclenche sur la
bande arrière du HMT-1
; alignez les ouvertures
du coussinet arrière
avec les crochets de la
bande arrière du HMT-1
et enclenchez-les.
Insérez l'extrémité
de la sangle dans la
fente intérieure des
deux côtés du HMT-1
comme indiqué.
Repliez l'extrémité sur
elle-même et xez-la
à l'aide du velcro.
Pendant le fonctionnement, enlevez le coussinet arrière pour
lire des informations de réglementation intrinsèquement sûre.

Générer un Code QR de conguration
1
2 3 4 5 6 7 8 9 10
Chargement du HMT-1
1. Connectez le câble de charge Micro
USB comme indiqué.
2. Connectez le câble au chargeur
mural comme indiqué et branchez-le.
Le bouton d'alimentation clignotera en
ROUGE lors de la charge et deviendra
VERT lorsqu'il sera complètement
chargé.
Le câble USB fourni avec le HMT-1 est un câble micro-USB spécial pour le transfert de données et la charge.
Il comprend un boîtier de sécurité qui protège les circuits de sécurité du HMT-1 contre les surtensions. Ces
surtensions peuvent endommager le HMT-1 et peuvent survenir lors de sa connexion à des ordinateurs, des
chargeurs muraux, des chargeurs de voiture et d’autres sources d'alimentation non certiés ou homologués
comme intrinsèquement sûr. C'est le seul câble homologué pour charger le HMT-1 et déplacer des chiers
vers et depuis le HMT-1.
Avertissement de sécurité N'utilisez que le chargeur fourni
À télécharger sur
OBTENEZ–LE SUR
Utilisez l’appli RealWear Companion
Scannez ce code avec votre Smartphone pour
télécharger RealWear Companion.
1. Téléchargez l’application RealWear Companion
à partir de Google Play ou Apple App Store.
2. Lancez RealWear Companion à partir de votre
smartphone.
3. Choisissez Conguration.
4. Choisissez Premier réglage.
5. Suivez les étapes de l’application pour saisir les
informations et générer un code QR.
OU Utilisez honeywell.setupmyhmt.com
1. Allez à honeywell.setupmyhmt.com depuis
votre ordinateur ou appareil mobile.
2. Sélectionnez Conguration.
3. Suivez les indications pour saisir vos infor-
mations et générer un Code QR.

1
2
3 4 5 6 7 8 9 10
N’éloignez pas trop l’écran de votre œil. Gardez l’écran le plus près possible de votre œil pour une meil-
leure vision. Réglez le bandeau pour que le HMT-1 repose bien horizontalement, légèrement au-dessus
de vos oreilles. Réglez les articulations d’épaule et de coude en forme de «Z», sous le champ de vision
de l’œil gauche ou droit.
Mettez le HMT-1
La dominance monoculaire est la tendance à préférer un œil à l’autre pour percevoir les signaux
visuels. La plupart des personnes ont l'œil droit dominant ; cependant, pour une petite partie de la
population, ni l'œil droit ni l'œil gauche ne sont dominants. Il est préférable d'utiliser votre œil domi-
nant lorsque vous regardez l'écran.
Pour déterminer quel est votre œil dominant
1. Formez un triangle avec les mains, les bras étendus.
2. Les deux yeux ouverts, faites la mise au point sur n'importe quel objet éloigné centré dans
le triangle.
3. Fermez l’œil droit en conservant la mise au point sur l'objet centré dans le triangle,.
Si l'objet est toujours dans le triangle, votre œil gauche est l’œil dominant.
4. Fermez l’œil gauche en conservant la mise au point sur l'objet centré dans le triangle,.
Si l'objet est toujours dans le triangle, votre œil droit est l’œil dominant.
5. Si l'objet est dans le triangle avec l'œil droit ou l’œil gauche, alors vous avez une dominance
monoculaire neutre.
6. Recommencez le test pour conrmer.
Vériez votre œil dominant
1 2
3
4 5 6 7 8 9 10

Allumez le HMT-1
1 2 3
4
5 6 7 8 9 10
Le HMT-1 est contrôlé par la voix et les mouvements
de tête. Dites ce que vous voyez à l'écran et bougez
la tête pour naviguer. Si vous êtes bloqué, dites
Acher l'aide.
Note : Pour changer de langue, maintenez enfoncé
le bouton d’action situé sur le côté du HMT-1. La
sélection de la langue changera automatiquement ;
lâchez le bouton quand la langue que vous désirez
est sélectionnée.
Scannez le Code QR de Conguration avec le HMT-1
1 2 3 4
5
6 7 8 9 10
Dites ce que vous voyez
1 2 3 4 5
6
7 8 9 10
1. Le HMT-1 va automatiquement se lancer en mode conguration.
2. Dirigez la caméra vers le code QR que vous avez généré à l’étape 1.
3. Le HMT-1 va détecter le code QR et congurer l’appareil.
Note : Une fois l’appareil connecté au WiFi, une mise à jour de RealWear Device Agent peut se produire.
Appuyez sur le bouton
d’alimentation pendant
3 secondes pour mettre
l’appareil sous tension.
Faites basculer la
camera vers le haut/le
bas pour obtenir la
meilleure vue.
Réglez le module d’affichage
de manière à bien voir les 4
coins de l’écran puis
bloquez–le à l’aide de la bague.

Table of contents
Languages: