Horizon Educational RESK-02B-1 User manual

www.horizoneducational.com | support@horizoneducational.com
-1
Model No.: RESK-02B-1/RESK-02B
Do-it-Yourself Fuel Cell Kit/Classroom Pack
To avoid the risk of property damage, serious injury or death:
This kit should only be used by persons 12 years old and up, and only under the
supervision of adults who have familiarized themselves with the safety measures
described in the kit. Keep small children and animals away, as it contains small parts that
could be swallowed. Read the instructions before use and have them ready for
reference.
Warning!
DIY Fuel Cell Kit/Classroom Pack

www.horizoneducational.com | support@horizoneducational.com
-2
1. Reversible fuel cell
2. Set of red and black pins
3. Set of silicone tubing
4. Battery pack with crocodiles
5. (5ml) Syringe
6. Motor 0.6V
7. (20ml) Syringe for storage of
Hydrogen and Oxygen
8. Pressure relief valve
9. Plastic clamp
10. LED diode
11. Wire set
12. Bag to protect fuel cell
List of components
1
2
3
4
5
7
6
8
9
10
11
12
DIY Fuel Cell Kit/Classroom Pack
RESK-02B-1 RESK-02B
1
1
1
1
2
1
2
2
2
1
1
1
12
12
12
12
24
12
24
24
24
12
12
12
1. Reversible fuel cell
2. Set of red and black pins
3. Set of silicone tubing
4. Battery pack with crocodiles
5. (5ml) Syringe
6. Motor 0.6V
7. (20ml) Syringe for storage of
Hydrogen and Oxygen
8. Pressure relief valve
9. Plastic clamp
10. LED diode
11. Wire set
12. Bag to protect fuel cell

www.horizoneducational.com | support@horizoneducational.com
-3
Safety Information
Before you start working with the Horizon DIY take notice of the following. Under certain
circumstances, hydrogen can create an explosive gas mixture. Though these devices in
this box are designed such that they can be used as described without danger, the advice
below must be followed at all times:
• The fuel cell and hydrogen storage may not be operated without supervision of
adult person.
• Hydrogen (H2) is much lighter than air and thus rises rapidly. In conjunction with
oxygen, a gas mixture capable of explosion can form. A potentially explosive
mixture arises for hydrogen concentrations from 4.0 to 77.0% in air. Therefore, it
holds that:
•The fuel cell must only be operated either outside or in suciently ventilated
rooms.
• Oxygen (O2) is a strongly oxidizing gas. When this gas gets in contact with organic
substances (e.g. oil, grease) spontaneous combustion may occur at room
temperature.
• Do not insert the cables into an electrical outlet.
• Do not connect the fuel cell or motor to other power sources.
• The removing and inserting of batteries is to be conducted by the adults only.
Ensure to respect the polarity.
• Non-rechargeable batteries are not to be recharged.
•Dierent types of batteries such as rechargable, alkline and standard batteries or
new and used batteries are not to be mixed and should be used separately.
• The battery pack cables are not to be inserted into an AC socket.
• The supply terminals of the battery pack are not to be short-circuited.
• The two spare red & black cables are not to be inserted into an AC socket.
• Exhausted batteries are to be removed from the battery pack.
• Dispose of dead batteries properly and without delay.
• Do not attach the battery wires directly to each other.
DIY Fuel Cell Kit/Classroom Pack

www.horizoneducational.com | support@horizoneducational.com
-4
Safe Experimentation
Here are some important instructions for parents, teachers, and students. All activities
described in this manual can be conducted without risk if you follow instructions and
rules conscientiously. To avoid the risk of property damage, serious injury or death:
1. Read carefully and fully understand the instructions before assembling this kit.
2. This product is intended only for use by persons 12 years old and up, and only
under the supervision of adults who have read and understood the instructions in
this user manual.
3. Pay special attention to the indications of quantity and to the sequence of the
individual steps.
4. Some parts are small and fragile: please be careful when handling and connecting
parts to avoid damage. Handle all parts and components with care.
5. Do not attempt to disassemble any part, item or component in this kit.
6. Keep small children away, because this kit contains small parts that could be
swallowed.
7. Wires are not to be inserted into socket-outlets.
8. Save these instructions and review frequently during use.
9. Do not eat, drink, or smoke near the fuel cell device and hydrogen storage.
10. Use fuel cell and hydrogen storage only at a site with good ventilation and keep all
sources of ignition away.
11. Clean your hands after use.
12. After using the reversible fuel cell, connect the silicon plugs to the nozzles, and
seal the fuel cell in a zip bag. Improper storing may lead to membrane drying
out, which may consequently result in the fuel cell damage.
DIY Fuel Cell Kit/Classroom Pack

www.horizoneducational.com | support@horizoneducational.com
-5
Operation guide..............................................................................................................................6
1.1 Using the Battery Pack to Perform Electrolysis..................................................6
1.2 Produce hydrogen (Electrolysis).............................................................................6
1.3 Power the system.......................................................................................................9
Troubleshooting .......................................................................................................................... 10
Projects.......................................................................................................................................... 11
1.4 Car............................................................................................................................... 11
1.5 Robot.......................................................................................................................... 12
Content
DIY Fuel Cell Kit/Classroom Pack

www.horizoneducational.com | support@horizoneducational.com
-6
This guide will give you enough information to assemble your rst carbon free
powertrain.
1.1 Using the Battery Pack to Perform Electrolysis
Please remove the screw from cover of battery box using
a screw driver. Push and slide the cover and open the
battery box. Try NOT to touch the cables when you open
the cover.
Place two AA batteries as indicated, please note polarity.
Push and slide the battery box cover to closed position
and screw tightly into place using screw driver.
• Make sure the switch on the battery box is in the
“o” position before you place the batteries into the box.
• Avoid any contact between the battery and water.
• WARNING: If the cable is short circuited the
batteries inside could become hot and potentially cause
burns, melting of parts, or create risk of re.
1.2 Produce hydrogen (Electrolysis)
A fuel cell has both a negative (Hydrogen) and a positive (Oxygen) side. While using the
reversible fuel cell as an electrolyser it‘s important to make sure the polarities (red to
red & black to black) are correct otherwise the fuel cell can be permanently damaged.
Operation Guide
DIY Fuel Cell Kit/Classroom Pack

www.horizoneducational.com | support@horizoneducational.com
-7
First step of the fuel cell assembly is the preparation of the exible plastic tubing. Cut
(2) 3cm long pieces and connect one to both of the pressure relief valves. Then cut a
12cm long pieces and connect to both of the 20ml syringes for storing hydrogen and
oxygen. Finally, cut a 5cm long piece of exible plastic tubing and connect to the 5ml
syringe for injecting the water.
Step 1 – Hydrating the Membrane
The membrane of the fuel cell can by hydradted by adding distilled water (regular water
can damage the fuel cell) to the Oxygen side of the fuel cell. Start by drawing ~1mL of
distilled water into a syringe and inject the distilled water into the bottom nozzle on the
Oxygen side of the fuel cell (some water might leak from the top nozzle). Never operate
the fuel cell without insuring that there is water in the oxygen side. Once lled, remove
the syringe and attach a pressure relief valvue to this nozzle.
Next,attachapressurereliefvalvetothelowernozzleontheHydrogenside.It‘simportant
to note that this side should be kept dry so check and make sure the tubing is dry!
Operation Guide
DIY Fuel Cell Kit/Classroom Pack

www.horizoneducational.com | support@horizoneducational.com
-8
Operation Guide
Step 2 – Connecting the Syringes
Attach a syringetothetopnozzleon eachside ofthe fuel cell (these willbe for gas storage).
Step 3 – Electrolysis
Connect the red & black lead cables to the fuel cell. During this process make sure the
battery pack is turned o! Attach the red and black cables from the battery pack to the
crocodile clips that are connected to the fuel cell (make sure the red and black leads do
not touch eachother – this would create a short circuit!).
Connect the red lead to the Oxygen (red) side and the black lead to the Hydrogen
(black) side. Once these proper connections are made, turn on the battery pack and
DIY Fuel Cell Kit/Classroom Pack

www.horizoneducational.com | support@horizoneducational.com
-9
the electrolysis process will begin. Turn the battery pack o once enough hydrogen has
been produced and disconnect it from the fuel cell. Once again, pay close attention to
ensure that the cables do not touch each other.
1.3 Power the system
A fuel cell has both a negative (Hydrogen) and a positive (Oxygen) side. While using the
fuel cell it is important to make sure the polarities (red to red & black to black) are correct
as it will aect the direction of the motor. This means the car will drive backwards if you
switch the polarity.
Step 1
Attach the the red lead to the motor contact with the red dot and attach the black lead
to the other contact on the motor (negative). Make sure these connections are tight,
do not allow the other ends of the leads to come in contact with each other – that
would create a short circuit!
Step 2
Attach the other end of the red lead to the Oxygen (red - positive) side of the fuel cell;
attach the other end of the black lead to the Hydrogen (black - negative) side.
Operation Guide
DIY Fuel Cell Kit/Classroom Pack

www.horizoneducational.com | support@horizoneducational.com
-10
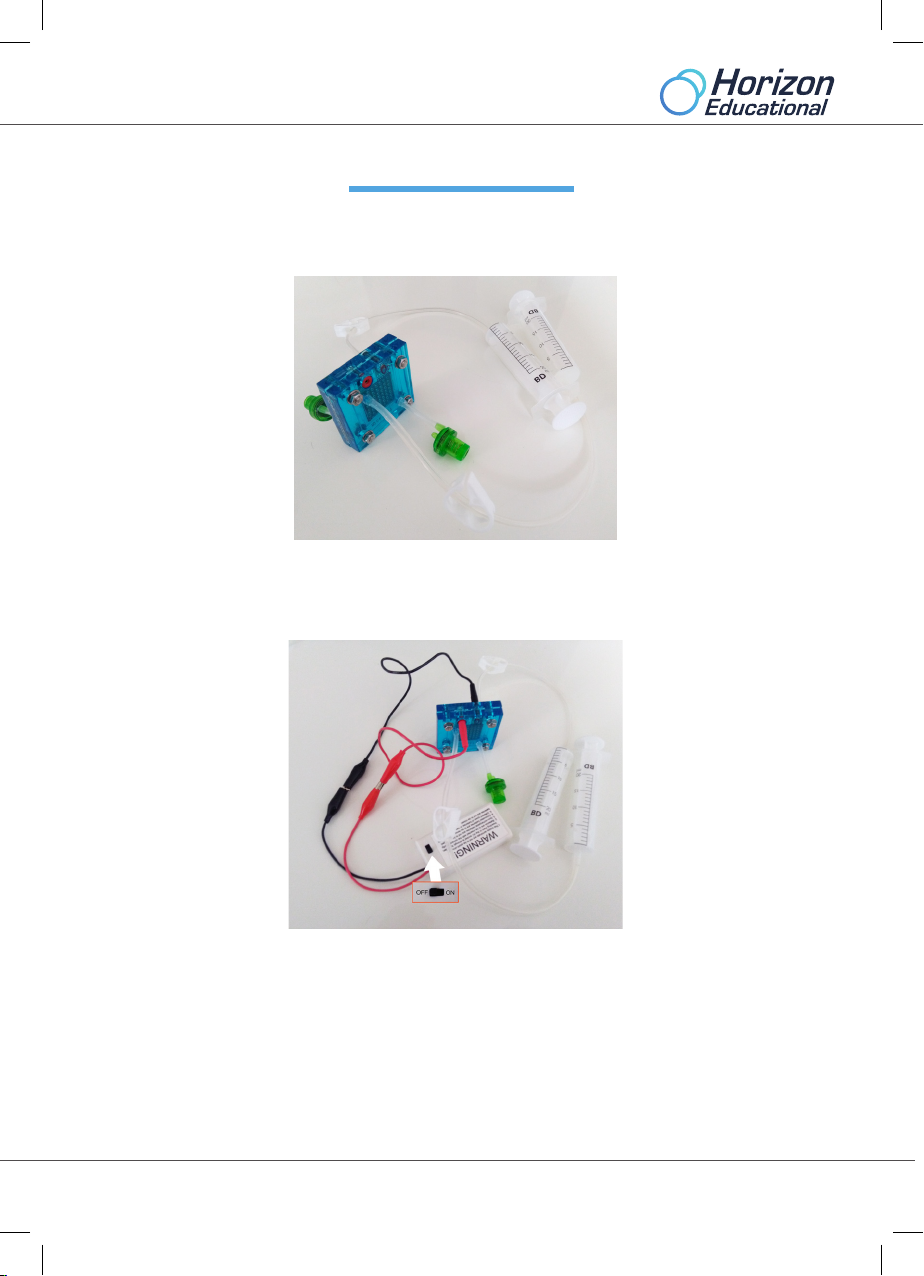
1. You will also need the following items (not included in this kit): - AA batteries
2. The reversible fuel cell does not produce hydrogen and/or oxygen. Solution:
a. Check whether the wires are appropriately connected, and whether there
are any loose connections.
b. The fuel cell could be completely destroyed if the red wire of the battery
pack is connected to the black socket of the fuel cell.
c. Check whether the switch of the battery pack is in the “on” position.
3. The water electrolysis process slows down. Solution:
a. Add water to the oxygen side of the fuel cell and wait for about 5 minutes.
b. Replace old AA batteries with new AA batteries inside the battery pack.
4. The car stops moving while there is still hydrogen left inside the tanks. Solution:
a. Purge the gases and perform water electrolysis for 4-5 minutes. Unplug
the hydrogen gas outlet tube and oxygen gas tubes to purge the gases.
Perform water electrolysis again until the hydrogen syringe is lled, and
connect the motor to the fuel cell. If the problem persists, go to the next
step.
b. Let the water electrolysis process last about 10 minutes to consume the
residual water. To push water out of the fuel cell, purge the gases. Perform
water electrolysis once more until the hydrogen tank is lled, then
connect the motor to the fuel cell.
The aim of the DIY-kit is to provide an open-ended learning experience of hydrogen fuel
cells and all the exciting science that comes along with this technology. Below you can
nd a few projects that can be built with additional material that can be found in most
homes, schools or science labs. For more information about all the chemistry, physics
and earth science behind these technologies check out and download our free E-book
and lesson plans online; www.horizoncurriculum.com
Note; tools and material mentioned in the project are not part of DIY kit.
Note; always make sure to have an adult around while building your own project
who knows how to use the suggested tools for the projects below.
Troubleshooting
DIY Fuel Cell Kit/Classroom Pack

www.horizoneducational.com | support@horizoneducational.com
-11
1.4 Car
This car is powered by a zero emission fuel and it can with help from the included motor
drive both forward and backward. Create your own car and race with other classmates
who will drive longer distance on single „tank“ of hydrogen. For this race you have to
create your car as light as possible!
Tools: carpet nife, soldering iron (it is very good for cutting polystyrene but it is not
neccessary), melting gun, ruler, sketchbook, pencil, brush.
Material (car chassis): polystyrene, plastic straps, plastic tube/rod, silicon hose, wheels
(it does not matter what kind of wheels, you can also create them or use wheels from
a building kit), glue, temperas (paint) for coloring, Horizon gearbox with electric motor,
assembled reversible fuel cell.
Alternative tools: whatever you and your superwising adult are trained and comfortable
using
Alternative material: recycled wood plank, plastic, aluminium, cartoon sheet, etc.
Sample projects
DIY Fuel Cell Kit/Classroom Pack

www.horizoneducational.com | support@horizoneducational.com
-12
1.5 Robot
If you do not want to use the motor as the output but rather the blinking diodes then
lets build something artsy! Create your own robo-buddy, a christmas tree or a dragon!
The choice is yours as long as you use the fuel cell to power the diodes and lots of your
own creativity!
Tools: carpet nife, scissors, melting gun, ruler, sketchbook, pencil, brush.
Material (robot body): cartoon, paper, glue, temperas (paint) or watercolors for
coloring, Horizon LED diodes, assembled reversible fuel cell, etc.
Alternativetools:whateveryou andyoursuperwisingadult aretrainedand comfortable using
Altrenative material: recycled wood plank, plastic, aluminium, cartoon sheet, polysteren, etc
Sample projects
IMPORTER
Horizon Fuel Cell Europe s.r.o.
Narodni 416/37
110 00 Prague,
Czech Republic
Horizon Fuel Cell Americas, Inc.
2531 W 237th Street, Ste 101
Torrance, CA 90505
United States of America
This manual suits for next models
1
Table of contents
Other Horizon Educational Educational Equipment manuals