manuals.online logo
Brands
  1. Home
  2. •
  3. Brands
  4. •
  5. Hornby
  6. •
  7. Toy
  8. •
  9. Hornby R070 User manual

Hornby R070 User manual

Other Hornby Toy manuals

Hornby 4/836B User manual

Hornby

Hornby 4/836B User manual

Hornby AIRFIX B-25 MITCHELL User manual

Hornby

Hornby AIRFIX B-25 MITCHELL User manual

Hornby CLASS 73 Manual

Hornby

Hornby CLASS 73 Manual

Hornby Princess Royal Class User manual

Hornby

Hornby Princess Royal Class User manual

Hornby B17 CLASS Manual

Hornby

Hornby B17 CLASS Manual

Hornby Railroad Patriot Class Manual

Hornby

Hornby Railroad Patriot Class Manual

Hornby CLASS 395 Manual

Hornby

Hornby CLASS 395 Manual

Hornby R3060 CLASS A1 TORNADO Manual

Hornby

Hornby R3060 CLASS A1 TORNADO Manual

Hornby PENDOLINO Manual

Hornby

Hornby PENDOLINO Manual

Hornby CLASS 87 Manual

Hornby

Hornby CLASS 87 Manual

Hornby FOWLER CLASS 4F 0-6-0 Manual

Hornby

Hornby FOWLER CLASS 4F 0-6-0 Manual

Hornby CLASS 40 Manual

Hornby

Hornby CLASS 40 Manual

Hornby CLASS 43 HST Manual

Hornby

Hornby CLASS 43 HST Manual

Hornby 4-6-2 REBUILT WEST COUNTRY CLASS Manual

Hornby

Hornby 4-6-2 REBUILT WEST COUNTRY CLASS Manual

Hornby Railroad Black 5 Manual

Hornby

Hornby Railroad Black 5 Manual

Hornby 'Elite" Unit User manual

Hornby

Hornby 'Elite" Unit User manual

Hornby 2-6-4T STANIER CLASS 4P Manual

Hornby

Hornby 2-6-4T STANIER CLASS 4P Manual

Hornby Class 5 User manual

Hornby

Hornby Class 5 User manual

Hornby Railroad County Class Manual

Hornby

Hornby Railroad County Class Manual

Hornby DIGITAL DCC User manual

Hornby

Hornby DIGITAL DCC User manual

Hornby CLASS 5 Manual

Hornby

Hornby CLASS 5 Manual

Hornby CLASS 2800 Manual

Hornby

Hornby CLASS 2800 Manual

Hornby CLASS 56 Manual

Hornby

Hornby CLASS 56 Manual

Hornby CLASS 20 Manual

Hornby

Hornby CLASS 20 Manual

Popular Toy manuals by other brands

FUTABA GY470 instruction manual

FUTABA

FUTABA GY470 instruction manual

LEGO 41116 manual

LEGO

LEGO 41116 manual

Fisher-Price ColorMe Flowerz Bouquet Maker P9692 instruction sheet

Fisher-Price

Fisher-Price ColorMe Flowerz Bouquet Maker P9692 instruction sheet

Little Tikes LITTLE HANDIWORKER 0920 Assembly instructions

Little Tikes

Little Tikes LITTLE HANDIWORKER 0920 Assembly instructions

Eduard EF-2000 Two-seater exterior Assembly instructions

Eduard

Eduard EF-2000 Two-seater exterior Assembly instructions

USA Trains EXTENDED VISION CABOOSE instructions

USA Trains

USA Trains EXTENDED VISION CABOOSE instructions

Modellbau Laffont Z1601 Assembly instructions

Modellbau Laffont

Modellbau Laffont Z1601 Assembly instructions

NOCH 12905 instruction manual

NOCH

NOCH 12905 instruction manual

Eduard Ki-61-Id quick start guide

Eduard

Eduard Ki-61-Id quick start guide

Viessmann Vollmer 45616 Mounting instruction

Viessmann

Viessmann Vollmer 45616 Mounting instruction

Vollmer 42004 Mounting instruction

Vollmer

Vollmer 42004 Mounting instruction

Phoenix Model CLASSIC-EP instruction manual

Phoenix Model

Phoenix Model CLASSIC-EP instruction manual

H-KING Sopwith Camel British WW1 Fighter instruction manual

H-KING

H-KING Sopwith Camel British WW1 Fighter instruction manual

MODSTER Predator 4x4 Crawler user manual

MODSTER

MODSTER Predator 4x4 Crawler user manual

DHK Hobby 8136 User instruction manual

DHK Hobby

DHK Hobby 8136 User instruction manual

THUNDER TIGER Raptor 50 V2 kit manual

THUNDER TIGER

THUNDER TIGER Raptor 50 V2 kit manual

Timberkits Skateboarder instructions

Timberkits

Timberkits Skateboarder instructions

Hangar 9 Funtana 125 Assembly manual

Hangar 9

Hangar 9 Funtana 125 Assembly manual

manuals.online logo
manuals.online logoBrands
  • About & Mission
  • Contact us
  • Privacy Policy
  • Terms and Conditions

Copyright 2025 Manuals.Online. All Rights Reserved.

Electrically Operated Turntable
To ensure safe transit some parts of the Turntable are packed loose.
Please read right through these instructions before assembling and
operating the turntable.
Caution
a. Never attempt to turn the turntable bridge by hand.
b. When handling always use both hands – do not allow the turntable
base to twist or distort.
c. Always operate on a firm flat surface.
d. Fishplates have sharp edges. Handle with care.
Assembly
1. Inlet Ramp
The 'inlet' ramp has two electrical contacts (Fig.1). Clip one of the special
track sections to the ramp (Fig.2) ensuring that the underside of each
metal rail makes a good connection with the appropriate contact.
This ramp must always be fitted with track as electric power is supplied
through it to operate locomotives on all other turntable tracks.
2. Outlet Ramps
There are thirteen ramp positions to which the seven outlet track
sections may be fitted. These alternatives allow a turntable to be installed
within a comparatively small layout by selecting the most convenient
positions for them.
If using the outlets for storing locomotives DO NOT fit track sections
directly across the bridge from one another otherwise locomotives
stored in both positions will be energised together when the bridge is
aligned with them. Clip track sections to the selected ramps ensuring that
the rail ends overhanging the bridge will make good connections with the
bridge rail contacts (Fig.3).
3. Track Height
To provide room for the operating mechanism the track on the turntable
is a little higher than normal and the special track sections fitted to the
ramps are inclined slightly. This height variation can be minimised by
laying approach tracks on Hornby Track Underlay which should be laid at
double thickness for about 2 inches (50mm) from the end of the ramp.
4. Hand Rails
Fix a hand rail on each side of the bridge (Fig.4).
1
2
3
4
Direct adult supervision is required for children under 14 years
12V
Special Track Section
31/4" (82.5mm)
Inlet Ramp
Electrical Contacts
Ensure good electrical
contact here
Bridge Rail
Contacts
Special Track Section
Outlet Ramp
Hand Rails
Turntable Bridge
4-680C 0907 Printed in China
Hornby Hobbies Limited, Westwood, Margate, Kent CT9 4JX, United Kingdom
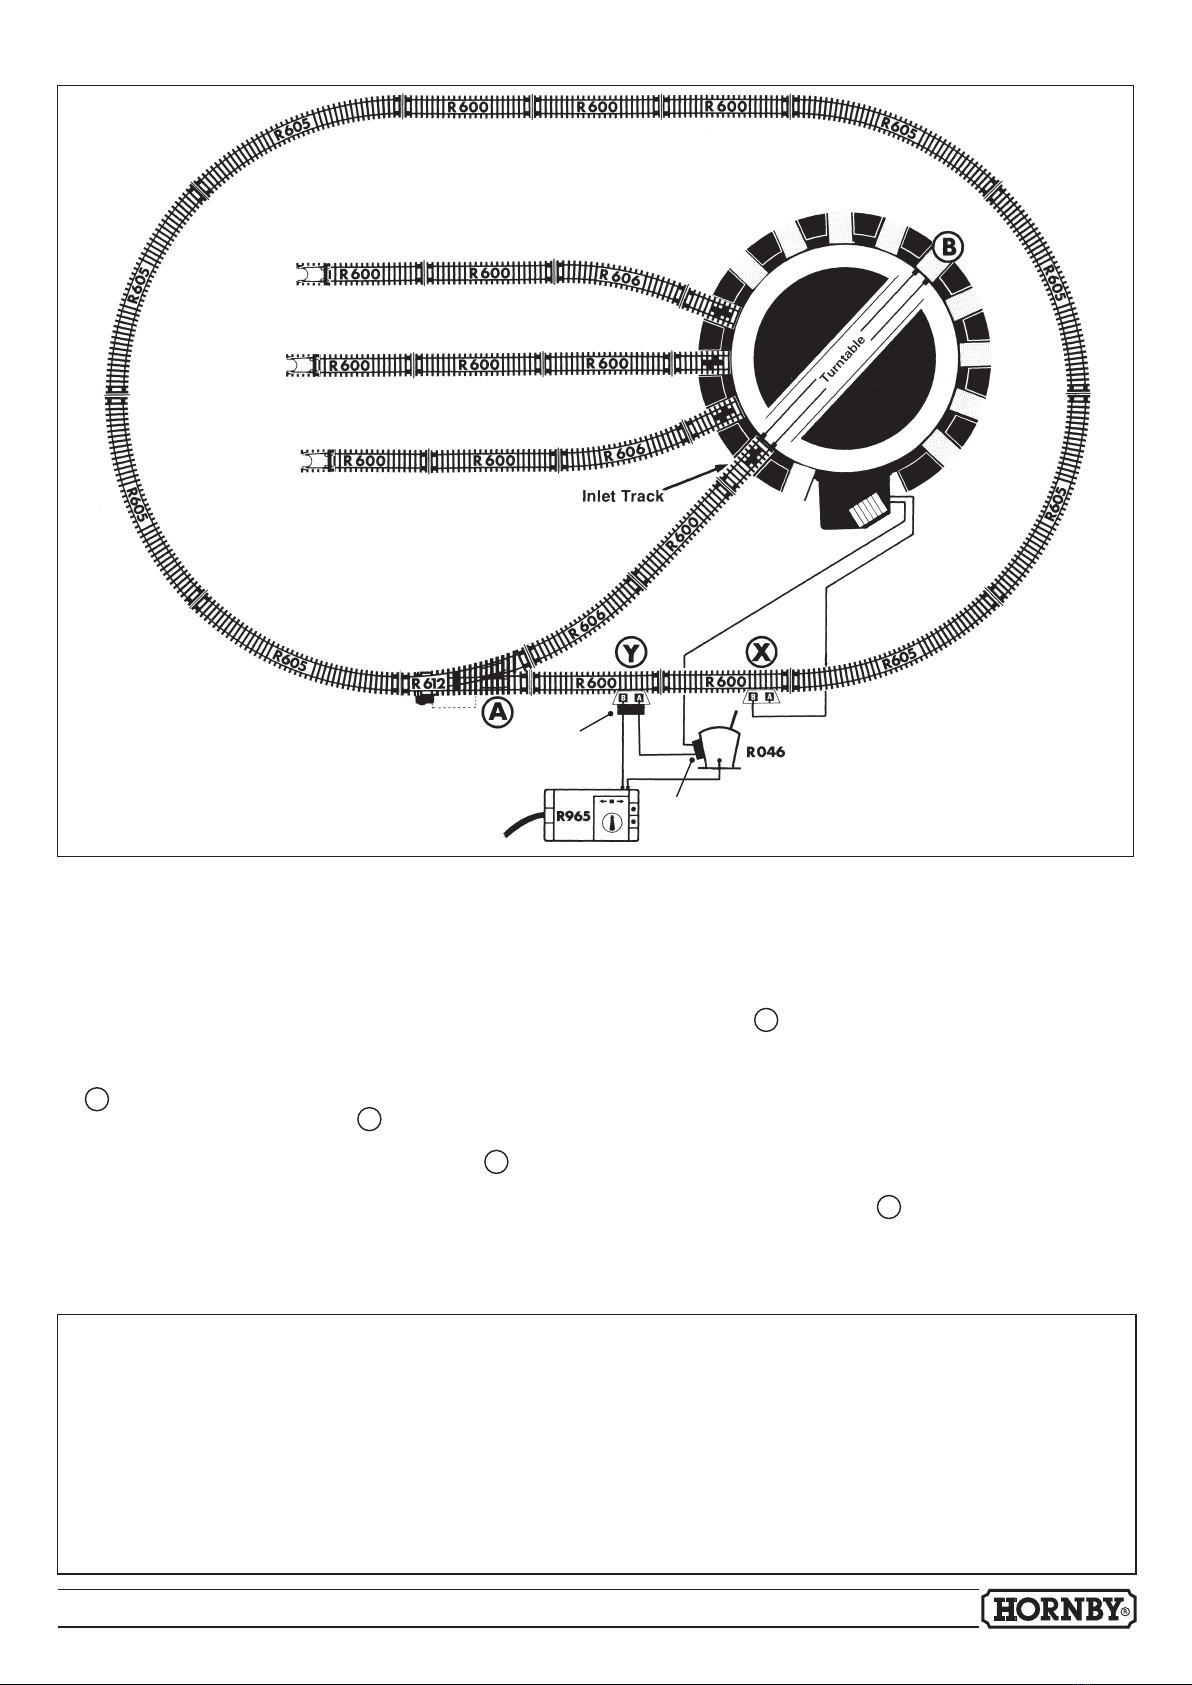
To turn the bridge, move the R046 switch lever to the left (it is
shown to the right in Fig.5). Operate the train controller knob in
either direction at a convenient speed. As the bridge aligns with
each outlet there will be a "dwell " time allowing the controller to
be switched to "off" when the required outlet is reached. Change
the R046 switch back to drive the locomotive off the turntable.
ii. To run a locomotive to any outlet track
Switch point A for the turntable, run the locomotive onto the
bridge – Stop.
Change the R046 switch and operate the train controller until
the bridge is lined up with the required outlet track.
Change the R046 switch again and drive the locomotive into
the outlet.
The only outlet that is electrically live is the one with which
the bridge is aligned and that will only be live when the power
connected to the inlet track is on. Locomotives can be stored
on the outlet tracks but track B (Fig.5) will always be live when
a locomotive is run between the bridge and the inlet track and
should not be used for storing locomotives.
The turntable may also be operated from the DC auxiliary output of
other Hornby power units by using an R047 switch.
SAFETY NOTICES
• Direct adult supervision is required for children under 14 years.
•
This product is not suitable for children under three years of age
because of small parts which can present a choking hazard. Some
components have functional sharp points and edges – handle with care.
• This product is intended for indoor use only.
•
The transformer is not a toy. It is a “Transformer for Toys”. Before
use, check that the transformer is the correct voltage for your mains
electricity supply. This product is only to be used with the
recommended transformer. The transformer should be examined
regularly for damage to the casing, plug pins and cables. In the event
of such damage, the set should not be used until the
transformer is replaced with a new
Hornby recommended
unit. Never attempt to open the transformer yourself.
• This product must not be connected to more than the
recommended number of power supplies. The output terminals of
the transformer must not be connected directly, or indirectly, to the
output of any other AC circuit derived from a transformer or mains
power supply.
• Before cleaning any part, disconnect the transformer from the mains
electricity supply. Do not use liquid for cleaning.
• Please retain these details and the address for future reference.
5. Assembly into Layout
The inlet track of the Turntable must be connected to a spur off the
main layout and it is essential that this spur has power available for the
movement of locomotives. The layout plan in Fig.5 shows a small layout
where power is fed to the turntable spur through point A.
6. Wiring
The turntable motor is arranged to work from the same 12 volt DC
Train Controller that is being used to drive a locomotive. Fig.5 shows the
wiring arrangement whereby an R046 switch is used to divert the power
from the track to the turntable motor. The extra power connecting
clip X supplied with the turntable must be fitted to a section of track
adjacent to that where the track feed clip Y is located.
Plastic twin connecting sleeves are fitted to the wires to provide an
optional facility to tidy the connections at track connection Y and
R046 switch
.
7. Locomotive Operation
i. To turn a locomotive
Switch point A (Fig.5) for the turntable spur, run the locomotive
from the main line onto the spur and continue slowly onto the
centre of the turntable bridge – Stop.
5
Turntable Operation
Connecting
Sleeve
Connecting
Sleeve