Hotpoint II E75 AA0 User manual

Compact Generator
2013/06 ver. 1.1.
Indesit Company UK Ltd
Morley Way,
Peterborough PE2 9JB
www.indesitcompany.com EN Operating Instructions
K
1
2
34
5
6
7
8
9
10 10
11
II E75 AA0 UK | II DC60 AA0 UK II C50 AA0 UK

Compact Generator
2013/06 ver. 1.1.
Indesit Company UK Ltd
Morley Way,
Peterborough PE2 9JB
www.indesitcompany.com EN Operating Instructions
K
1
2
34
5
6
7
8
9
10 10
11
II E75 AA0 UK | II DC60 AA0 UK II C50 AA0 UK

55
A
B
C
E F G
D
I
H
J

55
A
B
C
E F G
D
I
H
J

Compact Generator
2013/06 ver. 1.1.
Indesit Company UK Ltd
Morley Way,
Peterborough PE2 9JB
www.indesitcompany.com EN Operating Instructions
K
1
2
34
5
6
7
8
9
10 10
11
II E75 AA0 UK | II DC60 AA0 UK II C50 AA0 UK

5
enit
GENERAL SAFETY INSTRUCTIONS
• Iftheplug,powercordorapplianceappeartobe
damagedorifanyvisibledamageorwaterleaks
arefound,donotoperatetheiron.Insuchcases
haveitcheckedbyHotpoint’sauthorisedstaffin
ordertoavoidanyhazardoussituation.
• Iftheappliancewasdropped,donotoperateit.
• Thisappliancecanbeusedbychildrenagedfrom
8 years and above and persons with reduced
physical, sensory or mental capabilities or lack
ofexperienceandknowledgeiftheyhavebeen
given supervision or instruction concerning use
of the appliance in a safe way and understand
thehazardsinvolved.
• Supervisechildrentopreventthemfromplaying
withtheappliance.
• Neverleavetheapplianceunattendedwhenitis
pluggedintoanelectricalsocket.
• Aftereachuseoftheapplianceandwhenlling
thewaterreservoir,placetheapplianceinastable
position-usingthespecialironpadsupplied-and
disconnecttheplugfromtheelectricalsocket.
• The appliance must be used and placed on a
stable at horizontal surface. We recommend
usinganironingboard.
• For your safety, all repairs or maintenance
operationsontheappliancemustbecarriedout

6
en
exclusivelybyHotpoint’sauthorisedstaff.
• Cleaning and user maintenance shall not be
madebychildrenwithoutsupervision.
• Keeptheironanditscordoutofreachofchildren
lessthan8yearsofagewhenitisenergizedor
coolingdown.
This symbol warns operators that surfaces
are liable to get hot during use and can burn
your skin.

7
en
DESCRIPTION OF THE
APPLIANCE
1. Shot-of-steambutton
2. Steambutton
3. Powercableholder
4. Fillerholelid
5. Temperatureindicatorlight
6. Waterreservoir
7. Cablewinder
8. Soleplate
9. Temperaturecontrol(ifavailable)
Notshown:
Watermeasurer
Ironpad
damage to the appliance and void its warranty.
• Only connect the appliance to a grounded
socket.Whenusinganextensioncord,make
surethatagroundedsocketisavailable.
• Regularlychecktheconditionofthepower
cable.
Do not use the steam function with no
water in the reservoir to prevent any
damage to the pump.
• Donotllthewaterreservoirbyholdingthe
appliance directly under the tap. Always
use the water measurer supplied with the
appliance.
• Makesureyouhavedisconnectedtheplug
from the electrical socket before lling and
emptyingthewaterreservoirandinanycase
aftereachuse.
• Disconnect the plug from the socket by
holdingtheplugandnotbypullingthecable.
• Avoidanycontactbetweenthepowercable
andtheironplatewhenhot.
• Do not wind the power cable around the
platewhenhot.Usethespecialcablewinder
instead.
The iron and the water/steam coming out
of the soleplate are very hot and can
burn your skin.
• Beforestoringtheappliance,waituntilithas
INTRODUCTION
Thank you for purchasing our new
Compact Generator steam iron. We
recommend registering this product on
www.hotpoint.co.uk to make sure you are
entitled to all the benets made available
by Hotpoint’s Customer Service.
The Compact Generator was designed to have
thepowerofasteamgeneratorironwiththebody
and convenience of a conventional steam iron.
This is achieved thanks to a pump injecting as
muchsteamasagenerator.
Thisappliancewasdevelopedforhouseholduse
onlyandisnotintendedforindustrialuse.
Before you begin using the appliance, it
is important that you thoroughly read
these instructions and carefully keep them for
further reference.
GENERAL SAFETY
INSTRUCTIONS
Thesafetyfeaturesofyourironcomplywiththe
technicalspecicationsandregulationsinforce.
The mains voltage must match the
voltage of the iron (220-240 V). Any
connection error could cause irreversible

8
en
cooleddowncompletely-asteamirontakes
aboutonehourtocooldown.Usethehandle
tostoretheapplianceafteruse.
• Do not direct steam towards people or
animals and do not iron garments while
worn.
• After use, store the appliance in a stable
positionusingthespecialpadsupplied.
• Never add any perfume, vinegar, starch,
scale-removing agents, ironing products
or other chemicals in the water reservoir -
unless recommended by Hotpoint. Never
usecontaminatedwater.
• Neverimmersetheapplianceinwaterorany
otherliquid.
• Do not leave the appliance in the open
air and exposed to inclement weather
conditions.
• Never leave or use the appliance over or
closetoames,ovens,ammablematerials
orothersourcesofheat.
• Donotusetheapplianceforanyuseother
thanitsintendeduse.
• Should you suspect a failure, immediately
unplugitfromtheelectricalsocket.
• The manufacturer shall assume no
responsibility in case of damage resulting
fromanyimproperuseoftheappliance.
This appliance must be earthed. The fol-
lowing operations should be carried out
by a qualied electrician.
Replacing the fuse
Whenreplacingafaultyfuse,a13ampASTAap-
provedfusetoBS1362shouldalwaysbeused,
and the fuse cover re-tted. If the fuse cover is
lost, the plug must not be used until a replace-
mentisobtained.
Replacement fuse covers
If a replacement fuse cover is tted, it must be
ofthecorrectcolourasindicatedbythecoloured
markingorthecolourthatisembossedinwords
on the base of the plug. Replacements can be
obtained directly from your nearest Service De-
pot.
Removing the plug
If your appliance has a non-rewireable moulded
plug and you should wish to re-route the mains
cablethroughpartitions,unitsetc.,pleaseensure
thateither:
• theplugisreplacedbyafused13ampere
rewireableplugbearingtheBSImarkofap-
proval.
or:
• the mains cable is wired directly into a 13
ampcableoutlet,controlledbyaswitch,(in
compliancewithBS5733)whichisaccessi-
blewithoutmovingtheappliance.
Disposing of the plug
Ensurethatbeforedisposingoftheplugitself,you
makethepinsunusablesothatitcannotbeacci-
dentallyinsertedintoasocket.
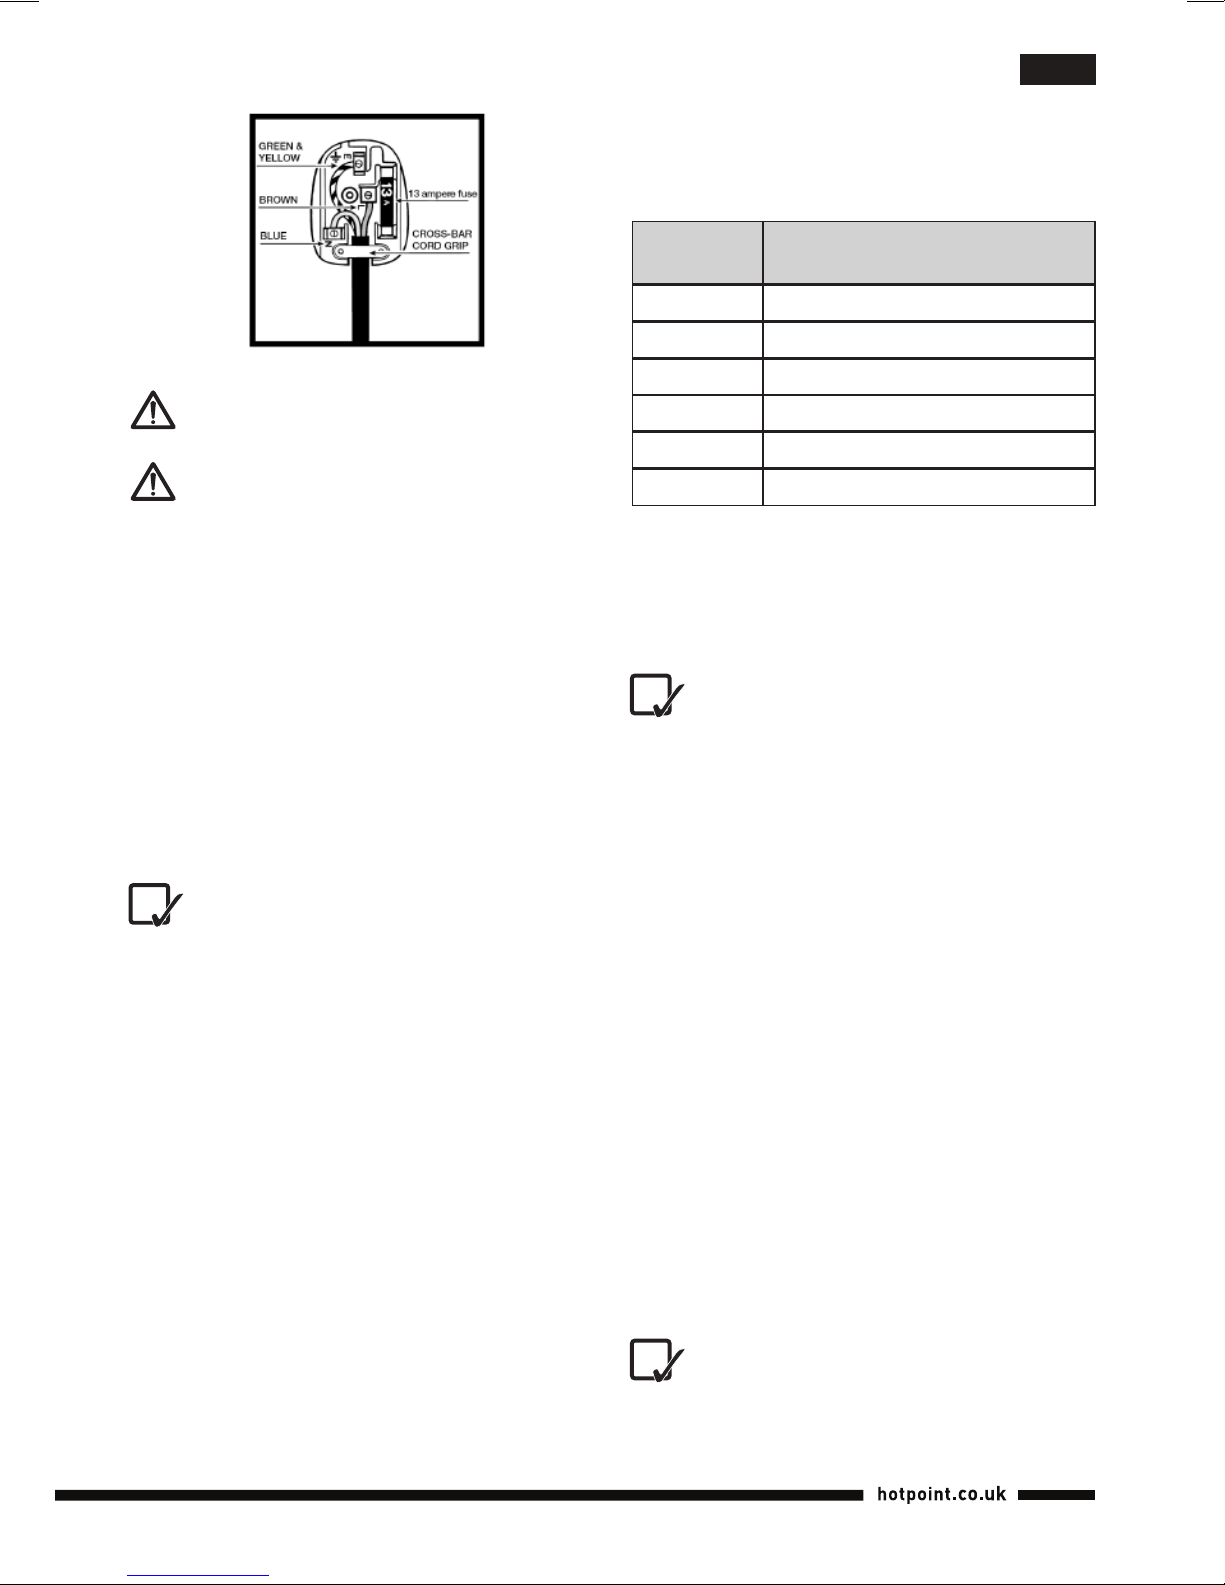
Instructions for connecting cable to
an alternative plug
The wires in the mains lead are coloured
in accordance with the following code:
GREEN & YELLOW EARTH
BLUE NEUTRAL
BROWN LIVE
As the colours of the wires in the lead may not
correspondwiththecolouredmarkingsidentifying
theterminalsinyourplug,proceedasfollows:
• Connect Green & Yellow wire to terminal
markedEor
orcolouredGreenorGreen
&Yellow.
• ConnectBrownwiretoterminalmarkedLor
colouredRed.
• ConnectBluewiretoterminal markedNor
colouredBlack.
Ifa13ampplug(BS1363)isuseditmustbetted
witha13ampfuse,eitherintheplugoradaptoror
atthedistributionboard.
If you are in any doubt regarding the electrical
supplytoyourmachine,consultaqualiedelec-
tricianbeforeuse.
How to connect an alternative plug
Thewiresinthismainsleadarecolouredinaccor-
dancewiththefollowingcode:
BLUE NEUTRAL (N)
BROWN LIVE (L)
GREEN & YELLOW EARTH (E)

9
en
veryhard(as measuredinFrench degrees),we
recommendmixingtapwaterand demineralised
wateraccordingtothefollowingtable.
Hardness
degree[°f]
Proportion
[tapwater:demineralisedwater]
7°f 1:0
7°f-14°f 1:0.5
14°f-22°f 1:1
22°f-32°f 1:2
32°f-54°f 1:3
>54°f 0:1
Todeterminethehardnessdegreeofthewaterin
yourarea,contactyourlocalwaterboardorbody.
This data is sometimes available on the board/
body’swebsitetoo.
Never add any perfume, vinegar, starch,
scale-removing agents, ironing pro-
ducts or other chemicals in the water reser-
voir - unless recommended by Hotpoint. Ne-
ver use contaminated water.
Water to be used – no Calc Proof
If your Compact Generator is not equipped with
thedescalingsystemCalcProof,werecommend
usingdemineralisedwater.
Filling the water reservoir (A)
Before lling the reservoir of the Compact
Generator with water, make sure that the iron
hasbeenswitchedoffanddisconnectedfromthe
electricalsocket.
1. PlacetheCompactGeneratorinahorizontal
position, open the lid of the ller hole (4)
and ll the water reservoir using the water
measurersuppliedwiththeiron(6).
2. Closethelidofthellinghole.
Never add any perfume, vinegar, starch,
scale-removing agents, ironing
products or other chemicals in the water
reservoir - unless recommended by Hotpoint.
Never use contaminated water.
The power supply cable must never be
bent or dangerously compressed.
The power supply cable must only be re-
placed by an authorised serviceman.
BEFORE USE
BeforeusingtheCompactGeneratorfortherst
time, remove all stickers, protective plastic or
cardboard packaging from the soleplate of the
iron.
Make sure that all adhesive parts have been
removed from the soleplate using a damp soft
clothandremove anyresiduesor particlesfrom
the manufacturing process by repeatedly lling
andemptyingthewaterreservoir.
When you switch on the Compact
Generator for the rst time, you may
notice an unpleasant smell, a little smoke and
some impurities. They will disappear in a few
minutes. When using the steam function for
the rst time, do not direct the steam jet on the
garments because manufacturing residues
may be present in the steam dispenser.
FILLING THE WATER
RESERVOIR
Waterplaysanessentialroleboth intheironing
process and in the good operation of the iron
in time. In particular, a high concentration of
limescalemaydamagesomepartsoftheCompact
Generatorandcauseitsearlydeterioration.
Water to be used – Calc Proof
Although the version of the Compact Generator
thatisequippedwiththe descaling systemCalc
Proofcanbeusedwithtapwater,ifthewateris

10
en
USING THE COMPACT
GENERATOR
Selecting the temperature (B)
If your Compact Generator is equipped with
the Optimal Soleplate Temperature technology,
youdon’tneed toadjustthetemperatureand/or
steam.
1. Connecttheplugofthe irontoagrounded
socket (220/240V). When the Compact
Generatorhasbeenswitchedon,abuzzer
willsoundandthetemperatureindicatorwill
lightup(5).
2. Youcanironallthefabricsthatcanbeironed
inanyorder.
In the version with no Optimal Soleplate
Temperature technology, follow the instructions
below.
1. Connecttheplugofthe irontoagrounded
socket (220/240V). When the Compact
Generatorhasbeenswitchedon,abuzzer
willsoundandthetemperatureindicatorwill
lightup(5).
2. Usethetemperaturecontrol(9)toselectthe
desiredtemperature.Ifyougofromalower
temperature to a higher temperature, the
temperatureindicatorlightsuptoshowthat
theCompactGeneratoriswarmingup.
3. Once the Compact Generator has reached
the set temperature, the temperature
indicatorlightgoesoff.
4. Make sure to check the garment label to
determine the fabric type. If in doubt, iron
a hidden part in order to determine the
most appropriate temperature and avoid
damagingthefabric.Incaseofverydelicate
fabrics such as silk, wool and synthetic
materials, iron the garment inside out to
prevent any shiny marks. Start with the
garments that require a low temperature,
e.g.syntheticfabrics.
USING THE IRON
When you switch on the Compact
Generator for the rst time, you may
notice an unpleasant smell, a little smoke and
some impurities. They will disappear in a few
minutes.
Optimal Soleplate Temperature (C)
If your Compact Generator is equipped with
the Optimal Soleplate Temperature technology,
you don’t need to adjust the temperature and/
orsteamnor tosortout thegarmentsbasedon
their fabrics. Just connect the plug of the iron
to a grounded socket (220/240V). As soon as
thetemperatureindicatorlightgoesoff,youcan
simply start ironing all the fabrics that can be
ironedinanyorder.
Ironing without steam (D)
Select the recommended ironing temperature
using the temperature control (9) - see step B,
chapter “Using the Compact Generator” and
paragraph“Selectingthetemperature”.
Ironing with steam (E)
1. Makesurethatthewaterlevelinthereservoir
ishigherthan1/4.
2. Selecttherecommendedironingtemperature
usingthetemperaturecontrol(9)-seestep
B, chapter “Using the Compact Generator”
Fabrics with this symbol on the label
must not be ironed.
GARMENT
LABEL FABRIC TYPE TEMPERATURE
INDICATION
synthetic
silk
mixedcotton
wool
mixedwool
cotton
linen
jeans
MIN
MAX

11
en
andparagraph“Selectingthetemperature”.
3. Pressthesteambutton(2)tousethesteam
ironing function. We recommend using the
steambuttonfunctionwhenthetemperature
ishigherthan●●●.
Wait for the temperature indicator light
to go off before pressing the steam
button.
Ironing with shot of steam (F)
Theshot-of-steamfunctionallowsyoutoeliminate
persistentcreases.Youcanusethisfunctionboth
inno-steamandsteamironingmode.
1. Makesurethatthewaterlevelinthereservoir
ishigherthan1/4.
2. Selecttherecommendedironingtemperature
usingthetemperaturecontrol(9)-seestep
B, chapter “Using the Compact Generator”
andparagraph“Selectingthetemperature”.
3. Presstheshot-of-steambutton(1)togetan
extrasteamowwhenironing.
Wait for the temperature indicator light
to go off before pressing the shot-of-
steam button.
FEATURES
Vertical steam function (G)
Theverticalsteamfunctionisusefultoeliminate
any creases from hanging garments, curtains
etc.To use this functionjustplacetheCompact
Generatorin avertical position.Allthefunctions
oftheCompactGeneratorwillremainunchanged
inthisposition-refertochapter“Usingtheiron”.
Do not direct steam towards people or
animals and do not iron garments while
worn.
Automatic switch-off function (H)
The automatic switch-off function ensures total
safety. This function automatically switches off
theCompactGeneratorwhenitisnotusedfor5
minutes.
IfyouleavetheCompactGeneratorunattended,a
buzzerwillsoundtoinformyouthattheautomatic
switch-offfunctionisactive.Simplymovetheiron
toswitchitbackon.
Wait until the temperature indicator light
goes off before starting ironing again.
CLEANINGAND MAINTENANCE
After use
1. Disconnecttheiron plug fromtheelectrical
socketandlettheCompactGeneratorcool
down.
2. Emptythewaterreservoir(6).
3. Wind the cord around the cable winder (7)
andstoretheCompactGeneratorusingthe
padsuppliedinadrysafeplace.
Cleaning the iron (I)
Never use aggressive and/or abrasive
products to clean the plastic parts and
the iron soleplate.
1. Disconnecttheiron plug fromtheelectrical
socketandlettheCompactGeneratorcool
down.
2. Clean the upper section of the Compact
Generator with a slightly dampened soft
cloth;thenwipeitdry.
3. For routine cleaning and/or the removal of
stains or other residues deposited on the
soleplate,useadampsoftclothanddry.
4. Useadampcottontiptoremoveanyscale
in the steam holes that may impair the
performanceofyourCompactGenerator.
In order to keep the soleplate perfectly
smooth and polished, avoid any contact
with metal objects and do not iron sharp
objects such as buttons, studs and hinges -
they may scratch the plate.
5. TocleanthePureWaterlter(11),openthe
llerholeandremovethePureWaterlter.
Wash the lter under running water, taking
care that the jet of water is not too strong,
andthenre-placeit.
6. Regularly rinse the reservoir with clean
water. After cleaning, always empty the
waterreservoir.

12
en
Maintaining the appliance - Calc Pro-
of (K)
TheCalcProofversionoftheCompactGenera-
torisequippedwithaspeciallimescalelterthat
reducestheconcentrationofcalcareous salts in
thevaporisationchamber.Asaconsequenceany
cleaningworkwillneedtobecarriedoutlessfre-
quently.
If your Compact Generator is equipped with the
descaling system Calc Proof, clean it every 3
monthsofuse(correspondingto35hoursofiro-
ning) by removing any residual calcareous salts
fromthevaporisationchamber:
1. Make sure the appliance is disconnected
fromtheelectricaloutlet.
Clean it near a sink and away from fa-
brics so that they don’t get stained.
2. Fillthewaterreservoir(6)asfarasitsmaxi-
mumllinglevel(5).
3. Setthetemperaturecontrol(10),ifavailable,
toitsminimumvalue.
4. Plug the appliance into an electrical outlet
and immediately press the steam button
(2)formin.3minutesoveracontaineruntil
abundant water has come out of the sole-
plate.
5. Set the temperature control, if available, to
its maximum value. Then press the steam
button again for any residual water to eva-
porate.
TIPS
If your Compact Generator is equipped
with the Optimal Soleplate Temperature
technology, you don’t need to adjust the
temperature and/or the steam. You can
iron all fabrics that can be ironed in any
order.
If your Compact Generator is not equipped with
the Optimal Soleplate Temperature technology,
youmayndthefollowingtipsuseful.
• Sortthegarmentsoutaccordingtothefabric
types. This will reduce the need to adjust
the temperature according to the different
fabrics.
• Start with the garments that require a low
ironing temperature and continue with
the garments requiring higher ironing
temperatures.
• Ifyouarenotsureaboutthecompositionof
thefabric,tryironingahiddenpartsuchas
a seam, hem or internal section. Start with
alowtemperatureandgraduallyincreaseit
untilyoundtheidealironingsetting.
• WhenyoureducetheCompactGenerator's
temperature to iron delicate garments, wait
approximately2minutestolettheironreach
thenewsettings.
• Pure wool (100% wool) garments can be
steam-ironedaslongasthetemperatureis
settowool.Werecommendusingacotton
cloth to prevent any shiny marks on the
garment.
• Never iron areas with obvious perspiration
marks because the heat will x the stains
andmakethempermanent.

13
en
• Theplugmaynotbeinsertedintotheelectricalsocketorit
maynotmakecontact.
• MakesurethatthetemperatureisnotsettoMIN.
• Thetemperatureindicatorlightison.This shows that the
CompactGeneratoriswarmingup.Theindicatorlightwill
gooffwhenthesettemperatureisreached.
• Notenoughwater in thewaterreservoir.Fillupthe water
reservoir.
• The Compact Generator is not hot enough. Re-place the
Compact Generator in a horizontal position using its pad
andwaituntilthetemperatureindicatorlightgoesoffbefore
startingtoiron.
• The soleplate temperature may be too low because the
shot-of-steam button has been activated too frequently.
Slightlyincreasethetimeintervalbetweenthesteamshots.
• Theremayberesiduesinthevaporisationchamber.Clean
it as shown in the chapter “Cleaning and maintenance”
undertheparagraph“Descaling”.
• You are using perfume, vinegar, starch, scale-removing
agents, ironing products or other chemicals. Remember
thatthesesubstancesmaydamagetheproduct.Rinsethe
waterreservoir.
• Youarenotusingthecorrectwatertype(seechapter"Filling
thewaterreservoir").
• You are using starch. You can use starch directly on the
reverse side of the fabrics and in any case never in the
waterreservoir.
• Thegarmentwasnotwashedcorrectlyorhassomesoap
residues.
• Youareironinganewgarmentnotyetwashedfortherst
time.
• The soleplate temperature may be too low because the
shot-of-steam button has been activated too frequently.
Slightlyincreasethetimeintervalbetweensteamshots.
• The soleplate temperature is set to a temperature that is
toolow.
• Youdidnotclosethelidofthellerholecorrectly.
• You used the shot-of-steam function and/or the steam
The soleplate stays cold and
does not warm up.
The temperature indicator
light goes on and off.
Steam comes out in a
reduced quantity or does not
come out at all.
Impurities coming out of the
soleplate stain the garments.
Water is dripping out of the
soleplate.
TROUBLESHOOTING
Problem Possible causes / Solutions

14
en
functionatatemperaturethatwastoolow.Werecommend
usingthesefunctionsattemperatureshigherthan●●●.
• You are using perfume, vinegar, starch, scale-removing
agents, ironing products or other chemicals. Remember
thatthesesubstancesmaydamagetheproduct.Rinsethe
waterreservoir.
• You are using a temperature that is too high. Clean the
soleplate-seechapter“Cleaningandmaintenance”under
paragraph“Cleaning”.
• You are using starch. You can use starch directly on the
reverse side of the fabrics and in any case never in the
waterreservoir.
• Thegarmentwasnotwashedcorrectlyorhassomesoap
residues.
• Youareironinganewgarmentnotyetwashedfortherst
time.
The soleplate is dirty or dark
and may stain the fabrics.

15
en
GUARANTEE
12 months Parts and Labour Guarantee
Thiscerticateofguaranteerepresentsthegua-
rantee (“Guarantee” hereinafter) offered by In-
desitCompanyUKLimitedwithregisteredofce
atPeterboroughPE29JBinrelationtoproducts
purchased in the United Kingdom and Indesit
IrelandLimitedwithregisteredofceinDublin9,
IrelandforproductspurchasedintheRepublicof
Ireland.ThisGuaranteedoesnotaffectyoursta-
tutoryrights.
Your product has the benet of our manufactu-
rer’s Guarantee, which covers the product for
twelvemonthsfromthedateofpurchase.
Thisgivesyouthereassurancethatif,withinthat
time, your product is proven to be defective be-
causeofeitherworkmanshipormaterials,wewill,
atourdiscretion,eitherrepairorreplacethepro-
ductatnocosttoyou.
ThisGuaranteeissubjecttothefollowingcondi-
tions:
• Documentaryproofoforiginalpurchasedate
isprovided.
• Cosmetic damage must be reported within
14daysfromthedateofpurchase.
• Theproducthasbeeninstalledandoperated
correctlyandinaccordancewithouropera-
tingandmaintenanceinstructions.
• The product is used only on the electricity
supplyprintedontheratingplate.
• The product has been used for normal do-
mesticpurposesonly.
• Theproducthasnotbeenaltered,serviced,
maintained,dismantled,orotherwiseinterfe-
redwithbyanypersonnotauthorisedbyus.
• Anyrepairworkmustbeundertakenbyusor
ourappointedagent.
• Anypartsremovedduringrepairworkorany
productthatisreplacedbecomeourproper-
ty.
• TheproductisusedintheUnitedKingdom
orRepublicofIreland.
TheGuaranteedoesnotcover:
• Damage resulting from transportation, im-
proper use, neglect or interference or as a
resultofimproperinstallation.
• Accidentaldamage,this includes butisnot
limitedto,damagewhichoccursasaresult
ofanexternalaction.
• Replacementofanyconsumableitemorac-
cessory.Theseincludebutarenotlimitedto:
• plugs,cables,lightbulbs,hoses,brushes,
coversandlters.
• Replacementofanyremovablepartsmade
ofglassorplastic.
After Sales Service
NooneisbetterplacedtocareforyourHotpoint
productduringthecourseofitsworkinglifethan
us–themanufacturer.
Essential Contact Information
Advice Line
Wehaveadedicatedteamwhocanprovidefree
advice and assistance with your product if you
experience any technical difculties. Simply call
our Hotpoint Service Hotline on 08448 240 055
(Republic of Ireland 0818 904 041)fortelephone
assistance.
Please note:
Our advisors will require the following infor-
mation:
Modelnumber:
Serialnumber:
Consumables and Accessories
We supply a full range of consumables and ac-
cessories to keep your product functioning ef-
cientlythroughoutitslife.
UK: 08448 225 225
Republic of Ireland: 0818 313 413
www.hotpoint.co.uk
Recycling and Disposal Information
As part of Hotpoint’s continued commitment to
helping the environment, Hotpoint reserves the
righttousequality,recycledcomponentstokeep
downcustomercostsandminimisematerialwa-
stage.

16
en
Please dispose of packaging and old products
carefully.
Register your new product and get a second
year FREE!
Wewanttogiveyouadditionalbenetsofowner-
ship of your product and offer you an additional
free 1 year guarantee when you register your
productwithHotpointwithin28daysofpurchase.
Ifyou donotregisteryourproductwithHotpoint
within28days,yourproductisguaranteedfor1
yearonly.
To activate your 2 year guarantee register with
usonlineatwww.hotpoint.co.uk.Pleasenotethat
the2yearguaranteeisonlyavailableinUKand
Irelandandissubjecttothesameconditionsas
the1yearGuarantee.Pleaserefertothecertica-
teofguaranteeformoreinformation.
DISPOSAL OF OLD
ELECTRICAL APPLIANCES
TheEuropeanDirective2002/96/ECon
Waste Electrical and Electronic
Equipment (WEEE), requires that old
household electrical appliances must
notbedisposedofinthenormalunsor-
tedmunicipalwastestream.
Old appliances must be collected se-
parately in order to optimise the recovery and
recyclingofthematerialstheycontainandreduce
theimpactonhumanhealthandtheenvironment.
The crossed out “wheeled bin” symbol on the
productremindsyouofyourobligation,thatwhen
youdisposeoftheapplianceitmustbeseparately
collected. Consumers should contact their local
authorityorretailerforinformationconcerningthe
correctdisposaloftheiroldappliance.

Compact Generator
2013/06 ver. 1.1.
Indesit Company UK Ltd
Morley Way,
Peterborough PE2 9JB
www.indesitcompany.com EN Operating Instructions
K
1
2
34
5
6
7
8
9
10 10
11
II E75 AA0 UK | II DC60 AA0 UK II C50 AA0 UK
Other manuals for II E75 AA0
1
This manual suits for next models
2
Table of contents
Other Hotpoint Iron manuals

Hotpoint
Hotpoint SI E40 BA1 UK User manual

Hotpoint
Hotpoint SG E12 AA0 UK User manual

Hotpoint
Hotpoint SI C35 CKG User manual

Hotpoint
Hotpoint SI E40 BA0 UK User manual

Hotpoint
Hotpoint II E75 AA0 User manual

Hotpoint
Hotpoint SG C11 CKG UK User manual

Hotpoint
Hotpoint SG E12 AA0 UK User manual

Hotpoint
Hotpoint SI E40 BA0 User manual

Hotpoint
Hotpoint ARISTON SG C11 CKG User manual