Hotpoint SG E12 AA0 UK User manual

Power Perfection
2013/06 ver. 1.1.
Indesit Company UK Ltd
Morley Way,
Peterborough PE2 9JB
www.indesitcompany.com EN Operating Instructions
2
1
3
4
5
6
7a
7
22
8
9
10
11
21 21
12
13
14
16
16
17
17
18
18
19
20
20
15
K
L
SG C10 AA0 UKSG E12 AA0 UK | SG DC11 AA0 UK

Power Perfection
2013/06 ver. 1.1.
Indesit Company UK Ltd
Morley Way,
Peterborough PE2 9JB
www.indesitcompany.com EN Operating Instructions
2
1
3
4
5
6
7a
7
22
8
9
10
11
21 21
12
13
14
16
16
17
17
18
18
19
20
20
15
K
L
SG C10 AA0 UKSG E12 AA0 UK | SG DC11 AA0 UK

11
A
B
C
D
E
F
G IH
J

11
A
B
C
D
E
F
G IH
J

Power Perfection
2013/06 ver. 1.1.
Indesit Company UK Ltd
Morley Way,
Peterborough PE2 9JB
www.indesitcompany.com EN Operating Instructions
2
1
3
4
5
6
7a
7
22
8
9
10
11
21 21
12
13
14
16
16
17
17
18
18
19
20
20
15
K
L
SG C10 AA0 UKSG E12 AA0 UK | SG DC11 AA0 UK

5
en
GENERAL SAFETY RULES
• Iftheplug,powercord,steamcable,partsofthe
appliance or the appliance itself appear to be
damagedorifanyvisibledamageorwaterleaks
are found, do not operate the steam generator.
In such cases have it checked by Hotpoint’s
authorisedstaffinordertoavoidanyhazardous
situation.
• Iftheappliancewasdropped,donotoperateit.
• Thisappliancecanbeusedbychildrenagedfrom
8 years and above and persons with reduced
physical, sensory or mental capabilities or lack
ofexperienceandknowledgeiftheyhavebeen
given supervision or instruction concerning use
of the appliance in a safe way and understand
thehazardsinvolved.
• Supervisechildrentopreventthemfromplaying
withtheappliance.
• Neverleavetheapplianceunattendedwhenitis
pluggedintoanelectrical socketor itis cooling
down.
• The appliance must be used and placed on a
steady at horizontal surface. We recommend
usinganironingboard.
• After every use, unplug the appliance from the
socketandmakesuretheironlockingdoorhas
been closed correctly. Place the appliance in a

6
en
steadyposition.
• For your safety, all repairs or maintenance
operationsontheappliancemustbecarriedout
exclusivelybyHotpoint’sauthorisedstaff.
• Cleaningandusermaintenacehallnotbemade
bychildrenwithoutsupervision.
• Keeptheironanditscordoutofreachofchildren
lessthan8yearsofagewhenitisenergizedor
coolingdown.
This symbol warns operators that surfaces
are liable to get hot during use and can burn
your skin.

7
en
12. Ironlockingdoor
13. Steamcable
14. Steambutton
15. Shot-of-steambutton
16. Steamcontrol
17. No-waterindicatorlight
18. On/Offbutton
19. Descalingbutton
20. SteamReadyindicatorlight
21. Temperaturecontrol(ifavailable)
22. Purewaterlter
viceisinplace( closedlock)andtheiron
islockedinitsspecialhousing.Thenliftthe
ironbyholdingitsboilerbase.
• Only connect the appliance to a grounded
socket.Whenusinganextensioncord,make
surethatagroundedsocketisavailable.
• Regularlycheck the condition of the power
cord.
• Whencleaning the appliance, make sure it
hasbeenunpluggedfromthesocket.
• Disconnect the plug from the socket by
holdingtheplugandnotbypullingthecable.
• Prevent the power cord and steam cable
from touching the hot soleplate. Use the
specialcord-rewindingclip.
The iron soleplate and the water / steam
coming out of the soleplate are very hot
and can burn your skin.
• Beforestoringthesteamgenerator,waituntil
it has completely cooled down - it will take
aboutthreehours.
• Do not direct steam towards people or
animals and do not iron garments while
worn.
• Never add any perfume, vinegar, starch,
scale-removing agents, ironing products
or other chemicals in the water reservoir -
unless recommended by Hotpoint. Never
usecontaminatedwater.
• Neverimmersetheapplianceinwaterorany
DESCRIPTION OF THE
APPLIANCE
1. Powercordholder
2. Temperatureindicatorlight
3. Iron
4. Soleplate
5. Ironsupportingbase
6. Boiler
7. Plasticprotectionlid
7a.Boilerclosingcap
8. Waterreservoir
9. Cord-rewindingclip
10. Electricpowercord
11. Ironlockingbutton
INTRODUCTION
Welcome to Hotpoint's Garment Care.
Thank you for purchasing our new
Power Perfection steam generator. We
recommend registering this product on
www.hotpoint.co.uk to make sure you are
entitled to all the benets made available
by Hotpoint's Customer Service.
Thisappliancewasdevelopedforhouseholduse
onlyandisnotintendedforindustrialuse.
Before you begin using the appliance, it
is important that you thoroughly read
these instructions and carefully keep them for
further reference.
GENERAL SAFETY RULES
The safety features of your steam generator
comply with the technical specications and
regulationsinforce.
The voltage of your system must match
the voltage of the steam generator (220-
240 V). Any connection error could cause
irreversible damage to the steam generator
and void its warranty.
• Youcannotusethehandletocarrytheiron
when it is locked in its special housing. To
carrytheiron,rstmakesurethelockingde-

8
en
compliancewithBS5733)whichisaccessi-
blewithoutmovingtheappliance.
Disposing of the plug
Ensurethatbeforedisposingoftheplugitself,you
makethepinsunusablesothatitcannotbeacci-
dentallyinsertedintoasocket.
Instructions for connecting cable to
an alternative plug
The wires in the mains lead are coloured
in accordance with the following code:
GREEN & YELLOW EARTH
BLUE NEUTRAL
BROWN LIVE
As the colours of the wires in the lead may not
correspondwiththecolouredmarkingsidentifying
theterminalsinyourplug,proceedasfollows:
• Connect Green & Yellow wire to terminal
markedEor
orcolouredGreenorGreen
&Yellow.
• ConnectBrownwiretoterminalmarkedLor
colouredRed.
• ConnectBluewireto terminal marked N or
colouredBlack.
Ifa13ampplug(BS1363)isuseditmustbetted
witha13ampfuse,eitherintheplugoradaptoror
atthedistributionboard.
If you are in any doubt regarding the electrical
supplytoyourmachine,consultaqualiedelec-
tricianbeforeuse.
How to connect an alternative plug
Thewiresinthismainsleadarecolouredinaccor-
dancewiththefollowingcode:
BLUE NEUTRAL (N)
BROWN LIVE (L)
GREEN & YELLOW EARTH (E)
otherliquid.
• Do not leave the appliance in the open air
and exposed to inclement weather condi-
tions.
• Never leave or use the appliance over or
closetoames,ovens,ammablematerials
orothersourcesofheat.
When being used, the boiler can get very
hot. Wait until the steam generator has
completely cooled down before putting it
away.
• Donotusetheapplianceforanyuseother
thanitsintendeduse.
• Should you suspect a failure, immediately
unplugitfromtheelectricalsocket.
• The manufacturer shall assume no
responsibility in case of damage resulting
fromanyimproperuseoftheappliance.
This appliance must be earthed. The fol-
lowing operations should be carried out
by a qualied electrician.
Replacing the fuse
Whenreplacingafaultyfuse,a13ampASTAap-
provedfusetoBS1362shouldalwaysbeused,
and the fuse cover re-tted. If the fuse cover is
lost, the plug must not be used until a replace-
mentisobtained.
Replacement fuse covers
If a replacement fuse cover is tted, it must be
ofthecorrectcolourasindicatedbythecoloured
markingorthecolourthatisembossedinwords
on the base of the plug. Replacements can be
obtained directly from your nearest Service De-
pot.
Removing the plug
If your appliance has a non-rewireable moulded
plug and you should wish to re-route the mains
cablethroughpartitions,unitsetc.,pleaseensure
thateither:
• theplug isreplaced bya fused13 ampere
rewireableplugbearingtheBSImarkofap-
proval.
or:
• the mains cable is wired directly into a 13
ampcableoutlet,controlledbyaswitch,(in

9
en
4. Repeattheoperation everytimethewater-
levelindicatorlight(17)turnson.
Never add any perfume, vinegar, starch,
scale-removing agents, ironing
products or other chemicals in the water
reservoir - unless recommended by Hotpoint.
Never use contaminated water.
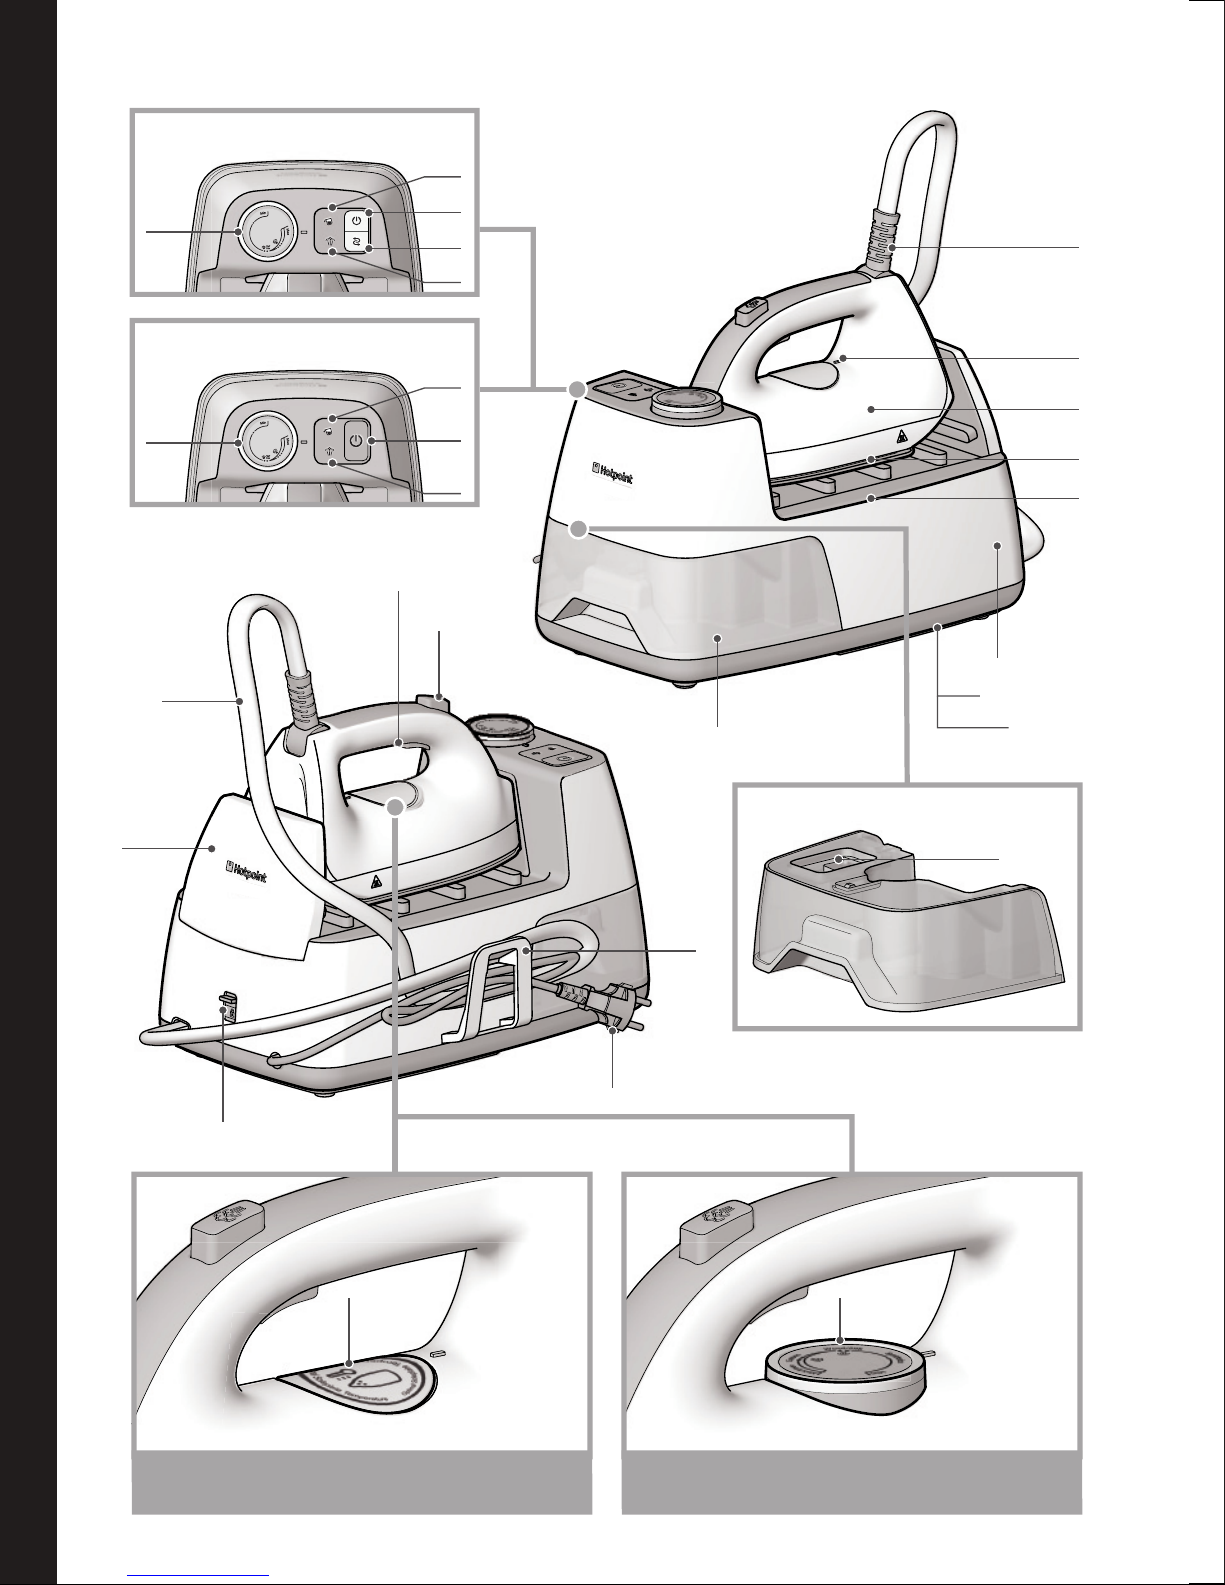
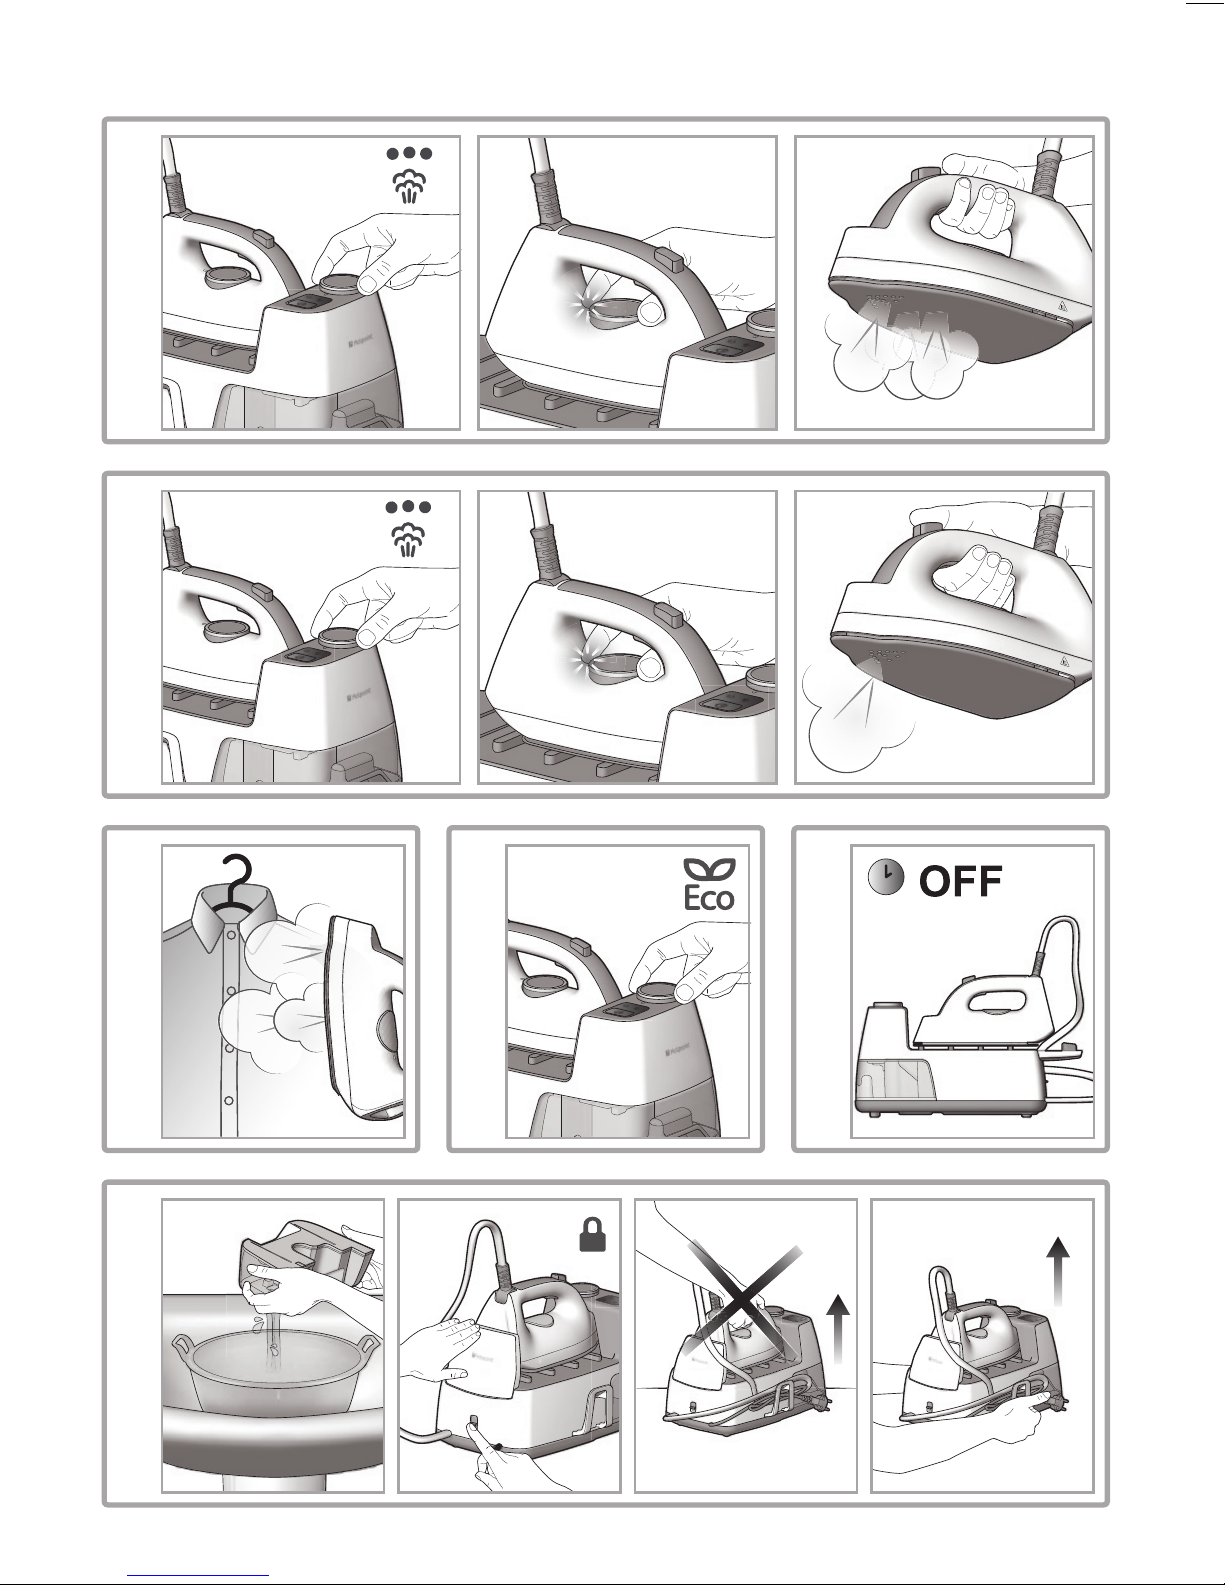
USING YOUR IRON
Temperature selection and steam ad-
justment (B)
If your Power Perfection is equipped with the
Optimal Soleplate Temperature technology, you
neednotadjustthetemperature.
1. Connect the plug of the appliance to a
groundedsocket(220/240V).
2. PresstheONbutton(18)-itwilllightupto
showthatthesteamgeneratorisON.
3. Wait until the temperature indicator light
turnsoffbeforestartingironing.
4. Select the appropriate steam setting by
means of the steam control (16) or set it
to the Min position to iron without steam.
As soon as the selected steam quantity is
available, the Steam Ready indicator light
(20)willturnon.
5. Youcanironallthetypesoffabricsthatcan
beironedinanyorder.
In the version with no Optimal Soleplate
Temperature technology, follow the instructions
below.
1. Connect the plug of the appliance to a
groundedsocket(220/240V).
2. PresstheONbutton(18)-itwilllightupto
showthatthesteamgeneratorisON.
3. Usethetemperaturecontrol(21)toselectthe
desired temperature. Every time you rotate
the temperature control, the temperature
indicatorlight (2)turns onto showthat the
temperatureischanging.
4. Whentheironreachesthesettemperature,
the temperature indicator light turns off to
showthattheironisreadyforuse.
5. Check the type of fabric on the garment
label.Ifyoudon'tknowthetypeoffabric,we
recommendironingahiddenpartinorderto
determinethemostappropriatetemperature
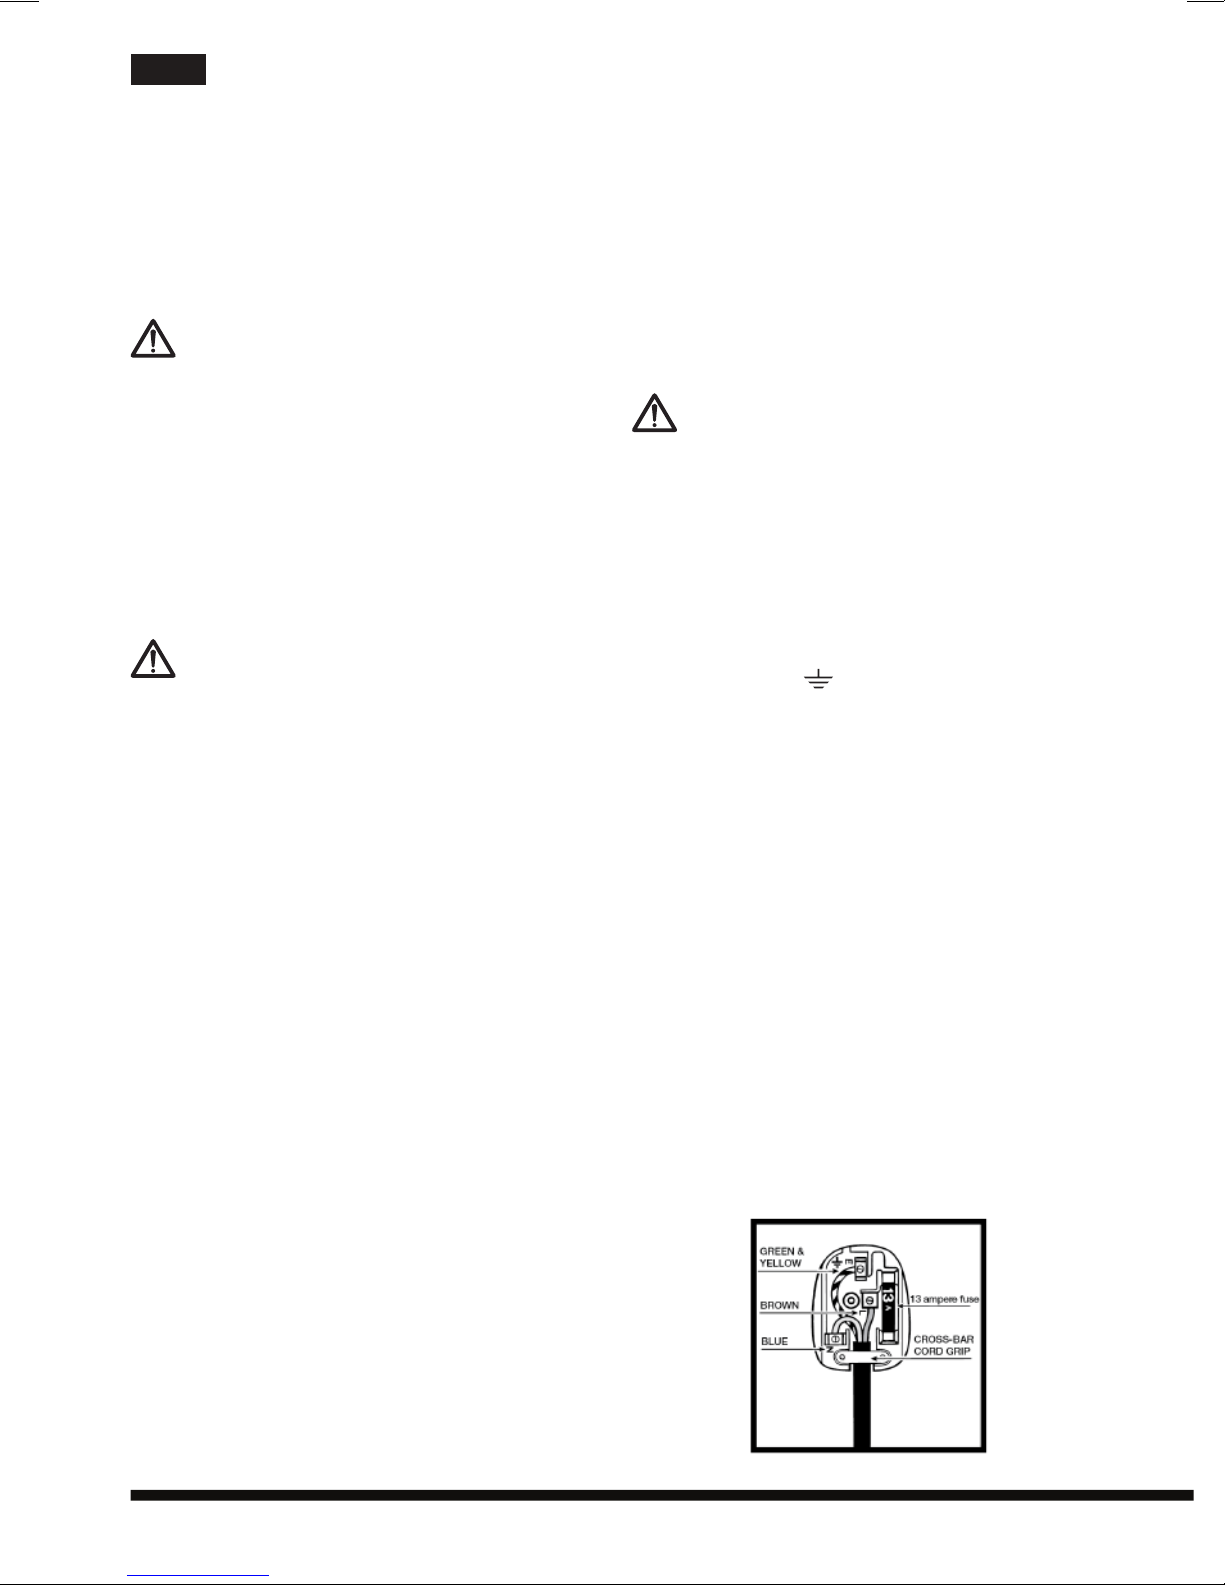
The power supply cable must never be
bent or dangerously compressed.
The power supply cable must only be re-
placed by an authorised serviceman.
FILLING THE WATER
RESERVOIR
Waterplaysanessentialrolebothintheironing
process and in the good operation of the
applianceoveralonglifespan.Inparticular,ahigh
concentration of limescale may damage some
partsoftheironandcauseitsearlydeterioration.
Suitable water
Although the Power Perfection steam generator
can be used with tap water, if the water is very
hard (as measured in French degrees), we
recommendmixingtapwateranddemineralised
wateraccordingtothefollowingtable.
Hardness
degree[°f]
Proportion
[tapwater:demineralisedwater]
7°f 1:0
7°f-14°f 1:0,5
14°f-22°f 1:1
22°f-32°f 1:2
32°f-54°f 1:3
>54°f 0:1
Todeterminethehardnessdegreeofthewaterin
yourarea,contactyourlocalwaterboardorbody.
This data is sometimes available on the board/
body'swebsitetoo.
Filling the water reservoir (A)
Before every use and every time the no-water
indicatorlightturnson,llthewaterreservoir:
1. Usethespecialhandletoremovethewater
reservoir(8).
2. When lling the reservoir, make sure the
maximumlevelshownonthereservoirisnot
exceeded.
3. Re-placethewaterreservoirintherelevant
housinguntilitclicksintoplace.

10
en
temperature using the temperature control
(21) - see step B, chapter “Temperature
selectionandsteamadjustment”.
3. Wait for the temperature indicator light to
turnoffandstartironingwithoutpressingthe
steambutton.Ironingwithsteam(E)
1. Makesurethatthewaterlevelinthereservoir
ishigherthan1/4.
2. Select the appropriate steam adjustment
using the steam control (16) and the
recommended ironing temperature using
the temperature control (21) - see step B,
chapter “Temperature selection and steam
adjustment”.
3. Pressthesteambutton(14)tousethesteam
ironing function. We recommend using the
steambuttonfunctionwhenthetemperature
ishigherthan .
Wait for the temperature indicator light
to turn off and for the Steam Ready
indicator light to turn on, before pressing the
steam button.
Ironing with shot of steam (F)
Theshot-of-steamfunctionisusefultoironoutany
persistentwrinklesthroughauniformemissionof
steamontothefabrics.Youcanusethisfunction
bothinno-steamandsteamironingmode.
1. Makesurethatthewaterlevelinthereservoir
ishigherthan1/4.
2. Select the appropriate steam adjustment
using the steam control (16) and the
recommended ironing temperature using
the temperature control (21) - see step B,
chapter “Temperature selection and steam
adjustment”.
3. Press the shot-of-steam button (15) to
get an extra steam ow when ironing. We
recommend using the shot-of-steam button
whenthetemperatureishigherthan .
Wait for the temperature indicator light
to turn off and for the Steam Ready
indicator light to turn on, before pressing the
steam button.
FEATURES
Vertical steam function (G)
The vertical steam function is useful to iron out
and avoid damaging the fabric. Silk, wood
andsyntheticfabrics:ironthegarmentinside
out to prevent any shiny marks. Start with
thegarmentsthatrequirealowtemperature,
e.g.syntheticfabrics.
6. Select the appropriate steam setting by
means of the steam control (16) or set it
to the Min position to iron without steam.
As soon as the selected steam quantity is
available, the Steam Ready indicator light
(20)willturngreen.
USING THE APPLIANCE
When you switch on the steam generator
for the rst time, you may notice an
unpleasant smell, a little smoke and some
impurities. They will disappear in a few
minutes.
Optimal Soleplate Temperature (C)
If your Power Perfection is equipped with the
Optimal Soleplate Temperature technology, you
neednotadjustthetemperatureandyouneednot
sortoutthegarmentsbasedontheirfabrics.Just
connecttheplugoftheappliancetoagrounded
socket (220/240V).As soon as the temperature
indicator light turns off, you can simply start
ironing all the fabric types that can be ironed in
anyorder.
Ironing without steam (D)
1. Setthesteamcontrol(16)totheMinposition
(=nosteam).
2. Select the recommended ironing
MIN
LINEN
Fabrics with this symbol on the label
must not be ironed.
GARMENT
LABEL FABRIC TYPE TEMPERATURE
INDICATION
STEAM
INDICATION
synthetic
silk
mixedcotton
wool
mixedwool
cotton
linen
jeans
Min
Min

11
en
wrinklesfromhanginggarments,curtainsetc.To
usethisfunctionjustplaceyourironinavertical
position.Allthefunctionsofthesteamgenerator
will remain unchanged in this position - refer to
paragraph“Usingtheappliance”.
We also recommend using the shot-of-steam
function to iron any hanging garments, because
itensuresanextrasteamowthatisexcellentfor
suchgarments.
Do not direct steam towards people or
animals and do not iron garments while
worn.
Eco function (H)
Your Power Perfection steam generator is
equippedwithanEcofunctionthatallowsenergy
savingsof30%comparedtonormalconsumption
in terms of maximum steam level, thus always
ensuringthesteamquantityneededtoironyour
garments.
TostarttheEcofunctionsetthesteamcontrol(16)
toEco ( ).WhentheSteamReady indicator
light(20)turnson,youcanstartsteamironing.
Automatic switch-off function (I)
The automatic switch-off function ensures total
safety.
This function automatically switches off the
steam generator when it is not used for a few
minutes.Inparticular,yourPowerPerfectionwill
automaticallyswitchoffafter11minutesifitisleft
unusedintheironingposition,ononesideorina
verticalposition.
If you leave the steam generator unattended, a
buzzerwillsoundtoinformyouthattheautomatic
switch-offfunctionisactive.Torestartit,justpress
oneofthebuttons(shotofsteam,steam).
Wait for the Steam Ready indicator light
to turn on again and for the temperature
indicator light to turn off before start ironing
again.
CLEANING AND
MAINTENANCE
After use (J)
1. Disconnect the appliance plug from the
electricalsocketandletthesteamgenerator
cooldown.
2. Emptythewaterreservoir(8).
3. Placetheironintoitshousing,makingsure
that its tip ts into the special groove and
close the iron locking lid (11) using the
specialironlockingbutton(12).
4. Wind the steam cable (13) and the power-
supply cord (10) around the special cord-
rewindingclip(9).
5. Store the steam generator in a safe dry
place.
6. Letthesteamgeneratorcooldownandstore
itinasafedryplace.
You cannot use the handle to carry the
iron when it is locked in its special hou-
sing. To carry the iron, rst make sure the lo-
cking device is in place ( closed lock) and the
iron is locked in its special housing. Then lift
the iron by holding its boiler base.
Cleaning (K)
Never use aggressive and/or abrasive
products to clean the plastic parts and
the iron soleplate.
1. Disconnect the appliance plug from the
electricalsocketandletthesteamgenerator
cooldown.
2. Cleantheplasticpartsofthesteamgenerator
withasoftdampclothanddry.
3. For routine cleaning and/or the removal of
stains or other residues deposited on the
plate,useadampsoftclothanddry.
4. Useadampcottontiptoremoveanyscale
in the steam holes that may impair the
performanceofyoursteamgenerator.
In order to keep the soleplate perfectly
smooth and polished, avoid any contact
with metal objects and do not iron sharp
objects such as buttons, studs and hinges -
they may scratch the plate.
5. To clean thePureWaterlter (22), remove
the water reservoir and slide out the Pure
Water lter. Wash the lter under running
water,takingcarethatthejetofwaterisnot
toostrong,andthenre-placeit.
6. Regularlyrinsethewaterreservoir(8)under
clean water. After cleaning, always empty

12
en
thewaterreservoir.
Scale removal (L)
If your steam generator is not equipped with
the descaling system Calc Proof, clean the
vaporisation chamber to remove any residual
calcareous salts. We recommend cleaning it
every time the descaling button (19) lights up.
Followtheprocedurebelow.
If you wish to clean it after using the
Power Perfection, wait at least 3 hours
until the steam generator has completely
cooled down.
1. Make sure the appliance is disconnected
fromtheelectricalsocket.
Clean it near a sink and away from
fabrics so that they don't get stained.
2. Remove the water reservoir (8) and place
thesteamgeneratoronasteadyatsurface.
3. Turn the steam generator upside down.
Unscrew the protection plastic lid (7) and
the boiler closing cap (7a) using an Allen
spanner.
4. Emptytheboilerofanyresidualwater.
5. Fill the boiler with 500 ml of water. Then
close,shakethesteamgeneratorandempty
it.Repeattheoperationatleasttwice.
6. Closetheboiler,makingsureitsclosingcap
hasbeenfastenedalltheway.Thenre-place
theprotectionplasticlid.
7. Re-place the boiler in its ordinary usage
position.
8. Connecttheappliancetoasocketandpress
theON/OFFbutton(18).
9. Holddownthedescalingbuttonforatleast
5secondsoruntilabuzzersoundsandthe
descalingbuttonturns.
When you start the steam generator
again, before using the steam function
on the garments press the steam button for at
least one minute to eject any residues or
particles that could stain the fabrics.
HINTS
If your steam generator is equipped with the
Optimal Soleplate Temperature technology, you
need not adjust the temperature and/or steam.
You can ironall the types offabrics that canbe
ironedinanyorder.
• Sortthegarmentsoutaccordingtothefabric
types. This will reduce the need to adjust
the temperature according to the different
fabrics.
• Start with the garments that require a low
ironing temperature and continue with
the garments requiring higher ironing
temperatures.
• Ifyouarenotsureaboutthecompositionof
thefabric,tryironingahiddenpartsuchasa
seam,hemorinternalsection.Startwithlow
temperature and gradually increase it until
youndtheidealironingsetting.
• When you reduce the steam generator’s
temperature to iron delicate garments, wait
approximately 2 minutes to let the steam
generatorreachthenewsettings.
• Pure wool (100% wool) garments can be
steam-ironedaslongasthetemperatureis
settowool.Werecommendusingacotton
cloth to prevent any shiny marks on the
garment.
• Never iron areas with obvious perspiration
marksbecausetheheatwillmakethestains
fastandpermanent.

13
en
• Theplugwasnotinsertedorisnotmakingcontact.
• MakesurethetemperatureisnotsettoMin.
• Thetemperature indicatorlight ison.This shows that the
ironiswarmingup.Theindicatorlightwillturnoffwhenthe
settemperatureisreached.
• Notenoughwater in the waterreservoir. Fill upthewater
reservoir.
• The iron is not hot enough. Place the iron on the special
supporting base and wait until the temperature indicator
lightturnsoffbeforeyoustartironing.
• Theplatetemperaturemaybetoolowbecausethesteam
buttonhasbeenactivatedtoofrequently.Slightlyincrease
thetimeintervalbetweensteamshots.
• MakesurethesteamcontrolisnotsettoMin.
• Theremayberesiduesinthevaporisationchamber.Clean
it as shown in the chapter “Cleaning and maintenance”
underparagraph“Descaling”.
• You are using perfume, vinegar, starch, scale-removing
agents, ironing products or other chemicals. Remember
thatthesesubstancesmaydamagetheproduct.Rinsethe
waterreservoir.
• Youarenotusingthecorrectwatertype.Rinsethe water
reservoirandaddtapwateronly.Incaseofveryhardwater,
werecommendmixingitproportionallywithdemineralised
water-seechapter"Fillingthewaterreservoir".
• You are using starch. You can use starch directly on the
reverse side of the fabrics and in any case never in the
waterreservoir.
• Thegarmentwasnotwashedcorrectlyorithassomesoap
residues.
• Youareironinganewgarmentnotyetwashedfortherst
time.
• Theplatetemperaturemaybetoolowbecausethesteam
buttonhasbeenactivatedtoofrequently.Slightlyincrease
thetimeintervalbetweensteamshots.
• Thesoleplatetemperatureissettoatemperaturethatistoolow.
• You used the shot-of-steam function and/or the steam
functionatatemperaturethatwastoolow.Werecommend
usingthesefunctionsattemperatureshigherthan●●●.
The soleplate stays cold and
does not warm up.
The temperature indicator
light goes on and off.
Steam comes out in a re-
duced quantity or does not
come out at all.
Impurities coming out of the
soleplate stain the garments.
Water is dripping out of the
soleplate.
TROUBLESHOOTING
Problem Possible causes / Solutions

14
en
• You are using a temperature that is too high. Clean the
soleplate-seechapter“Cleaningandmaintenance”under
paragraph“Cleaning”.
• You are using starch. You can use starch directly on the
reverse side of the fabrics and in any case never in the
waterreservoir.
• Thegarmentwasnotwashedcorrectlyorhassomesoap
residues.
• Youareironinganewgarmentnotyetwashedfortherst
time.
• Thewaterreservoirneedslling.
• Thewaterreservoirwasnotttedcorrectly.Placethewater
reservoirintherelevanthousinguntilitclicksintoplace.
• TheSteamReadyindicatorlightturnsontoshowthatthe
steam generator has reached the desired steam settings.
Whenyouusethesteamfunction,theindicatorlightturns
off.Itturnsonagainwhensuchsettingsarereachedagain.
The soleplate is dirty or dark
and may stain the fabrics.
The no-water indicator light
is on.
The Steam Ready indicator
light turns on and off.

15
en
GUARANTEE
12 months Parts and Labour Guarantee
Thiscerticateofguaranteerepresentsthegua-
rantee (“Guarantee” hereinafter) offered by In-
desitCompanyUKLimitedwithregisteredofce
atPeterboroughPE29JBinrelationtoproducts
purchased in the United Kingdom and Indesit
IrelandLimitedwithregisteredofceinDublin9,
IrelandforproductspurchasedintheRepublicof
Ireland.ThisGuaranteedoesnotaffectyoursta-
tutoryrights.
Your product has the benet of our manufactu-
rer’s Guarantee, which covers the product for
twelvemonthsfromthedateofpurchase.
Thisgivesyouthereassurancethatif,withinthat
time, your product is proven to be defective be-
causeofeitherworkmanshipormaterials,wewill,
atourdiscretion,eitherrepairorreplacethepro-
ductatnocosttoyou.
ThisGuaranteeissubjecttothefollowingcondi-
tions:
• Documentaryproofoforiginalpurchasedate
isprovided.
• Cosmetic damage must be reported within
14daysfromthedateofpurchase.
• Theproducthasbeeninstalledandoperated
correctlyandinaccordancewithouropera-
tingandmaintenanceinstructions.
• The product is used only on the electricity
supplyprintedontheratingplate.
• The product has been used for normal do-
mesticpurposesonly.
• Theproducthasnotbeenaltered,serviced,
maintained,dismantled,orotherwiseinterfe-
redwithbyanypersonnotauthorisedbyus.
• Anyrepairworkmustbeundertakenbyusor
ourappointedagent.
• Anypartsremovedduringrepairworkorany
productthatisreplacedbecomeourproper-
ty.
• TheproductisusedintheUnitedKingdom
orRepublicofIreland.
TheGuaranteedoesnotcover:
• Damage resulting from transportation, im-
proper use, neglect or interference or as a
resultofimproperinstallation.
• Accidentaldamage,this includes but isnot
limitedto,damagewhichoccursasaresult
ofanexternalaction.
• Replacementofanyconsumableitemorac-
cessory.Theseincludebutarenotlimitedto:
• plugs,cables,lightbulbs,hoses,brushes,
coversandlters.
• Replacementofanyremovablepartsmade
ofglassorplastic.
After Sales Service
NooneisbetterplacedtocareforyourHotpoint
productduringthecourseofitsworkinglifethan
us–themanufacturer.
Essential Contact Information
Advice Line
Wehaveadedicatedteamwhocanprovidefree
advice and assistance with your product if you
experience any technical difculties. Simply call
our Hotpoint Service Hotline on 08448 240 055
(Republic of Ireland 0818 904 041)fortelephone
assistance.
Please note:
Our advisors will require the following infor-
mation:
Modelnumber:
Serialnumber:
Consumables and Accessories
We supply a full range of consumables and ac-
cessories to keep your product functioning ef-
cientlythroughoutitslife.
UK: 08448 225 225
Republic of Ireland: 0818 313 413
www.hotpoint.co.uk
Recycling and Disposal Information
As part of Hotpoint’s continued commitment to
helping the environment, Hotpoint reserves the
righttousequality,recycledcomponentstokeep
downcustomercostsandminimisematerialwa-
stage.

16
en
Please dispose of packaging and old products
carefully.
Register your new product and get a second
year FREE!
Wewanttogiveyouadditionalbenetsofowner-
ship of your product and offer you an additional
free 1 year guarantee when you register your
productwithHotpointwithin28daysofpurchase.
Ifyou donotregisteryourproductwithHotpoint
within28days,yourproductisguaranteedfor1
yearonly.
To activate your 2 year guarantee register with
usonlineatwww.hotpoint.co.uk.Pleasenotethat
the2yearguaranteeisonlyavailableinUKand
Irelandandissubjecttothesameconditionsas
the1yearGuarantee.Pleaserefertothecertica-
teofguaranteeformoreinformation.
DISPOSAL OF OLD
ELECTRICAL APPLIANCES
TheEuropeanDirective2002/96/ECon
Waste Electrical and Electronic
Equipment (WEEE), requires that old
household electrical appliances must
notbedisposedofinthenormalunsor-
tedmunicipalwastestream.
Old appliances must be collected se-
parately in order to optimise the recovery and
recyclingofthematerialstheycontainandreduce
theimpactonhumanhealthandtheenvironment.
The crossed out “wheeled bin” symbol on the
productremindsyouofyourobligation,thatwhen
youdisposeoftheapplianceitmustbeseparately
collected. Consumers should contact their local
authorityorretailerforinformationconcerningthe
correctdisposaloftheiroldappliance.

Power Perfection
2013/06 ver. 1.1.
Indesit Company UK Ltd
Morley Way,
Peterborough PE2 9JB
www.indesitcompany.com EN Operating Instructions
2
1
3
4
5
6
7a
7
22
8
9
10
11
21 21
12
13
14
16
16
17
17
18
18
19
20
20
15
K
L
SG C10 AA0 UKSG E12 AA0 UK | SG DC11 AA0 UK
Other manuals for SG E12 AA0 UK
1
This manual suits for next models
2
Table of contents
Other Hotpoint Iron manuals

Hotpoint
Hotpoint ARISTON SG C11 CKG User manual

Hotpoint
Hotpoint II E75 AA0 User manual

Hotpoint
Hotpoint SI E40 BA0 User manual

Hotpoint
Hotpoint SI E40 BA1 UK User manual

Hotpoint
Hotpoint SG C11 CKG UK User manual

Hotpoint
Hotpoint SI C35 CKG User manual

Hotpoint
Hotpoint SG E12 AA0 UK User manual

Hotpoint
Hotpoint II E75 AA0 User manual

Hotpoint
Hotpoint SI E40 BA0 UK User manual