manuals.online logo
Brands
  1. Home
  2. •
  3. Brands
  4. •
  5. Hotpoint
  6. •
  7. Washer Dryer
  8. •
  9. Hotpoint WDL520P User manual

Hotpoint WDL520P User manual

Other manuals for WDL520P

2

This manual suits for next models

3

Other Hotpoint Washer Dryer manuals

Hotpoint AQUALTIS AQGMD 129 User manual

Hotpoint

Hotpoint AQUALTIS AQGMD 129 User manual

Hotpoint BHWD 125 User manual

Hotpoint

Hotpoint BHWD 125 User manual

Hotpoint WDD 10760 User manual

Hotpoint

Hotpoint WDD 10760 User manual

Hotpoint AQUALTIS AQGMD 149 User manual

Hotpoint

Hotpoint AQUALTIS AQGMD 149 User manual

Hotpoint WDF740A User manual

Hotpoint

Hotpoint WDF740A User manual

Hotpoint AQUALTIS AQD970F 49 User manual

Hotpoint

Hotpoint AQUALTIS AQD970F 49 User manual

Hotpoint BHWD 149 User manual

Hotpoint

Hotpoint BHWD 149 User manual

Hotpoint WDAL 8640 User manual

Hotpoint

Hotpoint WDAL 8640 User manual

Hotpoint Ultima WD860 User manual

Hotpoint

Hotpoint Ultima WD860 User manual

Hotpoint Aqualtis AQGMD149 User manual

Hotpoint

Hotpoint Aqualtis AQGMD149 User manual

Hotpoint Ultima WD71 User manual

Hotpoint

Hotpoint Ultima WD71 User manual

Hotpoint WD72 User manual

Hotpoint

Hotpoint WD72 User manual

Hotpoint WDPG 9640 User manual

Hotpoint

Hotpoint WDPG 9640 User manual

Hotpoint AQD1072D 697 User manual

Hotpoint

Hotpoint AQD1072D 697 User manual

Hotpoint AQM8F 49 U User manual

Hotpoint

Hotpoint AQM8F 49 U User manual

Hotpoint WDL 520 P User manual

Hotpoint

Hotpoint WDL 520 P User manual

Hotpoint WDL 5290 P User manual

Hotpoint

Hotpoint WDL 5290 P User manual

Hotpoint WD640 User manual

Hotpoint

Hotpoint WD640 User manual

Hotpoint WDF 760 P User manual

Hotpoint

Hotpoint WDF 760 P User manual

Hotpoint RG 864 User manual

Hotpoint

Hotpoint RG 864 User manual

Hotpoint AQUALTIS AQD1071D 69 User manual

Hotpoint

Hotpoint AQUALTIS AQD1071D 69 User manual

Hotpoint FDL 9640 User manual

Hotpoint

Hotpoint FDL 9640 User manual

Hotpoint Aquarius WD420P Operating and installation instructions

Hotpoint

Hotpoint Aquarius WD420P Operating and installation instructions

Hotpoint WDD 960 P User manual

Hotpoint

Hotpoint WDD 960 P User manual

Popular Washer Dryer manuals by other brands

Whirlpool WFC8090GX Use and care guide and installation instructions

Whirlpool

Whirlpool WFC8090GX Use and care guide and installation instructions

Whirlpool LTE5243DQ6 User instructions

Whirlpool

Whirlpool LTE5243DQ6 User instructions

Bosch XQG100-WDU285H00W User manual and installation instructions

Bosch

Bosch XQG100-WDU285H00W User manual and installation instructions

Beko HTE10736XS user manual

Beko

Beko HTE10736XS user manual

AEG L76685NWD user manual

AEG

AEG L76685NWD user manual

LG FWV1128WTSA owner's manual

LG

LG FWV1128WTSA owner's manual

Electrolux WTSL 6 E201 user manual

Electrolux

Electrolux WTSL 6 E201 user manual

AEG OKO_LAVAMAT 1260 User instruction book

AEG

AEG OKO_LAVAMAT 1260 User instruction book

Blomberg LRI285411 user manual

Blomberg

Blomberg LRI285411 user manual

Franke FWD 1400-6EI user manual

Franke

Franke FWD 1400-6EI user manual

Hitachi BD-W3300 instruction manual

Hitachi

Hitachi BD-W3300 instruction manual

Whirlpool FWDG96148SBS GCC Daily reference guide

Whirlpool

Whirlpool FWDG96148SBS GCC Daily reference guide

Equator EZ 1720 owner's manual

Equator

Equator EZ 1720 owner's manual

NEFF V6540X1EU Instruction manual and installation instructions

NEFF

NEFF V6540X1EU Instruction manual and installation instructions

Dawlance Spinner DS 9000 CM owner's manual

Dawlance

Dawlance Spinner DS 9000 CM owner's manual

Hoover WDYNS 654D-80 Instruction book

Hoover

Hoover WDYNS 654D-80 Instruction book

Dexter Laundry C Series Parts & service manual

Dexter Laundry

Dexter Laundry C Series Parts & service manual

Cetron STE26N5MNBBP0 manual

Cetron

Cetron STE26N5MNBBP0 manual

manuals.online logo
manuals.online logoBrands
  • About & Mission
  • Contact us
  • Privacy Policy
  • Terms and Conditions

Copyright 2025 Manuals.Online. All Rights Reserved.

GB

English, 1
Contents
Installation, 2-3-4-5
Unpacking and levelling
Connecting the electricity and water supplies
The first wash cycle
Technical data
Description of the Washer-dryer and
starting a ash cycle, 6-7
Control panel
Indicator lights
Starting a wash cycle
Wash cycles, 8
Table of wash cycles
Personalisation, 9
Setting the temperature
Setting the drying cycle
Functions
Detergents and laundry, 10
Detergent dispenser drawer
Preparing the laundry
arments requiring special care
Load balancing system
Precautions and tips, 11
eneral safety
Disposal
Opening the porthole door manually
Care and maintenance, 12
Cutting off the water or electricity supply
Cleaning the Washer-dryer
Cleaning the detergent dispenser drawer
Caring for the door and drum of your appliance
Cleaning the pump
Checking the water inlet hose
Troubleshooting, 13
Assistance, 14
GB
WDL 520 P/G/A/K
Instructions for use
WASHER-DRYER
GB
Installation
Levelling your appliance correctly will provide it with
stability and avoid any vibrations, noise and shifting
during operation. If it is placed on a fitted or loose
carpet, adjust the feet in such a way as to allow
enough room for ventilation beneath the Washer-
dryer.
Electric and ater connections
Connecting the ater inlet hose
NOTE: the seal is
included with the fill
hose on UK produced
models. So 1 should
read.
1. Connect the single end
hose connection onto
cold water tap with ¾
bsp thread etc. (see
figure).
Before making the connection, allow the water to
run freely until it is perfectly clear.
2. Connect the double
end hose connection to
the washer dryer. Screw
connections onto both
of the inlet valves
located at the top right-
hand side at the rear of
the appliance making
sure the flexible pipe
section of the "Y" is not
kinked (see figure).
! Although the two pipes are now connected to the
rear of the appliance, the washer dryer will draw
cold water as is required for both wash
programmes and tumble drying as required.
Note: This appliance SHOULD NOT BE
CONNECTED TO A HOT WATER SUPPLY.
3. Make sure there are no kinks or bends in the hose.
!The water pressure at the tap must be within the
values indicated in the Technical details table
(on the next page).
!If the water inlet hose is not long enough, contact
a specialist store or an authorised serviceman.
!Ensure that the supply taps are allowing water
through. Old taps may seize in the closed position
and thus prevent water reaching the machine.
A
!Keep this instruction manual in a safe place for
future reference. Should the appliance be sold,
transferred or moved, make sure the instruction
manual accompanies the Washer-dryer to inform
the new owner as to its operation and features.
!Read these instructions carefully: they contain
vital information on installation, use and safety.
Unpacking and levelling
Unpacking
1. Unpack the Washer-dryer.
2. Check whether the Washer-dryer has been
damaged during transport. If this is the case, do
not install it and contact your retailer.
3. Remove the 2
protective screws and
the rubber bush with
the respective spacer,
situated on the rear of
the appliance (see also
the installation leaflet).
NB:The plastic spacers
may fall down inside the
machine once the bolt
has been removed, and will not interfere with the
operation of the machine.
4. Do not remove external bar.
5. Seal the gaps using the plastic plugs provided.
6. Keep all the parts: you will need them again if
the Washer-dryer needs to be moved to another
location.
!Packaging materials are not children's toys.
Levelling
Your machine may make a considerable amount of
noise if the two front feet have not been adjusted
correctly.
1. Install the Washer-dryer on a flat sturdy floor,
without resting it up against walls, furniture
cabinets or other.
2. If the floor is not
perfectly level, com-
pensate for any
unevenness by
tightening or loosening
the adjustable front
feet (see figure); the
angle of inclination,
measured according to
the worktop, must not
exceed 2°.
GB
!
_the supply voltage is included within the values
indicated on the Technical details table
(see page 5);
_the socket is compatible with the washing
machine's plug. If this is not the case, replace
the socket or the plug.
Your appliance is now supplied with a 13 amp fused
plug it can be plugged into a 13 amp socket for
immediate use. Before using the appliance please
read the instructions below.
WARNIN - THIS APPLIANCE MUST BE EARTHED.
THE FOLLOWIN OPERATIONS SHOULD BE CARRIED
OUT BY A QUALIFIED ELECTRICIAN.
Replacing the fuse:
When replacing a faulty fuse, a 13 amp ASTA
approved fuse to BS 1362 should always be used,
and the fuse cover re-fitted. If the fuse cover is
lost, the plug must not be used until a replacement
is obtained.
Replacement fuse covers:
If a replacement fuse cover is fitted, it must be of
the correct colour as indicated by the coloured
marking or the colour that is embossed in words on
the base of the plug. Replacements can be obtained
directly from your nearest Service Depot.
Removing the plug:
If your appliance has a non-rewireable moulded plug
and you should wish to re-route the mains cable
through partitions, units etc., please ensure that
either:
the plug is replaced by a fused 13 ampere re-
wearable plug bearing the BSI mark of approval.
or:
the mains cable is wired directly into a 13 amp cable
outlet, controlled by a switch, (in compliance with
BS 5733) which is accessible without moving the
appliance.
Disposing of the plug:
Ensure that before disposing of the plug itself, you
make the pins unusable so that it cannot be
accidentally inserted into a socket.
Instructions for connecting cable to an alternative
plug:
Important: the wires in the mains lead are coloured
in accordance with the following code:
Green & Yello Earth
Blue Neutral
Bro n Live
65 - 100 cm
Connecting the drain hose
Connect the drain
hose, without bending
it, to a draining duct or
a wall drain situated
between 65 and 100 cm
from the floor;
The drain hose may be
connected to an under-
sink trap. Before
connecting the drain
hose from the machine
ensure that any blanks
or removable ends have
been taken off the
spigot.
If it is place over the
edge of a basin or sink
be sure the free end
of the hose should not
be underwater.
! We advise against the use of hose extensions; in
case of absolute need, the extension must have
the same diameter as the original hose and must
not exceed 150 cm in length.
Ensure that if the drain hose is pushed into a
standpipe, that the end does not go down more
than 15cms (6 inches). If the hose is pushed down
too far, this may cause the machine to self -
syphon ie. continuously empty as it is filling.
Electric connection
Before plugging the appliance into the mains
socket, make sure that:
_the socket is earthed and in compliance with
the applicable law;
_the socket is able to sustain the appliance's
maximum power load indicated in the Technical
details table (see page 5);
"
GB
As the colours of the wires in the lead may not
correspond with the coloured markings identifyng
the terminals in your plug, proceed as follows:
Connect reen & Yellow wire to terminal marked E
or or coloured reen or reen & Yellow.
Connect Brown wire to terminal marked L or
coloured Red.
Connect Blue wire to terminal marked N or coloured
Black.
If a 13 amp plug (BS 1363) is used it must be fitted
with a
13 amp fuse, either in the plug or adaptor or at the
distribution board.
If you are in any doubt the electrical supply to your
machine, consult a qualified electrician before use.
How to connect an alternative plug:
The wires in this mains lead are coloured in
accordance with the following code:
BLUE NEUTRAL (N)
BROWN LIVE (L)
GREEN & YELLOW EARTH (E)
Disposing of the appliance:
When disposing of the appliance please remove the
plug by cutting the mains cable as close as possible to
the plug body and dispose of it as described above.
! The Washer-dryer should not be installed in an
outdoor environment, not even when the area is
sheltered, because it may be very dangerous to
leave it exposed to rain and thunderstorms.
! When the Washer-dryer is installed, the mains
socket must be within easy reach.
! Do not use extensions or multiple sockets.
! The power supply cable must never be bent or
dangerously compressed.
! The power supply cable must only be replaced by
an authorised serviceman.
Warning! The company denies all liability if and
when these norms are not respected.
The first ash cycle
Once the appliance has been installed, and before
you use it for the first time, run a wash cycle with
detergent and no laundry, using the wash cycle 1.
GREEN &
YELLOW
BROWN
BLUE
13 ampere fuse
CROSS-BAR
CORD GRIP
GB
#
Technical data
Model WDL 520 P/ /A/K
Dimensions
width 59.5 cm
height 85 cm
depth 60 cm
Capacity from 1 to 7 kg for the wash programme
from 1 to 5 kg for the drying programme
Electrical
connections
please refer to the technical data
plate fixed to the machine
Water
connections
maximum pressure 1 MPa (10 bar)
minimum pressure 0.05 MPa (0.5 bar)
drum capacity 54 litres
Spin speedup to 1200 rotations per minute
Energy rated
programmes
according to
regulation
EN 50229
Wash : programme 1; temperature
60°C; using a load of 7 kg;
Drying: first drying cycle performed with
a 2 kg load, by selecting the dryness
level;
the second drying cycle is performed
with a 5 kg load, by selecting the
dryness level.
This appliance conforms to the
following EC Directives:
- 89/336/EEC dated 03/05/89
(Electromagnetic Compatibility) and
subsequent modifications
- 2002/96/EC
- 2006/95/EC (Low Voltage)
$
GB
Description of the Washer-dryer and
starting a ash cycle
Detergent dispenser drawer: used to dispense
detergents and washing additives (see Detergents
and laundry).
ON/OFFbutton: switches the Washer-dryer on
and off.
WASH CYCLEknob: programmes the wash cycles.
During the wash cycle, the knob does not move.
FUNCTION buttons with indicator light: used to
select the available functions. The indicator light
corresponding to the selected function will remain lit.
TEMPERATURE knob: sets the temperature or the
cold wash cycle (see Personalisation).
DRYINGknob: used to set the desired drying
programme (see Personalisation).
WASH CYCLE PROGRESS
indicator light
s:used
to monitor the progress of the wash cycle.
The illuminated indicator light shows which phase is
in progress.
DOOR LOCKEDindicator light: indicates whether
the door may be opened or not (see next page).
START/PAUSE button with indicator light: starts
or temporarily interrupts the wash cycles.
N.B. To pause the wash cycle in progress, press this
button; the corresponding indicator light will flash
orange, while the indicator light for the current
wash cycle phase will remain lit in a fixed manner. If
the DOOR LOCKED indicator light is switched
off, the door may be opened.
To start the wash cycle from the point at which it
was interrupted, press this button again.
TEMPERATURE
knob
Detergent dispenser drawer
WASH CYCLE PROGRESS
indicator lights
FUNCTION
buttons with
indicator lights
ON/OFF
button
DRYING
knob
DOOR
LOCKED
indicator light
START/PAUSE
button with
indicator light
Control panel
WASH CYCLE
knob
GB
%
Indicator lights
The indicator lights provide important information.
This is what they can tell you:
Wash cycle phase indicator lights
Once the desired wash cycle has been selected and has
begun, the indicator lights switch on one by one to
indicate which phase of the cycle is currently in progress.
Note: during the "Drain" phase, the indicator light
corresponding to the "Spin" cycle phase will illuminate.
Function buttons and corresponding
indicator lights
When a function is selected, the corresponding
indicator light will illuminate.
If the selected function is not compatible with the
programmed wash cycle, the corresponding indicator
light will flash and the function will not be activated.
If a function which is incompatible with another
function selected previously, only the most recent
selection will remain active.
Door locked indicator light
If this indicator light is on, the appliance door is locked
to prevent it from being opened accidentally; to avoid
any damage, wait for the indicator light to switch off
before you open the appliance door.
! If the START/PAUSE indicator light (orange)
flashes rapidly at the same time as the function
indicator light, this indicates a problem has
occurred (see Trou leshooting).
Starting a ash cycle
1. Switch the Washer-dryer on by pressing the ON/OFF button. All indicator lights will switch on for a few
seconds, then they will switch off and the START/PAUSE indicator light will pulse.
2. Load the laundry and close the door.
3. Set the WASH CYCLE knob to the desired programme.
4. Set the washing temperature (see Personalisation).
5. Set the drying cycle if necessary (see Personalisation).
6. Measure out the detergent and washing additives (see Detergents and laundry).
7. Select the desired functions.
8. Start the wash cycle by pressing the START/PAUSE button and the corresponding indicator light will remain
lit in a fixed manner, in green.
To cancel the set wash cycle, pause the machine by pressing the START/PAUSE button and select a new cycle.
9. At the end of the wash cycle the indicator light will switch on. The DOOR LOCKED indicator light will
switch off, indicating that the door may be opened. Take out your laundry and leave the appliance door ajar to
make sure the drum dries completely.
Switch the Washer-dryer off by pressing the ON/OFF button.
Wash
Rinse
Spin
Dry
End of wash cycle
No e: as soon as a drying
level or time period has
been set, this indicator
light illuminates to indicate
that the selected wash
cycle will be followed by a
drying phase.
&
GB
Wash cycles
Wash cycles
Table of ash cycles
Descrip ion of he wash cycle
Max.
emp.
(°C)
Max.
speed
(rpm)
Drying
De ergen s Max. load
(kg)
Cycle
dura ion
Wa sh Fabric
sof ener Normal Mini
load Normal Mini
load
Essentials cycles
1Co on: extremely soiled whites. 90° 1200 ll l 7 3 155 111
1Co on (1): extremely soiled whites. 60° 1200 ll l 7314498
2Co on: heavily soiled whites and resistant colours. 60° 1200 ll l 7312298
2Co on (2): heavily soiled whites and delicate colours. 40° 1200 ll l 7 3 115 91
3Coloured Co ons (3): lightly soiled whites and delicate colours. 40° 1200 ll l 738571
4Syn he ics: heavily soiled resistant colours. 50° 800 ll l 31,58263
5Fas wash 60': to refresh lightly soiled garments quickly
(not suitable for wool, silk and clothes which require washing by hand). 60° 1200 ll l 3-60 -
Specials cycles
6Baby cycle: heavily soiled delicate colours. 40° 800 ll l 2 1 118 97
7Shir s 40° 600 ll l 2 1 69 65
8Ready o wear (*) 30° 800 ll l 1-60 -
9Wo o l : for wool, cashmere, etc. 40° 800 ll l 1,5 1 55 51
10 Silk/Cur ains: for garments in silk and viscose, lingerie. 30° 0 -ll 2 1 55 51
Drying cycles
11 Drying Cottons - - l- - 5- - -
12 Drying Synthetics - - l- - 3- - -
13 Drying Wool - - l- - 1,5 - - -
Partials ash cycles
ARinse Fast -1200 l-l7 3 36 32
BSpin Fast -1200 l- - 7-16 -
CPump out -0- - - 7-2-
The information contained in the ta le is intended as a guide only.
For all Tes Ins i u es:
1) Tes wash cycle in compliance wi h regula ion EN 50229: se wash cycle 1 wi h a empera ure of 60°C.
2) Long wash cycle for co ons: se wash cycle 2 wi h a empera ure of 40°C.
3) Shor wash cycle for co ons: se wash cycle 3 wi h a empera ure of 40°C.
(*) Ready to Wear
This cycle was designed to wash and dry lightly soiled small loads quickly. By selecting this cycle it is possible to
wash and dry a maximum load of 1 kg in just 60 minutes.
!
Please note, this is an automatically programmed wash and dry cycle, therefore it is not possible to manually
set a drying time or drying level in conjunction with this cycle.
!
Please note, the Drying indicator illuminates only during the drying phase of the cycle, not when the cycle is
first selected.
GB
'
Personalisation
Setting the temperature
Turn the TEMPERATURE knob to set the wash temperature (see Ta le of wash cycles).
The temperature may be lowered, or even set to a cold wash ( ).
The Washer-dryer will automatically prevent you from selecting a temperature which is higher than the
maximum value set for each wash cycle.
Setting the drying cycle
Turn the DRYIN knob to set the desired drying type.
Two options are available:
A - Based on time: from 40 to 180 minutes.
B - Based on the how damp the clothes are once they have
been dried:
Iron : slightly damp clothes, easy to iron.
Hanger : dry clothes to put away.
Cup oard : very dry clothes, recommended for towelling
and bathrobes.
If your laundry load to be washed and dried is much greater than the maximum stated load (see adjacent
ta le), perform the wash cycle, and when the cycle is complete, divide the garments into groups and put some
of them back in the drum. At this point, follow the instructions provided for a "Drying only" cycle. Repeat this
procedure for the remainder of the load.
N.B: when the drying is complete there is a cooling period, even though the DRYIN knob is in the position.
Drying only
Turn the WASH CYCLE knob to one of the drying settings (11-12-13) according to the type of fabric, then
select the desired drying duration using the DRYIN knob.
Functions
The various wash functions available with this Washer-dryer will help to achieve the desired results, every time.
To activate the functions:
1. Press the button corresponding to the desired function;
2. the function is enabled when the corresponding indicator light is illuminated.
Note: If the indicator light flashes rapidly, this signals that this particular function may not be selected in
conjunction with the selected wash cycle.
Slo Spin (1200-600)
By selecting this function, reduces the spin speed.
 This function may not be used in conjunction with wash cycles 8, 10, 11, 12, 13, C.
Mini load
This function is recommended for when the load of laundry is equal to half, or less than half, of the maximum
recommended load (see Ta le of wash cycles).
 This function may not be used in conjunction with wash cycles 5, 8, 11, 12, 13, B, C.
Extra rinse
By selecting this function, the efficiency of the rinse is increased and optimal detergent removal is
guaranteed. It is particularly useful for sensitive skin.
 This function may not be used in conjunction with wash cycles 8, 11, 12, 13, B, C.
Super Wash
Because a greater quantity of water is used in the initial phase of the cycle, and because of the increased
cycle duration, this function offers a high-performance wash.
 This function may not be used in conjunction with wash cycles 5, 8, 9, 10, 11, 12, 13, A, B, C.
Fabric
ype
Load ype Max.
load
(kg)
Cupboard
dry
Henger
dry
Iron
dry
Cotton Clothing of different
sizes, Terry towels 5180170160
Synthe-
tics
Sheets, Shirts, Pyjamas,
socks, etc. 3180170160
Wool Knitwear, Pullovers, etc. 1,5 150 140 130
Table of Drying times (guideline values)

GB
Detergents and laundry
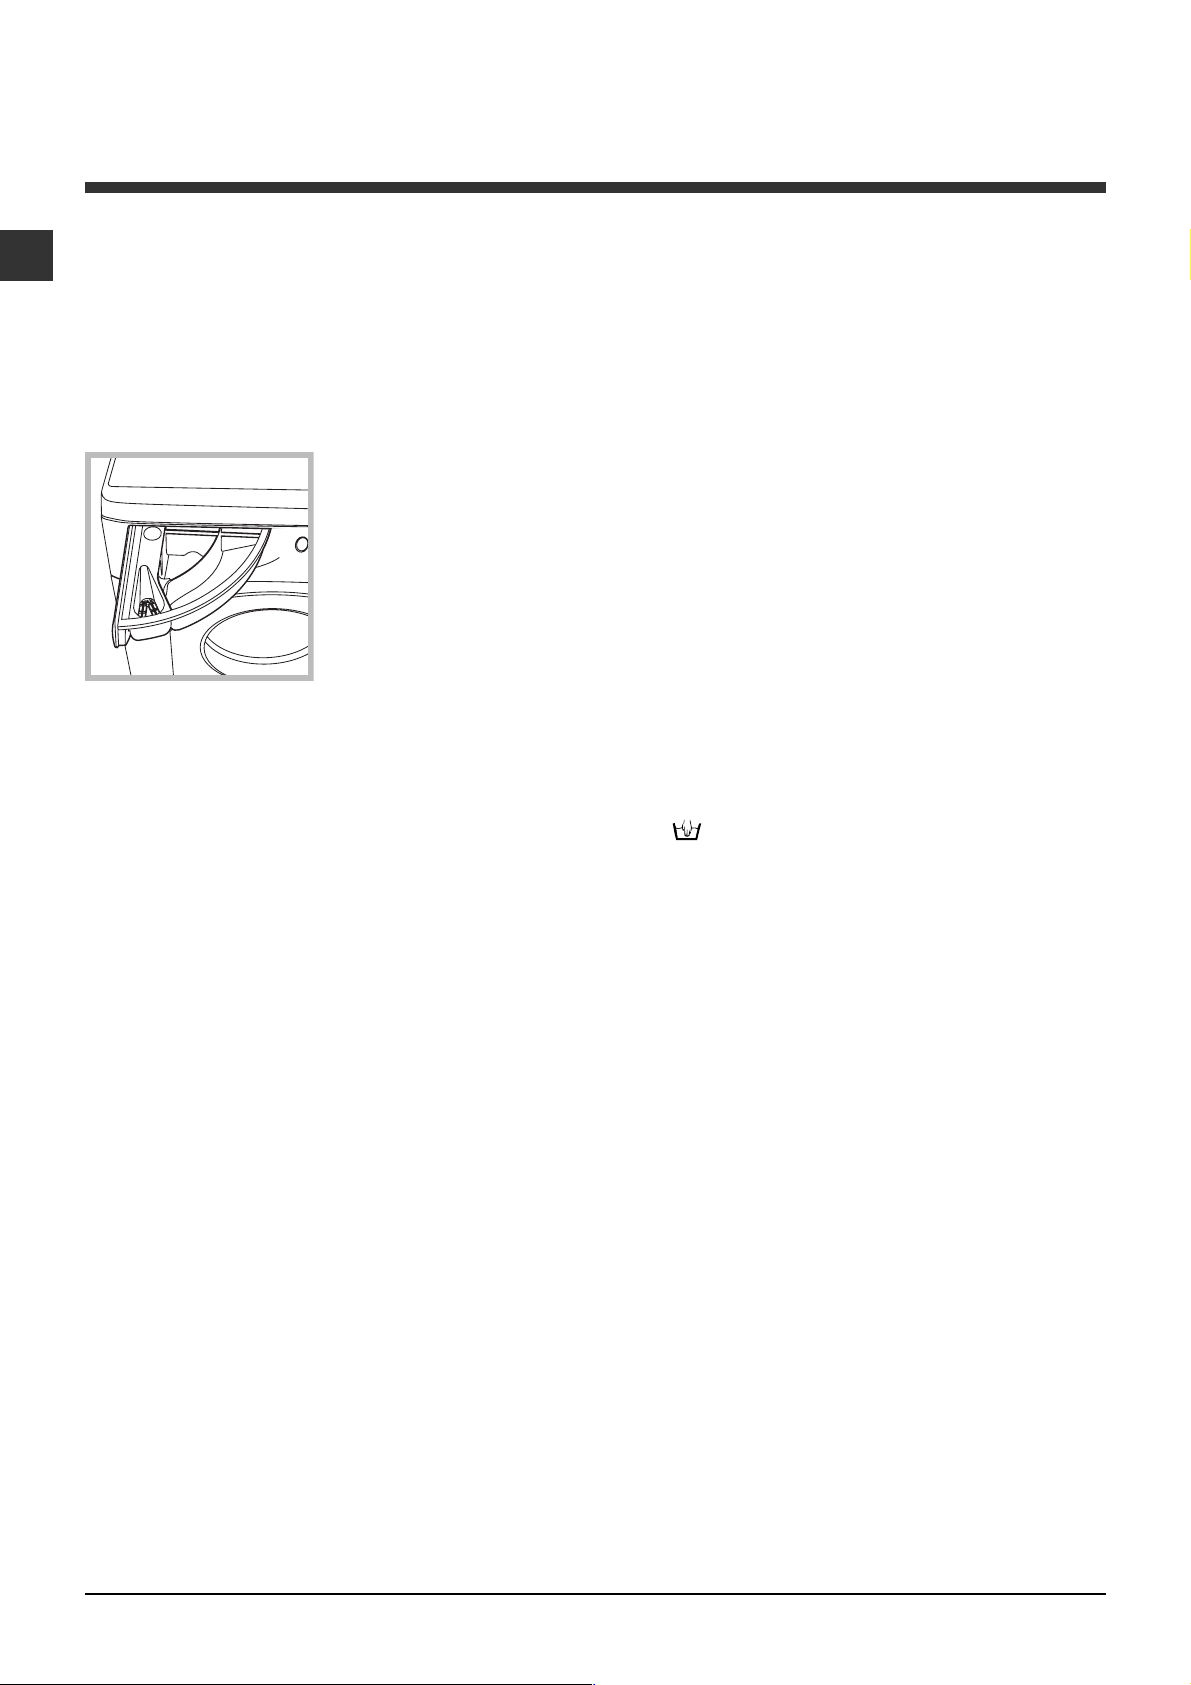
Detergent dispenser dra er
ood washing results also depend on the correct
dose of detergent: adding too much detergent will
not necessarily result in a more efficient wash, and
may in fact a build up on the inside of your appliance
and contribute to environmental pollution.
! Do not use hand washing detergents because
these create too much foam.
Open the detergent
dispenser drawer and
pour in the detergent or
washing additive, as
follows.
! Do not pour detergent into the middle compartment (*).
Detergent should only be poured into the compartment 1.
compartment 1: Detergent for the ash
cycle (po der or liquid)
For best results liquid detergent should be poured
in the dispenser immediately before the start of
the programme.
compartment 2: Additives (fabric softeners, etc.)
The fabric softener should not overflow the grid.
Preparing the laundry
 Divide the laundry according to:
- the type of fabric/the symbol on the label
- the colours: separate coloured garments from
whites.
 Empty all garment pockets and check the buttons.
 Do not exceed the listed values, which refer to
the weight of the laundry when dry:
Durable fabrics: max. 7 kg
Synthetic fabrics: max. 3 kg
Delicate fabrics: max. 2 kg
Wool: max. 1,5 kg
Ho much does your laundry eigh?
1 sheet 400-500 g
1 pillow case 150-200 g
1 tablecloth 400-500 g
1 bathrobe 900-1200 g
1 towel 150-250 g
Garments requiring special care
Baby cycle: this wash cycle 6 can be used to
remove the soiling typically caused by babies, while
ensuring that all detergent is removed from
nappies in order to prevent the delicate skin of
babies from suffering allergies. The cycle has been
designed to reduce the amount of bacteria by using
a greater quantity of water and optimising the
effect of special disinfecting additives added to the
detergent.
At the end of the wash cycle, the machine will slowly
rotate the drum to prevent the formation of
creases; to end the cycle press the START/PAUSE
button.
Shirts: use special wash cycle 7 to wash shirts in
various fabrics and colours.
It guarantees maximum care is taken of the
garments and minimises the formation of creases.
Wool: Hotpoint is the only Washer-dryer
manufacturer to have been awarded the
prestigious Woolmark Platinum Care endorsement
(M.0508) by the Woolmark Company, which means
that all woollen garments may be washed in the
Washer-dryer, even those which state hand wash
only on the label. Wash cycle 9 therefore offers
complete peace of mind when washing woollen
garments in the Washer-dryer (max. load 1,5 kg) and
guarantees optimal performance.
Silk: use special wash cycle 10 to wash all silk
garments. We recommend the use of special detergent
which has been designed to wash delicate clothes.
Curtains: fold curtains and place them in a pillow
case or mesh bag. Use wash cycle 10.
Load balancing system
Before every spin cycle, to avoid excessive vibrations
and to distribute the load in a uniform manner, the
drum rotates continuously at a speed which is slightly
greater than the washing rotation speed. If, after
several attempts, the load is not balanced correctly,
the machine spins at a reduced spin speed. If the load
is excessively unbalanced, the Washer-dryer per-
forms the distribution process instead of spinning.
To encourage improved load distribution and balance,
we recommend small and large garments are mixed
in the load.
Anti-crease
This function interrupts the wash programme, and
the washing is left to soak in water before the
appliance is drained. It can only be used with
programme 10 (Silk/Curtains) and helps to prevent
the formation of creases.
To complete the cycle press the START/PAUSE
button.
1
2
*