| PAGE 2
INSTALLATION INSTRUCTIONS
HOTow™CKM HEATER
INSTALLING THE HEATER
PREPARE COOLANT SYSTEM
1. Drain and ush cooling system to remove any debris
present in the engine’s cooling system.
SELECT PORTS
2. Select return port. The return port will allow heated coolant to
return to the engine. See Fig 2 on following page. Select the
return port using the following guidelines:
• return port must be located on the same side of the
engine as the intended heater mounting location
• return port must be located away from the engine
thermostat
• return port should be located toward the rear (ywheel) of
the engine
• return port should be located away from the supply port
3. Select supply port. The supply port will allow coolant
to ow from the engine to the heater. See Fig 2 on
following page. Select the supply port using the
following guidelines:
• Supply port may be located on the same side or opposite
side of the engine as the intended heater location
NOTE: For V-type engines, it is acceptable to
select a supply port on the opposite side
of the engine as long as the supply hose is
routed properly. See PLUMB HEATER.
• Supply port must be located at the lowest point of the
engine’s water jacket
• Supply port should be located toward the front (radiator)
of the engine
• Supply port should be located away from the return port
SELECT HOSE, FITTINGS & VALVES
4. Select ttings. CKM minimum port size tting:
• 3/4 inch NPT (20 mm)
5. Select hoses. CKM minimum hose inner diameter:
• 1 inch (25 mm)
NOTE: Select hoses rated for 250 °F (121 °C) and
100 psi (690 kPa) minimum.
6. Select optional, user-supplied isolation valves.
NOTE: HOTSTART recommends installing valves to
isolate the heating system in case of service.
(full-port) ball isolation valves.
MOUNT HEATER
NOTICE
Vibration damage: Do not mount
heater directly to engine. Engine
vibration may damage heater.
If the heater is installed with
rigid pipe, connect exible hose
to inlet and outlet to isolate
from vibration.
Heater orientation: CKM
heaters may be mounted straight
horizontally or vertically; do not
mount at an angle. If mounted
vertically, all dips and horizontal
hose routing must be eliminated.
An incorrectly oriented heater may
cause heater failure.
Outlet orientation: If mounting
heater horizontally, inlet and outlet
must face upward. If mounting
heater vertically, ensure outlet is
at top of heater. Do not attempt
to mount heater at an angle
or in any other orientation. An
incorrectly oriented outlet may
cause heater failure.
7. Select a heater mounting
position using the following
guidelines:
• Heater must be low enough to allow the return hose to
continuously rise to the return port.
• Heater must be on the same side of the engine as the
return port.
• Heater must be in a location that allows a minimum of 10
inches (26 cm) clearance for element removal.
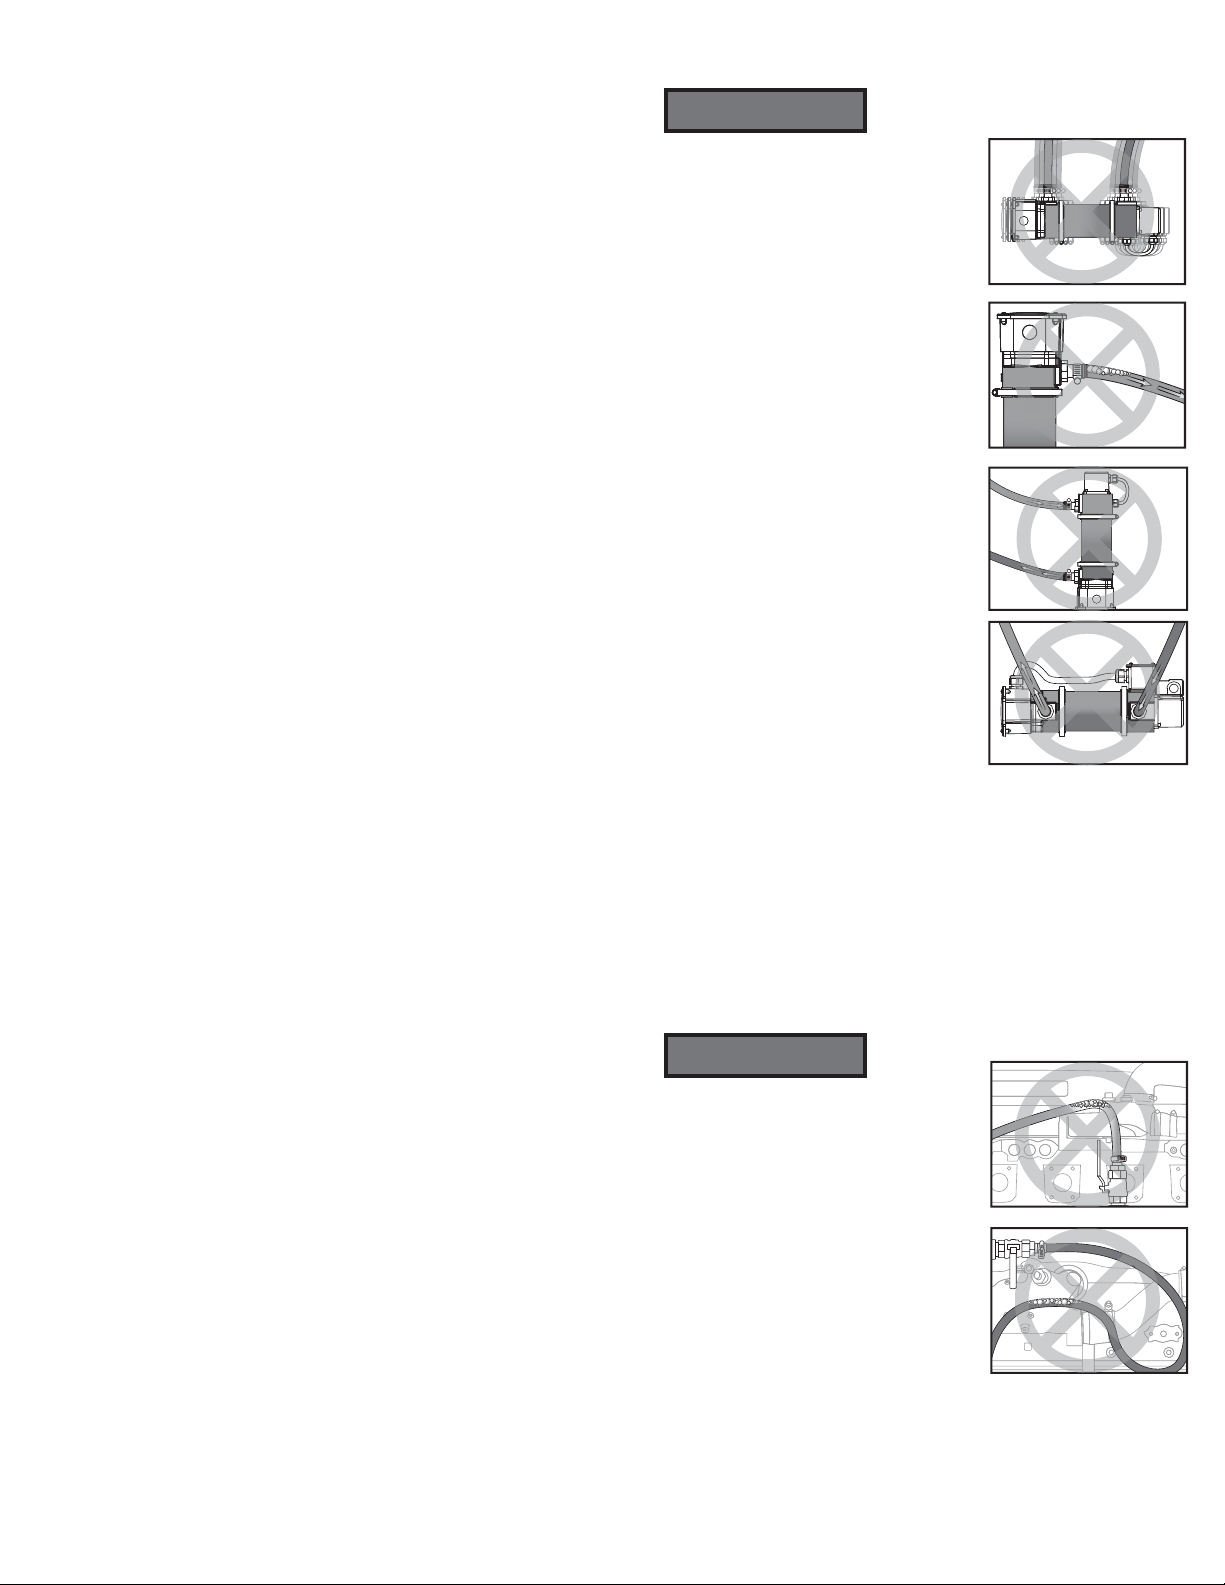
PLUMB HEATER
NOTICE
High points: Do not allow high points
along heater plumbing. High points
will restrict coolant ow and damage
heater. To avoid high points, it may be
necessary to change hose routing or
lower heater mounting location.
Dips and bends: Do not allow dips
or bends along heater plumbing.
Dips or bends will allow air pockets
to form, restricting coolant ow and
damaging heater.
90° Fittings: Elbows (90° ttings)
along heater plumbing may restrict ow and damage
heater. To minimize ow restriction, HOTSTART
recommends sweeping bends or 45°ttings in place of
90° ttings.