HOZAN C-451 User manual

各部の名称
製品情報
バック拡げ
C-451
1
このたびはホーザンC-451バック拡げをお買い上げいただき、まことにありがとうご
ざ い ま す 。こ の 取 扱 説 明 書 を よ く お 読 み に な り 、正 し く お 使 い く だ さ い 。ま た 、お読みに
なったあとも大 切に保 管してください 。
ヘッド
ボディ
アタッチメントB
ハンドル
アタッチメントA

2
ご使用上の注意
1六角レンチ(対辺2mm)を使用してハンドルをヘッドに取り付けます。
注意文の警告マークについて
本器は自転車用フレームを一時的に拡張させるための工具です。この目的以外には使用
しないでください。
準備
※ハンドルを取り付けずに、当社C-160輪業用ラチェットレンチ、もしくは14mm
サイズのスパナなどでヘッド部を回すこともできます。その場合は「ハンドルを回す」
の説明は、適宜読み替えてください。
2パット(アタッチメントの皮の部分)表面を清掃してください。異物、特に金属くずなど
硬いものが付着していると、フレームを傷付けます。パットには油がつかないように注意
してください。
この取扱説明書ではご使用上の注意事項を次のように区別しています。
…重傷をともなう重大事故の発生を想定してのご注意
…傷害や物的損害を想定してのご注意
なお、 として記載されていても、あるいは特に記述がなくても、状況によっては
重大な結果をまねくおそれがあります。正しく安全にご使用ください。
1.次の各車種に使用すると自転車を破損するおそれがあり、大変危険です。次に記す
車種には絶対に使用しないでください。
・アルミ製、チタン製、カーボン製フレームの自転車
・ホイールサイズが24インチ以下の小径車
・変速機付き自転車(後ろハブ内装変速機装備車を含む)
・電動アシスト自転車
・ベルト駆動自転車
2.作業するフレームに変形や亀裂、損 傷 など がない ことを 確 認して から作 業してくださ い。
損傷などを増大するおそれがあります。
3.定期的にネジ部分を清掃してグリースを塗布してください。
4.本器を改造しないでください。
5.本器に割れ、欠け、摩耗、変形などが認められるときは使用しないでください。

3
ご使用方法
準備
3初めてご使用になる前に、必ずグリースアップを
行ってください。ハンドルの回転がスムーズになり、
金属同士が摺れあって摩滅するのを最小限に抑え
ます。
・ネジ部分に付着したホコリ、ゴミを真ちゅう
ブラシなどで取り除きます。
・ネジ全体およびワッシャー部のすき間に
グリースを塗布します。
・その後は3回の使用につき1回程度(スプレー
式のグリースの場合は毎回)行ってください。
グリースアップした部分に異物が付着しないよう、置き場所にご注意ください。
摺動部に砂粒などを噛んだまま作業をすると本器を損傷します。
1フレームの拡げ作業
本器はハンドルを時計方向に回すと両アタッチメ
ントの間隔が開き、反時計方向に回すと閉じます。
まず、アタッチメント間隔を閉じぎみにしてアタッ
チメントAの 外 側を、作業するフレームのシート
ステイまたはチェンステイの一方の内側に当て
ます。
2ハンドルを徐々に時計方向に回して、アタッチメントBの内側がもう一方のステイの内
側にひっかかるようにします。
できるだけリヤエンドに近いところで作業した方が拡張が楽で、フレームへのダメージ
も少なくて済みます。
作業中に本器がチェーンステイもしくはシートステイより滑り、自転車から外れて
しまうことがあります。作業中に滑りが発生しましたら直ちに作業を中断し、
本器を緩め、本器を当てる場所や角度を変更してから作業を再開してください。
グリース
グリース
グリース
外側
アタッチメントA
内側
アタッチメントB

4
22.12
ご使用方法
3さらにハンドルをまわしてフレームを拡げます。
フレームは拡げすぎないようにしてください。拡げすぎると著しく変形、損傷する
おそれがあります。
4フレームの閉じ作業
フレームは閉じすぎないようにしてください。閉じすぎると著しく変形、損傷するお
それがあります。
拡げ作業と全く逆の操作を行います。アタッチメントAの内 側とアタッチメントBの
外側を両ステイの外側に当て、ハンドルを反時計方向に回します。
5使用後はネジ部分に付着したホコリ、ゴミを真ちゅうブラシなどで取り除き、全体を
ウエスでよくぬぐい、保管します。
パット(アタッチメントの皮の部分)には油がつかないようにしてください。

1
INSTRUCTION MANUAL
SEAT STAY OPENER & TIGHTENER
C-451
Identification of parts
Thank you for purchasing the HOZAN C-451 SEAT STAY OPENER & TIGHTENER. With
proper care and handling, this fine instrument will provide years of trouble-free operation.
Please read this entire instruction manual carefully before attempting to place this
instrument in service. Please keep this instruction manual available for reference.
Shaft head
Body
Attachment B
Handle
Attachment A

Even if the instructions do not have mark, there are some possibilities for a
serious situation. Follow the instructions.
2
Precautions
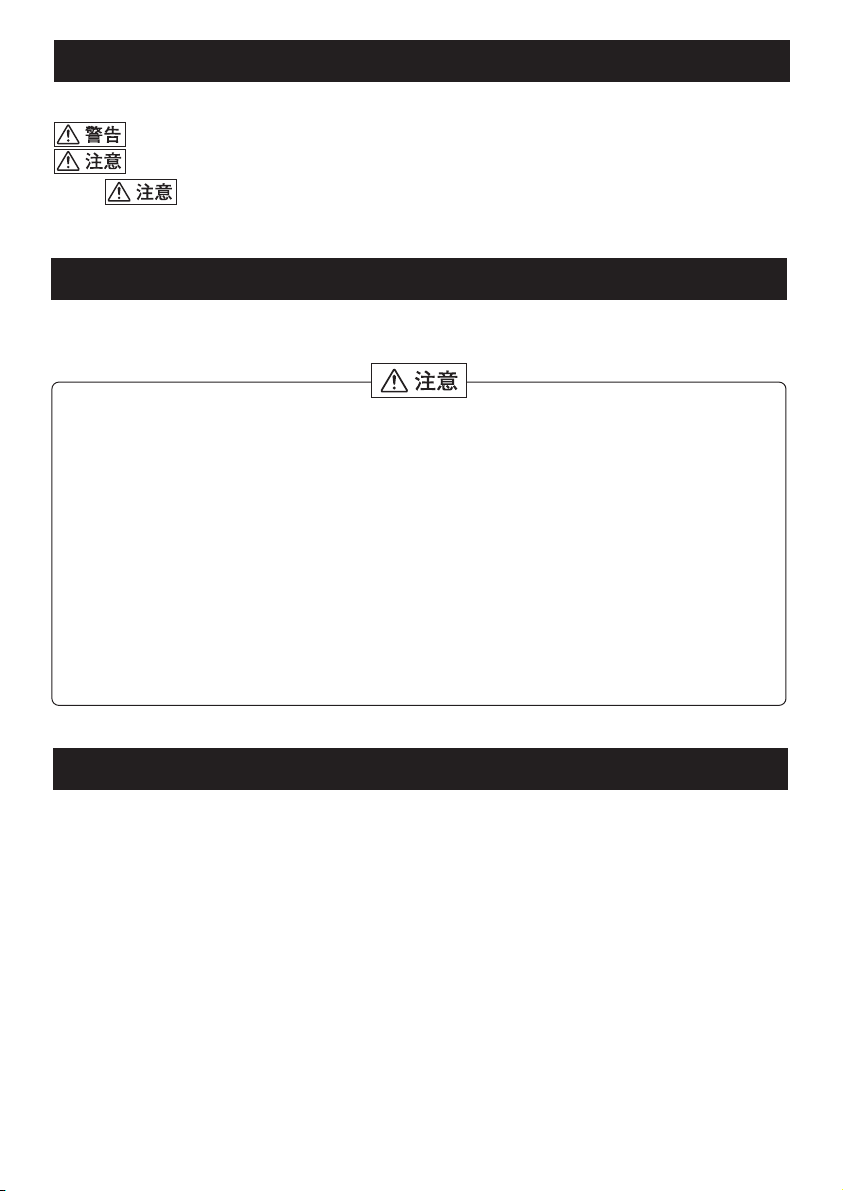
1Secure the handle on the shaft head using a 2 mm hex key wrench.
Warning and caution symbols
This tool is for widening the space of the stays of a bicycle temporarily during rear
wheel work.
Preparation
* You can also turn the shaft head with the HOZAN C-160 RATCHETING HUB
NUT WRENCH or 14 mm wrench in place of installing the handle provided.
In this case, convert the phrase "turn the handle" into "turn the shaft head
with the C-160 or the wrench".
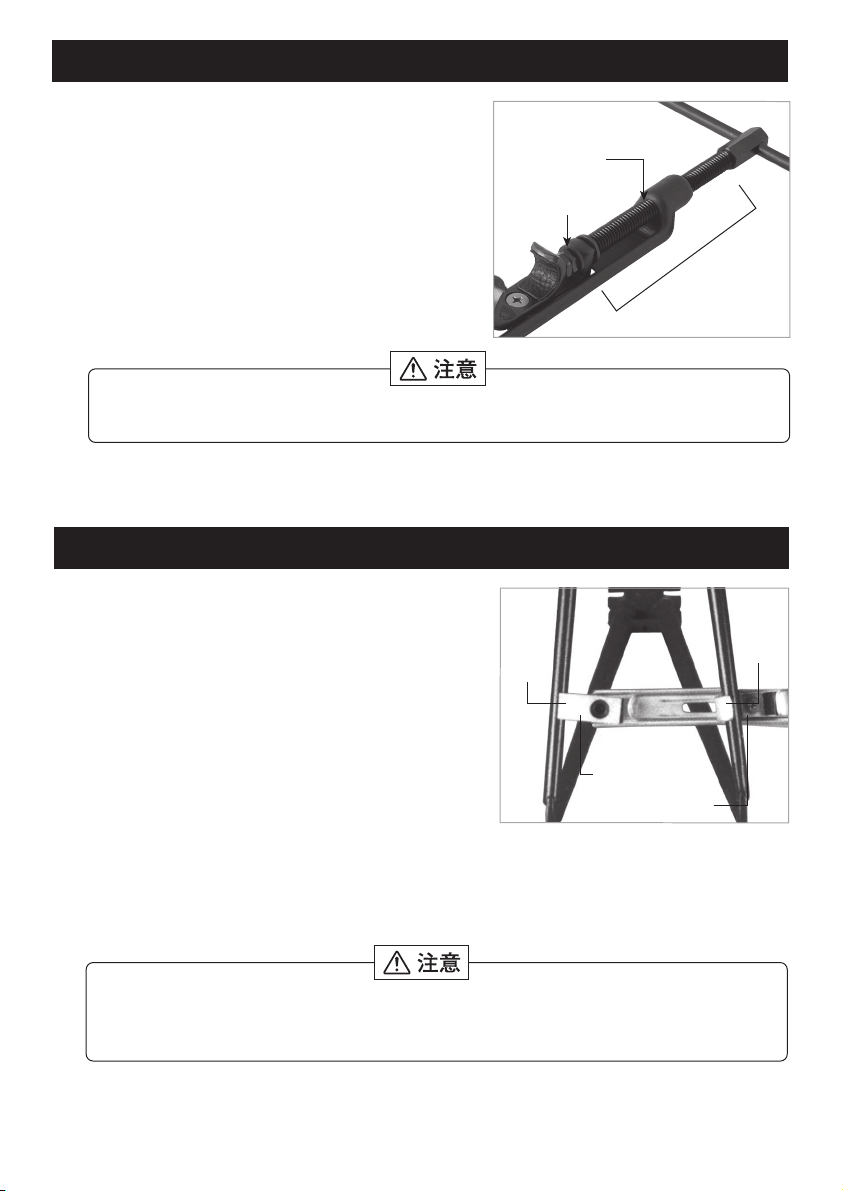
2Clean the surface of the pad (leather parts of the attachments). If there are
foreign bodies especially metallic scraps, they could hurt the frame. Keep oil
away from the leather pads of Attachments.
These symbols are used throughout the instruction manual to alert the user to potential
safety hazards as follows :
1. Do not use on bicycles listed below, otherwise this could break the bicycles
and cause a dangerous situation.
・Aluminum, titanium or CFRP flamed bicycle
・Bicycle with wheels of 24 inches or less
・Bicycle with a transmission (including bicycle with rear inner derailleur)
・Motor-assisted bicycle
・Belt- drive bicycle
2. Be sure that the frame has no deformation or damage before work.
Otherwise, this could aggravate damages.
3. Clean and grease the threads and between the washers periodically to keep
in good condition.
4. Do not modify the C-451.
5. Do not use when cracks, breaks, excessive wear, or deformation is found on
this tool.
Warning
Caution
…
…
Caution
Caution
Notice when incorrect handling could cause the user's death or serious
injury.
Notice when incorrect handling could cause injury to the user or material
damage.
Outside
edge

3
Preparation
Operation
3Be sure to grease before the first using.
This brings smooth handle works and
suppresses the rubbed metals wearing
down.
・Clean the dust and scraps on the
threads using a brass brush and such.
・Grease the entire threads and between
the washers.
・Grease once every three times of using
(every using if it is aerosol grease).
1Widening the frame
The attachment will become further separat-
ed when turning the handle clockwise, and
closer together when turning the handle
counterclockwise.
First, engage the outside edge of Attach-
ment A of the C-451 with the inside of one
of the seat stay or chain stay.
We recommend widening the stays at their
rear ends to reduce damaging them and to
make the work easier.
2Gently turn the handle clockwise to engage the inside hook of Attachment B
to the inside of seat stay or chain stay.
Working at as near as the rear end makes expanding procedure easy and
reduces damage to the frame.
Pay attention to put this tool on the place where foreign bodies do not stick
to the greased parts during work. Working while there are grains of sand
between rubbing parts damages this tool.
Caution
If the tool slides down from the chain stay or the seat stay of the bicycle,
stop the work immediately and loosen the tool. Work again after changing the
applying location or angle.
Caution
Grease
Grease
Grease
Outside
Outside
edge
edge
Outside
edge
Attachment A
Inside
hook
Attachment B

4
22.12
Operation
3Turn the handle further. The frame (stays) will be widened.
Do not widen the frame excessively. This could extremely deform or damage
the frame.
4Narrowing the frame
Reverse the procedures for widening. The inside edge of Attachment A and
the outside hook of Attachment B should catch the outside of both stays.
Turn the handle counterclockwise.
5Clean the dust and scraps on the threads using a brass brush and such,
and wipe whole the body after use. Keep oil away from the leather pads of
Attachments.
Caution
Do not narrow the frame excessively. This could extremely deform or damage
the frame.
Caution
1-2-12 Saiwaicho, Naniwa-ku, Osaka 556-0021, Japan
Tel : +81-6-6567-3111 Fax : +81-6-6562-0024
Table of contents
Other HOZAN Bicycle Accessories manuals
Popular Bicycle Accessories manuals by other brands

Kody Technologies
Kody Technologies 101-026 Installation instruction

DERO
DERO Stratus Shelter manual

Mio
Mio Cyclo 215HC user manual

Thule
Thule Yepp Nexxt Mini installation instructions

Profile Design
Profile Design Supersonic Ergo 35c installation instructions

Bottecchia
Bottecchia ETR 3 Use and maintenance manual