HP C1537A Product manual

PRELIMIARY unix
configuration
hp dds drives
technical reference manual
volume 5: unix configuration guide
HP C1537A & HP C1554A DDS-3 Drive (24 GB)
HP C1557A & HP C5648A DDS-3 Autoloader (144 GB)
HP C5683A DDS-4 Drive (40 GB)
HP C5713A DDS-4 Autoloader (240 GB)
HP C7438A DAT 72 Drive (72 GB)
Edition 9 Draft 1, February 2003
<Bold Header>

2
PRELIMIARY
Notice
The information contained in this
document is subject to change
without notice.
Hewlett-Packard makes no
warranty of any kind with
regard to this material,
including, but not limited
to, the implied warranties
of merchantability and
fitness for a particular
purpose. Hewlett-Packard shall
not be liable for errors contained
herein or direct, indirect, special,
incidental or consequential
damages in connection with the
furnishing, performance, or use of
this document.
Revision History
This document contains
proprietary information which is
protected by copyright. All rights
reserved. No part of this
document may be photocopied,
reproduced or translated to
another language without the
prior written consent of
Hewlett-Packard.
© Copyright 1994–2003
Hewlett-Packard Development
Company L.P.
Note
As far as this manual is
concerned:
nthe HP C1554A is identical to
the HP C1537A
nthe HP C5648A is identical to
the HP C1557A
The inclusion of a particular drive
or autoloader in this document
does not imply that that drive or
autoloader is currently available.
Version Date Changes
Edition 1 Nov 1994 All
Edition 7 May 1999 Addition of DDS-4 drives
Edition 8 Feb 2003 Removal of DDS-1 and DDS-2 drives. Inclusion of DAT 72 drives.
Manual restructured and reformatted.
Edition 9 Draft 1 Jul 2003 Change of HP (Compaq) Tru64 to HP Alpha
<Bold Header>

3
PRLIMIARY
The Purpose of this Manual
This is one of a six-volume set which documents HP DDS drives. This
volume provides basic information on configuring the following drives
with various operating systems:
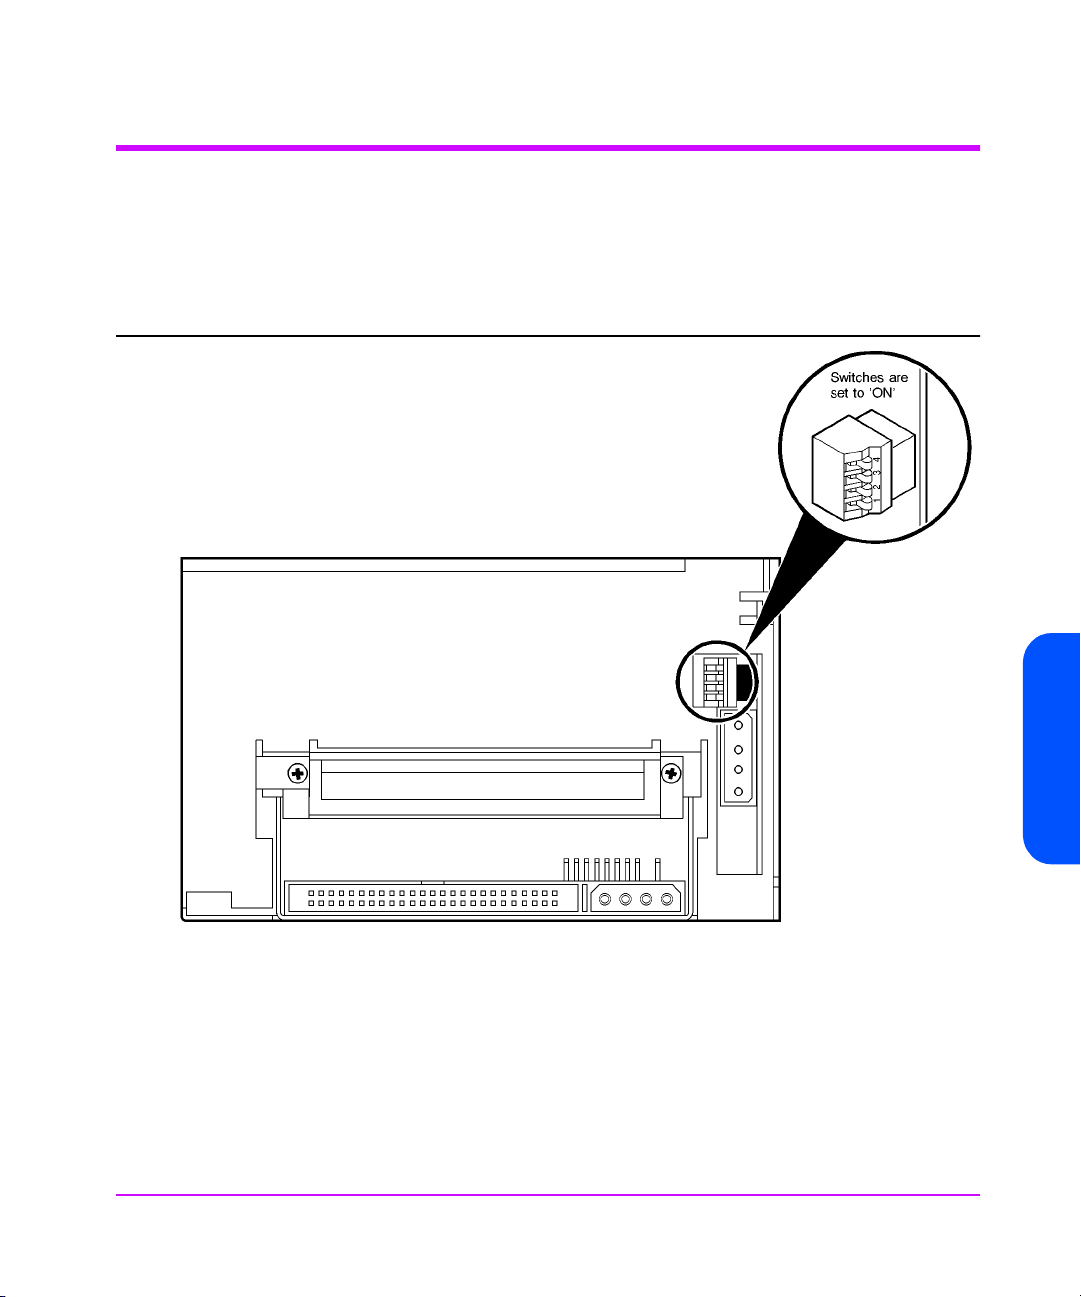
nHP C1537A (HP C1554A) DDS-3 drive, capacity: 24 gigabytes
nHP C1557A (HP C5648A) DDS-3 autoloader, capacity: 144 (6x24)
gigabytes
nHP C5683A DDS-4 drive, capacity: 24 gigabytes
nHP C5713A DDS-4 autoloader, capacity: 144 (6x24) gigabytes
nHP C7438A DAT 72 drive, capacity: 72 gigabytes
Capacities assume 2:1 data compression.
Note This manual contains information on connecting to various
operating systems. The information is given in good faith,
but since the operating systems and any upgrades that are
made to them are outside Hewlett-Packard’s control, HP
cannot guarantee that the details are correct. Please
consult the operating system documentation in conjunction
with this manual.
Related Documents
The following documents provide additional information:
Documents Specific to HP DDS Drives
The HP DDS Technical Manual also includes the following volumes:
nHardware Integration Guide, volume 1
nSoftware Integration Guide, volume 2
nThe SCSI Interface, volume 3
nSpecifications, volume 4
nBackground to DDS Products, volume 6
Please contact your HP supplier for copies.

4
PRELIMINARY
General Documents and Standardization
nEnhanced Small Computer System Interface (SCSI-2)
X3T9.2-1993 Rev. 10L, available through ANSI
nDDS-3
—ECMA-236, 1st Edition
nDDS-4
—ECMA-288, 1st Edition
Copies of General Documents can be obtained from:
ANSI 11 West 42nd Street
New York, NY 10036-8002
USA
ISO CP 56
CH-1211 Geneva 20
Switzerland
ECMA 114 Rue du Rhône
CH-1204 Geneva
Switzerland
Tel: +41 22 849 6000
Web URL: http://www.ecma.ch
Global Engineering Documents 2805 McGaw
Irvine, CA 92714
USA
Tel: 800 854 7179
or 714 261 1455

contents 5
The Purpose of this Manual 3
Related Documents 3
1
11
1Introduction 7
Drivers and Backup Software 7
Drivers 7
UNIX Applications 7
Application Software Availability 7
Configuring a Drive 8
To change the configuration: 8
Configuring an Autoloader 9
2
22
2HP Alpha UNIX 5.1x (DAT 72 drives only) 11
Updating the Tape Driver 11
What Next? 12
3
33
3HP Servers and Workstations — HP-UX 10.20 and 11.x 13
Determining the SCSI ID 13
To add stape to the kernel using sam: 14
Creating the Device Files 15
To add device files using sam: 15
To create device files using mksf: 16
What Next? 18
4
44
4IBM (AIX) Servers and Workstations 19
Determining the SCSI ID 19
Configuring the Device Files 19
What Next? 20
contents

6contents
Device Filenames under AIX 20
5
55
5Linux Servers and Workstations 23
Determining the SCSI ID 23
Configuring on Linux Systems 23
What Next? 25
6
66
6Silicon Graphics (SGI) 27
What Next? 30
MTCAN and Constants Values 30
7
77
7Sun Workstations—Solaris 2 (SunOS 5.x) 33
Determining the SCSI ID 33
Driver Configuration 34
HP-Data Values 35
What Next? 36
8
88
8Verifying the Installation 37
System-Specific Arguments 39
9
99
9Introduction to Configuration Switches 41
Configuration Switches 41
Data Compression—Switches 1 and 2 42
Media Recognition System (MRS)—Switch 3 or 8 42
Switches 3 through 8 43
Configuring an Autoloader 43
10
1010
10 Tables of Switch Settings 45
Configuration Switch Settings 45
Special Function Definitions 47
Autoloader Option Switch Settings 51
Glossary 53
Index 59

Introduction 7
Introduction
Drivers and Backup Software
Drivers
Check your operating system documentation to see whether a driver for DDS
drives is provided. If no operating system driver is available, you can use
various software applications to connect DDS drives.
Even operating systems which do support DDS drives directly only provide a
very basic level of support, so it is still a good idea to use software
applications to provide friendly user interfaces and to make full use of DDS
features.
UNIX Applications
You can write scripts to control DDS drives in UNIX using standard backup
utilities such as cpio and tar. To achieve more sophisticated control of the
drives, and to exploit the full range of DDS features, it is worth considering
software applications specifically designed for the task.
Application Software Availability
Most backup software companies provide applications for HP DDS products.
Contact your software supplier for details. Alternatively, contact your HP
supplier, who can provide you with details of a wide range of compatible
software.
For details of software for autoloaders, please contact your support center.
1

8Introduction
Configuring a Drive
When the drive is powered on, it reads a set of configuration switches on the
underside of the drive (see Chapter 9, “Introduction to Configuration
Switches”).
To change the configuration:
1 Switch the drive off.
2 Select the correct configuration for your system. See “Configuration
Switches” on page 41 for details of which setting to use for your system.
3 Switch the drive on again.
4 Ensure that the appropriate drivers and application software are installed
on the host computer.

Introduction 9
Introduction
Configuring an Autoloader
Note Autoloaders only exist in DDS-3 and DDS-4 versions, not
DAT 72.
Figure 1 Internal autoloaders: option switches
To configure an autoloader:
Note See “Autoloader Option Switch Settings” on page 51 for details
of the settings you need for different systems.
1 Switch the autoloader off.
2 Set the drive configuration on the switches on the underside.

10 Introduction
3 Set the autoloader configuration as follows:
Internal built-in autoloaders: set the switches on the rear of the autoloader
mechanism (see Figure 1).
External standalone autoloaders: the value of the option switch settings is
the number on the right when looking at the rear of the autoloader. To
change the number, click on the little buttons marked ‘−’ and ‘+’ above
and below the number with a ball-point pen or similar.
4 Switch the autoloader on again.
5 Ensure that the appropriate drivers and application software are installed
on the host computer.

HP Alpha UNIX 5.1x (DAT 72 drives only) 11
HP Alpha UNIX 5.1x (DAT 72 drives only)
Note Only DAT 72 drives are currently supported on HP Alpha.
Updating the Tape Driver
1 Modify the SCSI Tape Density Table to include:
scsi_tape_density[0x47] = "163000_bpi" 163000 0 (DAT72)
2 Add the following entry to your /dev/ddr.dbase file:
SCSIDEVICE
Type = tape
Name = "HP" "C7438A"
#
PARAMETERS:
TypeSubClass = rdat
TagQueueDepth = 0
MaxTransferSize = 0x0ffffff # (16MB - 1)
ReadyTimeSeconds = 120 # seconds
MODESELECT:
ModeSelectNumber = 0
SavePage = No
PageFormat = scsi2
BlockDescriptor = yes
TransferLength = 16
Hdr.Tape.BufferMode = 0x1
Data.UBYTE[0] = 0x3D #Vendor Unique Page Code 0x3D
Data.UBYTE[1] = 0x02
Data.UBYTE[2] = 0x01
DENSITY:
DensityNumber = 0,3,4,5,6,7
DensityCode = default
CompressionCode = 0x0
2

12 HP Alpha UNIX 5.1x (DAT 72 drives only)
Buffered = 0x1
DENSITY:
DensityNumber = 1,2
DensityCode = default
CompressionCode = 0x1
Buffered = 0x1
3 Rebuild the kernel by running:
/sbin/ddr_config -c /etc/ddr.dbase
then reboot the system with the tape drive attached. The device files for the
DAT 72 drive will be generated in /dev/tape and /dev/ntape when
you reboot.
4 The names of the device files can be interpreted as follows:
Devices in the /dev/ntape directory are "no-rewind" devices, those in /
dev/tape will do a rewind on close.
The device files then have the syntax, tapeX_dn
where:
Xis the instance of the drive
nis the density number
For example, /dev/ntape/tape66_d1 is a device file for device 66,
no-rewind using density number 1. Since all density numbers have the
same parameters it does not matter which density number file is used.
What Next?
Once the device files have been created, you should confirm that your new
tape drive is working properly. Chapter 8, “Verifying the Installation”
provides instructions on backing up and restoring a sample file to test your
installation.

HP Servers and Workstations — HP-UX 10.20 and 11.x 13
HP Servers and Workstations
— HP-UX 10.20 and 11.
x
Introduction
Before you install your tape drive log on to the HP web site, www.hp.com,
and download the latest hardware enablement patch bundle for your
operating system. This ensures that you will have the correct device driver for
your tape drive.
Determining the SCSI ID
Before you configure your system to support your new HP drive, you need to
determine what SCSI ID to use. The SCSI ID must be unique for each device
attached to the SCSI bus. To list the existing devices, use the following
command:
% /sbin/ioscan -f
The output of this should look similar to the following example:
Class I H/W Path Driver S/W State H/W Type Description
=============================================================================
bc 0 root CLAIMED BUS_NEXUS
bc 1 8 bc CLAIMED BUS_NEXUS Psudo Bus Converter
ba 0 8/0 GSCtoPCI CLAIMED BUS_NEXUS GSCtoPCI Bridge
ext_bus 1 8/0/2/0 c720 CLAIMED INTERFACE SCSI C895 Ultra2 Wide LVD
target 0 8/0/2/0.7 tgt CLAIMED DEVICE
ctl 1 8/0/2/0.7.0 sctl CLAIMED DEVICE Initiator
lan 0 8/0/20/0 btlan3 CLAIMED INTERFACE PCI(10110019) -- Built-in #1
ba 1 8/16 bus_adapter CLAIMED BUS_NEXUS Core I/O Adapter
tty 0 8/16/4 asio0 CLAIMED INTERFACE Built-in RS-232C
ext_bus 2 8/16/5 c720 CLAIMED INTERFACE Built-in SCSI
target 1 8/16/5.5 tgt CLAIMED DEVICE
disk 0 8/16/5.5.0 sdisk CLAIMED DEVICE SEAGATE ST34573N
target 2 8/16/5.7 tgt CLAIMED DEVICE
ctl 2 8/16/5.7.0 sctl CLAIMED DEVICE Initiator
3

14 HP Servers and Workstations — HP-UX 10.20 and 11.x
processor 0 62 processor CLAIMED PROCESSOR Processor
memory 0 63 memory CLAIMED MEMORY Memory
After you have installed the new tape drive, you can check that it has been
attached successfully. From a shell window (hpterm/xterm), execute
ioscan to display the list of attached devices:
% /sbin/ioscan -C tape -fn
The new lines should look similar to the following, where the 4in the Ifield
represents the instance of the SCSI tape driver, not the SCSI ID:
tape 4 2/0/1.5.0 stape CLAIMED DEVICE HP XXXXXX
where XXXXX is C1537A, C1557A, C5683A, C5713A or C7438A depending
on the type of drive.
If you cannot find the drive, this may be because the kernel does not contain
the correct driver. Use the System Administration Manager (sam) to add
stape to the kernel:
To add stape to the kernel using sam:
1 % sam
2 Select the following:
Kernel Configuration
Drivers
3 Highlight the stape driver. If the driver has not been added to the kernel,
both Current State and Pending State will read “Out”.
4 Select the following:
Actions
Add Driver to Kernel
The Pending State will now read “In”.
5 To add the new driver to the kernel, select:
Actions
Create a New Kernel
6 The stape driver will now be added to the kernel and then the system will
reboot.

HP Servers and Workstations — HP-UX 10.20 and 11.x 15
HP Servers and Workstations
— HP-UX 10.20 and 11.x
Creating the Device Files
Once you have verified the tape drive connection, you will need to create the
appropriate device files for the drive. Normally, you would have rebooted
your system after attaching the tape drive, and this process runs insf.
However, if you have not rebooted your system since attaching the drive, you
can create device files by one of two ways, either through the System
Administration Manager (sam), or by executing the mksf command.
To add device files using sam:
This is the recommended and simplest way to create device files.
1 % sam
This will bring up the graphical user interface for the utility.
2 Select the following:
Peripheral Devices
Tape Drives
sam will then scan the system for any tape drives connected.
When a drive is found, it will be displayed as:
Hardware Path Driver Description
===========================================================
8/0/2/0.3.0 stape HP XXXXXX
where XXXXX is C1537A, C1557A, C5683A, C5713A or C7438A
depending on the type of drive.
3 Highlight the drive and select the following from the tool bar:
Actions
Create Device Files
Create Default Device Files
This will create default device files for the drive. To view the device files
that have been created, select:
Actions
Create Device Files
Show Device Files

16 HP Servers and Workstations — HP-UX 10.20 and 11.x
where:
4 When you have exited sam, run ioscan to see the tape drive:
%/sbin/ioscan -C tape -fn
To create device files using mksf:
Note This method is not recommended.
1 Run insf as follows:
% /sbin/insf -C tape
2 Create the device files for the devices using the mksf command as
follows:
% /sbin/mksf -d stape -I <instance> [-n] [-u] /dev/rmt/X<name>
where:
Device File Description
where <I>
<I>m
<I>mn
<I>mb
<I>mnb
is the instance number of the drive
AT&T encoding, rewind driver
AT&T encoding, non-rewind driver
Berkeley encoding, rewind driver
where <X>
<Y>
<Z>
cXtYbZBEST
cXtYbZBESTb
cXtYbZBESTn
cXtYbZBESTnb
is the card number
is the target number
is the LUN number
Best compression driver, AT&T encoding, with rewind
Best compression driver, Berkeley encoding, with rewind
Best compression driver, AT&T encoding, non-rewind
Best compression driver, Berkeley encoding, non-rewind
Argument Description
-d stape Specifies the SCSI tape driver
-I <instance> Specifies the tape drive’s hardware address via the instance of the SCSI tape
driver. The first instance is 0, the second 1, and so on.
[-n] Specifies no rewind; absence of this parameter indicates rewind mode

HP Servers and Workstations — HP-UX 10.20 and 11.x 17
HP Servers and Workstations
— HP-UX 10.20 and 11.x
See the man page (man 1m mksf) for other options of the mksf command.
The stape section covers the SCSI tape driver options. The man page man 7
mt describes the long filenames used in HP-UX 10.xand later.
Example:
To create a device file with the following characteristics:
nA hardware address specified by instance 5 (-I 5)
nNo rewind (-n)
nBerkeley mode tape positioning on close (-u)
nA filename of 4mnb, where 4is the tape device identifier (/dev/rmt/
4mnb)
You would execute the following:
% /sbin/mksf -d stape -I 4 -n -u /dev/rmt/4mnb
You can check that the appropriate device file was created using the lssf
command as follows:
% /sbin/lssf /dev/rmt/4mnb
[-u] Specifies Berkeley mode; absence of this parameter indicates AT&T mode.
Berkeley and AT&T modes differ in their read-only close behavior:
nIn Berkeley mode, the tape position will remain unchanged by a device
close operation.
nIn AT&T mode, a device close operation will cause the tape to be
repositioned just after the next tape filemark (the start of the next file).
In most cases, Berkeley mode should be used.
/dev/rmt/X<name> Specifies the path of the device file, where:
XSpecifies the tape device identifier. Use the next available
identifier. You can examine the contents of /dev/rmt using the ls
command to determine which identifiers have already been used.
<name> Specifies the short name (in HP-UX 9.x-style) of the device file:
mnb No rewind, compression disabled, Berkeley-mode device
hnb No rewind, compression disabled, Berkeley-mode device
mnb No rewind, compression disabled, Berkeley-mode device
hnb No rewind, compression enabled, Berkeley-mode device
Argument Description

18 HP Servers and Workstations — HP-UX 10.20 and 11.x
This should produce the following output to show that the device file now
exists:
stape card instance 0 SCSI target 6 SCSI LUN 0 berkeley no rewind
BEST density at address 2/0/1.6.0 /dev/rmt/4mnb
To create a device file for a drive in uncompressed mode, you should use a
command such as:
mksf -H -a -b U_18
and for compressed mode (default):
mksf -H -a -b U_18C
The hardware path can be found from previous ioscan output.
What Next?
Once the device files have been created, you should confirm that your new
tape drive is working properly. Chapter 8, “Verifying the Installation”
provides instructions on backing up and restoring a sample file to test your
installation.

IBM (AIX) Servers and Workstations 19
IBM (AIX) Servers and
Workstations
Determining the SCSI ID
Before you configure your system to support your drive, you need to
determine which SCSI ID to use. IDs must be unique for each device attached
to the SCSI bus. To list the existing devices, use the following command:
% lsdev -C |grep SCSI
This will produce output that looks similar to:
scsi0 Available 00-00-0S Standard SCSI I/O Controller
hdisk0 Available 00-00-0S-0 1.0 GB SCSI Disk Drive
rmt1 Defined 00-00-0S-2,0 Other SCSI Tape Drive
The SCSI ID is in the series 00-00-0S-X,0, where Xis the SCSI ID. Review
the list of existing SCSI IDs and choose an available ID to assign to the new
tape drive.
Configuring the Device Files
To install a DDS-format drive on an IBM workstation you need to create the
appropriate device files for the drive.
Note Do not choose the smit option of “4mm2gb” as the Tape
Device Type. This is reserved for Connor drives. If you use it
with HP drives, you will get the error “Device to be
configured does not match the physical device
at the specified connection location”.
To change to variable block mode, use the following procedure:
1 If you are using a graphics terminal running X-Windows, then at a
Windows terminal, type: smit tape
4

20 IBM (AIX) Servers and Workstations
If you are using a non-graphics terminal, at the command line type:
% smit -C tape
2 If no device has been configured at this address before, select “add a
tape drive” to set up the address. From the pop-up window, select
“ost” or “Other SCSI tape drive” as the tape drive you wish to
change and choose connection addresses as appropriate.
3 Select from the window: “change/show characteristics of a
tape drive”
4 From the pop-up window, select “ost” or “Other SCSI tape drive”
as the tape drive you wish to change. Do not choose “4mm2gb”.
5 Change the block size field to 0, and click on the “DO” button or press
[Enter] to apply the change.
HP DDS-format drives will work with tar, cpio, backup, restore and dd.
For systems other than the 43P, the drive is also boot-capable, provided a
boot tape is generated using mkszfile and mksysb.
What Next?
Once the device files have been created, you should confirm that your new
tape drive is working properly. Chapter 8, “Verifying the Installation”
provides instructions on backing up and restoring a sample file to test your
installation.
Device Filenames under AIX
Use device filenames as listed below for the combination of Rewind on Close,
Retension on Open, and Compression that you want:
Filename Rewind on Close Retension on Open Compression
/dev/rmtnYes No enabled
/dev/rmtn.1 No No enabled
/dev/rmtn.2 Yes Yes enabled
/dev/rmtn.3 No Yes enabled
/dev/rmtn.4 Yes No disabled
This manual suits for next models
6
Table of contents
Other HP DC Drive manuals
Popular DC Drive manuals by other brands

Danfoss
Danfoss VLT FC Series installation instructions

Danfoss
Danfoss VLT instruction manual

Trane
Trane CVHE installation instructions

D+H
D+H VCD 204-K-TMS-B Original instructions

GEZE
GEZE E740 Syncro Service instructions

Mars
Mars Comfort-aire Century HBH Series Installation, operation & maintenance manual