HP DV2810US User manual

Multimedia
User Guide

© Copyright 2007 HewIett-Packard
Development Company, L.P.
Windows is a US. registered trademark of
Microsoft Corporation
The information contained herein is subject
to change without notice. The only
warranties for HP products and services are
set forth in the express warranty statements
accompanying such products and services.
Nothing herein should be construed as
constituting an additional warranty. HP shatt
not be liable for technical or editorial errors
or omissions contained herein.
First Edition: November 2007
Document Part Number: 460551-001

Product notice
This user guide describes features that are common to most models. Some features may not be
available on your computer.
iii

iv Productnotice

Table of contents
t Using multimedia hardware
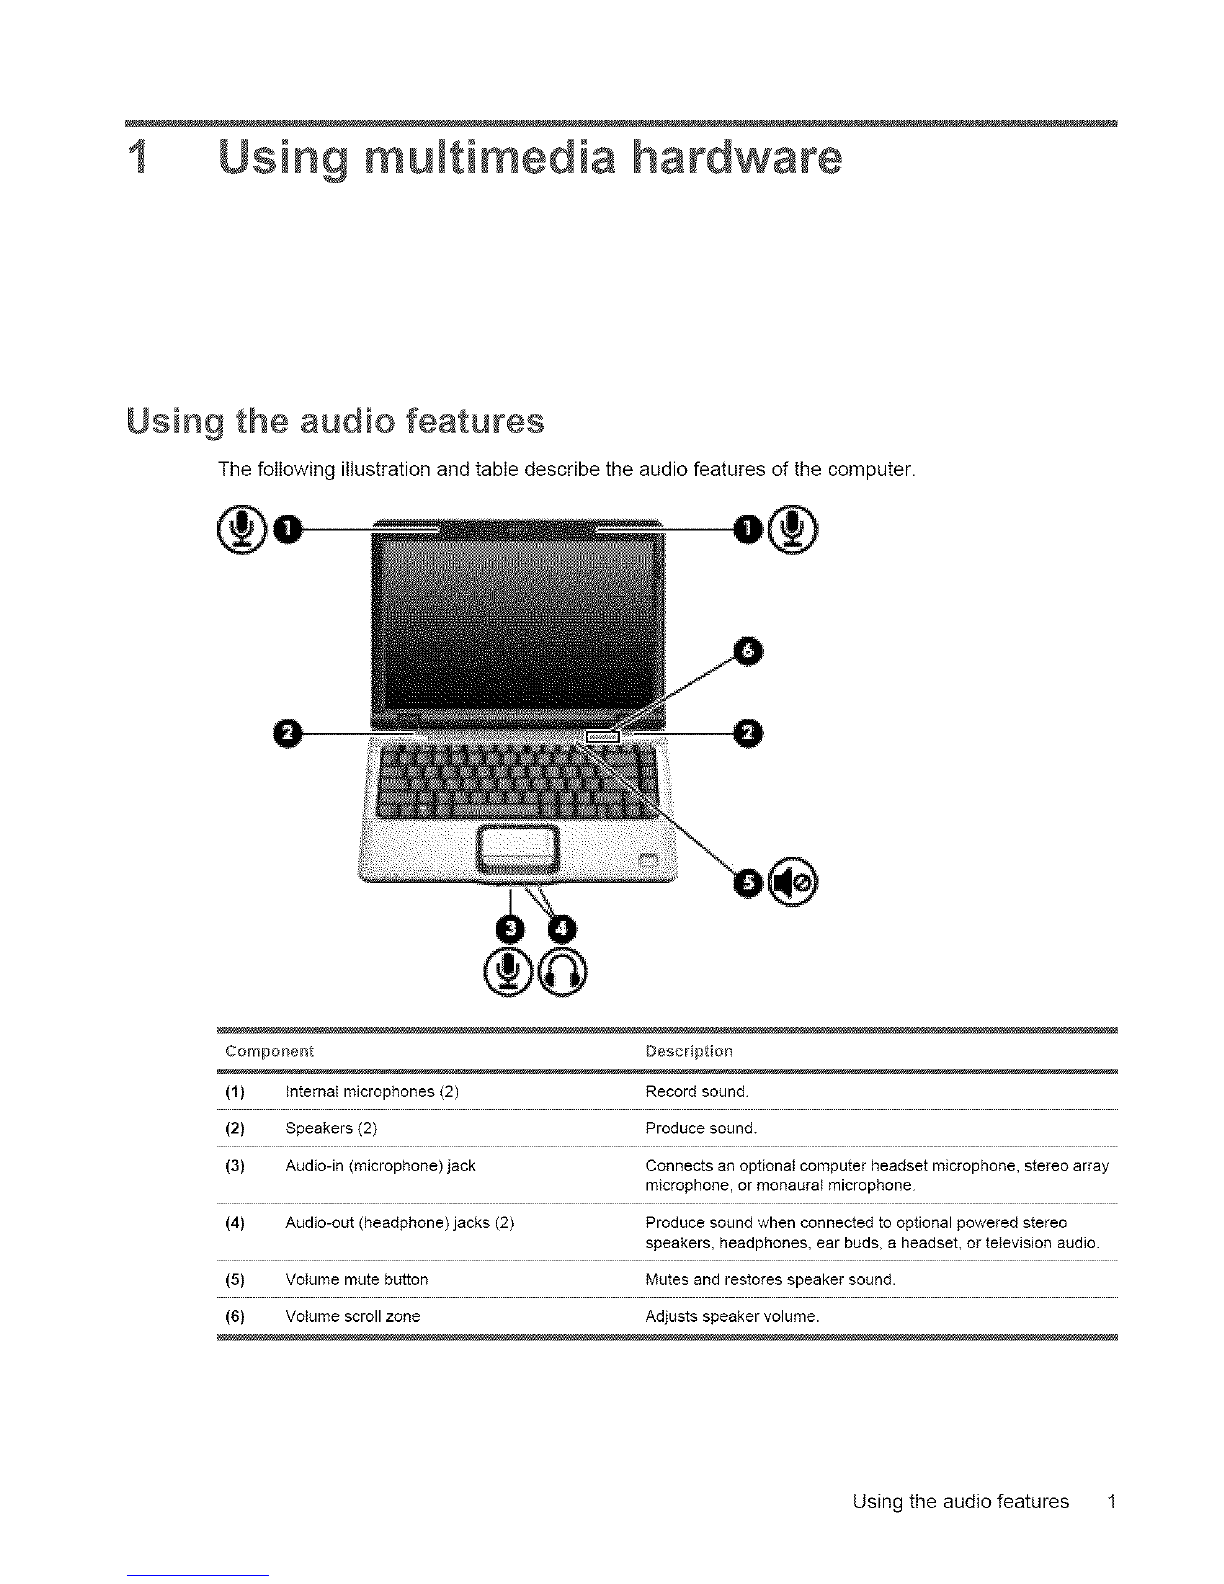
Using the audio features ...................................................................................................................... 1
Using the audio-in (microphone)jack .................................................................................. 2
Using the audio-out (headphone)jack ................................................................................. 2
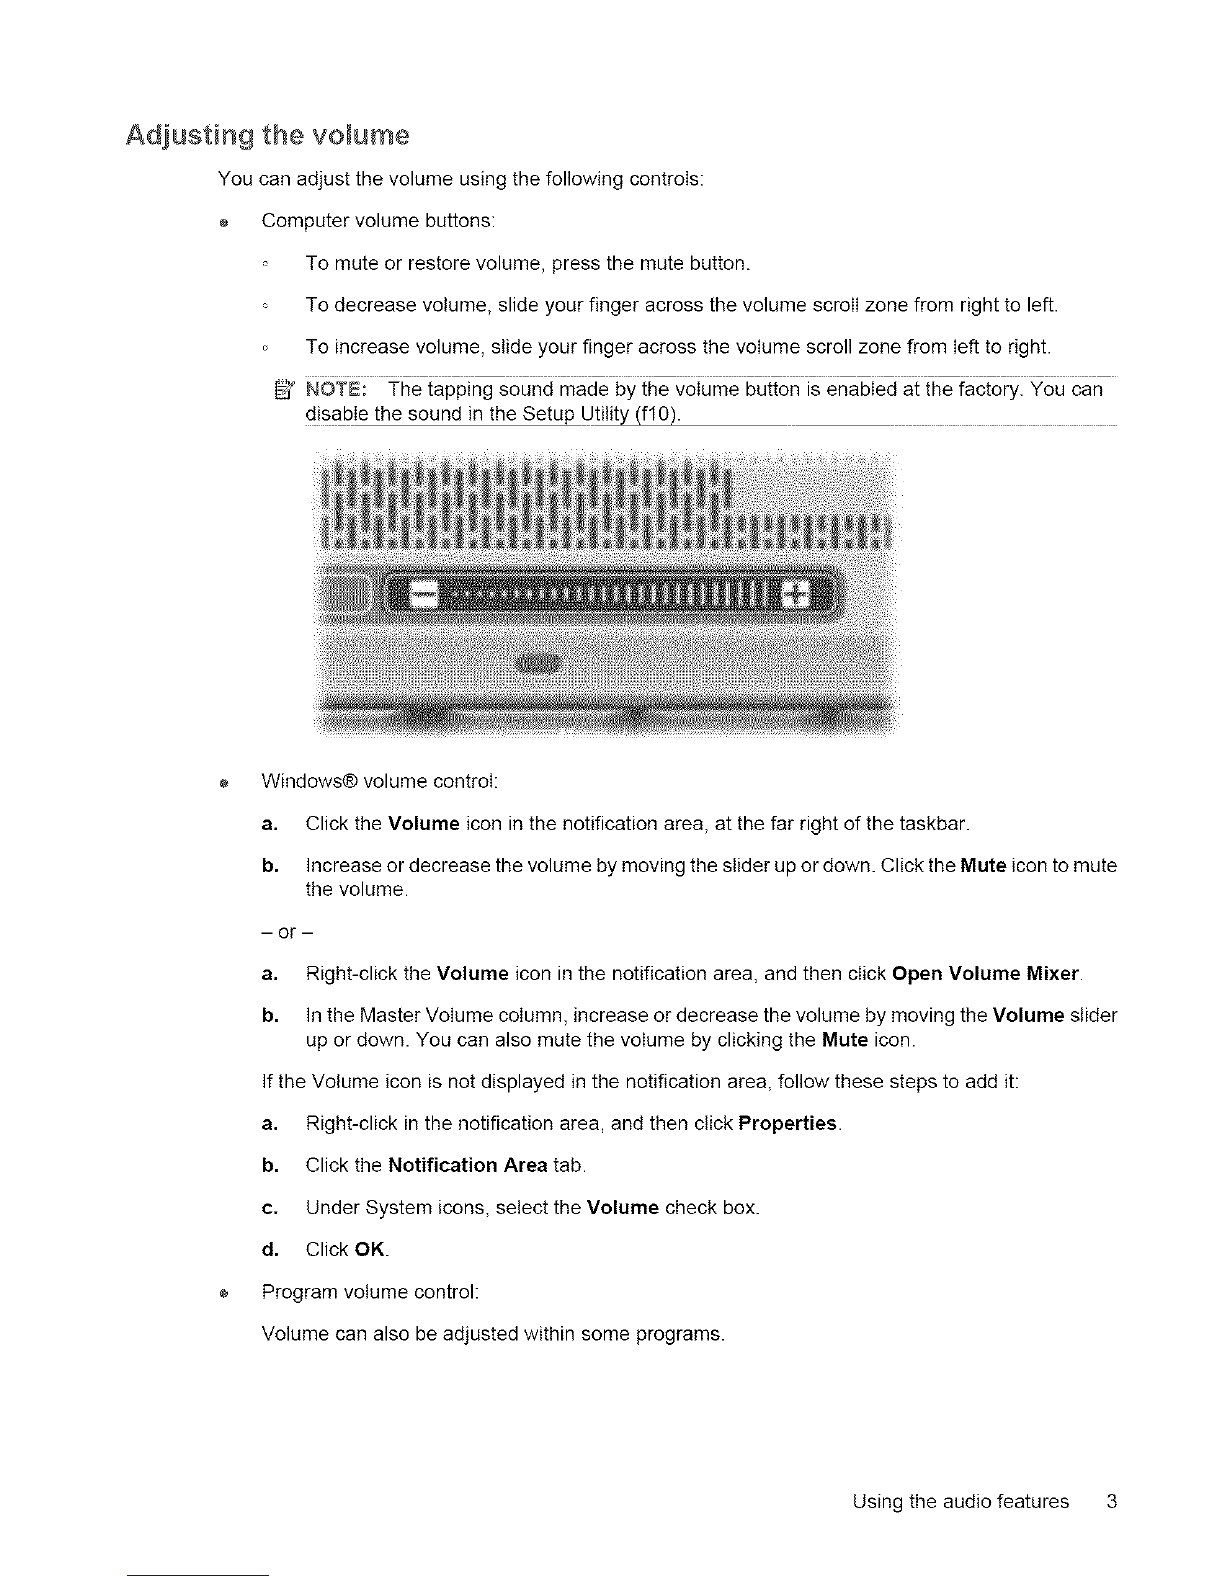
Adjusting the volume ........................................................................................................... 3
Using the Quick Launch buttons .......................................................................................................... 4
Using the video features ....................................................................................................................... 5
Using the external monitor port ............................................................................................ 5
Using the S-Video-out jack .................................................................................................. 6
Using the HDMI port (select models only) ........................................................................... 7
Using the webcam (select models only) ............................................................................................... 8
Adjusting webcam properties ............................................................................................. 10
Using an optical drive ........................................................................................................................ 11
Identifying the installed optical drive .................................................................................. 11
Inserting an optical disc (CD or DVD) ................................................................................ 11
Removing an optical disc (CD or DVD) ............................................................................. 12
When the disc tray opens .................................................................................. 12
When the disc tray does not open ..................................................................... 12
Using the media activity functions ...................................................................................................... 14
Using the media activity hotkeys ....................................................................................... 14
Using the media activity buttons ........................................................................................ 15
Previous/rewind button ...................................................................................... 15
Play/pause button ............................................................................................. 15
Next/fast forward button .................................................................................... 16
Stop button ........................................................................................................ 16
2 Wo_ki_g with multimedia software
Opening preinstalled multimedia software ......................................................................................... 18
Installing multimedia software from a disc .......................................................................................... 18
Using multimedia software ................................................................................................................. 18
Preventing playback disruptions ......................................................................................................... 19
Changing DVD region settings ........................................................................................................... 20
Observing the copyright warning ........................................................................................................ 20

vi

I Using multimedia
Using the audio features
The foIIowing illustration and tabIe describe the audio features of the computer.
O
Component #escdption
(1) Internal microphones (2) Record sound
(2) Speakers (2) Produce sound.
(3) Audio-in (microphone) jack Connects an optionat computer headset microphone, stereo array
microphone, or monaural microphone
(4) Audio-out (headphone) jacks (2) Produce sound when connected to optional powered stereo
speakers, headphones, ear buds, a headset, or television audio.
(5) VoIume mute button Mutes and restores speaker sound.
(6) Volume scroll zone Adjusts speaker volume.
Using the audio features 1

Using
Using
the audio-in (microphone} jack
The computer is equipped with a stereo (dual-channel) microphone jack that supports an optional stereo
array or monaural microphone. Using sound recording software with external microphones allows for
stereo recordings.
When connecting a microphone to the microphone jack, use a microphone with a 3.5-mm plug.
the audiooout (headphone} lack
A WARNII_G! To reduce the risk of personal injury, adjust the volume before putting on headphones,
earbuds, or a headset. For additional safety information, refer to the Regulatory, Safety and
Environmental Notices.
A CAUTION: To prevent possible damage to an external device, do not plug a single sound channel
(monaural) connector into the headphone jack.
In addition to connecting headphones, the headphone jack is used to connect the audio-out function of
an audio device such as external powered speakers or a stereo system.
When connecting a device to the headphone jack, use only a 3.5-mm stereo plug.
When a device is connected to a headphone jack, the speakers are disabled.
2 Chapter 1 Using multimedia hardware

Adjusting the volume
You can adjustthevolume usingthefollowingcontrols:
Computer volume buttons:
To mute orrestorevolume,pressthemute button.
To decreasevolume,slideyourfingeracrossthevolume scrollzone from righttoleft.
To increasevolume,slideyourfingeracrossthevolume scrollzone from lefttoright.
_Y N©TE The tappingsound made by thevolume buttonisenabledatthefactory.You can
disablethesound intheSetup Utility(flO).
i!
Windows® volume control:
a. Click the Volume icon in the notification area, at the far right of the taskbar.
b. Increase or decrease the volume by moving the slider up or down. Click the Mute icon to mute
the volume.
-- or -
a. Right-click the Volume icon in the notification area, and then click Open Volume Mixer.
b. In the Master Volume column, increase or decrease the volume by moving the Volume slider
up or down. You can also mute the volume by clicking the Mute icon.
If the Volume icon is not displayed in the notification area, follow these steps to add it:
a. Right-click in the notification area, and then click Properties.
b. Click the Notification Area tab.
c. Under System icons, select the Volume check box.
d. Click OK.
Program volume control:
Volume can also be adjusted within some programs.
Using the audio features 3

Using the Quick Launch buttons
The media button (I) and DVD button (2) functions vary by model and installed software. With these
buttons, you can watch movies, listen to music, and view pictures.
@
Pressing the media button launches the QuickPlay program.
Pressing the DVD button launches the DVD playback feature of the QuickPlay program.
NOTE: If the computer has been set up to require a Iogon password, you may be asked to log on to
Windows. QuickPlay launches after you log on. Refer to the QuickPIay software Help for more
information.
4 Chapter 1 Using multimedia hardware

Using the video features
Using the e×terna[ monitor port
The external monitor port connects an external display device, such as an external monitor or a projector,
to the computer,
A To connect a display device, connect the device cable to the external monitor port.
IOI
_2_ NOTE: If a properly connected external display device does not display an image, press fn+f4 to
transfer the image to the device. Repeatedly pressing fn+f4 alternates the screen image between the
computer display and the device.
Using the video features 5

Using the S-Video-out jack
The 7-pin S-Video-out jack connects the computer to an optional S-Video device such as a television,
VCR, camcorder, overhead projector, or video capture card.
To transmit video signals through the S-Video-out jack, you need an S-Video cable, available from most
electronics retailers. If you are combining audio and video functions, such as playing a DVD movie on
your computer and displaying it on your television, you also need a standard audio cable, available from
most electronics retailers, to connect to the headphone jack.
The computer can support one S-Video device connected to the S-Video-out jack, while simultaneously
supporting an image on the computer display or on any other supported external display.
NOTE: The S-Video connection provides a higher quality image than a composite-video connection.
To connect a video device to the S-Video-out jack:
1, Plug one end of the S-Video cable into the S-Video-out jack on the computer.
_ NOTE: If the S-Video-out jack on the computer is not accessible because the computer is docked
in an optional docking device, connect the S-Video cable to the S-Video-out jack on the docking
device.
2, Plug the other end of the cable into the video device, as instructed in the user guide included with
the device.
3, Press the fn+N keys to switch the image between display devices connected to the computer.
6 Chapter 1 Using multimedia hardware

Using the HDM port (select mode s on y}
Select computer models include an HDMI (High Definition Multimedia Interface) port. The HDMI port
connects the computer to an optional video or audio device, such as a high-definition television, or any
compatible digital or audio component.
The computer can support one HDMI device connected to the HDMI port, while simultaneously
supporting an image on the computer display or any other supported external display.
NOTE: To transmit video signals through the HDMI port, you need an HDMI cable (purchased
separately), available from most electronics retailers.
To connect a video or audio device to the HDMI port:
1, Plug one end of the HDMI cable into the HDMI port on the computer.
2, Connect the other end of the cable to the video device, according to the device manufacturer's
instructions.
3_ Press fn+f4 to switch the image between the display devices connected to the computer.
Using the video features 7

Using the webcam (select mode s on y)
Select computer models include a webcam, located at the top of the display. To access the webcam
and CyberLink YouCam software, select Start >All Programs > Accessories > ¢yberl_ink YouCam
> YouCam.
1_" NOTE: The first time you access the webcam software, you may experience a brief delay as the
software loads,
,/
For more information about using the webcam, see the HP Web site at h _:Lwww, hp,_Q_!suppQ[!.
Select your language and search for notebook weboam.
Using YouCam as your default webcam software enables you to experiment with the following features:
Video--Record and play back webcam video. You can also e-mail or upload video to YouTube,
using the icon on the software interface.
Streaming video--When you open your instant message program, YouCam displays a floating
toolbar that lets you add graphic effects,
Special effects--Add frames, filters, and emoticons to your snapshots and video.
Snapshots--Take single frame or "burst" webcam snapshots in rapid succession,
Connect--E-mail photos and video using the icon on the software interface.
_J NOTE: For information about using software designed for use with the webcam, refer to the online
Help for that software.
The webcam light (1) turns on when video software accesses the webcam (2),
O
8 Chapter 1 Using multimedia hardware

Foroptimumperformance,observethefollowingguidelineswhileusingthewebcam:
Besurethatyouhavethelatestversionofaninstantmessageprogrambeforestartingavideo
conversation.
Thewebcammaynotworkproperlyacrosssomenetworkfirewalts.Ifyouarehavingtrouble
viewingorsendingvideotosomeoneonanotherLANoroutsideyournetworkfirewaII,temporarily
disablethefirewalI.
NOTE: UndersomecircumstancesafirewaIIcanblockaccesstoInternetgames,interferewith
printerorfilesharingonanetwork,orblockauthorizede-mailattachments.Totemporarilysolve
theproblem,disablethefirewatl,performthetaskthatyouwanttoperform,andthenreenablethe
firewall.Topermanentlyresolvetheproblem,reconfigurethefirewall.
Wheneverpossible,placebrightlightsourcesbehindthewebcamandoutofthepicturearea.
Usingthewebcam(selectmodelsonly) 9

Adjusting webcam properties
You can adjust the following webcam properties:
Brightness--Controls the amount of light that is incorporated into the image. A higher brightness
setting creates a brighter image; a lower brightness setting creates a darker image,
Contrast--Controls the difference between lighter and darker areas on the image. A higher contrast
setting intensifies the image; a lower contrast setting maintains more of the original information's
dynamic range but leads to a flatter image.
Hue--Controls the aspect of color that distinguishes it from another color (what makes a color red,
green, or blue). Hue is distinct from saturation, which measures the intensity of the hue.
Saturation--Controls the strength of color in the final image. A higher saturation setting creates a
bolder image; a lower saturation setting creates a more subtle image.
Sharpness--Controls the definition of edges in an image. A higher sharpness setting creates a
more defined image; a lower sharpness setting creates a softer image.
Gamma--Controls the contrast affecting the mid-level grays or midtones of an image. Adjusting
the gamma of an image allows you to change the brightness values of the middle range of gray
tones without dramatically altering the shadows and highlights. A lower gamma setting makes
grays look black, and makes dark colors even darker.
Backtight Comp_Compensates in cases where a subject with a large amount of background light
would otherwise be obscured by blooming or silhouetting.
The Properties dialog box is accessible from various programs that use the webcam, usually from a
configuration, settings, or properties menu,
10 Chapter 1 Using multimedia hardware

Using an optical drive
Depending on the type of optical drive and software installed in your computer, the optical drive plays,
copies, and creates CDs or DVDs.
_demtifyimg the imstaHed optica_ drive
A Select Start > Computer.
_nserting art optica_ disc (CD or DVD)
1. Turn on the computer.
2. Press the release button (1) on the drive bezel to release the disc tray.
3. Pull out the tray (2).
4. Hold the disc by the edges to avoid touching the flat surfaces and position the disc label-side up
over the tray spindle.
r_--',/NOTE: If the tray is not fully accessible, tilt the disc carefully to position it over the spindle.
8. Gently press the disc (3) down onto the tray spindle until the disc snaps into place.
& Close the disc tray.
_2_ NOTE: After you insert a disc, a short pause is normal. If you have not selected a media player, an
AutoPIay dialog box opens. It prompts you to select how you want to use the media content.
Using an optical drive 11

Removing an optica_ disc (CD or DVD)
There are 2 ways to remove a disc, depending on whether the disc tray opens normally or not.
1,
2,
When the disc tray opens
Press the release button (1} on the drive bezel to release the disc tray, and then gently pull out the
tray (2} until it stops.
Remove the disc (3) from the tray by gently pressing down on the spindle while lifting the outer
edges of the disc. Hold the disc by the edges and avoid touching the flat surfaces.
NOTE: If the tray is not fully accessibIe_ tilt the disc carefully as you remove it.
3,
When the disc tray does not open
t, Insert the end of a paper clip (1) into the release access
2. Press in gently on the paper clip until the tray is released,
Close the disc tray and place the disc in a protective case.
in the front bezel of the drive.
and then pull out the tray (2) until it stops.
12 Chapter 1 Using multimedia hardware

3, Removethedisc(3)fromthetraybygentlypressingdownonthespindlewhileliftingtheouter
edgesofthedisc.Holdthediscbytheedgesandavoidtouchingtheflatsurfaces.
NOTE: If the tray is not fully accessible, tilt the disc carefully as you remove it.
4, Close the disc tray and place the disc in a protective case.
Using an optical drive 13

Using the media activity functions
The media activity hotkeys and the media activity buttons (select models only) control the play of an
audio CD or a DVD that is inserted into the optical drive.
Using the media activity hotkeys
A media activity hotkey is a combination of the fn key (1) and a function key.
When an audio CD or a DVD is not playing, press fn+f9 (2) to play the disc.
When an audio CD or a DVD is playing, use the following hotkeys:
To pause or resume playing the disc, press fn+f9 (2).
To stop the disc, press fn+fl0 (3}.
To play the previous track of an audio CD or the previous chapter of a DVD, press fn+fl 1
(4).
To play the next track of an audio CD or the next chapter of a DVD, press fn+f12 (5).
@®Ge
O
14 Chapter 1 Using multimedia hardware
Table of contents
Other HP Laptop manuals

HP
HP EliteBook Revolve 810 G2 Tablet User manual

HP
HP Stream Manual

HP
HP Pavilion dv5000 - Notebook PC User manual

HP
HP ProBook 635 Aero G7 Manual

HP
HP Mini 1103 User manual

HP
HP Spectrext Manual

HP
HP Presario CQ42-300 - Notebook PC User manual

HP
HP EliteBook x360 1040 G5 Manual

HP
HP Compaq nc8000 Manual

HP
HP Compaq Mini 210 Manual

HP
HP 17 Manual

HP
HP EliteBook 2560p User manual

HP
HP ProBook 450 G2 Manual

HP
HP ProBook x360 435 G7 Manual

HP
HP PAVILION DV2500 User manual

HP
HP Chromebook 11a Manual

HP
HP OmniBook 510 - Notebook PC User manual

HP
HP Compaq nc6220 Mounting instructions

HP
HP EliteBook 2540P Manual

HP
HP 4710s - ProBook - Core 2 Duo 2.53 GHz User manual