HP Pagewriter XLi M1700A User manual

Model
MI700A
Pagewriter
XLi
Cardiograph
Operating
Guide

The
Keyboard
and
Front
Panel

Low
Battery
Battery Level
AC%
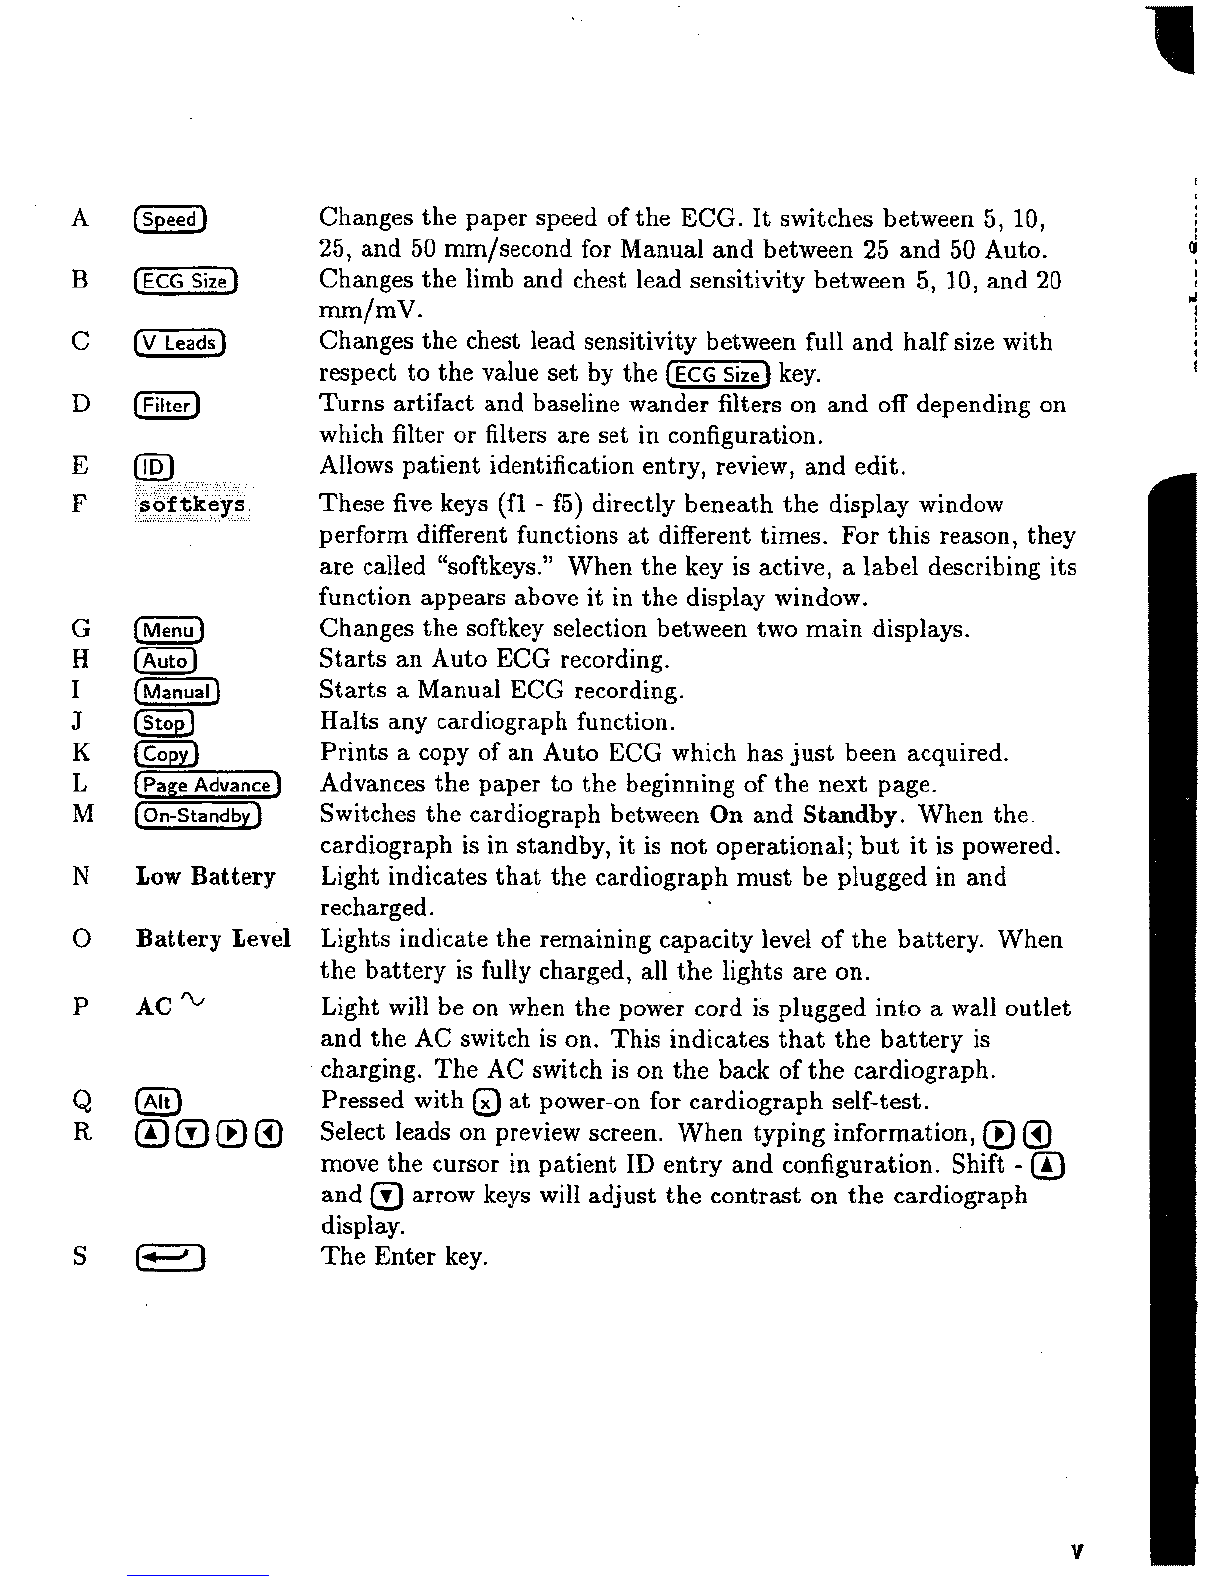
Changes the paper speed of the
ECG.
It switches between 5, 10,
25, and 50 mm/second for Manual and between
25
and 50 Auto.
Changes the limb and chest lead sensitivity between
5,
10,and 20
mm/mV.
Changes the chest Bead sensitivity between full and half size with
respect to the value set by the key.
Turns artifact and baseline wander filters on and off depending on
which filter or filters are set in configuration.
Allows patient identification entry, review, and edit.
These five keys (f1
-
f5) directly beneath the display window
perform different functions at different times. For this reason, they
are called "softkeys." When the key is active, a label describing its
function appears above it
in
the display window.
Changes the softkey selection between two main displays.
Starts an Auto EGG recording.
Starts a Manual EGG recording.
Halts any cardiograph function.
Prints
a
copy of an Auto ECG which has just been acquired.
Advances the paper to the beginning of the next page.
Switches the cardiograph between
On
and
Stadby.
When the.
cardiograph is in standby, it is raot operational; but it is powered.
Light indicates that the cardiograph must be plugged in and
recharged.
Lights indicate the remaining capacity level of the battery. When
the battery is fully charged, all the lights are on.
Light
will
be on when the power cord is plugged into
a
wall outlet
and the
AC
switch is on. This indicates that the battery is
charging. The
AC
switch
is
on the back of the cardiograph.
Pressed with
@
at power-on for cardiograph self-test.
Select leads on preview screen. When typing information,
@
@
move the cursor in patient
ID
entry and configuration. Shift
-
@
and arrow keys will adjust the contrast on the cardiograph
display.
The Enter key.

Safety
Summary
Safety
Symbols
The following symbols are used
on
the cardiograph or
Marked
an
the
the
carta
Cardiograph
Caution
-
See
operating instructions
-l@t
Type
CF,
defibrillation protected
%
Alternating current
0
Equipotential (this is
on
the
ground
lug)
B
The
maximum weight that the cart can hold.
Please see Chapter
4,
Maintariltaing
%he
Cardiograph,
for
further information about operaling your cardiograph
safely.
Conventions
Used
in
This
Manual
Warning
Warning
statements
describe
conditions
or
actions
that
@
can
result
in
personal
injury
or
lass
of
life.
Caution
Caution statements describe conditions or actions that
can result
in
damage to the equipment or software.
Note
Notes contain additional information on cardiograph
represents the temporary key labels
that
appear on the display.
@
represents keys
on
the front panel.

Documentation
Map
Documentation
Map
If
you
want
to:
Use
this
mmud:
Verify that all equipment is included
Packing
Lis-t
Record ECGs
Operaiing Guicle
Enter patient
ID
Make copies of ECGs
Store ECGs
Transmit or receive ECGs
Troubleshoot problems
Maintain the cardiograph
Set up the cardiograph
Install battery
Install software
Load paper
Change applications
Install or use Preview Plus
Configure the cardiograph
User
'ti
Reference Guide
Prepare patient
Maintain the cardiograph
Install
and
use the modem
Order
supplies
Use filters
Underst
and
analysis
Physician's
Guide

Contents
1.
Getting Acqueaiglted
About Your Cardiograph
. .
. .
. . .
1-2
About This Manual
.
a
a
a
.
a
1-
3
2,
Recording an
ECG
'
Recording an
ECG
.
.
.
- -
.
2-1
Preparing the Patient
+
-
a
2-2
Checking Signal Quality
.
.
.
.
. . . .
2-3
Using the Preview Screen (Optional)
a
2-
5
Choosing a Report Format
.
. .
..
. .
2-6
Auto Report Formats
.
a
a
.
2-
6
Changingthe Report Format
.
2-
7
Entering Patient
ID
.
a
a
2-8
Reviewing and Changing Patient
ID
-
2-
9
Recording an Auto ECG
.
*
a
a
2-10
Recording an
ECG
From the Patient
Module
.
2-12
Recording
a
Manual
ECG
. . . .
.
.
.
2-
13
Understanding the hinted
Report
.
. .
2-
14
3e
Making
Copies
of
Auto
ECGs
Copying ECGs Automatically
.
.
.
.
.
3-
1
Copying ECGs Manually
. . .
. .
.
.
3-
B
ECG
Report with Analysis
a
a
a a
3-2

4,
Storing
Auto
ECGs
MmudEy
Storing Auto ECGs
.....
4-
1
Printing
a
Stored
ECG
a
-
4-3
Printing More than One
ECG
....
4-41.
Reviewing and Changing Stored Patient
ID
i[nformation
.
a
a a
4-
6
Deleting a Stored
ECG
-
.
4-
8
Deleting More than One
ECG
....
4-
9
Using ECG-Log and Store-Log
.....
4-
9
Using CheckDisk
a
*
4-
10
Reformatting Flexible Disks
......
4-
11
5.
nansitting
and
Receiving
Auto
EGGS
Transmitting ECGs .
- -
*
5-
1
Transmitting More than? One
ECG
a a
5-3
Receiving ECGs
+
a
*
5-
3
6.
nonblleshooting
Checking
ECG
Technique
.......
Identifying
ECG
Problems
.......
If
the Recording Won't Start
.....
Preview Screen Problem . a
Error Messages
............
'9,
M~ntGnirag
the
Cardiograph
Care and Cleaning
..........
Cleaning the Cardiograph ......
Cleaning the Keyboard
......
Cleaning the Digital Array Printhead
and Paper Sensor
a a a
-
Cleaning the Electrodes and Cables
.
Caring for the Battery
........
Storing the Battery
.........
Replacing
the
Battery
.......
Disk Handling and Maintenance
Instructions
...........
Safety.
..............
CalEng for Service ........

United States of America 7-12
Canada
7-12
Other International Areas 7-12
A.
Patient
ID
Code
Tables
B.
Setting
up
Your
Cardiograph for
the
First
Time
Checking the Voltage Setting
. .
.
.
.
.
B-
l
Connecting the Cables
. .
.
.
. .
.
.
B-2
Installing and Using the Battery
. . .
.
B-4
Loading the Paper
-
a
.
a
.
B-8
Installing Software
. .
.
.
.
.
. .
.
.
B-10
Adjusting the Contrast on the Displays B-11
Setting the Date and'~ime
.
B-11
C.
Specifications
Basic Controls
.
a
a .
C-
l
Patient Safety
.
.
C-
1
Instrument Test
.
.
.
. .
.
. .
.
.
.
C-2
Power and Environment
.
.
. .
.
.
.
.
42-2
D.
Installing Applications
D-
l
Changing Applications
.
.
. . . . . .
D-2
Configuring your Cardiograph
to
Start
Up
in
a
Chosen Application
-
D-3
E,
Using
XLi
Preview
Hus
Reading the Preview Plus Screen
. .
.
.
E-
2
Observing
a
Patient's ECG Continuously
E-
3
Recording Timed Auto ECGs
.
. .
.
.
E-4
Recording Delayed Manual ECGs
.
. .
.
E-
5
Reformatting
a
Stored
EGG
.
.
. .
.
.
E-
7
Index

Figures
1-1.
The PageWriter
Xki
HP
MI700A
Cardiograph.
a
a
2-1.
The Patient Module.
a
-
2-2-
The
Preview Screen.
a
-
2-3. The
ECG
Report.
-
7-1.
Removing the Keyboard,
.
,
.
.
.
.
7-2.
Cleaning the Digital Array Printhead.
7-3.
Replacing the Battery.
.
.
.
. .
. .
7-4.
The Battery Assembly.
.
B-I. Connecting the Power Cord and Patient
Module Data Cable.
a
a
a
B-2. Connecting the Patient Module Lead
Wires and Data Cable.
.
-
-
B-3. Installing the Battery.
. . .
.
.
. . .
B-4. TheBatteryAssembly
..
a
B-5. Loading the Paper.
a
a
- -
B-6.
Inserting the Disk.
. .
. . .
.
.
:
.
E-1.
A Preview Plus Screen.
-
a
E-2.
A
Reformat Report Screen.
.
.
.
. .

2-1.
Patient Module Display Symbols
.
2-4
.........
2-2. Report Annotations
2-
15
.........
2-3.
Calibration Signals 2-16
6-1. ECG Problems
.
a
a
6-
2
A-1.
Patient
ID
Fields
,
a
a
A-2
A-2.
Medication and Diagnostic Codes
...
A-
3
A-3.
Race Codes
a
*
a a
A-
3

Getting
Acquainted
Figure
1-1.
The Pagewriter
XLI
HP
M1700A
Cardiograph.
A.
Patient
Module
B.
Preview Screen
(optional)
C.
Cardiograph
D.
Disk Drive
E.
Cart
Getting
Acquainted
1-1

Abut
Your
Your PageWriter Xki cardiograph:
Cardiograph
Acquires up to
16
leads simultaneously.
Analyzes and interprets the complete
ECG.
m
Allows
you
to
check lead quality on the preview screea
or patient module before printing the ECG.
rn
Allows you to start an ECG recording from the
cardiograph or from the patient module.
Provides selectable formats (Auto and Manual).
Stores EGGSon a removable flexible disk.
Allows you to upgrade software simply.
r
Operates on rechargeable batteries as well as
AC
power (with battery installed).
rn
Has
a
digital array printer with continuous-feed paper.
-r~
Displays signal quality and leads off conditions.
m
Provides the ability to transmit Auto ECGs via
modem, fax modern, or direct connection,
1-2
Getting
Acquainted

About
This
Manual
Keep this Operating Guide with your cardiograph in the
place provided on the cart. This guide contains concise
operating instructions for experienced Pagewriter XLi
cardiograph users. If you are unfamiliar with using this
cardiograph, please view the videotape tutorial,
Using
the Hewlett-Packard Page Writer
XL
Cardiographs.
For
additional help on using your cardiograph, refer to the
Page Writer
XEi
User's
Reference
Guide.
This manual describes how to perform the following
tasks:
Recording
an
EGG
as
Editing patient
ID
Making copies of Auto ECGs
as
Storing Auto ECGs
Deleting Auto
ECGs
rn
Transmitting and receiving Auto ECCs
Troubleshooting
rn
Caring for and maintaining the cardiograph
Preparing your cardiograph for use
Getting
Acquainted
1-3

Recording
an
ECG
This chapter contains the following information about
recording an
ECG
on your Pagewriter XLi cardiograph.
Preparing the patient
FB
Checking signal quality
Using the optional preview screen
im
Choosing
a
report format
Entering patient
ID
Recording an
ECG
B
Understanding the printed report
Recording
an
ECG
To
record an
ECG:
1.
If the cardiograph is not
on,
press
2.
Apply electrodes to the patient.
3.
Press or
to
record the ECG.
The rest of this chapter will include details on recording
ECGs,
Recording
an
ECG
2-1

Preparing
the
For electrode placement information, refer to the label
Patient
on the top of your cardiograph.
For
tips
OW
proper
ECG
technique, see the videotape
Using the Hewlett-Packard
Page Writer
XL
Cardiographs.
Also refer to the
Page Writer XLi Userjs Refiaence Guide.
Note
Computerized ECG analysis should always be reviewed
3
by
a
qualified physician.
Proper patient preparation and electrode placement are
the most important elements in producing
a
high quality
ECG
trace. Prepare the patient by:
1.
Gently scrubbing the electrode site with gauze.
2,
Attaching the electrodes secrare'ly.
3.
Reassuring and relaxing the patient.
2-2
Recording an
ECG

Checking
Signal
Quality
Figure
2-1.
The
Patient
Module.
A.
Lead Wises
B.
Patient Module Data Cable
C.
Start and Stop Button
D,
Color Scale
E.
Patient Module Display
I?.
Shorting Plugs
@
-
@
and keys will adjust
the
contrast on the
patient module display-
You can get better ECGs
by
viewing the patient module
display before recording
the
ECG
and adjusting the
leads as necessary. Noise bars for each lead extend
downward to show noislz levels. Collos scales on either
side of the patient module display indicate
by
the length.'
of the noise bar, the severity of the noise.
See
Table
2-1.
Recording
an
ECG
2-3

Table
2-1.
Patient
Module
Display
Symbols
Yellow zone bar: Moderate noise level.
Red zone bar:
High
noise level.
ECG
report quality
will
be
affected.
Check patient preparation.
Optional lead not installed. (Shorting plug present)
Patient
ID
number appears on the patient module display when you
press
@
any
time
you
have already recorded
an
ECG.
K
you
.
want to use this
ID,
press
@
to record the
ECG.
If you do not want
this
ID,
enter a new patient ID number from the front key
panel of the cardiograph.
***************t
Cardiograph is busy.
Press
@
again and the
ECG
will be recorded. If you want to enter
a
patient ID number, enter the number from the front
2-4
Recording
an
ECG

Using
the
Preview
Screen
(Optional)
Figure
2-2.
The
Pkev"sew
Screen.
A,
Brightness knob
B.
Contrast knob
The preview screen is another way besides the patient
module display to ensure that you record
a
good quality
ECG.
When the cardiograph is on, the preview screen
is
operating,
,
Before
you
connect the leads, the screen shows the
selected three Bead group. Each lead is shown as
a
dotted line indicating that the lead is
oK
H
As you connect the leads to
the
patient, lead
waveforms are displayed
on
the screen.
B
YOU
can select diflereaat lead groups to display
by
pressing the
@
and
Q
keys on the cardiograph's key
panel.

H
When you press the key?
EECG
information is
acquired. A fixed display of the Auto
ECG
waveform
then appears.
B
You may halt the recording if you see artifact or other
ECG
waveform problems on the fixed display,
m
When vou mess the 'kev, there is
a
continuous
display of three
lead
waveforms ow the screen.
B
You can adjust the contrast and brightness
on
the
screen with the two knobs on the lower right corner
of
the preview screen frame.
Note
If the preview screen is dark when you turn on the
cardiograph, turn the contrast and brightness knobs for
the proper brightness.
Choosing
a
Report
Format
Auto
Report
Formats
If-lead Auto reports may be displayed in
3
x
4
or
6
x
2
formats. The
3
x
4
format displays shorter segments of
waveform information than the
6
x
2 format. Rhythm
strips may be added to display
a
longer segment of one
or three leads
in
the
3
x
4
format,
2-6
Recording
an
EGG

Changing
the
Report
To
change the report format:
Format
'
1.
press
.
You will see
a
display similar to the one
shown
below.
2.
Press to select between Auto or Manual
report menus.
softkeys change features of
)
when setting the report
to select the report presentation. The
selections are:
See the
Page WriterXki User's Reference Guide
for
more explanation of the report formats.
4.
Press to select which leads will. be recorded.
Recording
an
ECG
2-7
Table of contents
Other HP Medical Equipment manuals
Popular Medical Equipment manuals by other brands

Westmed
Westmed Comfort Soft Plus instruction manual

Siemens
Siemens ARCADIS Orbic quick guide

Orliman
Orliman ET-220 INSTRUCTIONS FOR USE AND PRESERVATION

Planmeca
Planmeca Sovereign Classic Maintenance manual

Top shelf Orthopedics
Top shelf Orthopedics Boa Universe Instructions for use

OAKWORKS
OAKWORKS PF Series user manual