mectron Piezosurgery II Instruction manual

MANUAL OF USE AND MAINTENANCE
0476
II
English

2 / 32 Piezosurgery // GB
MANUAL OF USE AND MAINTENANCE
Summary
00.0 - INTRODUCTION ............................................................................................................................... 3
00.1 - Foreword ...................................................................................................................................... 3
00.2 - Description of the Device ............................................................................................................. 3
00.3 - Intended Use................................................................................................................................ 4
00.4 - Safety requirements ..................................................................................................................... 4
01.0 - IDENTIFITION DATA ........................................................................................................................ 6
01.1 - Identification data......................................................................................................................... 6
01.2 - Data Plate of the Device .............................................................................................................. 6
01.3 - Data Plate of the Scaler Handpiece.............................................................................................. 6
02.0 - TESTING .......................................................................................................................................... 7
02.1 - Testing of the equipment .............................................................................................................. 7
03.0 - DELIVERY ........................................................................................................................................ 7
03.1 - Delivery of the apparatus ............................................................................................................. 7
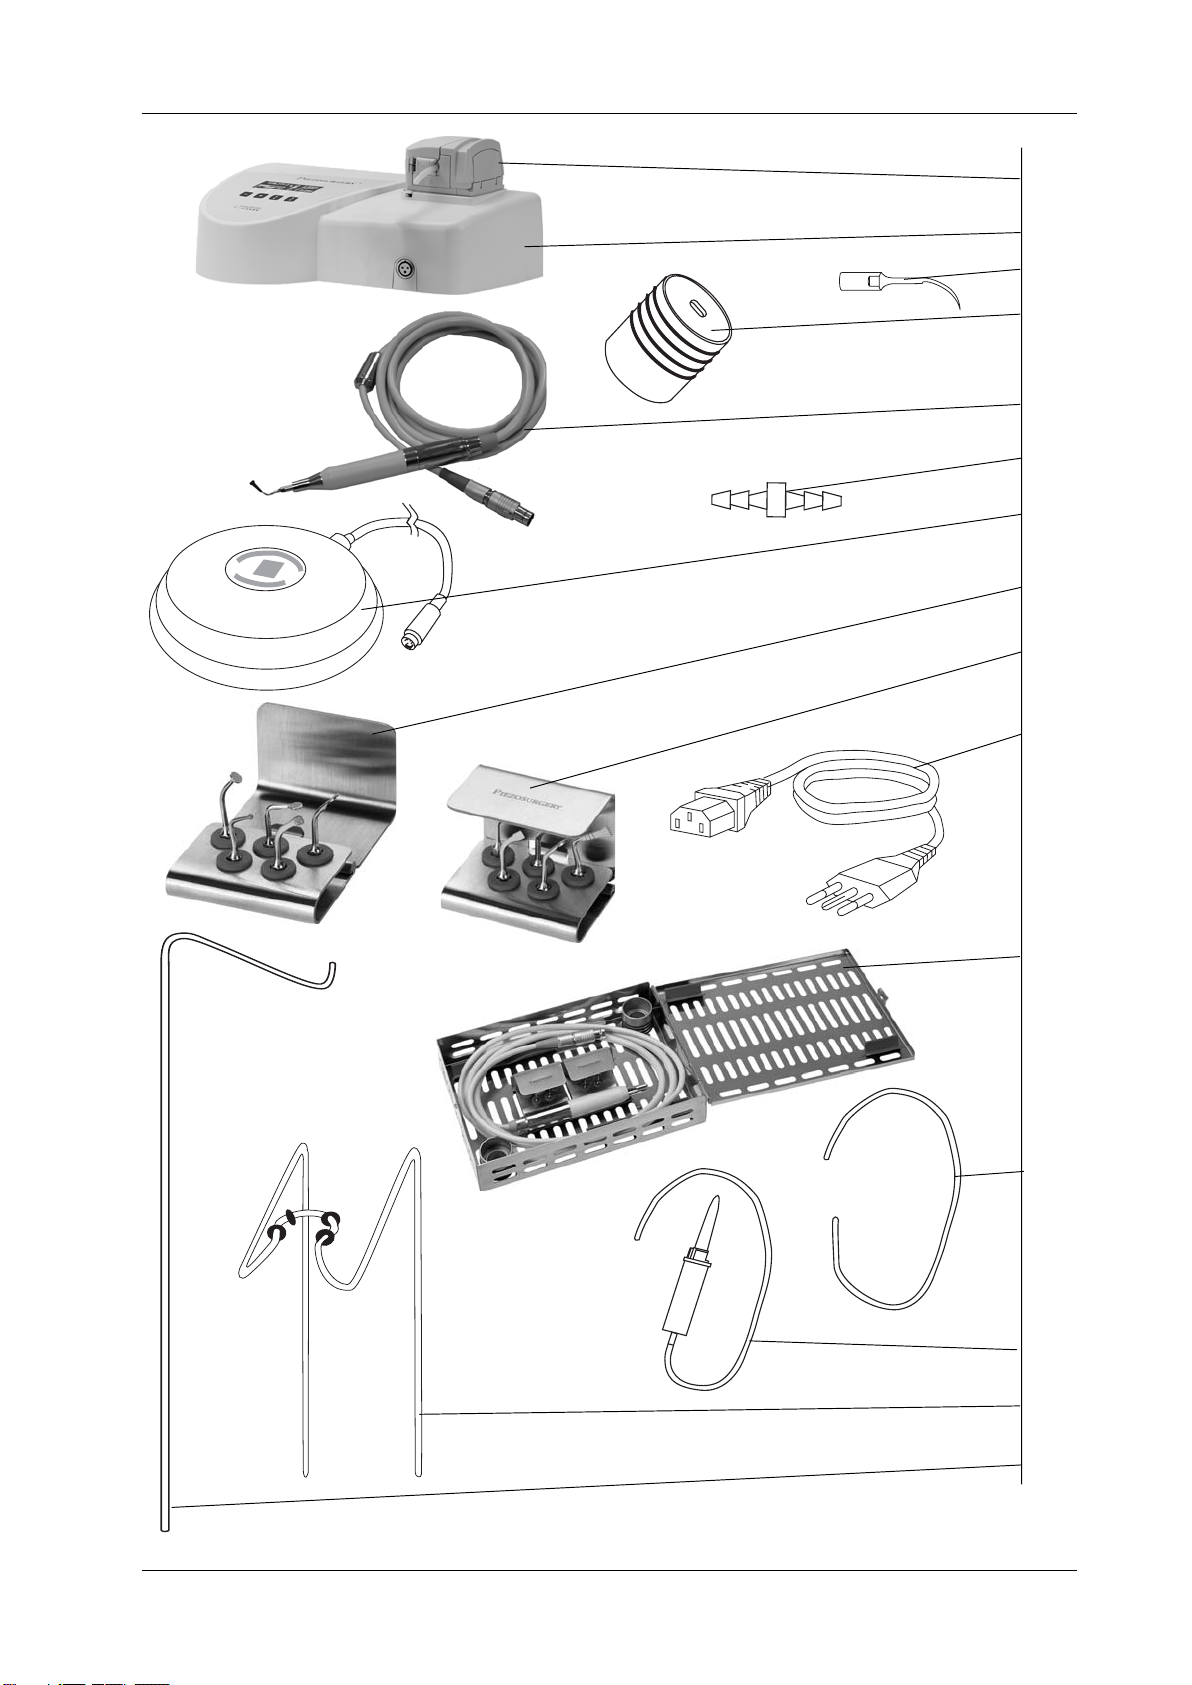
03.2 - List of Materials included in the Standard Supply ......................................................................... 8
04.0 - INSTALLATION ................................................................................................................................ 8
04.1 - Safety Requirements during Installation ....................................................................................... 8
04.2 - Initial Installation ........................................................................................................................ 10
04.3 - Connecting the Accessories....................................................................................................... 10
05.0 - USE ................................................................................................................................................ 13
05.1 - Controls ..................................................................................................................................... 13
05.2 - Switching the Device ON and OFF ............................................................................................. 13
05.3 - Description of the Display and Functions ................................................................................... 14
05.4 - Safety Requirements during Use ................................................................................................ 16
05.5 - Protection Systems and Alarms ................................................................................................. 17
05.6 - Instructions for Use .................................................................................................................... 18
05.7 - Rules for Keeping the Device in Proper Working Order ............................................................... 18
06.0 - CLEANING, DISINFECTION AND STERILISATION ....................................................................... 19
06.1 - CLEAN function – Cleaning of the liquid circuit ..........................................................................19
06.2 - Cleaning and disinfecting the casing of the apparatus ................................................................ 19
06.3 - Sterilisation procedure ................................................................................................................ 20
06.4 - Autoclave sterilisation of the handpiece ..................................................................................... 20
06.5 - Autoclave sterilisation of the inserts .......................................................................................... 21
06.6 - Autoclave sterilisation of the wrench for tightening the inserts ................................................... 21
06.7 - Autoclave sterilisation of the peristaltic pump tube .................................................................... 22
06.8 - Autoclave sterilisation of the connection between cord and peristaltic pump tube connection .... 22
07.0 - REGULAR MAINTENANCE ............................................................................................................ 23
07.1 - Shelf Storage ............................................................................................................................. 23
07.2 - Power-supply Cable ................................................................................................................... 23
08.0 - REPLACEMENT OF THE FUSES .................................................................................................. 23
09.0 - PROCEDURES AND PRECAUTIONS FOR DISPOSAL ................................................................. 24
10.0 - THE INSERTS ................................................................................................................................ 24
11.0 - SYMBOLS ...................................................................................................................................... 25
12.0 - TROUBLESHOOTING .................................................................................................................... 26
13.0 - TECHNICAL DATA ......................................................................................................................... 29
14.0 - GUARANTEE.................................................................................................................................. 31

Piezosurgery // GB 3 / 32
MANUAL OF USE AND MAINTENANCE
00.0 - INTRODUCTION
00.1 - Foreword
Before proceeding with the installation, use, maintenance or any other activities on
the equipment please read this manual carefully.
Always keep this manual within easy reach.
Important: To avoid causing personal injuries or damage to property, read all the points
concerning “Safety requirements” contained in this manual with particular
attention.
Depending on the level of risk involved, safety requirements are classed under the follow-
ing indications:
DANGER (always referred to personal injury)
WARNING (referred to possible damage to property)
The purpose of this manual is to ensure that operators are aware of the safety require-
ments, of the installation procedures and of the instructions for correct use and mainte-
nance of the apparatus.
The user is not authorised to tamper with the equipment under any circumstances.
If any problems are encountered, please contact a Mectron Service Centre.
Any attempts on the part of the user or any unauthorised personnel to tamper with or alter
the apparatus will invalidate the warranty and release the Manufacturers from any liability
in respect of any harm or damage to persons or property.
The information and illustrations contained in this manual are up-dated to the date of
publication indicated on page 32.
MECTRON are committed to continuous up-dating of their products, which may entail
changes to components of the equipment. If there are any discrepancies between the
descriptions contained in this manual and your equipment, please contact your dealer or
the MECTRON After-Sale service for explanations.
Using this manual for purposes other than those relating to the installation, use and main-
tenance of the equipment is strictly prohibited.
00.2 - Description of the Device
Thanks to its controlled three-dimensional ultrasound oscillations, the original Piezosurgery
technique rings in a new age for osteotomy and osteoplasty in Implantology, Periodontol-
ogy, Endodontics and Orthodontic Surgery. Its main features are:
- Micrometric cutting: Maximum surgical precision and intra-operative sensibility;
- Selective cutting: Maximum safety for the soft tissues;
- Cavitation effect: Maximum intra-operative visibility (bloodless field).
The equipment has an automatic tuning circuit that offsets wear of the inserts, thus ensur-
ing work in constant conditions of maximum efficiency.

4 / 32 Piezosurgery // GB
MANUAL OF USE AND MAINTENANCE
00.3 - Intended Use
The Piezosurgery is a piezoelectric device for bone surgery that enables osteotomy and
osteoplasty techniques to be applied to in almost any anatomical situation. This equip-
ment can be used in the following fields:
- Oral Surgery:
Extraction - Apicectomy - Cystectomy - Osteogenic distraction.
- Implantology:
Bone window osteotomy - Crest expansion - Bone fragment removal - Monocortical
bone removal - Osteoplasty - Final preparation of the implant site - Extraction for im-
mediate implantation - Elevation of Schneider’s membrane.
- Periodontal Surgery:
Osteotomy and osteoplasty techniques - Removal of bone tissues in regeneration sur-
gery - Root debridement - Root planing.
- Surgical Orthodontics:
Exposure or extraction of embedded teeth - Orthodontic corticotomy.
This equipment may be used only in a dentist’s surgery or out-patient’s department where
there are no inflammable gases (anaesthetic mixtures, oxygen, etc.).
00.4 - Safety requirements
Mectron will not accept any liability for direct or incidental personal injury or damage to
property in the following cases:
1 If the equipment is used for purposes other than that for which it is intended.
2 If the equipment is not used in accordance with all the instructions and requirements
described in this manual.
3 If the wiring system in the room where the equipment is used does not comply with the
applicable standards and appropriate requirements.
4 If any assembly operations, extensions, settings, alterations or repairs have been car-
ried out by personnel not authorised by Mectron.
5 If the environmental conditions in which the device is kept and stored do not comply
with the requirements indicated in the chapter on technical specifications.
DANGER: Qualified and specialised personnel.
This equipment may be used only by specialised and suitably trained personnel such as
surgeons. If correctly used, this equipment does not give rise to side effects. Improper
use, on the other hand, will give rise to transmission of heat to the tissues.
DANGER: Intended use.
Use the equipment solely for the purpose for which it is intended (see point “00.3”). Failure
to comply with this requirement could lead to serious harm to the patient and/or to the
operator and/or damage to/failure of the equipment.
DANGER: Contraindications.
Do not use the Piezosurgery on patients with pace-makers or other implantable electronic
devices. The same requirement applies also to the operator.

Piezosurgery // GB 5 / 32
MANUAL OF USE AND MAINTENANCE
DANGER: Contraindications.
An electrosurgical knife could interfere with correct functioning of the device.
DANGER: Cleaning, disinfection and sterilisation of new or repaired products.
All new or repaired products are delivered in non sterile conditions. Before being used for
treatments, all new or repaired products should be cleaned, disinfected and sterilised
following the instructions provided under point “06.0” strictly.
DANGER: Infection control.
In order to ensure maximum safety for both the patient and the operator, use only acces-
sories that have been cleaned, disinfected and sterilised. Follow the instructions provided
under point “06.0” closely.
DANGER: Use only original Mectron accessories and spare parts.
DANGER: Check the condition of the device before treatment.
Always make sure that there is no water under the apparatus. Before each treatment
always check that the equipment is in proper working order and that the accessories are
efficient. Do not carry out the treatment if any problems are encountered in operating the
device. If the problems concern the equipment contact an authorised technical service
centre.
DANGER: Breakage and wear of the Inserts.
The high-frequency vibrations and wear may, very occasionally, lead to breakage of the
insert. Inserts of which the shape has been changed or which are otherwise damaged are
liable to break during use. Any such inserts should definitely not be used. It is necessary
to instruct the patient to breathe through his nose during the treatment in order to avoid
ingestion of the broken off fragment of the insert.
DANGER: Do not install the equipment anywhere where there is a risk of explo-
sions.
The equipment cannot function in places where there is an inflammable atmosphere (an-
aesthetic mixtures, oxygen, etc.).
DANGER: Personal injury.
The footswitch of the Piezosurgery must not be activated with the door of the peristaltic
pump open (Fig.4 - Ref.B). Moving parts could injure the operator.
WARNING: Contraindication.
Do not carry out this treatment on metal or ceramic prosthetic artefacts. The ultrasonic
vibrations could lead to decementing of such artefacts.
WARNING: Contraindication.
After autoclave sterilising of the handpiece, wait for it to cool down completely before
using it.

6 / 32 Piezosurgery // GB
MANUAL OF USE AND MAINTENANCE
01.0 - IDENTIFITION DATA
01.1 - Identification data
An exact description of the model including the serial number of the equipment will make
it easier for our After-Sale Service to respond quickly and efficiently to your queries.
Always provide the above information whenever you contact a Mectron Service Centre.
01.2 - Data Plate of the Device
Each device has its own data plate (Fig.1), on which its technical specifications and serial
number are indicated. The data plate is on the rear of the device. The remaining data are
included in this manual (see Section “13.0”).
01.3 - Data Plate of the Scaler Handpiece
The serial number of this Piezosurgery handpiece is engraved on the ringnut (Fig.2 -
Ref.A).
Fig. 2
A
Fig. 1

Piezosurgery // GB 7 / 32
MANUAL OF USE AND MAINTENANCE
02.0 - TESTING
02.1 - Testing of the equipment
All equipment manufactured by MECTRON is thoroughly checked and tested, including
all components.
During the testing procedure the components are subjected to a number of work cycles.
The tests highlight any malfunctioning due to faulty components.
This procedure ensures proper functioning and reliability of all components.
03.0 - DELIVERY
03.1 - Delivery of the apparatus
The equipment contains electronic components that may be damaged by impacts even
inside the packaging. Special care must therefore be taken for both transport and storage.
In order to avoid crushing, do not place cartons on top of one.
All material shipped by MECTRON is checked at the time of shipment.
The equipment is delivered properly protected and packaged.
At the time of receipt of the equipment check it for possible transport damage. If any
damage is found, make a complaint to the carrier.

8 / 32 Piezosurgery // GB
MANUAL OF USE AND MAINTENANCE
03.2 - List of Materials included in the Standard Supply
1 Casing of the device (Fig.3 - Ref.B).
2 Piezosurgery handpieces complete with cords (Fig.3 - Ref.E).
2 K4 torque wrenches K4 (Fig.3 - Ref.D).
1 Footswitch with cable and plug (Fig.3 - Ref.G).
2 Connections for the cord and tube of the peristaltic pump (Fig.3 - Ref.F).
2 Drip system (Fig.3 - Ref.O).
1 Power-supply cable (Fig.3 - Ref.L).
8 Tube for the Piezosurgery peristaltic pump (Fig.3 - Ref.N).
1 Rod for supporting the bag (Fig.3 - Ref.Q).
1 Support for the Piezosurgery handpiece (Fig.3 - Ref.P).
1 Basic Insert Kit (Fig.3 - Ref.H) consisting of 5 inserts (Fig.3 - Ref.C).
1 Sinus Lift Insert Kit (Fig.3 - Ref.I) consisting of 5 inserts (Fig.3 - Ref.C).
1 Surgical Tray - Container for accessories to be sterilised (Fig.3 - Ref.M).
The items listed may vary during promotional campaigns.
WARNING: Handpiece and cord can’t be detached.
04.0 - INSTALLATION
04.1 - Safety Requirements during Installation
DANGER: The wiring system of the premises where the apparatus is installed and
used must comply with the applicable standards and the relevant electrical safety require-
ments.
DANGER: Do not install the apparatus in places where there is a risk of explosion.
The apparatus may not be used in areas where there are inflammable atmospheres (an-
aesthetic mixtures, oxygen, etc.).
DANGER: Install the apparatus in a place where it will be protected from blows and
from accidental sprays of water or other liquids.
DANGER: Do not install the device on or in the vicinity of sources of heat. Install it in
such a way that there is an adequate circulation of air around it. Leave sufficient free
space around it, in particular with reference to the fan on the rear (Fig.5 - Ref.G).
DANGER: Personal injury.
The footswitch of the Piezosurgery must not be activated when the door of the peristaltic
pump is open (Fig.4 - Ref.B). Moving parts could cause personal injury of the operator.
WARNING: Do not expose the apparatus to direct sunlight or to sources of UV light.
WARNING: The apparatus is transportable, however it must be handled with care
when it is moved. Position the pedal on the floor in such a way that it can only be activated
intentionally by the operator.

Piezosurgery // GB 9 / 32
MANUAL OF USE AND MAINTENANCE
A
B
C
D
E
F
G
H
I
L
M
N
O
P
Q
Fig. 3

10 / 32 Piezosurgery // GB
MANUAL OF USE AND MAINTENANCE
WARNING: Before connecting the cord to the device, make sure that the electrical
contacts are perfectly dry. If necessary, dry them with the air syringe.
04.2 - Initial Installation
To ensure perfect operation of the equipment, it is installed by technical personnel author-
ised by Mectron. The equipment will be installed in a suitable and handy place for it to be
used, and is enabled by entering an activating password.
The activating password is given to the technician responsible for installation and is not
indicated inside the package containing the device. The purpose of this is to ensure im-
mediate traceability of the device, as required according to current legislation.
The technician must:
- Install the device in a suitable place;
- Explain the main aspects of correct installation to the user;
- Fill in the installation form, including the purchaser’s data;
- Send the installation form to Mectron to ensure traceability and activation of the war-
ranty;
- Enter the activating password to enable the device.
04.3 - Connecting the Accessories
The accessories listed below have to be connected to the Piezosurgery device:
1 Insert the silicone tube into the peristaltic pump, proceeding as follows:
- Open the door (Fig.4 - Ref.A) as far as it will go (Fig.4 - Ref.B).
- Position the tube in the impeller (Fig.4 - Ref.C).
- Close the door completely (Fig.4 - Ref.E).
DANGER: Personal injury.
The footswitch of the Piezosurgery must not be activated when the door of the peristaltic
pump is open (Fig.4 - Ref.B). Moving parts could cause personal injury of the operator
2 Insert the rod for supporting the bag into the hole provided for it (Fig.5 - Ref.E).
3 Insert the handpiece support into the two holes provided for it (Fig.5 - Ref.C).
4 Connect the footswitch to the casing of the device by inserting the plug into the footswitch
socket (Fig.5 - Ref.H).
5 Plug the power cable into the connector on the casing of the device (Fig.5 - Ref.I) and
then into the power outlet.
6 Connect the Piezosurgery cord to the cord connector on the device (Fig.5 - Ref.D).
7 Insert the tube of the Piezosurgery into the pump fitting (Fig.5 - Ref.N). Insert the pump
fitting into the tube of the peristaltic pump (Fig.5 - Ref.M).
8 Connect end of the tube of the peristaltic pump (Fig.5 - Ref.L) to the flow-control sys-
tem.
9 Connect the flow-control system to the bag containing the appropriate liquid for the
treatment.

Piezosurgery // GB 11 / 32
MANUAL OF USE AND MAINTENANCE
A
CD
B
Fig. 4
E

12 / 32 Piezosurgery // GB
MANUAL OF USE AND MAINTENANCE
GH I
Fig. 5
Mectron
Piezosurgery
A
B
C
D
E
F
N
M
L

Piezosurgery // GB 13 / 32
MANUAL OF USE AND MAINTENANCE
05.0 - USE
05.1 - Controls
This section illustrates the parts of the front panel (Fig.6) of the Piezosurgery unit, ena-
bling the controls described in this manual to be located immediately.
Description of the controls
Ref. A - Graphic display.
Function The display shows the following information:
The type of power setting ROOT/BONE
The output power level set in the ROOT mode. ENDO/PERIO
The output power level set in the BONE mode. QUALITY 1/2/3
and SPECIAL
The delivery rate of the pump. PUMP: 5 Levels
The cleaning cycle for the liquid circuit. CLEAN
Ref. B - Pair of 2 keys: PUMP + and -.+ -
Function These can be used to set the delivery rate of the peristaltic pump
Ref. C - Power-level key
Function This key is used to set the output power level required
Ref. D - Power-type key
Function This key is used to set the type of output power required: ROOT/BONE;
This key is used to set the CLEAN function by holding down the key for 5
seconds.
Other controls for operating the device are:
Ref. F (Fig.5) - The ON/OFF switch.
Function For supplying electricity to the device.
Ref. G (Fig.3) - The enabling footswitch.
Function For activating operation of the device.
05.2 - Switching the Device ON and OFF
Switching the device on
1 Power up the device by turning on the MAIN SWITCH (Fig.5 - Ref.F) situated on the
casing of the device, taking care not to press the footswitch.
2 The device will switch on.
Switching the device off
1 Power down the device by turning off the MAIN SWITCH (Fig.5 - Ref.F) situated on the
casing of the device.
2 The device will switch off.

14 / 32 Piezosurgery // GB
MANUAL OF USE AND MAINTENANCE
05.3 - Description of the Display and Functions
This point describes the three “screens” shown on the Piezosurgery display and their
functions.
With the Piezosurgery device, two different power modes can be used. These are ROOT
and BONE. Press the arrow key (Fig.6 - Ref.D) to set the required power mode. The type
of power that has been chosen will be indicated between two pointers (Fig.7 - Ref.B).
Device in the ROOT mode Fig. 7 - In the ROOT mode, press the power-level key (Fig.6
- Ref.C) to set the following functions:
- ENDO
- PERIO
To adjust the delivery rate of the pump, press the +and –keys (Fig.6 - Ref.B). In the
ROOT mode, the speed can be set to between nought and five. The display will show the
speed that has been selected (Fig.7 - Ref.A).
C
D
A
B
Fig. 6
Fig. 7
A
B

Piezosurgery // GB 15 / 32
MANUAL OF USE AND MAINTENANCE
Device in the BONE mode Fig. 8 - In the BONE mode, press the power-level key (Fig.6
- Ref.C) to set the following functions:
- QUALITY 1
- QUALITY 2
- QUALITY 3
- SPECIAL
To adjust the delivery rate of the pump press the +and –keys (Fig.6 - Rif.B). In the BONE
mode, the speed can be set to between one and five. The display will show the speed that
has been selected (Fig.8 - Ref.A).
Device in the CLEAN mode: Fig. 9 - The device has a CLEAN function, which can be
used to carry out a cleaning cycle of the hydraulic circuit. This function must be carried
out after using the device, before cleaning, disinfecting and sterilising all the parts (See
Section 06.0).
To activate the CLEAN function, press the power selection key and hold it down for 5
seconds (Fig.6 - Ref. D). The following message will appear on the display “Footswitch
to start or a key to abort”. This tells the operator to press the footswitch to start the
cleaning cycle or to press any of the four keys below the display to exit from the CLEAN
function. For further indications concerning the CLEAN function, see point 06.1.
Fig. 9
Fig. 8
A

16 / 32 Piezosurgery // GB
MANUAL OF USE AND MAINTENANCE
05.4 - Safety Requirements during Use
DANGER: Contraindications.
Do not use the Piezosurgery on patients with pacemakers or other implantable electronic
devices. This requirement also applies to the operator.
DANGER: Breakage and wear of the inserts.
High frequency oscillations and wear may, on rare occasions, lead to breakage of an
insert. If the shape of an insert has been altered or if it is otherwise damaged, it is liable to
break while it is being used. Inserts in these conditions should not be used under any
circumstances. In order to avoid ingestion by the patient of a fragment of a broken insert,
he/she should be instructed to breathe through his/her nose during the treatment.
DANGER: Control of infections.
For maximum safety of both the patient and the operator, clean, disinfect and sterilise the
piezoelectric handpiece, the inserts and the torque wrench after each treatment. Follow
the appropriate instructions for doing this provided in point 06.0 “CLEANING, DISINFEC-
TION AND STERILISATION”.
WARNING: Contraindication.
Do not carry out treatments on metal or ceramic prosthetic artefacts. The ultrasonic vibra-
tions could cause decementing of such artefacts.
WARNING: Contraindication.
After autoclave sterilising of the handpiece, wait for it to cool down completely before
using it.
WARNING: The electrical contacts inside the cord connector must be dry.
Before connecting the handpiece to the device, make sure that the electrical contacts of
the connector are perfectly dry, in particular after the autoclave sterilisation cycle. If nec-
essary, dry the contacts by blowing air onto them with the syringe
WARNING: After using aggressive solutions, it is necessary to carry out a cleaning
cycle of the tubes and handpiece with distilled water, using the clean function (See point
06.1). If the tubes are not cleaned, crystallisation of the salts could seriously damage the
device.
WARNING: To use the device correctly, it is necessary to press the footswitch and
start it up without letting the insert rest on the part to be treated. This will allow the elec-
tronic circuit to detect the point where resonance of the insert is best without any interfer-
ence, thus enabling optimum performance.
If this is not done, contact with the part to be treated or with other surfaces before start-up
could cause tripping of the protection systems.
WARNING: For spray treatment, use only inserts through which liquid is passed.

Piezosurgery // GB 17 / 32
MANUAL OF USE AND MAINTENANCE
05.5 - Protection Systems and Alarms
The device has a diagnostics circuit that is used to recognize tripping of the protection
systems and of the alarms. These are shown on the display, as follows:
ERR1 Signal that the general protection system has been activated:
- Piezosurgery handpiece not connected to the device.
- Tuning circuit not working correctly.
- Handpiece failure.
ERR 2 Signal that the general protection system has been activated:
- Piezosurgery handpiece not connected to the device.
- Tuning circuit not working properly.
- Handpiece failure.
ERR 3 For the manufacturer only - Contact the Mectron Service Centre.
ERR 4 Signal that the general protection system has been activated:
- Tuning circuit not working properly.
- Handpiece failure.
ERR 5 Signal that the tuning scan has failed:
- Insert not correctly secured to the handpiece.
- Insert worn, broken or deformed.
- Electrical contacts of cord wet
ERR 6 Signal that the “power supply out of range” protection system has been tripped.
ERR 8 Signal indicating an error in communications with the scaler module.
ERR 9 Signal indicating an error in pump operation:
- Check whether the pump and tube are correctly installed.
- Check whether the pump is prevented from turning
ERR CKS Error signal. Firmware. Firmware checksum incorrect:
- If the equipment is working properly, call as soon as possible.
- If the equipment is not working correctly, stop using it and call the Mectron
Service Centre immediately.

18 / 32 Piezosurgery // GB
MANUAL OF USE AND MAINTENANCE
05.6 - Instructions for Use
1 Open the air intake on the drip system.
2 Fit the required insert (Fig.10 - Ref.A) onto the Piezosurgery handpiece and lock it into
place using one of the wrenches included in the supply.
3 To use the torque wrench correctly (Fig.10 - Ref.B), proceed as follows:
- screw the insert onto the handpiece as far as it will go
- hold the wrench and the casing of the handpiece very firmly
- turn the wrench in a clockwise direction until the clutch engages (the outer casing of
the wrench slides against the casing of the handpiece). The insert is now locked prop-
erly into place.
4 Make sure that the Piezosurgery handpiece is correctly connected to the handpiece
connector (Fig.5 - Ref.D).
5 Check the display to see the type of power that has been set (See point 05.3). If the
type of power required differs from the type that has been set, use the key for select-
ing the type of power (Fig.6 - Ref.D). This can be pressed to toggle between the
ROOT and BONE functions.
6 Check the display to see the power level that has been set (See point 05.3). If the type
of power required differs from the level that has been set, use the key for selecting
the power level (Fig.6 - Ref.C). This can be used to choose between the following
options, depending on the type of power that has been set:
- ROOT ENDO - PERIO
- BONE QUALITY 1 - QUALITY 2 - QUALITY 3 - SPECIAL
7 Check the display to see the delivery rate of the peristaltic pump (see point 05.3). If the
delivery rate required is other than the level that has been set, use the PUMP + and –
keys (Fig.6 - Ref. B) to choose between the following, depending on the type of power
that has been set:
- ROOT 6 delivery rate levels From 0 to 5
- BONE 5 delivery rate levels From 1 to 5
NOTE: Sprayless treatment is only possible in the ROOT function, setting the delivery
rate of the peristaltic pump PUMP to nought (Fig.7 - Ref.A). No notches should be
shown on the display.
05.7 - Rules for Keeping the Device in Proper Working Order
1 Check the state of wear of the inserts periodically and replace any for which a drop in
performance is noted.
2 Do not alter the shape of the inserts by bending or filing them.
3 Replace any insert that has become deformed or damaged by impacts.
A
B
Fig. 10

Piezosurgery // GB 19 / 32
MANUAL OF USE AND MAINTENANCE
4 Always make sure that any threaded parts and their contact surfaces are perfectly
clean.
5 If an insert becomes too worn, the device will stop working.
06.0 - CLEANING, DISINFECTION AND STERILISATION
06.1 - CLEAN function – Cleaning of the liquid circuit
WARNING: Failure to carry out cleaning of the tubes will lead to crystallisation of salts
that can seriously damage the equipment.
WARNING: Handpiece and cord can’t be detached.
The device has a CLEAN function (See point 05.3), which can be used to run a cleaning
cycle to clean the hydraulic circuit. This function must be carried out after using the de-
vice, before cleaning, disinfecting and sterilising all the parts (See following points).
1 Disconnect the tube of the peristaltic pump from the flow-control system.
2 Place the tube in a glass containing water (demineralised water is recommended).
3 To activate the CLEAN function, press the power-selection key and hold it down for 5
seconds (Fig.6 - Ref.D). The following message will appear on the display “Footswitch
to start or a key to abort”.
4 Fit one of the inserts used during the operation onto the handpiece.
5 Place the handpiece over a bowl to collect the water that will be drained off during the
cleaning cycle.
6 Press the footswitch to start the cleaning cycle. As soon as the peristaltic pump starts
up, a status bar will appear on the display to indicate progressively the time remaining
to completion of the tempo CLEAN cycle. The cycle lasts for 20 seconds and cannot
be stopped.
7 Once the cleaning cycle has been completed, the device exits from the CLEAN func-
tion and returns to the function that had been set previously.
8 Repeat the operations described from point 3 onwards to carry out the cleaning cycle
of the tubes and of all the accessories used, i.e.:
- Handpieces (Make sure that the electrical contacts of the cord connector to be sub-
jected to the cleaning cycle are dry);
- Inserts;
- Peristaltic pump tube;
- Cord / peristaltic pump tube connection.
9 On completion of the cleaning operations, empty the tubes and dry the accessories
that have been through the cleaning cycle.
06.2 - Cleaning and disinfecting the casing of the apparatus
DANGER: Switch off the apparatus.
Always turn off the apparatus by means of the switch (Fig.5 - Ref.L) and disconnect it from
the power outlet before carrying out the following cleaning, disinfection and sterilisation
activities.
DANGER: The casing of the apparatus is not protected against the penetration
of liquids. Do not spray liquids directly onto the surface of the casing of the appara-
tus.

20 / 32 Piezosurgery // GB
MANUAL OF USE AND MAINTENANCE
DANGER: The apparatus cannot be sterilised.
After each treatment carry out the following operations:
1 Remove the insert from the scaler handpiece.
2 Clean and disinfect the surfaces of the casing, the cords and their connectors using a
cloth moistened with a mild detergent or disinfectant solution with a neutral pH (pH 7).
Follow carefully the instructions given by the manufacturer of the disinfectant solution.
Allow the disinfectant solution to dry in the air before using the apparatus.
NOTE: Water-based disinfecting solutions with a neutral pH are highly recommended.
Some alcohol-based disinfecting solutions may be harmful and discolour or otherwise
damage plastic materials.
06.3 - Sterilisation procedure
WARNING: Carry out sterilisation using only a steam autoclave.
Do not use any other type of sterilisation procedure (dry heat, radiation, ethylene oxide,
gas, low-temperature plasma, etc.).
DANGER: Infection control - Parts that can be sterilised.
In order to avoid bacterial or viral infections, always clean, disinfect and sterilise the fol-
lowing components after each treatment:
1 Handpiece (Fig.3 - Ref.E);
2 Inserts (Fig.3 - Ref.C);
3 Wrench for tightening the inserts (Fig.3 - Ref.D);
4 Peristaltic pump tube (Fig.3 - Ref.N);
5 Cord / peristaltic pump tube connection (Fig.3 - Ref.F).
The above components are made of materials that will withstand a maximum temperature
of 135 °C for maximum of 20 minutes.
All the stages of sterilisation must be carried out by the operator in accordance with EN
554 and EN 556 standards.
06.4 - Autoclave sterilisation of the handpiece
WARNING: Handpiece and cord can’t be detached.
WARNING: Do not dip the handpiece into disinfectant solutions or liquids of
any other kind since this could damage it.
WARNING: Do not sterilise the handpiece with the insert screwed into it.
WARNING: The electric contacts of the connectors of the handpiece and of the
cord must be dry.
At the end of the sterilisation cycle and before connecting the handpiece to the cord, make
sure that the electric contacts of both connectors are completely dry. If necessary, dry the
contacts by blowing air onto them with the syringe.
Other manuals for Piezosurgery II
1
Table of contents
Other mectron Medical Equipment manuals
Popular Medical Equipment manuals by other brands

Acteon Satelec
Acteon Satelec Piezotome 2 user manual

Leica BIOSYSTEMS
Leica BIOSYSTEMS CM3600 XP Instructions for use

Coopers of Stortford
Coopers of Stortford F890 Instructions for use

NRS
NRS Compact Easy with Armrests & Backrest M48477 User instructions

OSCAR
OSCAR VXT15 User instructions

KaVo
KaVo NOMAD PRO 2 Operator's manual