HP STORAGEWORKS ALL-IN-ONE STORAGE SYSTEM User manual

HP StorageWorks
3Gb SAS BL Switch Installation
Instructions
This document describes procedures for installing an
HP StorageWorks 3Gb SAS BL Switch in an HP
BladeSystem c-Class enclosure, for use in solutions that
include external HP SAS storage enclosures.
© Copyright 2008, 2011 Hewlett-Packard Development Company,
L.P.
Third edition: January 2011
The information in this document is subject to change without notice.
Printed in US.
www.hp.com
*496788-003*
Key installation steps include:
1. Getting started
2. Planning the configuration
3. Selecting the interconnect bay
4. Installing the switch
5. Accessing the switch
6. Updating switch firmware
7. Connecting cables to the switch
8. Configuring the switch
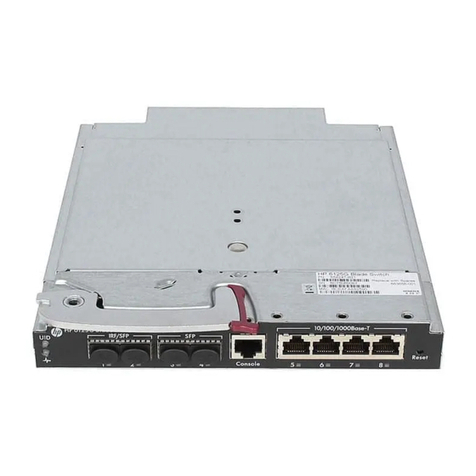
Front panel and LED definitions
NormalOff
Unit ID LED1Solid—Being identified
Blinking—Firmware is being updated
Blue
Not powered upOff
Health LED2 Solid—Healthy
Green
Blinking—Error, there is a problem
with the switch
Amber
Locking latch handle3
No link between the port and external
storage enclosure
Off
Link LED4
Solid—Link between port and external
storage enclosure is established
Steady blinking (1Hz)—Switch
hardware or software is starting up.
Access to the switch and its VSM
software is restricted and server blades
with SAS mezzanines mapped to the
switch interconnect bay are restricted
from starting up.
Irregular blinking—There is activity on
the established link
Green
NormalOff
Fault LED5 Solid—Link error, there is a problem
with the SAS port on the switch or
external storage enclosure, or with the
SAS cable
Amber
SAS ports (to external devices)6
Before you begin
CAUTION:
•Removing a blanking panel or module can significantly change
air flow within an operating enclosure. Each enclosure bay
must be populated for the enclosure to cool properly. Remove
a module or blanking panel from an enclosure bay only when
a new module is available to install in that bay.
•Parts can be damaged by electrostatic discharge. Use proper
antistatic protection. For more information, see HP c-Class
BladeSystem or SAS BL Switch user guides.
•For safety information and regulatory notices, see the SAS BL
Switch user guides.
Getting started
•Familiarize yourself with information available on the HP BladeSystem
website: http://www.hp.com/go/bladesystem.
Navigate through the HP BladeSystem website to learn more about
BladeSystem c-Class enclosures, SAS BL Switch, mezzanine cards,
servers, and other BladeSystem components. Product pages, over-
views, QuickSpecs, and user documents for all BladeSystem products
are accessible from this website.
•In the left pane of the HP BladeSystem website, click BladeSystem
Portfolio to access product web pages for BladeSystem hardware
components, software, and services.
•Click Interconnects to navigate to the SAS BL Switch product
page. Tabs and links in this page provide information specific
to the switch, such as QuickSpecs.
•Click Adapters and Mezzanines to navigate to the SAS
Mezzanines product page. Tabs and links in this page provide
information specific to the SAS mezzanine.
•Click External Storage to access the BladeSystem Storage
page. Under the Direct Connect SAS banner, links are provided
to product pages of specific components that are supported
for use with solutions centered around this SAS BL Switch and
externally-connected SAS storage enclosures. A link is also
provided to the Direct Connect SAS Storage for HP BladeSys-
tem website. Tabs and links in this page provide information
about BladeSystem solutions, including videos.
•In the left pane of the HP BladeSystem website, click Technical
Resources to access to the HP BladeSystem Technical Resources
page. Tabs across the top of this page provide access points for
planning, installing, maintaining, and troubleshooting information.
User documents for all BladeSystem components are located on
the Installing tab.
•Obtain the following documents; they are needed when planning,
installing, and configuring the switch:
•HP Direct-Connect External SAS Storage for HP BladeSystem
Solutions Deployment Guide
•HP 3G Virtual SAS Manager User Guide
•HP StorageWorks 3Gb SAS BL Switch User Guide
•HP StorageWorks 3Gb SAS BL Switch QuickSpecs
These documents are available on the BladeSystem Technical Re-
sources page (described above) and on the HP Manuals pages at
nl
http://www.hp.com/support/manuals.
Planning the configuration
For both single- and dual-domain deployments, a variety of cabling and
configuration strategies are available. Consider the server blades,
switches, external storage enclosures, and external backup devices in
your deployment and develop plans for cabling the external devices and
for zoning the switch to control access to the storage.
For assistance, HP strongly recommends using the HP Direct-Connect
External SAS Storage for HP BladeSystem Solutions Deployment Guide.
The deployment guide provides guidelines, instructions, and configuration
examples for solutions centered around an HP BladeSystem c-Class
enclosure with server blades, SAS BL switches, SAS mezzanine cards,
and external SAS storage enclosures.
IMPORTANT:
Cabling and zoning restrictions exist, based on the server type,
mezzanine slot, BladeSystem server device bay, BladeSystem
interconnect bay, and switch ports to which external SAS storage
enclosures are connected. For a quick reference of the
restrictions, see the printed
3Gb SAS BL Switch Zoning
Restrictions
Important card that shipped with the switch. For
detailed planning information, see the
HP Direct-Connect External
SAS Storage for HP BladeSystem Solutions Deployment Guide
.
Selecting the interconnect bay
Each interconnect bay in the HP BladeSystem c-Class enclosure maps to
servers via the server mezzanine slot in which Smart Array Controllers
are installed. When selecting an interconnect bay for a SAS BL Switch,
make sure that the selected interconnect bay maps to the desired server
bays. For information about mappings, see the printed 3Gb SAS BL
Switch Zoning Restrictions Important card that shipped with the switch.
For information about supported SAS Controllers, see the HP 3Gb SAS
BL Switch QuickSpecs.
IMPORTANT:
This switch can be deployed in both single- and dual-domain
environments. When used in dual-domain configurations, the
two switches must be installed in the same row of the
BladeSystem c-Class enclosure.
Installing the switch
NOTE:
•The SAS BL Switch may be hot-installed in an operational en-
closure.
•Make sure that Smart Array SAS controllers are installed in
server mezzanine slots that map to the selected BladeSystem
c-Class enclosure interconnect bay.
•The SAS BL Switch does not have a power on/off button. Power
is automatically applied or removed when the switch is installed
or removed from the enclosure. Alternatively, power can be
applied or removed through the Onboard Administrator applic-
ation.
•Connect SAS cables to external storage enclosures only after
confirming that the desired firmware version is installed on the
switch.
1. Remove the air baffle from the selected interconnect bay.
2. Prepare the switch.
3. Install the switch in the open interconnect bay.
4. Note the following during startup:
•When installed in an operational enclosure, the switch automat-
ically powers up and performs a series of Power On Self Tests.
•All eight switch Link LEDs will blink while the switch and the VSM
software are starting up.
•Startup time is approximately two minutes. If startup is longer
than two minutes, confirm that a supported version of Onboard
Administrator is installed on the system.
•After the switch and the VSM software have started up success-
fully, the switch Health LED will be solid green.
•If the Health LED is amber or off, remove the switch from the
BladeSystem enclosure Interconnect Bay and reinstall it, pressing
firmly on the switch and its locking latch handle to ensure it is
seated properly. If trouble persists, see the "Troubleshooting"
section of the HP BladeSystem enclosure setup and installation
guide.
For more information about switch LED patterns, see “Front panel
and LED definitions”on page 1.
NOTE:
Do not connect cables to the switch at this time. HP recommends
connecting cables only after confirming that the switch is
operational and has the desired, supported version of firmware
installed.
Accessing the switch
The switch is configured and managed through the HP Onboard
Administrator and HP Virtual SAS Manager (VSM) applications.
To access VSM:
1. Access Onboard Administrator (OA).
2. In the OA Systems and Devices navigation tree, expand the
Interconnect Bays, and select the HP SAS BL Switch.
3. After selecting the SAS switch to manage, click Management Console
and wait a few moments for the VSM application to open.
For more information about accessing and using the VSM, see the HP
3G Virtual SAS Manager User Guide.
Updating switch firmware
Firmware is pre-installed on each switch in the factory, but an updated
version may be available.
Factory-installed firmware:
Latest-available firmware:
1. Record the firmware version that was pre-installed on the switch.
The installed firmware version is displayed in the VSM near the
center of the HP Virtual SAS Manager banner. Access the VSM and
make note of the firmware version installed on each SAS BL Switch
in the BladeSystem enclosure.
2. Record the latest available firmware version.
Firmware can be obtained from several HP websites, including:
•HP Support Download drivers and software page:
nl
http://www.hp.com/support/downloads.
This Support site includes download pages for all HP products.
The HP 3Gb SAS BL Switch is listed in the bladesystem section.
Obtain firmware from this site if you want to update the switch,
but not the other devices in the solution. Download the .img
firmware file and use the VSM to install.
•HP BladeSystem Firmware Maintenance page:
nl
http://h18004.www1.hp.com/products/blades/components/
c-class.html.
This BladeSystem site provides links to BladeSystem Firmware
Release Sets and the HP Smart Update Firmware DVD ISO, which
include tested, compatible sets of firmware for components in-
cluded in BladeSystem solutions and are designed to help man-
age firmware interdependencies between HP BladeSystem c-Class
components. Select the Compatibility tab to view version inform-
ation and download firmware for individual components. Obtain
firmware from this site if you want to update the switch, along
with other devices in the solution. Download .exe firmware files
and use the Smart Update Firmware DVD ISO to install.
3. If needed, update firmware on each switch to the latest version.
For instructions using the VSM, see the HP 3G Virtual SAS Manager
User Guide. For instructions using the HP Smart Update Firmware
DVD, see the HP BladeSystem Firmware Maintenance website.
IMPORTANT:
When two HP 3Gb SAS BL Switches are installed in the same
row of a BladeSystem enclosure, make sure that they are running
the same firmware version.
Connecting cables to the switch
After confirming that the desired firmware is installed on the switch,
connect SAS cables between the switch and the external SAS storage
enclosures or external backup devices. Be sure to connect the external
devices to switch ports that the desired servers will be able to access.
(See Getting started and Planning the configuration.)
The SAS BL Switch uses SAS cables with mini-SAS universal connectors.
For a list of supported cables, see the SAS BL Switch QuickSpecs.
IMPORTANT:
Confirm that firmware installed on the external SAS devices is
supported for use with the firmware installed on the switch.
Consult the QuickSpecs for the switch and the external devices.
Configuring the switch
Key configuration steps include:
•Entering switch parameters.
•Creating zone groups.
•Assigning zone groups to servers.
Configure the switch using the VSM application. For more information,
see the HP 3G Virtual SAS Manager User Guide.
IMPORTANT:
•Zoning restrictions exist. For more information, see the follow-
ing:
•
Important 3Gb SAS BL Switch Zoning Restrictions
(printed
and shipped with the switch)
•
HP Direct-Connect External SAS Storage for HP BladeSystem
Solutions Deployment Guide
(introduced in Getting started)
•When upgrading from a single-domain to a dual-domain en-
vironment, access the VSM and view the configuration settings
for each switch. If needed, manually configure the new switch.
Additional information
HP BladeSystem: http://www.hp.com/go/bladesystem
HP BladeSystem Interconnects:
nl
http://www.hp.com/go/bladesystem/interconnects
HP BladeSystem Technical Resources:
nl
http://www.hp.com/go/bladesystem/documentation
HP BladeSystem Firmware Maintenance: http://h18004.www1.hp.com/
products/blades/components/c-class.html
HP Storage: http://www.hp.com/storage
HP Support: http://www.hp.com/support
HP Manuals: http://www.hp.com/support/manuals
HP Downloads: http://www.hp.com/support/downloads
Other manuals for STORAGEWORKS ALL-IN-ONE STORAGE SYSTEM
8
This manual suits for next models
1
Table of contents
Other HP Switch manuals

HP
HP ProCurve 3500yl Series User manual

HP
HP ProCurve 2520G-PoE User manual

HP
HP 12500 Series User manual

HP
HP 5500-24G-PoE+-4SFP Assembly instructions

HP
HP GbE2c - Blc Layer 2/3 Fiber SFP Option User manual

HP
HP StorageWorks 7110 - Virtual Array User manual

HP
HP ProCurve 1600M Manual

HP
HP AdvanceStack 100Base-T Hub-8TXE Installation and operating manual

HP
HP AK241A - StorageWorks 8Gb Simple SAN... User manual

HP
HP ProCurve 2510-48 User manual