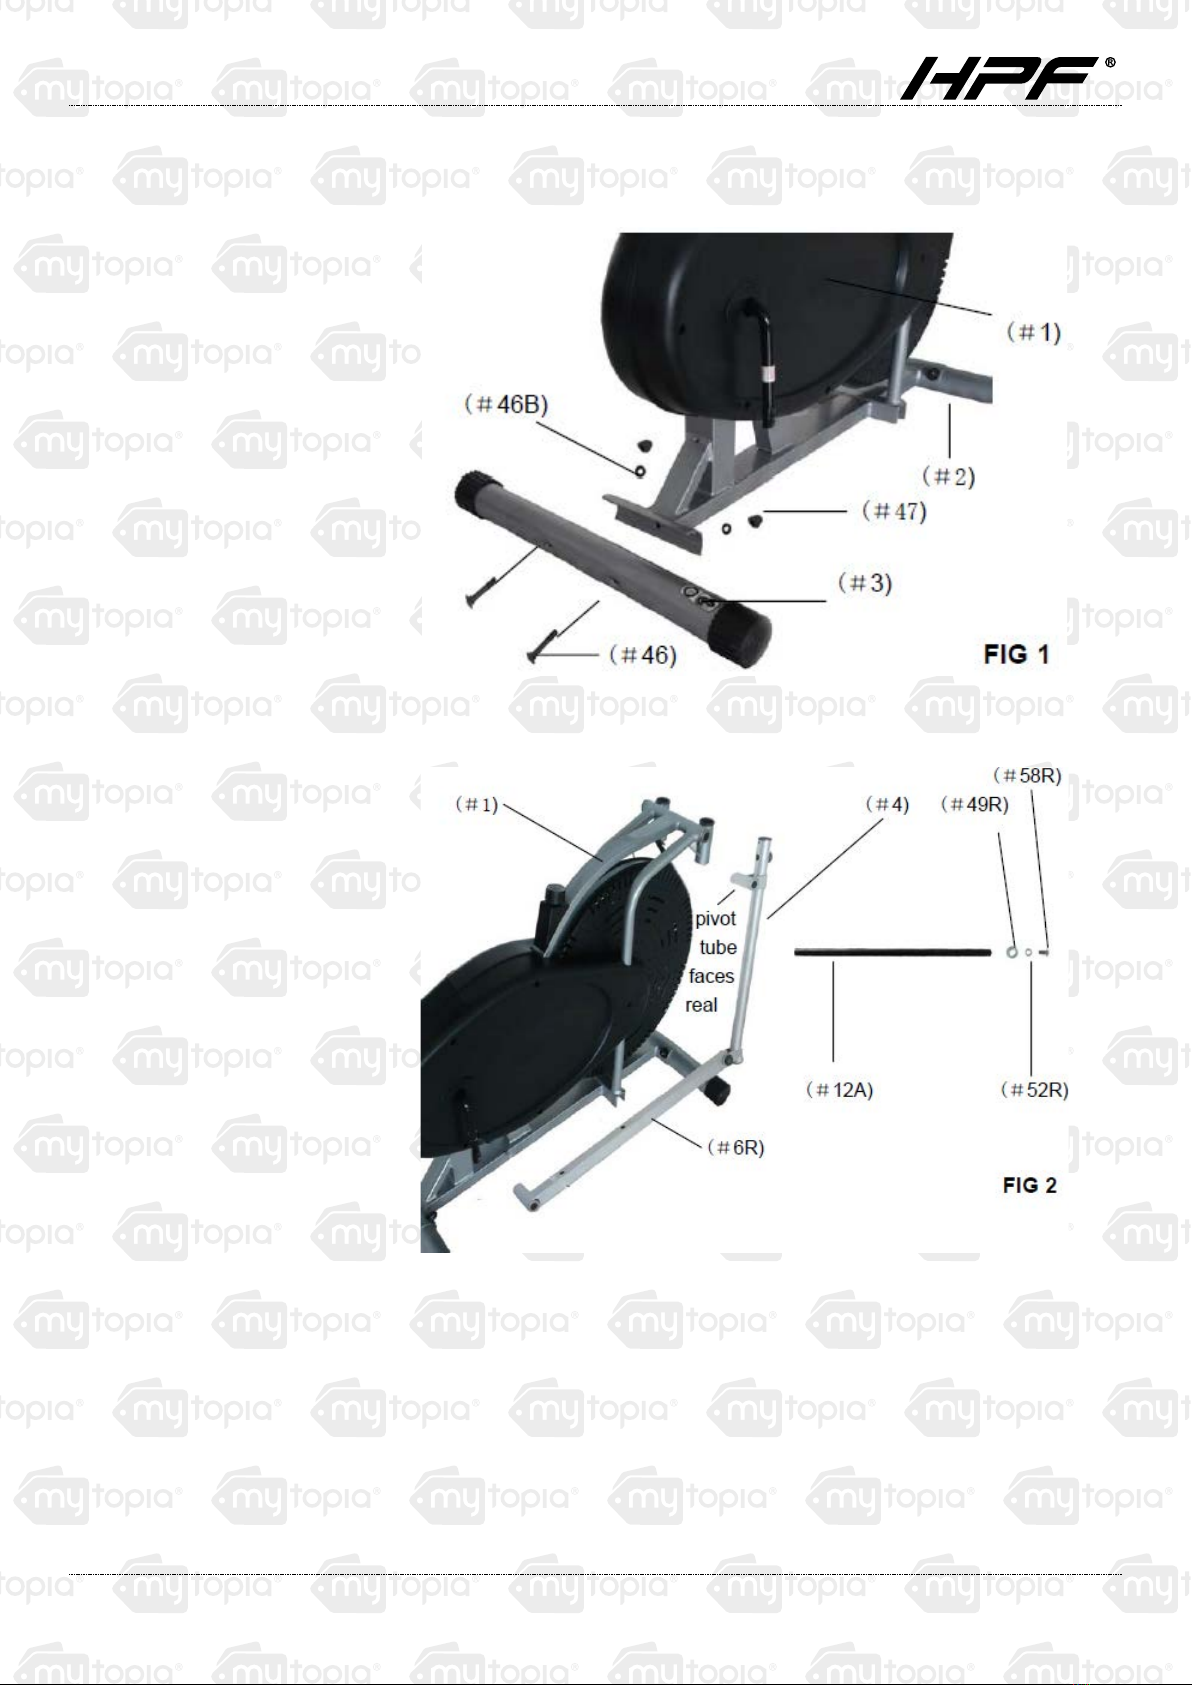
HPF XTR2 User manual

Cross Trainer XTR2
User Manual
RETAIN THIS MANUAL FOR FUTURE REFERENCE
PLEASE READ THIS MANUAL CAREFULLY BEFORE USE

Cross Trainer XTR2
i
Table of Contents
Safety.......................................................................................................................................1
Assembly and Usage ...................................................................................................................2
Before You Begin..........................................................................................................................................2
Identify Your Hardware..................................................................................................................................2
Assembling your XTR2..................................................................................................................................3
Handlebars....................................................................................................................................................5
Electronic Monitor..........................................................................................................................................6
Exercise Computer..................................................................................................................................6
Tension Adjustment.......................................................................................................................................7
Reversible Movement....................................................................................................................................8
Exploded Diagram.......................................................................................................................9
Parts List.................................................................................................................................10
Warm-Up and Cool-Down Routine ................................................................................................11
Specifications...........................................................................................................................14

Cross Trainer XTR2
1
Safety
Note the following precautions before assembling or operating the XTR2.
SAVE THESE INSTRUCTIONS.
•THE MAXIMUM WEIGHT CAPACITY OF THE XTR2 IS 250 LBS. Persons whose body weight exceeds this
limit should NOT use this machine.
•Keep children and pets away from the XTR2 at all times. Do NOT leave unattended children in the same
room with the machine.
•If the user experiences dizziness, nausea, chest pain, or any other abnormal symptoms, STOP the workout
at once. CONSULT A PHYSICIAN IMMEDIATELY.
•Position the XTR2 on a clear, level surface. DO NOT use near water or outdoors.
•Always wear appropriate workout clothing when exercising. Running or aerobic shoes are also required.
•Use the XTR2 only for its intended use as described in this manual. DO NOT use any other accessories not
recommended by the manufacturer.
•DO NOT place any sharp objects around the XTR2.
•Handicapped or disabled persons should not use the XTR2 without the presence or a qualified health
professional or physician.
•Before exercising, always do stretching first.
•NEVER operate the XTR2 if it is not functioning properly.
WARNING! BEFORE BEGINNING THIS OR ANY EXERCISE PROGRAM, CONSULT YOUR PHYSICIAN
FIRST.THIS IS ESPECLALLY IMPORTANT FOR INDIVIDUALS OVER THE AGE OF 35 OR PERSONS WITH
PRE-EXISTING HEALTH PROBLEMS. READ ALL INSTRUCTIONS BEFORE USING.

Cross Trainer XTR2
2
Assembly and Usage
Before You Begin
1. Locate a comfortable work site. Assemble your XTR2 Elliptical Cross-Trainer in an open space with
adequate ventilation and lighting. Because the XTR2 is portable to some extent, you need not assemble it
exactly where it is to be used. For your convenience, however, you should avoid hauling the machine across
excessive distances, through narrow passageways or over staircases once its assembly is complete. If the
XTR2 is to be assembled in a living quarters, protect the floor or carpet with a large mat before removing
parts from the carton.
2. Find your tools. You will need the following tools to assemble the XTR2
−Ruler
−Adjustable Wrench
−Standard Screwdriver
−WD40 lubricant or Vaseline (if necessary)
3. Review all safety guidelines of this manual.
Identify Your Hardware
4. Organise your nuts and bolts before assembly. Nuts are identified by the diameter of their cavities. For
more information, refer to exploded view diagram and parts list of this manual.

Cross Trainer XTR2
3
Assembling your XTR2
5. Install cylindrical bases
(#2 for front. #3 for rear)
to the main frame (#1).
Notice that the front base
(#2) has wheels for
moving your XTR2.
For each base, use two
3/8”X 2 1/4” carriage
bolts (#46) and two
3/8”acom nuts (#47). See
(#47) Flg.1.
Steps 6 through 8
describe the assembly for
the pedals any coupler
bars. Once assembly for
one side is complete,
repeat these steps for the
other side before you
proceed to attach the
handlebars.
Notice the coupler bar for
each side is different (#4
for right side, #5 for left
side). A coupler bar is at
the correct side of the
XTR2 when its horizontal
pivot tube, which is
welded at the top of the
coupler bar, faces the
rear of the machine as
seen from the user. See
Fig.2.
6. Insert a handle bar shaft
(#12A) through the
coupler bar of right & Left
both side and frame.
The handle bar shaft
shown in Page 2.
Then put D sharp washer
and Spring washer on
both side and tighten the
hinge screw.

Cross Trainer XTR2
4
BEFORE CONTINUING ASSEMBLY YOU MUST READ THE FOLLOWING
IMPORTANT INFORMATION.
PLEASE NOTE:
ANY DAMAGES TO THE BOLT OR PRODUCT CAUSED BY FAILURE TO FOLLOW THESE STEPS
BELOW MAY RENDER THE PRODUCT’S WARRANTY VOID.
IMPORTANT: THE LEFT HAND BOLT AND NUT (BLUE) IS A REVERSE THREAD (ANTI-CLOCKWISE).
The bolt has an L imprinted on the head. Be sure to
use the correct bolts (marked L or R) and the correct
nuts (Left-blue/Right-beige) on the appropriate side.
•
When installing, ensure the wave washer and spring
washer are correctly located
•
Tighten the bolt through the crank arm as pictured.
Ensure the wave washer pushes up hard against the
bolt head once installed.
•
Tighten the nut on the bolt until the spring washer is
flat against the crank. As it is a threaded nut, this will
require extra force.
FAILURE TO FOLLOW THE PROCEDURE EXACTLY
AS DESCRIBED MAY CAUSE DAMAGE TO THE BOLTS/CRANK/NUTS AND COULD VOID YOUR
WARRANTY.
In order to install the hinge bolt properly, keep it
perfectly straight as the bolt goes through the pedal
tubing and the crankshaft. If the hinge bolt is
connected to the crankshaft at an angle, damage to
both the hinge bolt and the crankshaft may occur.

Cross Trainer XTR2
5
7. Attach a pedal (#11) to
a pedal tubing (#6).Use
two 3/8”×2” bolts (#44)
and two 3/8”nuts (#45).
See Fig.3.
Handlebars
You can easily switch your handlebars (#7L, #7R) between the dual-action mode and the fixed mode during your
workout.
8. Dual-action mode: To allow the handlebars
to move along with the pedals, attach them to
the coupler bars. Select a height setting that
is comfortable to the user, and make sure
both handlebars are set at the same height.
Lock each handlebars in place with a knob
bolt (#17). See Fig.4.
9. Fixed mode: To keep the handlebars
stationary, attach them to the tubing on the
main frame between the coupler bars.
As with the dual-action mode, set both
handlebars at the same, comfortable height
and secure them with knob bolts (#17).

Cross Trainer XTR2
6
Electronic Monitor
10. Attach the electronic monitor (#50) to the main
frame bracket. Connect the monitor to the
sensor wire. See Fig.5.
With the press of a button, you can set the
electronic monitor of your XTR2 to display the
following information:
TIME: How long you have been exercising.
SPEED: How fast you are running.
DISTANCE: How far you would have run with
your two feet on the ground.
CALORIE: How many calories you have
burned.
Exercise Computer
FUNCTIONS:
•SCAN: Automatically scans each function in sequence.
•TIME: Counts the time duration of exercise from zero up to 99:59 in one second increment.
•CALORIES: Accumulates the calorie consumption during exercise. This is a rough guide only and should be
used as a comparison over several exercise sessions.
•DST: Accumulates the distance during workout session.
•SPD: Displays the current speed.
KEY:
MODE/RESET (OPTION): Press to select each function and hold the button for 3 seconds to clear all values,
NOTE:
•Power-on automatically when start operating.
•With no signal transmitted to the computer for 2 minutes, the computer will shut off the LCD display and
clear all measured value automatically.
•The SCAN mode lets your monitor automatically alternate all of the four readouts in short intervals, so you
don’t have to stop and press a button to check for different information.
•The monitor comes with 1×L1154 battery and tums itself off when not in use to conserve energy.
•Replace batteries about every four months, depending on frequency of use.

Cross Trainer XTR2
7
11. Attached seat (#59) onto the end of the seat
tube (#58). Use 3 pieces of spring washers
and 3 nylon nuts ban tighten them, Insert the
bellow (#6) to the seat tube.
12. Attached the seat tube w/bellow insert into the
tube of the end part of the tracer.
Use the tri-knob to adjust the height for your
need.
Tension Adjustment
The assembly of your XTR2 is now complete. As you try it for the first time, you should adjust the tension to a
desirable level before you begin a full workout.
13. For minute tension adjustment, simply use the tension adjustment knob found at the top centre. Tension
level can be manipulated this way to vary intensity of workout as you exercise.
14. For greater tension adjustment, you may loosen or tighten the friction belt (#35) by re-strapping it. To do so,
first tum the tension adjustment knob all the way to the loosest setting. Then re-strap the belt at the buckle
on the main frame, just beneath the flat beam at the top centre. The more length you allow for the friction
belt to wrap around the wheel, the less friction it will cause. Re-adjust the tension knob after you finished re-
strapping.

Cross Trainer XTR2
8
Reversible Movement
Remember, your XTR2 has REVERSIBLE movement! Forward pedalling emphasizes your quadriceps muscles
(front thighs), while backward pedalling emphasizes your hamstrings (back thighs).
Take advantage of this fact to make your workout less fatiguing and more fun!

Cross Trainer XTR2
9
Exploded Diagram

Cross Trainer XTR2
10
Parts List
Parts
No. Description Quantity Parts
No. Description Quantity
1 Main frame 1 29 Nut 1
2 Front bottom tube 1 30R Collar housing 1
3 Back bottom tube 1 30L Collar housing 1
4 Right coupler bar 1 31 Collar ball
5 Left coupler bar 1 32 Collar housing 2
6R Right pedal tubing 1 33 Nut 2
6L Left pedal tubing 1 34 Chain 25H×220L 1
7R Right handle bar 1 35 Tension belt 1
7L Left handle bar 1 36 Tension control 1
8R Right chain cover 1 37 Tension spring 1
8L Left chain cover 1 38 Chain cover screw M5×15 2
9 Fan wheel 1 39 Chain cover screw M5×45 2
10 Fan wheel cover 1 40 Tension fix screw M5 1
11 Pedal 2 41 Fan wheel fix screw M5 16
12A Handle bar shaft 1 42 Bolt φ1/4” ×2” 2
12B Pedal hinge bolt (L & R) 2 43 Nut 1/4” 2
13 End caps(φ2”) 4 44 Bolt φ3/8” ×2 4
14 Foam grips 2 45 Nut 3/8” 6
15 End caps(φ1”) 2 46 Bolt φ3/8” ×2” 4
16 Plastic bushing(φ1-1/4”) 4 46(B) Washer φ3/8” 4
17 Knob 2 47 3/8” Acorn Nut 4
18 Plastic roller 2 48 Nut M12 (L & R) 2
19 Steel bushing φ5/8” 8 49R&L D sharp washer 28φ×5” 2
20 Steel bushing φ3/8” 4 50 Computer 1
21 Brass bushing φ10 2 51 Spring washer 2
22 Fan wheel axle 1 52R&L Spring washer
13φ×8.5φ×2.5” 2
23 Nut 3/8” 3 53 Small pipe 1
24 WasherI.D×24mm O.D×10mmI.D×24mm
O.D×2t 1 54 Chain cover screw 2
25 Nut 3/8” 2 55 Washer 1
26 Sensor 2 56 Bolt 2

Cross Trainer XTR2
11
Parts
No. Description Quantity Parts
No. Description Quantity
27 crankshaft 2 57 R&L Hinge screw 2
28 Chain wheel 1 58 Seat tube 1
59 Seat 1 62 Bellow 1
60 M8 nylon nut 3 63 Tri-knob 1
61 M8 spring washer 3
Warm-Up and Cool-Down Routine
A good exercise program consists of a warm-up, aerobic exercise and a cool down. Do the entire program at
least two to three times a week, resting for a day between workouts. After several months, you can increase
your workouts to four or five times per week.
AEROBIC EXERCISE is any sustained activity that sends oxygen to your muscles via your heart and lungs.
Aerobic exercise improves the fitness of your lungs and heart. Aerobic fitness is promoted by any activity that
uses your large muscles e.g.: legs, arms and buttocks. Your heart beats quickly and you breathe deeply. An
aerobic exercise should be part of your entire exercise routine.
The WARM-UP is an important part of any workout. It should begin every session to prepare your body for more
strenuous exercise by heating up and stretching your muscles, increasing your circulation and pulse rate, and
delivering more oxygen to your muscles.
COOL-DOWN at the end of your workout. Repeat these exercises to reduce soreness in tired muscles.
Head Rolls
Rotate your head to the right for one count, feeling
the stretch up the left side of your neck, then rotate
your head back for one count, stretching your chin to
the ceiling and letting your mouth open. Rotate your
head to the left for one count, then drop your head to
your chest for one count.
Shoulder Lifts
Lift your right shoulder toward your ear for one count.
Then lift your left shoulder up for one count as you
lower your right shoulder.

Cross Trainer XTR2
12
Side Stretches
Open your arms to the side and lift them until they are
over your head. Reach your right arm as far toward
the ceiling as you can for one count. Repeat this
action with your left arm.
Quadriceps Stretch
With one hand against a wall for balance, reach
behind your and pull your right foot up. Bring your
heel as close to your buttocks as possible Hold for 15
counts and repeat with left foot.
Inner Thigh Stretch
Sit with the soles of your feet together and your knees
pointing outward. Pull your feet as close to your groin
as possible. Gently push your knees toward the floor.
Hold for 15 counts.

Cross Trainer XTR2
13
Toe Touches
Slowly bend forward from your waist, letting your
back and shoulders relax as you stretch toward your
toes. Reach as far as you can and hold for 15 counts.
Hamstring Stretches
Extend your right leg. Rest the sole of your left foot
against your right inner thigh. Stretch toward your toe
as far as possible. Hold for 15 counts. Relax and then
repeat with left leg.
Calf/Achilles Stretch
Lean against a wall with your left leg in front of the
right and your arms forward. Keep your right leg
straight and the left foot on the floor. Then bend the
left leg and lean forward by moving your hips toward
the wall. Hold, then repeat on the other side for 15
counts.

Cross Trainer XTR2
14
Specifications
Weight Capacity 110kg
Elliptical Weight 25kg
LCD Display Time, Speed, Distance and Calories
Special Features Adjustable Seat Height, Adjustable
resistance, Forward & Reverse Motion

Some experts believe the incorrect or prolonged use of almost any
product could causeserious injury or death. For information that
may reduce your risk of serious injury or death consult thepoints
below and additionally, the information available at
www.datastreamserver.com/safety
- Consult all documentation, packaging and
product labelling be fore use. Note that some
products feature online documentation which
should be printed and kept with the product.
- Check product for loose / broken / damaged /
missing parts, wear or leaks (if applicable) be fore
each use. Never use a product with loose / broken
/ damaged / missing parts, wear or leaks (if
applicable).
- Products must be inspected and serviced (if
applicable) by a qualified specialist every 6
months assuming average residential use by a
person of average weight and strength, ab ove
average technical aptitude, on a property
matching average metropolitan specification.
Intended use outside these guidelines could
indicate the product is not suitable for intended
use or may require more regular inspection or
servicing.
- Ensure all possible users of the p roduct have
completed an industry recognised training course
before being given access to the product.
- The product has been supplied by a general merchandise
retailer that may not be familiar with your specific applic ation or
your description of the application. Be sure to attain third party
approval for your application from a qualified specialist before use
regardless of prior assurances by the retailer or its representatives.
- This product is not intended for use where fail-safe operation is
required. As with any product (take an automobile, aircraft,
computer or ball point pen for example) there is always a small
chance of a technical issue that needs to be repaired or may
require replacement of the product or a part. If the possibility of
such failure and the associated time it takes to rectify could in any
situation inconvenience the user, business or employee or could
financially affect the user, business or employee then the product
is not suitable for your requirements. This p roduct is not for use
where incorrect operation or a failure of any kind, including but
not limited to a condition requiring product return, replacement,
service by a technician or replacement of parts could cause a
financial loss, loss of employee time or an in convenience
requiring compensation.
- If this item has been purchased in error considering the points
above simply contact the retailer directly for details of their
returns policies if required.
Table of contents
Other HPF Fitness Equipment manuals