manuals.online logo
Brands
  1. Home
  2. •
  3. Brands
  4. •
  5. HPM
  6. •
  7. Heater
  8. •
  9. HPM Instant Heat 4 Ducted User manual

HPM Instant Heat 4 Ducted User manual

INSTANT HEAT 4 DUCTED
Retain this card for operating instructions and warranty details
Please read carefully
Read these instructions completely before starting
installation.
The infrared lamps heat by direct radiation rather than by
heating the air in the room, so the Instant Heat 4 should be
located directly over the drying area.
It must not be installed where there is a possibility of water
splashing onto the lamps. Locate the Instant Heat 4 in
accordance with the requirements of the SAA/SANZ Wiring
Rules AS/NZS 3000 relating to damp situations. This means
that no part of the Instant Heat 4 may be located directly
above any part of the bath or shower recess or enclosure. For
unenclosed showers refer to Wiring Rules conditions.
For information on switch locations, refer to Wiring Rules
AS/NZS 3000
Note: Steam will only be removed if there is sucient ow of
air through the room. Ensure adequate inlets exist through
windows, vents or under the door. Air ow path from the inlet
to the fan should ideally pass over the steam sources. See over
– ‘Getting the most from your Instant Heat 4’.
Note: Instant Heat 4 must be installed horizontally in ceiling
by a licensed electrical contractor or similarly qualied person.
Regulations concerning the discharge of air have to be
fullled. The Instant Heat has a free air discharge of 240m³/hr
and care should be taken that airow throughout meets
specic requirements in building regulations. Local building
codes may require venting to the outside. Ducting must be
tted and vented to the outside using exterior grille provided
as shown in gure 1 and 2.
To duct to the outside connect the
onto the outlet side of the exhaust
fan. After installing the outlet grille
to your eaves wall, connect the
exible duct (max 3m cut if
necessary, remember to avoid
bends etc) and ax using the duct
tape provided.
Location:
The Instant Heat is for ceiling
mounting only, with the lowest
point to be at least 2.4 metres
above oor level. It is not intended
to be installed in wardrobes or
within 300mm of sides of walls, as
per Figure 3. There is a danger of
combustion if placed too close to
curtains or other ammable
materials
Ceiling Preparation and
Installation:
Instant Heat 4 may be installed in
the ceiling cavity between joists
using the built-in clip fasteners.
Correct installation requires the
cavity to have a minimum height of
260mm for safe operation. The
clearances between Instant Heat
and surrounding joists and above
ceiling shown in Figures 4 and 5
shall be observed. Thermal
insulation or similiar material shall
not be placed on top of the Instant
Heat, and adjacent material to the
side shall be kept clear to a
minimum distance of 300m. Joists, beams and rafters shall
not be cut or notched to install Instant Heat.
AFTER DETERMINING LOCATION OF THE HEATER USE THIS
CARD AS A TEMPLATE TO MARK OUT AND CUT AN APERTURE
300 x 300mm (Fig 6).
If adequate support is not available for Instant Heat 4, it may
be necessary to provide for extra strengthening.
Final assembly:
Check that the power to the unit is
o.
All models:
Insert infrared lamps rmly into the
sockets to ensure good electrical
contact and long life. Centralise the
lamp surround. Wipe the surround
and bulbs clean. Connect the power
and check all functions.
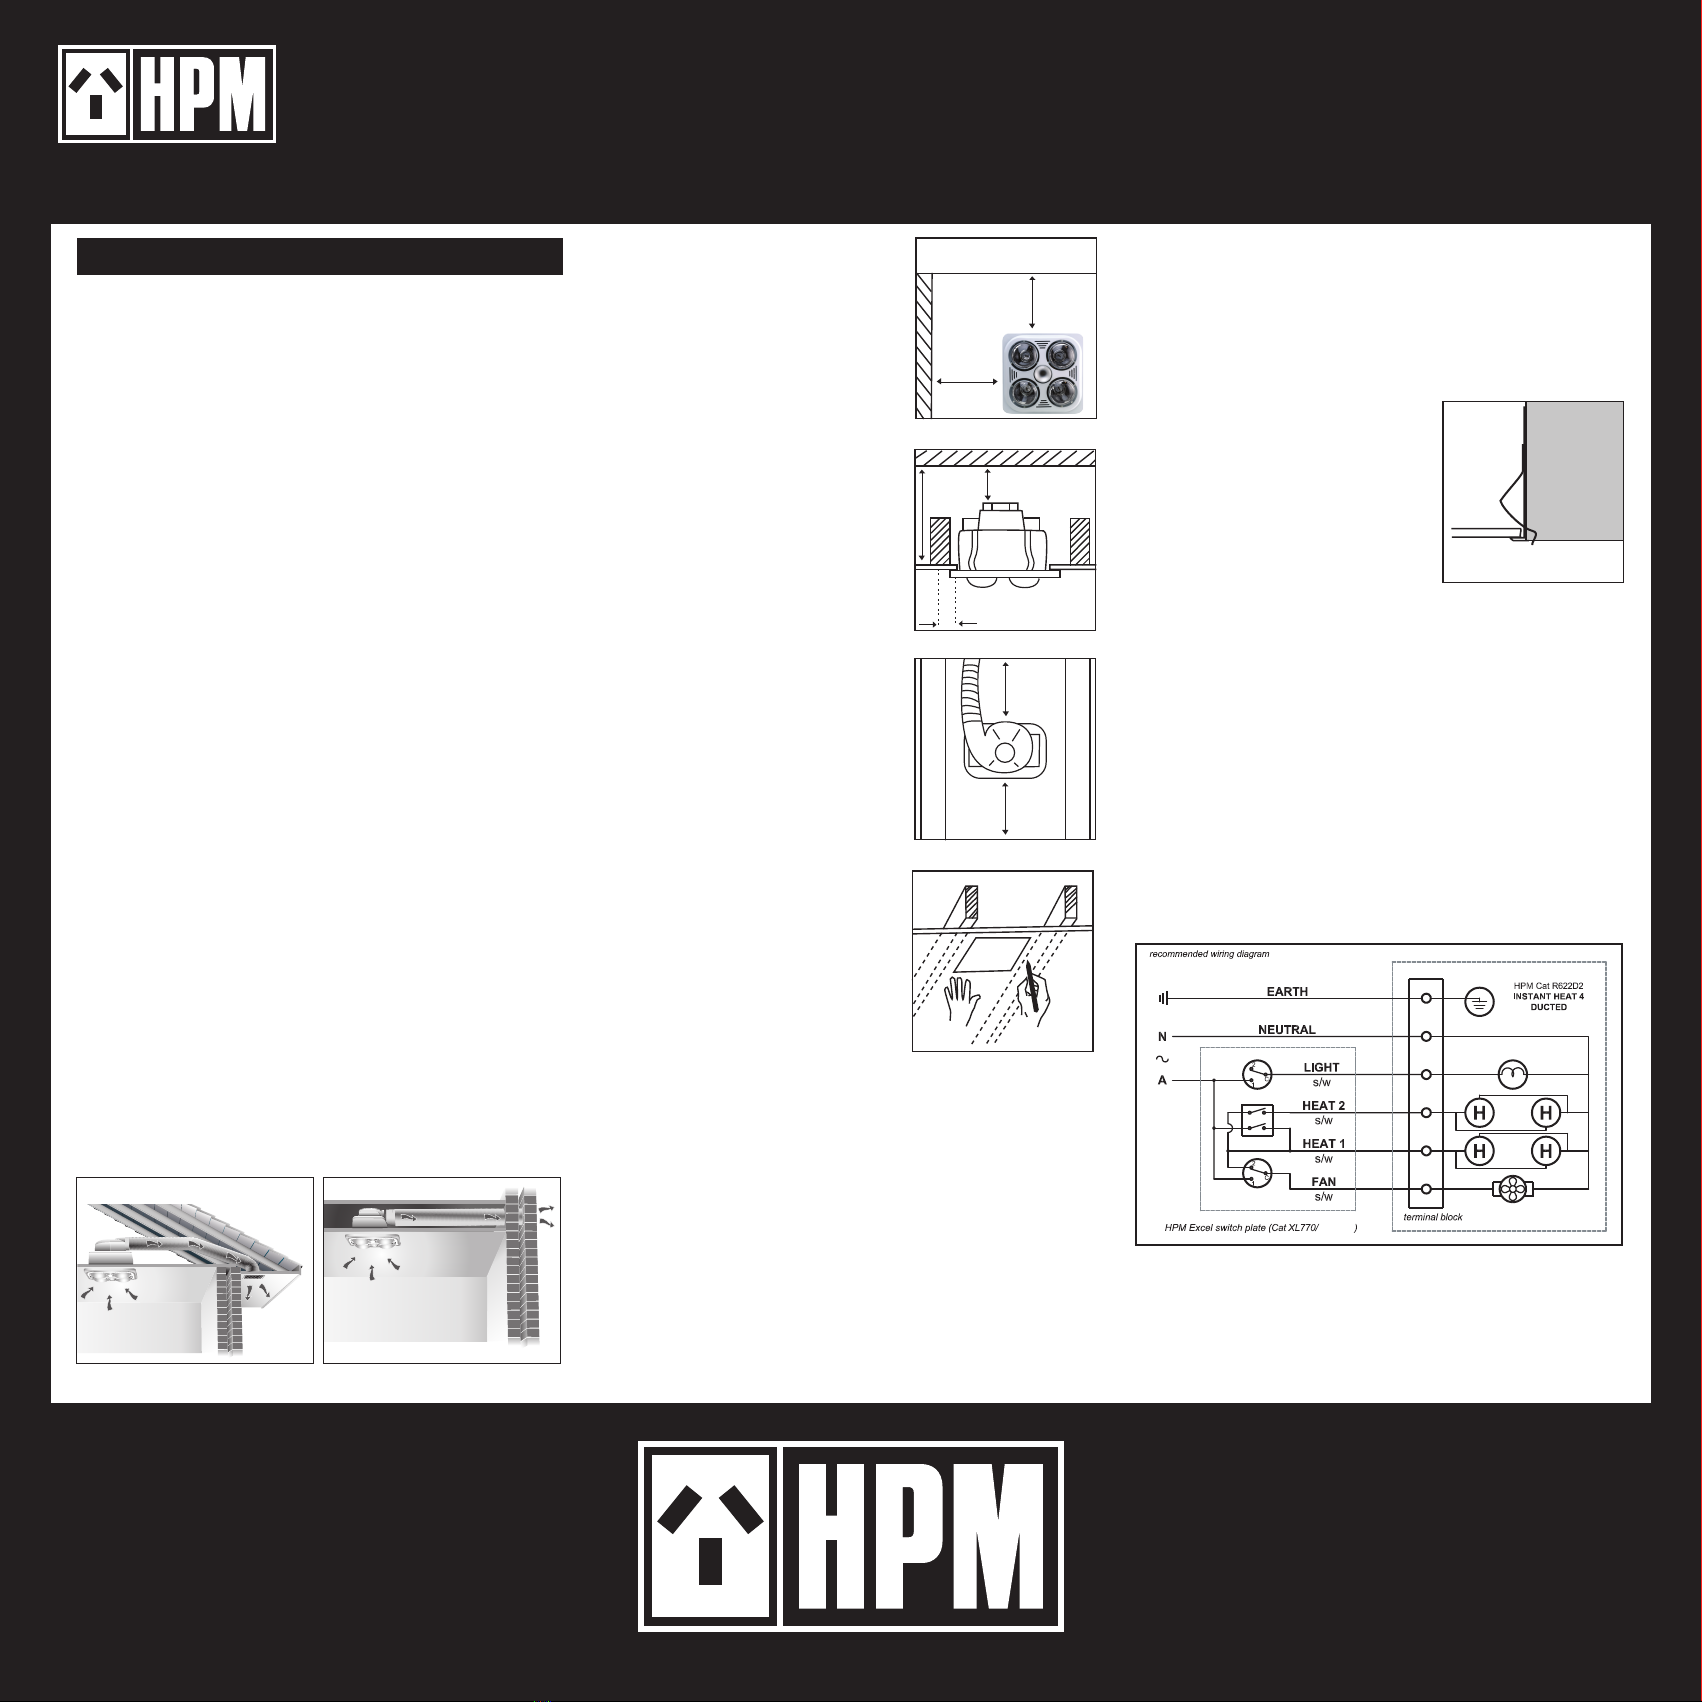
Wiring:
Three switches on an Excel wall plate are supplied. Snap the
switches into the plate. Do not use with any solid state speed
control. Wall plate should be located so that the switches are
not within reach of a person in a bath or shower. Wiring
connection is as per gure 8.
For information on switch locations, refer to Wiring Rules
AS/NZS 3000
Standard roof application Multi storey application
Fig 3
Fig 7
Fig 8
Fig 4
Fig 5
Fig 6
Fig 1 Fig 2
For additional information, contact HPM
Australia: 1300 369 777
New Zealand: 0800 476 009
www.hpm.com.au
Distibuted by HPM Industries Pty Ltd
PO BOX 6245
Silverwater, NSW 1811
210mm min
height clearance
75mm side clearance
220mm
Joist
Joist
Joist
300mm300mm
Fixing to ceiling:
Remove all lamps. Push the heat lamp body into the opening
allowing the springs to snap open. To secure, push the lower
ends of the springs apart. (Fig 7) The ceiling board thickness
should be adjusted to enable the springs to be tted without
excessive force.
Instant Heat 4
Ducted Body
Template
3DSPEC
300mm
300mm
Wall
INSTANT HEAT 4 DUCTED
Heater, exhaust fan ducted and light
Cat R622D2
Specication
Cat R622D2
230-240V a.c. 50Hz
1240W max
T 40º C
(May be connected to a lighting or power circuit if
loading permits.)
General:
The Ducted Instant Heat 4 model has powerful heat lamps
manufactured to oer peak performance in all bathrooms
with ceiling heights up to 3.3 metres (11ft). The Instant Heat
dual heat function is another energy saver, allowing you to
adjust the heat level to suit prevailing conditions or personal
preference.
N.B. The Instant Heat 4 Ducted is not a tanning lamp.
The HPM Instant Heat 4 Ducted has been designed to
exacting standards to give you many years of trouble-free
operation. To ensure you get the most from your Instant Heat
there are a few simple points to keep in mind.
Getting the most from your Instant Heat 4
Location:
Locate the unit over drying area. The unit must not be located
directly over the shower or bath and must only be mounted
horizontally in ceilings
Heat Lamps:
The HPM Instant Heat lamps have no warm-up period
because the infrared lamps provide instantaneous heat, and
are designed to heat you and not the bathroom – that’s the
ecient way infrared heat works. You’ll save money and
energy, at an average cost of around one cent a shower if
used correctly, (based on an average 5 minute drying time).
Also, to get the full benet of Instant Heat’s infrared warmth,
stand directly under the heat lamps. These exclusive clear
lamps have been designed specically for this application,
and concentrate their heat for maximum eectivess.
WARNING:
Do not look directly into bulbs when in use.
This appliance is not intended for use by persons (including
children) with reduced physical, sensory or mental
capabilities, or lack of experience and knowledge, unless they
have been given supervision or instruction concerning use of
the appliance by a person responsible for their safety.
Children should be supervised to ensure that they do not play
with the appliance.
Ventilation:
To ensure optimum performance of the ducted exhaust fan, it
is essential that you provide a generous air-ow into your
bathroom to help Instant Heat’s powerful and ecient
exhaust fan to quickly suck out steam while you shower. Your
Instant Heat works by drawing steam-laden air from the room
and, as with all exhaust fans, it is essential that sucient air
inlets are provided. Ensure adequate inlets exist through
windows, vents or under the door. The air-ow path from inlet
to fan should ideally pass over the steam source.
Centre light:
The centre 100 watt light in this Instant Heat model is
designed to provide general illumination in your bathroom.
For specic tasks like shaving or putting on make-up, you may
need extra lighting to suit individual needs.
The heat lamps can also be used to provide additional bright
illumination for your bathroom.
Cleaning:
Allow bulbs to cool before cleaning. To clean the bulbs and
lamp surround use a cloth dampened with detergent or liquid
glass cleaner.
Replacement lamps:
Heating lamps: Instant Heat lamps have been specially
developed for best performance.
Instant Heat 4 – 4 x 275 watts maximum.
Replace with HPM Cat L275HLES or equivalent.
Light Bulb: Replace with OSRAM 100W R80 E27
or equivalent.
Important – Replacement with any lamp other than that
specied above may cause damage to the moulding and void
the warranty
Five year extended warranty
Under this warranty, for a period of ve years from the date of purchase, HPM Industries undertakes to replace or make good any part or
parts, including the motor but excluding the heat lamps or centre light bulb, (see heat lamp warranty) which are proven to be defective.
One year warranty – heat lamps:
Instant Heat’s infrared lamps are covered for a period of one year from the date of purchase. If any fail during this period, the lamp(s) will be
replaced without charge.
The warranties apply only if:
(1) The unit is installed and used in accordance with the manufacturer’s instructions.
(2) The unit was installed by a licensed electrical contractor or similarly qualied person.
(3) The defects were not caused by changes or modications made by unqualied persons.
Exclusions:
This warranty does not cover damage or loss caused by:
(a) Misuse, negligence or faults due to incorrect installation
(b) Improper wiring circuits or fuses
(c) Attempts to repair the appliance by unqualied persons
(d) Failure to maintain the appliance in accordance to manufacturer’s instructions.
The benefits conferred by this warranty are in addition to all other rights and remedies in respect of the product which the
consumer has under the Trade Practices Act and similar state and territory laws.
WARRANTY
Cat R622D2
Distributed by HPM Industries Pty Ltd
PO BOX 6245
Silverwater, NSW 1811
Australia: 1300 369 777
New Zealand: 0800 476 009
PRODUCT
INFORMATION
INSTANT HEAT 4 DUCTED
Retain this card for operating instructions and warranty details
23784A Made in China

This manual suits for next models

1

Other HPM Heater manuals

HPM BH2D User manual

HPM

HPM BH2D User manual

HPM BH1WE User manual

HPM

HPM BH1WE User manual

Popular Heater manuals by other brands

Paris Rhone PE-HE001 user manual

Paris Rhone

Paris Rhone PE-HE001 user manual

Reznor ML 1511 INSTALLATION, COMMISSIONING, SERVICE AND USER INSTRUCTIONS

Reznor

Reznor ML 1511 INSTALLATION, COMMISSIONING, SERVICE AND USER INSTRUCTIONS

Lenoxx H200 manual

Lenoxx

Lenoxx H200 manual

Goldair ecopanel GEPH211 manual

Goldair

Goldair ecopanel GEPH211 manual

American Comfort Worldwide ACW0035 owner's manual

American Comfort Worldwide

American Comfort Worldwide ACW0035 owner's manual

DeLonghi HVY1030 instructions

DeLonghi

DeLonghi HVY1030 instructions

HEAT1 ECO plus-line LDHR018-150EKY instructions

HEAT1

HEAT1 ECO plus-line LDHR018-150EKY instructions

Haverland ECO-RADS Instruction & installation manual

Haverland

Haverland ECO-RADS Instruction & installation manual

Thermo Sphere TSR-0500-A install guide

Thermo Sphere

Thermo Sphere TSR-0500-A install guide

Gabarron Elnur RBC9 Installation instructions & user guide

Gabarron

Gabarron Elnur RBC9 Installation instructions & user guide

Waves TH-104982.1 manual

Waves

Waves TH-104982.1 manual

L.B. White Foreman owner's manual

L.B. White

L.B. White Foreman owner's manual

Element 900 Installation and operation manual

Element

Element 900 Installation and operation manual

Siku PTC-21 operating instructions

Siku

Siku PTC-21 operating instructions

Oceanic OCEABH1500W user manual

Oceanic

Oceanic OCEABH1500W user manual

Bimar S603.EU Instruction booklet

Bimar

Bimar S603.EU Instruction booklet

EINHELL WW 2000 R operating instructions

EINHELL

EINHELL WW 2000 R operating instructions

CHIEF Vulcan ADU CHH5404 Original instruction manual

CHIEF

CHIEF Vulcan ADU CHH5404 Original instruction manual

manuals.online logo
manuals.online logoBrands
  • About & Mission
  • Contact us
  • Privacy Policy
  • Terms and Conditions

Copyright 2025 Manuals.Online. All Rights Reserved.