hpmont HD3Z Series User manual

V1.2 2018.11
HD3Z Series
Mining Inverter
User Manual
HD3Z Series
Mining Inverter

FORWARD
Thank you for purchasing HD3Z series mining inverter manufactured by Shenzhen
Hpmont Technology Co., Ltd.
This User Manual describes how to use HD3Z series mining inverter and their
installation wiring, parameter setting, troubleshooting and daily maintenance etc.
Before using the product, please read through this User Manual carefully. In addition,
please do not use this product until you have fully understood safety precautions.
Note:
Preserve this Manual for future use.
If you need the User Manual due to damage, loss or other reasons, please contact
the regional distributor of our company or directly contact our company Technical
Service Center.
If you still have some problems during use, please contact our company Technical
Service Center.
Due to product upgrade or specification change, and for the purpose of
improving convenience and accuracy of this manual, this manual’s contents may
be modified.
Email address: overseas_1@hpmont.com


Version and Revision Records
Time: 2018/11
Version: V1.2
Revised chapter Revised contents
•V1.2 published.


HD3Z Quick Start Guide
Note:
Some of the parameters are factory setting, user mayn't need to set them when first time using the product.
(1). Start / Stop HD3Z and set running frequency via keypad
1. Power on HD3Z. Use keypad to set below parameter.
Ref. Code Function Setting Description
F00.10 Frequency setting channel selection 0 (default) Running frequency set by keypad digital
setting
F00.11 Command setting channel selection 0 (default) Keypad runs command channel
F00.13 Running frequency digital setting - Running frequency, adjust according to
actual
F03.01 / F03.02 Acc. / Dec. time 1 - Acc. / Dec. time, adjust according to actual
F08.00 - F08.04 Rated parameter of motor - Set according to motor nameplate
2. Press on keypad to start HD3Z. Press / key to increase / decrease setting frequency.
Press to stop HD3Z.
(2). To use terminal to start / stop HD3Z, and analogue value to set running frequency
1. DI1 is forward signal input, DI2 is reverse signal input. Below is the connection.
2. Power on HD3Z. Set function codes according to connection.
Ref. Code Function Setting Description
F00.10 Select frequency setting channel 3 Set by analogue value
F00.11 Select command setting channel 1 Terminal
F03.01 / F03.02 Acc. / Dec. time 1 - Acc. / Dec. time 1, adjust according to actual
F08.00 - F08.04 Rated parameter of motor - Set according to motor nameplate
F15.00 DI1 function selection 2 (default) FWD (DI FWD signal input)
F15.01 DI2 function selection 3 (default) REV (DI REV signal input)
F16.01 AI1 function selection 2 (default) Frequency setting channel (set by AI1)
3. Adjust AI1 to set running frequency.
4. Connect K1, motor will forward run. Disconnect it, motor stops running. Connect K2, motor reverse
run. Disconnect K2, motor stops running. Connect or disconnect both K1 and K2, motor stops running.
DI1
COM
DI2
AI1
+10
Fault indicating
Output indicating
signal at running
K1
K2 DO1
R1C
R1B
R1A
GND
Forward
Reverse
Analogue input

(3). Use communication to start / stop HD3Z and set running frequency
1. Connect as per below figure.
2. Power on, and set function code according to below table.
Ref. Code Function Setting Meaning
F00.10 Select frequency setting channel 2 Set by SCI
F00.11 Select command setting channel 2 Running command set by terminal
F03.01 Acc. time 1 - Acc. time, adjust according to actual
F03.02 Dec. time 1 - Dec. time, adjust according to actual
F08.00 - F08.04 Rated parameter of motor - Set according to motor nameplate
F17.00 Data format 0 (default) 1-8-2 format, no parity, RTU
F17.01 Baut rate 3 (default) 9600bps
F17.02 Local address 2 (default)
3. SCI code 0x06 reads to register 0x3200 to start / stop inverter which local address = 2.
E.g.: Set FWD command:
Address Code Register address Register content Checksum
Command /
Response frame 0x02 0x06 0x32 0x00 0x10 0x01 0x4B 0x41
E.g.: Set decelerates to stop command:
Address Code Register address Register content Checksum
Command /
Response frame 0x02 0x06 0x32 0x00 0x10 0x04 0x8B 0x42
4. SCI code 0x06 reads to register 0x3201 to change running frequency. E.g: Set running frequency of
local address 2 = 45.00Hz:
Address Code Register address Register content Checksum
Command /
Response frame 0x02 0x06 0x32 0x01 0x11 0x94 0xDB 0x7E
DO1
R1C
R1B
R1A
MODBUS
MODBUS RX
TX
TX
RX
Fault indicator NC contact
Running output indicator
Fault indicator NO contact
COM
External
device

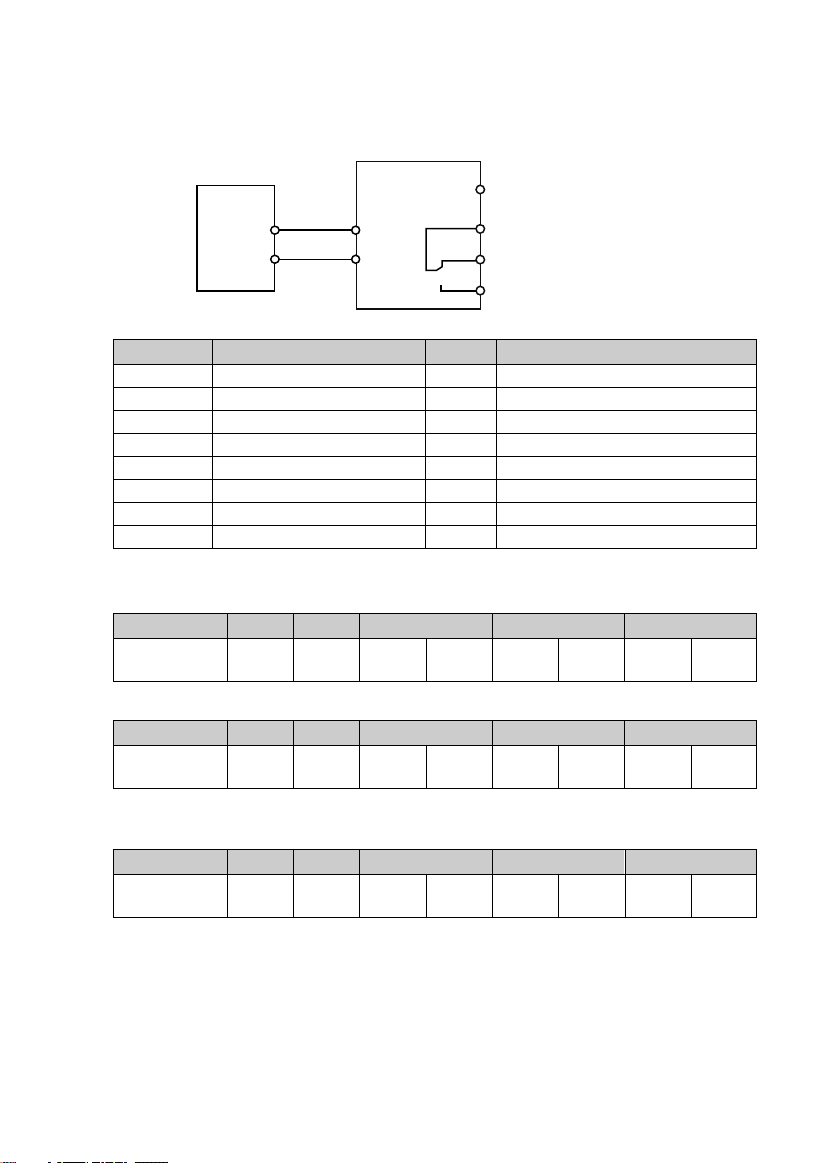
(4). To use terminal to control timing start / stop HD3Z
1. Check that HD3Z is installed properly. DI1: Forward signal input; DI2: Reverse signal input. Below is
the connection.
2. Power on, and set function parameters as per below table:
Ref. Code Function Setting Meaning
F00.10 To select frequency setting channel 0 (default) Set by keypad digital setting
F00.11 To select command setting channel 1 Running command set by terminal
F00.13 Running frequency digital setting - Running frequency, set according to actual
F03.01 / F03.02 Acc. / Dec. time 1 - Acc. / Dec. time, adjust according to actual
F15.00 DI1 function selection 2 (default) FWD (DI FWD signal input)
F15.01 DI2 function selection 3 (default) REV (DI REV signal input)
3. Check present time and date (D01.00 - D01.02). If not synchronize with real time, reset time (P00.00 -
P00.02).
Ref. Code Function Setting Meaning
D01.00 Present year - Present year by system
D01.01 Present MM/DD - Present MM/DD by system
D01.02 Present time - Present time by system
P00.00 Year - Set year (according to actual)
P00.01 MM/DD - Set MM/DD (according to actual)
P00.02 Time - Set Hr/Min (according to actual)
4. Enable timing start / stop (P01.00) and set timing start / stop time (P01.01 - P01.08) according to
actual needs. For instance: Set inverter start at 8:00, stop at 12:00, start at 14:00, stop at 17:30.
Refer to below:
Ref. Code Function Setting Meaning
P01.00 Timing start and stop selection 1 Valid, enable timing start and stop
P01.01 Timing start 1 8.00 Start
P01.02 Timing stop 1 12.00 Stop
P01.03 Timing start 2 14.00 Start
P01.04 Timing stop 2 17.30 Stop
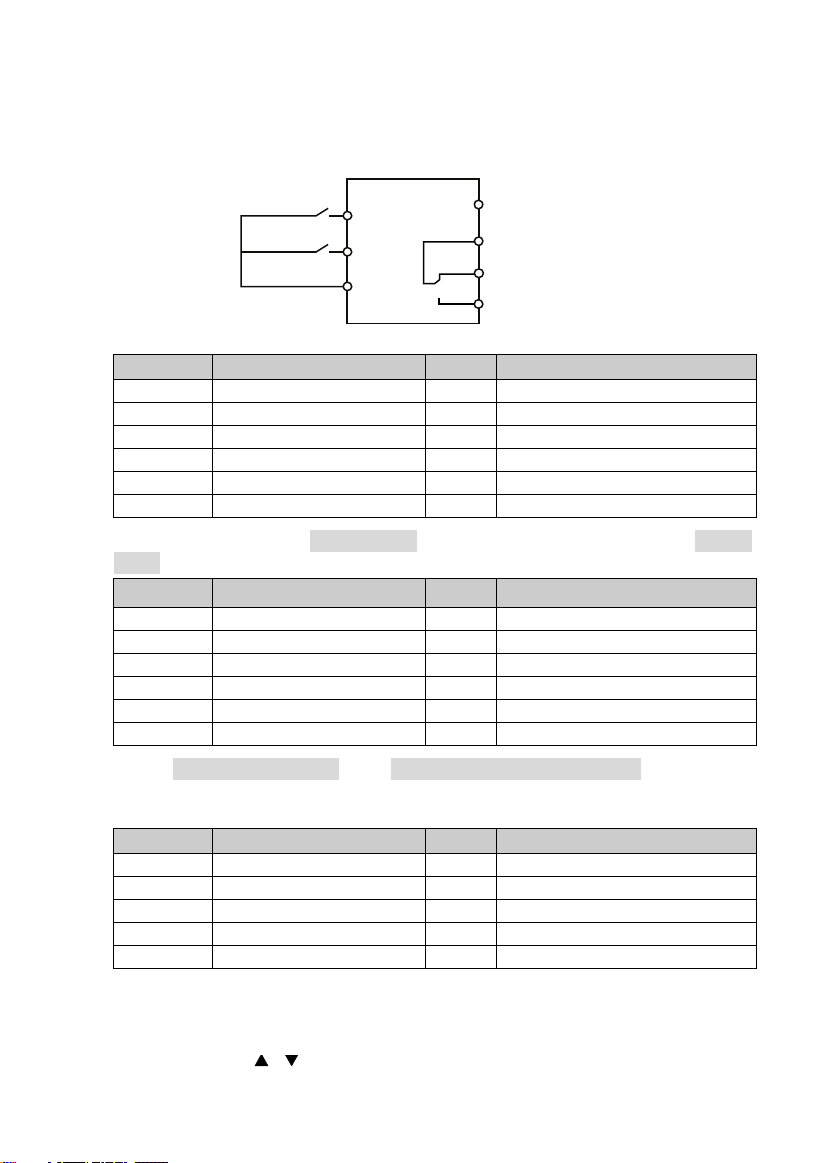
5. Connect K1 or K2 to enable timing start or stop function. Inverter will auto controls motor to run
FWD or REV or stop according to time sequence in above table. Disconnect K1 or K2, motor stops
running, inverter exits timing start / stop function.
6. Set F00.13 or press / on keypad to increase / decrease setting frequency.
DI1
COM
K1
K2 DI2
DO1
R1C
R1B
R1A
ForwardOutput indicating
signal at running
Fault indicating
Reverse

(5). To use terminal to control timing frequency switch
1. Refer to step 1-3 in “(4). To use terminal to control timing start / stop of HD3Z”.
2. Enable timing frequency switch (P01.09) and set time and value of timing frequency switch. For
instance, set frequency = 50.00Hz after 8:00, and 35.00Hz after 14:00:
Ref. Code Function Setting Meaning
P01.09 Timing frequency switch selection 1 Valid
P01.10 Time 1 of timing frequency switch 8.00 Min/Sec
P01.11 Value 1 of timing frequency switch 50.00Hz Frequency
P01.12 Time 2 of timing frequency switch 14.00 Min/Sec
P01.13 Value 2 of timing frequency switch 35.00Hz Frequency
3. Connect K1 or K2, motor runs FWD or Rev, and control motor according tofrequency sequence in
above table. Disconnect K2 or K2, motor stops running.
(6). To use terminal to manually dehumidify motor
1. Below is the connection. DI4 is manually dehumidifying input.
2. Power on and set below parameter:
Ref. Code Function Setting Meaning
F15.03 DI4 function selection 90 Manually dehumidifying (signal input)
F19.42 Motor dehumidifying current 10%
(default) Set dehumidifying current
F19.43 Dehumidifying time when current of
motor rises 30.0min Set dehumidifying time when current of
motor rises
3. Make sure running signal of inverter is disconnected, and connect K1. Inverter starts to dehumidify
according to dehumidifying current. Disconnect K1, inverter stops dehumidifying.
DI4
COM
K1
Manually
dehumidifying
DO1
R1C
R1B
R1A
Fault indicator NC contact
Running output indicator
Fault indicator NO contact
COM

(7). To use terminal to dehumidify motor automatically
1. Below is the connection. DI4 is auto dehumidifying input.
2. Power on and set below parameter.
Ref. Code Function Setting Meaning
F00.11 Command setting channel 1 Terminal settin channel
F15.00 DI1 function 2 (default) FWD
F15.03 DI4 function 91 Auto dehumidifying
F16.00 AI1 function 22 Detect motor humidity
F19.42 Motor dehumidifying current 10%
(default) Set dehumidifying current
F19.43 Dehumidifying time when current of
motor rises 30.0min Set dehumidifying time when current of
motor rises
F19.44 Auto dehumidifying selection 0 (default) According to humidity
F19.45 Motor auto dehumidifying humidity 80%
(default) Motor auto dehumidifying humidity
F19.46 Motor auto dehumidifying humidity
delay
5%
(default) Motor auto dehumidifying humidity delay
3. Connect K1, inverter inputs auto dehumidifying signal; Disconnect K2, inverter inputs running signal.
When present motor humidity d00.53 > F19.45, inverter starts dehumidifying according to setting
current; When present motor humidity d00.53 < F19.45 - F19.46, inverter stops dehumidifying and
motor starts running.
DI1
COM
K2
K1
FWD
DI4
Auto
dehumidifying
DO1
R1C
R1B
R1A
Fault indicator NC contact
Running output indicator
Fault indicator NO contact
COM


CONTENTS
Chapter 1 Safety Information and Precautions.................................................................................................... 1
Chapter 2 Product Information............................................................................................................................... 3
2.1 Model.................................................................................................................................................. 3
2.2 Rated Value ........................................................................................................................................ 3
2.3 Technical Data ................................................................................................................................... 4
2.4 Reactor Selection.............................................................................................................................. 5
2.5 Parts of Inverter................................................................................................................................. 6
Chapter 3 Machenical Installation.......................................................................................................................... 7
3.1 Precautions ........................................................................................................................................ 7
3.2 Hoisting and Handling Instructions............................................................................................... 7
3.3 Installation Site Requirement......................................................................................................... 8
3.4 Installation Direction and Space .................................................................................................... 8
3.5 Dimensions and Mounting Size...................................................................................................... 9
3.6 Open / Close Door Lock.................................................................................................................. 10
Chapter 4 Electrical Installation............................................................................................................................ 11
4.1 Precautions ...................................................................................................................................... 11
4.2 Peripheral Accessories Selection.................................................................................................. 11
4.2.1 Wiring Specifications of Input and Output ....................................................................................... 11
4.2.2 Power Terminal Lug................................................................................................................................... 12
4.3 Main Circuit...................................................................................................................................... 12
4.3.1 Power Terminal............................................................................................................................................ 13
4.3.2 Supply and Motor Connection.............................................................................................................. 13
4.4 Control Board .................................................................................................................................. 13
4.4.1 Control Terminal ......................................................................................................................................... 14
4.4.2 Control Terminal Wiring ........................................................................................................................... 15
4.5 Optical Fiber Communication Decsription................................................................................. 17
4.6 Wiring Requirement ....................................................................................................................... 17
Chapter 5 Operation Instructions......................................................................................................................... 19
5.1 Function Description...................................................................................................................... 19
5.1.1 Operation Mode ......................................................................................................................................... 19
5.1.2 Frequency Setting Channel.................................................................................................................... 19
5.1.3 Operation Status ........................................................................................................................................ 20
5.1.4 Running Modes........................................................................................................................................... 20
5.2 Operation Instruction .................................................................................................................... 20

5.2.1 Keypad Description................................................................................................................................... 20
5.2.2 Display Status.............................................................................................................................................. 21
5.2.3 Keypad Operation Examples..................................................................................................................22
Chapter 6 Function Introduction.......................................................................................................................... 25
6.1 Display Parameter........................................................................................................................... 25
6.1.1 d00: Status Display Parameter............................................................................................................... 25
6.1.2 d01: Timing Display Parameter..............................................................................................................27
6.2 General Parameters........................................................................................................................ 28
6.2.1 F00: Basic Parameters ...............................................................................................................................28
6.2.2 F01: Protection of Parameters ............................................................................................................... 31
6.2.3 F02: Parameters for Start and Stop ......................................................................................................32
6.2.4 F03: Acc. / Dec. Parameter....................................................................................................................... 34
6.2.5 F04: Process PID Control.......................................................................................................................... 35
6.2.6 F05: External Setting Curve Parameter...............................................................................................38
6.2.7 F06: Multi-speed......................................................................................................................................... 39
6.2.8 F08: Asyn. Motor Parameters ................................................................................................................. 40
6.2.9 F09: V/f Control Parameters.................................................................................................................... 41
6.2.10 F10: Senior Parameter 1.........................................................................................................................42
6.2.11 F11: Senior Parameter 2.........................................................................................................................42
6.2.12 F15: Digital I/O Terminal Parameters................................................................................................. 43
6.2.13 F16: Analogue I/O Terminal Parameters ..........................................................................................51
6.2.14 F17: SCI Communication Parameter .................................................................................................53
6.2.15 F18: Display Control Parameter ..........................................................................................................54
6.2.16 F19: Function-boost Parameters ........................................................................................................ 55
6.2.17 F20: Fault Protection Parameters ....................................................................................................... 59
6.2.18 F23: PWM Control Parameter ..............................................................................................................61
6.2.19 P00: Timing Time Parameter ................................................................................................................61
6.2.20 P01: Timing Control Parameter...........................................................................................................62
Chapter 7 Troubleshooting and Maintenance ................................................................................................... 63
7.1 Troubleshooting.............................................................................................................................. 63
7.2 Maintenance.................................................................................................................................... 66
Appendix A MODBUS Communication Protocol ............................................................................................... 69
Appendix B Parameters.......................................................................................................................................... 79


Shenzhen Hpmont Technology Co., Ltd. Chapter 1 Safety Information and Precautions
HD3Z Series User Manual V1.2 -1-
Chapter 1 Safety Information and Precautions
Safety Definition
Pay attention to below marks on products / user manual.
Danger: A Danger contains information which is critical for avoiding safety hazard.
Warning: A Warning contains information which is essential for avoiding a risk of damage to products or other
equipements.
Note: A Note contains information which helps to ensure correct operation of the product.
Professional personnel
Only qualified electrical engineer can perform electrical wiring.
Only a trained and authorized professional person can maintain the product.
Braking
HD3Z has in-built braking unit and braking resistor, applying to braking load occasions that braking is less than 10%
only.
Danger
Warning
Note
Warning
1


Shenzhen Hpmont Technology Co., Ltd. Chapter 2 Product Information
HD3Z Series User Manual V1.2 -3-
Chapter 2 Product Information
2.1 Model
2.2 Rated Value
Refer to section 3.5 Dimensions and Mounting Size, page 9 for size information.
Model Motor
(kW)
Rated capacity
(kVA)
Rated input
current
(A)
Rated output
current
(A)
Size
HD3Z-4T055 55 72 113 110 Frame A
HD3Z-4T075 75 100 156 152 Frame A
HD3Z-4T090 90 116 180 176 Frame A
HD3Z-4T110 110 138 214 210 Frame B
HD3Z-4T132 132 167 256 253 Frame B
HD3Z-4T160 160 200 307 304 Frame B
HD3Z-4T200 200 250 385 380 Frame C
HD3Z-4T220 220 280 430 426 Frame C
HD3Z-4T250 250 309 475 470 Frame C
Product model
Motor power
Input specification
Output specification
Software version
Serlal number
MODEL: HD3Z-4T055
55kW
POWER:
3PH 280-460V 113A 50/60Hz
INPUT:
72kVA 0-460V 110A 0-400Hz
OUTPUT:
1.00
Version:
2

Chapter 2 Product Information Shenzhen Hpmont Technology Co., Ltd.
-4- HD3Z Series User Manual V1.2
2.3 Technical Data
Electrical
Input voltage
Rated voltage: Three phase 380V
Range: Three phase: 280 - 460V
Imbalance rate < 3%
Input frequency 50/60Hz ± 5%
Output voltage 0 - input vlotage
Output frequency 0 - 400.00Hz
Performance
Maximum current 150% rated output current for 2 minutes
180% rated output current for 10 seconds
Control mode V/f
Running command Keypad; External terminal; SCI communication
Speed setting Digital; Analogue / Pulse; SCI communication
Speed resulotion Digital setting: 0.01Hz
Analogue setting: 1‰ × max. frequency
Characteristic Functions
Parameter copy function Copy 2 sets of parameters from MCB of inverter to keypad and vise versa
Programmableinput / output
terminal Programmableinput / output terminal
Process PID adjustment function In-built process PID module
Timing start / stop function Can set 4 sets of timing start / stop
Timing frequency switch function Can set 8 timing frequency switch
Communication protocol MODBUS protocol
Protection Functions
Auto-limit current protection Output current can auto-limit against overcurrent fault
Overload pre-alarm and alarm Overload early pre-alarm and protect
Input / Output voltage phase loss
protection Input / Output voltage phase loss auto-detect and alarm function
PID commands and feedback loss
detection
PID can auto-identify whether loss the setting and feedback or the alarm
function
Power output grounding fault
protection Power output grounding fault protection is enabled
Power output short circuit
protection Power output short circuit protection is enabled
Input / Output
External analogue power supply +10V, max. 100mA
External digital power supply +24V, max. 200mA
Analogue input AI1 voltage 0 - 10V, AI2 current 0 - 20mA
Analogue output AO1 voltage 0 - 10V, AO2 current 0 - 20mA
Digital input DI1 - DI6, DI6 can be selected as high speed pulse signal
Digital output DO1

Shenzhen Hpmont Technology Co., Ltd. Chapter 2 Product Information
HD3Z Series User Manual V1.2 -5-
Input / Output
Relay output R1A / R1B / R1C, R2A / R2C - R7A / R7C
Contact rating 250VAC / 3A or 30VDC / 1A
Communication
Optical, TX / RX, MODBUS protocol
HD3Z has in-built optical transceiver single fiber mode. User optical flange
interface is ST type.
Keypad
LCD display
Display in Chinese
Display setting frequency, output frequency, output voltage, output current,
motor rpm, output torque, parameter for start and stop, status parameter and
fault code.
Parameter copy Achieve quick parameter copy
Environment
Running temperature -10 - +55°C
Storage temperature -40 - +70°C
Location for use In factory and mine (no corrosive gas, inflammable gas, oil mist and water
drip), may cause conducting pollution caused by dust and condensation
Humidity Less than 95%RH, non-condensing
Oscillation 2 -3.5m/s2when 2-9Hz; 10m/s2 (when 9 - 200Hz (IEC60721-3-3)
Protection class IP54
Pollution degree Degree 3 (dry conductive pollution)
2.4 Reactor Selection
Refer to Table 2-1 for selection of AC input reactor and AC output reactor.
Tab l e 2-1 Reactor selection
Model
AC input reactor AC output reactor
Model Para. (mH/A) Model Para. (mH/A)
HD3Z-4T055 HD-AIL-4T055 0.13/115 HD-AOL-4T055 0.04/125
HD3Z-4T075 HD-AIL-4T075 0.093/150 HD-AOL-4T075 0.035/160
HD3Z-4T090 HD-AIL-4T090 0.08/180 HD-AOL-4T090 0.03/200
HD3Z-4T110 HD-AIL-4T110 0.067/210 HD-AOL-4T110 0.02/225
HD3Z-4T132 HD-AIL-4T132 0.055/255 HD-AOL-4T132 0.016/280
HD3Z-4T160 HD-AIL-4T160 0.046/305 HD-AOL-4T160 0.013/320
HD3Z-4T200 HD-AIL-4T200 0.037/380 HD-AOL-4T200 0.011/400
HD3Z-4T220 HD-AIL-4T220 0.034/415 HD-AOL-4T220 0.01/450
HD3Z-4T250 HD-AIL-4T250 0.026/530 HD-AOL-4T250 0.009/560
2
This manual suits for next models
9
Table of contents
Other hpmont Inverter manuals

hpmont
hpmont HD20 Series User manual

hpmont
hpmont HD3N-TC Series User manual

hpmont
hpmont HD09 Series User manual

hpmont
hpmont HD09-2S0P2G User manual

hpmont
hpmont HD07-S Series Specification sheet

hpmont
hpmont HD30-2D0P4G 1.0 5.8 2.5 0.4HD30-2D0P7G 1.5 10.5 4.0 0.75HD30-2D1P5G 2.8 18.5 7.5 1.5HD30-2D2P2GHD30-2T3P7G 5.9 19 17... User manual

hpmont
hpmont HD31-4T2P2P User manual

hpmont
hpmont HD31 Series User manual

hpmont
hpmont HD09-S Series User manual

hpmont
hpmont HD20 Series User manual