manuals.online logo
Brands
  1. Home
  2. •
  3. Brands
  4. •
  5. HSS Hire
  6. •
  7. Grinder
  8. •
  9. HSS Hire Hilti DGHI50 User manual

HSS Hire Hilti DGHI50 User manual

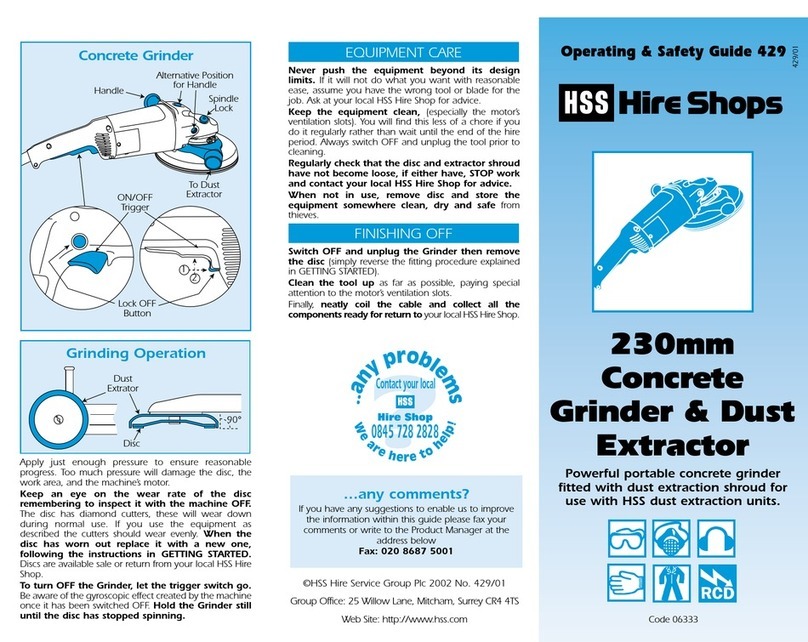
FINISHING OFF
©HSS Hire Service Group Ltd 2021No. 3016/01
Building Two, Think Park, Mosley Road,
Trafford Park, Manchester, M17 1FQ
www.hss.com
... have you been trained
The law requires that personnel using this type of equipment in
the workplace must be competent and qualified to do so.
Training is available at HSS Training
0845 766 7799
…any comments?
If you have any suggestions to enable us to improve the
information within this guide please e-mail your comments or
write to the Safety Guide Manager at the address beloww
e-mail: [email protected]
For advice on the safety and suitability of this
equipment contact your local HSS Hire Shop.
Keep children, animals and bystanders away from
the work area.
Never use this equipment if you are ill, feeling
tired, or under the influence of alcohol or drugs.
This equipment should only be used by a
competent person who has read and understood
these instructions.
Ensure the work area is well lit and ventilated. Do
not work near flammable gasses or liquids.
Safety Goggles MUST be worn by everyone in
the work area.
NOTE: Some materials being removed by this
process may contain substances which can be
harmful to health. A suitable mask must be worn
when using this equipment.
NOTE: This equipment generates potentially
harmful noise levels. To comply with health and
safety at work regulations, ear defenders must be
worn by everyone in the vicinity.
Wear practical, protective clothing,
gloves and footwear. Avoid loose garments
and jewellery that could catch in moving parts.
Ensure the tool is switched OFF before plugging it
in to its power supply. Switch off and unplug it before
making any adjustments.
Check the equipment before use. If it shows signs of
damage or excessive wear, return it.
Think twice before locking the ON/OFF control in
the ON position using any trigger lock.
If working above ground-level, work from a
suitable, stable platform - an access tower for
example. Never work from ladders or steps.
Information on COSHH regulations is available from your
local HSS Hire Shop.
The concrete planer should always be used with a dust
extractor unit.
Most HSS power tools plug into a standard 13amp
power socket. However, 110v tools (with a round
yellow plug) must be provided with a suitable 110v
generated supply, or powered from the mains via a
suitable 110v transformer.
ELECTRICAL SAFETY
GENERAL SAFETY
Extension leads should be fully unwound and
loosely coiled, away from the equipment. Never run
them through water, over sharp edges or where they
could trip someone.
Using electrical equipment in very damp or wet
conditions can be dangerous.
To reduce the risk of electric shock, use a
suitable RCD (Residual Current-Operated Device)
available from your local HSS Hire Shop, or power 240V
(Not 110V) equipment from a power circuit with a
built-in RCD.
If the equipment fails, or if its plug or lead gets
damaged, return it. Never attempt to repair it yourself.
Never carry or pull the equipment by its flex.
Ensure the work is free from nails, screws etc. If
these cannot be removed, drive them well below
the surface.
To start the tool, simply squeeze in the trigger.
Release the trigger to stop.
For continuous operation, squeeze the trigger then
push in the lock button. To stop the tool from the
locked position, squeeze the trigger fully then
release it.
To level a surface, the base of the planer should be
aligned with the diamond wheel. The front roller
should be adjusted upward, to the level required, for
the desired amount of stock removal.
To change the amount of stock removed, loosen
the allen bolts on the grip holder with the allen
key (provided).
GETTING STARTED NOTE: The maximum stock removal should not
exceed 2.5mm.
The planer has a built in dust extraction system. To
empty the dust bag, unclip it from machine then
slide the bag sealing strip back. To refit simply reverse
the above instruction. Connect house from the dust
extractor to the tool dust port outlet.
Intended Use
The product described is an electrically powered
diamond grinder for grinding mineral materials.
Always use a dust extractor to ensure optimum dust
removal. The grinder is designed exclusively for dry
abrasive removal of uncoated mineral materials
and thin coatings on concrete and similar mineral
materials, with a maximum layer thickness of 3 mm
(0.12in). Use both hands to hold the product firmly.
Siting an RCD
When used with a transformer an RCD will only
protect the user if fitted between the transformer and
the tool being used.
An RCD fitted between the power supply and the
transformer only protects up to the transformer.
Tool or
Lead RCD Transformer Supply
Raise or lower the front roller to adjust the
gap between it and the diamond wheel. The
difference is the stock removal amount.
Once the correct setting is achieved, secure
the front roller by tightening the allen bolts.
If the tool fails, or if its flex or plug gets damaged,
return it. Never try to repair it yourself.
Keep the flex out of harm’s way, draping it over one
shoulder to keep it clear of moving parts.
1. Side handle
2. Clamping lever side
handle
3. Supply cord
4. Release buttons, bow
grip
5. Height adjustment of
the guard
6. Adjusting lever for
segment opening
7. Segment opening
8. Guard with Lamellar
seal
9. Mounting flange
10. Diamond cup wheel
11. Keyless quick-action
clamping screw
12. Holder for grinding
pad
13. Grinding pad for
precision grinding
14. On/off button
15. Locking button cor
continuous operation
16. LED status indicator
17. Buttons for gear
selection
18. Gear indicator
19. Connector for dust
extraction
Inadmissible misuse
Do not use accessory tools that are not approved for this
product. This includes cut-off wheels, diamond cut-off
wheels and rotary wire brushes.
Do not use the product for wet grinding, do not
grind projecting objects such as nails or screws.
Do not use the product if slats on the dust hood
are worn; never use the product without a dust
extractor. Never use the grinding pad at a speed for
which it is not approved.
Preparations at the workplace
Installing an accessory tool
1. Clean the chuck
2. Slip the mounting flange on to the arbor and turn
the mounting flange until it engages
3. Position the accessory tool on the centering collar of
the mounting flange
4. Screw the quick-action clamping screw into the
arbor and tighten the screw
Removing the accessory tool
1. Slacken the clamping nut
2. Remove the accessory tool
Adjusting the side handle
1. To release the side handle, open the clamping lever
2. Adjust the side handle to the desired position
3. Close the clamping lever
Adjusting the guard
1. Switch the grinder off
2. Position the power tool on the grinding wheel
3. Use the height adjuster to adjust the height - Note:
The guard is at the optimum height when the
distance between the slats and the surface is
approximately 1mm.
4. If you are working along a wall, turn the segment
opening of the guard to the desired position
5. Be sure to close the segment opening when you
finish working along the wall
Selecting the gear
CAUTION - Risk of injury and damage. If speed is too
high, segments of the grinding accessory can come
loose. Use only gears 1 and 2 for fine grinding.
GETTING STARTED CONT. 1. Use the gear selector switch to select a gear to suit
the accessory tool you are going to use and the
hardness of the material to be worked
2. Use 1st gear for better dust control when grinding
off soft mineral materials, such as paint from cement
rendering, and to make the power tool easier to
guide when grinding off coatings from soft materials
3. Use 5th gear to apply full power of the tools when
grinding hard mineral materials such as concrete,
floor screeding or natural stone
Types of work
Switching on
CAUTION - Risk of injury. Inadequately secured accessory
tools can work loose. Before each use, always check that
the accessory tool is secure.
1. Connect the grinder to an industrial vacuum cleaner.
2. Lift the power tool clear of the work surface
3. Press and hold down the on/off switch - the status
LED of the locking button flashes
4. Press the locking button to switch on the grinder in
continuous-operationmode - the locking button has
to be pressed within one second
Trying out after fitting a new diamond cup wheel
CAUTION - Risk of injury. Damaged diamond cup wheels
can come loose.
Do not use a diamond cup wheel if it vibrates; protect the
cup wheel against impact, shock loading and grease.
Hold the power tool just clear of the surface you are
going to work on and allow it to run for at least 1 minute
without load.
Sanding
1. Select a gear
2. Switch the grinder on
3. Bring the power tool with the accessory tool into
contact with the work surface and keep the tool
moving with a steady back-and-forth action
4. Apply moderate pressure and do not dig the tool
into the material
5. The diamond cut wheel can overheat and suffer
damage when used to grind very hard mineral
materials such as concrete with a high gravel
content. Under these circumstances take frequent
breaks from grinding and, with the power tool idling,
allow the diamond cup wheel to cool down briefly
Switching off
To switch off the power tool, press the locking button
or the on/off switch
Always hold the planer with both hands and
switch ON before bringing the planer into contact
with the work.
Adopt a stable posture with both feet on firm level
ground, do not work in areas where you are forced to
stand on loose debris or on a slippery uneven surface.
BASIC TECHNIQUE
Never apply too much pressure. Keep the planer
moving either in a straight line or in a circular motion,
or it may rut the work.
Lift it clear before switching OFF, and wait for
moving parts to stop before putting it aside.
On first contact with the surface, the planer will
try to throw you off line. Take great care until you
become familiar with the tool.
Never push the equipment beyond its design
limits. If it will not do what you want with reasonable
ease, assume you have the wrong tool for the job. Ask at
your local HSS Hire Shop for advice.
Regularly check the condition of the diamond
wheel, if it show signs of excessive wear contact your
local HSS Hire Shop for a replacement.
Keep the equipment clean. You will find this less of a
chore if you clean up regularly, rather than wait unit the
end of the hire period.
When not in use, store the equipment somewhere
clean, dry and safe from thieves.
When using the dust extractor listen for the bleep
noise and view the lamp indicator as there could be
restricted air flow or the dust bag needs replacing.
Switch OFF and unplug the planer. Remove the
dust extractor hose from the tool dust port. Remove
and empty the dust collection bag
Thoroughly clean the machine and dust extractor,
ready for return to HSS.
EQUIPMENT CARE
FINISHING OFF
Pe
Petrol Di
Diesel
Ro
Read OPS Guide Ou
Outdoor Use only Hl
Heavy Lifting Cd
Check Oil daily
Cc
Cleaning Charge Rc
Repair Charge
Know Your Symbols
Correct PPE
must be worn
General use PPE / Warning
Fuel and Supply Types
Safe Procedures
Return Responsibility
Clearly marked minimum PPE
will be visible on all equipment,
All hirers must understand and
respect the safe procedures
of all equipment.
It is the responsibility of the hirer
to maintain and return the
equipment in a clean condition
and good working order.
Charges apply to equipment
returned dirty and damaged.
HSS have created clear Icons to inform the hirer of
their responsibilities towards the safe use of hire equipment.
These are designed to reduce the amount of different safety
information labels required for each product for hire.
Danger
Electric shock
2t
2 - Stroke Petrol
Cf
Check Fuel daily
Cw
Check Water daily
Ea
Must be Earthed
Class 1
Doi
Double Insulated
Class 2
21
Swl
Refer to Data Plate
SWL
V
Check Power
Voltage Data Plate
V
Danger
Rotating blade Danger
Hot exhaust
HAV
Hand Arm Vibration
Caution
Abrasive Wheel Caution
Finger trap
El
Electric
Electrical Safety
Safe wiring procedures. Enl
Earth Live Neutral
Wire Coding
E
N
L
!
PPE
Bc
Battery Care Sh
Safe Height
Working

This manual suits for next models

1

Other HSS Hire Grinder manuals

HSS Hire 452 Operator's manual

HSS Hire

HSS Hire 452 Operator's manual

HSS Hire 6333 Troubleshooting guide

HSS Hire

HSS Hire 6333 Troubleshooting guide

HSS Hire 964 Installation and operating manual

HSS Hire

HSS Hire 964 Installation and operating manual

HSS Hire 06348 Troubleshooting guide

HSS Hire

HSS Hire 06348 Troubleshooting guide

HSS Hire HTC 270 Troubleshooting guide

HSS Hire

HSS Hire HTC 270 Troubleshooting guide

Popular Grinder manuals by other brands

Hitachi G 12VA Technical data and service manual

Hitachi

Hitachi G 12VA Technical data and service manual

KNECHT A 950 III operating instructions

KNECHT

KNECHT A 950 III operating instructions

Proxxon BSL 220/E manual

Proxxon

Proxxon BSL 220/E manual

Felisatti SG6/750 operating instructions

Felisatti

Felisatti SG6/750 operating instructions

Makita DGA521 instruction manual

Makita

Makita DGA521 instruction manual

Toro STX-38 Cleaning guide

Toro

Toro STX-38 Cleaning guide

Ronix 3100K quick start guide

Ronix

Ronix 3100K quick start guide

Makita 9565 Parts Breakdown

Makita

Makita 9565 Parts Breakdown

Makita DGA518 instruction manual

Makita

Makita DGA518 instruction manual

Bosch 1375A - Grinder Angle 4 1/2 Small 6 Amp operating instructions

Bosch

Bosch 1375A - Grinder Angle 4 1/2 Small 6 Amp operating instructions

DeWalt D28065 Original instructions

DeWalt

DeWalt D28065 Original instructions

PROPOINT 8712135 user manual

PROPOINT

PROPOINT 8712135 user manual

Parkside PWS 230 A1 Operation and safety notes

Parkside

Parkside PWS 230 A1 Operation and safety notes

Worksite BG106 Operator's manual

Worksite

Worksite BG106 Operator's manual

Makita 9527PB Parts Breakdown

Makita

Makita 9527PB Parts Breakdown

Ryobi BG612GSB Repair sheet

Ryobi

Ryobi BG612GSB Repair sheet

LEVIOR 28030 Manual for use

LEVIOR

LEVIOR 28030 Manual for use

Nitto Kohki MG-40 instruction manual

Nitto Kohki

Nitto Kohki MG-40 instruction manual

manuals.online logo
manuals.online logoBrands
  • About & Mission
  • Contact us
  • Privacy Policy
  • Terms and Conditions

Copyright 2025 Manuals.Online. All Rights Reserved.