HSS Hire Hire-Weld HW024 Troubleshooting guide

Electro-Fusion
Pipe Welder
A pipe-welding device for use with
specialist polyethylene pipe systems.
Operating & Safety Guide HW024
With output voltage selected by the user (between
8 and 44Vac.rms. the user would also need to input
fusion time and voltage information).
Manual 39.5Vac.rms. setting…
With the unit switched OFF, press and hold the No
3 keypad and switch the main unit ON.
The LCD will display ‘MANUAL MODE 39.5’, you
can now release the No 3 key and proceed with the
set-up.
The LCD will then display ‘VERSION 5.0’ then
‘ENT.OP-CODE 000’. The latter is asking you to input
your operator code and should NOT be used unless the
unit is to be used by more than one person. If you input
a new three-digit code, make sure you don’t forget it.
The LCD will prompt the user to connect the output leads
to the fitting. Connect the leads ensuring a firm
positive connection is achieved.
The unit will then ask for the electro-fusion time
for the particular joint. The time information will
be found on the joint, enter the value using the
numerical keypads then press enter.
Finally, press the green START button to activate the
weld, (the LCD will display the fusion time and will count
down during the fusion cycle). Once the weld is
complete, the buzzer will sound and the LCD will
display a joint reference number for your records.
You should now switch the main unit OFF before
disconnecting the output leads and proceed to the
next joint.
Manual Variable 8 – 44Vac.rms. setting…
With the unit switched OFF, press and hold the No
4 keypad and switch the main unit ON.
The LCD will display ‘MANUAL MODE 8/44’, you
can now release the No 4 key and proceed with the
set-up.
The LCD will then display ‘VERSION 5.0’ then
‘ENT.OP-CODE 000’. The latter is asking you to input
your operator code and should NOT be used unless the
unit is to be used by more than one person. If you input a
new three-digit code, make sure you don’t forget it.
The LCD will prompt the user to connect the output leads
to the fitting. Connect the leads ensuring a firm
positive connection is achieved.
The unit will ask for the electro-fusion time for the
particular joint. The time information will be found
on the joint, enter the value using the numerical keypads
then press enter.
The unit will then ask for the fusion set voltage for
the particular joint. Again, the voltage information
will be found on the joint, enter the value using the
numerical keypads then press enter. If the joint is a
39.5Vac.rms. joint you can weld in this mode by entering
a voltage of 99.
Finally, press the green START button to activate the
weld, (the LCD will display the fusion time and will count
down during the fusion cycle). Once the weld is
complete, the buzzer will sound and the LCD will
display a joint reference number for your records.
You should now switch the main unit OFF before
disconnecting the output leads and proceed to the
next joint.
Barcode Set Up…
With the unit switched OFF, press and hold the No
5 keypad and switch the main unit ON.
The LCD will display ‘BARCODE MODE’, you can now
release the No 5 key and proceed with the set-up.
The LCD will then display ‘VERSION 5.0’ then
‘ENT.OP-CODE 000’. The latter is asking you to input
your operator code and should NOT be used unless the
unit is to be used by more than one person. If you input a
new three-digit code, make sure you don’t forget it.
The LCD will prompt the user to connect the output leads
to the fitting. Connect the leads ensuring a firm
positive connection is achieved.
The unit will ask for the barcode for the particular
joint. The barcode will be found on the joint, simply
hold the scanner over the barcode until the LCD
displays the 24 bit code read.
If the barcode cannot be read the LCD will display a
fault and you will have to enter the code manually.
Enter the code using the numerical keypads then
press enter.
You will then be prompted to press the green START
button to activate the weld, (the LCD will display the
fusion time and will count down during the fusion cycle).
Once the weld is complete, the buzzer will sound
and the LCD will display a joint reference number
for your records.
You should now switch the main unit OFF before
disconnecting the output leads and proceed to the
next joint.
Never push the equipment beyond its design
limits. If it will not do what you want with
reasonable ease and speed, assume you have the
wrong type or size of welder for the job. Ask at
your local HSS Hire Weld Depot for advice.
When not in use, store the equipment somewhere
clean, dry and safe from thieves.
Keep the equipment clean. You will find this less of a
chore if you clean it up regularly rather than wait until
the end of the hire period.
Switch OFF and unplug the unit from its power
supply. Disconnect all leads and coil them up
neatly ready for return, to your local HSS Hire Weld
Depot.
FINISHING OFF
EQUIPMENT CARE
Code 55010
©HSS Hire Service Group Plc 2001 No. HW024/01
Group Office: 25 Willow Lane, Mitcham, Surrey CR4 4TS
Web Site: http://www.hireweld.com
…any comments?
If you have any suggestions to enable us to improve
the information within this guide please fax your
comments or write to the Product Manager at the
address below
Fax: 020 8687 5001
HW024/01
Output
Leads
Joint
Joint
Information
Connections

For advice on the safety and suitability of this equipment
contact your local HSS Hire Weld Depot.
There is a serious risk of personal injury if you do
not follow all instructions laid down in this guide.
The hirer has a responsibility to ensure that all
necessary risk assessments have been completed
prior to the use of this equipment.
Most welding tasks may be considered as hot work
in site situations and may be subject to specific
permits to work.
This equipment should only be used by an operator
who has been deemed competent to do so by
his/her employer.
This equipment should be used by an able bodied,
competent adult who has read and understood these
instructions. Anyone with either a temporary or permanent
disability, should seek expert advice before using it.
Keep children, animals and bystanders away from
the work area. Cordon off a NO GO area using
cones and either barriers or tape, available for hire
from your local HSS Hire Weld Depot.
Never use this equipment if you are ill,
feeling tired, or under the influence of
alcohol or drugs.
This equipment is heavy (26Kg), never attempt
to lift it on your own, always get help.
Wear practical, protective clothing,
gloves and footwear. Avoid loose garments
and jewellery that could catch in moving parts, tie back
long hair.
Take all necessary precautions to protect yourself
and others against the possibility of contracting
infectious diseases in your work environment.
Always switch OFF and unplug the equipment
when not in use.
Never use welding equipment near computers or
any sensitive electronic equipment.
Ensure the work area is well lit and ventilated, a
fume extractor or smoke eliminator should be used. If in
doubt, ask about lighting and ventilation equipment at
your local HSS Hire Weld Depot.
Warning
If you are wearing an electronic life support
device (a heart pacemaker) you must consult
your doctor before going near or working with
this equipment. Magnetic fields associated with
high currents may affect these devices.
GENERAL SAFETY Do not work near flammable gases or liquids, petrol
or paint thinner fumes for example. Keep combustible
materials at a safe distance – at least 5m.
Make sure you know how to switch this machine OFF
before you switch it ON in case you get into difficulty.
Check the condition of the equipment before use.
If it shows signs of damage or excessive wear, return it to
your local HSS Hire Weld Depot.
The HSS Electro-Fusion Pipe Welder requires a 110V
16amp power supply either from an ECE3 TIN12 3.0
kw (5kva) generator or transformer.
If the equipment fails, or if its power supply cable
or plug becomes damaged, return it. Never try to
repair it yourself.
Keep cables out of harm’s way, and clear of the
work area.
Extension leads should be fully unwound and
loosely coiled, away from the equipment. Never run
them through water, over sharp edges or where they
could trip someone.
Keep the equipment dry, using electrical
equipment in very damp or wet conditions can
be dangerous.
To reduce the risk of electric shock, always
use a suitable RCD (Residual Current-Operated
Device) available from your local HSS Hire Weld Depot.
Ensure the welder and the power socket are switched
OFF before plugging into the power supply.
This guide is designed to help the user to safely set
up and dismantle the welder. It is not intended as
a guide to welding techniques as it is assumed
that the user already has the necessary
training/knowledge and experience.
Position the main unit close to the power supply
and the pipe joint.
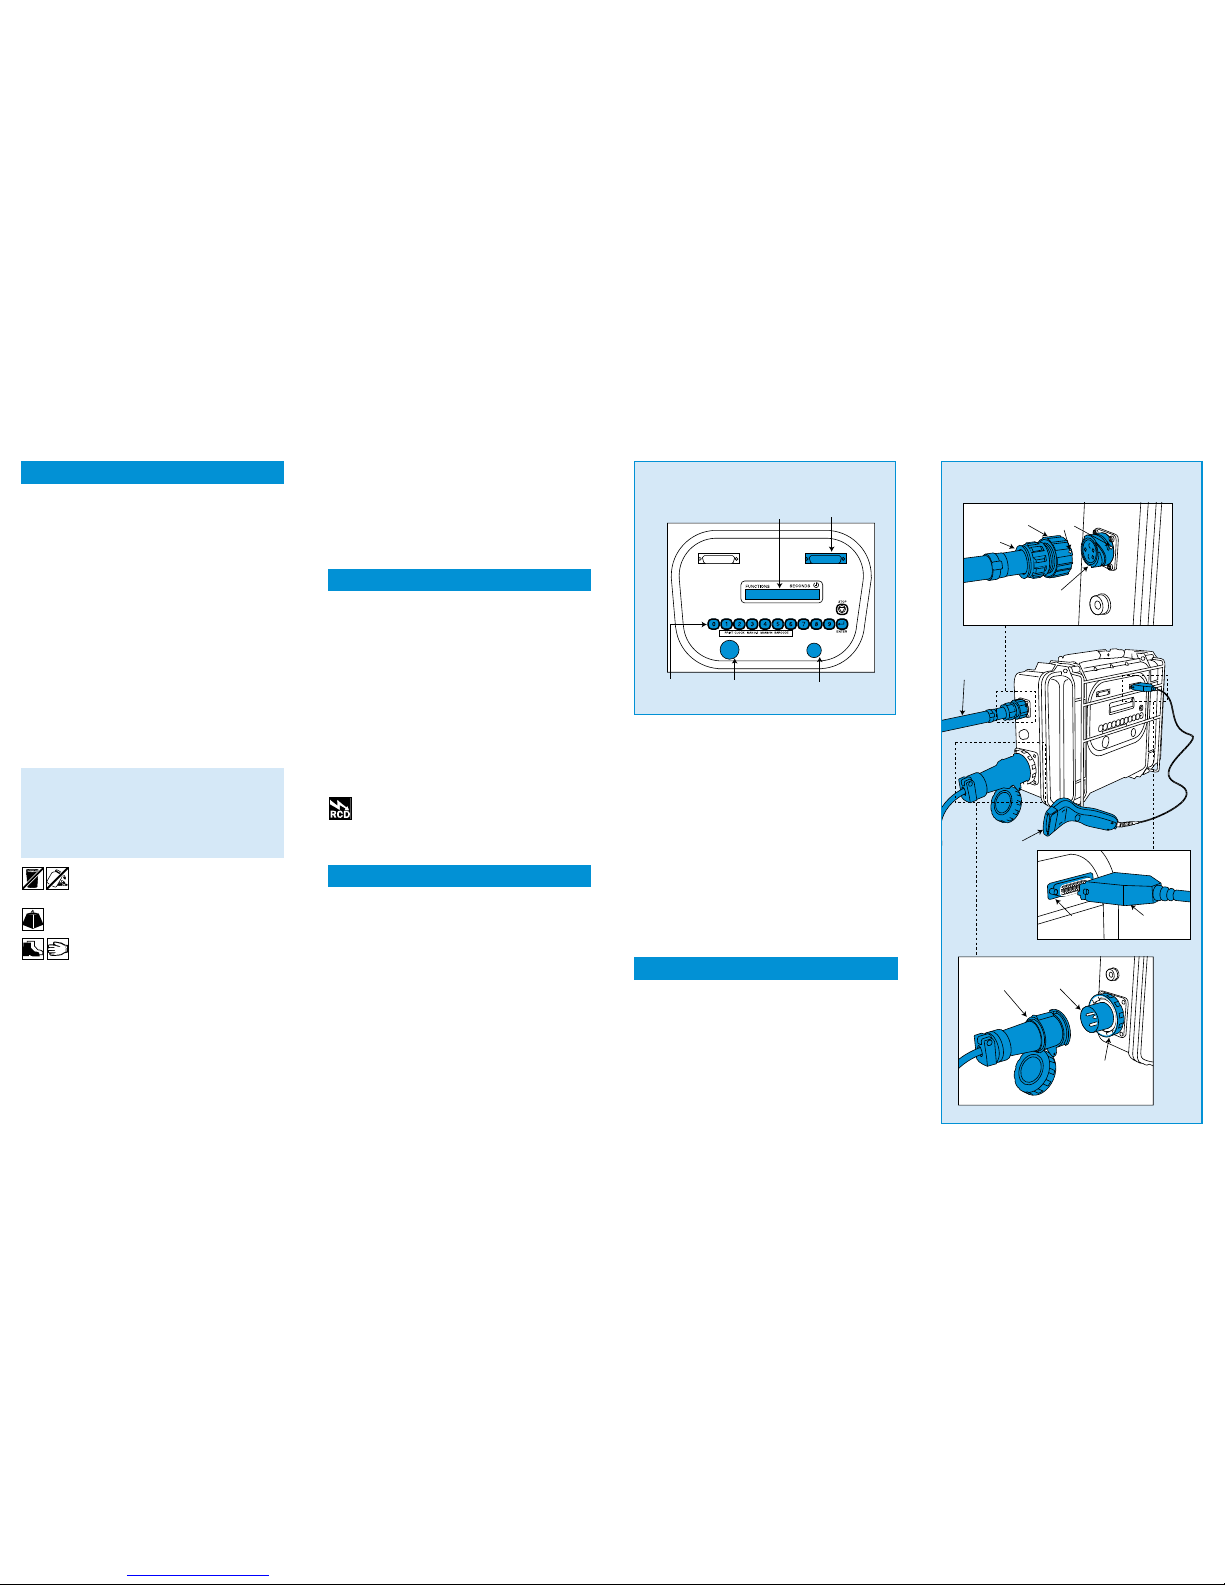
Connect the output lead 5-pin plug to the
connection socket on the side of the main unit (see
illustration). Push the plug in then lock in place by
turning the lock collar clockwise until the yellow dot on
the plug lines up with the yellow dot on the socket.
Connect the power supply cable to the connector on
the side of the main unit and once inserted, turn the
collar clockwise to lock in position.
Finally, if using the barcode system, connect the
readers’ RS232 plug to the RS232 socket marked
‘BAR CODE’.
GETTING STARTED
ELECTRICAL SAFETY
It is essential to familiarise yourself with all the
controls before starting.
There is a red emergency STOP button which also
acts as the ON / OFF master switch. To switch the
unit ON, turn the STOP button anticlockwise until
it pops out.
If you get into difficulty at any time, press the
STOP button to switch the unit OFF and stop any
welding process.
The green button to the right of the unit is the
START button. Press this to begin the electro-fusion
process and timer.
The key buttons marked 0 through to 9 are used
to input values where required and are also used
to select different functions (as described in BASIC
TECHNIQUES).
The LCD display will show various information,
depending on the situation.
The Electro-Fusion Pipe Welder can be set up in
either manual or barcode mode depending on the
type of fittings you are using.
If no barcode is available, follow the ‘manual set
up’ instructions. If a barcode is available, follow
the ‘barcode set up’ instructions.
Manual Set up…
The manual set up allows for two operation modes.
With output voltage set at 39.5Vac.rms (where
each process would be fixed at that setting and no fusion
voltage would be required).
BASIC TECHNIQUES
5 Pin
Socket
Yellow
Dot
Lock
Collar
Connection
Socket
Barcode
Scanner
Power
Supply
Cable
RS232
Socket RS232
Plug
Power
Supply
Socket
Lock
Collar
Output
Lead
Electro-Fusion Pipe Welder
LCD
Display
RS232
Scanner
Connection
Numeric
Key Pad Green
Start Button
Red
STOP Button
Control Panel
Other HSS Hire Welding System manuals