HTC ARIA User manual

HTC ARIA™
USER MANUAL
BY KEITH KARATZAS

CONTENTS
Safety Instructions and Warnings ...................................................................................................................................1
Included in the box..........................................................................................................................................................1
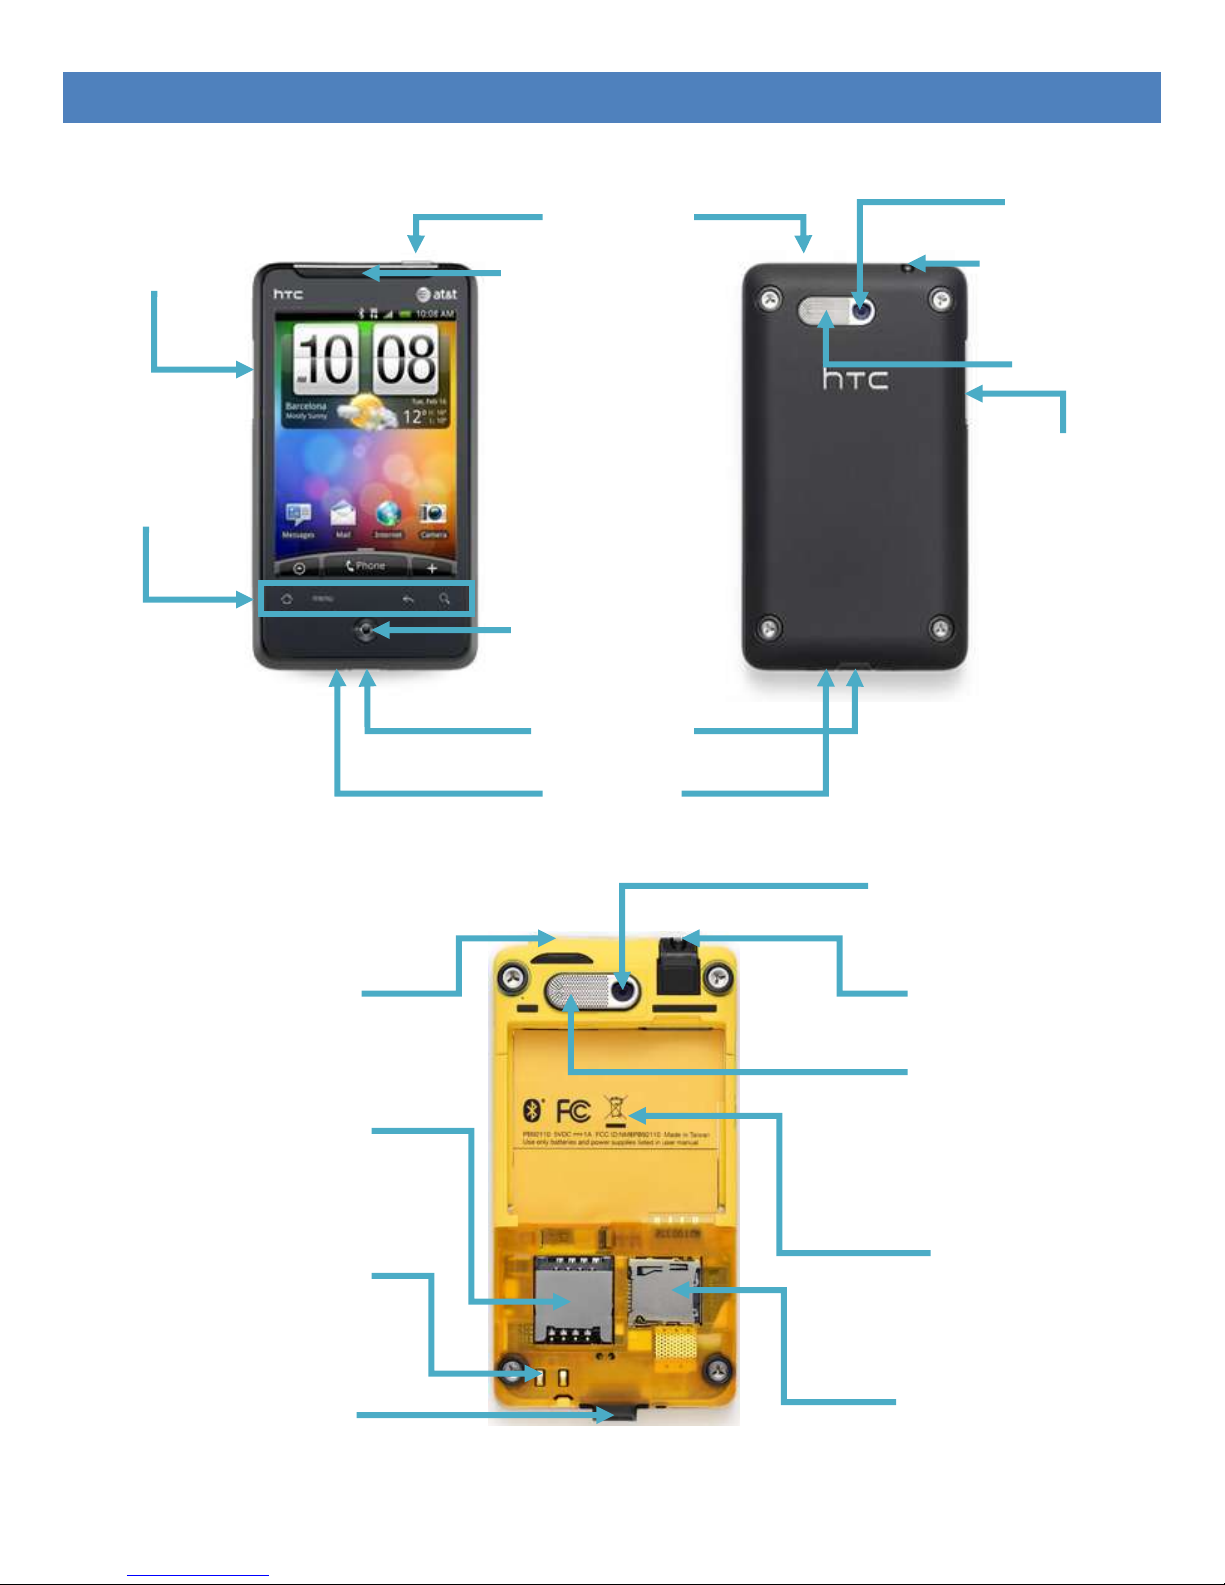
Operating the Device.......................................................................................................................................................2
Getting Started ................................................................................................................................................................3
Google Account ...........................................................................................................................................................4
Power Button ..............................................................................................................................................................4
Notification Icons ........................................................................................................................................................5
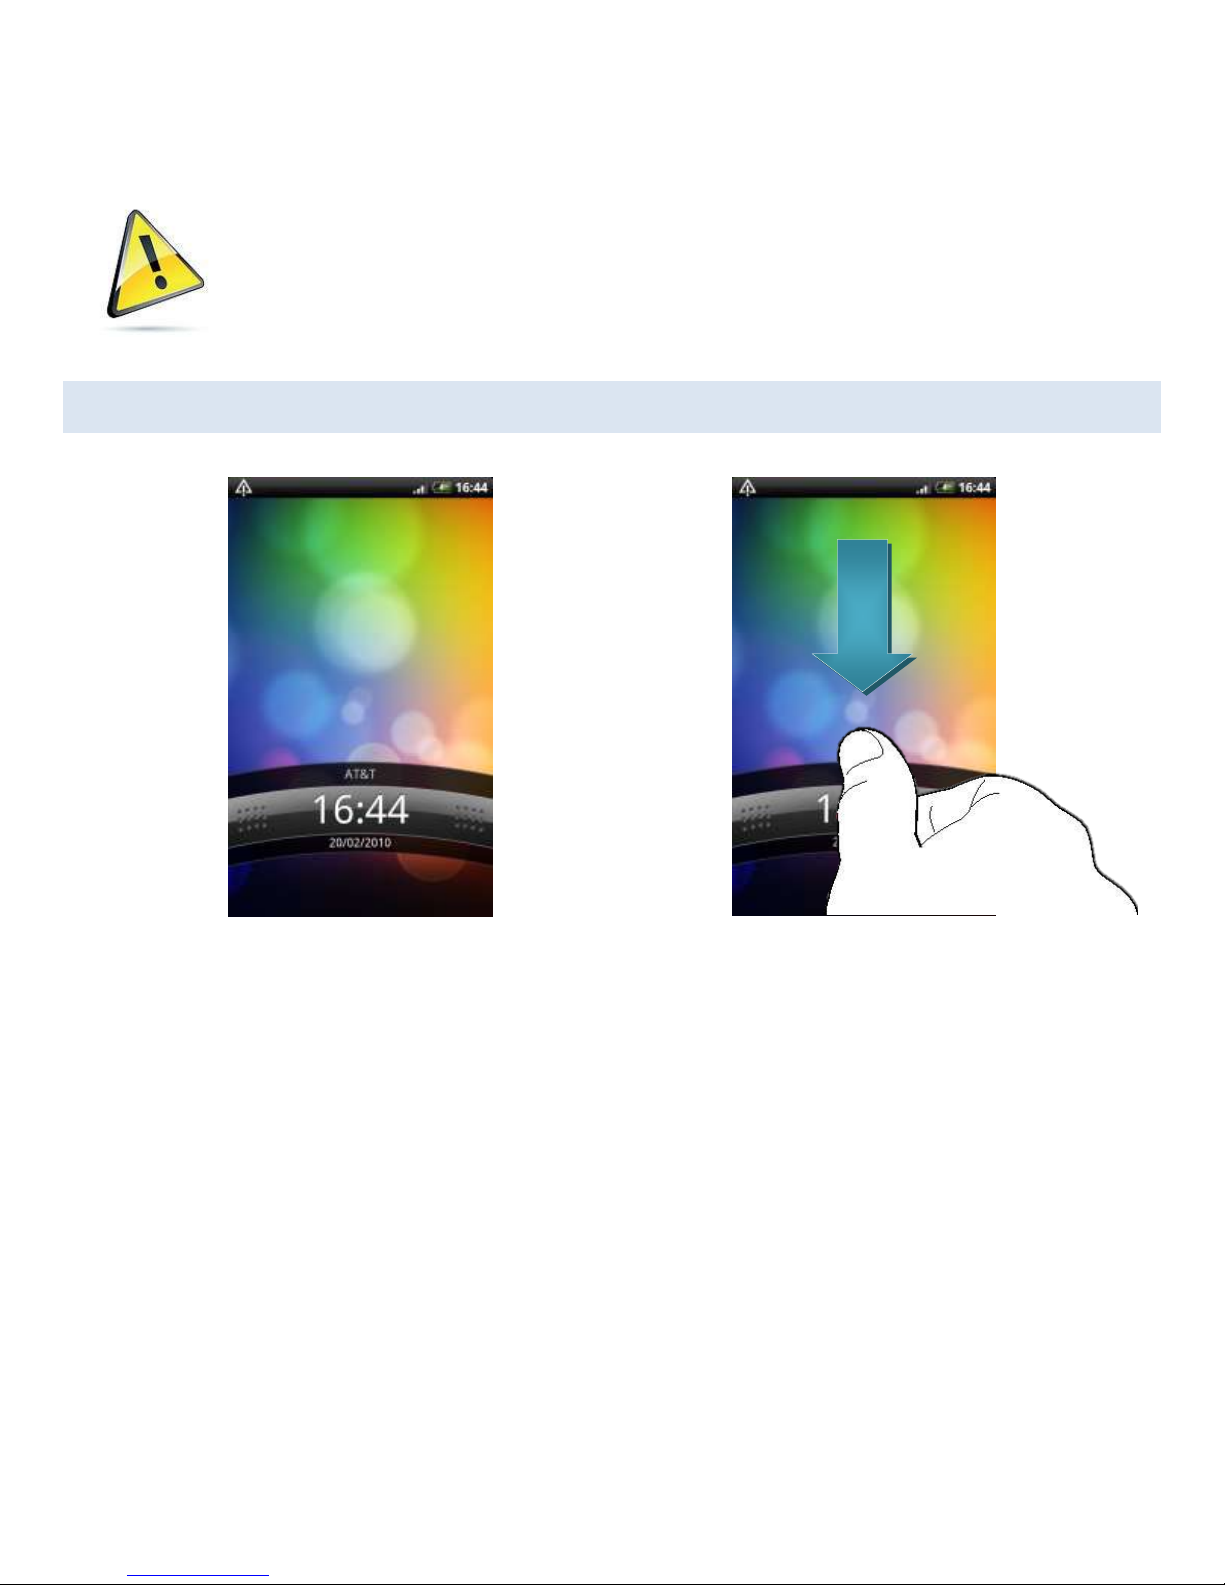
Lock Screen..................................................................................................................................................................6
Home Screen ...............................................................................................................................................................7
navigation....................................................................................................................................................................7
Adding app icons to a homescreen .............................................................................................................................7
Removing or moving app icons from a home screen ..................................................................................................8
Using the phone ..............................................................................................................................................................9
Making a phone call ....................................................................................................................................................9
While in a call ..............................................................................................................................................................9
Incoming Calls............................................................................................................................................................10
Voicemail...................................................................................................................................................................10
Compatibility Issues.......................................................................................................................................................11
Data Connections ......................................................................................................................................................11
Connecting to a computer.........................................................................................................................................11
Linking to other Accounts..........................................................................................................................................12
Android marketplace.................................................................................................................................................12
Troubleshooting ............................................................................................................................................................13
Processing Speeds .....................................................................................................................................................13
Android Update .........................................................................................................................................................13
Product Specifications ...................................................................................................................................................14

1
SAFETY INSTRUCTIONS AND WARNINGS
MicroSD Card Removal
Always remove or install a memory card when
phone is off. Removing the card while the phone is
on may lead to data corruption.
Battery Overheating
Should the battery overheat while charging, it will
disable charging to prevent the battery catching fire.
INCLUDED IN THE BOX
Phone
USB Cable
USB to outlet plug
3.5 mm wired headset
Battery
2 GB MicroSD memory card slot

2
OPERATING THE DEVICE
Micro SD Card slot
Battery slot
SIM Card slot
Back cover connectors
Micro USB Port
Rear speaker
Power button
3.5mm Audio Port
Power Button
Rear speaker
Camera
Camera
3.5mm Audio Jack
Micro USB Port
Joystick Control
Front Speaker
Volume Control
Volume Control
Control Buttons
Microphone

3
GETTING STARTED
ongratulations on purchasing the HTC Aria.
The battery included with the phone has a
temporary charge and needs to be fully
charged before the phone is ready to use. Follow
the instructions included with the battery to
properly install it, along with the SIM card and
included 2 GB MicroSD card.
Once installation of these parts is complete,
install the back cover of the phone, careful to avoid
the protruding volume buttons on the side of the
phone. The phone will not activate without the
back cover installed.
There are two metal contacts on the back of the
phone which prohibit activation without the back
cover to bridge the connections. Be sure to line up
the rear speaker with the corresponding opening in
the back cover.
C
Slide the SIM card in to its slot with the
notched corner of the card to the upper
left.
To insert the battery, align the contacts
on the battery with the lower-right hand
corner of the slot.
This is the proper way to insert the
memory card, push it in until a *click*
sound is heard.
This is the proper method to attach the
back plate of the phone.
1.
Install the battery, SIM card
and memory card.
2.
Attach the back cover.
3.
Charge the phone for 12
hours.
4.
Start using your HTC Aria

4
GOOGLE ACCOUNT
The HTC Aria is an Android-based device. Android
was created by Google. When the phone is first
activated, you will be prompted to create a Google
account. Choose an existing account or create one
specifically for this phone. Once a Google account
has been selected, accessing Google-owned sites will
be considered logged in with this account. These
include, but are not limited to: Gmail, YouTube and
Google.
Creating a new phone contact and choosing to add
it to the Google address book will make contacts
available to other Google functions.
POWER BUTTON
Action:
Function:
Press and hold the power button.
Phone power setting options will appear
Phone OFF
Silent mode
Vibration Mode
Airplane mode
Mobile Network On/Off
(For more information see page on Data
Connections)
While display is blank, press and release.
The display will reactivate, showing lock screen.
While display is active, press and release.
The display will go blank.

5
NOTIFICATION ICONS
Phone status and connection icons
Message, warnings and ongoing function icons

6
Notification icons are used to mark changes in status of the phone, warnings or concerns, and ongoing
actions. Most of the time, these icons are self-explanatory but the provided list of icons will show which
functions of the phone are currently active.
The notification bar will not appear while apps are active. If there are no auditory
notifications set for an action, then there will be no warnings or status updates until
returning to a home screen.
LOCK SCREEN
The lock screen is the shown only if the phone is locked. This will appear after using the power button to
reactivate the display. To unlock the phone, slide a finger down the screen to unlock it. All other external
buttons and controls on the phone will not function if the phone is locked, other than the volume control in
certain situations. The volume control buttons will only work if an installed app, which includes audio such as
the Music app, is running while the phone is locked.
The lock screen will also change depending on which apps are active at the time. The pre-installed “Music”
app will add “Back, Forward and Play/Pause”buttons to the lock screen so the phone does not have to be
unlocked to use the controls. These media controls may disappear from the lock screen. If they do, place your
finger along the top edge of the lock bar and slide your finger up the screen.

7
HOME SCREEN
On the home screen, pressing the home button on
the front of the phone (which has an icon shaped like
a house) will bring up miniature versions of all the
screens and allow selection of a specific one.
Finger swipe gestures allow movement between
the screens, but they do not rollover to the other
side.
The home screen is the default location which the
phone will show when the display is reactivated or
the phone is turned on. It can be modified to show
whichever apps you choose. There are a total of
seven screens (3 to the left, 3 to the right) but the
center one will show whenever the phone is turned
on or the phone is unlocked. It is recommended to
place icons most frequently used on the center
screen.
NAVIGATION
Finger gestures such as swipe, drag, tap and two-
finger enlarge are possible on the touch screen but
the joystick on the phone’s faceplate can also be
used. The joystick can be used to move and select
icons from the screen.
ADDING APP ICONS TO A HOMESCREEN
Each app, widget and function is available to be placed on the home screens. To add new icons to the
home screen, press and hold on the chosen location. Another menu will appear to select an icon for the
chosen app. Once selected, the icon will appear on the home screen.

8
REMOVING OR MOVING APP ICONS FROM A HOME SCREEN
To remove an app from a home screen, press and hold the icon. The app can be moved to a new position
on the screen or if it is moved to an edge, the next home screen on that side (if there is one) will appear and it
can be placed there. A new option will also replace the phone application at the bottom of the screen which
will say “Trash.”Dragging the icon to that location and letting go will remove the icon from the screen.
Moving or removing an icon from any home screen will not delete it from the phone. It
will simply remove it from the screen. Apps will still be accessible through the “More”
button on any home screen. The “More”button is the small button at the lower-left
handed corner of any home screen and has the illustration of a small triangle on it.

9
USING THE PHONE
MAKING A PHONE CALL
Touching the phone button available on any home
screen will activate the phone function.
The phone number can be entered manually or by
typing the first few letters of the contact name or
number and the phone will automatically search the
contacts on the phone.
The list over the phone numbers are previously
dialed calls. They can be scrolled through and the
numerical pad will temporarily disappear. If you do
not find what you are looking for, tap the button in
the lower-left hand corner of the screen to bring the
numerical pad back.
WHILE IN A CALL
While in a call, an image will appear, if there is one,
for the contact on the phone. If not, then the Android
droid mascot will appear. (See Linking to other
Accounts for more information)
Over the “End Call” button at the bottom of the
screen, a pair of buttons will be visible only while in a
call. The left one will hold the call, while the button
on the right will activate the speakerphone function.
The headset volume or speaker volume can be
adjusted by using the volume buttons on the side of
the phone.

10
INCOMING CALLS
If the phone is unlocked, then this screen will appear,
replacing any active app or function on the phone. An
image of the caller will appear if there is a connected
account.
If the phone is locked, the screen will activate.
Drag the bar up to reject the call or down to accept it.
The phone can also be flipped face-down. This will
mute the ringer as well as send the call to voicemail.
During a call, the phone’s display may go dark. This does not mean that the phone has
shut off or dropped the call. Hold the phone away from your ear momentarily and the
phone’s sensors will detect the movement and reactivate the display.
VOICEMAIL
To access the voicemail system for the phone, open the phone function. On the numerical pad, press and
hold “1” until the phone enters a call. Entering the voicemail system for the first time, the system will prompt
you to change your greeting and give instructions on how to change it.

11
COMPATIBILITY ISSUES
DATA CONNECTIONS
The HTC Aria has both 3G and WiFi capability. The 3G connection is carrier dependent but can be rendered
inactive for a time. WiFi can be enabled and disabled to save power as needed. It will drain the phone’s
battery faster if it is active.
If both the 3G and WiFi are active at the same time, the phone will automatically attempt
to connect to any detected wireless networks before it will allow an active 3G
connection. If you intend on using a 3G connection instead of WiFi, disable the WiFi
system.
CONNECTING TO A COMPUTER
With the included USB cable (MicroUSB to USB),
this phone can be connected to a computer. After
connecting it to a computer, this menu will appear. If
the phone is connected as “Charge only,” the phone
will not appear as a device attached to the computer.
If “Sync” or “Disk Drive” is selected, then the
computer will detect the phone and attempt to load
drivers to allow connection.
Using the disk drive function, access is limited to
the memory card installed on in the phone.
Depending on the size of the memory card, files,
images and video can be uploaded to be accessed
later on the phone. Folder arrangement does not
matter, if files are loaded in as a folder, the phone will
still read them as individual files.

12
LINKING TO OTHER ACCOUNTS
Since the Aria is a smartphone, it is possible to access several different online accounts, such as Facebook,
Flickr, Twitter and others. When using the phone to log into other accounts, it will remember the logins.
When accessing a contact or creating a new contact, the option to link it to a friend profile through one of
your accounts will appear. Their avatar or picture will display during a call and will appear when dialed.
The linking function will only work if online friends have their phone number attached to
their accounts. For example, Facebook friends who do not have a phone number on
their account will not appear with their personal image even after linking.
ANDROID MARKETPLACE
The Aria is an Android-based phone. A pre-installed app for the Android Marketplace will be on the phone.
This is where apps, games and videos will be available for download to the phone. The Google account chosen
to sign into the phone will be the account that all apps are permanently attached to.
All charges for apps and downloads will be applied to the Google account, instead of to the phone plan.
This will be the case whether the phone is part of a family plan or an individual plan.

13
TROUBLESHOOTING
PROCESSING SPEEDS
During normal use, the phone may slow down depending on how many processes are active at the time.
For example, when using the Android Marketplace, the phone may attempt to download and install several
apps at once. This will cause the phone to slow down and apps may crash. If updating several apps at a time,
it is suggested to let the phone complete all downloads and installations before using larger apps, such as
games. If there are any additional problems while downloading several apps at a time, you may have to enter
the Android Marketplace and update one app at a time manually.
ANDROID UPDATE
An Android update is available for the HTC Aria. Should you choose to update the phone’s operating
system, it will reset the phone to factory settings. All files stored on the phone, settings and other files will be
removed from the phone. The Google account can be used to back up contacts, which can be reinstalled
when logging back into the phone after the reset.
This update will add an additional feature to the phone. If there is an installed memory card, then some of
the installed apps can be set to run off of the memory card. This will save space in the phone’s internal
memory. Not all apps are transferrable and some may still store data on the phone.
It is recommended to update the phone before personalization.
Visit http://www.htc.com/us/support/htc-aria-att/software-updates for more information.

14
PRODUCT SPECIFICATIONS
CPU Speed
600 MHz
Platform
Android 2.1 with HTC Sense
Memory (Onboard)
ROM: 512 MB
RAM: 384 MB
Dimensions
4.09 inches x 2.27 inches x 0.46 inches
Weight
4.06 ounces with battery
Display
3.2 inch touch sensitive screen with 320 X 480 HVGA
resolution
Network
HSBPA/WCDMA:
850/1900 MHz
Upload speed of up to 384 Kbps and download
speed of up to 7.2 Mbps
Quad-band GSM/GPRS/EDGE:
850/900/1800/1900 MHz
GPS
Internal GPS antenna
Sensors
G-Sensor
Digital compass
Proximity sensor
Ambient light sensor
Connectivity
Bluetooth 2.1
WiFi
3.5 mm stereo audio jack
5-pin micro USB 2.0 port
Camera
5 megapixel color camera with auto focus
Supported Audio formats
Playback: .aac, .amr, .ogg, .m4a, .mid, .mp3, .wav,
.wma
Recording: .amr
Supported Video formats
Playback: .3gp, .3g2, .mp4, .wmv
Recording: .3gp
Battery
Rechargeable Lithium-ion polymer
Expansion slot
microSD memory card (SD 2.0 compatible)

15
Other manuals for ARIA
4
Table of contents
Other HTC Cell Phone manuals

HTC
HTC Freestyle User manual

HTC
HTC Sensation Cincinnati Bell User manual

HTC
HTC Windows Phone 8S User manual

HTC
HTC HTC Desire X Owner's manual

HTC
HTC HTC Status User manual

HTC
HTC Tornado User manual

HTC
HTC Cell Phone User manual

HTC
HTC Tattoo User manual

HTC
HTC Desire 520 User manual

HTC
HTC HTC Snap User manual