ASPERA R7 User manual

1
AsperaR7
User Manual

2
Contents
Safety Information.................................................................3
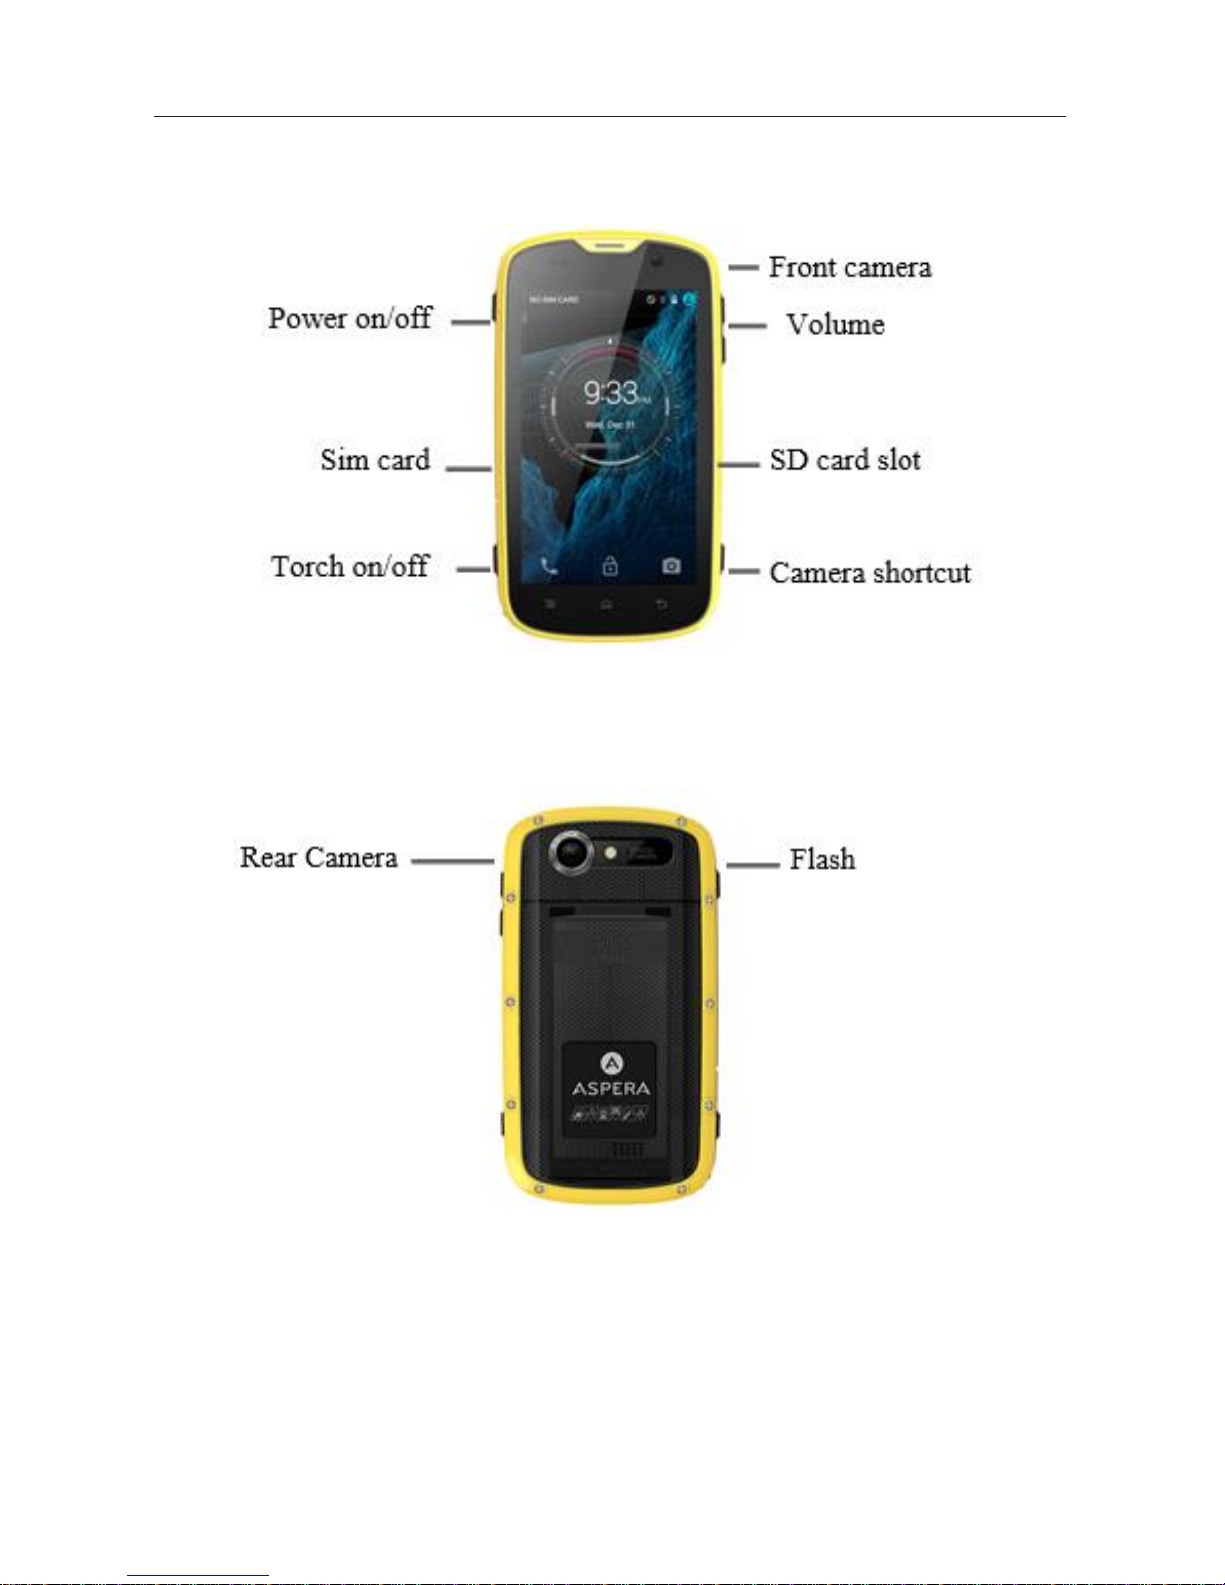
Appearance and Key Function...............................................5
Introduction...........................................................................6
Call Functions........................................................................7
Notifications Bar ...................................................................8
Contacts.................................................................................9
Messaging..............................................................................9
Bluetooth and Wi-Fi ............................................................10
Audio Setting.......................................................................11
Internet ................................................................................12
Play Store ............................................................................12
Camera ................................................................................13
Gallery.................................................................................14
Music...................................................................................14
FM radio..............................................................................15
Sound Recorder...................................................................15
Calendar ..............................................................................16
Alarm Clock........................................................................17
Settings................................................................................17
GPS and Maps.....................................................................18
Backup and Reset................................................................18
Maintenance and service......................................................19

3
Safety Information
Please carefully read the terms below:
Usage Safety
Do not use the phone in situations where it might cause danger.
Transportation Safety
Please observe all transportation laws regarding mobile phone usage.
Please drive with both hands on the wheel.
PLEASE DRIVE RESPONSIBLY-DO NOT TEXT AND DRIVE.
Hospital Safety
Please follow hospital rules and regulations.
Please turn off your mobile phone when near medical instruments.
Airport Safety
Remember to follow all airport and flight safety regulations.
Please do not use your phone during flight unless in Airplane mode.
Chemical Warning
Do not use your mobile phone around fuels and chemicals.
Temperature Warning
Do not subject your phone to extreme temperature conditions.
Emergency Calls
Make sure your mobile phone is switched on and in a cellular serviced area.
From the home
screen, tap the phone key and go to the dialer screen and dial
the emergency number.
Accessories and Batteries
Use only Aspera mobile batteries and accessories.
Information Backup
Remember to keep a written record of all important information.
Battery Safety and Precautions
-For better performance and longer battery life, it is recommended that you
charge the battery fully before using the mobile phone for the first time.
-The optimum performance of a new battery is typically achieved after two
or three complete charge cycles

4
Note: Keep in mind that continuous overcharging will affect long term
battery life.
-While charging, keep the mobile phone out of reach of small children.
-Store the battery in a cool and dry place away from sunlight and water.
- Do not expose battery to extreme temperatures (below-8℃(18℉) or
above 43℃(110℉)).
-Immediately stop using the battery if it produces an odour, crack and leaks,
overheats, distorts or has any other type of physical damage.
-Avoid using the charger near or around liquids. If the charger comes in
contact with water or any liquids
immediately unplug it from the outlet to
reduce the risk of overheating,
charger malfunction, electric shock or fire.
Warning: Please be careful with the disposal of used batteries. Do not
throw away the batteries with daily waste. Please follow local environment
laws and guidelines for proper waste disposal.

5
Appearance and Key Function

6
Introduction
Installation of the Micro SIM card
Advisory:
Please keep the SIM card out of the reach of small children. The
SIM
card and its contacts are easily damaged due to scratching or bending. Please
use caution when carrying, installing or taking out the SIM card,
To insert SIM card:
1. Lift the seal on the left side of the phone. Insert the Micro SIM card with
the connectors facing up towards the screen with the SIM’s angled corner
entered first. Ensure the seal is replaced correctly.
2. The user can insert an SD card by lifting the seal on the right side of the
phone (for additional storage capacity). The connectors of the card should
face upward. Ensure the seal is replaced correctly.
Power On and Off
Turn On-Please ensure the SIM card has been properly inserted into the
phone.
Press down and hold the Power key to switch on the phone.
Turn Off- Hold down the Power key until an options menu appears. Select
Power Off in the menu and confirm in the pop-up prompt to switch off the
phone.
Security

7
To change security settings, tap on the Settings icon then scroll down and
tap Security. This will provide options for password locks, password
changes, and other security functions.
Call Functions
Select the phone icon. At the dialer keyboard, enter the phone number and then
click the dial key. You can select a Contact to call by tapping Contacts and
scrolling down and tapping the required Contact.
A contact can be added to Speed dial by clicking the star above their name.
Call logs:
Every telephone number called and received will be saved in the
phones call log. All the numbers in the call log can be dialed directly by
clicking the dial icon on the screen and selecting the contact.

8
Notifications Bar
The notification bar is located on the top of the screen and displays
notifications for a range of services, such as messages, email and
applications that are installed. Scroll downwards from top of the screen to
get an expanded notification bar.
All notifications from applications will appear here as well as hardware
notifications such as connection of the USB.
At the top of the screen the “shortcuts” tab can also be selected. This will
provide you quick access to common settings allowing uthe ser to turn
on/off a particular setting. Simply tap on Shortcuts at the top right of the
screen one you have scrolled down the notifications bar.
You can also get notifications to appear on your lock screen. The default
settings have to be changed in order for this to occur. Go to settings->sound
and notification->notification->” when device is locked” and then select
show all notification content.

9
Contacts
Click on the Contacts icon. Tapping the 3 vertical dots at top right will show
a menu with all the Contact options such as importing from sim card and
choosing which contacts to display.
To edit a contact, click on the name then select the pen at top of the screen.
The default display is the phone contacts, the contacts are listed
alphabetically by default.
Select any contact and the dialing and messaging options will be shown.
To add a contact, click on the small blue person icon and fill in contact details
accordingly.
Messaging
You will find the Messaging icon at the bottom of the screen,
click the message icon to edit your text and send to the desired contact.
To add an image, contact V-card or audio file to a message simply click the
green plus symbol at the start of the text message and you will be prompted to
select what you wish to be added.
To delete a text message, press down on the message until the phone notifies
you that message has been selected. Then click the bin icon in the top left to
delete the message.

10
Bluetooth and Wi-Fi
Power on Bluetooth:
Tap the Settings icon and scroll down and tap Bluetooth, then toggle right to
turn on Bluetooth.
The Bluetooth icon will appear in the notification bar, then it will start to
scan for all devices within its range and will display all available devices in a list. You
can then tap on the device you wish to connect with.
Alternatively swipe down from top of the screen and select the short cuts tab. From here,
press the Bluetooth icon to turn it on.
Power on Wi-Fi:
Tap the Settings icon and then tap Wi-Fi and select ON to power on Wi-Fi. Click on
the desired Wi-Fi
network to be connected. You may be asked to enter the
password of that Wi-Fi network.
Alternatively swipe down from top of screen and select the short cuts tab. From here,
press the wife icon to turn it on.

11
Tethering and Wife Hotspot
To set up a wireless hotspot go to
settings->more->tethering and portable
hotspots->Wi-Fi-Hotspot
and then turn on and then select “turn on a wireless hotspot.”
For tethering go to
settings->more->tethering and portable hotspot
. At this point you
may either turn on Bluetooth tethering or USB tethering.
Note: USB tethering can only be turned on when the USB is connected.
Audio Setting
To switch to silent mode, go to settings->sound and notification->silent mode.
To change ringtone, go to settings->sound & notification. Click on the small
settings icon next to general. Then go to “phone ringtone” and you will be
presented with a list of options to which you can change your ringtone to.
In this section the notification sound can also be modified, select “default
notification sound” and select your preferred sound.

12
Internet
Google Chrome is installed on the phone as the default browser. Before you start
browsing, ensure that you are connected to the internet.
Once you are connected click on the Chrome icon to begin browsing.
Play Store
To begin browsing the Play Store login with an existing Gmail account or create
a new account. Google play allows you to download music, applications,
and games directly to
your device. To access the Google Play Store, click
on the Play Store icon. You must be connected to the internet.

13
Camera
Open Camera: To open the camera click on the camera icon.
Taking pictures: Aim the camera at object you wish to capture. Tapping on a
particular region of the screen will focus the camera on that region.
Deleting Pictures: To delete a picture, select a picture and tap on the 3 vertical
dots in top left of the screen. An expanded list of options will come up, select
the delete option to delete the picture.
At the bottom of the screen you can slide across to select to capture video.
Other Features: The Aspera R7 camera allows for various filters and borders
to be added to a photo. To access these effects, select a photo and click on the
pencil icon on the bottom left.

14
Gallery
Open images: Click on the Gallery icon. This is
the default location for
pictures taken by the phone.
Pictures are stored in separate albums. There will
be a separate album for screen shots.
Screenshots can be taken by simultaneously
pushing the on/off button and volume down key.
Music
Open Music: Tap on the Music icon
Music is sorted by different files such as Artists,
Albums, Songs, Playlists.
Choose one of the songs to play it. You can also
create Playlists by tapping on the menu at top
right of the screen.

15
FM radio
The FM radio uses the wired headphones as an antenna in order to receive
a signal. Before using this function, connect headphones/earphones to the
headphone port located at the top of the device.
Open FM radio: Press the FM radio icon to open the application;
Click the 3 vertical dots at top right of screen, then click Search to scan FM
Channels automatically. Click the arrow at bottom right of the screen to see
all channels.
Click the headphone icon at top of the screen to play through the loudspeaker
Sound Recorder
Open Sound Recorder: Click on the Sound Recorder icon to open the
application.
Recording:
Keep the phone's microphone near the sound source;
Click the record button to record the audio.

16
Click the stop button to stop recording the audio.
Calendar
The calendar helps keep track of your life's most important moments in one
application. Click on any date to add an event at the appropriate time.
Clicking on the time will bring up a text box where you can add the details
of the event

17
Alarm Clock
Click on the Clock icon then click the alarm icon at top left
. Tap on the “+” icon to
add a new alarm. You can toggle on or off any alarm in this screen by tapping
on the toggle button on the right.
Settings
Open Settings by tapping on the Settings icon. Click any functions you want
to modify. Note many common settings can be quickly turned on/off in
“shortcuts” tab. Access shortcuts by swiping downward from top
of screen.

18
GPS and Maps
The R7 also comes with GPS. To use the GPS first turn on the location
services. To do this swipe down from top of the screen and then go to the
shortcuts tab.
In the shortcuts tabs, select “location.” The location icon will go blue to
indicate that it has been turned on.
After this is done go to the google maps icon in menu and use the map
functions you desire.
Note: Google maps is the default maps option in android devices.
Backup and Reset
To perform a factory reset on the R7, go to settings->backup and
reset-> factory data reset. MAKE SURE TO BACK UP ALL
IMPORTANT DATA BEFORE THE RESET. Make sure you have
the “back up my data” setting turned on.

19
Maintenance and service
Your Aspera R7 is a product with intricate design and functionality. Please use
carefully. Following are some suggestions for you to effectively maintain the
quality of your Aspera mobile.
1. Keep the mobile dry. Rainwater, moisture and other liquids
may contain
mineral matters, which may erode the electronic wires if seals are not
closed correctly.
2. Don't store the mobile in dusty or gritty places; the
moving parts and electronic elements may be damaged.
3. Don't put the mobile in areas subjected to extreme heat.
4. Don't keep the mobile in extreme cold temperatures. This may lead to
moisture being generated within the mobile once the phone is removed from
cold areas, resulting in damage of the circuit board.
5. Please open the mobile seals as per the descriptions in the manual. Don't
try any other means.
6. Don't deliberately throw, knock or shake the mobile. Any rough treatment of
the mobile may result in damage of
t
he inner circuit board and its
structure.

20
7. Don't clean the mobile with ardent chemical, detergent or strong
wash.
8. Don't paint any dye on the mobile. Painting may
affect the normal
operation.
9. Clean the lens with clean, dry soft cloth (such as the camera lens, distance
sensor and light sensor).
10. Please use the charger in indoor areas only.
The above suggestions apply to your mobile, battery, charger and
other accessories. If any device doesn't work, please take it to the nearest
authorized maintenance agency for repairing, or contact Aspera Mobile on
info@asperamobile.com or 1300 656456 or from overseas +61435463060
Table of contents
Other ASPERA Cell Phone manuals