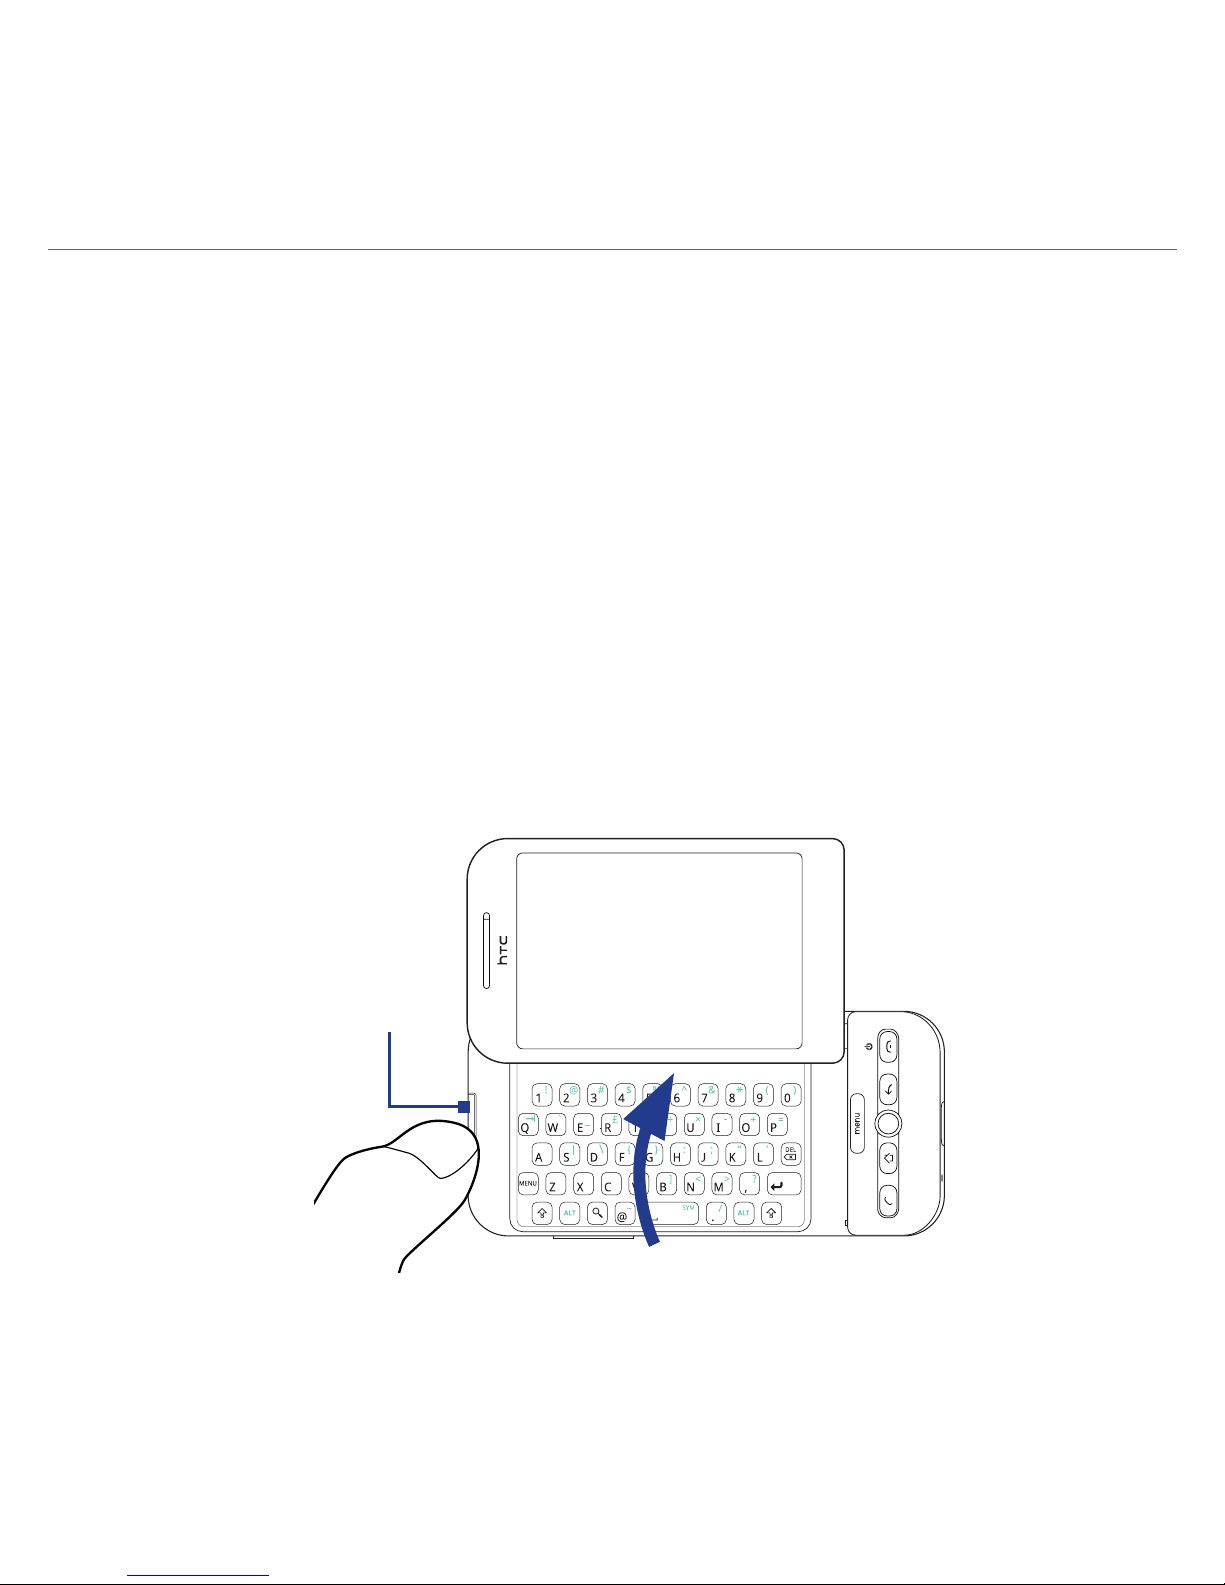
HTC Dream User manual

Quick Start Guide
For a more complete guide in using your phone,
download the User Manual PDF
www.htc.com/www/support/dreamx/user-guides.html

Please Read Before Proceeding
THE BATTERY IS NOT CHARGED WHEN YOU TAKE IT OUT OF THE BOX.
DO NOT REMOVE THE BATTERY PACK WHEN THE DEVICE IS CHARGING.
YOUR WARRANTY IS INVALIDATED IF YOU DISASSEMBLE OR ATTEMPT TO
DISASSEMBLE THE PHONE.
PRIVACY RESTRICTIONS
Some countries require full disclosure of recorded telephone conversations, and
stipulate that you must inform the person with whom you are speaking that the
conversation is being recorded. Always obey the relevant laws and regulations
of your country when using the recording feature of your PDA Phone.
LIMITATION OF DAMAGES
To the maximum extent permitted by applicable law, in no event shall HTC
or its providers be liable to user or any third party for any indirect, special,
consequential, incidental or punitive damages of any kind in contract or tort,
including, but not limited to, injury, loss of revenue, loss of goodwill, loss
of business opportunity, loss of date, and/or loss of profits arising out of, or
related to, in any manner, or the delivery, performance or nonperformance
of obligations, or use of the weather information, stock data, data or
documentation hereunder regardless of the foreseeability thereof.
FOR MORE INFORMATION
For health, safety, and regulatory information, see “Safety and Other Notices”.

Table of Contents
Contents
1. Welcome to the HTC Dream Quick Start Guide.................5
2. Inside the Box ................................................................................5
3. Getting to Know the HTC Dream............................................6
4. Installing the SIM Card, Battery, and Storage Card ..........7
5. Charging the Battery................................................................ 10
6. Starting Up .................................................................................. 10
7. Home Screen............................................................................... 11
8. Getting Around Your Phone.................................................. 13
9. Accessing Device Applications and Settings .................. 15
10. Creating a Google Account and Signing In..................... 16
11. Making Your First Call .............................................................. 18
12. Adding Contacts........................................................................ 19
13. Entering Information ............................................................... 22
14. Basic Settings.............................................................................. 23
15. Sending a Text Message ......................................................... 27
16. Sending a Multimedia Message .......................................... 28
17. Using Wi-Fi................................................................................... 29
18. Sending Email Messages........................................................ 30
19. Surfing the Web......................................................................... 31

Table of Contents
20. Using YouTube™ ........................................................................ 32
21. Bluetooth ..................................................................................... 33
22. Managing Your Time................................................................ 34
23. Taking Pictures and Capturing Video................................. 36
24. Copying Multimedia Files to Your Phone......................... 37
25. Listening to Music..................................................................... 38
26. Viewing Pictures and Videos................................................. 39
27. Uploading Pictures to Picasa ................................................ 40
28. Synchronizing Google Applications................................... 41
29. Downloading Applications from Android Market ........ 42
30. Resetting the Phone ................................................................ 43
Appendix: Safety and Other Notices.......................................... 44

Quick Start Guide 5
1. Welcome to the HTC Dream Quick Start Guide
Congratulations on your purchase of the HTC Dream.
This Quick Start Guide will help you get started with your
Android™ powered Touch Phone. The Quick Start Guide offers
information about the basic features and functions that you
want to know or use right away after you turn on the phone for
the first time.
2. Inside the Box
You should find the following items inside the box.
HTC Dream phone•Battery•
USB cable•AC adapter•
Wired stereo headset•Pouch•
2GB microSD™ card•Quick Start Guide•

6 Quick Start Guide
3. Getting to Know the HTC Dream
Notification LED
Touch Screen
HOME
END CALL/POWER
BACK
TRACKBALL
CALL
MENU
Earpiece
Keyboard
USB Connector/Earphone Jack
Microphone
VOLUME
UP
3.2
Megapixel
Camera
Speaker
Back Cover
CAPTURE
Storage
Card Slot
VOLUME
DOWN

Quick Start Guide 7
4. Installing the SIM Card, Battery, and Storage Card
Make sure your phone is turned off before installing the SIM
card, battery, and storage card. You also need to remove the
back cover before you can install the battery and SIM card.
To remove the back cover
Hold the phone sideways with the control buttons on the
right.
Slide the screen panel up to reveal the keyboard and the
back cover release tab.
Gently push down the release tab with your finger until the
back cover disengages from the phone.
Back cover
release tab
3
2
4. Pull the back cover out, then set it aside.
1.
2.
3.

8 Quick Start Guide
To install the SIM card
Locate the SIM card slot,
then insert the SIM card
with its gold contacts
facing down and its cut-
off corner facing out the
card slot.
Slide the SIM card
completely into the slot.
1.
2. Cut-off
corner
To install the battery
Align the battery’s
exposed copper
contacts with the battery
connectors inside the
battery compartment.
Insert the contact side
of the battery first then
gently push the battery
into place.
Replace the back cover.
1.
2.
3.
Battery
contacts

Quick Start Guide 9
To install the storage card
Hold the phone sideways with the control buttons on the
right.
Open the keyboard, then locate the storage card slot at the
side of the control buttons.
Pry open the storage card slot cover.
Insert the microSD card into the slot with its golden
contacts facing down until it clicks in place.
2 4
Storage card
slot cover
3
5. Replace the storage card slot cover.
Note Make sure that both ends of the cover are properly seated on the
slot. The phone will not detect the storage card when the slot cover
is not properly replaced.
1.
2.
3.
4.

10 Quick Start Guide
5. Charging the Battery
New batteries are shipped partially charged. Before you start
using your phone, it is recommended that you install and charge
the battery.
To charge the battery
Flip open the USB connector cover at the bottom panel of
your phone.
Insert the USB connector of the AC adapter to the USB
connector on your phone.
Plug in the AC adapter to an electrical outlet to start
charging the battery. The Notification LED shows a solid
green light when the battery is fully charged.
6. Starting Up
After installing your SIM card and battery and charging the
battery, you can now power on and start using your phone.
Turn on the power
Press the END CALL/POWER button. The Home screen displays.
Note To turn off the power press and hold the END CALL/POWER button
for a few seconds. When the Phone options menu appears, touch
Power off, and then touch OK.
1.
2.
3.

Quick Start Guide 11
7. Home Screen
The Home screen is your starting point for using the applications
on your phone. You can customize the Home screen to display
application icons, shortcuts, folders, and widgets according to
your preference.
Notifications.
Your call, text, and
other notifications
appear here.
Touch and hold
this area to display
the date.
•
•
Signal strength
Battery statusConnection status
Touch an icon to
open the related
application
Touch the
Applications
tab to access the
applications on
your phone.
Time
Tip While in any application, press HOME to display the Home screen.

12 Quick Start Guide
To go to the left and right side of the extended
Home screen
The Home screen extends beyond the screen width to provide
more space for adding icons, widgets, and more. Slide your
finger horizontally across the screen to go to the left or right
side of the extended Home screen.
Tip While on an extended Home screen, press HOME to return to the
center Home screen.
To learn how to customize the Home screen, refer to the
“Phone Basics” chapter in the User Manual PDF.

Quick Start Guide 13
8. Getting Around Your Phone
There are different ways to navigate around the Home screen,
menus and application screens on your phone.
Touch
When you want to select items onscreen such as application and
settings icons, or press onscreen buttons, simply touch them
with your finger.
Touch and hold
To open the available options for an item (for example, contact
or link in a web page), simply touch and hold the item.
Swipe or slide
To swipe or slide means to quickly drag your finger vertically or
horizontally across the screen.
Drag
Touch and hold your finger with some pressure before you
start to drag. While dragging, do not release your finger until
you have reached the target position.

14 Quick Start Guide
Flick
Flicking the screen is similar to swiping, except that you need
to swipe your finger in light, quicker strokes. This finger gesture
is always in a vertical direction, such as when flicking the
contacts or message list.
Rotate
For most screens, you can automatically change the screen
orientation from portrait to landscape by opening the
keyboard.
Use the TRACKBALL
You can use the TRACKBALL to select or highlight items on the
screen.
Search button
Press the Search key ( to search information on the current
screen (e.g. Home screen) or application (e.g. Browser). For
example, while in Browser, press SEARCH to launch Google™
search and search information on the web.
Refer to the “Phone Basics” chapter in the User Manual PDF for
more details.

Quick Start Guide 15
9. Accessing Device Applications and Settings
The Applications tab holds all pre-installed applications on your
phone. This tab will also hold the icons of applications that you
download and install from Android Market.
To open the Applications tab
Press HOME, and then touch .
On the Applications tab:
Touch an icon to open the related application.
Scroll up/down on the tab using your finger or the
TRACKBALL to view more applications.
Note To hide the Applications tab, touch or press the BACK
button.
For complete information about applications that are
pre-installed on your phone, refer to the User Manual PDF.
•
•

16 Quick Start Guide
Settings
Control and customize phone settings from the Settings screen.
To open the Settings screen
On any application screen, press
HOME > MENU, and then touch
Settings.
On the Home screen, touch the
Applications tab, and then touch
Settings.
For complete information about the
settings on your phone, consult the
User Manual PDF.
•
•
10. Creating a Google Account and Signing In
The first time you access a Google service such as Google
Talk™, Gmail™, or Android Market™, you will be prompted to
create a Google account or sign in to your existing Google
account (could be a Google Mail or Gmail account).
Read the set up information on the screen and then
touch Next.
2. Touch Create.
1.

Quick Start Guide 17
Note If you have an existing Google account, touch Sign in. Use the
keyboard to enter your user name and password, and then touch
Sign in. Your Google account email messages, calendar events,
and contacts will automatically synchronize with your phone.
3. Open the keyboard, and then enter your name and account
user name, and then touch Next. Follow screen instructions
to create your Google account.
4. The phone synchronizes with your Google account. Touch
Finish setup.
Retrieve your Google account password
Do these if you forgot your Google account password:
1. On your computer, open your browser and go to
http://google.com.
2. On the upper-right side of the web page, click Sign in.
3. On the right side of the page, click I cannot access my
account.
4. In the Please select your issue section, select I forgot my
password.
5. Click Reset your password now, and then follow the
procedure on how to recover your password.

18 Quick Start Guide
The following sections in this Quick Start Guide will show you
how to use basic phone functions including how to make a call,
enter information, send text and email messages, and more.
11. Making Your First Call
To place a call
Press the CALL ( ) button to
open the dialer.
Dial the number or contact you
want to call, and then press .
As you touch the keys on the
numeric keypad, the screen will
display matches found on your
phone and call log based on the
keys you have touched.
1.
2.
Tip During a call, press the VOLUME UP or VOLUME DOWN button
on the left panel of the phone to adjust the in-call volume.
To check missed calls
When you have missed calls, you will see the missed call icon
( ) in the status bar. To check who the caller was, touch and
hold the status bar, and then drag your finger downward on
the screen to open the notifications panel.

Quick Start Guide 19
12. Adding Contacts
Contacts gives you quick and easy access to people you
frequently communicate with.
To open Contacts
Press HOME, and then touch Contacts.
To add a new contact
When you open Contacts for the first time, you are presented
with options on how you can easily import your contacts into
your phone.
Touch to import
contacts from your
Microsoft® Exchange
ActiveSync® account.
If you do not have an
Exchange ActiveSync
account, you will be
taken to the set up
screen.
Touch to import
contacts stored
on your SIM card
into the phone.
Touch to create
a new contact
on the phone.

20 Quick Start Guide
To add a new contact on the phone
In the Contacts tab, touch Create new contact.
Open the keyboard and then enter the contact’s name and
contact information such as mobile phone number, home
phone number, or email address. Roll the TRACKBALL up or
down to move among fields.
Touch to replace
or customize
the information
label. Touch to delete the
information.
Touch to add a
caller ID icon.
Touch to add
information for
this section.
Touch to set the
type of contact.
3. When finished, scroll down to the bottom of the screen and
touch Done.
1.
2.
Other manuals for Dream
4
Table of contents
Other HTC Cell Phone manuals

HTC
HTC 10 User manual

HTC
HTC T-Mobile G1 User manual

HTC
HTC HTC One X User manual

HTC
HTC Wildfire S T-Mobile User manual

HTC
HTC S620 - Smartphone - GSM User manual

HTC
HTC HTC Touch Dual User manual

HTC
HTC DROID Droid Incredible 2 User manual

HTC
HTC HTC One X User manual

HTC
HTC G1 User manual

HTC
HTC One A9 User manual