HTC HT-856 User manual

User's Manual
Infrared Thermometer
Please read this user's manual thoroughly before using this unit
and keep it properly for yourfuture reference.


Contents
1. Introduction................................................................ 1
2. Features ...................................................................... 2
3. Application ................................................................. 3
4. Safety.......................................................................... 3
5. Field of View.............................................................. 4
6. Specifications ............................................................. 5
7. Meter Description....................................................... 7
8. LCD Display Description........................................... 8
9. Operating Instruction.................................................. 9
10. Notes....................................................................... 13
11. Accessories ............................................................. 15

1
1. Introduction
Congratulations on your purchase of our professional non-contact
infrared thermometers with Type-K input measurement.
These units can provide fast, easy and accurate temperature
readings. With the non-contact (IR) and contact (TK) technology,
they can be used to measure the surface temperature of
hard-to-reach objects like electrified equipment or moving objects,
without any damage to them.

2
2. Features
◆Fast and easy measurement
◆Precise IR and TK temperature measurement
◆Built-in laser pointers increase the target accuracy
◆Adjustable emissivity: 0.1~1.0
◆ºC/ºF selection
◆MAX, MIN, DIF, AVG record
◆REC datalogger function for 12 points
◆LCD display with backlight
◆Resolution 0.1℃/℉
◆Trigger lock
◆Adjustable High/Low alarm
◆Automatic range selection
◆Automatic data hold function
◆Automatic power off
3
3. Application
This units can be widely used in Food preparation, Safety and Fire
inspection, Plastic molding, Asphalt, Marine, Printing ink, dryer
temperature and Fleet maintenance.
4. Safety
◆Use extreme caution when the laser beam is turned on.
◆Do not point the beam toward human or animal eyes.
◆Do not allow the beam to strike the eye from a reflective surface.
◆Do not use the laser near explosive gases.
4
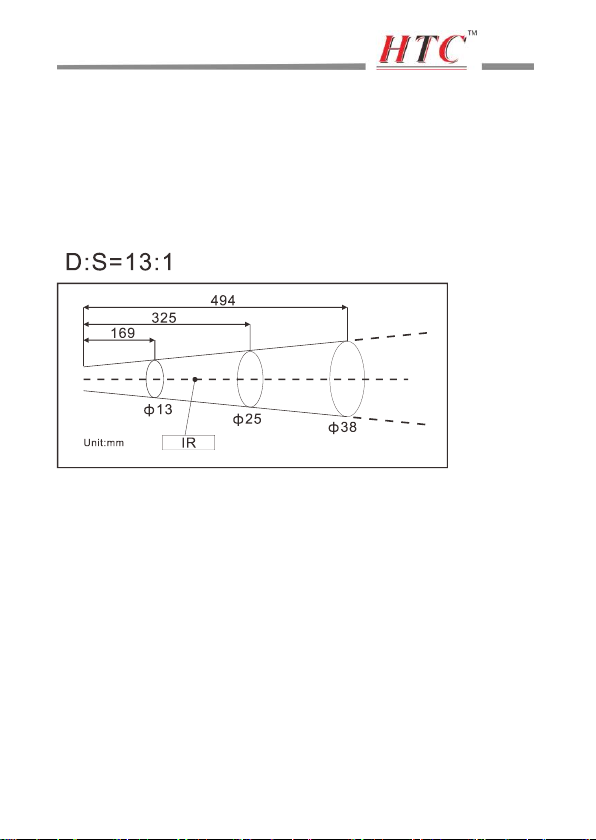
5. Field of View
The meter's field of view is 13:1, for example, if the meter is 13
inches from the target spot, the diameter of the target must be at
least 1 inch. Other distance ratios are show as Fig. 1 in the field of
view diagram.
(Fig: 1 )

5
6. Specifications
Range
IR:-50~500℃/-58~932℉
TK: -50~1370℃/-58~2498℉
Accuracy
IR:-50~0℃/-58~32℉:±4℃/7.2℉
IR:0~500℃/32~932℉:±1.5%±2℃/3.6℉
TK:-50~1370℃/-58~2498℉:±1.5%±1℃/1.8℉
D:S
13:1
Emissivity
Adjustable: 0.10~1.0
Resolution
0.1℃(0.1℉)﹤1000 ,1℃(1℉)﹥1000
Response Time
﹤250 ms
Spectral Response
8~14um
Over range indication
LO
HI
Polarity Display
Auto display, "-" indicates negative, while positive
with no sign.
Diode Laser
Output<1mW,630~670nm, class 2(Ⅱ)
Automatic Power Off
Meter shuts off automatically after 35 seconds
Operating Temp.
0℃~50℃/32℉~122℉
Storage Temp.
-20℃~60℃/-4℉~140℉

6
Relative Humidity
Operating:10~95%RH;Storage:<80%RH
Power Supply
9V battery
Weight
275g
Dimensions(L*W*H)
95*83*192mm
Safety
“ ” Comply with EMC
Notes:
◆Accuracy can be ensured while the temperature is at 18℃~
28℃(64℉~82℉) and humidity is less than 80 % RH.
◆Field of View: Make sure that the target is larger than the unit’s
spot size. The smaller the target, the closer you should be to it.
When accuracy is critical, make sure the target is at least twice as
large as the spot size.

7
7. Meter Description
①Laser pointer
②IR sensor
③K-type probe interface
④SET button
⑤Measurement trigger
⑥Battery cover
⑦UP/DOWN button
⑧Laser/Backlit button
⑨LCD Display
Table of contents
Other HTC Thermometer manuals


