manuals.online logo
Brands
  1. Home
  2. •
  3. Brands
  4. •
  5. Hubbell
  6. •
  7. Floodlight
  8. •
  9. Hubbell AFL20 User manual

Hubbell AFL20 User manual

ATTENTION! Wiring Instructions: If your fixture is equipped with a multi-tap ballast and if no voltage was
specified on the purchase order, the ballast has been wired for operation on a 277 volt circuit (347v in Canada).
If other than 277volts is required, i.e.; 120v, 208v, 240v, connect incoming voltage lead to required voltage on terminal
block.
AFL20 – Architectural Floodlight Installation Instructions
P.O. Box 60080 • 16555 East Gale Ave.
City of Industry, California 91716-0080
626/968-5666 •FAX 626/330-3861
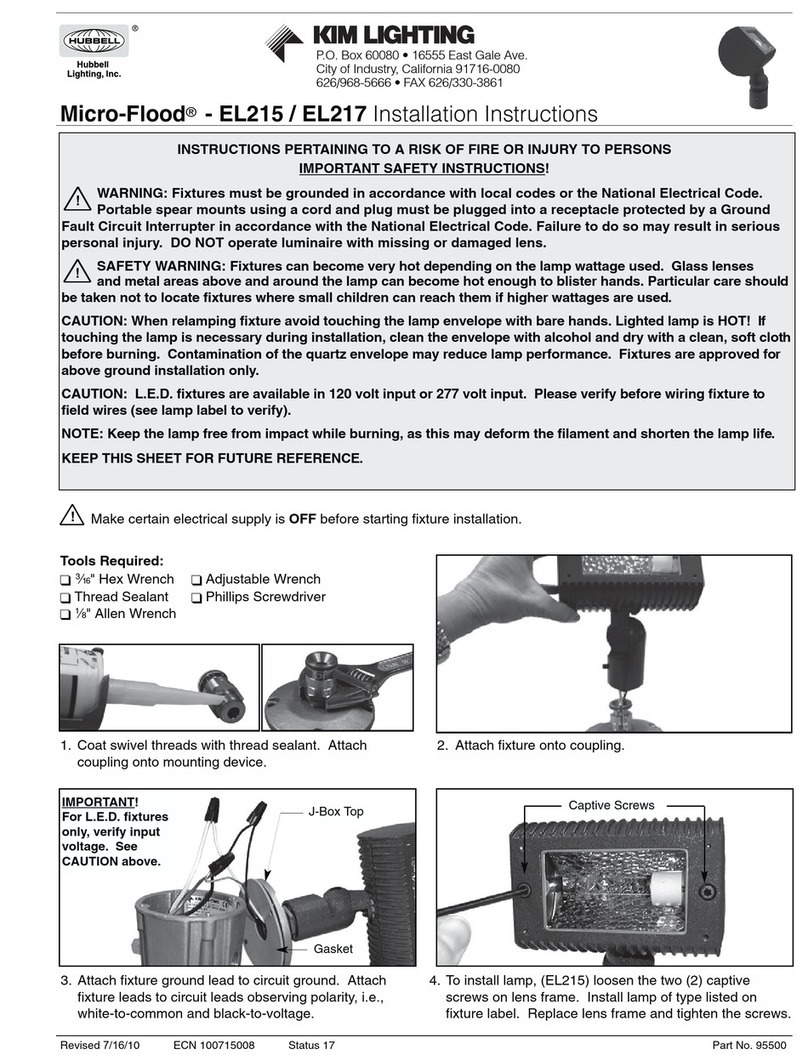
WARNING: Fixtures must be grounded in accordance with local codes or the National Electrical Code.
Failure to do so may result in serious personal injury.
MAINTENANCE: To maintain light efficiency and prevent fixture overheating, lenses must be kept clean and
free of dirt, dust, leaves, trash and mineral deposits from water. For optimum performance a regularly
scheduled maintenance program should be followed.
LAMP NOTE: All lamps must be rated for “Universal Burning Position” because fixture tilt changes lamp
orientation. DO NOT operate luminaire with missing or damaged lens.
CAUTION: All wiring should be done by a qualified electrician. KEEP THIS SHEET FOR FUTURE REFERENCE.
FIXTURE IS APPROVED FOR ABOVE GRADE INSTALLATION ONLY.
Revised 3/26/12 ECN 120326011 Status 15 Part No. 95450
Housing Gasket
Housing
Stop Ar
Swivel Bolt
Swivel Spacer
m
Slip Hinge
Pins
Lens Frame
Ballast
J-20 x 3K" Lg.Hex
Socket Cap Screws
(F" Allen Wrench)
Lens and Lens Gasket
~
Reflector
Captive Reflector
Mounting Screws
(4)10-32 x K" Lg.
(Phillips screwdriver)
AFL22 lamp position shown. See
catalog forAFL21, 23, 24, 25, 26
C- 16
Set Screw
Tenon Mount Swivel
!
Tools Required: F" Allen Wrench
3⁄32" Allen Wrench L" Socket and Ratchet
AFL21 Horizontal Flood
AFL22 Vertical Flood
AFL23 Medium Flood
AFL24 Narrow Flood
AFL25 Spot
AFL26 Narrow Spot
MOUNTING: The AFL20 mounts to any 2"pipe tenon (2C"O.D. x 4K"
minimum length). Refer to optional mounting device instructions for
attachment to conduit system.
!
AFL20 – Architectural Floodlight
Installation Instructions
Page 2 Kim Lighting Inc. •16555 E. Gale Ave. • PO Box 60080 •City of Industry, CA 91716-0080 •626/968-5666 • Fax 626/330-3861
Reflector and Lens Cleaning:
A regularly scheduled maintenance program should be established to retain light output and minimize heat retention. Dusting
with a clean, dry cloth is normally sufficient for the reflector. Dust or dirt film accumulation should be regularly removed from
both sides of the lens by washing with ammonia and water. Do not use strong alkaline, acid, or abrasive cleaners.
Tool Required: Phillips Screwdriver
Ballast Access and Replacement:
Make certain the electrical supply is OFF before accessing or replacing ballast.
1. Loosen four (4) captive screws holding reflector in place. Remove ballast components and retain hardware for installation.
2Install replacement ballast and make all connections per wiring label on ballast core. Replace reflector.
3.Check that fixture gasket is clean and in place; close lens frame by applying left pressure to seat frame against hinges
before closing. Tighten screws progressively and evenly to a hand-snug condition with allen wrench.
Swivel Adjustment:
1. Holding fixture so it will not fall, loosen swivel bolt withL" socket.
2. Adjust fixture to desired angle and tighten swivel bolt. Teeth lock swivel every 5°.
!
AFL21 Horizontal Flood
AFL22 Vertical Flood
AFL23 Medium Flood
Swivel Bolt
(L" socket).
AFL24 Narrow Flood
AFL25 Spot
AFL26 Narrow Spot
INSTALLATION INSTRUCTIONS:
Make certain the electrical supply is OFF before starting fixture installation.
1. Feed circuit wires to bottom of swivel assembly and wire accordingly. Install fixture on tenon being careful
not topinchwires. Orient fixture to desired directionand tighten (2) C-16 set screws progressively.
3.To prevent fixture windmilling, remove (1) tenon set screw, drill recess in tenon for screw point, and replace screw.
2. Attach fixture leads to circuit leads observing polarity, i.e., green-to-ground, white-to-common, and black-to-voltage.
4. Open lens frame and install lamp of type and wattage shown on fixture label and chart below. All lamps must be rated
for “Universal Burning Position”because fixture tilt changes lamp orientation. Check that fixture gasket is in place and
close lens frame by applying left pressure to seat frame against hinges before closing. Tighten screws progressively
and evenly to a hand-snug condition with allen wrench.
!
Lamp Information
Fixture Lamp Type Wattage
HPS
AFL20 Series MH 250 - 400
Pulse Start MH
WARNING
The H.I.D. / Fluorescent fixtures utilizes a lamp that may
contain mercury. For information on disposal of lamp, go
to website: www.lamprecycle.org
Page 3 Kim Lighting • 16555 E. Gale Ave. • P.O. Box 60080 • City of Industry, CA 91716-0080 • 626/968-5666 • FAX 626/330-3861
KIM LIGHTING LIMITED WARRANTY
When installed in accordance with Kim Installation Instructions and accepted trade practices, the
following shall apply:
General Product Limited Warranty Coverage
All material and component parts used in the manufacture of Kim Products, are warranted to be free
from defects of material and/or workmanship for a period of 1 year from date of sale, with the
following exceptions:
Auxiliary Equipment
All auxiliary equipment (such as lamps, ballasts, and transformers) provided by and/or included in
Kim Products shall carry the component manufacturer's warranty.
Copper and Bronze Landscape Components
Copper and Bronze Landscape fixture components shall be warranted against defects of material
and/or workmanship, and failure due to corrosion, for a period of 25 years from date of sale.
Composite In-Grade Components
Composite In-Grade fixture components installed below grade, shall be warranted against defects of
material and/or workmanship, and failure due to corrosion, for a period of 7 years from date of sale.
Aluminum Landscape Components
Aluminum Landscape fixture components installed below grade, shall be warranted against defects
of material and/or workmanship for a period of 3 years from date of sale. Aluminum fixture
components in direct contact with soil shall be warranted from defects of material and failure from
corrosion for a period of 1 year from date of sale.
Limit of Liability and General Conditions
Only products which are installed, used and maintained in accordance with applicable Kim
instructions, specifications and accepted trade practices, are covered by the Kim Warranty. During
the warranty period, with proof of purchase, Kim will repair or replace with the same or similar
product, at Kim's option, without charge. Labor costs are the owner's responsibility and are
excluded from this warranty. This warranty is void if the product is modified, tampered with,
misapplied, poorly installed, improperly maintained, or subjected to abnormal conditions.
Repair or replacement as provided under this warranty is the exclusive remedy of the purchaser.
This warranty is in lieu of all other warranties, expressed or implied, including any implied warranty of
fitness for a particular application. Kim Lighting shall not be liable to the purchaser for indirect or
consequential damages.
How may we serve you better? Please let us know.
Visit our website at: www.kimlighting.com
Your concerns are important to us.
AFL20 - Architectural Floodlight
Installation Instructions
AFL21 Horizontal Flood
AFL22 Vertical Flood
AFL23 Medium Flood
AFL24 Narrow Flood
AFL25 Spot
AFL26 Narrow Spot

This manual suits for next models

6

Other Hubbell Floodlight manuals

Hubbell Facade Flood User manual

Hubbell

Hubbell Facade Flood User manual

Hubbell Sling SGF2 User manual

Hubbell

Hubbell Sling SGF2 User manual

Hubbell KILLARK KFLC Series Instruction Manual

Hubbell

Hubbell KILLARK KFLC Series Instruction Manual

Hubbell LED ALF-6LU-5K Series User manual

Hubbell

Hubbell LED ALF-6LU-5K Series User manual

Hubbell 103-7 SERIES User manual

Hubbell

Hubbell 103-7 SERIES User manual

Hubbell Chalmit ARRAN X ARXI/30/LE Manual

Hubbell

Hubbell Chalmit ARRAN X ARXI/30/LE Manual

Hubbell Progress Lighting PCOLF Series Service manual

Hubbell

Hubbell Progress Lighting PCOLF Series Service manual

Hubbell LIGHTSCAPER LSP-LSCS-1000LM-3000K User manual

Hubbell

Hubbell LIGHTSCAPER LSP-LSCS-1000LM-3000K User manual

Hubbell Colt Flood User manual

Hubbell

Hubbell Colt Flood User manual

Hubbell 15360 Series Manual

Hubbell

Hubbell 15360 Series Manual

Hubbell 1031-3 User manual

Hubbell

Hubbell 1031-3 User manual

Hubbell Quartz Flood Q500 Series User manual

Hubbell

Hubbell Quartz Flood Q500 Series User manual

Hubbell KIM LIGHTING Micro-Flood EL217 User manual

Hubbell

Hubbell KIM LIGHTING Micro-Flood EL217 User manual

Hubbell Linear LED ALF12LU5KBZ Series User manual

Hubbell

Hubbell Linear LED ALF12LU5KBZ Series User manual

Hubbell SGF1 User manual

Hubbell

Hubbell SGF1 User manual

Hubbell FSL User manual

Hubbell

Hubbell FSL User manual

Hubbell RFL4 User manual

Hubbell

Hubbell RFL4 User manual

Popular Floodlight manuals by other brands

SDJ SG PIXI5WL user manual

SDJ

SDJ SG PIXI5WL user manual

DeWalt DC509-XE instruction manual

DeWalt

DeWalt DC509-XE instruction manual

Stairville DJ Lase Pro 1000 RGB owner's manual

Stairville

Stairville DJ Lase Pro 1000 RGB owner's manual

GE Powerflood HLU instructions

GE

GE Powerflood HLU instructions

Somogyi home FLL PIR 20 instruction manual

Somogyi

Somogyi home FLL PIR 20 instruction manual

Lightforce ROK40 User instructions

Lightforce

Lightforce ROK40 User instructions

Robus RLEDF20W-24 instruction manual

Robus

Robus RLEDF20W-24 instruction manual

Gewiss Dedalo LED instructions

Gewiss

Gewiss Dedalo LED instructions

Sealey LED3000 manual

Sealey

Sealey LED3000 manual

Sanico GOLDLUX TRIO 323125 manual

Sanico

Sanico GOLDLUX TRIO 323125 manual

Leviton 1kW Studio Fresnel Product data

Leviton

Leviton 1kW Studio Fresnel Product data

AccuLux UniLux 5 LED Instructions for use

AccuLux

AccuLux UniLux 5 LED Instructions for use

Ledj STAGE WASH U.V. 36 LEDJ106 user manual

Ledj

Ledj STAGE WASH U.V. 36 LEDJ106 user manual

Francis Searchlights A2980 User instruction & installation manual

Francis Searchlights

Francis Searchlights A2980 User instruction & installation manual

BOSS ILLUMINATION SCORPIO II product manual

BOSS ILLUMINATION

BOSS ILLUMINATION SCORPIO II product manual

Home Zone Security AEC-5340 quick start guide

Home Zone Security

Home Zone Security AEC-5340 quick start guide

Monoprice 612790 user manual

Monoprice

Monoprice 612790 user manual

Martec FORTRESS II MLXF3451M instruction manual

Martec

Martec FORTRESS II MLXF3451M instruction manual

manuals.online logo
manuals.online logoBrands
  • About & Mission
  • Contact us
  • Privacy Policy
  • Terms and Conditions

Copyright 2025 Manuals.Online. All Rights Reserved.