Hubble Pure User manual

USER’S GUIDE
Hubble Pure
The features described in this user’s guide are subject to modifications without prior notice.
3-in-1 light & sound nursery air purifier

Welcome...
to your new Hubble Air Purifier Hubble Pure!
Thank you for purchasing your new Hubble Air Purier!
Keeping the air clean in your nursery is essential to your baby’s health. The Hub-
ble Light & Sound Air Purier is an essential item to have in your home. This 3-in-
1 air purier keeps the air clean while also providing soothing solutions, for your
little one.
The air purier lters has an advanced ltration system – true HEPA lter and
high-efciency activated carbon lter- that lters out airborne allergens, pet
hair, dander, smoke, mold, odors and large dust particles to ensure your baby is
breathing easily and safely. Additionally, it removes 99.97% of airborne contami-
nants as small as 0.3 microns.
Help your baby fall asleep or keep them entertained. Connect your phone via
Bluetooth and play a lullaby or audiobook for your little one, on the high-quality
speaker.
Choose from 7 different night light colors to soothe your baby in the dark. The
night light also provides guidance, during late night feeding and diaper changes,
without having to turn on the harsh, aggressive bedroom lights.
Please keep your original dated sales receipt for your records. For warranty ser-
vice of your Hubble product, you will need to provide a copy of your dated sales
receipt to conrm warranty status.
Registration is not required for warranty coverage. For product related questions,
please call:
Live Chat: hubbleconnected.com
Email: [email protected]
This User’s Guide has all the information you need to make the most out of your
product.
Please read the Safety Instructions on page 6 before you install the unit.
Inside the Box
• 1 x Air Purier
• 1 x Activated Carbon Composite True HEPA Filter
• 1 x Power adaptor
• 1 x Quick Start Guide

Overview of the Air Purifier
Functions Descriptions
On/Off key Toggle to power on (Blue key backlit) and power
off (Red key backlit).
Fan Speed key
Tap to select fan speeds: Low (low Blue key
backlit); Middle (moderate Blue key backlit); High
(bright blue key backlit).
Night Light key
Blue key backlit: 7 Night Light colors plays in cyclic,
tap once the button to conrm the color selection,
long press for 3s to switch off the Night Light.
Sleep On key
Tap to enter Sleep On mode: Backlit key LED turns
to dim blue, the Fan speed is locked at low speed
and Night Light will be off. Tap twice to switch off
the Sleep On mode.
5
1
2
4
3
1. Air Outlet
2. Night Light Cover
3. Micro-USB power socket
4. Bottom cover (HEPA lter
compartment access)
5. Touch Control Panel

4
Table of contents
Table of contents
1. Safety Instructions ............................................................................... 5
2. Getting Started ..................................................................................... 7
2.1 Install HEPA lter for your Air Purier................................................7
2.2 Connect Air Purier to Power Supply................................................7
3. Recommendations for Use and Care................................................ 8
4. Operations............................................................................................... 9
4.1 Power on/off ......................................................................................9
4.2 Fan speed selection ...........................................................................9
4.3 Sleep On mode selection ..................................................................9
4.4 Night Light Setting ..........................................................................10
4.5 Bluetooth Audio Streaming .............................................................10
5. Dismantle and cleaning of Night Light Cover............................... 11
6. Checking and Maintaining the Filter.............................................. 13
7. Troubleshooting ................................................................................... 15
8. Disposal of the Device (environment)
.................................................. 16
9. General Information ........................................................................... 17
10.Technical Specifications .................................................................... 22

5
Safety Instructions
English
1. Safety Instructions
READ AND SAVE THESE INSTRUCTIONS.
WARNING
This product is compliant with all relevant electromagnetic field standards
and is, when handled as described in the User’s Guide, safe to use. Therefore,
always read the instructions in this User’s Guide carefully before using the
device and save it for later use.
• This product is not a toy. Do not allow children to play with it.
• The air purifier is intended for indoor use only. Do not operate the air
purifier outdoors.
• Make sure that all filters are properly installed before you switch on the
unit.
• Always turn the appliance off before unplugging it.
• Always disconnect the unit by unplugging it from the electrical outlet
before moving or cleaning the unit, opening the grill, changing the filters
and whenever the unit is not in use.
• To disconnect the unit, be sure to pull the plug and not the cord.
• Plug the appliance directly into an electrical outlet.
• Keep the cord out of heavy traffic areas.
• To avoid fire hazard, NEVER put the cord under rugs, near heat registers,
radiators, stoves, or heaters.
• To protect against electrical hazards, DO NOT immerse the appliance in
water or other liquids. Do not use near water.
• This appliance can be used by children aged from 8 years and above
and persons with reduced physical, sensory or mental capabilities or lack
of experience and knowledge if they have been given supervision or
instruction concerning use of the appliance in a safe way and understand
the hazards involved.
• Cleaning and user maintenance shall not be performed by children without
supervision.
• Appliance that are obviously damaged must not be operated.
• If the supply cord is damaged, it must be replaced by the manufacturer, its
service agent or similarly qualified persons in order to avoid hazard.

6Safety Instructions
• DO NOT attempt to repair or adjust any electrical or mechanical functions
on this unit. Doing so will void your warranty. The inside of the unit
contains no user serviceable parts. All servicing should be performed by
the manufacturer or its service agent.
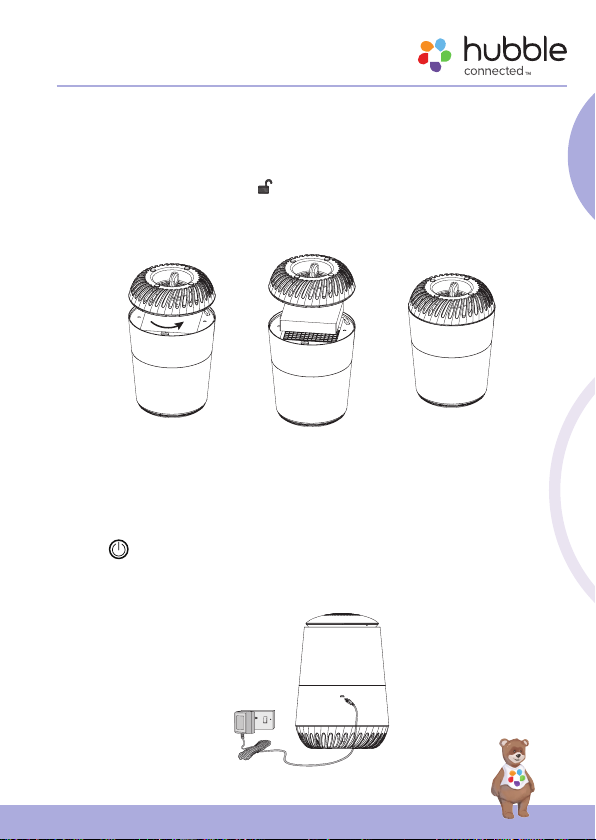
• Place the air purifier on a smooth, level surface, such as a table.
• NEVER place the appliance on a soft surface, such as a bed or sofa, as this
could cause the unit to tip over and block the air inlet or outlet grills.
• Do NOT place anything on top of the unit.
• NEVER drop or insert any objects into the air inlet and outlet of the unit.
• Do NOT run cord under carpeting.
• Always handle the air purifier with dry hands to avoid electric shock.
• Do NOT use this appliance when you have used indoor smoke type insect
repellents or in places with oil residues, burning incense, or chemical
fumes.
• Do NOT use the appliance in a room with major temperature changes, as
this may cause condensation inside the appliance.
• Do NOT use the appliance in wet surroundings with high ambient
temperatures, such as the bathroom, toilet, or kitchen.
• Do NOT place the appliance directly below an air conditioner to prevent
condensation from dripping onto the appliance.
• Keep the appliance away from heated surfaces and open flames.
• To prevent interference, place the appliance at least 2 m (6.6 feet) away
from electrical appliances that use airborne radio waves such as TVs,
radios, and radio-controlled clocks.
• Do NOT use gasoline, benzene, thinner, harsh cleaners, etc. on and/or in
the unit while cleaning as they will damage the product.
• NEVER use alcohol or other solvents.
• The unit is only intended for household use as described in this User’s
Guide. Any other use not recommended by the manufacturer may cause
fire, electric shock or injury to persons.
• Keep this User’s Guide for future reference.
Important guidelines for installing Air Purifier
• Use of other 2.4 GHz products, such as other wireless networks or
microwave ovens may cause interference with this product. Keep the Air
Purifier away from these types of products, or turn them off if they appear
to be causing interference.

7
Getting Started
English
2. Getting Started
2.1 Install HEPA filter for your Air Purifier
• Take the HEPA filter out from polybag.
• Follow the UNLOCK mark to to loose the bottom cover (Fig. 1).
• Put back the HEPA filter into the compartment (Fig. 2).
• Replace the bottom cover then rotate to lock (Fig. 3).
• Place the unit back to upright position.
fig 1
Unlock
fig 2 fig 3
2.2 Connect Air Purifier to Power Supply
• Connect the micro-USB plug of the power adaptor to the air purifier and
the other end to the electrical outlet.
• Use only the enclosed power adaptor (5VDC 2A).
• The button will light up momentarily and the backlight will stay on
for 5s then goes off. It will light up again when you tap to turn on the Air
Purifier.

8Recommendations for Use and Care
3. Recommendations for Use and
Care
• The appliance is only intended for household use as described in this
manual. Any other use not recommended by the manufacturer may
cause fire, electric shock or injury to persons.
• During operation, NEVER block the air openings, grills/ outlets of the
unit or place the unit on a soft surface such as a bed or sofa, as this
could cause the unit to tip over, blocking the air inlet or outlet openings.
• Before replacing the true-HEPA filter, make sure that you unplug the air
purifier from the electrical outlet in order to prevent electric shock.
• Use a clean, dry, soft cloth to wipe the external surface of the unit.
• Do NOT let the area around the air purifier to become damp or wet.
Please do NOT immerse the device into water or other liquids in order
to prevent electrical hazards.
• Clean the air purifier according to instructions when the product will not
be in frequent use. Before storage, make sure that all the parts are clean
and dry. Store the air purifier in a dry place. After storage, clean the air
purifier again and remove any dust on the outside.
• Please do NOT operate the appliance with a damaged cord or plug.
If the motor fan fails to rotate, OR if the device has been dropped or
damaged in any manner, leading to appliance malfunction, DO NOT
operate it to prevent risks of harm or injury.
• The unit may cause interference to other nearby 2.4 GHz products, such
as other wireless networks Bluetooth systems or microwave ovens during
operation. Keep the air purifier away from these types of products, or
turn them off if there is interference.
• Every effort has been made to ensure high standards of reliability of
your air purifier. However, if something does go wrong, please do not
try to repair it yourself - contact Customer Service for assistance.

9
Operations
English
4. Operations
4.1 Power on/off
Tap once on button to power on (backlit turns blue) or to power off
(backlit turns red). When rst power up, the unit operates automatically at
middle fan speed and ionizer operates simultaneously.
When rst power up, the Bluetooth audio streaming function enters pairing
mode, use Bluetooth-enabled mobile phone to scan for (device “ Hubble
Pure”) and complete the pairing.
4.2 Fan speed selection
Touch once the button to select 3 fan speeds:
• Low (low blue backlit)
• Middle (dim blue backlit)
• High (bright blue backlit)
4.3 Sleep On mode selection
The device is featured with Sleep mode function helping baby to fall into
sleep. Toggle the button to program sleep mode on/off. When Sleep
On mode is selected, the device runs with LOW fan speed, button backlit
OFF and BLUE night light.
Tap once any button at this state will switch off the sleep mode setting
temporarily, the unit will return to Sleep On mode again if no key action
within 3 seconds. To switch off the function, tap twice any button on the
control panel.

10 Operations
4.4 Night Light Setting
The device gives 7-night light colors for selection.
Key press Action Button backlit
indication
First power up Auto cyclic mode
(or color selection
mode)
Bright blue
Tap 1st time the
button
Stop to select the
desired night light at
auto cyclic.
Dim blue
Tap 2nd time the
button
Switch to steady
white color.
Amber
Tap 3rd time the
button
Repeat the auto
cyclic mode (or color
selection mode)
and subsequent key
actions.
Bright blue
Note: Long press 3s on button to switch off the Night Light.
4.5 Bluetooth Audio Streaming
When the unit is rst powered up, the unit enters Bluetooth pairing mode
once the unit detects registered Bluetooth-enabled device, they will re-
connect. You need to connect with Bluetooth each time the unit is powered
off and on.
Note:
If the unit is already connected with an electronic device, the Bluetooth
speaker is unable to connect / pair with a third one without switching off
the already paired device.

11
Dismantle and cleaning of Night Light Cover
English
5. Dismantle and cleaning of Night
Light Cover
The dust will likely stay on the inside surface of the clear Night Light Cover
after period of use. It is detachable for cleaning. Disconnect the power from
the electrical outlet then follow the steps below.
1. Hold the Night Light Cover on opposite sides. Follow the “open”
marking to turn the cover in counter-clockwise until the catches are
released.
2. Pull the Cover up until it leaves the main body completely.

12 Dismantle and cleaning of Night Light Cover
3. After cleaning is done, move the cover back to the original position.
4. Make sure the cover sits properly on the main body. Follow the “close”
mark to turn clockwise the cover until the catches lock.
Importance:
• Wipe the dusts and dirt with detergent slightly moistened cloth or use
water to clean once a month
• Re-assemble the unit only after all parts are completely dry
• Use dilute neutral detergent to do the cleaning.
• Never use abrasive, aggressive, or flammable cleaning agents such as
bleach or alcohol to clean any part of the appliance. Otherwise, it will
cause discoloration or deformation.

13
Checking and Maintaining the Filter
English
6. Checking and Maintaining the
Filter
• Maintain the Activated Carbon Composite HEPA Filter by checking it
frequently.
• When the filter turns from white to gray or black, it should be replaced.
• Depending on the air quality conditions, you may need to replace it
more frequently. The recommended replacement frequency for normal
use is every 6-month of use. Below are the steps of filter replacement:
1. Turn the unit with the bottom facing up then follow the UNLOCK mark
to turn to release the bottom cover.
2. Remove the bottom cover.

14 Checking and Maintaining the Filter
3. Take the Filter (square in shape) out from the compartment with the
assistance of ribbons. Replace with new lter in the correct orientation
and position.
4. Put the bottom cover back to the unit and turn in a clockwise direction
to the position marked with a LOCK mark.
IMPORTANT:
Do NOT attempt to wash and re-use the combination filter. Please contact
service at Live Chat: hubbleconnected.com or visit our website: support.
hubbleconnected.com to purchase a replacement filter.
NOTE:
The True HEPA and Activated Carbon Filter are combined as a single filter
unit. The multi layers include the True HEPA/Activated Carbon filter.
Activated Carbon
Composite HEPA
Filter

15
Troubleshooting
English
7. Troubleshooting
Issues Solution
The unit not operate. 1. Please check and make sure that the unit is
properly plugged in and the power outlet is
energized.
2. Please make sure that the unit has been
turned ON.
3. Please check and make sure that the lter is
properly installed and the rear grill is seated
correctly.
The airow that comes
out of the air outlet is
signicantly weaker than
before.
1. Please make sure that nothing is blocking
the air inlet and filtered air outlets.
2. Please check the lter condition and replace
it if necessary. Recommended to replace the
Activated Carbon/HEPA lter every 6-month
of use.
3. Please check if you have removed all
packaging material.
Why I hear excessive
noise during device
operation?
1. Please check and make sure that the parts
are firmly positioned in place.
2. Please check if you have removed all the
packaging material from the HEPA lter.
Why is the night light
continuously blinking?
Installation The bottom cover doesn't seem to
t with the main unit. Make sure that the bottom
cover is at the LOCK position.
Power indication light
off; does not work
No power supply
Connect the unit to power supply and switch on.

16 Disposal of the Device (environment)
8. Disposal of the Device (environment)
At the end of the product life cycle, you should not dispose of
this product with normal household waste. Take this product to
a collection point for the recycling of electrical and electronic
equipment. The symbol on the product, user's guide and/or box
indicates this.
Some of the product materials can be re-used if you take them
to a recycling point. By reusing some parts or raw materials from used
products you make an important contribution to the protection of the
environment.
Please contact your local authorities in case you need more information on
the collection points in your area.

17
General Information
English
9. General Information
If your product is not working properly, read the Quick Start Guide or the
User’s Guide of one of the models listed on page 1.
Contact Customer Service:
Live Chat: hubbleconnected.com
Email: [email protected]
Consumer Products and Accessories Limited Warranty
(“Warranty”)
Thank you for purchasing this Hubble Smart Nursery branded product
manufactured under license by Binatone Electronics International LTD
(“BINATONE”).
What Does this Limited Warranty Cover?
Subject to the items listed below in the section “What is not Covered”
BINATONE warrants that this Hubble connected branded product
(“Product”) will be free from defects in material and workmanship under
normal use for a period of 1 year from the date of purchase and that any
certied accessory (“Accessory”) sold for use with this product will be free
from defects in materials and workmanship under normal use for a period of
90-days from the date of purchase. This Limited Warranty is your exclusive
warranty and is not transferable.
What is not covered?
This Limited Warranty excludes and does not cover:
• Normal deterioration or wear resulting from use;
• Damage caused by or resulting from misuse, abuse, or accident;
• Damage caused by or resulting from improper operation or storage;
• Damage caused by or resulting from contact with foreign substances,
including, but not limited, to liquid, water, rain, humidity, perspiration,
sand, dirt, and/or food;
• Damage caused by or resulting from the use of Non-Hubble Smart
Nursery branded or certied Products or Accessories or other peripheral
equipment;

18 General Information
• Damage caused by or resulting from modications, alterations,
tampering, improper installation, or repairs by someone other than
Hubble connected, BINATONE or their authorized representatives;
• Defects, damages, or the failure of Products or Accessories due to any
communication service or signal you may subscribe to or use with the
Products or Accessories; and,
• Periodic maintenance, repair and replacement of parts due to normal
wear and tear.
What Other Limitations Are There?
THIS LIMITED WARRANTY SETS FORTH THE ENTIRE LIABILITY OF
BINATONE AND CONTAINS YOUR SOLE AND EXCLUSIVE REMEDY.
OTHER THAN THIS LIMITED WARRANTY, BINATONE MAKES NO
ADDITIONAL REPRESENTATIONS OR WARRANTIES, EXPRESS OR
IMPLIED, INCLUDING WARRANTIES OF MERCHANTABILITY OR FITNESS
FOR A PARTICULAR PURPOSE. IF YOUR STATE DOES NOT PERMIT
THE DISCLAIMER OF WARRANTIES, THEN THE IMPLIED WARRANTY
OF MERCHANTABILITY AND FITNESS FOR A PARTICULAR PURPOSE
IS LIMITED TO THE DURATION OF THIS LIMITED WARRANTY. REPAIR
OR REPLACEMENT IS YOUR SOLE AND EXCLUSIVE REMEDY AGAINST
BINATONE AND Hubble Smart Nursery. IN NO EVENT SHALL BINATONE
OR Hubble Smart Nursery’s LIABILITY TO REPAIR OR REPLACE YOUR
PRODUCT OR ACCESSORY EXCEED THE ORIGINAL PURCHASE PRICE
OF THE PRODUCT AND ACCESSORY AND BINATONE AND Hubble
Smart Nursery’s TOTAL LIABILITY FOR DAMAGES ARISING FROM THIS
LIMITED WARRANTY SHALL NOT EXCEED THE PRICE YOU PAID FOR THE
PRODUCT AND ACCESSORY REGARDLESS OF WHETHER SUCH CLAIM
ARISES UNDER CONTRACT, STATUTE, TORT OR OTHERWISE. IN NO
EVENT AND UNDER NO CIRCUMSTANCES WILL BINATONE OR Hubble
Smart Nursery BE LIABLE FOR DIRECT, INDIRECT, INCIDENTAL, SPECIAL
OR CONSEQUENTIAL DAMAGES OF ANY KIND, OR LOSS OF REVENUE
OR PROFITS, LOSS OF BUSINESS, LOSS OF INFORMATION OR OTHER
FINANCIAL LOSS ARISING OUT OF OR IN CONNECTION WITH THE
ABILITY OR INABILITY TO USE THE PRODUCTS OR ACCESSORIES. ALL
DISCLAIMERS, LIMITATIONS OF LIABILITY AND MODIFICAITONS OF

19
General Information
English
WARRANTIES STILL APPLY EVEN IF THE LIMITED REMEDY OF REPAIR
AND REPLACEMENT FAILS OF ITS ESSENTIAL PURPOSE.
Some jurisdictions do not allow the limitation or exclusion of incidental or
consequential damages, so the above limitations or exclusions may not
apply to you. This Limited Warranty gives you specic legal rights, and you
may have other rights that vary from one jurisdiction to another.
Who is covered?
This Warranty extends only to the rst consumer purchaser and is not
transferable.
What will BINATONE do?
BINATONE or its authorized distributor at its sole discretion will, at
no charge, repair or replace any Products or Accessories that do not
conform to this Warranty. In the event that replacement is necessary to
remedy a defect in material or workmanship, BINATONE may use new
or remanufactured products, accessories or parts of equal quality to the
original Product or Accessory.
How to Obtain Warranty Service or Other Information?
To obtain service or information, please call:
Live Chat: hubbleconnected.com.
Email: [email protected]
You will receive instructions on how to ship the Products or Accessories at
your expense and risk, to a BINATONE Authorized Repair Center.
You must include: (a) the Product or Accessory; (b) the original proof of
purchase (receipt) which includes the date, place and seller of the Product;
(c) if a warranty card was included in your box, a completed warranty card
showing the serial number of the Product; (d) a written description of the
problem; and, (e) your name, address, email address and telephone number.
These terms and conditions constitute the complete warranty agreement
between you and BINATONE regarding the Products or Accessories
purchased by you, and supersede any prior agreement or representations,
including representations made in any literature publications or promotional
materials issued by BINATONE or representations made by any agent,
employee or staff of BINATONE, that may have been made in connection
with your purchase of any Product and/or Accessory.

20 General Information
FCC and IC regulations (FCC Part 15)
This device complies with Part 15 of the FCC Rules. Operation is subject
to the following two conditions: (1) this device may not cause harmful
interference, and (2) this device must accept any interference received,
including interference that may cause undesired operation.
Warning: Changes or modications to this unit not expressly approved
by the party responsible for compliance could void the user’s authority to
operate the equipment.
NOTE: This equipment has been tested and found to comply with the
limits for a Class B digital device, pursuant to Part 15 of the FCC Rules.
These limits are designed to provide reasonable protection against harmful
interference in a residential installation. This equipment generates, uses
and can radiate radio frequency energy and, if not installed and used in
accordance with the instructions, may cause harmful interference to radio
communications.
However, there is no guarantee that interference will not occur in a
particular installation. If this equipment does cause harmful interference
to radio or television reception, which can be determined by turning
the equipment off and on, the user is encouraged to try to correct the
interference by one or more of the following measures:
• Reorient or relocate the receiving antenna.
• Increase the separation between the equipment and receiver.
• Connect the equipment into an outlet on a circuit different from that to
which the receiver is connected.
• Consult the dealer or an experienced radio/TV technician for help.
Other manuals for Pure
1
Table of contents
Other Hubble Air Cleaner manuals
Popular Air Cleaner manuals by other brands

Setra Systems
Setra Systems AIIR Watch quick start guide

Better Air
Better Air Biologic PRO Quick start installation guide

New-Aire
New-Aire Plugin-II operating instructions

Concept2
Concept2 CA2010 manual

cleanAIR
cleanAIR AtmosAir 500 Series Installation, operation and maintenance guide

PureAir
PureAir SOLO owner's manual