Hubix SECRA-1 User manual

2018.10
INSTRUKCJA UŻYTKOWANIA
HEŁMU OCHRONNEGO ELEKTROIZOLACYJNEGO
ZE ZINTEGROWANĄ OSŁONĄ TWARZY
TYPU SECRA-1
INSTRUKCJA UŻYTKOWANIA 7 PL
OPERATING MANUAL 15 EN
GEBRAUCHSANWEISUNG 23 DE
MANUAL DE USO 31 ES
NOTICE D’UTILISATION 39 FR
ISTRUZIONE D’USO 47 IT
MANUAL DE USO 55 PT

Fig. 1
1
2
3
Fig. 3
Fig. 4
1
2
Fig. 6
1
2
3
Fig. 7
Fig. 2
1
2
3
1
Fig. 8
PROD
X/XX
UTIL
X/XX
1
2
Fig. 5
1
2
3
2
1
2

1
2
Fig. 10
Fig. 12
Fig. 13
Fig. 14
1
2
3
Fig. 9
Fig. 11
1
2

INSTRUKCJA UŻYTKOWANIA
HEŁMÓW OCHRONNYCH ELEKTROIZOLACYJNYCH
ZE ZINTEGROWANĄ OSŁONĄ TWARZY
TYPU SECRA-1
Typ: SECRA-1
Odmiany:
H058S-1 ARC-W1 (ABS)
Klasa 0 (1 000V), Box Test - klasa 1
EN 397:2012 + A1:2012, EN 50365:2002, EN 166:2001, GS-ET 29:2010-02
Klasa E (20kV)
ANSI/ISEA Z89.1:2014
Producent:
HUBIX Sp. z o.o.
96-321 ŻABIA WOLA Huta Żabiowolska ul. Główna 43
tel.: +48 46 857 84 40, fax: +48 46 857 80 21, [email protected], www.hubix.pl
Jednostka Notyfikowana, która przeprowadziła badanie typu UE:
Hełm –CIOP-PIB, (nr 1437), ul. Czerniakowska 16, 00-701 Warszawa;
Osłona twarzy –CIOP-PIB, (nr 1437), ul. Czerniakowska 16, 00-701 Warszawa;
Jednostka Notyfikowana prowadząca proces oceny zgodności z typem w oparciu o
wewnętrzną kontrolę produkcji oraz nadzorowane kontrole produktu w losowych
odstępach czasu (moduł C2):
- CIOP-PIB, ( nr 1437), ul. Czerniakowska 16, 00-701 Warszawa.
1. PRZEZNACZENIE
Hełm typu SECRA-1 w odmianie H058S-1 ARC-W1 (ABS), przeznaczony jest do
ochrony głowy przed urazami wywoływanymi przez spadające przedmioty, a zarazem
stanowi ochronę przed porażeniem elektrycznym klasy 0 (1 000V) EN 50365:2002 i
klasy E (20kV) ANSI/ISEA Z89.1:2014 zapobiegając przepływowi prądu rażeniowego
poprzez głowę. Stanowi również ochronę przed łukiem elektrycznym i odpryskami
stopionego metalu. Szczególnie zalecanydo stosowania jako sprzęt ochronyosobistej
przy pracach pod napięciem, pracach na wysokości oraz przy wykonywaniu czynności
przełączeniowych. Temperatura pracy w zakresie -40°C do +60°C.
Wizjer osłony twarzy posiada zewnętrzną powłokę odporną na zarysowania i na
uszkodzenia przez drobne cząstki, oraz wewnętrzną powłokę zapobiegającą
zamgleniu. Konstrukcja osłon pozwala na ochronę przed łukiem elektrycznym (klasa
1 - Box Test). Stanowi też ochronę przed uderzeniem cząsteczek o średniej energii,
przed kroplami i rozbryzgami cieczy, oraz przed stopionymi metalami i gorącymi
ciałami stałymi. Osłony posiadają także filtry chroniące przed działaniem
promieniowania UV.
2. OZNAKOWANIE
oznakowanie wytłoczone wewnątrz skorupy hełmu:
symbol pracy pod napięciem;
Klasa 0 klasa elektryczna dla instalacji o napięciu znamionowym do 1000V
napięcia przemiennego i 1500V napięcia stałego;
EN 50365:2002 norma odniesienia „Hełmy elektroizolacyjne przy instalacjach niskiego
napięcia”;
logo producenta;
SECRA H058S model hełmu;
ABS materiał skorupy hełmu;
53-63cm zakres regulacji obwodu głowy;
207/8-245/8inch zakres regulacji obwodu głowy;
EN 397:2012+A1:2012 norma odniesienia „Przemysłowe hełmy ochronne”;
-40°C bardzo niska temperatura (do –40°C);
LD odporność na odkształcenie boczne;
MM odporność na odpryski stopionego metalu;
440Vac izolacja elektryczna (zgodnie z EN 397);
ANSI/ISEA Z89.1-2014 norma odniesienia „American National Standard for Industrial
Head Protection”
Type I typ hełmu zgodnie z ANSI/ISEA Z89.1-2014;
Class E klasa elektryczna hełmu zgodnie z ANSI/ISEA Z89.1-2014;
LT niższa temperatura zgodnie z ANSI/ISEA Z89.1-2014;
HT wyższa temperatura zgodnie z ANSI/ISEA Z89.1-2014;
CE 1437 oznakowanie zgodności z rozporządzeniem 2016/425 oraz numer jednostki
notyfikowanej przeprowadzającej nadzorowane kontrole produktów w
losowych odstępach czasu (moduł C2);
LOT NO: XXX numer serii;
www.secra.pl adres strony, gdzie dostępna jest deklaracja zgodności.
POLSKI

oznakowanie wytłoczone na tylnej, zewnętrznej części skorupy hełmu:
PROD X/XX data produkcji (kwartał / rok);
UTIL X/XX data utylizacji (kwartał / rok).
oznakowanie na tylnej, zewnętrznej części skorupy hełmu:
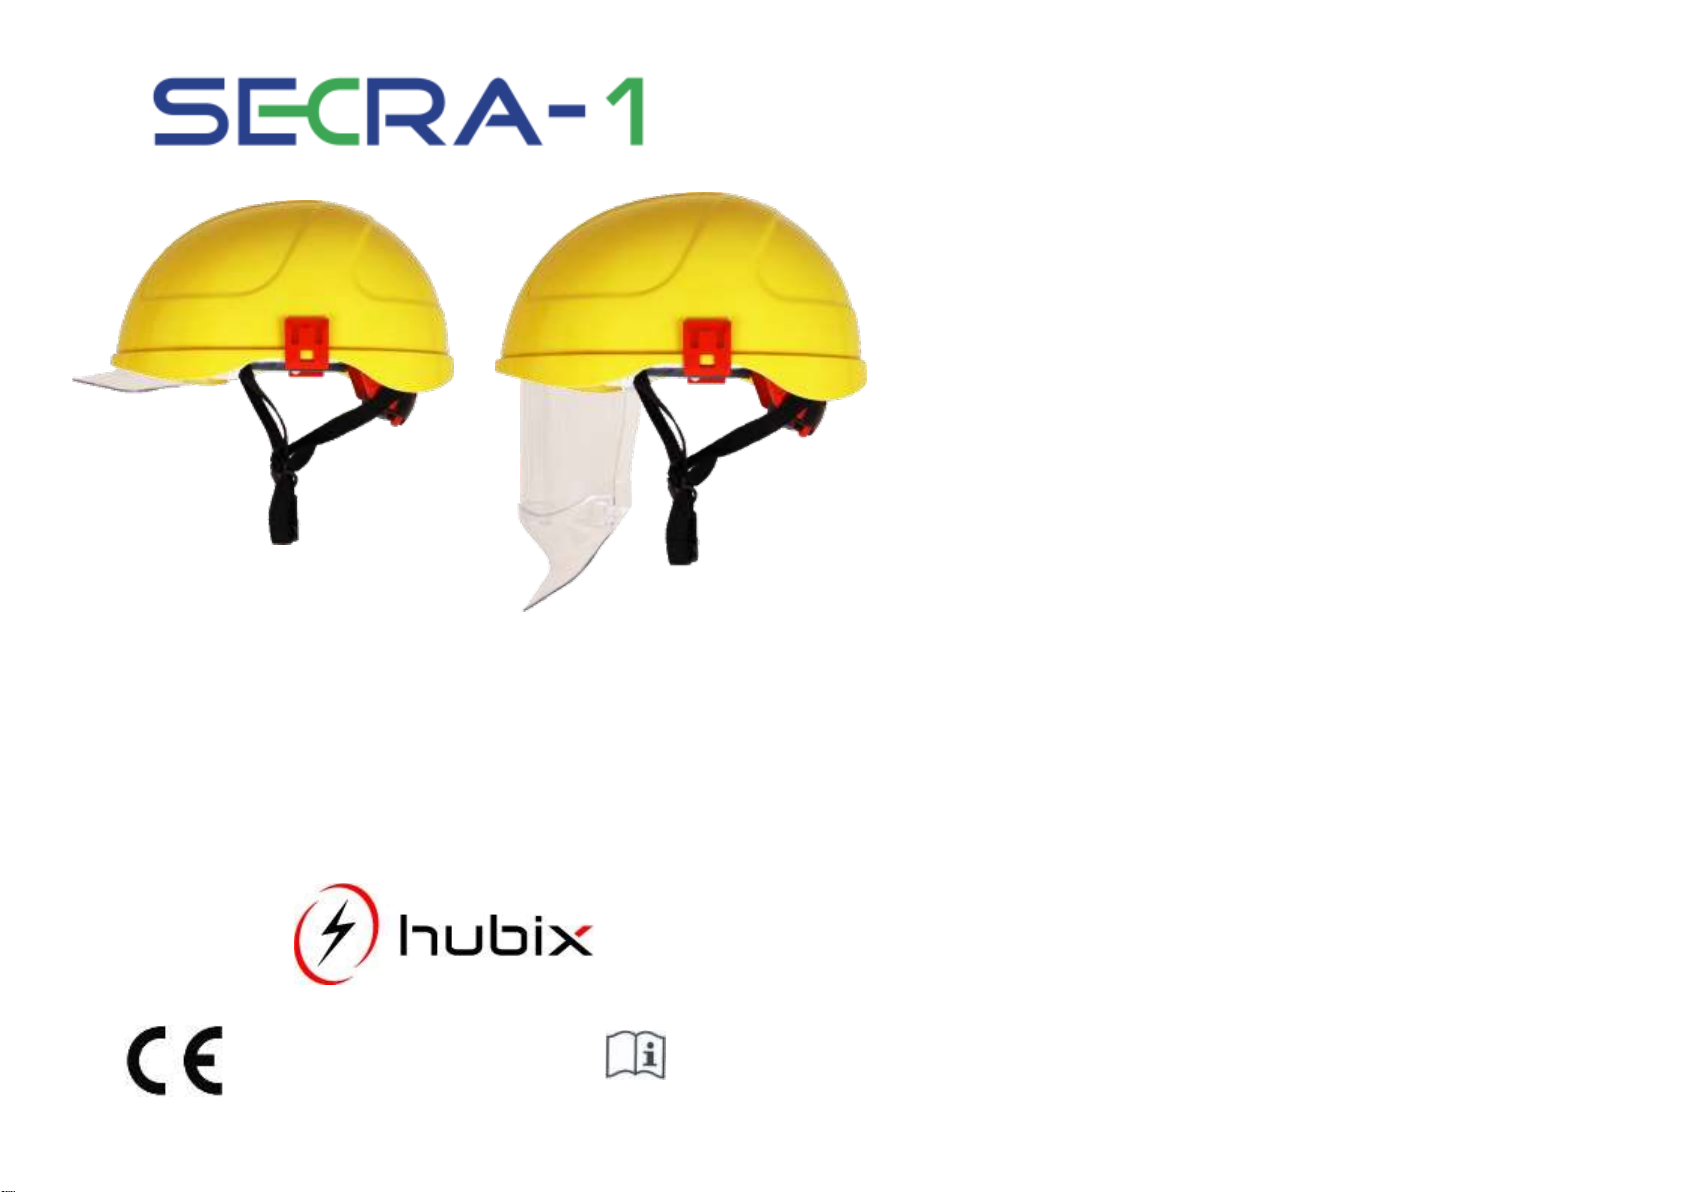
SECRA-1 typ hełmu.
oznakowanie na wizjerze:
1000V
symbol prac pod napięciem zgodnie z RFU nr 03-025/2012
2C-1,2 numer kodowy i stopień ochrony filtru UV;
HUBIX nazwa producenta;
1 klasa optyczna;
B odporność na uderzenia o średniej energii;
8-1-0 ochrona przed łukiem elektrycznym;
8 symbol ochrony zgodnie z EN 166:2001
-1 ochrona przed zagrożeniami termicznymi wywołanymi łukiem elektrycznym klasa 2
(4kA/0,5s) zgodnie z GS-ET 29:2010-02 “Supplementary requirements for the testing
and certification of face shields for electrical works”;
-0 współczynnik VLT >75% klasa 0, zgodnie z GS-ET 29:2010-02;
9 ochrona przed stopionymi metalami i gorącymi ciałami stałymi;
K odporność na uszkodzenia powierzchni przez drobne cząstki;
N odporność na zamglenie;
CE oznakowanie zgodności z Rozporządzeniem 2016/425.
oznakowanie wytłoczone na daszku:
HUBIX nazwa producenta;
EN 166:2001 norma odniesienia „Ochrona indywidualna oczu. Wymagania”;
3 ochrona przed kroplami i rozbryzgami cieczy;
8 ochrona przed łukiem elektrycznym;
9 ochrona przed stopionymi metalami i gorącymi ciałami stałymi;
B odporność na uderzenia o średniej energii.
3. REGULACJE
Przed użyciem hełm musi zostać odpowiednio wyregulowany tak aby zapewniał
skuteczną ochronę. Użytkownik powinien dopasować hełm do obwodu głowy, ustawić
wysokość noszenia i długość paska podbródkowego w taki sposób, aby hełm dobrze
pasował, nie przesuwał się i nie przechylał.
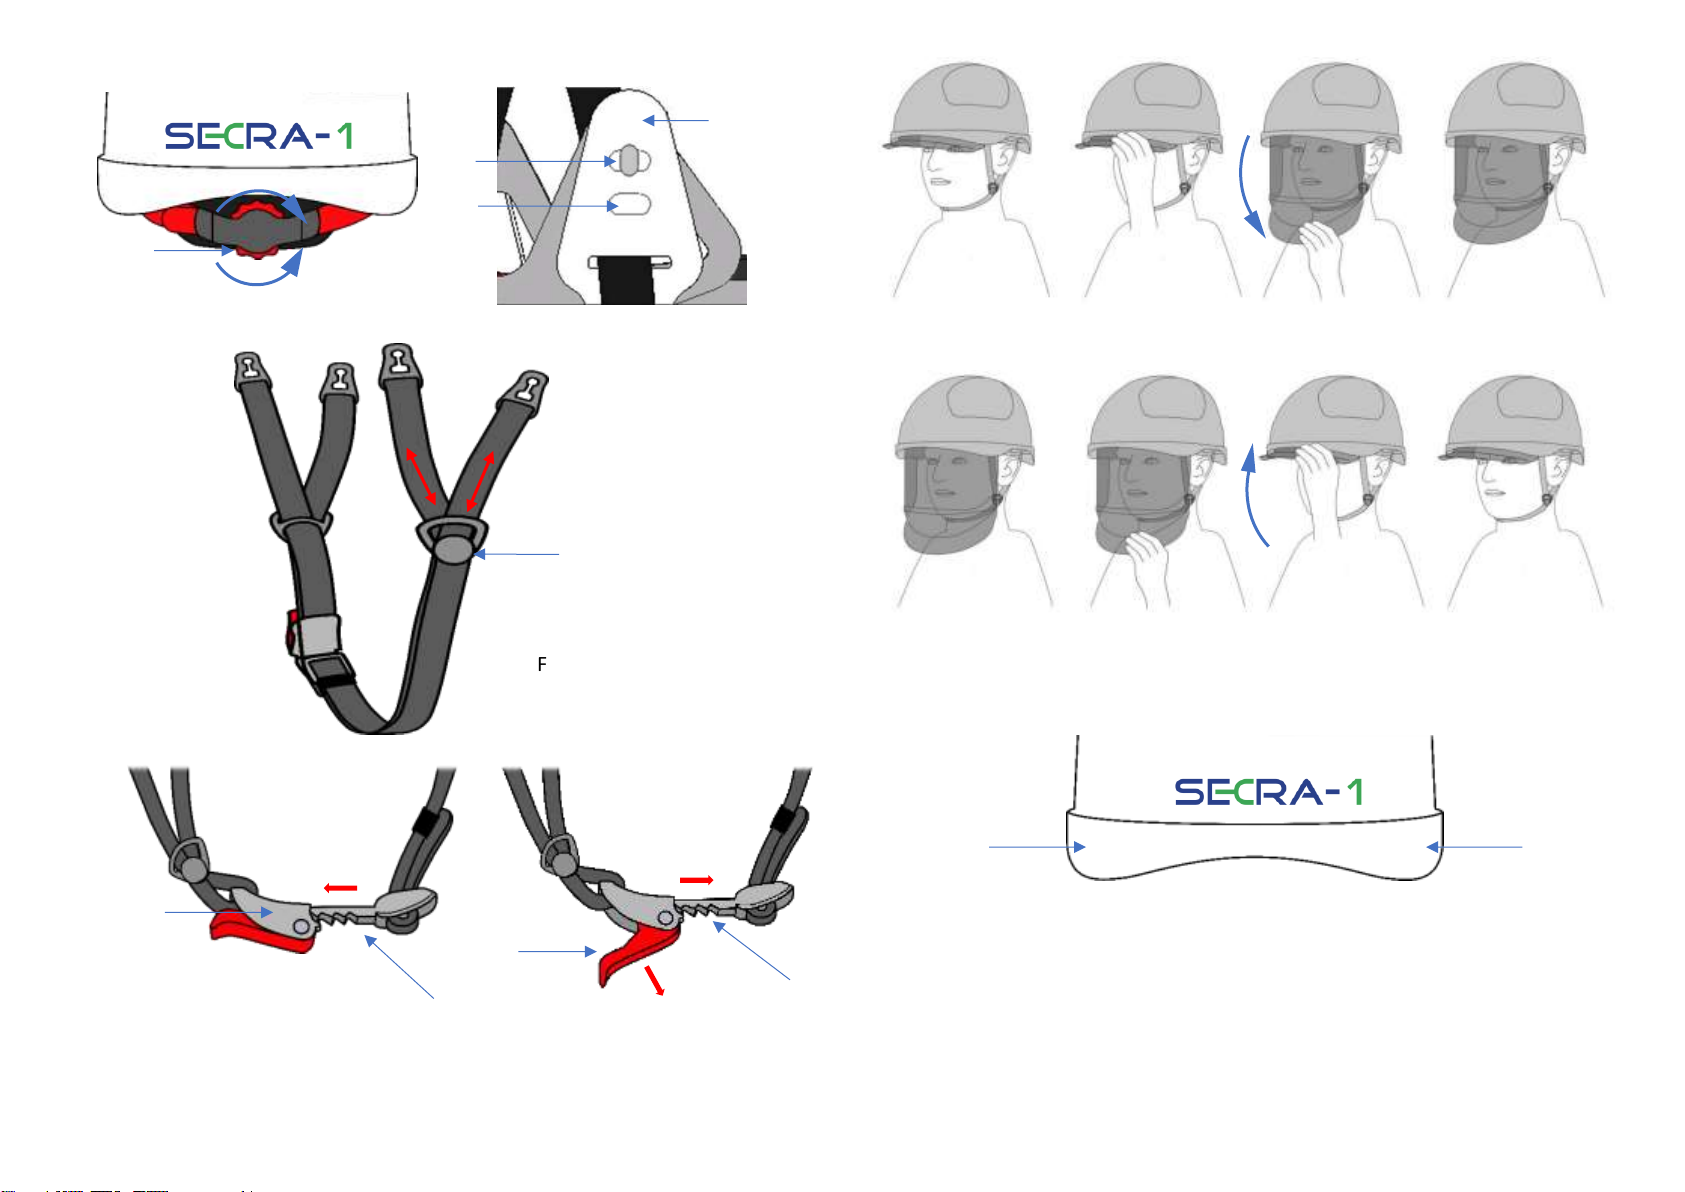
REGULACJA OBWODU GŁOWY
Hełm posiada regulację skokową obwodu głowy co 1mm w zakresie od 53cm do
63cm. Po nałożeniu hełmu na głowę należy dopasować go do obwodu głowy
obracając pokrętło regulatora (1) umieszczonego z tyłu hełmu (Fig.1). Obrót w lewo
(2) pozwala luzować a obrót w prawo (3) zaciskać opaskę regulatora.
REGULACJA WYSOKOŚCI NOSZENIA
Hełm posiada dwupozycyjną regulację wysokości noszenia (Fig.2). Po nałożeniu
hełmu na głowę należy upewnić się czy pasy nośne są odpowiednio ustawione do
wysokości głowy. Standardowo, zaczepy pasa (1) montowane są w pozycji płytkiej
(2). W celu zmiany wysokości noszenia, należy zamocować cztery zaczepy pasa w
pozycję głęboką (3).
REGULACJA PASKA PODBRÓDKOWEGO
Pasek podbródkowy (Fig.3) posiada regulację długości, indywidualnie dla lewej i
prawej części paska. Dla każdej z części można zmienić długość przedniego (1) i
tylnego (2) odcinka, przesuwając pasek przez rozdzielacz (3).
ZAPIĘCIE/ODPIĘCIE PASKA PODBRÓDKOWEGO
Aby zapiąć pasek należy wprowadzić w zatrzask (1) element paska (2) (Fig.4) Aby
odpiąć pasek należy odciągnąć zapinkę (1) i zwolnić element paska (2) z zatrzasku.
(Fig.5)
OPUSZCZANIE/PODNOSZENIE OSŁONY TWARZY
1. Aby opuścić (otworzyć) osłonę twarzy (Fig.6), należy delikatnie uchwycić ją za
daszek (1) i pociągnąć (2), aż całkowicie wysunie się na zewnątrz hełmu (3),
2. Aby podnieść (zamknąć) osłonę twarzy (Fig.7), należy najpierw delikatnie uchwycić
ją za daszek (1) a następnie wsunąć osłonę twarzy do hełmu, popychając ją do góry
(2).
UWAGA! Nieprawidłowe (niezgodne z instrukcją) użycie, otwieranie / zamykanie
osłony może spowodować jej uszkodzenie. Nie naciskaj zbyt mocno na części
osłony twarzy i nie zamykaj / nie otwieraj jej zbyt szybko.
4. KONTROLA PRZED UŻYCIEM
Przed każdym rozpoczęciem pracy należy dokonać oględzin hełmu i osłony twarzy.
Oględziny obejmują sprawdzenie:
obraku widocznych wad skorupy hełmu;
opoprawność działania regulacji obwodu głowy;
opoprawność zapięcia paska podbródkowego;
obraku widocznych wad osłony;
opoprawność działania osłony;
ookresu użytkowania.
W przypadku wykrycia mechanicznych (pęknięcia, głębokie rysy, itp.) lub
chemicznych (odbarwienia, wyblaknięcia, itp.) uszkodzeńskorupy, uszkodzeń
więźby, wadliwego działania regulacji obwodu głowy, wadliwego mocowania,
zapięcia lub uszkodzeń paska podbródkowego, a także mechanicznych (pęknięcia,
głębokie rysy, przedziurawienia), lub chemicznych (odbarwienia, zmatowienia itp.)
uszkodzeń osłony twarzy lub jej wadliwego działania oraz w przypadku powstania
wątpliwości co do zapewnienia optymalnego poziomu ochrony, hełm należy wycofać
z użytkowania.
Zwrócić uwagę na okres użytkowania hełmu, który wynosi 60 miesięcy od daty
produkcji oznaczonej na hełmie. Po tym okresie hełm wraz z osłoną należy wycofać
z użytkowania i poddać procesowi utylizacji.
Hełm zabrudzony nie może być użyty w pracach pod napięciem.
W przypadku zawilgocenia hełm należy dokładnie osuszyć przed użyciem.
UWAGA! Przed przystąpieniem do pracy, użytkownik powinien sprawdzić czy
ograniczenia elektryczne dla hełmów odpowiadają wartości znamionowej
napięcia i kategorii lub klasy zagrożeń, które mogą wystąpić podczas
użytkowania.

5. ŚRODKI OSTROŻNOŚCI W TRAKCIE UŻYTKOWANIA
Hełm nie powinien być użytkowany w sytuacjach, w których występuje ryzyko
częściowego obniżenia jego wartości izolacyjnych. Postępować zgodnie z
wymogami zawartymi w instrukcjach organizacji prac pod napięciem.
6. ŚRODKI OSTROŻNOŚCI PO UŻYCIU
Jeżeli hełm lub osłona twarzy ulegną zabrudzeniu lub zanieczyszczeniu, zwłaszcza
ich powierzchnie zewnętrzne, należy je dokładnie wyczyścić zgodnie z zaleceniami
producenta zawartymi w pkt. 8.
7. PRZECHOWYWANIE I TRANSPORT
Hełm przechowywać i przewozić w oddzielnym worku transportowym lub pojemniku.
Podczas przechowywania lub transportu osłona twarzy powinna być schowana do
środka hełmu. Hełm umieszczać z dala od źródeł ciepła. Chronić przed
uszkodzeniami mechanicznymi, ściskaniem i przed działaniem światła słonecznego,
wilgoci, spalin itp. Nie umieszczać hełmu bezpośrednio przy oknach pomieszczeń
lub szybach samochodów. Zaleca się przechowywanie w temperaturze (20±15)0C.
8. CZYSZCZENIE I DEZYNFEKCJA:
Hełm i osłona twarzy powinny być czyszczone po każdorazowym użyciu, co
umożliwia dokładną kontrolę i zapobiega podrażnieniu skóry użytkownika. Hełm
czyścić wyłącznie wodą z dodatkiem mydła. Po umyciu dokładnie osuszyć. Nie
stosować do czyszczenia rozpuszczalników, detergentów i materiałów
ściernych. Potniki przy silnym zużyciu wymienić na nowe.
Osłonę twarzy czyścić wyłącznie wodą z dodatkiem mydła. Po umyciu dokładnie
osuszyć. Do czyszczenia powierzchni wizjera należy używać załączonej do każdego
hełmu ściereczki z mikrofibry.
UWAGA! Osłona może ulec uszkodzeniu przez niektóre agresywne substancje
chemiczne. Nie stosować do czyszczenia rozpuszczalników, detergentów lub
materiałów ściernych.
9. EKSPLOATACYJNE CZĘŚCI ZAMIENNE
Elementy hełmu nadmiernie zużyte lub uszkodzone należy wymienić na nowe.
Producent gwarantuje pełny serwis oferowanego wyrobu. Uszkodzony element
hełmu, użytkownik może wymienić we własnym zakresie lub w celu wymiany, przesłać
hełm z uszkodzonym elementem do producenta.
Wykaz części zamiennych do wymiany przez użytkownika we własnym zakresie:
H058S-PC potnik czołowy;
H058S-PT potnik tylny;
H058S-WZ więźba, kompletna;
H058S-PS pasek podbródkowy z zaczepami bezpieczeństwa, kompletny;
H058S-1 SZW1 osłona twarzy ARC-W1, kompletna;
H058S-CL ściereczka do czyszczenia wizjera;
H058S-WR worek do przechowywania i transportu.
Aktualne instrukcje dostępne są na www.secra.pl
9. WYMIANA CZĘŚĆI ZAMIENNYCH
POTNIKI
Potniki (Fig. 9) przymocowane są do pasa głównego - potnik czołowy (1) i pasa tylnego
–potnik tylny (2) za pomocą rzepów. Aby wymienić potnik przedni, należy odczepić
kolejno sześć rzepów, które mocują go wokół pasa. Aby wymienić potnik tylny należy
go uchwycić i delikatnie ciągnąc, oddzielić od regulatora obwodu głowy. W miejsce
zużytych potników zamocować nowe
WIĘŹBA
W celu wymiany więźby (Fig. 10), należy między obręcz a zaczep więźby włożyć
wkrętak płaski (szerokość 3mm). Następnie lekko odchylić wkrętak aż do momentu
zwolnienia zatrzasku zaczepu więźby (1). Czynność tę powtórzyć na pozostałych
zaczepach. Po zwolnieniu wszystkich czterech zaczepów, należy je uchwycić i
delikatnie ciągnąc (2) oddzielić więźbę od obręczy hełmu (Fig.11).
W miejsce uszkodzonej więźby zamocować nową. W tym celu należy wprowadzić
zaczepy więźby w otwory obręczy a następnie kolejno je wciskać aż do usłyszenia
kliknięcia (zabezpieczenia zatrzasku zaczepów).
PASEK PODBRÓDKOWY
W celu wymiany paska podbródkowego (Fig.12) należy uchwycić zaczep paska (1) i
silnie ciągnąc oddzielić go od obręczy hełmu. Czynność tę powtórzyć na pozostałych
czterech zaczepach.
W miejsce uszkodzonego paska podbródkowego zamocować nowy. W tym celu
należy wprowadzić zaczep paska (2) na trzpień w obręczy (3) a następnie pociągnąć
do góry (Fig. 13) aż do zabezpieczenia zaczepu (Fig. 14).
OSŁONA TWARZY
Wymiana osłon twarzy zawarta jest w osobnej instrukcji.
10. AKCESORIA DODATKOWE
Opcjonalnie do hełmu mogą być dołączane akcesoria dodatkowe:
H058S-AD2 dwa adaptery, do mocowania na hełmie ochronników słuchu,
montowane przez producenta lub we własnym zakresie
H058S-OS ochronniki słuchu, do montażu na adapterach we własnym zakresie
H058S-LT latarka, do montażu we własnym zakresie
H058S-AEP osłony boczne, do montażu we własnym zakresie
BUFF komin lub kominiarka
Aktualne instrukcje dostępne są na www.secra.pl
11. OKRES UŻYTKOWANIA
Okres użytkowania hełmu z osłoną wynosi 60 miesięcy od daty produkcji. Data
produkcji kwartał/rok (1) i data utylizacji kwartał/rok (2) są wytłoczone na tylnej
zewnętrznej części skorupy hełmu (Fig. 8).

PO UPŁYWIE TERMINU OZNACZONEGO DATĄ UTYLIZACJI (2) HEŁM NALEŻY
BEZWZGLĘDNIE WYCOFAĆ Z UŻYTKOWANIA I PODDAĆ PROCESOWI
UTYLIZACJI.
UWAGA!
PO KAŻDYM UDARZE, POJAWIENIU SIĘ PĘKNIĘĆ LUB USZCZERBKÓW
HEŁM NALEŻY WYCOFAĆ Z UŻYTKOWANIA.
W PRZYPADKU: PĘKNIĘCIA, PRZEDZIURAWIENIA LUB ZMATOWIENIA
OSŁONY, HEŁM NALEŻY WYCOFAĆ Z UŻYTKOWANIA,LUB WYMIENIĆ
OSŁONĘ.
13. GWARANCJA
Producent udziela na hełm 24 miesięcznej gwarancji, liczonej od daty zakupu.
Gwarancji nie podlegają elementy hełmu noszące cechy normalnego zużycia,
przerabiane i modyfikowane, nieprawidłowo przechowywane, uszkodzone w wyniku
wypadków, zaniedbań i zastosowań niezgodnych z przeznaczeniem.
OSTRZEŻENIE!
•Po każdym udarze, pojawieniu się pęknięć lub uszczerbków hełm należy
wycofać z użytkowania.
•Nie dokonywać modyfikacji lub eliminacji oryginalnych elementów hełmu.
•Hełm elektroizolacyjny nie może być używany jako jedyny środek ochrony
osobistej podczas prac pod napięciem.
•W zależności od ryzyka występującego przy określonym rodzaju pracy,
niezbędne jest stosowanie oprócz hełmu dodatkowego sprzętu ochronnego.
•Producent nie ponosi odpowiedzialności za wprowadzenie bez uzgodnienia
z nim zmian w wyposażeniu, indywidualnego dopasowywania elementów
roboczych nie będących na wyposażeniu hełmu i nie przystosowanych do
prac pod napięciem.
•Nie pokrywać hełmu lub osłony twarzy farbami, lakierami, itp.
•Nie naklejać na hełm lub osłonę etykiet samoprzylepnych bez zgody
producenta.
•Nie stosować do czyszczenia hełmu lub osłony twarzy rozpuszczalników,
detergentów i materiałów ściernych.
•Nie rzucać, nie ściskać i nie używać hełmu jako podpory.
•Przed przystąpieniem do pracy, sprawdzić czy ograniczenia elektryczne dla
hełmów odpowiadają wartości znamionowej napięcia i kategorii lub klasy
zagrożeń, które mogą wystąpić podczas użytkowania.
•Osłona twarzy ARC-W1 może być stosowana wyłącznie z hełmem SECRA
H058S.
•Osłona twarzy chroni przed zagrożeniami tylko przy jej całkowitym
opuszczeniu.
•Nie stosować pod hełm nakryć głowy, ocieplaczy itp., które nie zostały
poddane badaniom w zestawie razem z hełmem. Użycie niewłaściwego
nakrycia głowy może spowodować znaczne zmniejszenie poziomu ochrony.
•Razem z hełmem stosować tylko nakrycia głowy (np. kominy, kominiarki)
zalecane przez producenta.
•Utrzymuj w czystości osłonę twarzy, a w szczególności jej przezroczysty
wizjer.

OPERATING MANUAL
Electrically Insulating Helmet
with Integrated Face Shield
type SECRA-1
Type: SECRA-1
Variant: H058S-1 ARC-W1 (ABS)
Class 0 (1 000V), Box Test –class 1
EN 397:2012 + A1:2012, EN 50365:2002, EN 166:2001, GS-ET 29:2010-02
Class E (20kV)
ANSI/ISEA Z89.1:2014
Manufacturer:
HUBIX Sp. z o.o.
96-321 ŻABIA WOLA Huta Żabiowolska ul. Główna 43
Tel: +48 46 857 84 40, fax: +48 46 857 80 21, hubix@hubix.pl, www.hubix.pl
The notified body that carried out the EU-type examination:
Helmet–CIOP-PIB, (No 1437), ul. Czerniakowska 16, 00-701 Warszawa;
Face shield –CIOP-PIB, (No 1437), ul. Czerniakowska 16, 00-701 Warszawa;
The notified body carrying out the conformity assessment procedure to type based
on internal production control plus supervised product checks at random intervals
(Module C2):
- CIOP-PIB, (No 1437), ul. Czerniakowska 16, 00-701 Warszawa.
1. INTENDENT USE
SECRA-1 type helmets in the H058S-1 ARC-W1 (ABS) variation is intended to
protect the head against injuries caused by falling objects and at the same time,
against electric shock class 0 (1000V) EN 50365:2002 and class E (20kV)
ANSI/ISEA Z89.1:2014 caused by flow of electric current through the head, against
electric arc, and against projected droplets of molten metal. It is recommended in
particular as a personal protection equipment to be used during work on live
equipment, work at heights, and work on electrical connections. Working
temperature in the range -40°C to +60°C.
The face shield has an external scratch-resistant and resistance to damage by fine
particles surface and an internal anti-fog surface. The face shields protect the user
against short-circuit electric arc (class 1- Box Test. They also protect against the
impact of particles with medium energy, the risk of projected solid objects and
liquids, and projected molten metal. The shield also has filter to protect against UV
radiation.
2. MARKING
marking stamped on the helmet shell:
indicates a product intended for work on live equipment;
Klasa 0 Class 0 - electrical class for use up to rated mains voltage of 1,000V AC
and 1,500V DC;
EN 50365:2002 applicable standard ”Electrically insulating helmets for use on low voltage
installations”;
identification of the manufacturer;
SECRA H058S model name (hard hat);
ABS material of helmet shell;
53-63cm range of head circumference adjustment;
207/8-245/8inch range of head circumference adjustment;
EN 397:2012+A1:2012 applicable standard ”Industrial safety helmets”;
-40°C resistance to very low temperatures (down to -40°C);
LD resistance to lateral deformation;
MM resistance to projected droplets of molten metal;
440Vac electric insulation (according to the EN 397 standard);
ANSI/ISEA Z89.1-2014 applicable standard "American National Standard for Industrial
Head Protection”;
Type I protection against shocks at the top of the head, according to the standard
ANSI/ISEA Z89.1;
Class E electrical class, according to ANSI/ISEA Z89.1;
LT lower temperature (according to the ANSI/ISEA Z89.1 standard);
HT higher temperature (according to the ANSI/ISEA Z89.1 standard);
CE 1437 marking of conformity with the Regulation 2016/425 and the number of the
Notified Body carrying out supervised product checks at random intervals
(module C2);;
LOT NO: XXX serial number;
www.secra.pl website address where a declaration of conformity is available.
marking stamped on the rear, outer part of shell:
PROD X/XX production date (quarter/year);
UTIL X/XX expiry date (quarter/year).
ENGLISH

marking on the rear, outer part of shell:
SECRA-1 type of helmet..
marking on the visor:
1000V
indicates a product intended for work on live equipment (according to the
RFU no 03-025/2012);
2-1,2 protection level of the UV filter;
HUBIX identification of the manufacturer;
1 optical class;
B resistance to medium-energy impacts;
8-1-0 protection against short-circuit electric arc
8 protection against electric arc according to EN 166:2001;
-1 protection against thermal effects associated with electrical arc - class 1
(4kA/0,5s) according to GS-ET 29:2010-02 “Supplementary requirements for the
testing and certification of face shields for electrical works”;
-0 coefficient VLT >75%, class 0, according to GS-ET 29:2010-02;
9 protection against projected molten metal and hot solid objects;
K resistance to damage by fine particles
N resistance to fogging;
CE marking of conformity with the Regulation 2016/425;
marking stamped on the lower part of the shield - the chin protection:
HUBIX identification of the manufacturer;
EN 166:2001 applicable standard ”Personal eye protection. Specifications”;
3 protection against projected liquid;
8 protection against electric arc;
9 protection against projected molten metal and hot solid objects;
B resistance to medium-energy impacts.
3. ADJUSTMENT
Before use, the helmet must be properly adjusted to provide effective protection.
The user should adjust the hard hat to the circumference of the head, changing the
wearing height and the length of the chin strap in such a way that the hard hat fits
well, does not move or tilt.
HEAD CIRCUIT ADJUSTMENT
The hard hat is equipment with a ratchet mechanism to adjust to the circumference
of the head with the precision of 1mm over a range of 53 to 63cm. After putting the
helmet on the head, adjust it to the head circumference by turning the knob of the
headband (1) located on the back of the helmet (Fig.1). Turning to the left (2) allows
you to loosen and turn to the right (3) to tighten the headband.
ADJUSTMENT OF WEARING HEIGHT
The hart had has two adjustment positions for the wearing height (Fig.2). After
putting the helmet on the head, make sure that the cradle is properly adjusted to the
height of the head. As standard, the attachment of the headband (1) is mounted in
the low position (2). In order to change the wearing height, attach the attachment of
the headband to the high position (3).
ADJUSTMENT OF THE CHIN STRAP
The chinstrap (Fig. 3) has a length adjustment, individually for the left and right of the
strap. For each part, the length of the front (1) and rear (2) sections can be changed
by sliding the strip through the splitter (3).
FASTENING OF THE CHIN STRAP
To fasten the strap, insert the strap element (1) into the clip (2) (Fig.4) To unfasten the
strap, pull the clip (1) and release the strap element (2) from the clip. (Fig.5)
OPENING/CLOSING OF THE FACE SHIELD
1. In order to lower (open) the face shield (Fig.6), gently grab it with hand, (1), pull it
down (2), until it fully extends to the outside of the helmet (3).
2. In order to lift (close) the face shield (Fig.7), gently grab it with hand, (1), and slide
the face shield into the helmet, by pushing it upward (2).
Caution! Incorrect (not according to the instruction) use/opening/closing of
the face shield may cause its damage. Do not press on parts of the face shield
too hard and do not close/open it too fast.
4. CHECKS BEFORE EACH USE
The hard hat and the face shield must be checked each time before work is resumed.
During the visual inspection, the following items must be checked:
oabsence of visible defects on hard hat;
oproper operation of the head circumference adjustment mechanism;
oproper operation of the chin strap fastener;
oabsence of visible defects on the shield;
oproper operation of the shield's mechanisms;
othe period of use or expiry date.
In the event of a mechanical damage of the shell (cracks, deep scratches, etc.) or
chemical (discoloration, fading, etc.), improper operation of the head circumference
adjustment or of the chin strap fastener and mechanical (cracks, deep scratches,
perforations), or chemical (discoloration, tarnishing etc.) damage to the face shield
or its malfunction and if there is any doubt as to the optimal level of protection, the
helmet must not be used for work on live equipment and it should be withdrawn from
use
If the expiry date has passed, the helmet must be disposed of.
If the helmet is wet, it must be completely dried before use.
WARNING! Before starting work, the user should check whether the electrical
limits for helmets correspond to the voltage rating and the category or class
of hazards that they are likely to encounter during use.

5. PRECAUTION IN USE
The helmets should not be used in situations where there is a risk which could
partially reduce its insulating properties. Follow the requirements of the live work
organization instructions.
6. PRECAUTION AFTER USE
If the helmet or face shield becomes dirty or contaminated, particularly their external
surfaces, they should be thoroughly cleaned in accordance with the manufacturer's
recommendations (see 8.)
7. STORAGE AND TRANSPORT
The helmet must be stored and transported in a special transport bag or other
protective packaging. During storage or transport, the face shield should be hidden
inside the helmet. Keep the helmet away from any sources of heat. Protect the
helmet against mechanical damage, compression, sunlight (UV), humidity, exhaust
gases, etc. Do not place the helmet in direct vicinity of windows or car windows. The
recommended storage temperature is 20±15°C
8. CLEANING AND DISINFECTION:
The hard hat and face shield should be cleaned after each use, which enables
precise control and prevents skin irritation of the user. The hard hat should be
cleaned only with soap and water. Do not use any solvents, detergents and
abrasives for cleaning. The sweatbands must be regularly replaced.
The face shield should be cleaned only with soap and water. After washing, dry the
shield properly. To clean the surface of shield visor, use a microfiber cloth, attached
to each helmet.
CAUTION! The face shield can be damaged by certain aggressive chemical
substances. Do not use any solvents or detergents and abrasives to clean the
face shield.
9. SPARE PARTS
Parts of the helmet that are very worn or damaged must be replaced with new ones.
The manufacturer provides full service of the product it offers and its dedicated
accessories. The users can replace damaged elements of the helmet by themselves or
send the helmet with a damaged part to the manufacturer.
List of spare parts to be replaced by the user himself:
H058S-PC front sweatband
H058S-PT rear sweatband
H058S-WZ head harness, complete
H058S-PS chinstrap with safety catches, complete
H058S-1-SZW1face shield ARC-W1, complete
H058S-CL visor cleaning cloth
H058S-WR storage and transport bag
The latest instructions are available at www.secra.pl
10. REPLACEMENT OF SPARE PARTS
SWEATBAND
The sweatbands (Fig. 9) are fixed to the main strap –front sweatband (1) and the
back strap –back sweatband (2) using Velcro fasteners. In order to replace the front
sweatband, remove the six Velcro, which fasten it around the headband. In order to
replace the back sweatband, grab it and separate them from the regulator by gently
pulling them. In place of worn sweatband attach new ones.
HARNESS
In order to change the harness (Fig. 10), put a flat screwdriver (3 mm wide)
between the rim and the attachment of the harness. Then lightly pull the screwdriver
until the attachment of the harness becomes opened (1). Perform the same
procedure on all the attachments. After releasing all four attachments, grasp them
and pull gently (2) to separate the harness from the rim of the helmet (Fig.11).
In order to replace a damaged harness with a new one, insert the attachments of the
harness in the openings of the rim, push them one after another until a clicking sound
can be heard, and then check if they have been fastened properly.
CHIN STRAP
In order to change the chinstrap (Fig.12), grasp the attachment of the chinstrap (1)
and separate it from the anchorage on the rim of hard hat by pulling it with force.
Perform the same procedure on the remaining attachments. Replace the new one in
place of the damaged chinstrap.
Insert the attachments of chin strap (2) on the anchorage of the rim (3) and then pull
them up (Fig. 13) until securing the attachments (Fig. 14).
FACE SHIELD
The replacement of face shields is included in a separate manual.
11. ADDITIONAL ACCESSORIES
Optionally, additional accessories can be attached to the helmet:
H058S-AD2 two adapters for mounting on the helmet of earmuff, mounted by the
manufacturer or for self-assembly
H058S-OS earmuff, for mounting on adapters for self-assembly
H058S-LT flashlight, for self-assembly
H058S-AEP arcflash ear protectors, for self-assembly
Original Buff balaclava
Information on additional accessories and the manner of their installation are
contained in separate manuals
The latest instructions are available at www.secra.pl

12. LIFE TIME
The lifetime of the helmet with face shield is 60 months from the date of manufacture.
The production date quarter/year (1) and the date of utilization quarter/year (2) are
pressed on the back of the outer shell of the helmet (Fig. 8).
AFTER THE DATE MARKED “UTIL X / XX” ON THE BACK OF THE SHELL [see
Fig.8 (2)] THE HELMET MUST BE WITHDRAWN FROM USE AND DISPOSED
OF.
IN THE EVENT OF AN IMPACT, FALL, APPEARANCE OF CRACKS OR
PERFORATIONS, THE HARD HAT MUST BE DISPOSED OF.
IN THE EVENT OF CRACKS, SCRATCHES, PERFORATIONS AND
DISCOLORATION OR TARNISHING, THE FACE SHIELD MUST BE DISPOSED
OF OR REPLACED.
In normal and standard use conditions, the face shield ensures sufficient protection
for 60 months.
13. WARRANTY
This product is covered with a 24-month warranty, starting from the date of
purchase. The warranty does not cover defects caused by negligence, accidents,
problems resulting from improper use (non-conforming to the manufacturer's
instruction) or physical wear of the product.
WARNING!
•In the event of an impact, fall, appearance of cracks or perforations, the
hard hat must be disposed of.
•Do not modify or remove any of the original helmet components.
•The electrically insulating helmet cannot be used as the only personal
protective equipment during live work.
•Depending on the risk involved in a particular type of work, it is necessary
to use additional protective equipment in addition to the helmet.
•The manufacturer accepts no responsibility in the event of any
modifications of the equipment performed without its permission and in
the event of any additions or replacement of accessories that have not been
approved by the manufacturer or do not constitute a part of the original
hard hat and not adapted to live work.
•Do not apply paint, varnishes, etc. to the hard hat or visor of face shield.
•Do not stick self-adhesive labels on the helmet or face shield without the
consent of the manufacturer.
•Do not use solvents, detergents and abrasives to clean the helmet or face
shield.
•The helmet must not be thrown, dropped or used as a support.
•Before starting work, check that the electrical limits for helmets correspond
to the voltage rating and category or class of hazards that may occur during
use.
•The ARC-W1 face shield can only be used with the SECRA H058S helmet.
•The face shield protects against hazards only when it is completely
lowered.
•Do not use headgear, warmers, etc. under the helmet, which have not been
tested in combination with the helmet. Using the wrong headgear can
significantly reduce the level of protection.
•With the helmet use only balaclavas recommended by the manufacturer.
•Keep the face shield, in particular the transparent visor, clean.

GEBRAUCHSANWEISUNG
DER ELEKTRISCH ISOLIERENDEN SCHUTZHELME
MIT INTEGRIERTEM GESICHTSCHUTZ
TYP SECRA-1
Typ:
SECRA-1
Varianten: H058S-1 ARC-W1 (ABS)
Klasse 0 (1 000 V), Box Test - Klasse 1
EN 397:2012 + A1:2012, EN 50365:2002, EN 166:2001, GS-ET 29:2010-02
Klasse E (20 kV)
ANSI/ISEA Z89.1:2014
Hersteller:
HUBIX Sp. z o.o.
96-321 ŻABIA WOLA Huta Żabiowolska ul. Główna 43
Die notifizierte Stelle, die die EU-Baumusterprüfung durchgeführt hat:
Schutzhelm –[CIOP-PIB], (Nr.: 1437), ul. Czerniakowska 16, 00-701 Warszawa;
Gesichtsschutz –[CIOP-PIB], (Nr.: 1437), ul. Czerniakowska 16, 00-701
Warszawa;
Die notifizierte Stelle, die das Konformitätsbewertungsverfahren – Konformität mit dem
Baumuster auf der Grundlage einer internen Fertigungskontrolle mit überwachten
Produktprüfungen in unregelmäßigen Abständen (Modul C2):
- Zentralinstitut für Arbeitsschutz - Nationales Forschungsinstitut [CIOP-PIB],
(Nr.: 1437), ul. Czerniakowska 16, 00-701 Warszawa;
1. VERWENDUNGSZWECK
Die Schutzhelme Typ SECRA-1 in den Varianten: H058S-1 ARC-W1 (ABS) sind für
Kopfschutz vor Verletzungen durch herabfallende Gegenstände bestimmt und
zugleich stellen sie den Schutz gegen Stromschlag Klasse 0 (1 000 V) EN 50365:2002
und Klasse E (20 kV) ANSI/ISEA Z89.1:2014 dar, indem sie den Stromfluss durch den
Kopf verhindern. Sie bieten auch Schutz gegen Lichtbogen und Spritzer
geschmolzenen Metalls. Sie sind besonders empfohlen für den Einsatz als
persönliche Schutzausrüstung bei Arbeiten unter Spannung, Arbeiten in der Höhe und
bei Schaltvorgängen. Arbeitstemperatur im Bereich -40 °C bis +60 °C.
Die Gesichtsschutzvisiere haben eine kratzfeste Außenbeschichtung und eine interne
Antibeschlagbeschichtung. Die Konstruktion der Gesichtsschutze ermöglicht den
Schutz gegen Lichtbogen (Klasse 1 - Box Test). Sie schützen auch gegen die
Einwirkung von Partikeln mit mittlerer Energie, gegen Tropfen und Spritzer von
Flüssigkeit und gegen geschmolzene Metalle und heiße Feststoffe. Der Schutz verfügt
über die UV-Filter.
2. MARKIERUNG
Markierung, die in der Innenseite der Helmschale geprägt wird:
Symbol der Arbeit unter Spannung
Klasse 0 elektrische Klasse für Installationen mit Nennspannung bis 1000 V
Wechselspannung und 1500 V Gleichspannung;
EN 50365:2002 Bezugsnorm „Elektrisch isolierende Helme für Arbeiten an
Niederspannungsanlagen“;
Herstellerlogo;
SECRA H058S Helm Modell;
ABS Material der Helmschale;
53 - 63 cm Einstellungsbereich des Kopfumfangs;
207/8- 245/8Zoll Einstellungsbereich des Kopfumfangs;
EN 397:2012+A1:2012 Bezugsnorm „Industrieschutzhelme“;
-40 °C sehr niedrige Temperatur (bis –40 °C);
LD Beständigkeit gegen seitliche Verformung;
MM Beständigkeit gegen Spritzer geschmolzenen Metalls;
440 Vac elektrische Isolierung (gemäß EN 397);
ANSI/ISEA Z89.1-2014 Bezugsnorm „American National Standard for Industrial Head
Protection“ [amerikanische Norm zur Prüfung des industriellen
Kopfschutzes]
Typ I Helm Typ gemäß ANSI/ISEA Z89.1-2014;
Klasse E elektrische Klasse des Helms gemäß ANSI/ISEA Z89.1-2014;
LT niedrigere Temperatur gemäß ANSI/ISEA Z89.1-2014;
HT Temperatur gemäß ANSI/ISEA Z89.1-2014;
CE 1437 Kennzeichnung der Konformität mit der Verordnung 2016/425 und Nummer
der notifizierten Stelle, die die überwachten Produktprüfungen in
unregelmäßigen Abständen (Modul C2) durchführt;
LOS NR. XXX Seriennummer;
www.secra.pl Website, in der die Konformitätserklärung verfügbar ist.
DEUTSCH

Markierung, die in der hinteren Außenseite der Helmschale geprägt wird:
PROD X/XX Produktionsdatum (Quartal / Jahr);
UTIL X/XX Entsorgungsdatum (Quartal / Jahr).
Markierung, die in der hinteren Außenseite der Helmschale angebracht wird:
SECRA-1 Helm Typ.
Markierung des Visiers:
1000 V
Symbol der Arbeiten unter Spannung gemäß RFU Nr. 03-025/2012
2C-1,2 Codenummer und UV-Filter-Schutzstufe
HUBIX Herstellername;
1 optische Klasse;
B Beständigkeit gegen mittlere Schläge;
8-1-0 Schutz vor dem Lichtbogen;
8 Schutzsymbol gemäß EN 166:2001
-1 Schutz vor thermischer Gefährdung durch Lichtbogen Klasse 1
(4 kA/0,5 s) gemäß GS-ET 29:2010-02 “Supplementary requirements for the testing
and certification of face shields for electrical works“ [Ergänzende Anforderungen für die
Prüfung und Zertifizierung von Gesichtsschutz für elektrische Arbeiten];
-0 Koeffizient VLT > 75 % Klasse 0, gemäß GS-ET 29:2010-02;
9 Schutz gegen geschmolzene Metalle und heiße Feststoffe;
N Beständigkeit gegen Beschlagen;
CE Kennzeichnung der Konformität mit der Verordnung 2016/425;
Markierung, die am unteren Teil des Gesichtsschutzes, Kinnschutz geprägt
wird:
HUBIX Herstellername;
EN 166:2001 Bezugsnorm „Persönlicher Augenschutz. Anforderungen“,
3 Schutz gegen Tropfen und Flüssigkeitsspritzer;
8 Schutz gegen Lichtbogen;
9 Schutz gegen geschmolzene Metalle und heiße Feststoffe;
B Beständigkeit gegen mittlere Schläge;
3. EINSTELLUNGEN
Vor dem Gebrauch muss der Helm richtig eingestellt sein, um einen wirksamen Schutz
zu gewährleisten. Der Benutzer sollte den Helm auf den Kopfumfang einstellen, die
Tragehöhe und die Länge des Kinnriemens so einstellen, dass der Helm gut sitzt, sich
nicht bewegt und nicht kippt.
EINSTELLUNG DES KOPFUMFANGS
Der Helm verfügt über eine stufenweise Einstellung des Kopfumfangs alle 1 mm im
Bereich von 53 cm bis 63 cm. Nach dem Aufsetzen des Helms, ist er auf den
Kopfumfang einzustellen, indem den Reglerknopf (1), der hinter angebracht wird,
gedreht wird (Abb. 1). Drehen nach links (2) ermöglicht es, das Reglerband zu lösen
und Drehen nach rechts (3) ermöglicht es, das Reglerband festzuziehen.
EINSTELLUNG DER TRAGEHÖHE
Der Helm verfügt über zweistufige Einstellung der Tragehöhe (Abb.2). Nach dem
Aufsetzen des Helms ist sicherzustellen, dass die Tragegurten richtig auf die
Kopfhöhe eingestellt sind. Standardmäßig werden die Gurthaken (1) in der flachen
Position (2) montiert. Um die Tragehöhe zu ändern, sind vier Gurthaken an der tiefen
Position (3) zu befestigen.
EINSTELLUNG DES KINNRIEMENS
Der Kinnriemen (Abb. 3) verfügt über Längeneinstellung, individuell für die linke und
rechte Seite des Riemens. Für jeden Teil kann die Länge der vorderen (1) und hinteren
(2) Abschnitte geändert werden, indem der Riemen durch den Verteiler (3) geschoben
wird.
KINNRIEMEN SCHLIESSEN / ÖFFNEN
Um den Kinnriemen zu schließen, ist das Gurtelement (1) in den Clip (2) zu stecken
(Abb. 4). Um den Gurt zu lösen, ist der Clip (1) aufzubiegen und das Gurtelement (2)
vom Clip zu lösen. (Abb. 5)
GESICHTSCHUTZ SENKEN / ANHEBEN
1. Um den Gesichtsschutz herunterzulassen (zu öffnen) (Abb. 6), greifen Sie ihn
vorsichtig an das Visier (1) und ziehen Sie ihm (2), bis er vollständig aus der
Helmschale (3) herausgezogen ist.
2. Um den Gesichtsschutz anzuheben (zu schließen) (Abb. 7), greifen Sie ihn
vorsichtig an das Visier (1) und dann den Gesichtsschutz in die Helmschale
einschieben, indem es nach oben geschoben wird (2).
Achtung! Unsachgemäße (der Anweisung nicht gemäß) Anwendung, falsches
Öffnen / Schließen des Schutzes kann ihn beschädigen. Drücken Sie nicht zu
stark auf die Teile des Gesichtsschutzes und schließen / öffnen Sie ihn nicht zu
schnell.
4. PRÜFUNG VOR DEM GEBRAUCH
Vor jeder Arbeit sollen der Helm und Gesichtsschutz einer Sichtprüfung unterzogen
werden. Die Sichtprüfung fasst folgende Fragen um:
okeine sichtbaren Defekte in der Helmschale;
okorrekte Kopfumfangeinstellung;
okorrekte Kinnriemenbefestigung;
okeine sichtbaren Mängel im Schutz;
oordnungsgemäße Funktion des Schutzes;
oLebensdauer.
Bei mechanischen (Risse, tiefe Kratzer usw.) oder chemischen (Verfärbung,
Verblassen, usw.) Beschädigungen der Helmschale, Beschädigung des Trägers,
unsachgemäßer Bedienung der Kopfumfangseinstellungen, fehlerhafter
Befestigung, Anlegen oder Beschädigung des Kinnriemens, sowie mechanischer
(Risse, tiefe Kratzer, Durchlochungen) oder chemische (Verfärbungen, Anlaufen
usw.) Schäden am Gesichtsschutz oder dessen Fehlfunktion, wenn Zweifel
bestehen, ob ein optimales Schutzniveau gewährleistet wird, sollte der Helm nicht
mehr verwendet werden.

Achten Sie auf die Lebensdauer des Helms, die 60 Monate ab dem auf dem Helm
markierten Herstellungsdatum beträgt. Nach dieser Zeit sollten der Helm und
Gesichtsschutz außer Betrieb genommen und entsorgt werden.
Ein schmutziger Helm darf bei den Arbeiten unter Spannung nicht verwendet
werden.
Wenn der Helm feucht ist, soll er vor dem Gebrauch gründlich getrocknet werden.
ACHTUNG! Vor Beginn der Arbeiten sollte der Benutzer prüfen, ob die
elektrischen Grenzwerte für Helme der Nennspannung und der Kategorie oder
Klasse von Gefahren entsprechen, die während des Gebrauchs auftreten
können.
5. VORSICHTSMASSNAHMEN BEI DER VERWENDUNG
Der Helm sollte nicht in Situationen verwendet werden, in denen die Gefahr besteht,
dass seine Isolationswerte teilweise abgesenkt werden. Befolgen Sie die
Anforderungen gemäß den Anweisungen der Organisationen der Arbeit unter
Spannung.
6. VORSICHTSMASSNAHMEN NACH DER VERWENDUNG
Wenn der Helm oder der Gesichtsschutz verschmutzt oder verunreinigt werden,
insbesondere an den Außenflächen, sollten diese gemäß den Anweisungen des
Herstellers im Punkt sorgfältig gereinigt werden. 8.
7. AUFBEWAHRUNG UND TRANSPORT
Den Helm ist in einem getrennten Transportbeutel oder -behälter aufzubewahren
und zu transportieren. Bei der Aufbewahrung oder beim Transport sollte der
Gesichtsschutz im Helm gesteckt sein. Den Helm von Wärmequellen fernhalten. Vor
mechanischen Beschädigungen, Quetschungen und Sonneneinstrahlung,
Feuchtigkeit, Abgasen usw. schützen. Den Helm nicht direkt an die Scheiben von
Fahrzeugräumen oder Fenstern stellen. Die Aufbewahrung in der Temperatur
(20±15)0C ist empfohlen.
8. REINIGUNG UND DESINFEKTION:
Der Helm und der Gesichtsschutz sollten nach jedem Gebrauch gereinigt werden,
was eine gründliche Prüfung ermöglicht und Hautirritationen des Benutzers
verhindert. Den Helm nur mit Wasser und Seife reinigen. Nach der Reinigung
gründlich abtrocknen. Keine Lösungsmittel, Reinigungsmittel und
Scheuermittel für die Reinigung verwenden. Die Schweißbänder sind bei starker
Abnutzung gegen neue auszutauschen.
Den Gesichtsschutz nur mit Wasser und Seife reinigen. Nach der Reinigung
gründlich abtrocknen. Zur Reinigung der Visieroberfläche ist das jedem Helm
beigefügte Mikrofasertuch zu verwenden.
ACHTUNG! Der Schutz kann durch aggressive Chemikalien beschädigt werden.
Keine Lösungsmittel, Reinigungsmittel und Scheuermittel für die Reinigung
verwenden.
9. VERSCHLUSS-ERSATZTEILE
Übermäßig abgenutzte oder beschädigte Elemente des Helms sollten gegen neue
ausgetauscht werden. Der Hersteller garantiert den vollen Service des angebotenen
Produkts. Der Benutzer kann das beschädigte Element selbst austauschen oder den
Helm mit dem beschädigten Element an den Hersteller zuschicken.
Verzeichnis der Ersatzteile, die der Benutzer selbst austauschen kann:
H058S-PC Stirn-Schweißband;
H058S-PT hinteres Schweißband;
H058S-WZ kompletter Träger;
H058S-PS Kinnriemen mit Sicherheitsverschlüssen, komplett;
H058S-1-SZW1Gesichtsschutz ARC-W1, komplett;
H058S-CL Tuch zur Reinigung des Visiers;
H058S-WR Aufbewahrungs- und Transportbeutel.
Aktuelle Anweisungen finden Sie unter www.secra.pl
10. AUSTAUSCH VON ERSATZTEILEN
SCHWEISSBÄNDER
Die Schweißbänder (Abb. 9) sind am Hauptgürtel - Stirn-Schweißband (1) und im
Rückenteil - hinteres (2) Schweißband mit dem Klettverschluss befestigt. Um das
vordere Schweißband auszutauschen, sind sechs Klettverschlüsse zu lösen, die es
am Band befestigen. Um das hintere Schweißband auszutauschen, ist es zu greifen
und es vorsichtig von der Kopfumfangeinstellung wegziehen. Die abgenutzten
Schweißbänder gegen neue auszutauschen.
TRÄGER
Um den Träger (Abb. 10) auszutauschen, soll zwischen Band und Trägerhaken ein
flacher Schraubendreher (Breite 3mm) eingelegt werden. Dann den
Schraubendreher leicht biegen, bis die Verriegelung des Trägers (1) gelöst wird.
Diesen Vorgang an den weiteren Haken wiederholen. Nachdem Sie alle vier Haken
gelöst werden, greifen Sie sie und ziehen Sie vorsichtig (2), um den Träger vom
Helmrand zu trennen (Abb. 11).
Den abgenutzten Träger gegen neuen auszutauschen. Dazu sollen die Haken des
Trägers in die Randbohrungen gesteckt werden und dann nacheinander eingedrückt
werden, bis sie klicken (Sicherung der Hakenverriegelung).
KINNRIEMEN
Um den Kinnriemen auszutauschen (Abb. 12), ist der Gürtelhaken (1) zu greifen und
vom Helmrand fest abzuziehen. Diesen Vorgang an den weiteren
vier Haken wiederholen.
Den abgenutzten Kinnriemen gegen neuen auszutauschen. Dazu ist der Haken des
Kinnriemens (2) auf den Randdorn (3) einzuführen und dann nach oben zu ziehen
(Abb. 13) bis der Haken gesichert wird (Abb. 14).
GESICHTSSCHUTZ
Der Austausch von Gesichtsschutz ist in einer getrennten Anweisung beschrieben.

11. ZUSÄTZLICHES ZUBEHÖR
Optional kann zusätzliches Zubehör dem Helm beigefügt werden:
H058S-AD2 zwei Adapter zur Montage des Gehörschutzes auf dem Helm, der
vom Hersteller montiert werden kann oder zur Selbstmontage
vorgesehen ist.
H058S-OS Gehörschutz zur Selbstmontage auf den Adaptern
H058S-LT Helmlampe zur Selbstmontage
H058S-AEP Seitenschutz gegen Lichtbogen zur Selbstmontage
BUFF Schlauchschal oder Kapuzenmütze
Informationen zu zusätzlichem Zubehör und zur Montage sind in getrennten
Anleitungen zu finden.
Aktuelle Anweisungen finden Sie unter www.secra.pl
12. LEBENSDAUER
Die Lebensdauer des Helms mit dem Gesichtsschutz beträgt 60 Monate ab
Herstellungsdatum. Das Herstellungsdatum Quartal / Jahr (1) und das
Verwendungsdatum Quartal / Jahr (2) sind auf der Rückseite der Helmaußenschale
geprägt (Abb. 8).
NACH ABLAUF DES DATUMS, DAS ALS ENTSORGUNGSDATUM MARKIERT
IST (2), IST DER HELM BEDINGUNGSLOS NICHT WEITER ZU VERWENDEN
UND DEM ENTSORGUNGSPROZESS ZU UNTERZIEHEN.
ACHTUNG!
NACH JEDEM SONNENSTICH, NACH AUFTAUCHEN VON BRÜCHEN ODER
MÄNGELN SOLL DER HELM NICHT WEITER VERWENDET WERDEN.
WENN: DER GESICHTSSCHUTZ GEBROCHEN, DURCHGELÖCHERT ODER
TRÜBE IST, SOLL DER HELM NICHT WEITER VERWENDET WERDEN, ODER
DER GESICHTSCHUTZ AUSGETAUSCHT WERDEN.
Unter normalen Bedingungen sollte der Gesichtsschutz einen ausreichenden Schutz
für 60 Monate bieten. Bei intensiver Nutzung, insbesondere bei längerer UV-
Bestrahlung, empfiehlt der Hersteller, den Gesichtsschutz nach 24 Monaten
auszutauschen.
13. GARANTIE
Der Hersteller gewährt 24 Monate Garantie auf den Helm, gerechnet ab Kaufdatum.
Die Garantie gilt nicht für die Helmteile, die normale Abnutzungsmerkmale
aufweisen, die verarbeitet und modifiziert, unsachgemäß gelagert, durch Unfälle,
Fahrlässigkeit und nicht bestimmungsgemäßen Gebrauch beschädigt wurden.
WARNUNG!
•Nach jedem Sonnenstich, nach Auftauchen von Brüchen oder Mangeln soll
der Helm nicht weiter verwendet werden.
•Die originalen Helmteile sollen weder modifiziert noch entfernt werden.
•Der elektrisch isolierende Schutzhelm darf als einziges Schutzmittel bei den
Arbeiten unter der Spannung nicht verwendet werden.
•Je nach dem Risiko, das bei einer bestimmten Art von Arbeit auftritt, ist es
notwendig, zusätzliche Schutzausrüstung zu dem Helm zu verwenden.
•Der Hersteller ist weder für die Änderungen an der Ausrüstung, die ohne
individuelle Vereinbarung mit ihm erfolgt haben, noch für individuelle
Einstellung von Werkstücken, die keine Helmausstattung sind und nicht für
Arbeiten unter Spannung geeignet sind, verantwortlich.
•Den Helm oder den Gesichtsschutz mit Farben, Lacken usw. nicht
beschichten.
•Auf den Helm oder den Gesichtsschutz keine Selbstklebeetiketten ohne
Zustimmung des Herstellers anbringen.
•Keine Lösungsmittel, Reinigungsmittel und Scheuermittel für die Reinigung
des Helms oder des Gesichtsschutzes verwenden.
•Nicht werfen, nicht quetschen und den Helm nicht als Stütze benutzen.
•Vor Beginn der Arbeiten ist zu prüfen, ob die elektrischen Grenzwerte für
Helme der Nennspannung und der Kategorie oder Klasse von Gefahren
entsprechen, die während des Gebrauchs auftreten können.
•Der Gesichtsschutz ARC-W1 kann ausschließlich mit dem Helm SECRA
H058S verwendet werden.
•Der Gesichtsschutz schützt nur, wenn er vollständig gesenkt ist.
•Keine Kopfbedeckungen, Wärmer usw. unter dem Helm verwenden, die im
Set mit dem Helm nicht geprüft wurden. Die Verwendung der falschen
Kopfbedeckung kann das Schutzniveau erheblich reduzieren.
•Zusammen mit dem Helm sind nur vom Hersteller empfohlene
Kopfbedeckungen (z. B. Schlauchschals oder Kapuzenmützen) zu
verwenden.
•Halten Sie den Gesichtsschutz sauber, insbesondere den transparenten
Visier.

MANUAL DE USO
CASCOS DE SEGURIDAD ELÉCTRICAMENTE AISLANTES
CON PROTECCIÓN FACIAL INTEGRADA
TIPO SECRA-1
Tipo: SECRA-1
Modalidades: H058S-1 ARC-W1 (ABS)
Clase 0 (1 000V), Box Test - clase 1
EN 397:2012 + A1:2012, EN 50365:2002, EN 166:2001, GS-ET 29: 2010-02
Clase E (20kV)
ANSI/ISEA Z89.1:2014
Fabricante:
HUBIX Sp. z o.o.
96-321 ŻABIA WOLA Huta Żabiowolska ul. Główna 43
El organismo notificado que ha efectuado el examen UE de tipo:
Casco –CIOP-PIB, (nº 1437), ul. Czerniakowska 16, 00-701 Warszawa;
Protección facial – CIOP-PIB, (nº 1437), ul. Czerniakowska 16, 00-701
Warszawa;
El organismo notificado que ha efectuado el procedimiento de evaluación de la
conformidad con el tipo basada en el control interno de la producción más control
supervisado de los productos a intervalos aleatorios (módulo C2):
- CIOP-PIB, (nº 1437), ul. Czerniakowska 16, 00-701 Warszawa;
1. USO PREVISTO
Los cascos de tipo SECRA-1 en las modalidades H058S-1 ARC-W1 (ABS) sirven
para proteger la cabeza contra las lesiones provocadas por objetos caídos,
constituyendo a la vez la protección contra el choque eléctrico de la clase 0 (1 000V)
EN 50365:2002 y la clase E (20kV) ANSI/ISEA Z89.1:2014 previniendo el flujo de
corriente de descarga a través de la cabeza. Asimismo, constituyen la protección
contra el arco eléctrico y fragmentos de metal proyectados. Es especialmente
recomendable como equipo de protección personal durante los trabajos bajo tensión,
trabajos en altura y operaciones de conexión. La temperatura de servicio es de -40°C
a +60°C.
Las pantallas de la protección facial cuentan con un revestimiento resistente a los
arañazos y un resistente interno contra la niebla. La estructura del casco permite
proteger contra el arco eléctrico (clase 1 - Box Test). Son, a la vez, la protección
contra el impacto de partículas de energía media, gotas y salpicaduras de líquidos,
así como contra los metales fundidos y los sólidos calientes. Las protecciones
cuentan también con los filtros que protegen contra la radiación UV.
2. ETIQUETA
etiquetado grabado en el interior del casquete:
símbolo de trabajo bajo tensión;
Clase 0 clase eléctrica para instalaciones de tensión nominal hasta 1000V de
corriente alterna y de 1500V de corriente continua;
EN 50365:2002 norma de referencia “Cascos eléctricamente aislantes para utilización en
instalaciones de baja tensión”;
logo del fabricante;
SECRA H058S modelo del casco;
ABS material del casquete;
53-63cm rango de ajuste del perímetro de la cabeza;
207/8-245/8inch rango de ajuste del perímetro de la cabeza;
EN 397:2012+A1:2012 norma de referencia “Casos de protección industriales”;
-40°C temperatura muy baja (hasta –40°C);
LD resistencia a las deformaciones laterales;
MM resistencia a las salpicaduras del material fundido;
440Vac aislamiento eléctrico (de acuerdo con la EN 397);
ANSI/ISEA Z89.1-2014 norma de referencia “American National Standard for Industrial
Head Protection”
Type I tipo de casco de acuerdo con la ANSI/ISEA Z89.1-2014;
Class E clase eléctrica del casco de acuerdo con la ANSI/ISEA Z89.1-2014;
LT temperatura inferior de acuerdo con la ANSI/ISEA Z89.1-2014;
HT temperatura superior de acuerdo con la ANSI/ISEA Z89.1-2014;
CE 1437 el marcado de conformidad con el Reglamento 2016/425 y el número del
organismo notificado que efectúa control supervisado de los productos a
intervalos aleatorios (módulo C2);
LOT NO: XXX número de serie;
www.secra.pl dirección de la página donde está disponible la declaración de conformidad.
ESPAÑOL

etiquetado grabado en la parte trasera externa del casquete:
PROD X/XX fecha de fabricación (trimestre / año);
UTIL X/XX fecha de eliminación (trimestre / año).
etiquetado en la parte trasera externa del casquete:
SECRA-1 tipo de casco.
etiquetado en la pantalla:
1000V
símbolo de trabajos bajo tensión de acuerdo con RFU nº 03-025/2012;
2C-1,2 número de código y grado de protección del filtro UV;
HUBIX nombre del fabricante;
1 clase óptica;
B resistencia a los impactos de energía media;
8-1-0 protección contra el arco eléctrico
8 símbolo de protección de acuerdo con la EN 166:2001;
-1 protección contra los riesgos térmicos derivados del arco eléctrico clase 1
(4kA/0,5s) de acuerdo con GS-ET 29:2010-02 “Supplementary requirements for the
testing and certification of face shields for electrical works”;
-0 coeficiente VLT >75% clase 0, de acuerdo con GS-ET 29:2010-02;
9 protección contra los metales fundidos y los sólidos calientes;
N resistencia a la formación de la niebla;
CE el marcado de conformidad con el Reglamento 2016/425;
Etiquetado grabado en la parte inferior de la protección facial, protección del
mentón:
HUBIX nombre del fabricante;
EN 166:2001 norma de referencia “Protección individual de ojos. Requisitos”;
3 protección contra las gotas y salpicaduras del líquido;
8 protección contra el arco eléctrico;
9 protección contra los metales fundidos y los sólidos calientes;
B resistencia a los impactos de energía media.
3. AJUSTES
Antes de usar, efectúe un ajuste adecuado del casco para que proporcione una
protección eficaz. El usuario deberá ajustar el casco a su cabeza, ajustar la altura y
la longitud de la correa del mentón de modo que el casco le encaje bien, no se
desplace ni incline.
AJUSTE DEL PERÍMETRO DE LA CABEZA
El casco cuenta con un ajuste progresivo del perímetro de la cabeza cada 1 mm en
el rango de 53 cm a 63 cm. Una vez puesto el casco en la cabeza, ajústelo según el
perímetro de la cabeza girando el regulador(1) situado en la parte trasera del casco
(Fig.1). El giro a la izquierda (2) permite aflojar la banda perimetral, mientras que el
giro a la derecha (3) cierra la banda del regulador.
AJUSTE DE LA ALTURA
El casco cuenta con dos posiciones de ajuste de altura de uso (Fig.2). Una vez puesto
el casco en la cabeza, asegúrese de que las bandas estén bien ajustados según la
altura de le cabeza. Los elementos de fijación de la banda (1) suelen instalarse en la
posición poco profunda (2). Para cambiar la altura de uso, fije los cuatro elementos
de fijación de la banda en la posición profunda (3).
AJUSTE DE LA CORREA DEL MENTÓN
La correa del mentón (Fig.3) cuenta con un ajuste de su longitud, por separado para
la parte derecha e izquierda de la correa. Se puede cambiar la longitud de la sección
frontal (1) y trasera (2) de cada una de las partes desplazando la correa por el
elemento de separación (3).
CIERRE/APERTURA DE LA CORREA DEL MENTÓN
Para cerrar la correa, introduzca el elemento de la correa (2) en el cierre (1) (Fig.4).
Para abrir la correa, tire el cierre (1) y suelte el elemento de la correa (2) del mismo.
(Fig.5)
BAJAR/SUBIR LA PROTECCIÓN FACIAL
1. Para bajar (abrir) la protección facial (Fig.6), sujétela suavemente por la visera (1)
y tire (2) hasta que salga por completo del casco (3),
2. Para subir (cerrar) la protección facial (Fig.7), primero sujétela suavemente por la
visera (1) y luego introdúzcala en el caso empujando hacia arriba (2).
¡Atención! Un uso desconforme (con el manual), una apertura / un cierre
incorrecto pueden provocar daños. No presione demasiado en las partes de la
protección facial ni la cierre / abra demasiado rápido.
4. CONTROL ANTES DE CADA USO
Cada vez antes de empezar el trabajo inspeccione el casco y la protección facial. La
inspección cubre la comprobación de:
ola ausencia de defectos en el casquete;
oel funcionamiento correcto del ajuste perimetral de la cabeza;
oel cierre correcto de la correa del mentón;
ola ausencia de defectos visibles de la protección;
oel funcionamiento correcto de la protección;
oel periodo de uso.
Si se detectan daños mecánicos (fisuras, arañazos profundos etc.) o químicos
(manchas de color, pérdida de color etc.) del casquete, daños del arnés,
funcionamiento defectuoso del ajuste del perímetro de la cabeza, fijación incorrecta,
cierre defectuoso o daños de la correa del mentón, así como daños mecánicos
(fisuras, arañazos profundos, perforación) o químicos (manchas de color, opacidad
etc.) de la protección facial o su funcionamiento incorrecto, así como si surgen dudas
en cuanto al nivel óptimo de protección, el casco deberá retirarse del uso.
Preste atención al periodo de uso que es de 60 meses contando desde la fecha de
producción grabada en el casco. Después de este periodo el casco con la
protección deberá retirarse del uso y eliminar.
Un casco sucio no podrá usarse en trabajos bajo tensión.
Si el casco está húmedo, séquelo bien antes del uso.

¡ATENCIÓN! Antes de empezar el trabajo, el usuario deberá comprobar si las
restricciones eléctricas para los cascos corresponden con el valor nominal de
la tensión y la categoría o la clase de peligro que puedan darse durante el uso.
5. PRECAUCIONES DURANTE EL USO
El casco no deberá usarse en situaciones donde exista el riesgo de disminución
parcial de sus propiedades aislantes. Siga las instrucciones contenidas en los
manuales de organización de trabajos bajo tensión.
6. PRECAUCIONES DESPUÉS DEL USO
Si el casco o la protección facial están sucios o contaminados, especialmente, sus
superficies externas, efectúe una limpieza minuciosa de acuerdo con las
instrucciones del fabricante contenidas en el punto 8.
7. ALMACENAMIENTO Y TRANSPORTE
El casco deberá almacenarse y transportarse en una bolsa de transporte o un
recipiente separados. Durante el almacenamiento o el transporte, la protección
facial deberá encontrarse en el interior del casco. Mantenga el casco fuera de las
fuentes de calor. Proteja el casco contra daños mecánicos, apriete o exposición
solar, humedad, gases de escape, etc. No coloque el casco directamente en las
ventanas de habitaciones o lunas de coches. Es recomendable almacenar a
temperaturas de (20±15)0C.
8. LIMPIEZA Y DESINFECCIÓN:
El casco y la protección facial deberán limpiarse después de cada uso, lo que
permite controlarlos y prevenir irritaciones cutáneas del usuario. Limpie el casco
solo con el agua y jabón. Séquelo bien después de lavar. Para limpiar no use
solventes, detergentes ni materiales abrasivos. Si las bandas de sudor están
muy gastadas, deberán sustituirse por nuevas.
Limpie la protección facial solo con el agua y jabón. Séquelo bien después de lavar.
Para limpiar la superficie de la pantalla use siempre el paño de microfibra adjunto al
casco.
¡ATENCIÓN! Algunas agresivas sustancias químicas podrán dañar la
protección. Para limpiar no use solventes, detergentes ni materiales abrasivos.
9. REPUESTOS DE USO
Los elementos del casco excesivamente gastados o dañados deberán sustituirse por
nuevos. El fabricante proporciona un servicio completo del producto ofrecido. Un
elemento dañado del casco podrá ser sustituido por el propio usuario o por el
fabricante al que deberá entregarse el casco con el elemento dañado.
El listado de los repuestos reemplazables por el usuario:
H058S-PC banda de sudor frontal;
H058S-PT banda de sudor trasera;
H058S-WZ arnés completo;
H058S-PS correa del mentón con elementos de seguridad, completa;
H058S-1-SZW1protección facial ARC-W1, completa;
H058S-CL paño para limpiar la pantalla;
H058S-WR bolsa de almacenamiento y transporte.
Los manuales actuales están disponibles en www.secra.pl
10. SUSTITUCIÓN DE LOS REPUESTOS
BANDA DE SUDOR
Las bandas de sudor (Fig. 9) están fijadas a la banda principal - banda de sudor frontal
(1) y a la banda trasera –banda de sudor trasera (2) por medio de los velcros. Para
sustituir la banda de sudor frontal, suelte los seis velcros que la fijan alrededor de la
banda. Para sustituir la banda de sudor trasera, agárrela y tirando ligeramente
sepárela del ajuste del perímetro de la cabeza. Instale nuevas bandas de sudor en
lugar de las viejas.
ARNÉS
Para sustituir el arnés (Fig. 10), entre el aro y el elemento de fijación del arnés
introduzca un destornillador plano (de 3 mm de ancho). Luego incline ligeramente
el destornillador hasta que se suelte el cierre del elemento de fijación del arnés (1).
Repita esta operación en otros elementos de fijación. Una vez soltados todos los
cuatro elementos de fijación, sujételos y tirando ligeramente (2) separe el arnés del
aro del casco (Fig.11).
Fije un arnés nuevo en lugar del viejo dañado. Para ello, introduzca los elementos de
fijación del arnés en los agujeros del aro, luego presiónelos uno tras otro hasta que
se oiga un clic (cierre de los elementos de fijación).
CORREA DEL MENTÓN
Para sustituir la correa del mentón (Fig.12), agarre el elemento de fijación de la
correa (1) y tirando con fuerza sepárelo del casco. Repita esta operación en otros
cuatro elementos de fijación.
Fije una correa nueva en lugar de la vieja dañada. Para ello, introduzca el elemento
de fijación de la correa (2) en la espiga en el aro (3) y luego tírelo hacia arriba (Fig.
13) hasta que se bloquee el elemento de fijación (Fig. 14).
PROTECCIÓN FACIAL
La sustitución de las protecciones faciales se describe en un manual aparte.
11. ACCESORIOS ADICIONALES
Opcionalmente, el casco puede estar dotado de accesorios adicionales:
H058S-AD2 dos adaptadores para fijar las protecciones auditivas instalados por
el fabricante o por su propia cuenta
H058S-OS protecciones auditivos para su montaje en los adaptadores por su
propia cuenta
H058S-LT linterna para su montaje por su propia cuenta
H058S-AEP protecciones laterales contra el arco para el montaje por su propia
cuenta
BUFF cuello o pasamontañas

La información relativa a los accesorios adicionales y la forma de su montaje se
encuentra en los respectivos manuales.
Los manuales actuales están disponibles en www.secra.pl
12. PERIODO DE USO
El periodo de uso del casco con la protección es de 60 meses contando desde la
fecha de producción. La fecha de producción trimestre/año (1) y la fecha de
eliminación trimestre/año (2) están grabadas en la parte posterior externa del
casquete (Fig. 8).
UNA VEZ VENCIDO EL PLAZO INDICADO DE ELIMINACIÓN (2), ES
OBLIGATORIO RETIRAR EL CASCO DEL USO Y ELIMINARLO.
¡ATENCIÓN!
EL CASCO DEBERÁ RETIRARSE DEL USO DESPUÉS DE CADA IMPACTO, SI
APARECEN FISURAS O DAÑOS EN EL MISMO.
EN EL CASO DE: FISURAS, PERFORACIÓN U OPACIDAD DE LA
PROTECCIÓN, EL CASSO DEBERÁ RETIRARSE DEL USO O SUSTITUIR LA
PROTECCIÓN.
En las condiciones normales de uso, la protección deberá garantizar sus
propiedades durante 60 meses. Durante el uso intenso, sobre todo, si la protección
está sometido a la radiación UV, el fabricante recomienda su sustitución después
de 24 meses.
13. GARANTÍA
El fabricante concede al casco una garantía de 24 meses contando desde la fecha
de su compra. La garantía no cubre los elementos del casco con marcas de
desgaste normal, alterados y modificados, almacenados de modo incorrecto,
dañados debido a accidentes, negligencia y usos desconformes.
¡ADVERTENCIA!
•El casco deberá retirarse del uso después de cada impacto, si aparecen
fisuras o daños en el mismo.
•No haga modificaciones ni elimine elementos originales del casco.
•El casco eléctricamente aislante no podrá usarse como el único equipo de
protección personal durante los trabajos bajo tensión.
•En función del riesgo existente en un determinado trabajo, además del
casco, es necesario usar un equipo de protección adicional.
•El fabricante no asume responsabilidad si se hacen cambios, ajustes
individuales de los elementos de trabajo no incluidos en el equipamiento del
casco ni adaptados para el trabajo bajo tensión sin su autorización.
•No cubra el casco o la protección facial con pinturas, barnices, etc.
•No coloque etiquetas autoadhesivas en el casco o la protección facial sin la
autorización del fabricante.
•Para limpiar el casco o la protección facial no use solventes, detergentes ni
materiales abrasivos.
•No lance, ni apriete ni use el casco como soporte.
•Antes de empezar el trabajo, compruebe si las restricciones eléctricas para
los cascos corresponden con el valor nominal de la tensión y la categoría o
la clase de peligro que puedan darse durante el uso.
•Las protecciones faciales ARC-W1 pueden usarse solo con el casco SECRA
H058S.
•La protección facial protege contra los riesgos solo si está bajada por
completo.
•No use artículos de sombrería, aislantes, etc. debajo del casco que no se
hayan sometido a ensayos junto con el casco. El uso de un artículo de
sombrería inadecuado podrá reducir el nivel de protección.
•Con el caso use solo artículos de sombrería de protección (p.ej. cuellos,
pasamontañas) recomendados por el fabricante.
•Mantenga la protección facial limpia y, en particular, la pantalla transparente.

NOTICE D’UTILISATION
DES CASQUES DE PROTECTION ÉLECTRIQUEMENT ISOLANTS
AVEC PROTECTION DU VISAGE INTÉGRÉE
TYPE SECRA-1
Type: SECRA-1
Modèles: H058S-1 ARC-W1 (ABS)
Classe 0 (1 000V), Box Test - classe 1
EN 397:2012 + A1:2012, EN 50365:2002, EN 166:2001, GS-ET 29: 2010-02
Classe E (20kV)
ANSI/ISEA Z89.1:2014
Producteur:
HUBIX Sp. z o.o.
96-321 ŻABIA WOLA Huta Żabiowolska ul. Główna 43
Tél.: +48 46 857 84 40, fax: +48 46 857 80 21, hubix@hubix.pl, www.hubix.pl
L’organisme notifié ayant effectué l’examen UE:
Casque –CIOP-PIB, (no1437), ul. Czerniakowska 16, 00-701 Warszawa;
Protection du visage –CIOP-PIB, (no1437), ul. Czerniakowska 16, 00-701
Warszawa;
L’organisme notifié évaluant la conformité au type sur la base du contrôle interne de la
production et de contrôles supervisés du produit à des intervalles aléatoires (module C2):
- CIOP-PIB, ( no1437), ul. Czerniakowska 16, 00-701 Warszawa.
1. DESTINATION
Les modèles H058S-1 ARC-W1 (ABS) sont destinés à protéger la tête contre les
blessures causées par des chutes d'objets et en même temps ils protègent contre les
chocs électriques de classe 0 (1 000V) EN 50365:2002 et de classe E (20kV)
ANSI/ISEA Z89.1:2014 en évitant le passage du courant de contact par la tête. Ils
protègent aussi contre l’arc électrique et contre les projections de métal fondu. Ils sont
particulièrement recommandés pour leur utilisation comme équipement de protection
individuelle pendant les travaux sous tensions, les travaux en hauteur et les travaux
d’interconnexion. La température de fonctionnement -40°C à +60°C.
Les visières de la protection faciale sont dotées d’un revêtement extérieur résistant
aux griffures et d’un revêtement intérieur avec protection anti-buée. La construction
des visières permet une protection contre l’arc électrique (de classe 1 - Box Test). Ils
protègent aussi contre les impacts des particules de moyenne énergie, contre les
gouttes et les éclaboussures de fluides, contre les métaux fondus et les solides
chauds. Les visières possèdent aussi des filtres de protection contre les rayons UV.
2. MARQUAGE
Marquage moulé à l'intérieur de la calotte du casque:
Symbole travail sous tension;
Classe 0 la classe électrique pour les installation d’une tension nominale jusqu'à 1000 V de
tension alternative et 1500 V de tension continue;
EN 50365:2002 la norme de référence «Casques électriquement isolants pour utilisation
sur installations basse tension »;
Logo du producteur;
SECRA H058S modèle du casque;
ABS matériau de la calotte du casque;
53-63cm plage de réglage de la circonférence de la tête;
207/8-245/8inch plage de réglage de la circonférence de la tête;
EN 397:2012+A1:2012 norme de référence «Casques de protection pour l'industrie »;
-40°C température très basse (jusqu'à –40°C);
LD résistance à la déformation latérale;
MM résistance aux projections du métal fondu;
440Vac isolement électrique (conformément à EN 397);
ANSI/ISEA Z89.1-2014 norme de référence « American National Standard for Industrial
Head Protection»
Type I type du casque conforme à ANSI/ISEA Z89.1-2014;
Classe E classe électrique du casque conformément à ANSI/ISEA Z89.1-2014;
LT basse température conformément à ANSI/ISEA Z89.1-2014;
LT haute température conformément à ANSI/ISEA Z89.1-2014;
CE 1437 le marquage de conformité au règlement 2016/425 et le numéro de
l’organisme notifié effectuant des contrôles supervisés du produit à des
intervalles aléatoires (module C2);
LOT NO: XXX numéro de série;
www.secra.pl adresse du site avec la déclaration de conformité.
FRANÇAIS
This manual suits for next models
1
Table of contents
Languages:
Other Hubix Safety Equipment manuals
Popular Safety Equipment manuals by other brands

Compass
Compass STCCS 14 quick start guide

ABS
ABS ABS-Lock X-Y installation manual

ECOSAFE
ECOSAFE AMS200 instruction manual

Kapriol
Kapriol COMBI Manufacturer's instruction and information

Kapriol
Kapriol ALFA 5 Manufacturer's instruction and information

TIE DOWN
TIE DOWN Hippo Anchor 65219 instruction manual