Huion Inspiroy Giano User manual

Inspiroy Giano
Contents
Product Overview ...................................................... 2
Introduction ......................................................... 2
Accessories ......................................................... 3
Connection .......................................................... 4
Driver .............................................................. 8
Driver Installation ..................................................... 8
Driver Interface Overview ................................................ 9
Pen Tablet Setting .................................................... 11
Digital Pen Setting .................................................... 18
Driver Setting ....................................................... 21
How to Use the Digital Pen .............................................. 25
Product Specifications ................................................. 26
Troubleshooting ...................................................... 27
1 / 29

Inspiroy Giano
Product Overview
Introduction
Thanks for choosing HUION Inspiroy Giano creative pen tablet. As a new
generation of professional Bluetooth pen tablet, Inspiroy Giano enables you to
enjoy drawing and creating with higher efficiency. With this pen tablet, you can
freely write and draw, making lines varied in width, painting pictures in
different shades of colors, and gaining a pen-on-paper experience.
To better understand and use this product, please read this user manual
carefully. It shows how to use Inspiroy Giano when you connect it to a
computer running Windows operating system. It is also applicable to
computers running Mac operating system unless a special note is given out.
Note: Design and specifications are subject to change without notice. And the
pictures in the User Manual are for reference only.
2 / 29

Inspiroy Giano
Accessories
Please see the detailed product introduction.
After unboxing your package, make sure that you have the following items:
Pen Tablet*1
Battery-free Digital Pen*1
Pen Holder*1
Standard Pen Nib*5, Felt Pen Nib*5
USB-C Cable*1
Quick Start Guide*1
3 / 29

Inspiroy Giano
Connection
You can connect Inspiroy Giano to a computer or an Android device via a USB-C cable or
Bluetooth. You can also check the tablet status by watching the smart LCD screen on the top
left of Inspiroy Giano.
Smart LCD screen
The smart LCD screen helps check the device status of the pen tablet. Different icons indicate
different status of the pen tablet.
Battery icon:
Current battery level The battery icon indicates the current battery level (from level 1 to level 5).
4 / 29

Inspiroy Giano
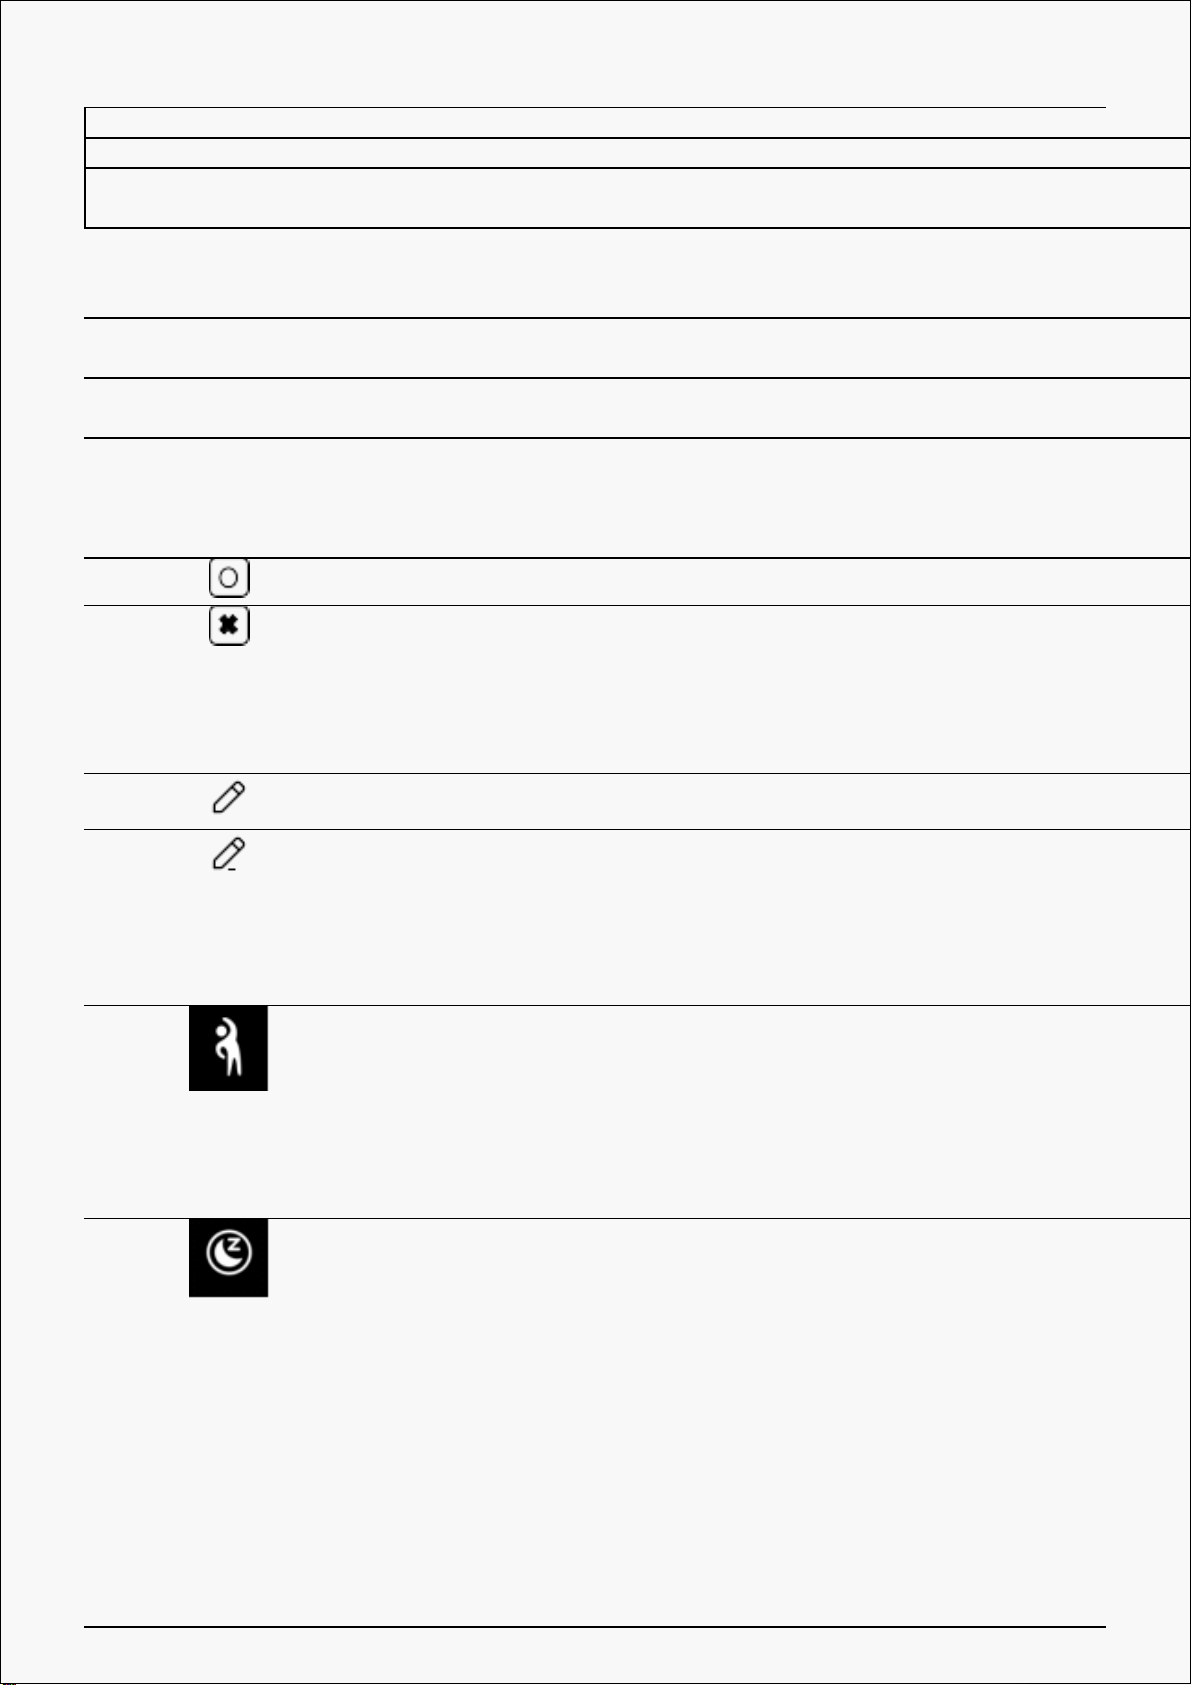
Charging A flashing battery icon indicates that the battery is charging.
Full charge A full battery icon indicates that the battery is fully charged.
Low battery A red flashing battery icon indicates a low battery and the device is about to
shut off immediately.
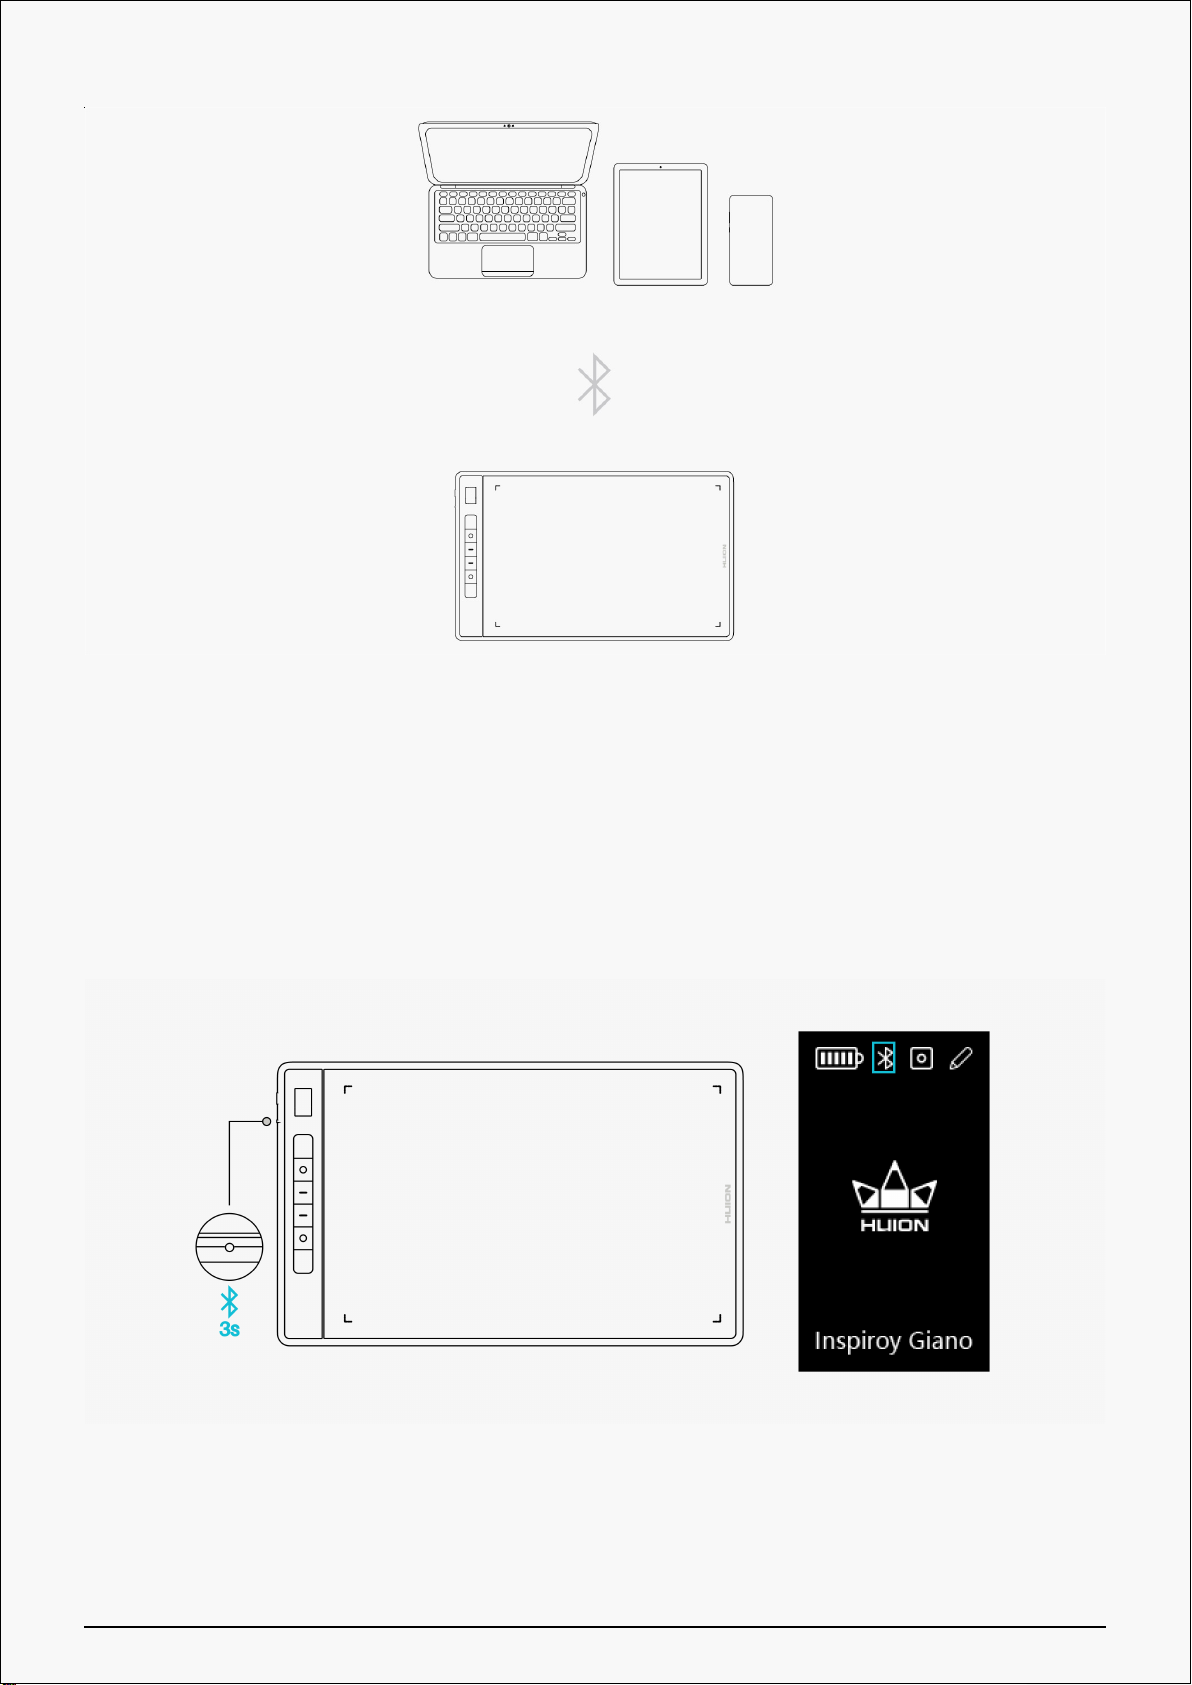
Bluetooth/Usb icon:
Bluetooth icon
flashes
A flashing Bluetooth icon indicates the pen tablet is in the pairing mode and
can be found by other devices (the icon flashes once per second).
Bluetooth icon is
steady and bright
A steady bright Bluetooth icon indicates the pen tablet is paired to another
device via Bluetooth.
USB icon appears The Bluetooth icon will turn into a USB icon if the pen tablet is connected via a cable.
Press key icon:
The press key is enabled.
The press key is disabled.
Digital pen icon:
The digital pen is not on the tablet and the pen buttons are not pressed.
The digital pen is on the tablet or the pen button is pressed.
Sedentary reminder icon:
After you have used the tablet for 2 hours, the exercise icon will appear and flash for 15s until the
previous icon appears. Meanwhile a pop-up notification will show up on the driver every 2 hours. (The
notification can be turned off in the driver. )
Sleeping mode icon:
When not using the tablet for 15 minutes, a moon icon will appear on the screen, indicating that the
pen tablet is in sleeping mode. You can wake up the tablet by placing the digital pen on it or pressing
any press key (K1 to K6 and two pen press keys), then the smart LCD screen will be on. After entering
sleeping mode for 30 minutes, the tablet will shut off, then you need to press the power button to turn
it on. You can also change the sleep time in the driver.
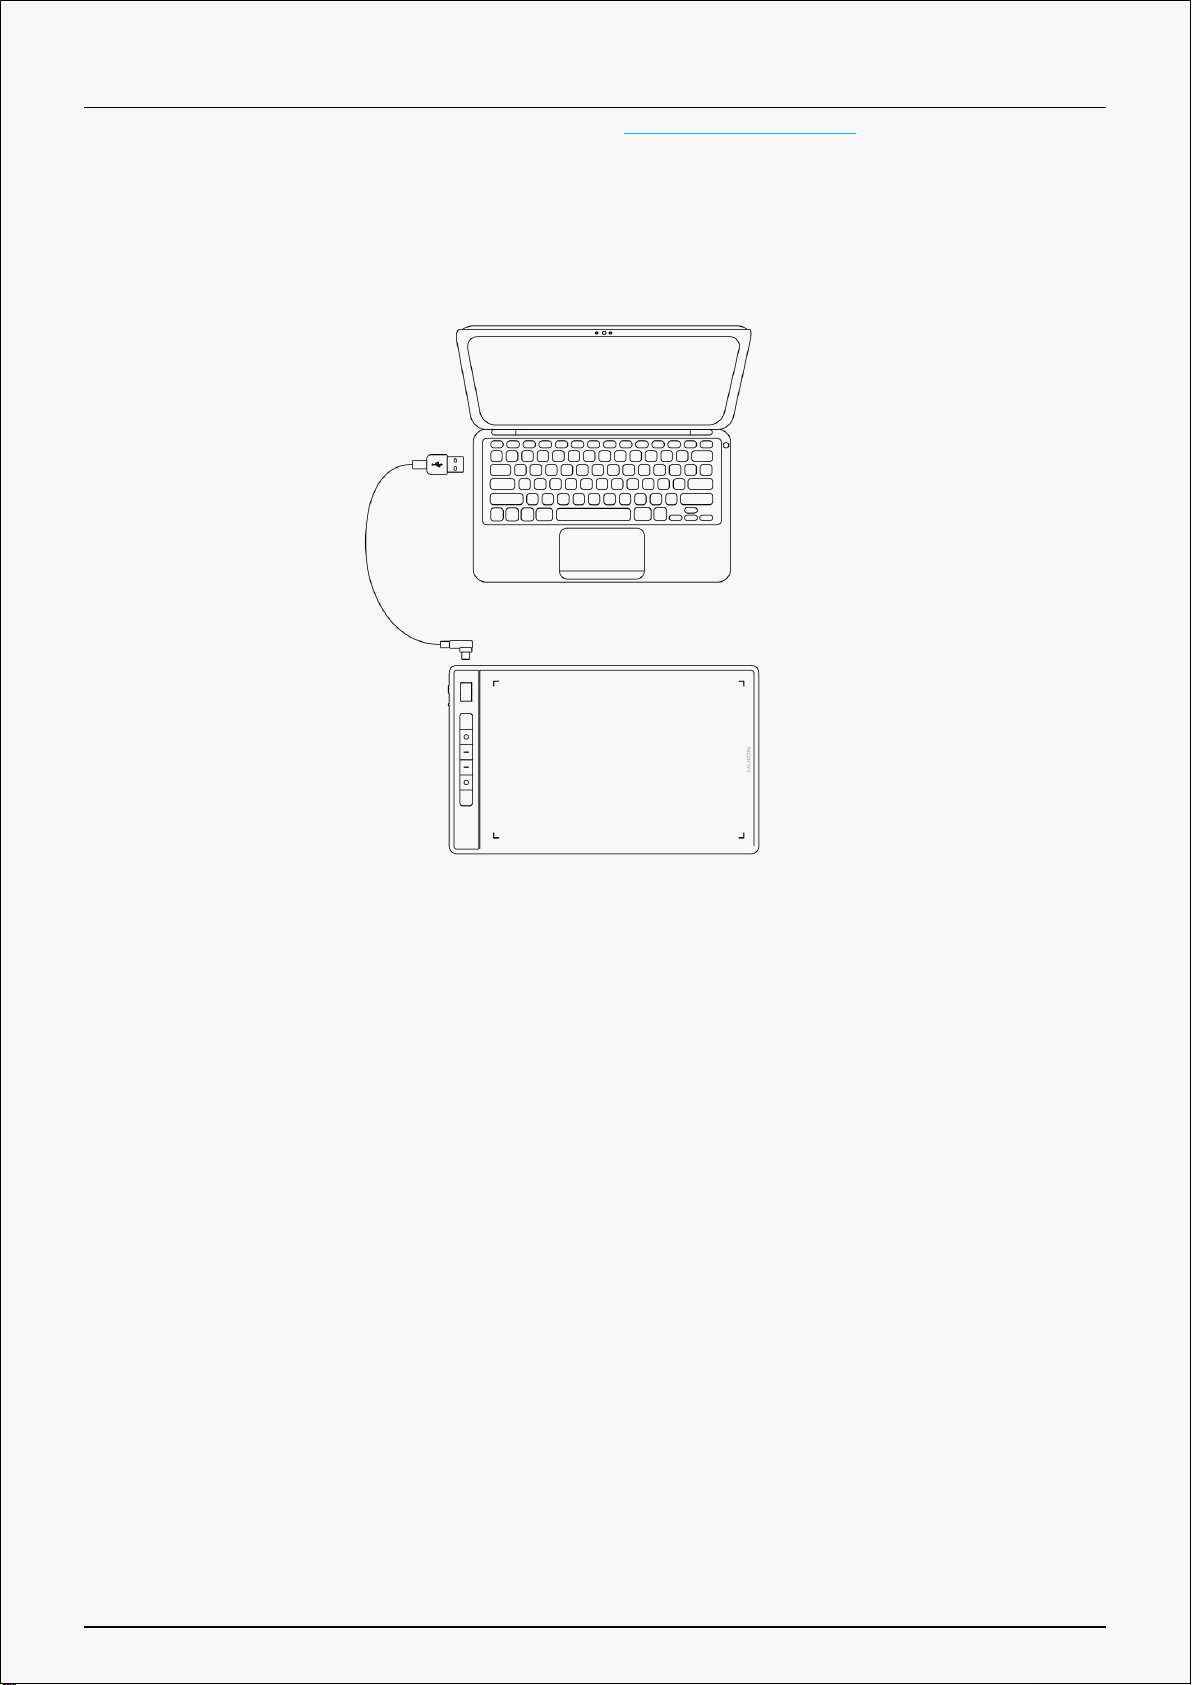
Wired Connection
1. Take out the USB-C cable from the box, and use it to connect Inspiroy Giano to a computer.
5 / 29

Inspiroy Giano
2. Please choose and download the correct driver Driver-Inspiroy Giano from our official
website.
3. Open the driver and a picture of Inspiroy Giano will appear, indicating that the pen
tablet is successfully connected to your computer. Now you can use your pen tablet.
Bluetooth Connection
If your computer or Android phone has a built-in Bluetooth, you can connect Inspiroy Giano
to it via Bluetooth. Please follow the steps below:
1. Turn on Bluetooth on your computer or Android device.
2. Press the power button of Inspiroy Giano to start it. (If the tablet does not receive a
Bluetooth connection request in 3 minutes, it will shut off automatically.)
3. Find your tablet (Inspiroy Giano-xxx) on your computer or Android device, and pair them
together by following the prompts.
6 / 29

Inspiroy Giano
If you do not find the tablet (Inspiroy Giano-xxx) on your computer or Android device, follow
the instruction below to pair them
1. Turn on Bluetooth on your computer or Android device.
2. Press the power button of Inspiroy Giano to start it. (If the tablet does not receive a
Bluetooth connection request in 3 minutes, it will shut off automatically.)
3. Find your tablet (Inspiroy Giano-xxx) on your computer or Android device, and pair them
together by following the prompts.
Note: If the aspect ratio of active working area of Inspiroy Giano is out of proportion with that
of your phone screen or computer screen, please press K1+K4 simultaneously for 3 seconds to
adjust it.
7 / 29

Inspiroy Giano
Driver
Driver Installation
1. Please choose the correct driver for your device from our website: Driver-Inspiroy Giano.
2. Click Driver-Inspiroy Giano to download it.
3. Follow the instructions to complete the installation.
Notice:
① Before installing the driver, please close all graphic software and antivirus programs. The
note (“HuionTabletCore.exe” failed to launch!) below appears only on devices with Windows
OS, indicating that the driver is blocked by antivirus programs or drawing apps.
② Please make sure your computer operating system is Windows 7 or later/mac OS 10.12 or
later.
③ Open the driver and a picture of Inspiroy Giano will appear, indicating that the pen
tablet is successfully connected to your computer. Now you can use your pen tablet.
④ If the connection fails, please restart the driver or your computer.
Note: The pen tablet cannot work once the driver is uninstalled or deleted. In this case please
click Driver-Inspiroy Giano to reinstall a driver, and your pen tablet and digital pen will
restore to their default settings.
8 / 29

Inspiroy Giano
Driver Interface Overview
9 / 29

Inspiroy Giano
1. Pen Tablet
On the “Pen Tablet” interface, Users can set functions of the tablet, including Press Key and
Working Area Set.
See Section
2. Digital Pen
Users can set functions of the pen on this “Digital Pen” interface, including Press Key, Mode
selection, Pressure Sensitivity Adjustment, and Pressure Test.
See Section
3. Store
Huion Store is where you can get the latest information about the product such as its FAQ or
sales promotion. In addition, you can also purchase Huion’s other products or accessories
here.
10 / 29

Inspiroy Giano
4. Add Programs
1. Some programs which have already been opened will appear for you to choose from after
clicking Add a Program on the screen. For more programs, click Browser and choose the item
that you want to get it added.
2. You can set different functions for different programs. Functions of the press keys change
automatically as you switch from one program to another.
3. When you select “All programs”, the functions of press keys that you set are valid for every
program. By clicking Add a Program from the drop-down list, you can set the functions for a
specific program and hence have unique settings for different programs. After that, when you
launch a specific program, the Driver will automatically recognize it and the setting features
will change to its corresponding ones.
5. Setting
Users can set the functions of a driver on this interface, including check out Device
information, Backup setting, General setting, and its version.
See Section
6. Common Problems
Click “?” and jump to Support in our website https://support.huion.com/en/support/home to
get a user manual or feed back the problems to us.
7. Switch between Devices
The Driver is able to support two devices at most. Functions of them can be customized by
users respectively. When switch to one of them, functions change to its corresponding ones.
Pen Tablet Setting
Press Key
You can customize the functions of these press keys according to your own habits. (You can
also uncheck "Enable press keys" in the lower left corner to turn off these functions.)
1. Place the cursor over one of the buttons on the screen of your computer to check its
11 / 29

Inspiroy Giano
default value.
2. Click a button and assign the function you want to it. (You can choose among the functions
below.)
Refer to this table of settings below to help you decide if you want to change the existing
settings.
Note: The performance of functions in the table below is up to the device that you have
connected. And this table is subject to change without notice.
Keyboard Key Click on the input box above and enter a valid key combination to create a
shortcut.
Mouse Key Select the functions of a Mouse or Wheel. Mouse: Mouse Left Button,
Mouse Right Button, Mouse Middle Button, and Double-left Click. Wheel:
12 / 29

Inspiroy Giano
Wheel Forward and Wheel Backward. Other functions: Ctrl, Alt, Shift, and
Win.
Switch Select between Switch Screen, Switch Brush, Mouse Mode On/Off, and
Game Mode On/Off.
Run Program Click Browse and select the program that you want to run quickly. After
that, press the key to launch the item.
System
Application
You can apply these functions to press keys: Lock the Screen, Sleep, Power
Off, Show/Hide Desktop, Task View, Start Menu, and Calculator.
Multimedia You can apply these functions to press keys: Previous Song, Next Song,
Play/Pause,Volume up, Volume down, and Muted.
Precision Mode You can toggle between normal precision and a precision that you choose,
from Fine to Ultra Fine. In the Precision Mode window that appears, move
the slider to set the precision that you toggle into. For example, if you
assign Precision Mode to a pen button, when you press the pen button, you
switch to working in the precision that you selected from the slider. When
you press the pen button again, you switch back to working in the normal
precision. Press “Esc” or press the pen button for the third time to exit
Precision Mode.
Pan/Scroll This function allows you to pan and scroll in a document or item by moving
the pen tip up and down or right and left.When you select Pan/Scroll, the
Scroll Speed window appears. Move the slider to your preferred scrolling
speed.
Quick Menu Pick it up and you can use the key to pull up the Quick Menu. Detailed
information for reference is down below this table.
Fixed Pressure
Sensitivity
You can lock the pressure at the current level until you release the
component. For example, if you assign this setting to a pen button, you can
paint with pressure sensitivity enabled in your application until you reach
the brush size you like. Then, press and hold the pen button to lock in that
brush size as long as you are pressing and holding the button.
None When select None, the keys will not work.
13 / 29

Inspiroy Giano
Note: The pictures are for reference only.
Click Customize in the picture above to call out a quick menu (see picture 1). For each of the
six buttons on the left, users can enter a name for it and set unique function for it. After that,
users can call up the Quick Menu by pressing the key (see picture 2). The menu disappears
after a click on any of the six buttons. By clicking “Fix” once the menu will be fixed on the
desktop while after a second try the “Fix” button changes to “Close” and the menu disappears
(see picture 3). Put the cursor on the menu to drag it.
Picture 1
14 / 29

Inspiroy Giano
Picture 2
Picture 3
Working Area
Select the Working Area tab to adjust the ratio of the distance of pen movement on the pen
tablet to that of the corresponding cursor movement on the monitor.
If only one monitor is in use:
By default the entire active area of pen tablet maps to the whole monitor.
If more than one monitor is in use:
① Extended mode: The monitors are in extended mode, and you need to choose one that will
be mapped to on the driver interface and the other monitors will work as external displays.
② Mirror mode: In mirror mode (all monitors display the same content), the pen tablet maps
to the entire screen on each monitor and cursors displayed on them move simultaneously.
15 / 29

Inspiroy Giano
1. Working Area Setting
Define the active working area of Inspiroy Giano that will be mapped to the monitor. Three
modes on the driver can be chosen:
[1] Full Area: The entire active area of the pen tablet will be mapped to the monitor. It is the
default setting.
[2] Screen Ratio: The aspect ratio of the active pen tablet area depends on that of the display
device. In Screen Ratio mode, these two ratios keep the same.
[3] Custom Area:
1> Enter coordinate values.
2> You can adjust the working area of the pen tablet by changing the outlines of the smaller
rectangle (see picture 1). You can also drag the two blue rectangles to select the active areas
of the digital pen on the screen and the pen tablet. (see picture 2 and 3).
Picture 1
16 / 29

Inspiroy Giano
Picture 2
Picture 3
17 / 29

Inspiroy Giano
2. Rotate Working Area
Both left-handed and right-handed users can freely use the pen tablet because it can be
rotated by 0°, 90°, 180°or 270°.
Digital Pen Setting
1. Press Key
You can use this digital pen to interact with your device, including drawing, writing, moving
files, or activating the functions of pen press keys.
The setting of the pen press keys is the same as the Press Key setting of the tablet. Please
refer to it.See Section
18 / 29

Inspiroy Giano
2. Pen Nib Activity
The pen nib of the digital pen can be set as Valid/Invalid according to users’ needs. Click the
drop-down button to set its activity. In Valid mode, the pen works well, and in Invalid
mode, the pen has a cursor movement, but cannot complete specified actions.
3. Enable Windows ink
Microsoft Windows provides extensive support for pen input. When the “Enable Windows
Ink” option is ticked, pen features are supported in software such as Microsoft Office,
Windows Whiteboard, Adobe Photoshop CC, SketchBook 6, etc.
19 / 29

Inspiroy Giano
4. Game Mode/Mouse Mode
Game Mode: This mode is ideal for OSU gaming. In Game Mode, you can enjoy exci
ting OSU games as the cursor
on the monitor speeds up to follow the pen movement. It is not suggested to choo
se the Game Mode if you are
not playing OSU games.
Mouse Mode: In Mouse Mode, the digital pen acts as a mouse. Move the pen nib across the
tablet and the cursor on the monitor move to a new position accordingly. The cursor will stop
moving and stay in that place when you raise the pen off the tablet. So you can use the pen to
interact with your computer as you are using a mouse or a touchpad. You can also adjust the
speed of cursor in Sensitivity setting according to your habits. There are 8 levels for you to
choose.
20 / 29
Table of contents
Other Huion Graphic Tablet manuals

Huion
Huion INSPIROY RTS-300 User manual

Huion
Huion GT-220 User manual

Huion
Huion INSPIROY H610X User manual

Huion
Huion KAMVAS 13 User manual

Huion
Huion Kamvas 24 User manual

Huion
Huion KAMVAS GT-156HD V2 User manual

Huion
Huion Kamvas Pro 19 User manual

Huion
Huion DWH69 User manual

Huion
Huion INSPIROY HS611 User manual

Huion
Huion KAMVAS Pro 16 Plus User manual

Huion
Huion KD200 User manual

Huion
Huion T25 User manual

Huion
Huion GS2402 User manual

Huion
Huion HS610 Installation guide

Huion
Huion KAMVAS 13 User manual

Huion
Huion Kamvas RDS-220 User manual

Huion
Huion KAMVAS GT-191 V2 User manual

Huion
Huion GT-133 User manual

Huion
Huion KAMVAS Pro 16 4K User manual

Huion
Huion NEW 1060PLUS User manual